Jim Shealy
-
Motivation to Use Steppers over Servos
05/19/2014 at 23:44 • 0 commentsIn my quest to derive a robot control scheme from scratch, I've been working to figure out how to control a stepper motor. Stepper motors are great because they're cheap, relatively simple to control, and can maintain a constant torque without burning out. Unlike a hobby brushless motor or brushed motor, stepper motors don't burn out when they stall. They're designed to go to a position and stay there as long as it's below the rated torque. By changing the current going through the windings you make the motor "step" (hence "stepper motor") in a direction and stay there. You can see a simplified image below.
![]()
If you imagine driving the coils, the magnetic rotor will align with a set of coils. Energize the other ones and it'll "step" to align with the other coils. What's neat is that if you power the coils in various arrangements you can actually achieve fractional steps (albeit these steps tend to become less accurate as you divide them finer).
Why Not Use a Servo?
Servos are also (generally) meant to create large torques through a geared drivetrain. They also include control circuitry to go to a postion that you command, eliminating most of the control logic necessary. Albeit very convenient there's a few major disadvantages:
1- Jittery: Servos have a tendency to not hold an exact position and jitter. Cheap servos have control logic that makes them act like a really stiff spring from a commanded position. (This is proportional control; the force exerted is proportional to the distance from the desired target, IE a spring). Because cheap servos have a very low resolution they tend to jitter around the desired position due to their accuracy errors.
2- Inaccurate: Cheap servos don't necessarily go to the position commanded. Hysteresis (or the the inability to return to a state due to losses such as friction) and various loading conditions will prevent the servo from going all the way to the desired point. This is typically due to the proportional control lowering the output torque near the target position. While this doesn't make a difference on an RC system due to the human being able to compensate, on a robot arm these inaccuracies will be propagated, amplified, and compounded by the physical arm to result in very poor accuracy. This is not to say that there aren't accurate servos! they're just quite expensive (typically >$90)
3- Fragile: Servos definitely have higher holding torque per size than stepper motors. However, when a servo is over torqued and back driven, the gears have a tendency to break or strip. Stepper motors will instead just skip a magnetic pole and settle into the next allowable position. This is especially nice if for example the robot arm runs into an obstacle or is hit (ie bumped) by an object. These impacts are especially prone to breaking servos.
4- Expensive: Nice servos are expensive! There's a reason for this though, the accurate sensors, high speed, high torque drives cost more to produce.
5- Typically Limited range: Servos rarely are continuous rotation. This can present serious design challenges (and reduces the flexibility of the design!)
Now, that's all not to say that stepper motors are the god of all motors. Servos are extremely convenient and provide a very compact mechanical control package. They're very easy to control and if you're ok with low accuracy, they're definitely cost effective. The main difference here is that with a good mechanical design and control logic, stepper motors are more robust and potentially significantly cheaper. Especially with the proliferation of 3D printers that rely on stepper motors, it's become progressively cheaper and easier to use steppers.
-
A Dive Into the World of Coffee
05/05/2014 at 22:16 • 0 comments![]()
Coffee as it turns out is a complicated and VERY subtle process. Here's an overview of what can affect your final outcome:
Growing Location --> Time of Season --> Rain --> Quality of picked beans --> Handling --> Shipping conditions --> Storage conditions --> Roasting Style --> Time from roasting to grinding --> Time from grinding to brewing --> Temperature of water --> Brewing method --> Temperature of drinking.
Seriously, it's ridiculous! But, assuming you've bought your beans from a reputable source, what you do starts with the roasting/storing part of the process.
So, First things first:
Buy Freshly Roasted Coffee Beans
Look around on the internet and you're likely to find some coffee roasters in the area! I get my beans for $6 a 1/2 lb (0.23kg) at my local farmer's market. She roasts every day, and so I get them hours after they've been roasted! Now, as an aside, all roasting is not equal. There are darker roasts, lighter roasts, and different roast styles (drum roasted vs air roasted). You'll need to decide what YOU like and find a location, color roast, and your preferred roast style. Fortunately you can help weed out poor quality coffee by seeing if the roaster is passionate about what they do. If they are, and you feel like giving it a shot, then ask them for a suggestion! I guarantee that just about anything you get freshly roasted will be better than something sitting on a shelf for a month at the store.
Store Your Beans Properly
What's cool about coffee is that the chemical reactions of the coffee isn't done once you roast it. Coffee actually can take up to a week to mature (depending on blend/roasting style). When you first get your beans they won't smell like much and are pretty dry. Over the next few days you'll find that the beans start to bead up with volatile oils, and will eventually be glistening and soaked in it. I'll try to post some day by day pictures of coffee beans as they mature, but this is essentially the point where the coffee is at it's peak. After this your coffee will start to get more bland as the volatiles continue to evaporate out.
So, take your fresh beans and keep them at room temperature. If you put them in the fridge or freezer, you'll risk moisture ingress from condensation when you open the bag. The freezer can also damage the flavors, so in my opinion it's not worth it. Just buy what you're going to use in less than 2 weeks. You can always try another blend if you run out ;)
Grind Your Beans When You're Ready to Brew
Don't grind your beans until you're completely ready to start brewing, IE the water is heating and you've got <5 minutes before you're going to pour the water. Grinding exposes the flavors, and like an apple, the coffee will start to oxidize right away! Now, mere mortals like you and I may not tell the difference between 1 or 2 minutes delay, it's just good habit to be ready to pour once you're done grinding.
Use a Burr Grinder
Coffee is a steeping process. You are attempting to extract specific flavors from a coffee bean without extracting too little (weak and bland coffee) or too much (very acidic and astringent). Whatever method you use, in the end you're trying to get a consistent coffee grind that each particulate has the same surface area to volume ratio so they all extract evenly, ideally the same size as well. When you have grind that is too fine, it over steeps very quickly. When you have coarse grind, it takes significantly longer to pull out the desirable flavors and you need to modify the water temperature accordingly. When you have a large variety of grind size, you will result in under extracted large particulates, and over extracted fine particulates with the resultant brew both weak and astringent. Burr grinders are the defacto standard as they generally produce consistent desireable grind sizes as opposed to blade grinders that typically results in inconsistent grind. Blade grinders also heat up the coffee significantly more and drive out the tasty volatiles!
Note that while most good burr grinders are expensive, you can get a manual Hario Skerton grinder for <$35 online.
![]()
Seriously, The grinding part of coffee is one of the most important steps. Good coffee ground poorly will result in poor coffee.
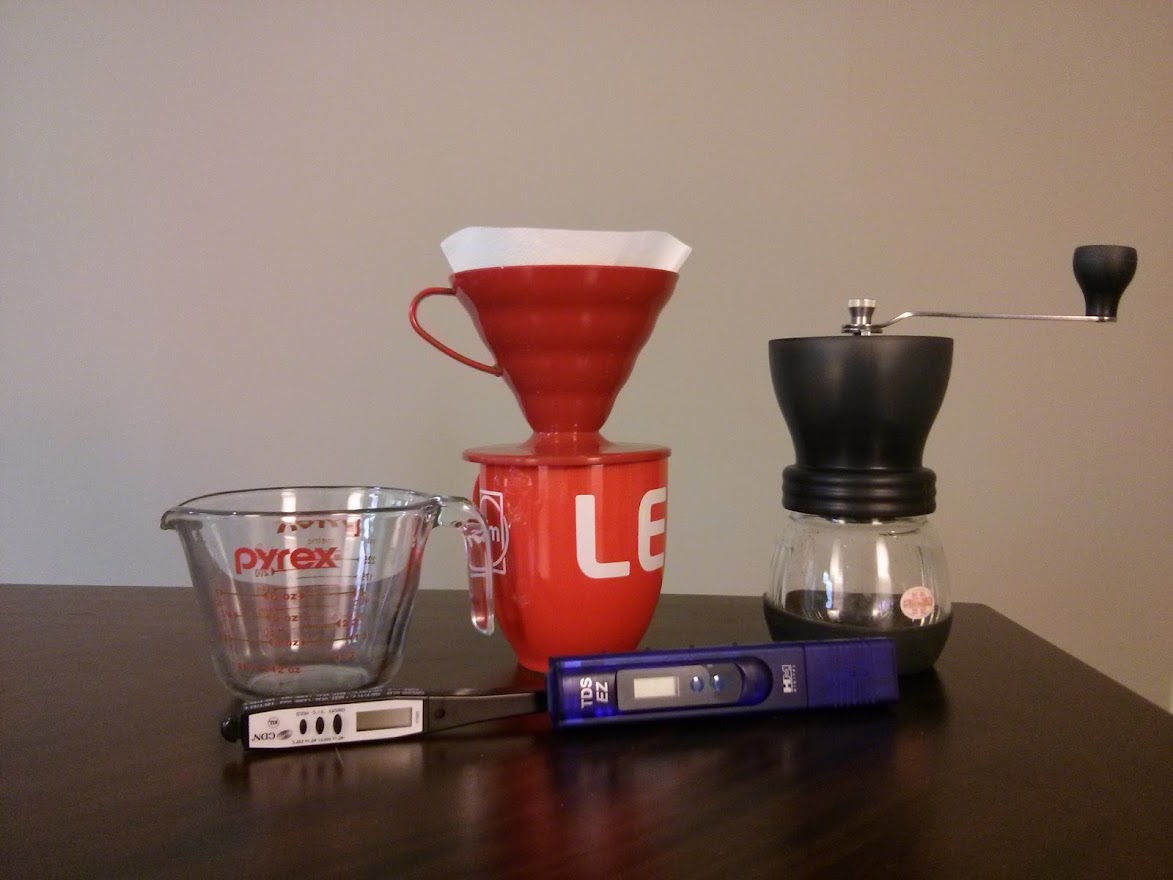
Use a Thermometer
The brewing process does matter, but more importantly, the water temperature needs to be appropriate for how you're brewing. In general you should be making sure your water is at ~191°F (~88.5°C). Brewing at the right temperature will prevent you from dissolving flavors that you don't want! It also means you can extract the flavors you do want! It may seem silly that a few degrees either direction makes a difference, but I've gotten results with all else equal, from bitter and undrinkably strong, to weak and bland. If you're using water that was just boiling, you probably shouldn't.
-
Learning PSOC and Some of its Idiosyncrasies
05/04/2014 at 19:07 • 0 commentsI went over some of the reasons I really like the PSOC architecture as a platform in the "Intro to PSOC" update. But I want to get into the actual issues and things to know for the new user to prevent wasting tremendous amounts of time.
1- Microcontrollers
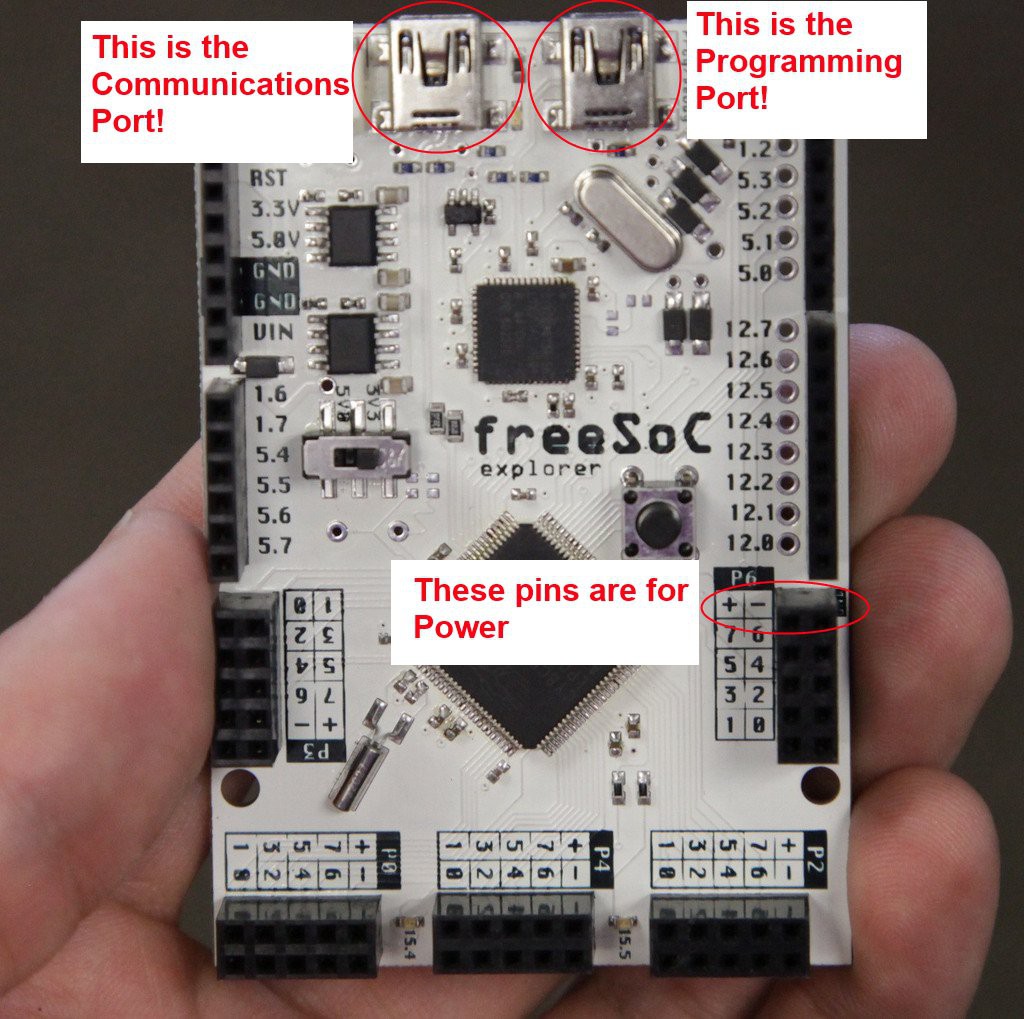
Let's start with micro controller hardware differences. If you've only ever used the Arduino, it turns out the programming/debug port is not the same as the communications port! I spent countless hours trying to figure out why the serial port wasn't enumerating (read 8+ hours). It turns out that it's normal (and apparently obvious) that many micro controllers have more than one port, and programming/debugging is handled separately. I couldn't find any answers online, well because no one had the same problem, there wasn't one! upon plugging my usb cord into the other port I applied my head directly to the table because suddenly the serial port worked. Oh, and just remember to check if your pins are not actually micro controller pins, but power pins. It'll save you some rewiring.
![]()
2- Floating Pins
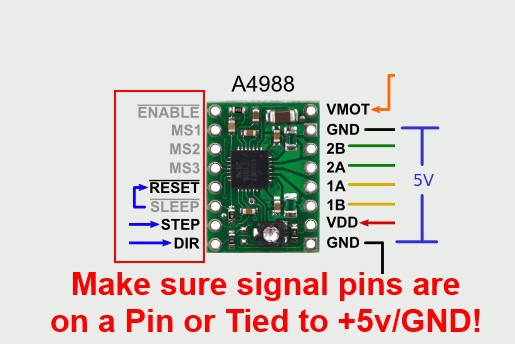
I had some interesting gremlins in the wires when I started coding for the stepper motor controllers. As it turns out, if your reset, sleep, or enable pins aren't tied to a polarity, you'll have very flaky control of the stepper motors! But, that's not limited to just those, ALL signal pins must be attached to a polarity or enabled pin to prevent floating. While it's neat to be able to hold your hand near the wires and have the robot arm start moving on its own, it's extremely frustrating to figure out!
![]()
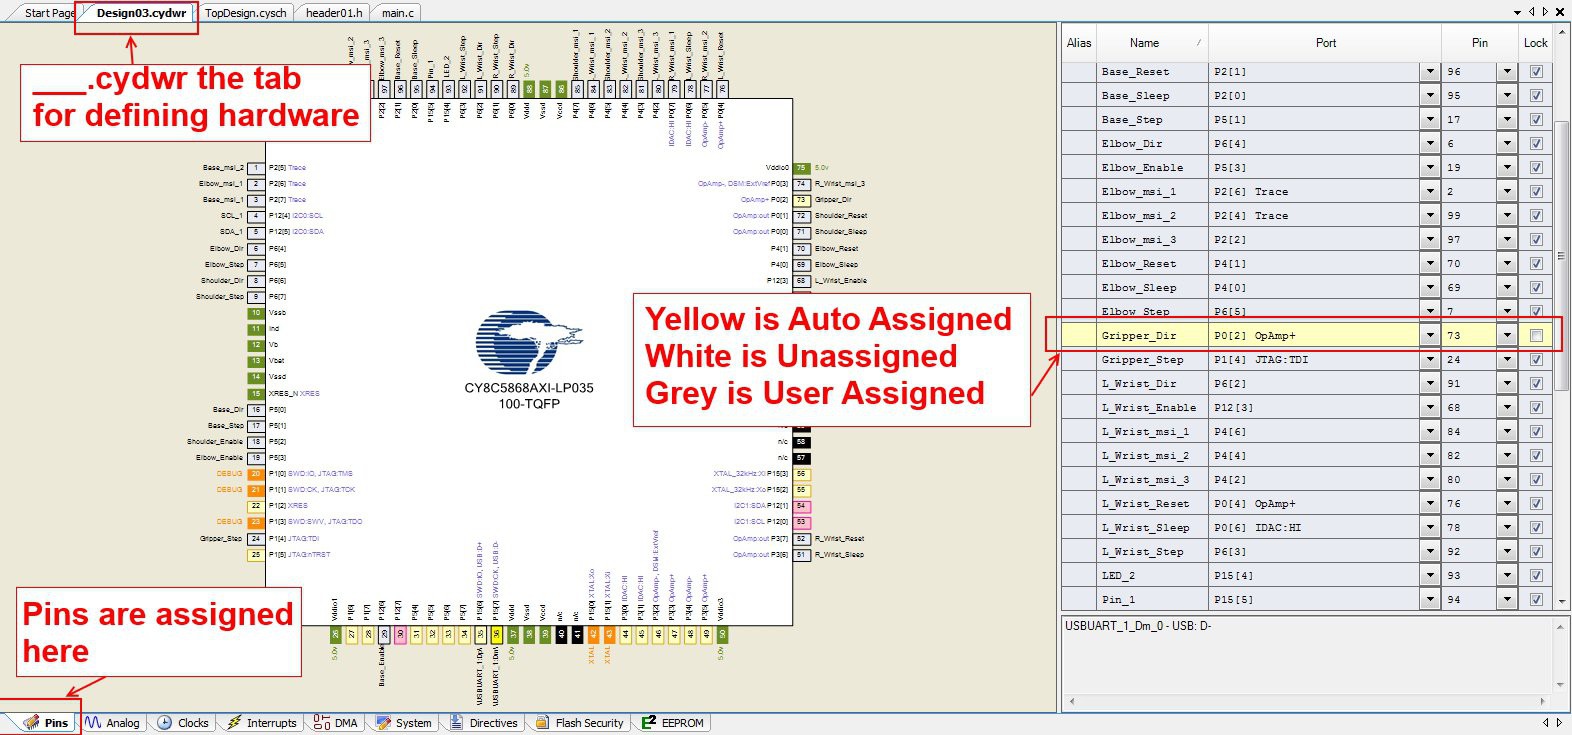
Additionally, make sure the Microcontroller pins that the signal pins are connected to are actually defined by the PSOC controller. All of this is done through the PSOC Creator software as shown below:
![]()
If you have yellow auto assigned pins, you should make sure they're actually the pin you want! On the FREESOC the pins have silk screened labeling that calls out the port (P4[7], etc.) instead of the pin number. While all the breakout/development boards may not do this, it's not a bad thing to keep in mind. Part of my floating pin issues were due to pins being plugged into micro controller pins that weren't defined, and thus didn't have a polarity!
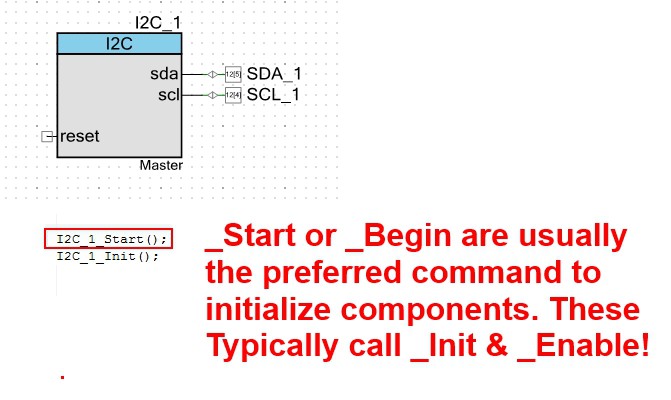
3- FPGA Hardware (or UDB components) Must be Started
This is something that took me ages to figure out, but components must be started before they do anything! Many component data sheets say this, but it's not always explicitly called out. That's a major difference you'll see with PSOC and a CPU only architecture like arduino. Not only that, but there are ~4 commands used to start components.
componentName_Start()
componentName_Begin()
componentName_Init()
componentName_Enable()
Some components need to be initialized before they can be enabled. Others only need to be enabled. The key to this is is that if there is a _Start() or a _Begin() command, use these as they'll take care of initializing and enabling in the correct order. Because Cypress' PSOC Creator auto fills, just try one of these two commands first before worrying if there is a specific initialization order.
![]()
While PSOC creator auto-fills, make sure you've built your project BEFORE trying to code! The build command creates the code handles you will use, and they'll be unavailable if you didn't build after inserting a hardware component.
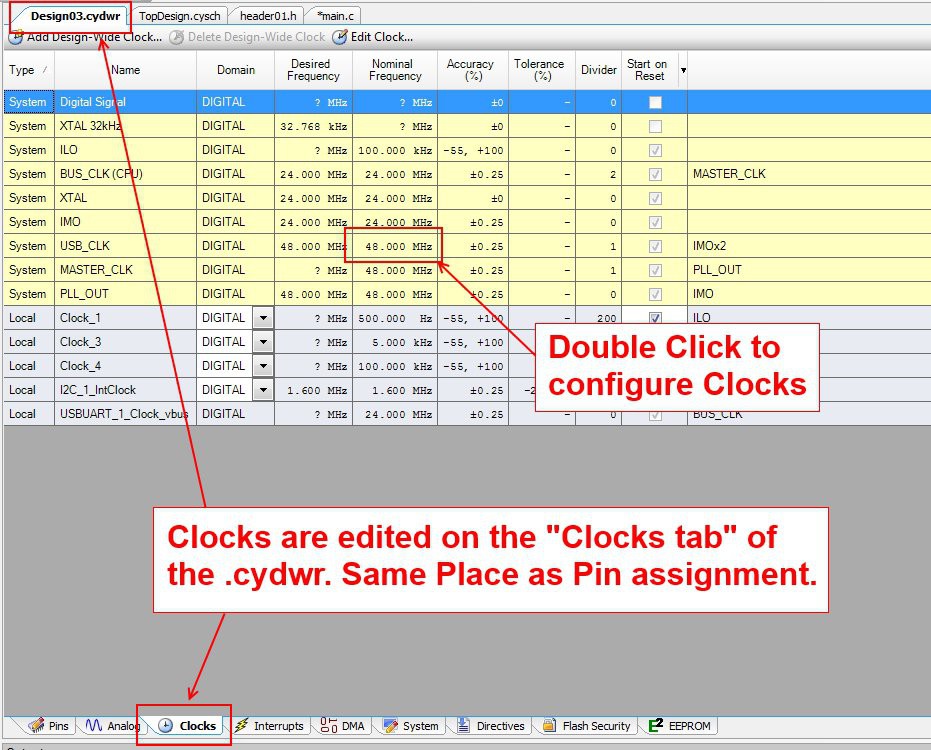
4- Clocks
PSOC allows for tremendous flexibility and ease of setting clocks. Unfortunately that ease can make communications protocols break down because you messed with the wrong one (IE the USB clock!). Let's dig into that a little deeper:
![]()
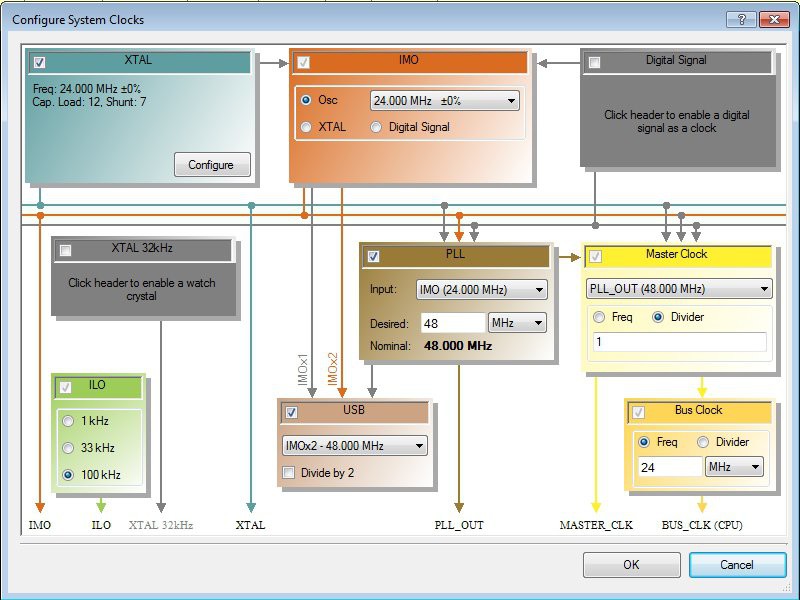
By double clicking the clock frequency box, you'll be taken to another page with the clocks, showing how they're all interdependent or dependent depending on how you set them. The lines show what connects to what, and which clocks you can base other ones off of.
![]()
I won't pretend to understand what all the clocks actually mean, but the important thing is this, The faster the bus clock, the faster your CPU.
BUT, you wanted to use USB right? USB should be 48.000 MHz with a tight tolerance, but the CPU can be run to a maximum of 67MHz. These aren't multiples, and you'll get low tolerances with your CPU clock if you try to do a frequency that's not a multiple. This is the underlying issue that while PSOC has great flexibility with clocks, all of your hardware clocks will be based off of something you set here with some sort of frequency divider. You'll have to find a configuration that is divisible into the frequencies that you need for your components, while having the fastest clock speed available for your CPU to aid in processing.
I would suggest spending some time familiarizing yourself with the diagram, and notice that the arrows point to what the clock output is being fed into. In order to keep the USB at a tight tolerance I've set the XTAL to 24Mhz, which feeds the IMO to a tight tolerance. The USB can then be made 2x the IMO to be the desired 48Mhz. the PLL also feeds off the XTAL or IMO its output is set to double the input to also achieve 48MHz. This then directly feeds the master clock and the bus clock.
I also believe the I2C that I use for the Wii Nunchuck is based off the ILO which I've set to 100kHz for "Fast Mode". It also makes for very easy math and I'd recommend it!
If someone has suggestions for a different configuration of these to achieve a faster output, I'd love to hear it! This is what I've found so far to be a stable configuration for all the components I'm using, and I hope it provides a decent fallback if you start getting clock errors. You might have a heck of a time trying to figure out why your component isn't working when it turns out to be a clock failed to initialize because you didn't obey its operating perimeters.
-
Intro to PSOC
05/01/2014 at 21:23 • 0 commentsSo what is PSOC? Why the heck would I use this over an arduino?
The simple answer is this: FPGA (esque), large libraries, tons of documentation, useful IDE, Debugging
Doesn't make sense yet? It took me a while to get it also! I saw a cool kickstarter project for this development board (FREESOC) and after watching the video, it got me thinking that this chip had leaps and bounds more capability than the arduino!
Here's John Morello's video of the FREESOC, even if you don't know half of what he's saying (I didn't), it's really useful to start imagining all the possibilities of what you could do:
https://www.kickstarter.com/projects/18182218/freesoc-and-freesoc-mini/widget/video.html
If you didn't watch, PSOC stands for "Programmable System On a Chip". What makes it so special is that there are digital, analog, and communications components that work in PARALLEL with the CPU! If you look at the picture below the different boxes each represent a "parallel" component that operate independently of the CPU.
Pretty neat isn't it? It's like your CPU is a person driving a car, you design the hardware on the digital and analog systems to be capable of navigating the track, and then teach your CPU how to sit at the helm and drive the vehicle you designed. The CPU doesn't have to do both at the same time!
![]()
Having used arduinos a decent amount, I've found that I get to a certain point of complexity and I suddenly have to start digging into interrupts. This is where the simple arduino code begins to break down and starts to get really ugly and confusing.
I've constantly run into this working with counters on Arduino. I need something to count to some varying value, but I can't afford to use "Delay" or "Millis" because it makes my code really laggy, or isn't consistent enough. So, I turn to interrupts. They're neat because my code can jump from one thing to another, but all of a sudden I'm bit shifting control registers in the ATMEL and everyone's code that I'm trying to follow doesn't look anything like what I normally use in the IDE. Then, suddenly things start to break in ways I don't understand, and I won't even start on using multiple interrupts...
This is where the PSOC starts to become really neat. I can place a "counter" component, hook up a time source (clock), set the clock to a specific frequency, tell the counter "go" and it does what I tell it to do. Not only that, but your code can "set and forget" the counter because the counter will keep on counting, even if the CPU is asleep, or using "Delay", or whatever! Neat! And all I have to do is drag and drop a component, click it to set what I want, and we're done.
So that's the long story of why I chose the PSOC to run this project. The CPU does the calculations to drive the arm, and the hardware and counters take care of the mechanics of actually incrementing/decrementing the stepper motor drivers to the correct positions. The CPU says how far and how fast, and the hardware takes care of doing it.
Now, that's not to say PSOC isn't without pitfalls, ESPECIALLY for a complete novice like myself at C and programmable logic. Check out the lessons learned with PSOC to get a better idea of what you need to do to actually get started and save (literally) hundreds of hours of frustration.
(I'll add the link once I get that page up, patience ;) )
RoboBarista: A Coffee Brewing Robot
A flexible, open source robot arm that grinds, pours, and serves only the best robotic brewed Coffee.