Brenda Armour
-
Alexa Sample Response to "The Barn What is the Temperature?"
08/22/2016 at 11:14 • 0 comments -
Integrating Voice Control , Node Red and Sensor Tag
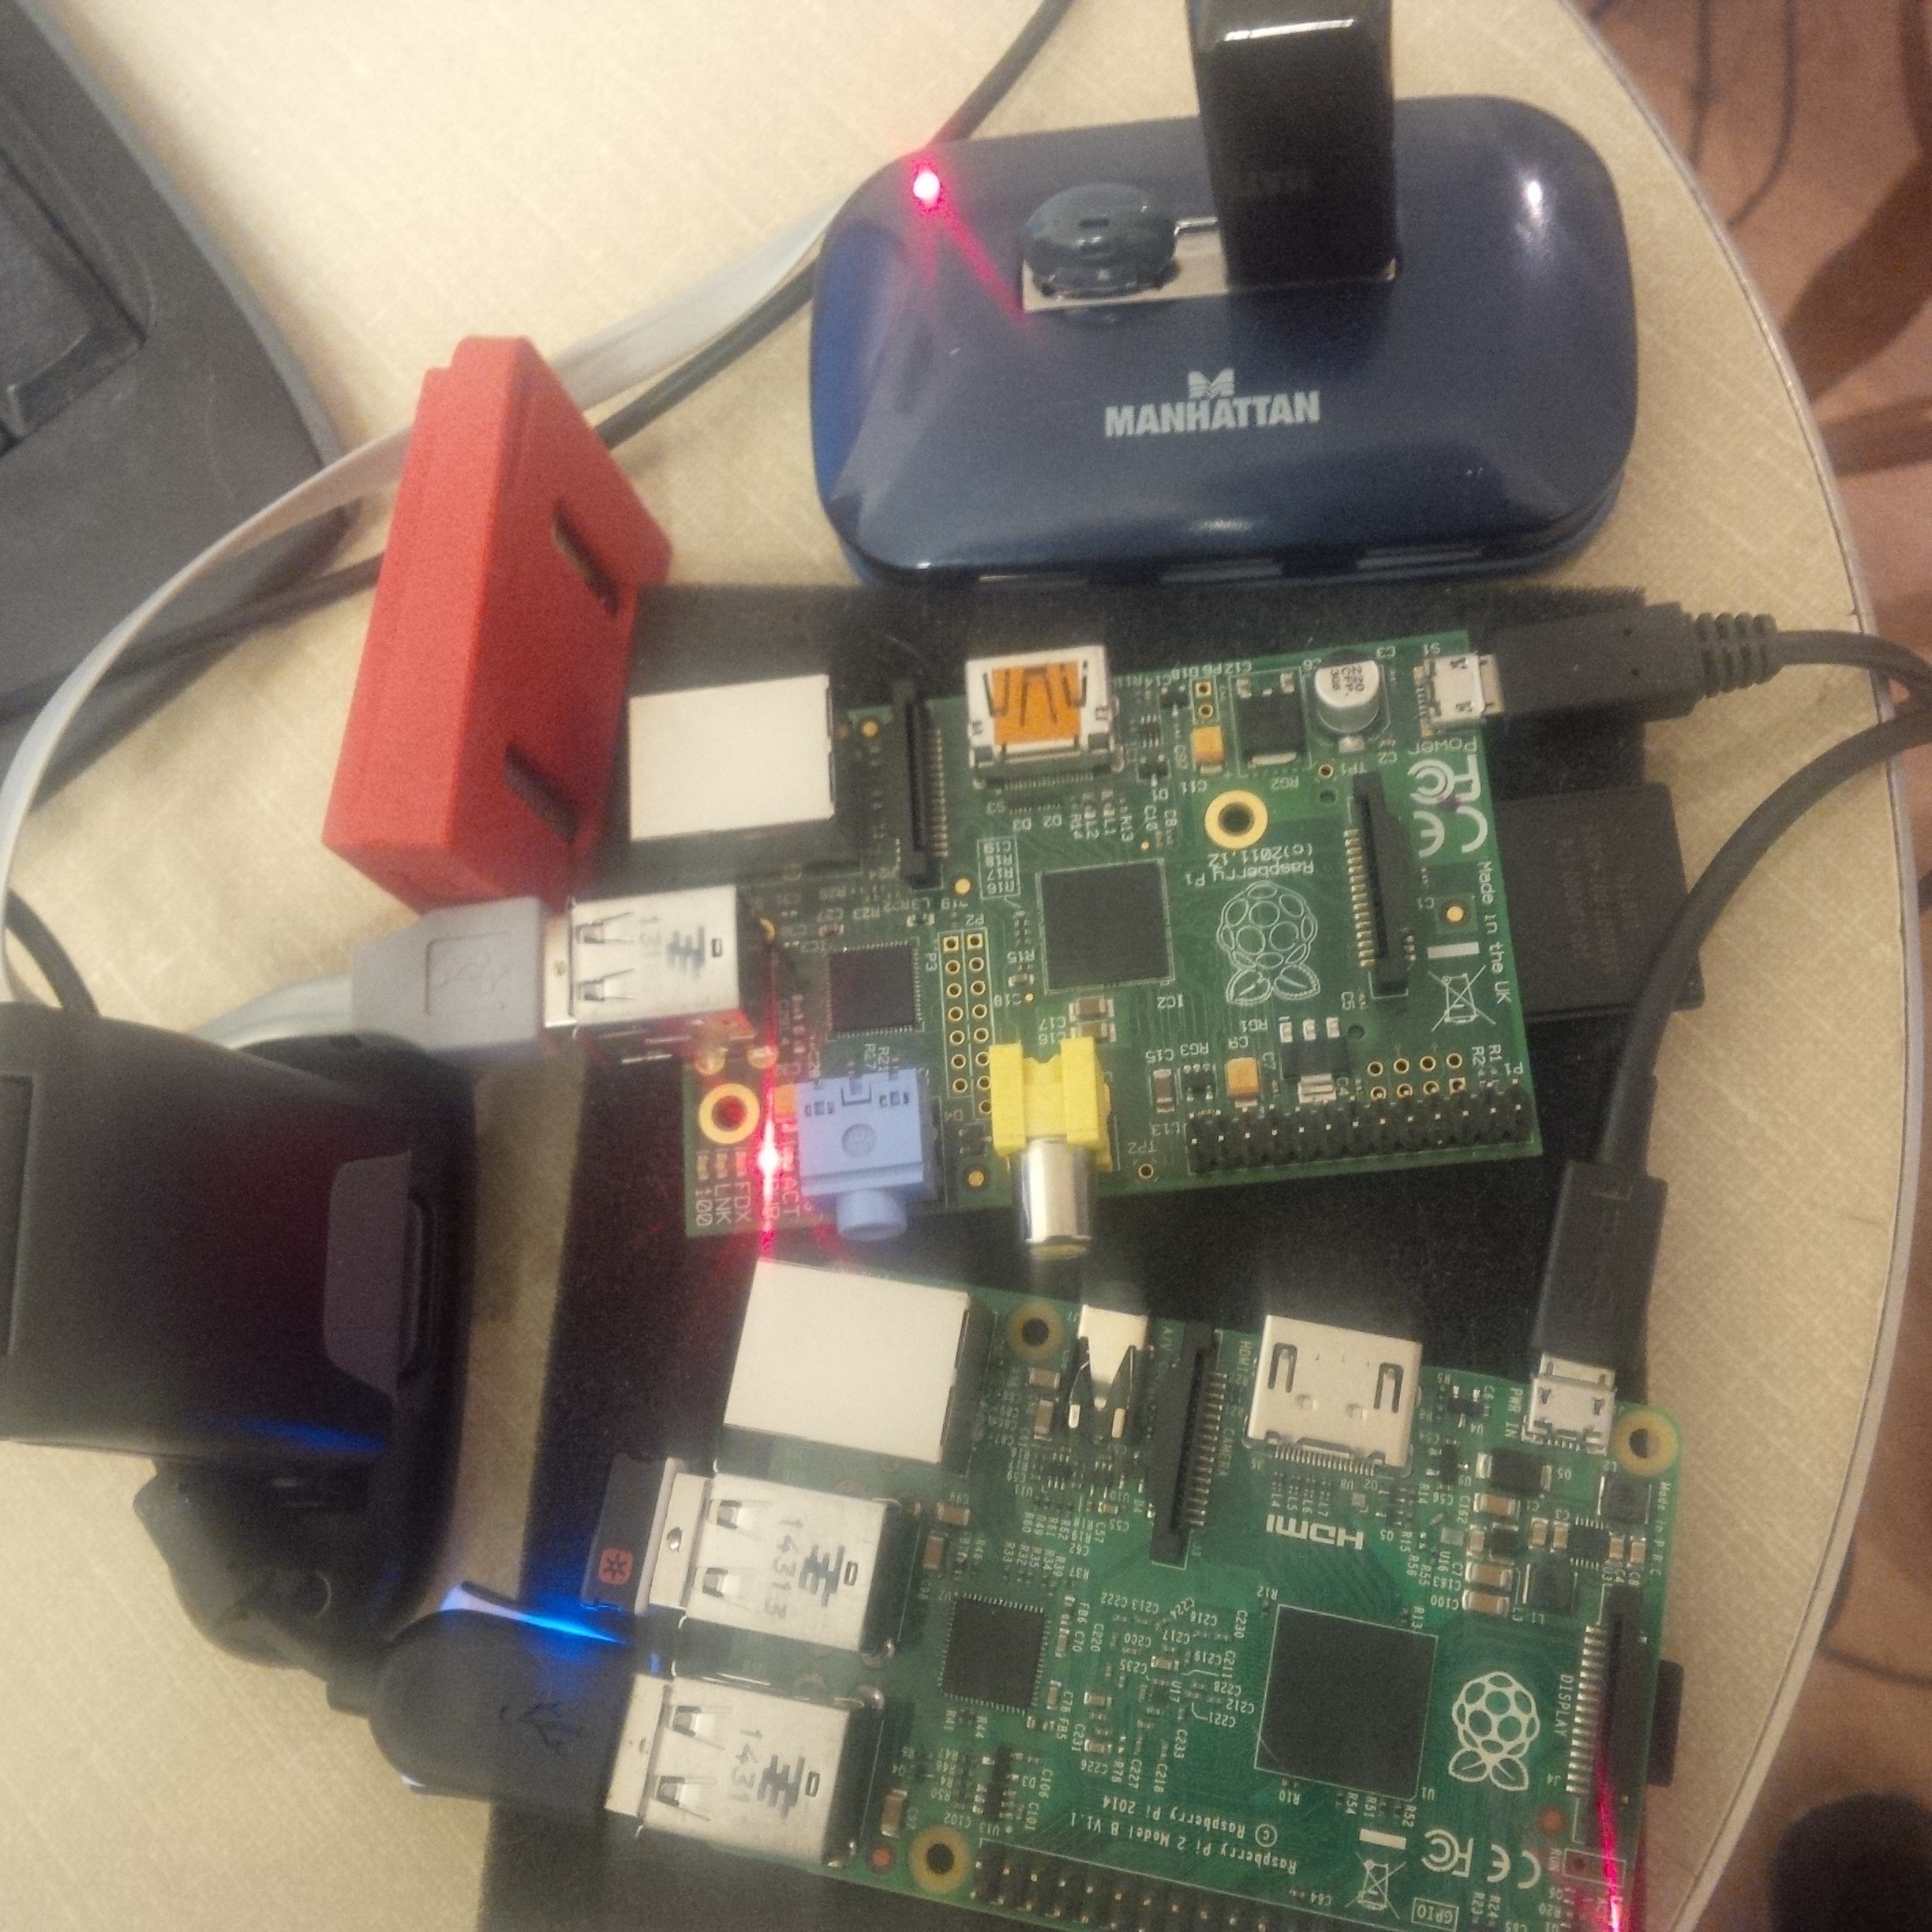
08/20/2016 at 15:39 • 1 commentI have decided on the final model for the weather station. In order to improve the automation , I have extended the use of Alexa voice control using the Skills Set. I have decided on using two Raspberry Pi computers. I also want to thank those who have shown interest and support for the project. I have learned a lot about the Internet of Things and deployment of data to the Cloud. This project has made me a better programmer !
![]()
Worker Pi
This Raspberry Pi is connected to IBM Bluemix and I have documented the steps to install the software to deploy the sensor data to the cloud. I will be testing extending the sensor network using Xbee in the near future so will leave the project open. I am using a slightly different version of Freeboard that works with Node Red in Bluemix. This will allow anyone to visualize the data delivered by the sensor tag on any internet connected device. I'm using the Raspberry Pi B. I also am using a USB hub.
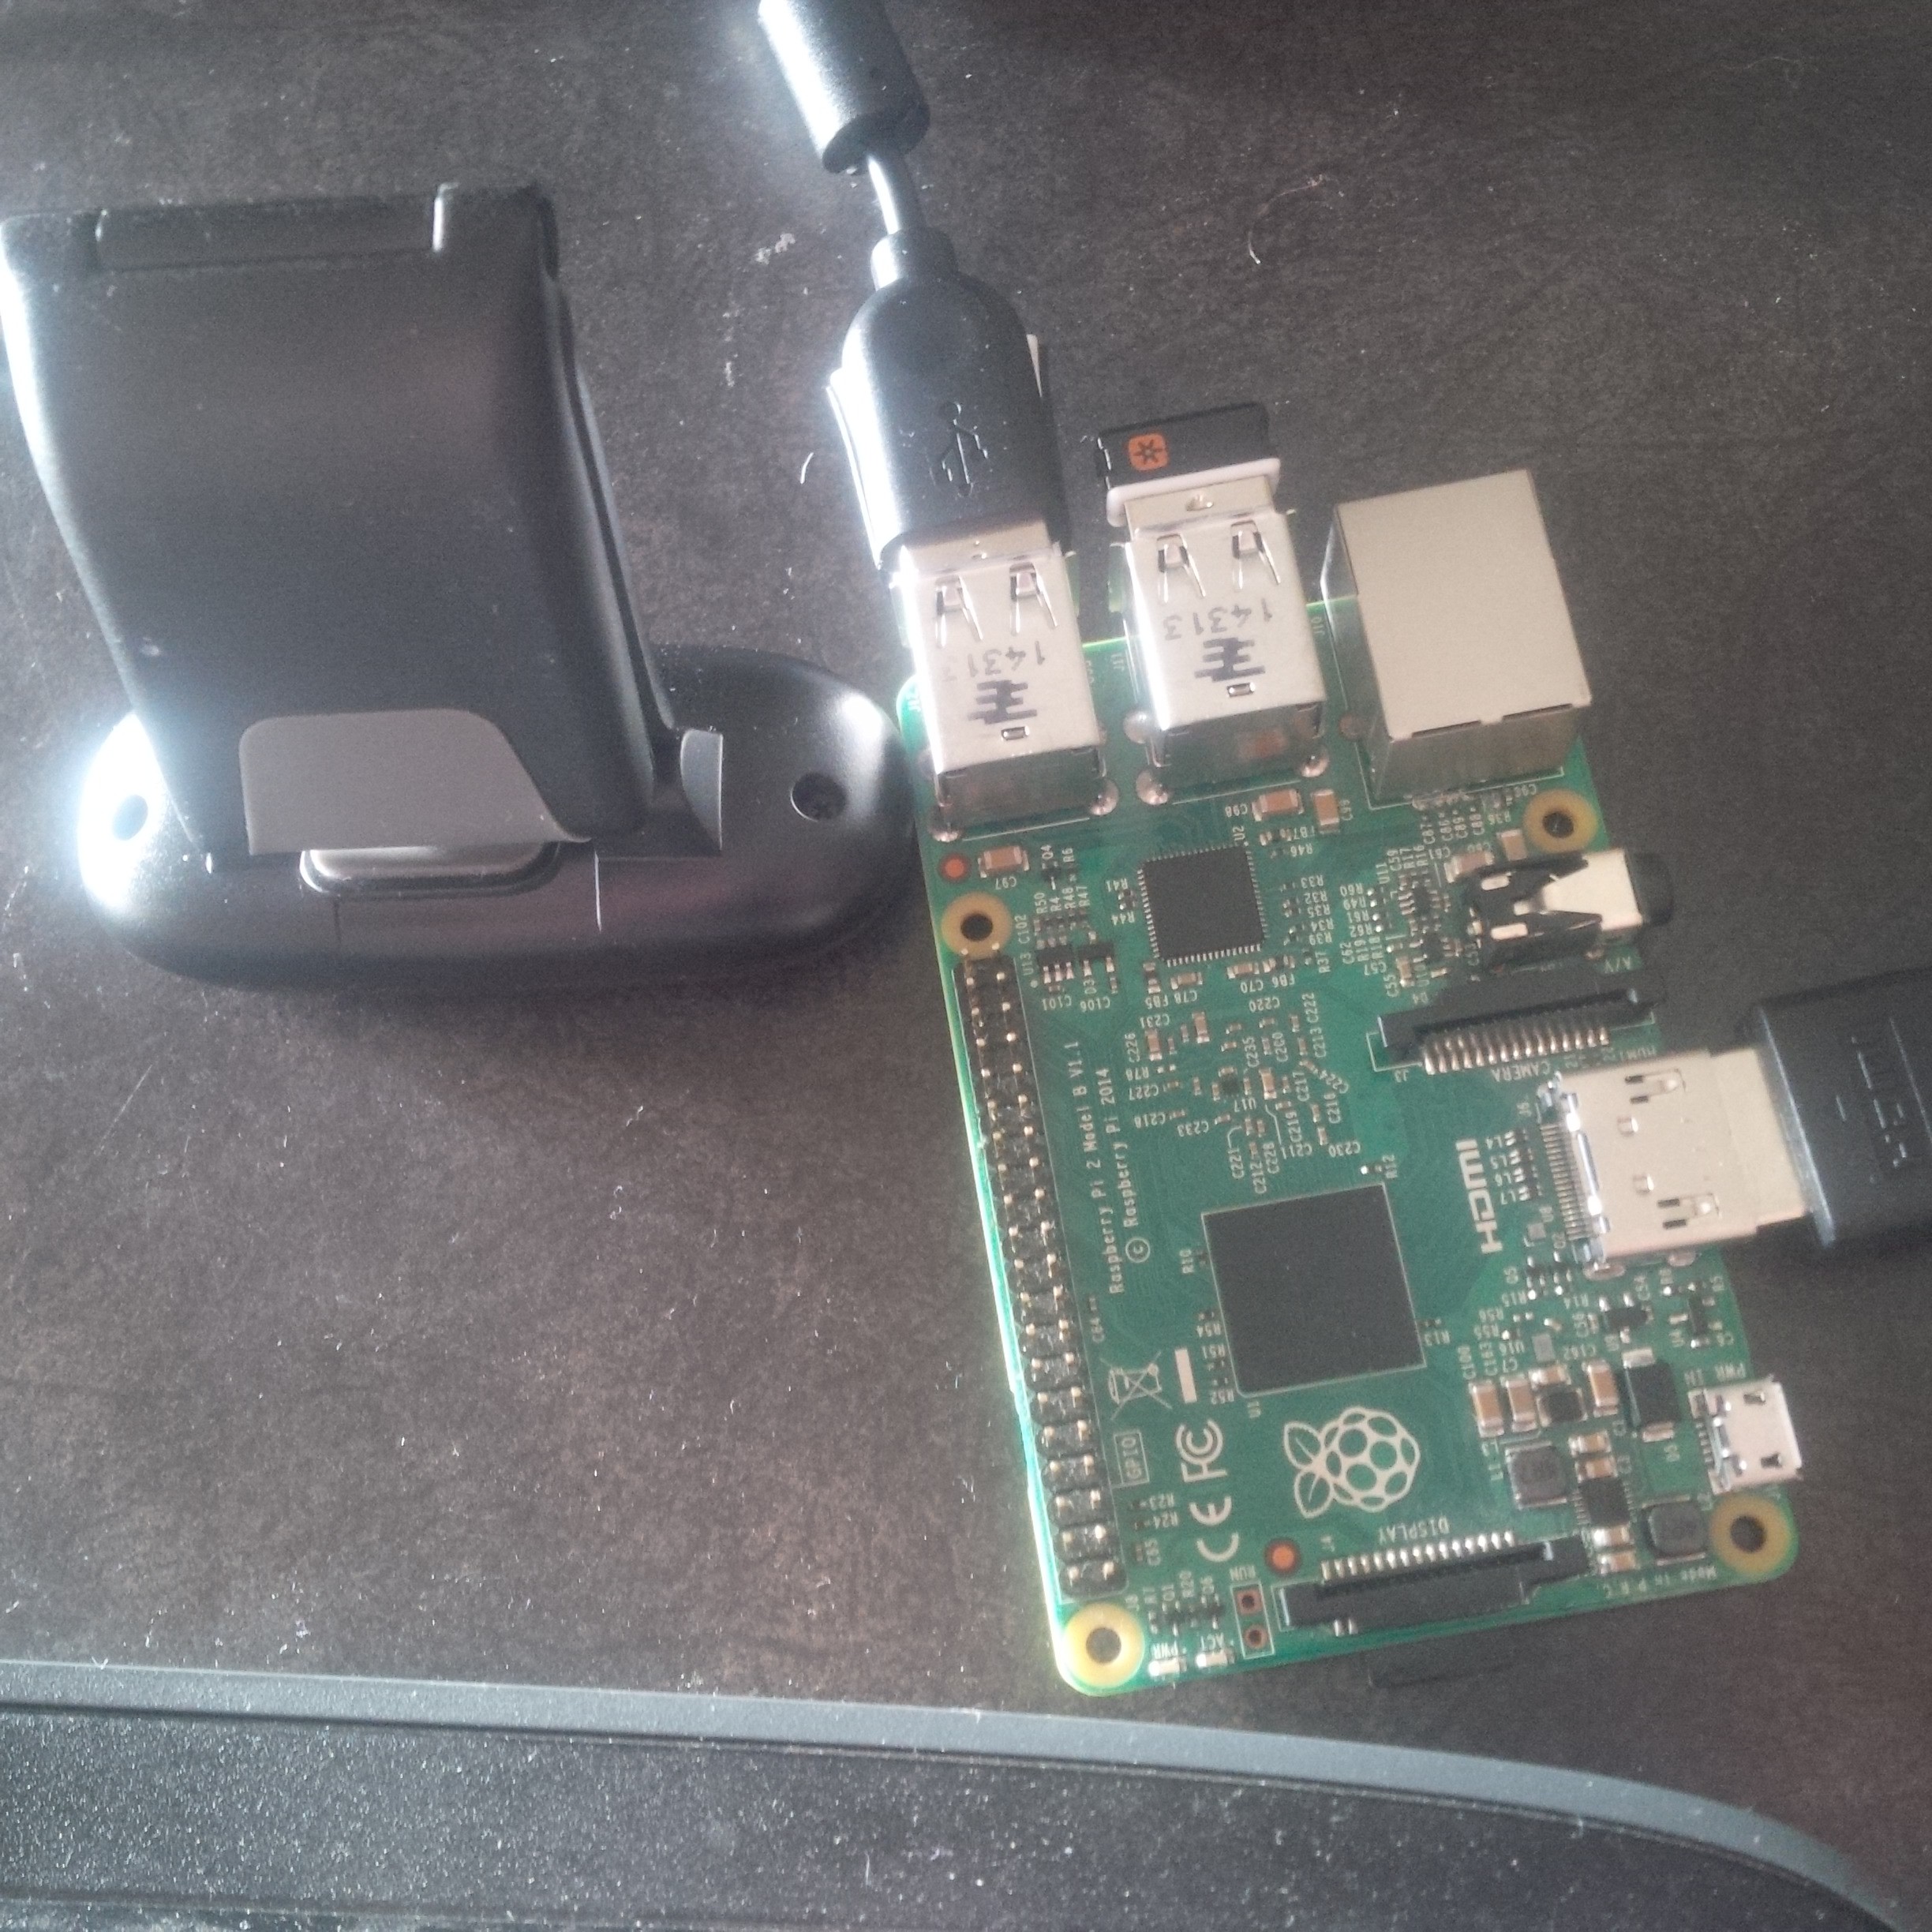
Commander Pi
The Commander Pi can be placed at any location with a network connection. So if the Worker is in the barn the Commander may be in the house or at the office. As long as there is a network connection, it will be communicating with the Worker Pi using the Bluemix cloud and Amazon cloud. The Commander allows you to ask about the temperature, humidity and lux settings within the enclosure. You can still view the dashboard but this is a powerful way to quickly check the status of indoor weather conditions using voice commands. I have documented setting up Alexa on the Raspberry Pi but this time I will be using Skills to enhance the use of voice control. I'm using the Raspberry Pi 2.
The beauty of the model is its flexibility and low cost.
Let's get started !
Alexa Skills for Weather Station
Once you have Alexa set up on your Raspberry Pi (see log ) you can customize commands . I have demonstrated some basic commands in the video but the sky is the limit as to what you can do with the skills kit.
Node Red
For this final stage I am using the Bluemix Node Red rather than a local install on the Raspberry Pi. The setup includes nodes to connect Alexa to my FoxTracker project on Bluemix. I will just be focusing on temperature for now because of the deadline . I created a short video to show the properties of the nodes. I used two sessions of Putty to get this working.
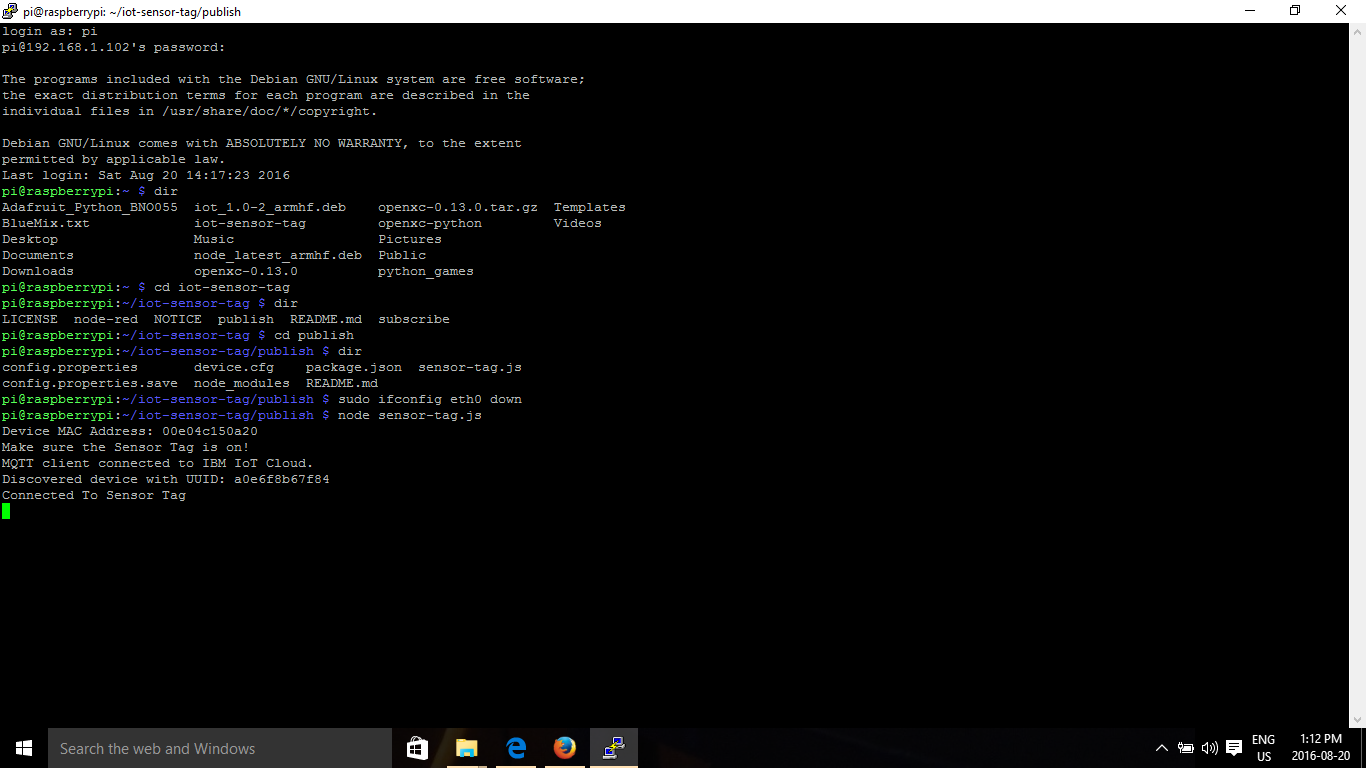
Fire Up the Worker Pi to connect to Bluemix.
See my log entry for details on installing and running the program. You should see the following if the program did run successfully on Putty.
Fire Up the Commander Pi to connect to Alexa![]()
See my log entry for installing and running the program.
![]()
Setting up the Skill Sets
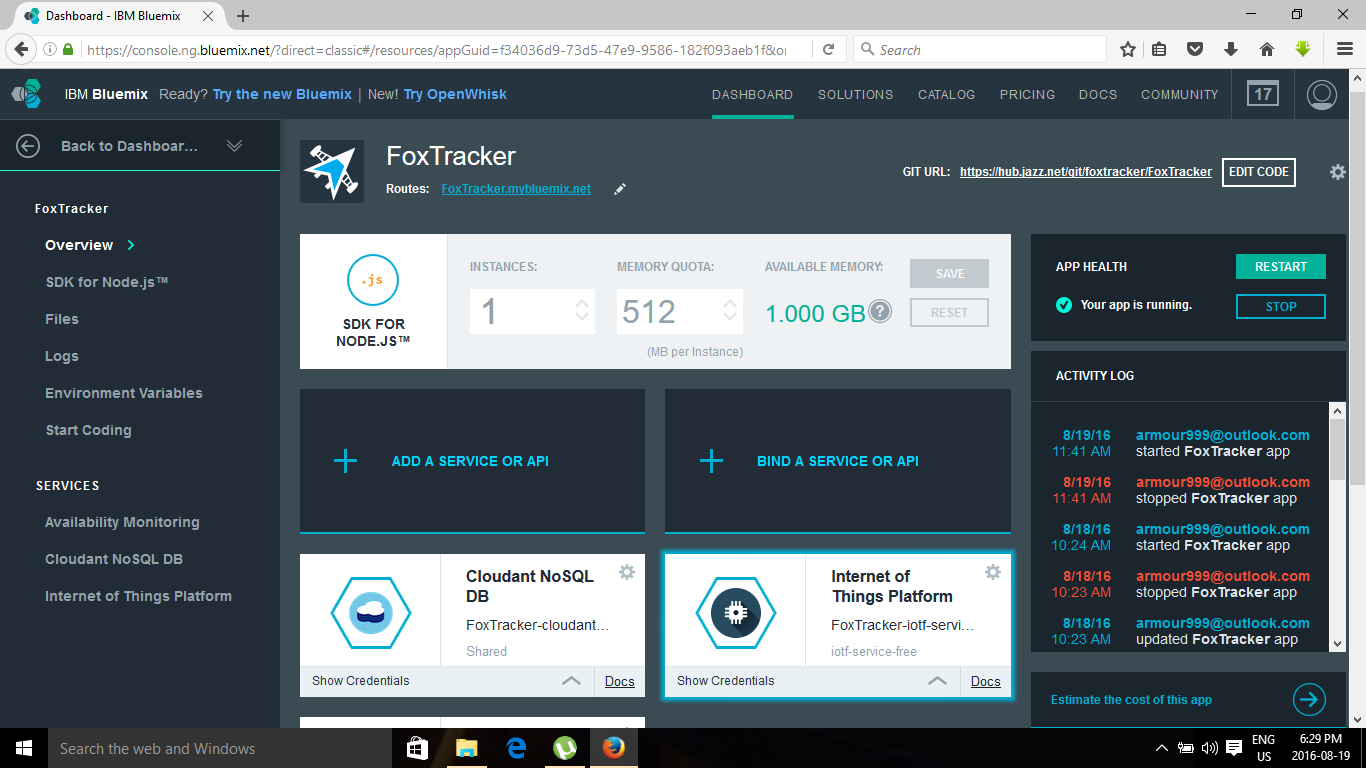
Log into Bluemix and select FoxTracker
![]()
FoxTracker Dash Board includes the url for Routes. We are going to be using this as an endpoint in Alexa. My route is FoxTracker.mybluemix.net. Later I will use this url and the url I set up for the http node.
![]()
Log into Amazon Developer website and select Alexa Skills Set.
![]()
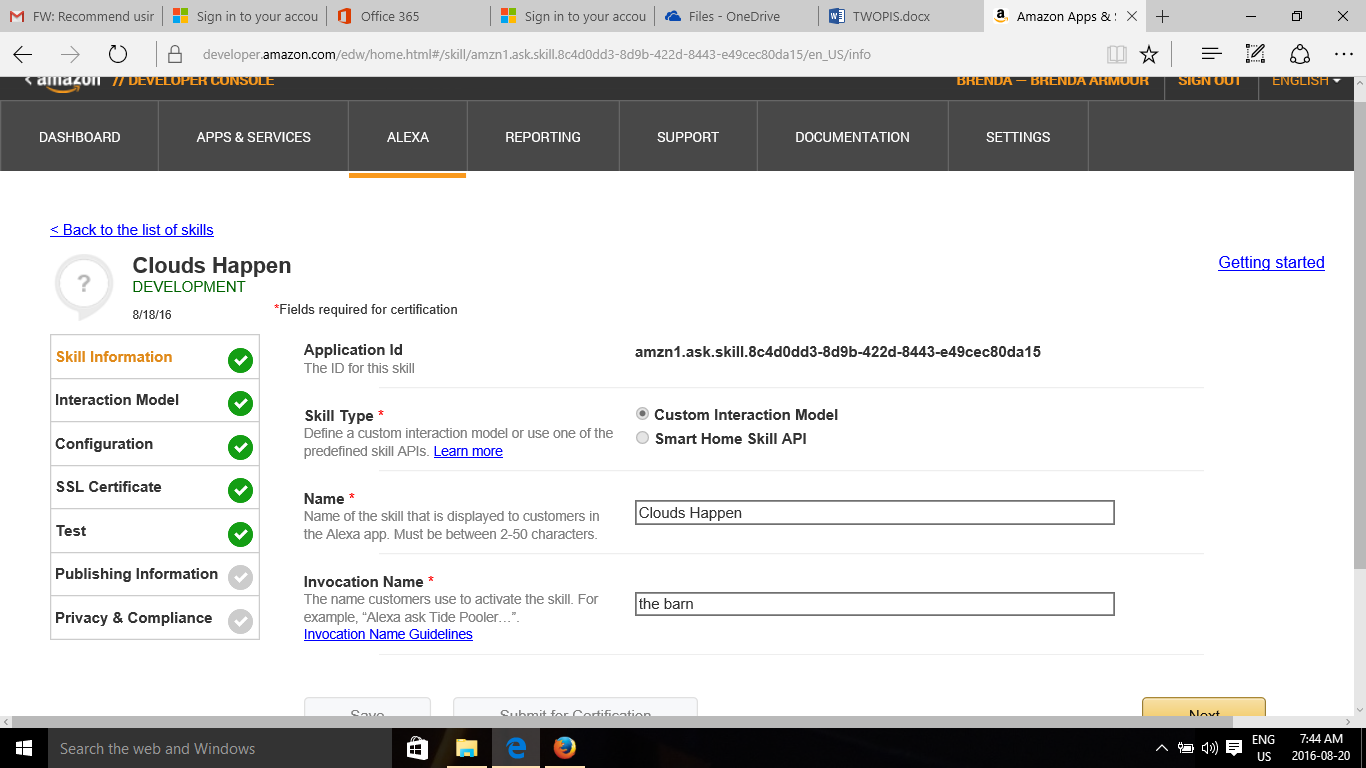
Name your skill and choose a Invocation Name. I simply called mine "the barn". So in this demo I will be saying "Alexa ask the barn what is the temperature ?"
![]()
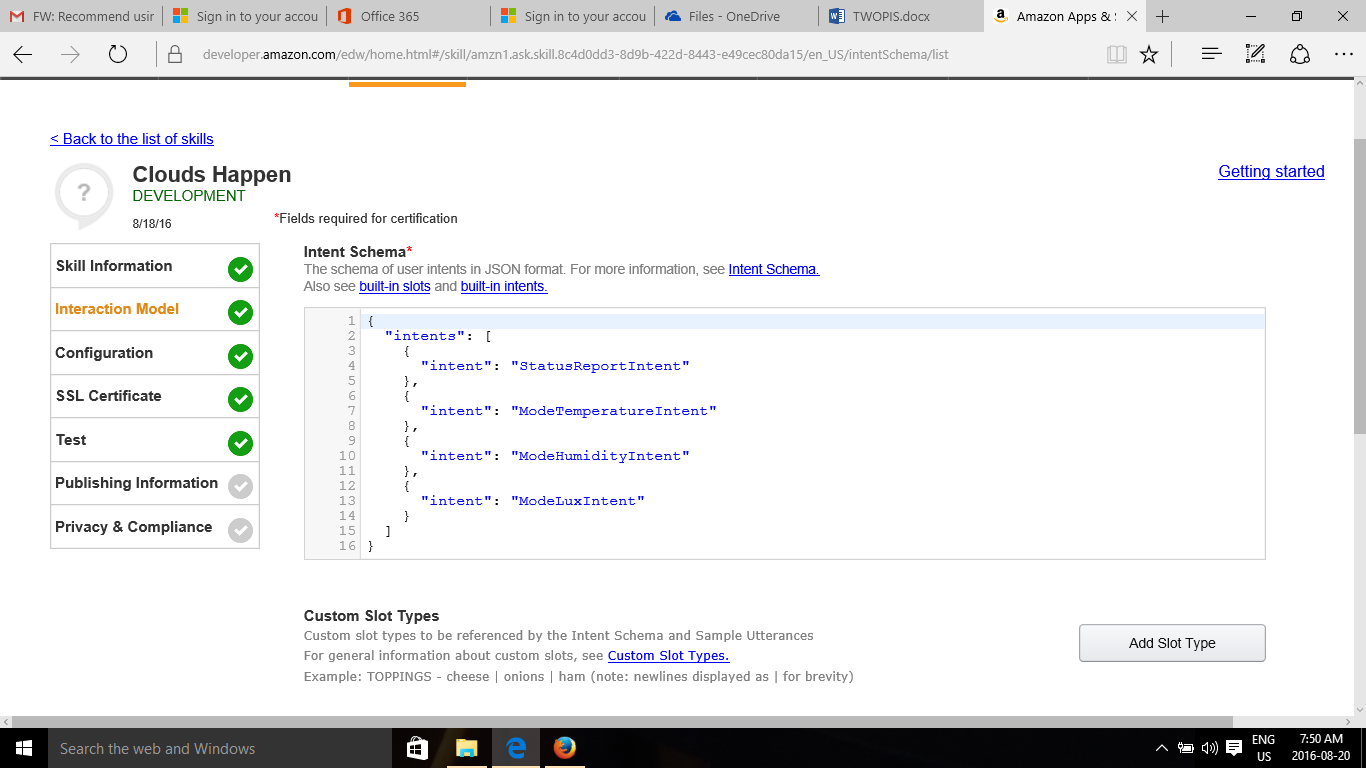
Set up the Intent Schema. This is flexible. I set up the parameters I wish to test.
![]()
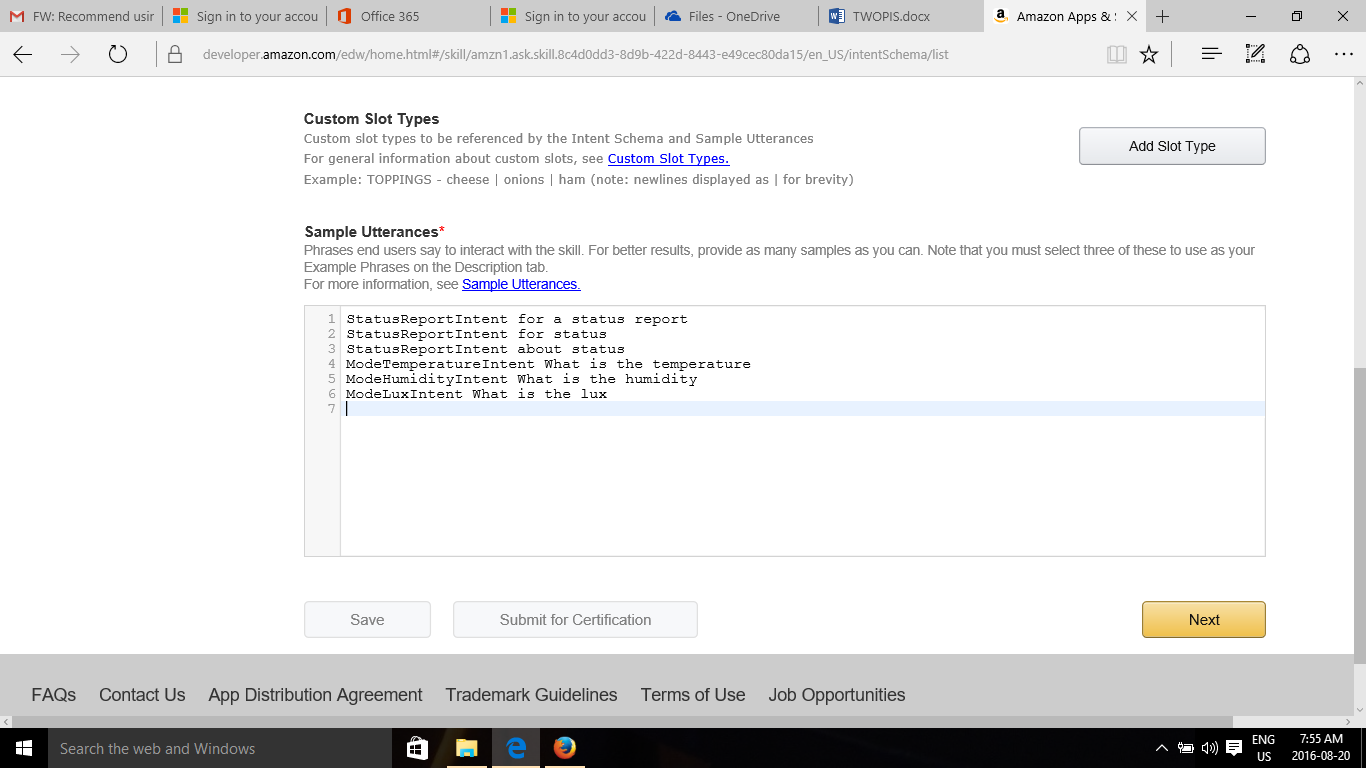
Set up Utterances for your Intents. I only included one for each intent but you can include a number of variations as to what someone may ask. i.e How's the temperature ?
![]()
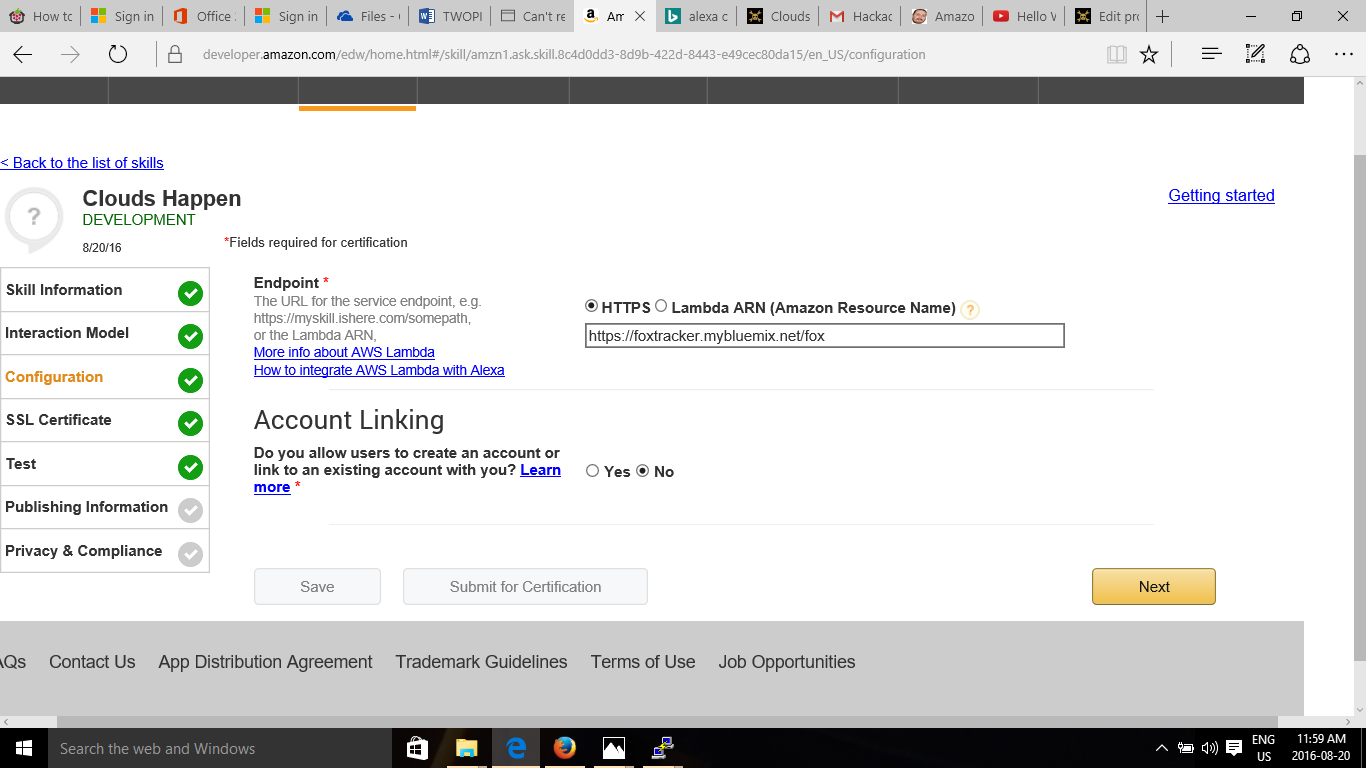
Setup your Endpoint. Copy your url from Bluemix and add the url you specified in Node Red.
![]()
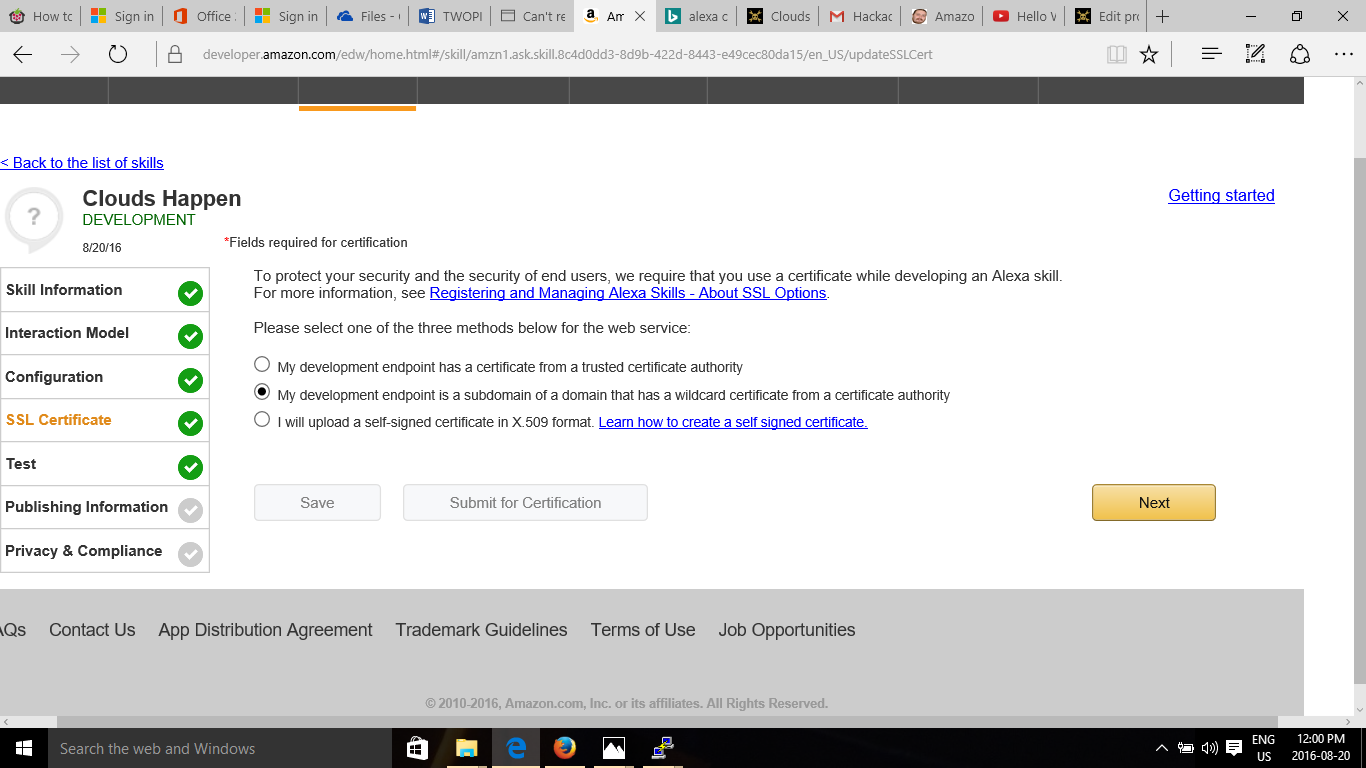
Select the second option for wildcard certificate.
![]()
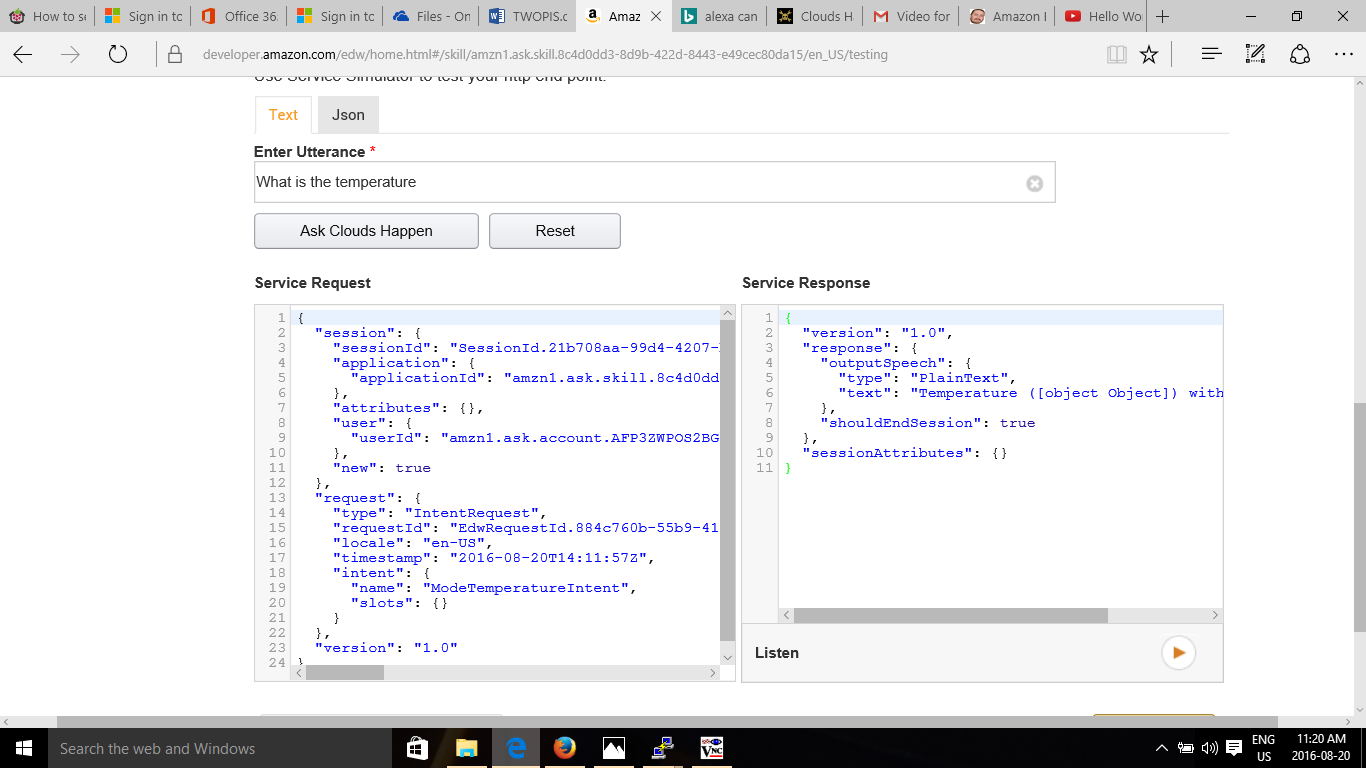
Test your Utterance ! Make sure your Endpoint is correct or it will not work.
![]()
-
Bringing the components together Part 1
08/13/2016 at 16:08 • 0 commentsIts been some time since I added a new log. I have been mulling over how to bring this all together. At first I thought this phase might be a new project. But I think it can be incorporated nicely to Clouds Happen. I will be sending the Sensor Tag motion data to IBM Bluemix Cloud .
Sending Sensor Data to IBM Bluemix
I used this excellent video by Ryan Baxter exclusively to achieve the deployment of sensor motion data to Bluemix The video was made in Nov 12, 2014 and Bluemix has changed. His video can be found here: . He was using a Beaglebone Black as a gateway and I am using a Raspberry Pi B. I had to make some modification to his code to accommodate the changes to Bluemix which I have documented. The screenshots in the video have changed so if you do follow the video than you may have to improvise to get where you need to be. Basically all you are doing is connecting a device and than creating a service. Then you can create a APP. You also need to sign up for a free trial from IBM. If I missed a step please let me know
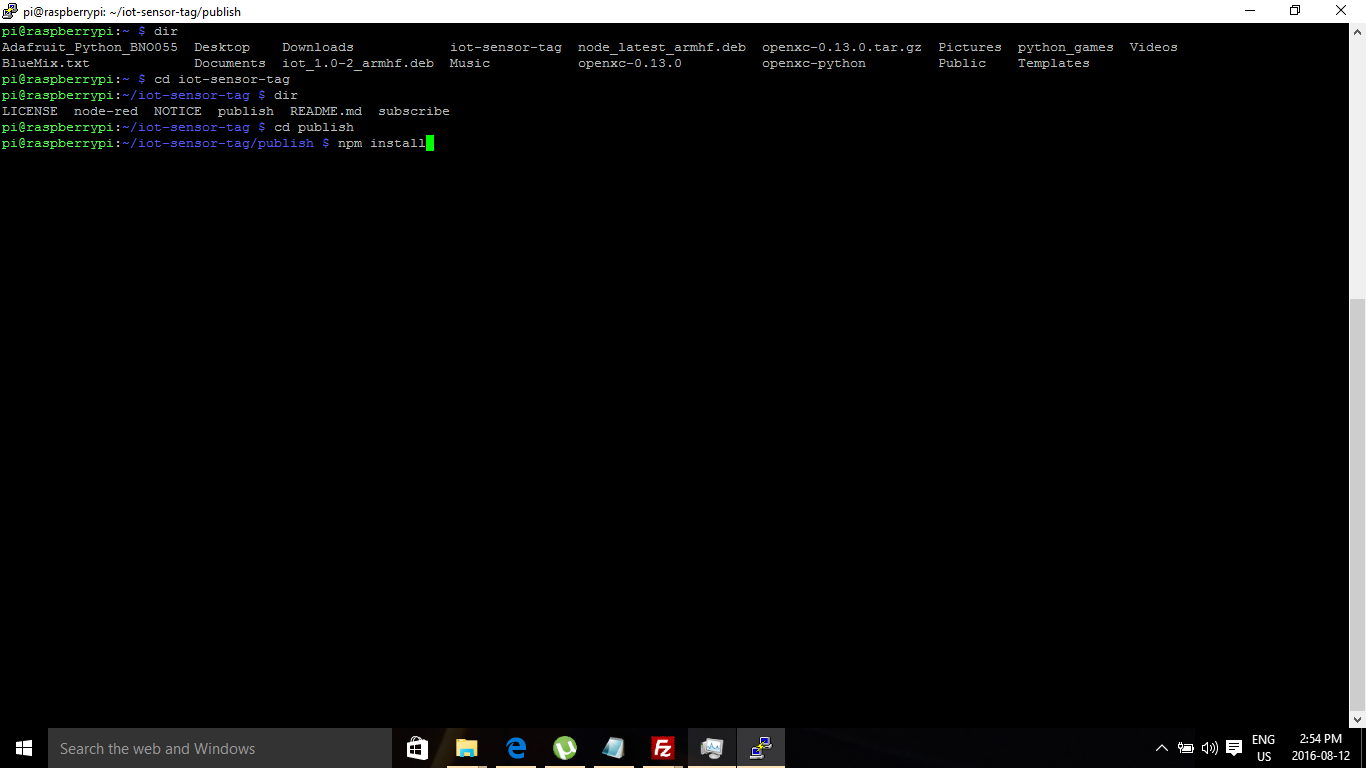
At your terminal (I'm using Putty) use Git command to clone the repository . Found here - https://github.com/IBM-Bluemix/iot-sensor-tag.
git clone https://github.com/IBM-Bluemix/iot-sensor-tag![]()
Move to the publish directory and execute the command npm install – You may see some warnings but as long as they are not errors it should be okay.
Now lets set up our Raspberry Pi in Bluemix ;
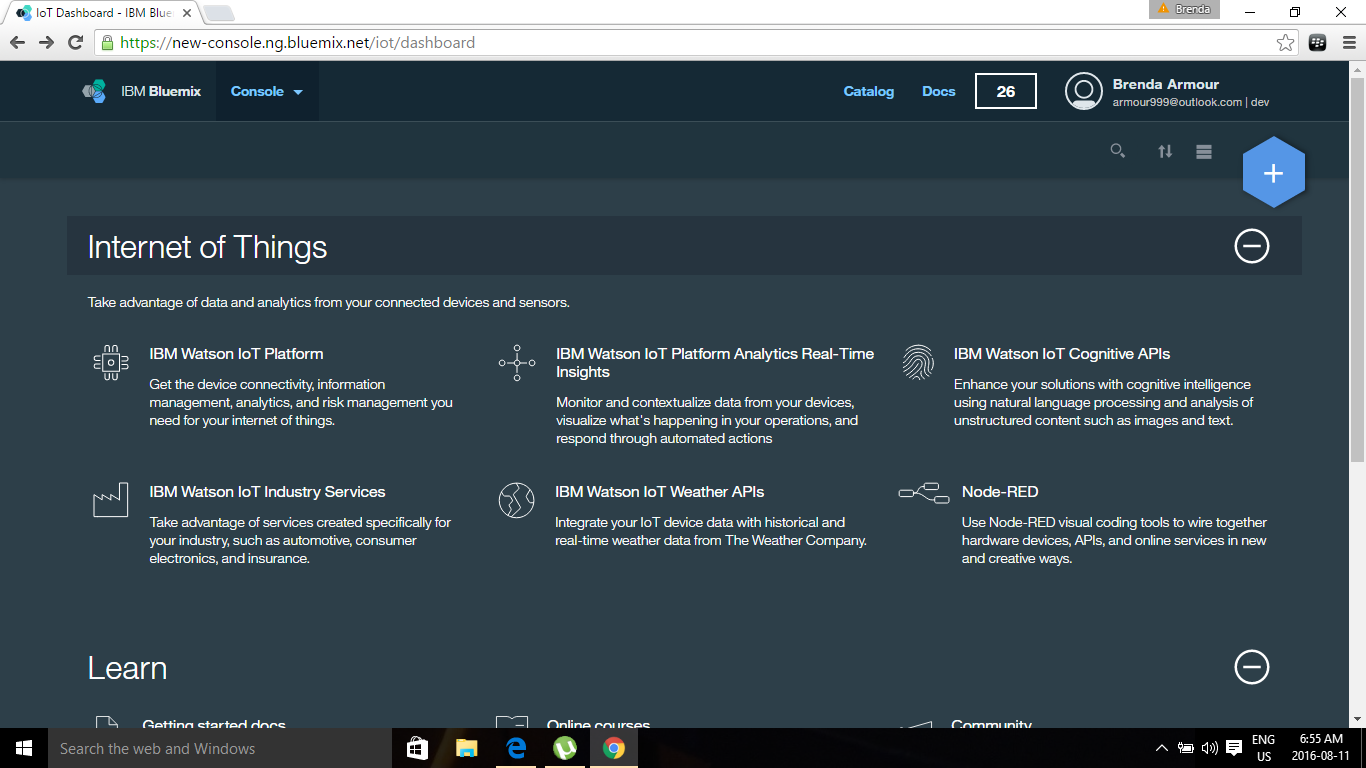
Console for IBM. Click on Catalog.
![]()
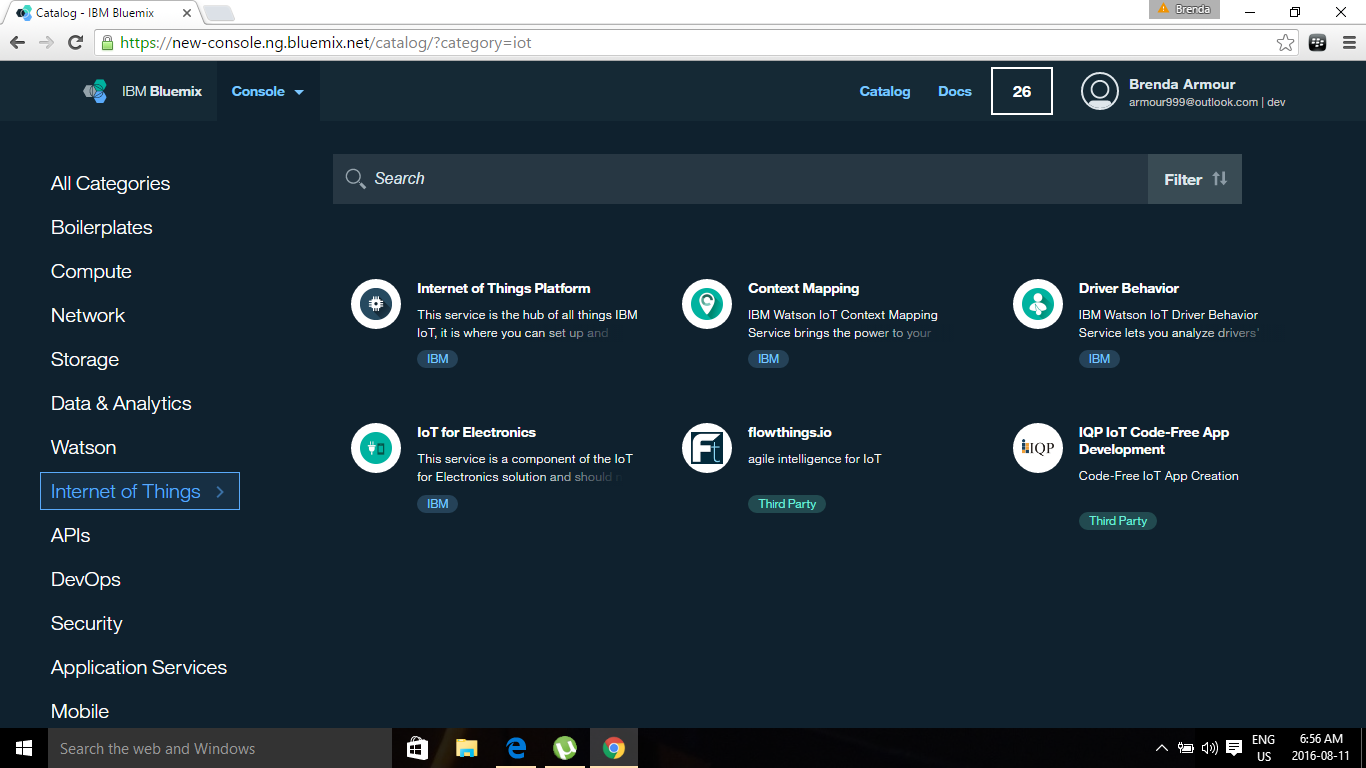
Select Internet of Things on the left. Now select Internet of Things
![]()
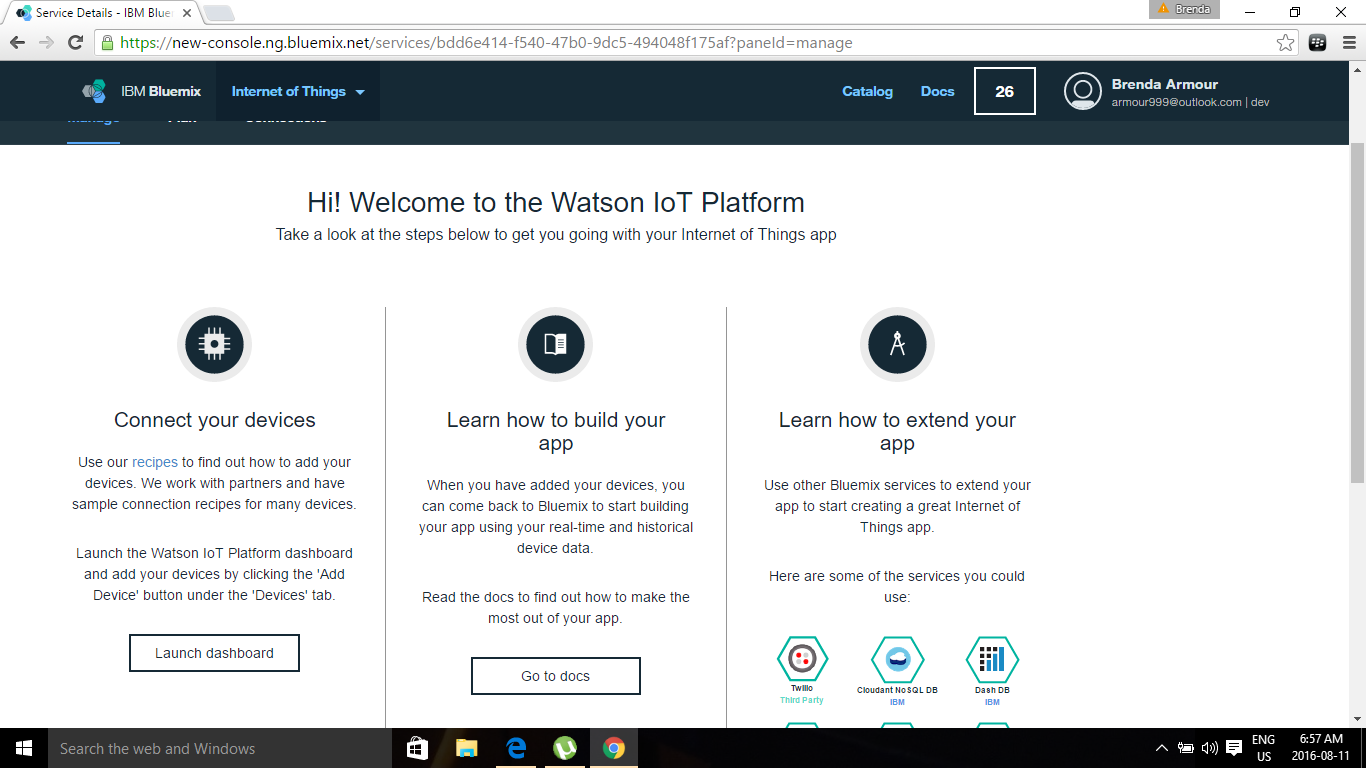
Under Connect you device – click on Launch dashboard
![]()
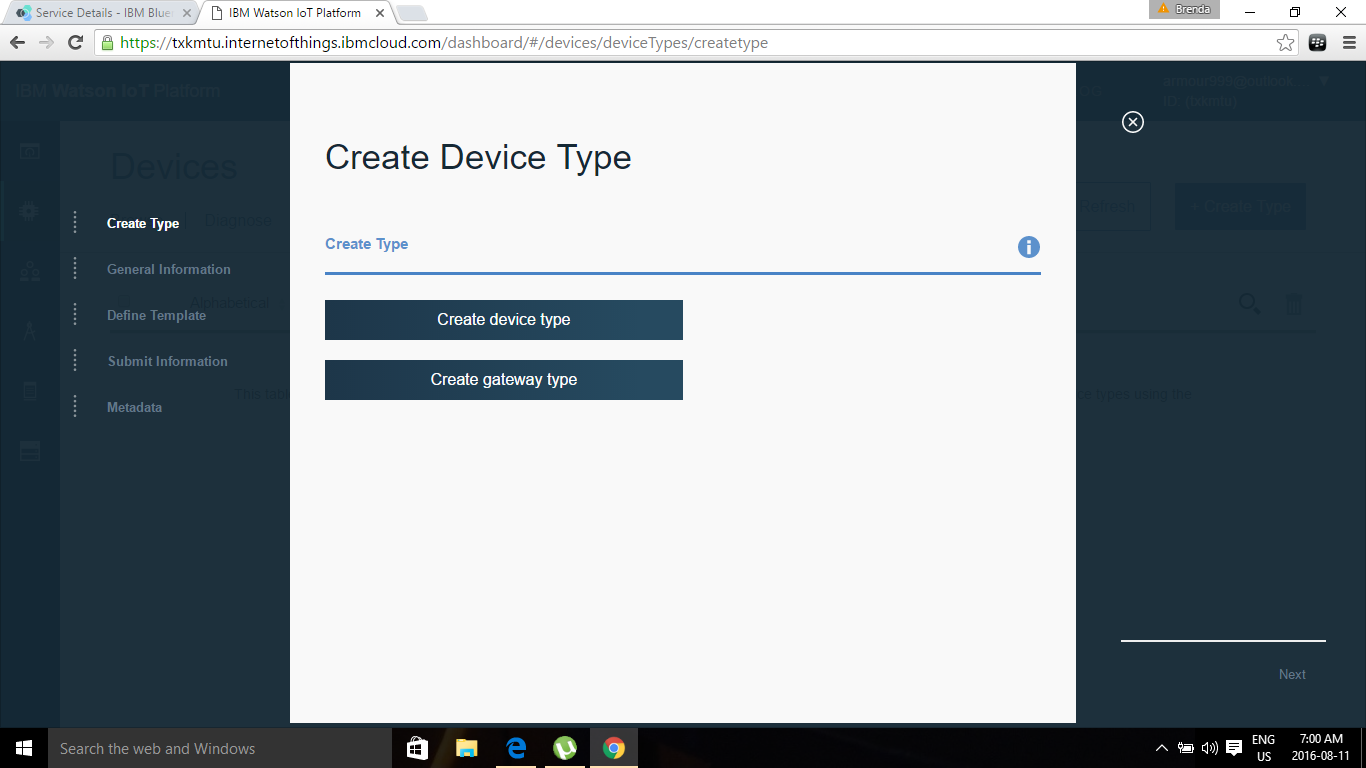
Select Create Device Type
![]()
Select Create device type:
![]()
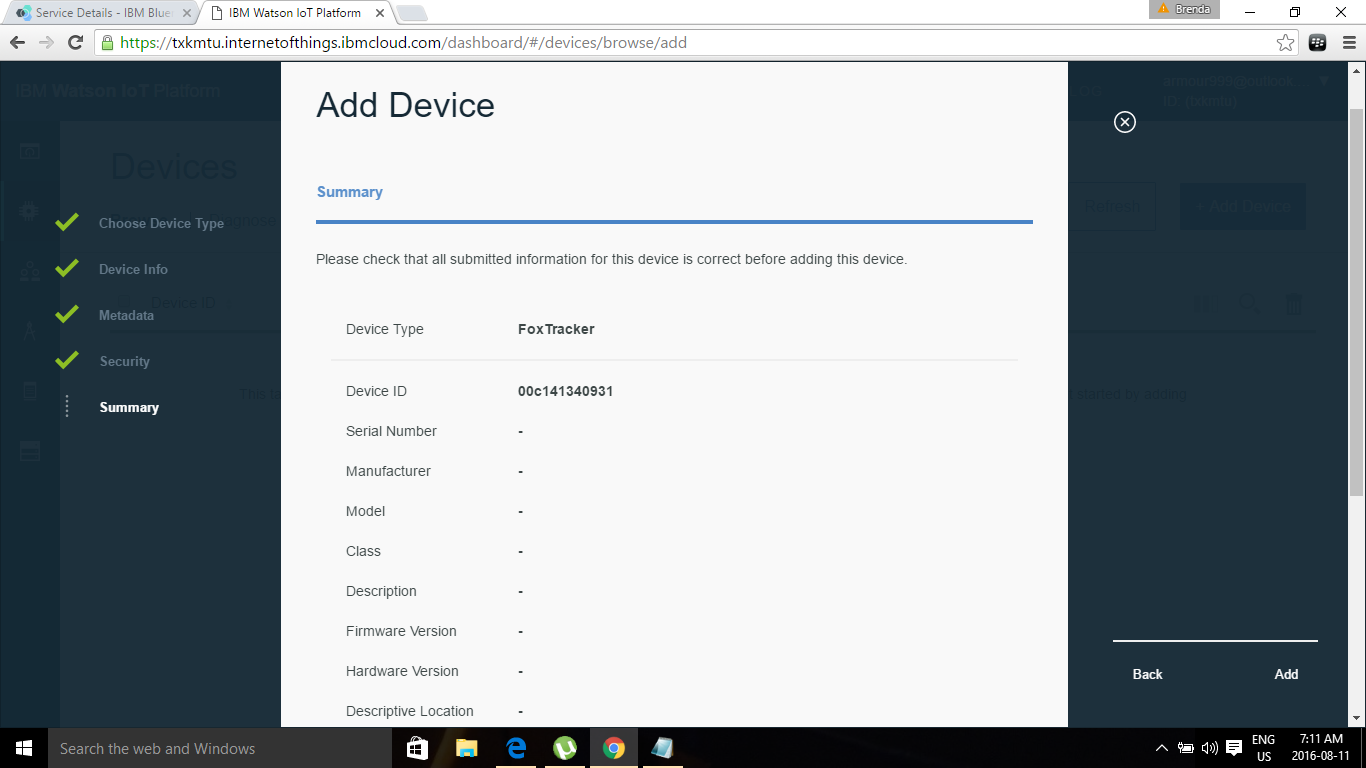
Name your Device. Add the MAC address for the Pi. The MAC address can be found using ifconfig. All other fields are not mandatory
![]()
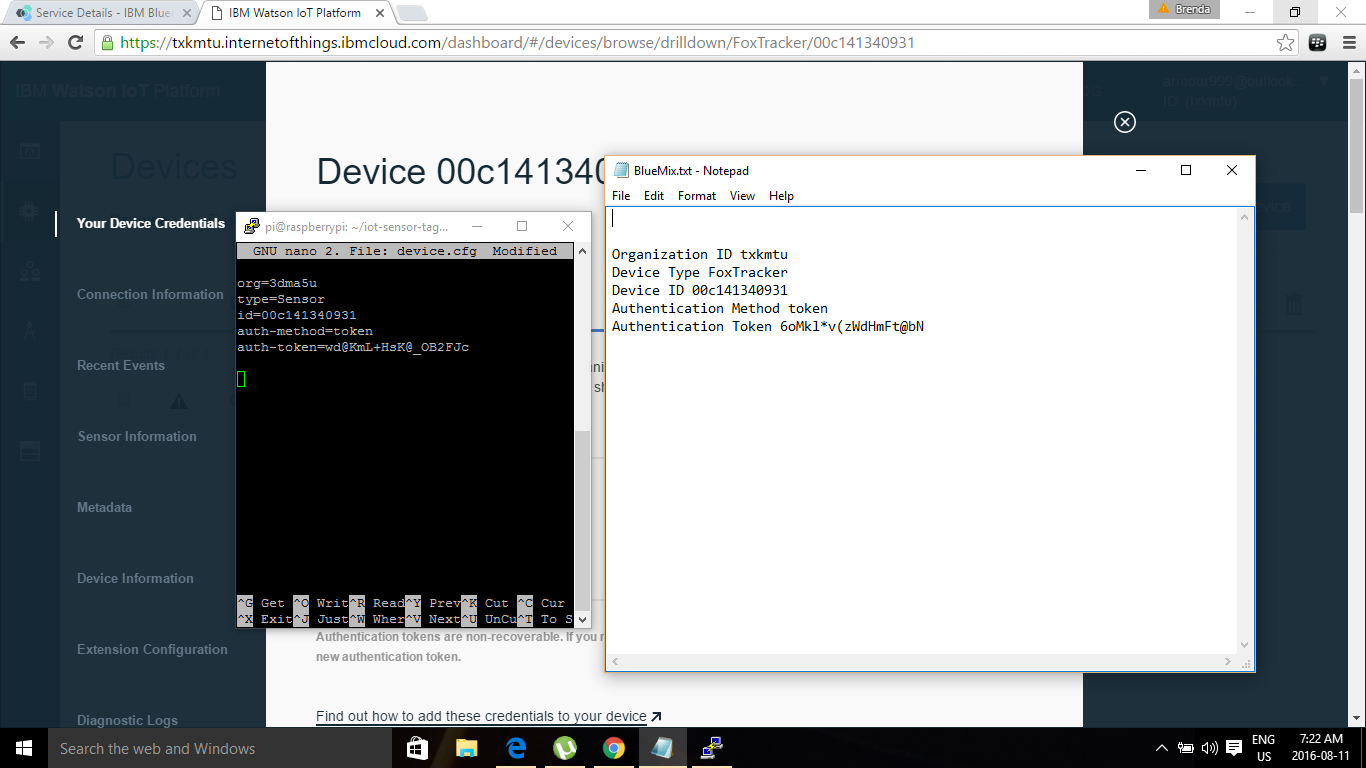
Generate you credentials . This is where I had to modify the code. During the setup you have to create a config.properties to store you credentials generated by Bluemix. This screen shot shows what I copied from Bluemix to Notepad. I changed the field names to match his code. My credentials have changed so I'm not concerned about showing them. The device.cfg shows one set of credentials modified to work in the program. If you view his video the syntax has changed to the example in Notepad. Use sudo nano within the publish directory to copy your credentials to that was generated by Bluemix.
![]()
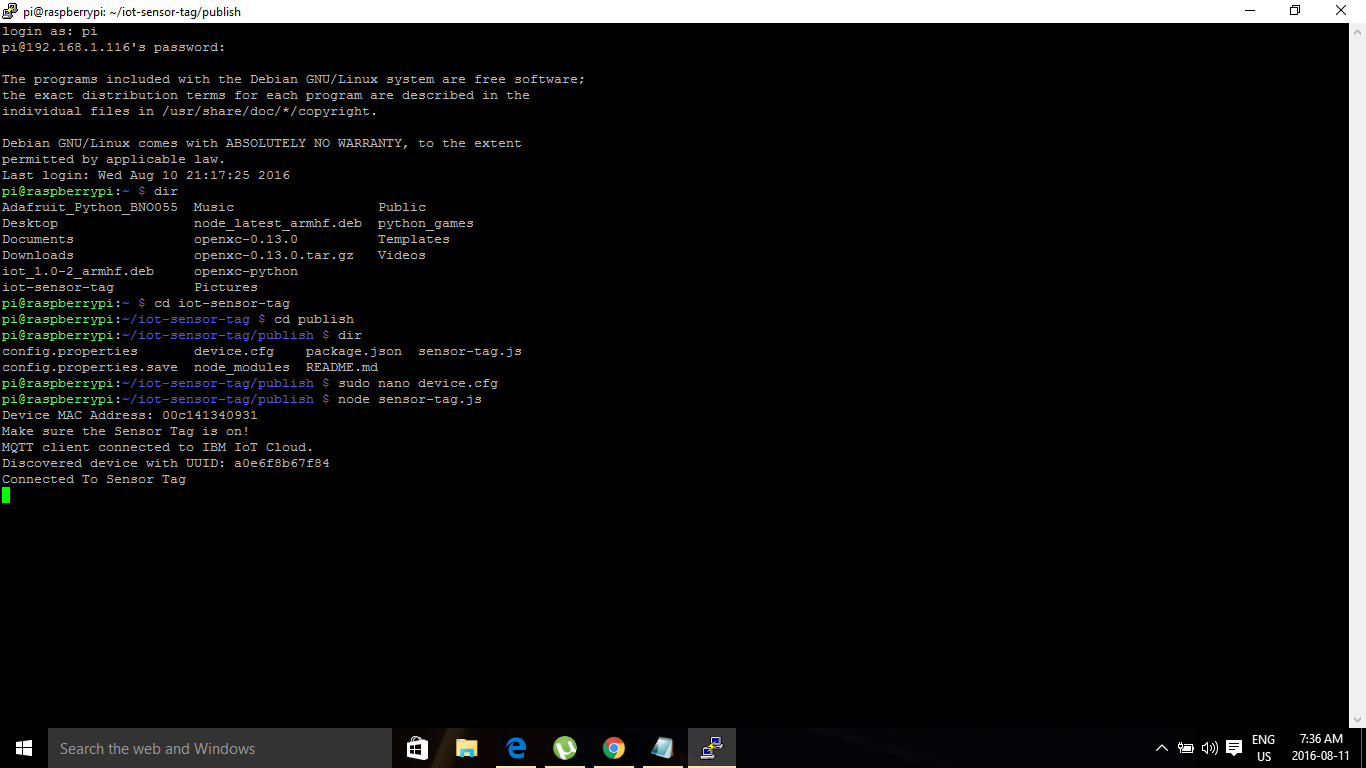
Now we can start the program from the publish directory.
Node sensor-tag.jsMake sure your sensor tag is connected and you should see this in Putty.
![]()
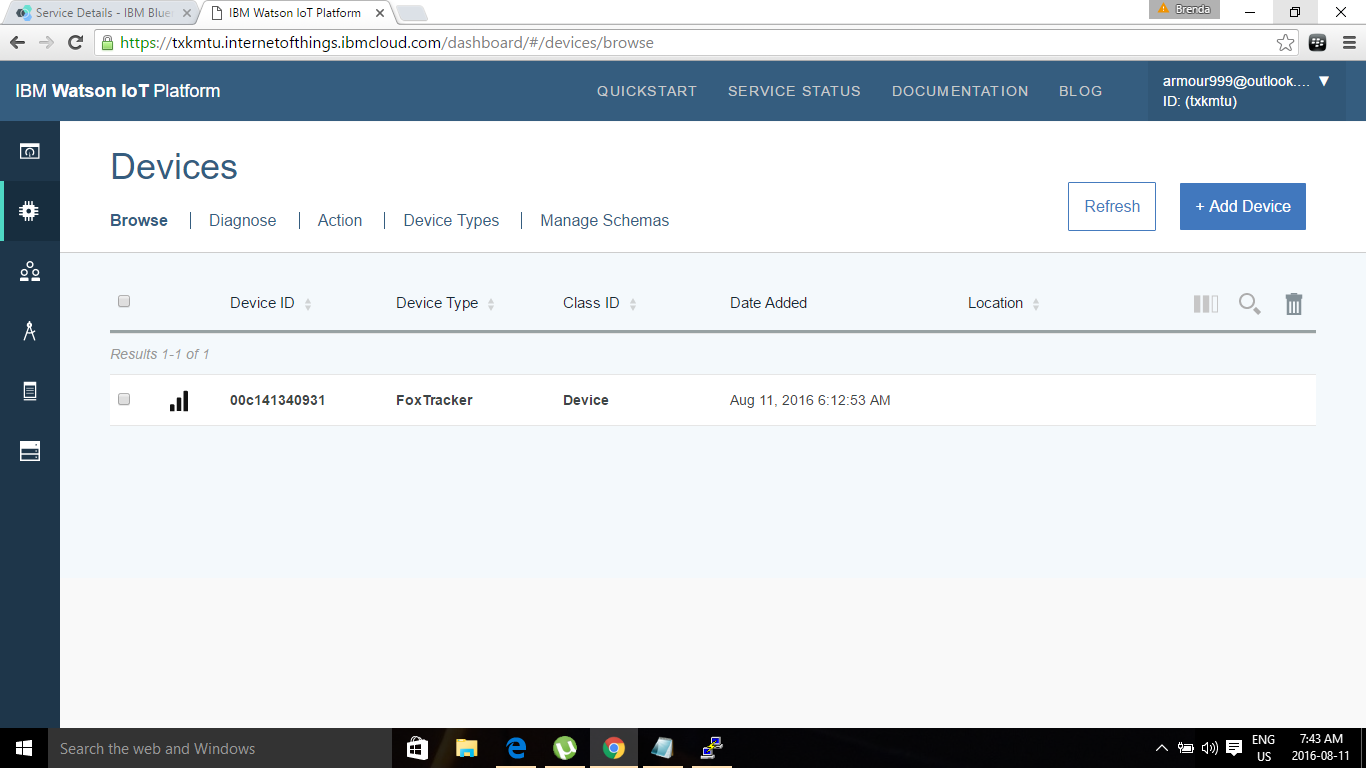
Lets go back to Bluemix. Connected to fox tracker
![]()
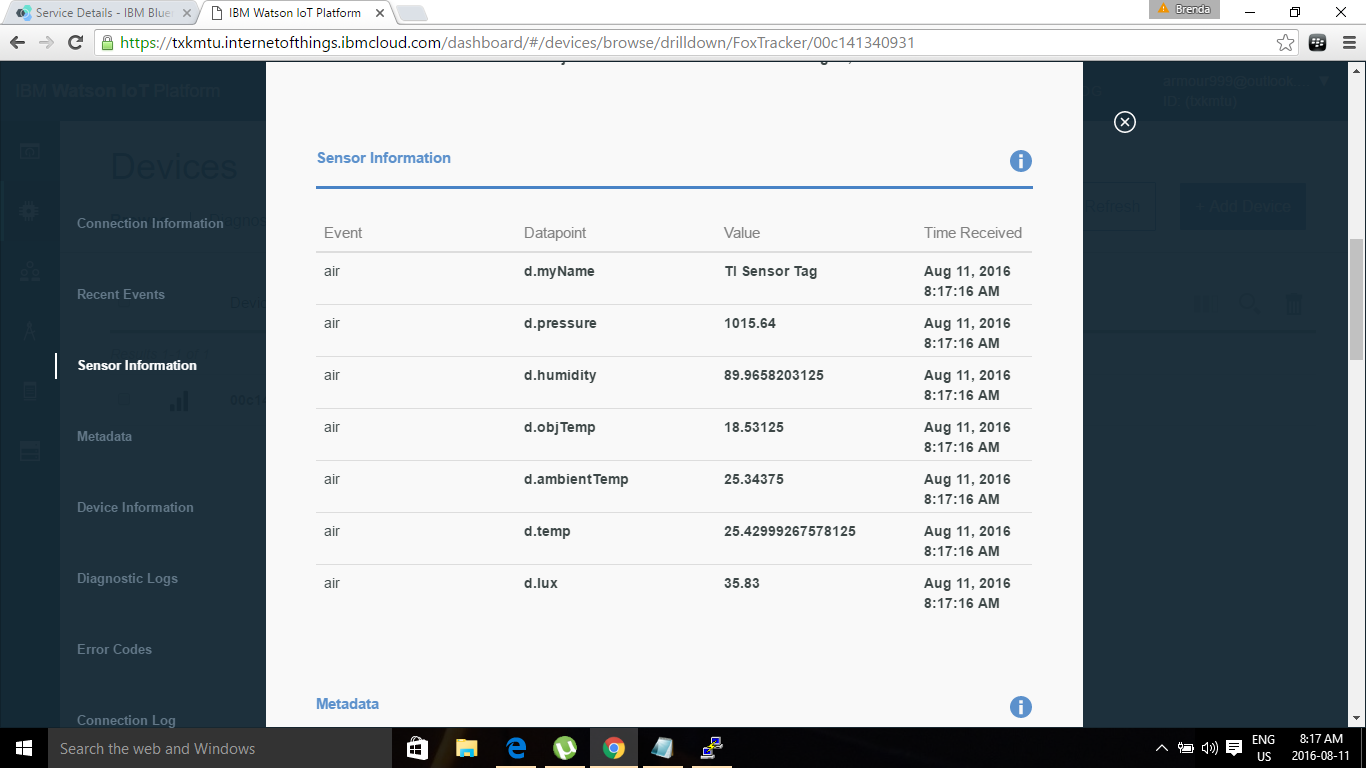
Sensor data coming in !
![]()
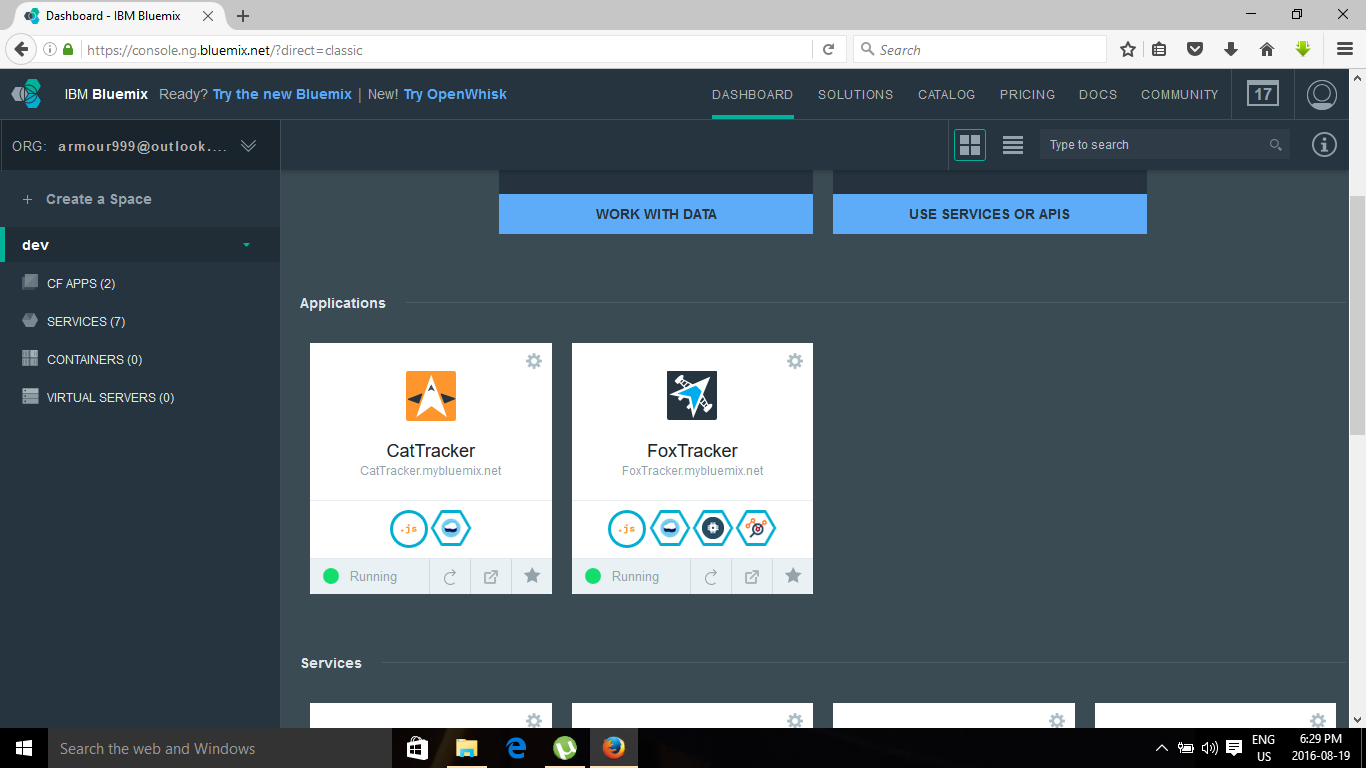
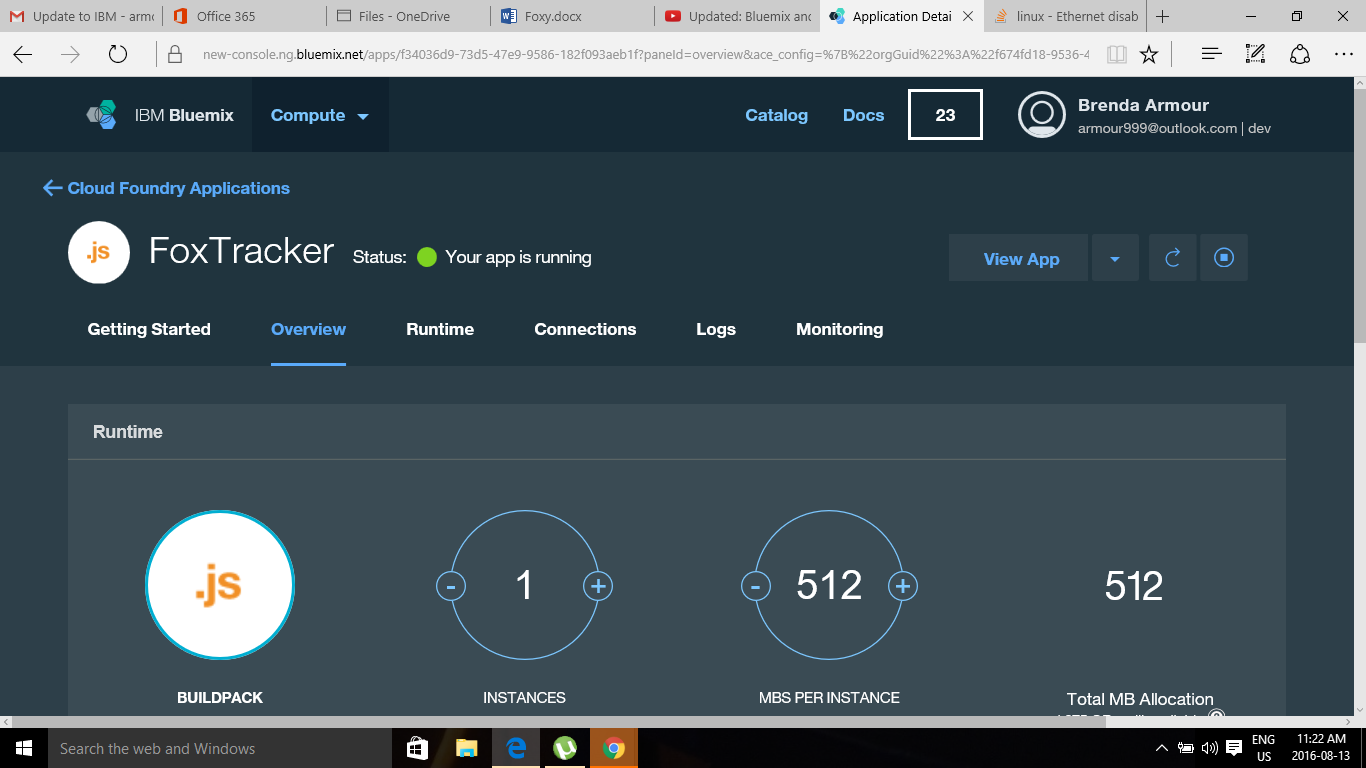
I have created an app for the Fox Tracker .
![]()
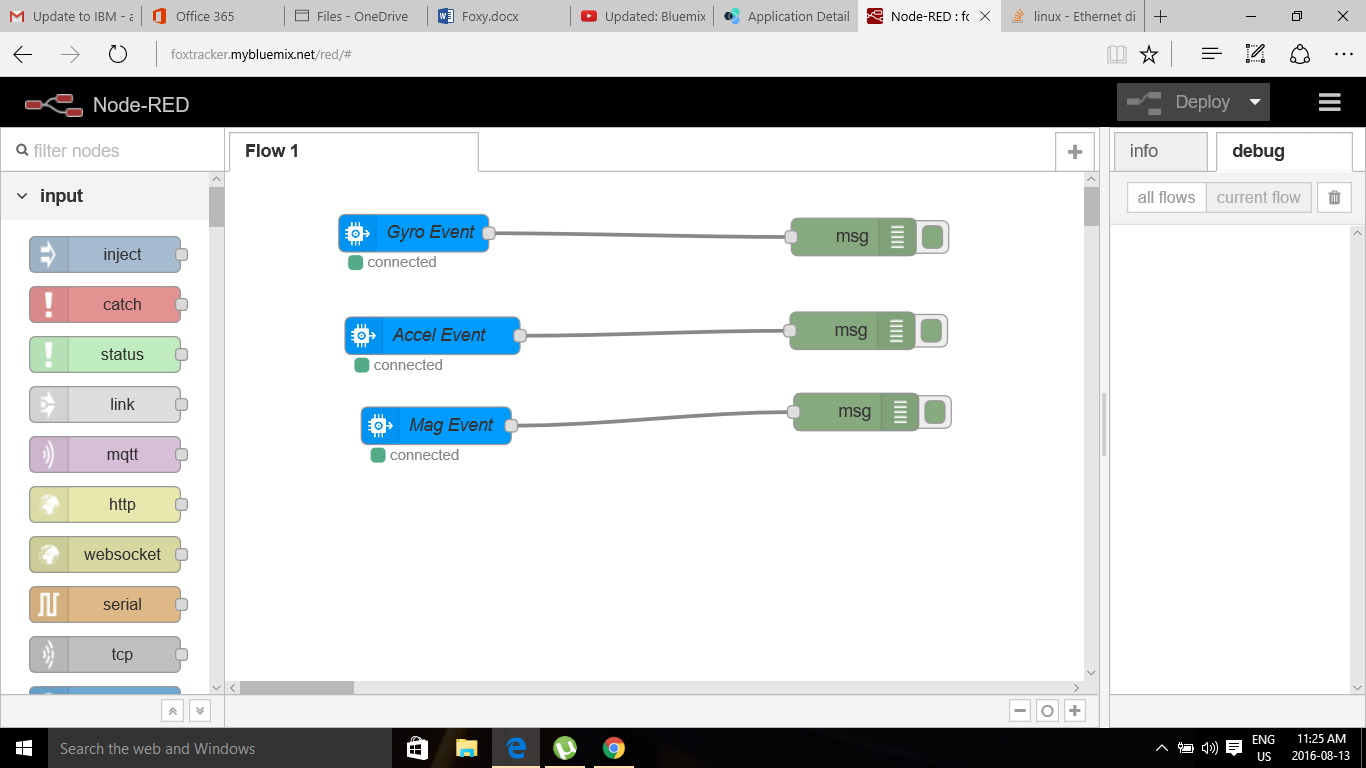
Click on view App. I also imported a node red flow from the git repository.
![]()
-
Open -Source Licenses and Permissions
07/11/2016 at 20:08 • 0 commentsOpen –Source Licenses and Permissions
PiAUIS Suite
https://tldrlegal.com/license/gnu-general-public-license-v3-(gpl-3)
You Tube Live Streaming
https://www.google.com/intl/en/policies/terms/
Alexa
https://github.com/amzn/alexa-avs-raspberry-pi/blob/master/LICENSE.txt
https://developer.amazon.com/edw/avs_agreement.html
Amazon Developer Kit
https://developer.amazon.com/appsandservices/support/legal/tou
VPN tight
http://www.tightvnc.com/licensing.php
FHEM
License: GPL (v2)
BlueMix
http://www.ibm.com/legal/us/en/?lnk=flg-tous-usen?lnk=flg
Raspberry Pi
Raspberry Pi is a trademark of the Raspberry Pi Foundation.
Raspbian and NOOBS contain Java SE Platform Products, licensed to you under the Oracle Binary Code Licence Agreement available here
-
Clouds Happen Overview
07/11/2016 at 11:17 • 0 comments -
Adding Enocean Pi to the Mix
07/10/2016 at 20:00 • 0 comments![]()
-
Revised Enocean Pi for Automation of Physical Objects
07/10/2016 at 17:15 • 0 comments![]()
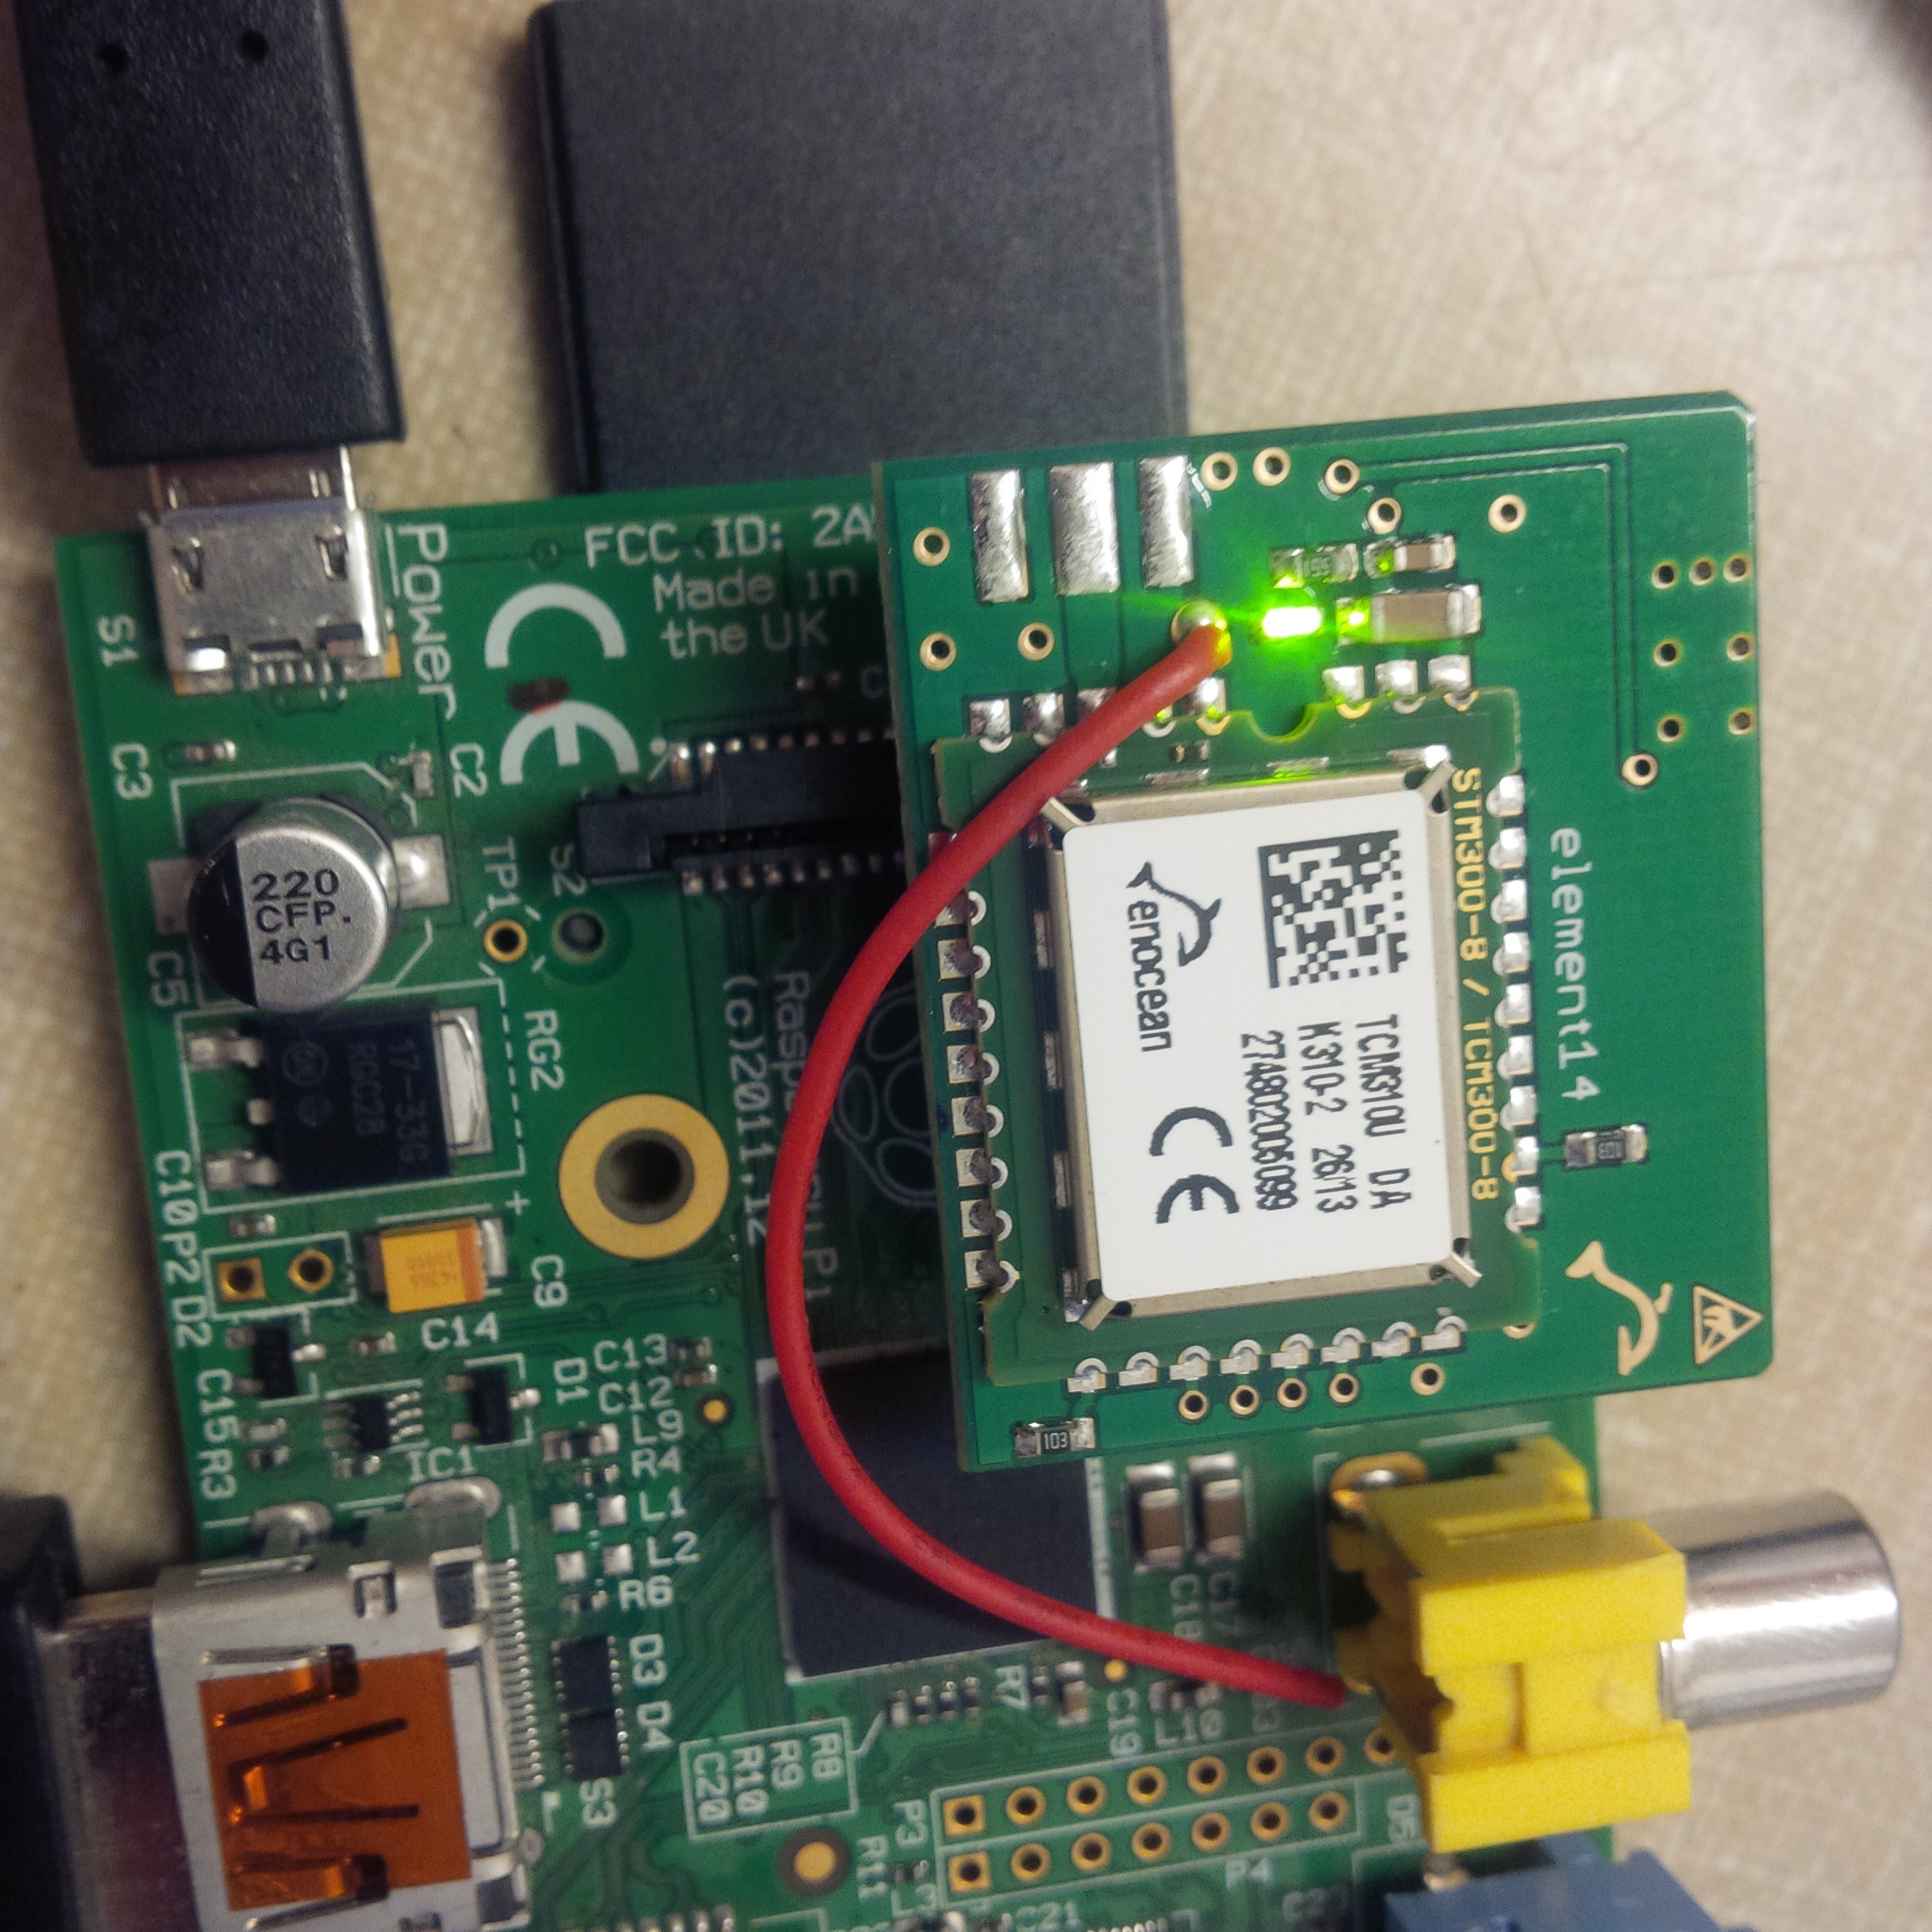
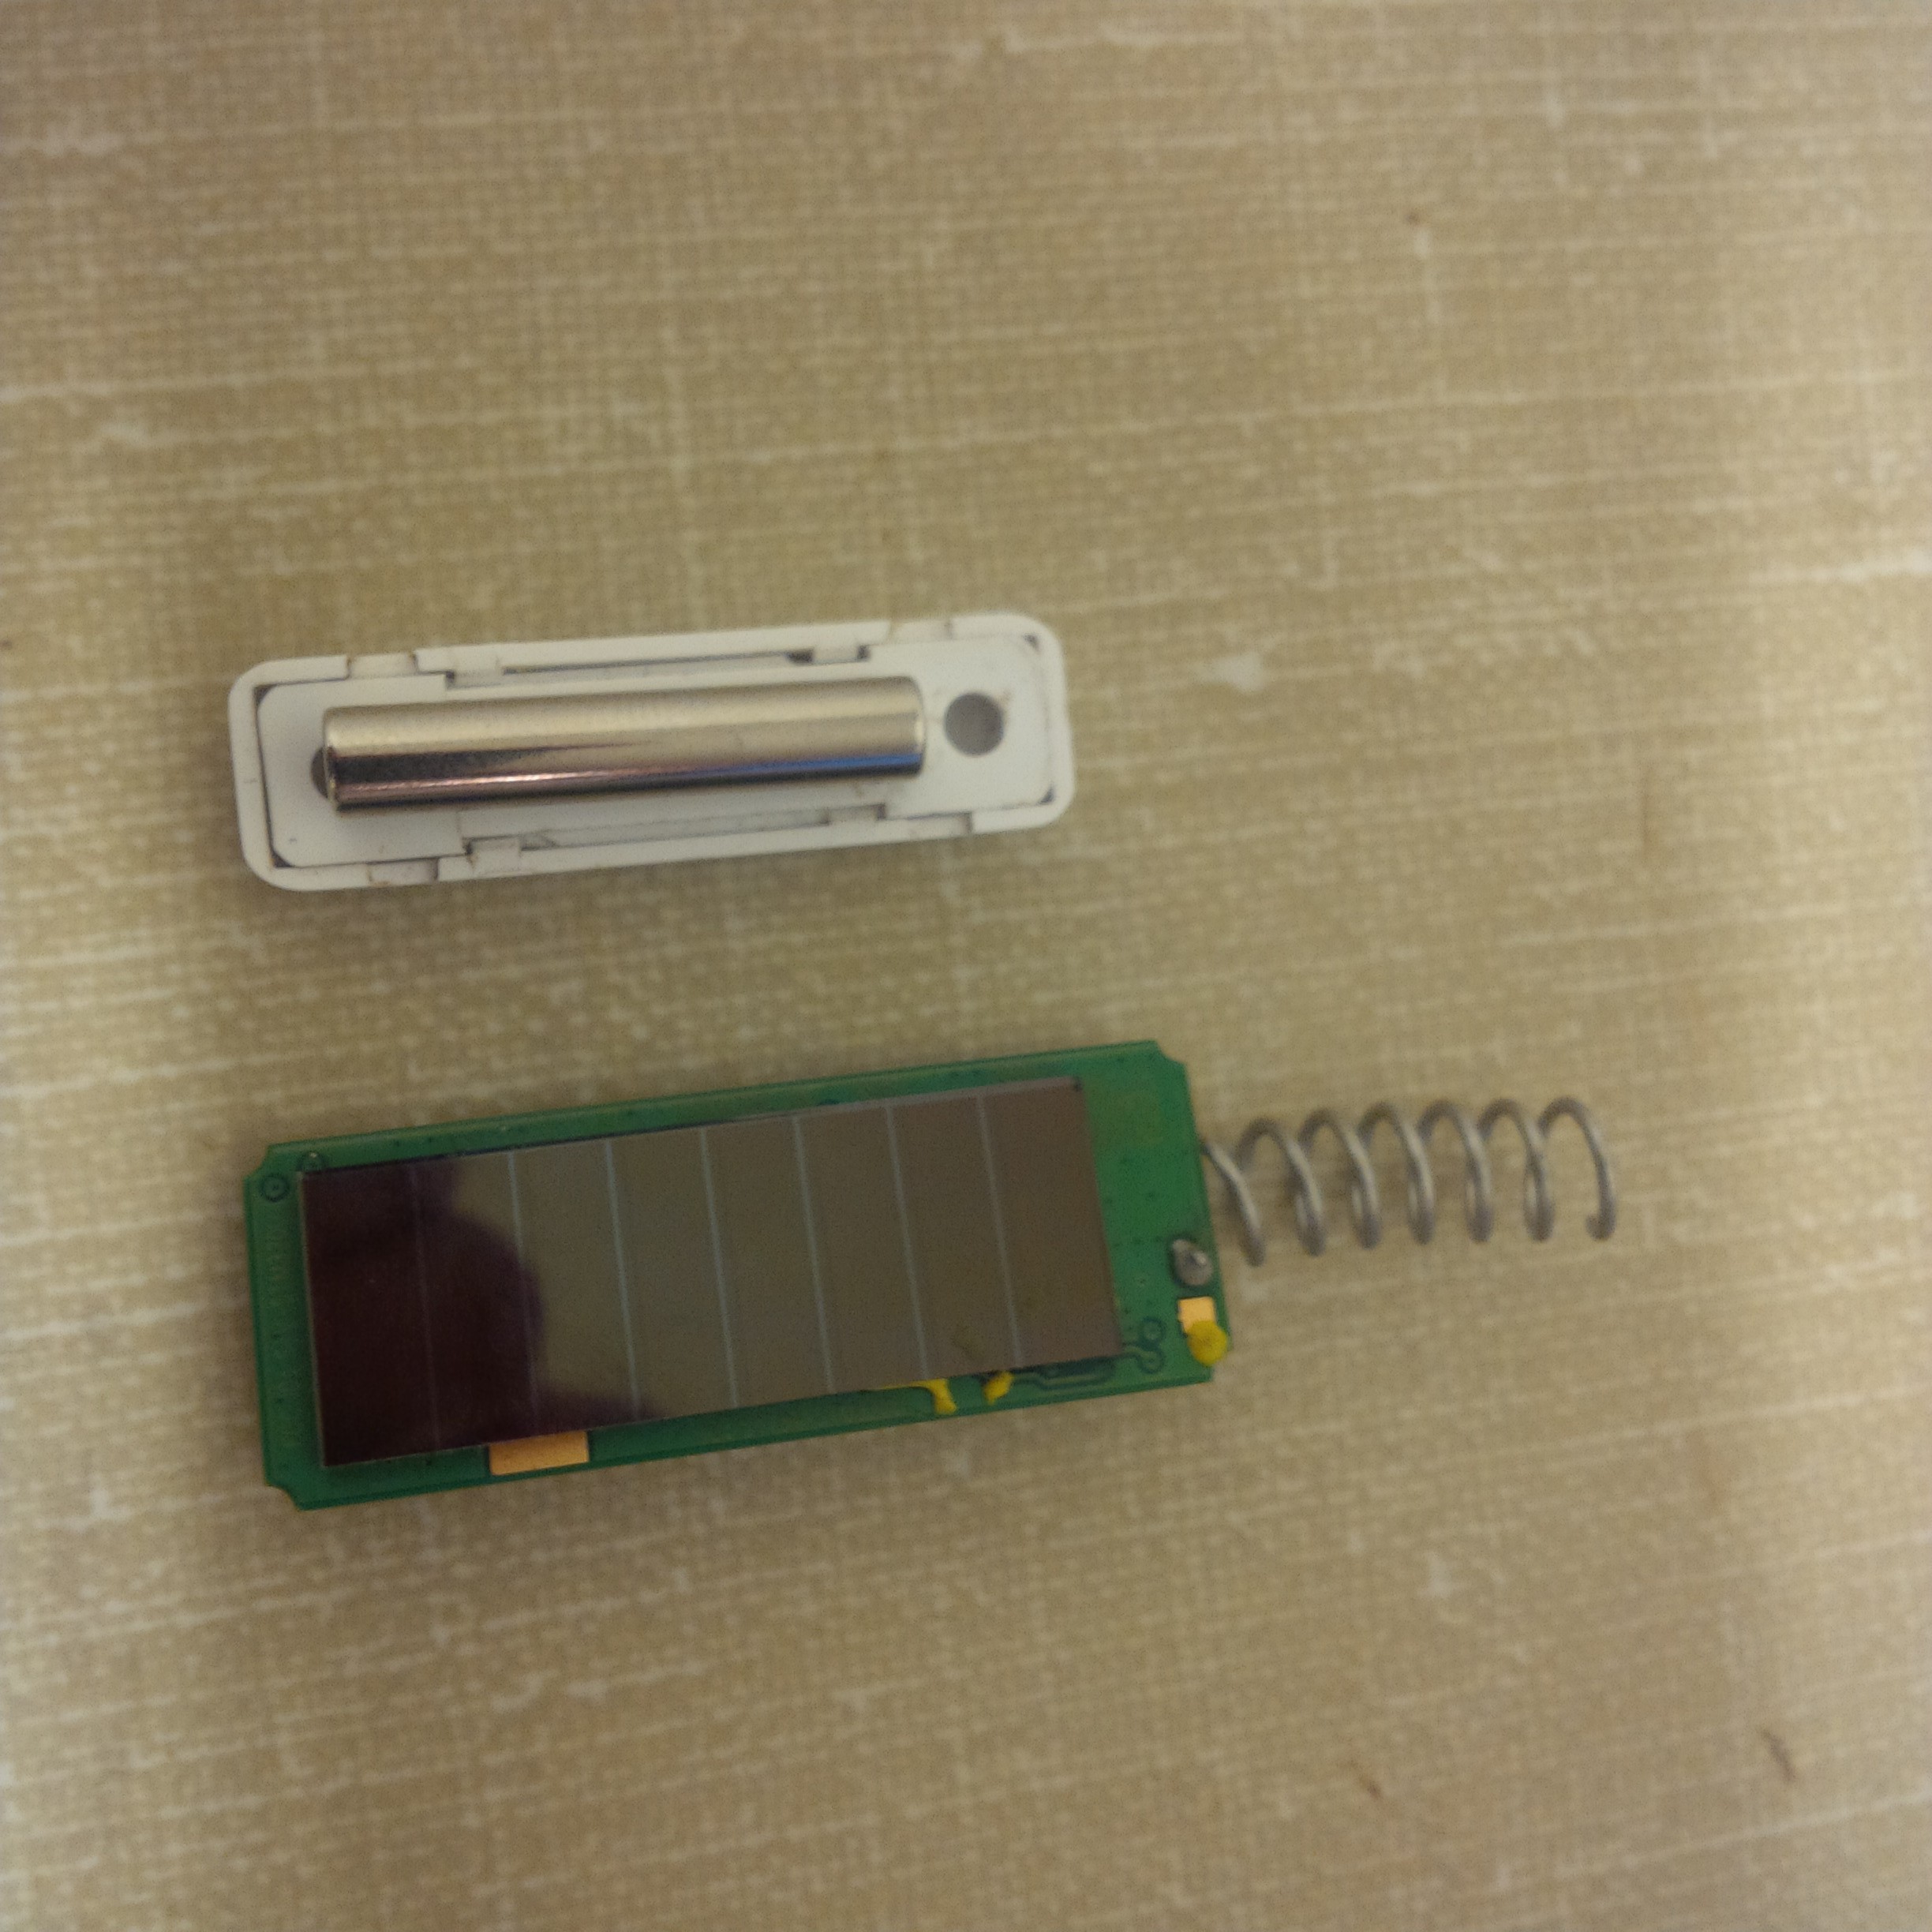
I am using Enocean Pi to sense if a door has been opened or closed. I decided to use the Raspberry Pi B and Raspbian as the operating system. I also installed FHEM for testing. Changes to Jessie seems to have altered the serial port for the Raspberry Pi. The serial port /dev/ttyAMA0 is missing in the update.
This is the third component to my project. The actuator is a reed or contact sensor. No batteries required or wiring for Enocean sensors.![]()
Installation of FHEM:sudo apt-get install perl libdevice-serialport-perl libio-socket-ssl-perl libwww-perl sudo apt-get install -f wget http://fhem.de/fhem-5.7.deb sudo dpkg –i fhem-5.7.deb
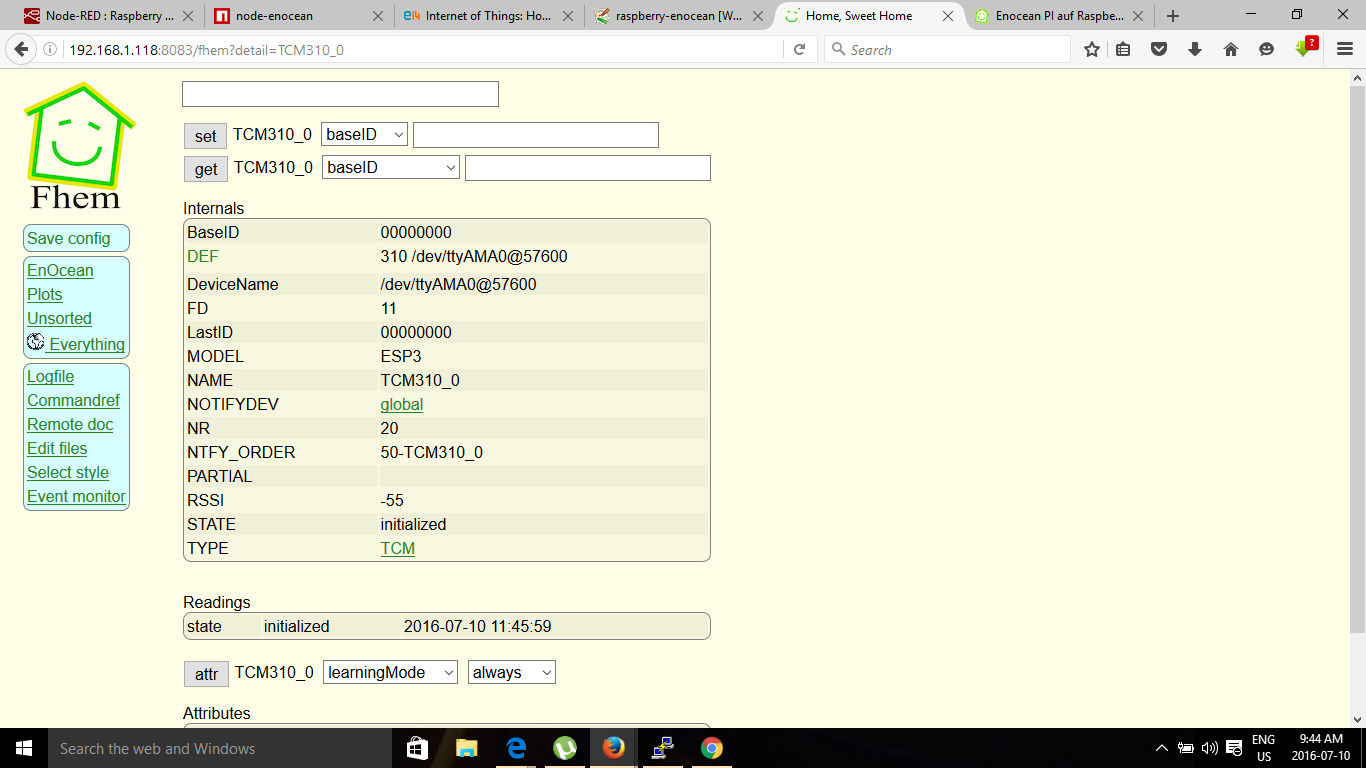
http://<RaspberryIP>:8083/fhem![]()
I clicked on the learning button on the contact sensor and now have a room called Enocean. The contact sensor is given a unique ID. When I bring the magnet close to the contact sensor and then move it away that state will change.
The idea is to provide an inexpensive way of providing alerts if a door or window has been opened. Looks like every thing is configured correctly so I install Node Red.wget http://node-arm.herokuapp.com/node_latest_armhf.deb sudo dpkg -i node_latest_armhf.deb sudo apt-get install build-essential python-rpi.gpio hash -rIf you are using Raspbian then an additional step must be taken:
sudo apt-get install gcc-4.8 g++-4.8
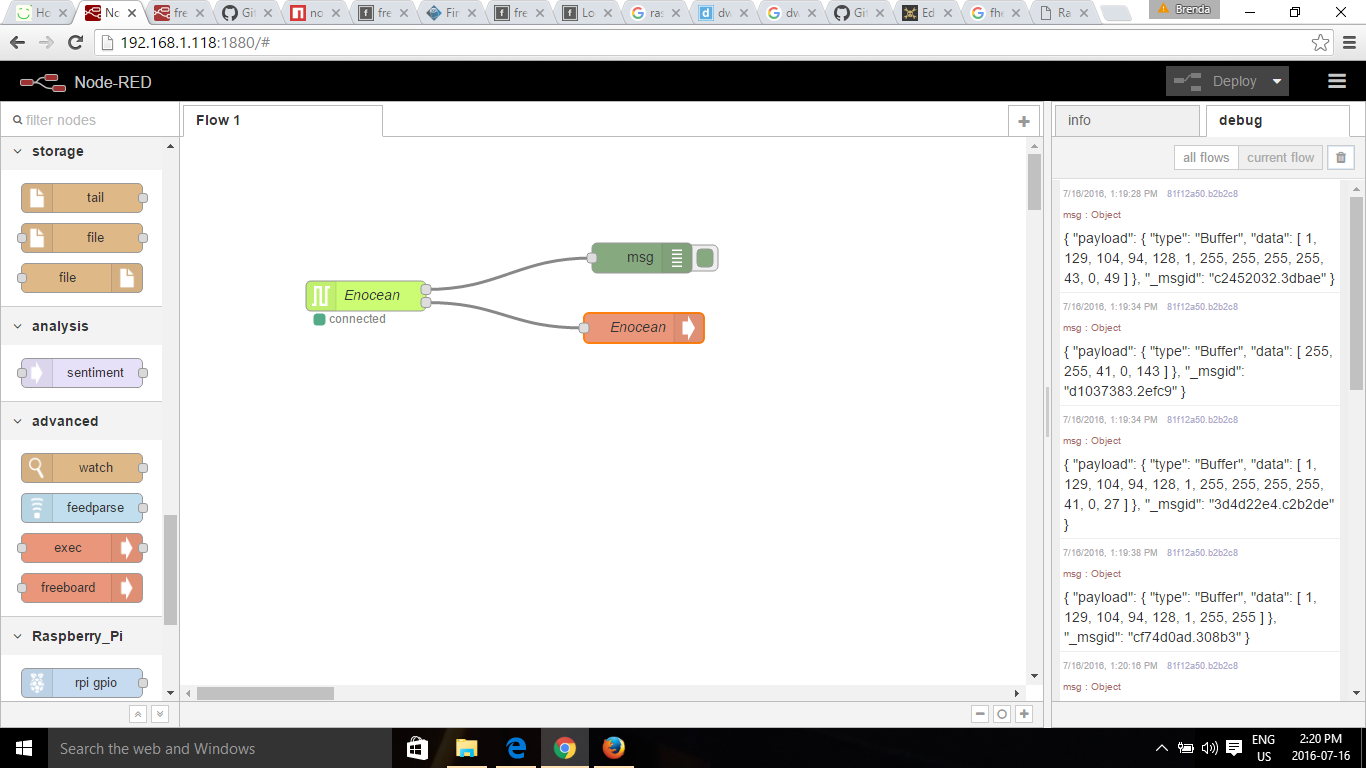
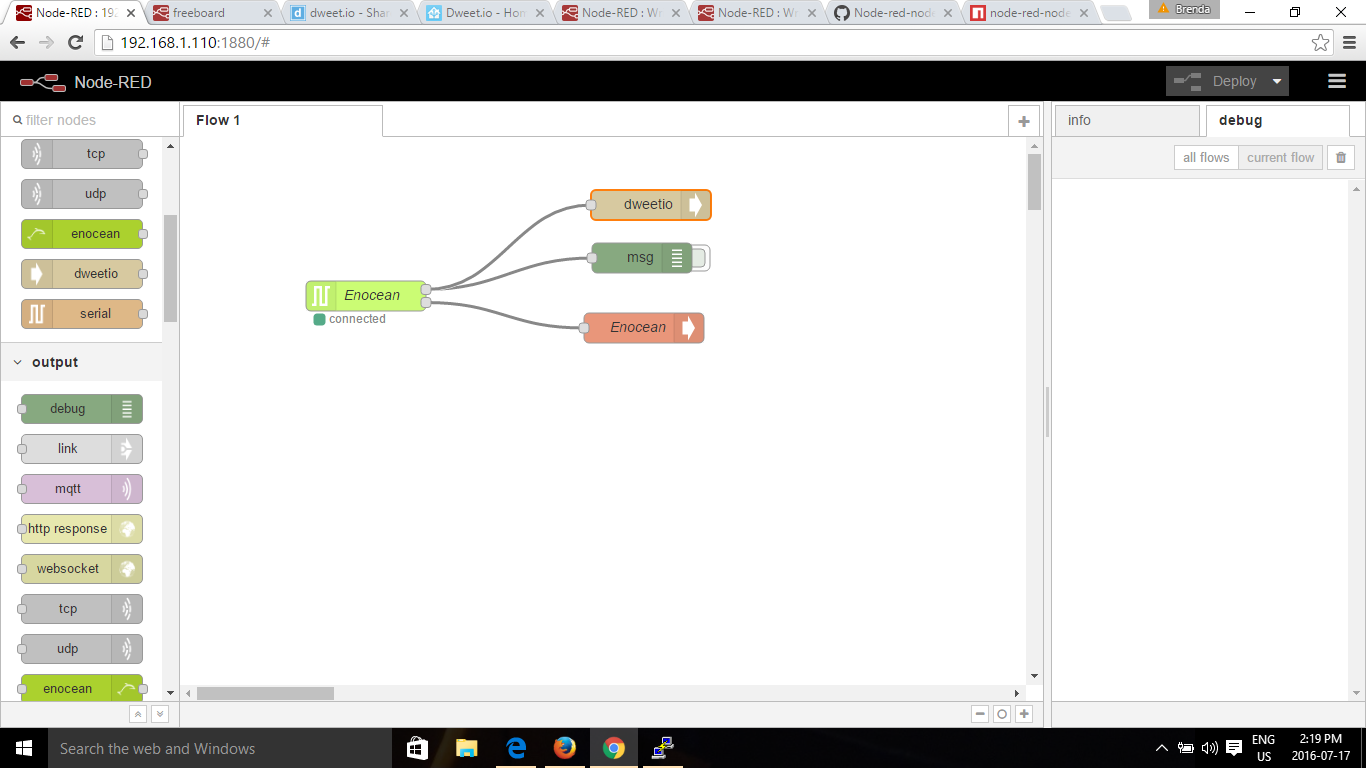
Next:sudo npm cache clean sudo npm install -g --unsafe-perm node-redI had experimented with TheThingBox and liked their Enocean node . So I installed the node and had some unexpected results.
Install Node:
npm install ttb-enoceanBut the Enocean nodes that did displayed worked !
![]()
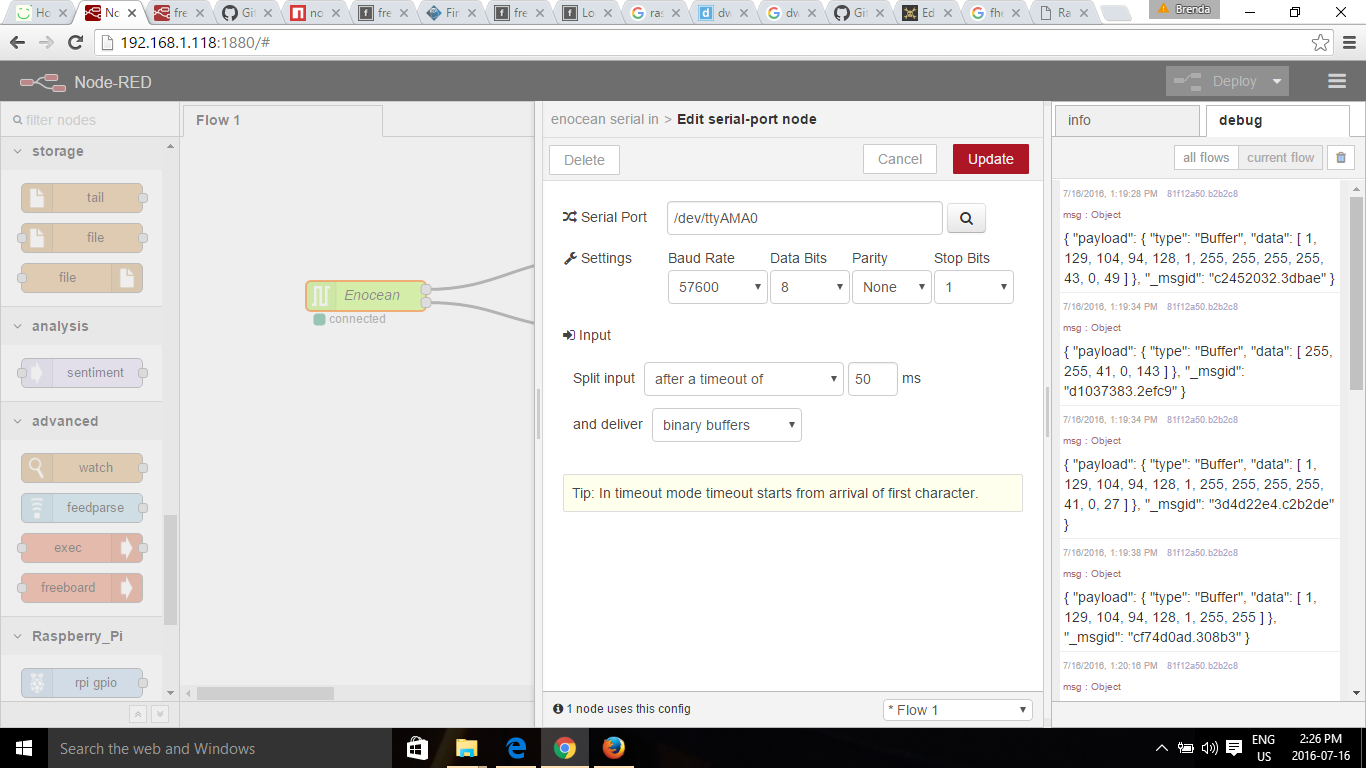
The configuration of the Enocean Node looks like this:
![]()
The payload was not what I expected. But I can work with this. I added Freeboard node to the flow:
cd ~/.node-rednpm install node-red-contrib-freeboardNow that I have a rather unexpected result in the payload . I was expecting this:// 1BS sensor telegram msg.ID // EnOcean device/chip ID
msg.state // 8 open or 0 // 9 close or 1
Next: Set Up Dashboard for Enocean Reed Sensor
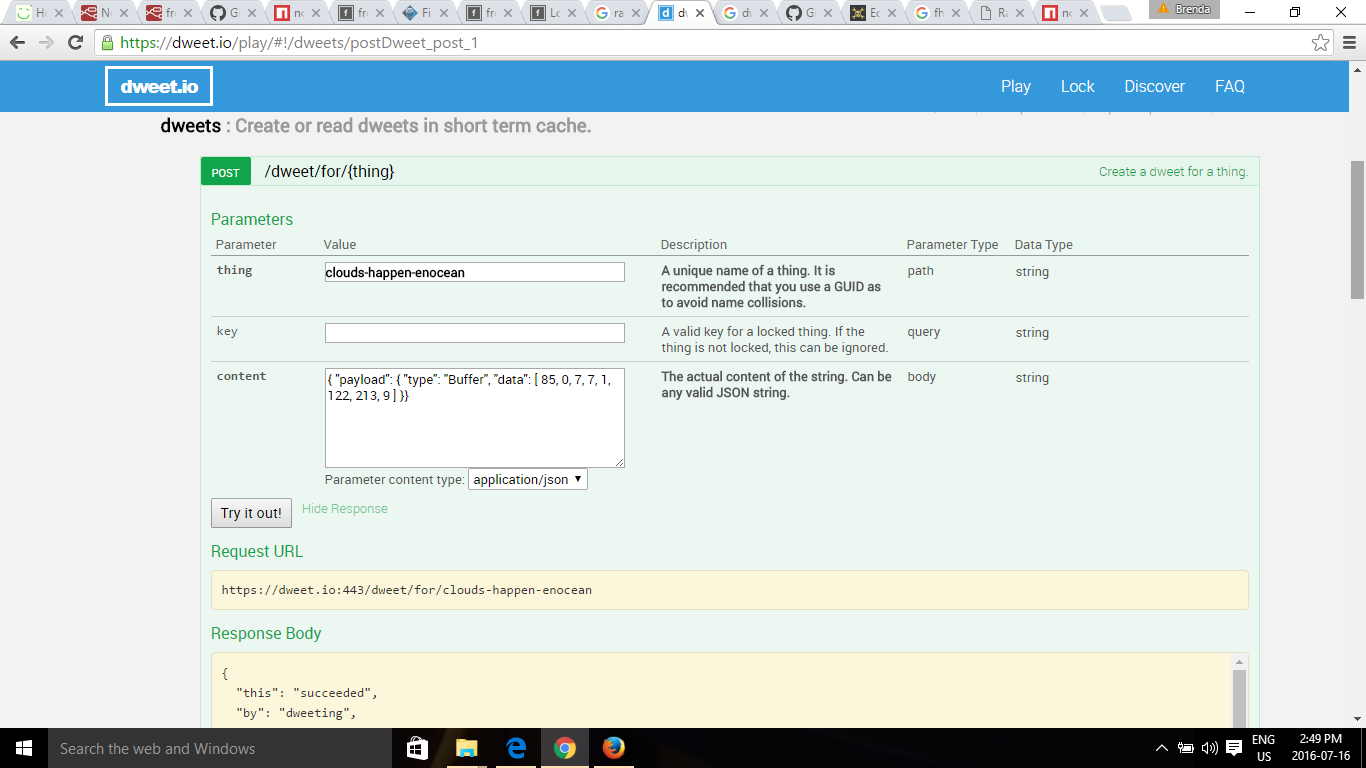
I had to set up a Dweet Thing for the contact sensor.
![]() Now back to Freeboard:
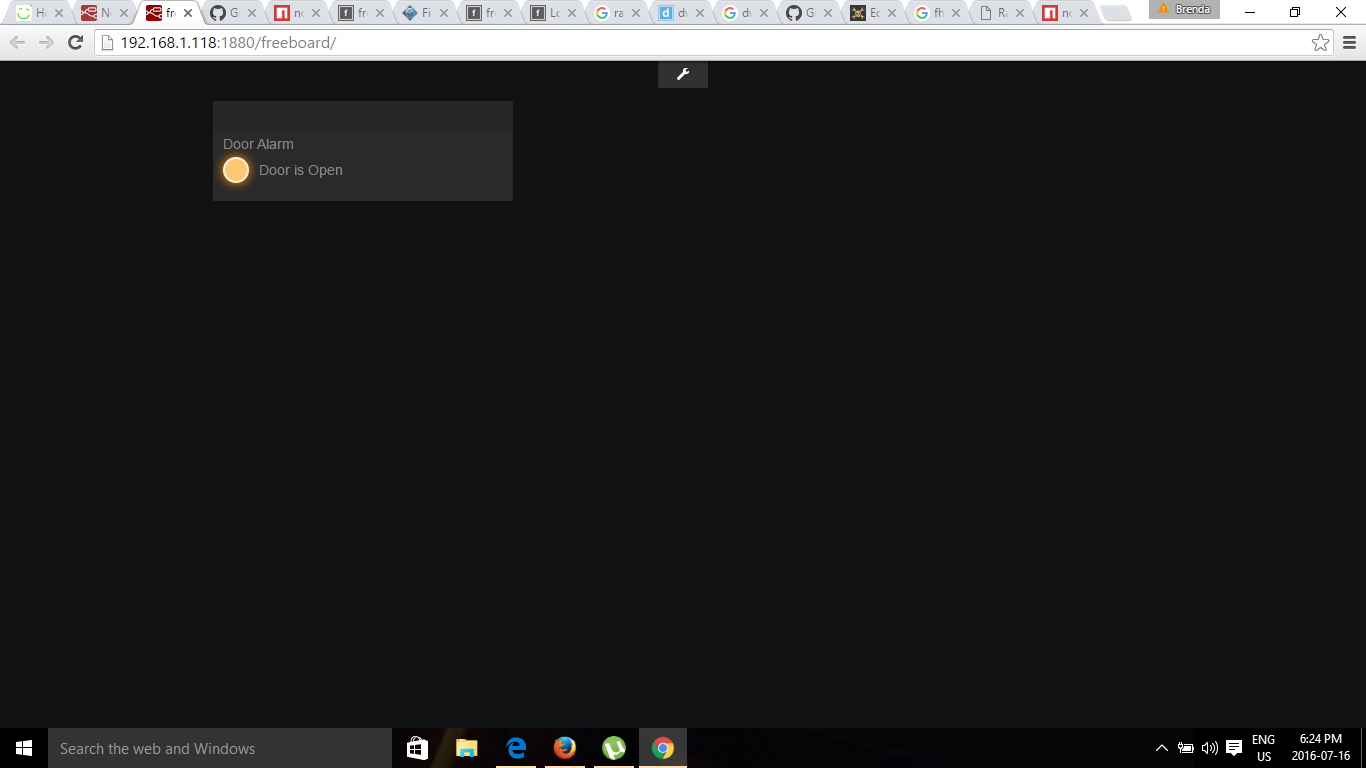
Now back to Freeboard:I added an Indicator Light to the dashboard to warn if the door is open.
![]()
Now install Dweetio Node:
cd ~/.node-rednpm install node-red-node-dweetio![]()
I noticed that the datasource for the Enocean Pi was not updating in real time. As I moved the magnet close to the sensor nothing happened. Once I started to send the msg.payload to my Dweet then it worked. The Open State means the magnet is away from the sensor so the Door is open. The Closed State means the magnet is close to the sensor so the Door is closed. Here's a short video of testing the sensor:
-
New VoiceCommand
06/28/2016 at 19:19 • 0 commentsYes I have left my previous attempt for Voice Commands behind. I installed Alexa from Amazon on the raspberry pi 2. If you want to add voice command to your project then you should try this out. There is no cost and you do not have to give out credit card info. It performs better than what I expected. Alexa is chatty but does provide detailed info from my questions. My only issue remaining is extending WIFI. Okay have another week for that.
STEP 1 VNC SERVER
Install VNC Server
VNC is a graphical desktop sharing system that will allow you to remotely control the desktop interface of your Raspberry Pi from another computer. This will come in very handy as you get rid of the external monitor connected to your Pi. Type:
sudo apt-get install tightvncserverStart VNC Server
To start VNC Server, type:
tightvncserver
You'll be asked to set a password to access the Pi. The password is maximum 8 characters,
Run VNCServer at Startup
You want to make sure the VNC Server runs automatically after the Raspberry Pi reboots, so you don’t have to manually start it each time with the command tightvncserver through SSH. To do that, type the following in the terminal:
cd /home/picd .configNote the '.' at the start of the folder name. This makes it a hidden folder that will not show up when you type 'ls'.
mkdir autostartcd autostartCreate a new configuration by typing the following command:
nano tightvnc.desktopEdit the contents of the file with the following text:
[Desktop Entry]
 Type=Application
Name=TightVNC
Exec=vncserver :1  S
tartupNotify=false
Type ctrl-X and then Y, and then press Enter to save the changes to the fThe next time you reboot, the VNC server will restart automatically.
Connecting to Raspberry Pi via VNC
I’m on a Windows 10 Laptop and now need to install a VNC client. The machine is 64 bit so I will be installing the Windows (64-bit) version.
http://www.tightvnc.com/download.php
During installation you'll be offered the choice of Typical, Custom or Complete. You only need the VNC client and not the server, so choose Custom. Then select
TightVNC Serverand chooseEntire feature will be unavailable. ClickNext. Uncheck the option about Windows Firewall and clickNextagain, thenInstall.Once the installation is complete you should find
TightVNC Viewerunder the start menu. When you run it you'll be presented with the dialog below. You will need to enter the IP address of the Raspberry Pi followed by the screen number (:0or:1). For example:192.168.0.6:1
STEP 2 : VLCClick on connect and you should see your raspberry pi desktopInstall VLC
Get VLC media player by typing:
sudo apt-get install vlc-nox vlc-dataNOTE: If you already have VLC installed, you will need to remove two conflicting libraries by running the following commands:
sudo apt-get remove --purge vlc-plugin-notifysudo rm /usr/lib/vlc/plugins/codec/libsdl_image_plugin.soUnable to fetch errors If you run into some "Unable to fetch" errors while trying to install VLC, try the following:
sudo apt-get update sudo apt-get upgrade sudo apt-get install vlc-nox vlc-dataTest that VLC is installed correctly
Type the following into the terminal:
whereis vlcThis will provide you with the installation path.
vlc: /usr/bin/vlc /usr/lib/vlc /usr/share/vlc /usr/share/man/man1/vlc.1.gz
Set the environment variables for VLC
Type the following into the terminal:
export LD_LIBRARY_PATH=/usr/lib/vlc
export VLC_PLUGIN_PATH=/usr/lib/vlc/plugins
Check if the environment variables were set successfully
echo $LD_LIBRARY_PATH> /usr/lib/vlc
echo $VLC_PLUGIN_PATH> /usr/lib/vlc/plugins
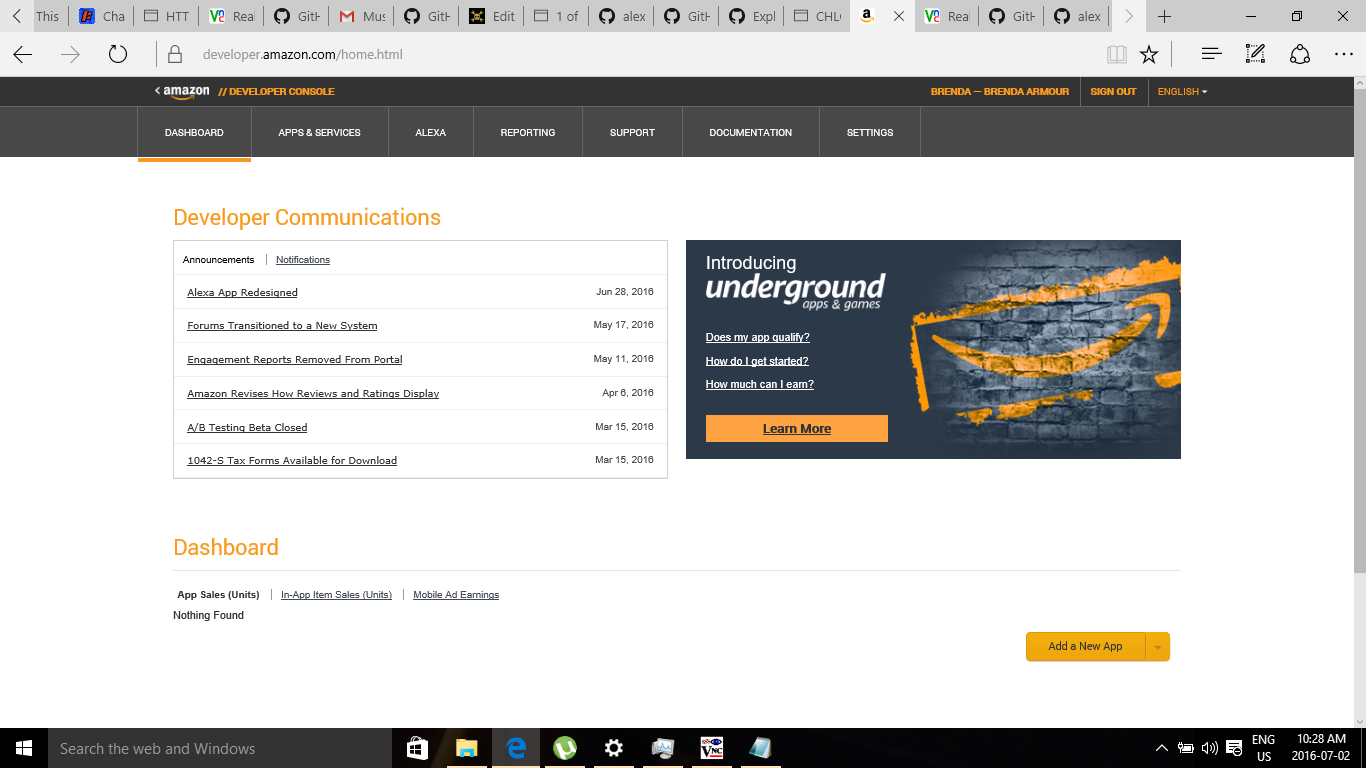
STEP 3 Apply for a free Amazon Developer Account
Get a free Amazon developer account if you do not already have one.
![]()
STEP 4: Download the sample app and dependencies on your Raspberry Pi
Download the sample app zip file from the Github repo. Please note that by downloading this package, you are agreeing to the Alexa Voice Service Agreement.
Copy and expand the .zip file on your Raspberry Pi
- Unless you downloaded the zip directly onto your Pi, copy and then expand the zip file on your Pi to/home/pi/Desktop/alexa-avs-raspberry-pi-master/. I downloaded from my laptop and moved the file using FileZilla.
Download and install Node.js
Type:
sudo apt-get update&&sudo apt-get upgradeSet up the apt-get repo source:
curl -sL https://deb.nodesource.com/setup | sudo bash -Install Node:
sudo apt-get install nodejsInstall NPMChange directories to /home/pi/Desktop/alexa-avs-raspberry-pi-master/samples/companionService
cd /home/pi/Desktop/alexa-avs-raspberry-pi-master/samples/companionServiceInstall the dependencies:
npm installInstall Java Development Kit
You need to have Java Development Kit (JDK) version 8 or higher installed on your Pi. To make things easier, we've included a script that will install the latest version of JDK on your Pi and remove older JDK versions.
cd /home/pi/Desktop/alexa-avs-raspberry-pi-master/samples/javaclientRun the installation script:
./install-java8.shYou will get a message from Oracle Java installer that you must accept the Terms of Service for Java SE Platform, press Enter. Then, press Tab, and then Enter to say “Yes” to the Terms of Service.
Verify your version of JDK
Now verify the commands with the -version option:
java -version>> java version "1.8.0_91"
>> Java(TM) SE Runtime Environment (build 1.8.0_91-b14)
>> Java HotSpot(TM) Client VM (build 25.91-b14, mixed mode)
javac -version
>> javac 1.8.0_91
Make sure your JDK and ALPN versions match
Using the File Manager on the Pi, navigate to the following directory:
/home/pi/Desktop/alexa-avs-raspberry-pi-master/samples/javaclient
In a text editor, open pom.xml and locate <alpn-boot.version>xxx</alpn-boot.version>. Confirm the ALPN version matches your JDK version using the table located at eclipse.org/jetty. If the versions match no further action is required. If the versions do not match, update the pom.xml file with the correct ALPN version and save. My version was fine.
Install Maven
Download Maven
Download the Binary tar.gz file apache-maven-3.3.9-bin.tar.gz from maven.apache.org Again I used FileZilla to upload the file to the Raspberry Pi.
Extract the contents
Goto:
cd /home/pi/DownloadsExtract the contents of the tarball to the /opt directory
sudo tar xvf apache-maven-3.3.9-bin.tar.gz -C /optTell your shell where to find maven
You’ll do this in the system profile settings so it is available to all users.
Create a new file /etc/profile.d/maven.sh, by typing the following in the terminal:
sudo touch /etc/profile.d/maven.sh
sudo nano /etc/profile.d/maven.sh
In the editor, add the following to maven.sh:
export M2_HOME=/opt/apache-maven-3.3.9
export PATH=$PATH:$M2_HOME/bin
Type ctrl-X and then Y, and then press Enter to save the changes to the file.
Log out and back into the Pi so the profile script takes effect. You can test that it is working with the following command:
mvn -version>> Apache Maven 3.3.9
STEP 5: Generate self-signed certificatesInstall SSL
Get openssl:
sudo apt-get install opensslVerify install
whereis openssl> openssl: /usr/bin/openssl /usr/share/man/man1/openssl.lssl.gz
Change directories to
cd /home/pi/Desktop/alexa-avs-raspberry-pi-master/samples/javaclientStep 2: Run the certificate generation script:
./generate.shYou will be prompted for some information:
These must be entered exactly as they appear below.
- When prompted for a product ID, enter my_device
- When prompted for a serial number (DSN), enter 123456
- When prompted for a password, press enter to leave it blank.
A private key would be generated for you.
STEP 5: Getting started with Alexa Voice ServiceRegister your product and create a security profile.
- Login to Amazon Developer Portal - developer.amazon.com
- Click on Apps & Services tab -> Alexa -> Alexa Voice Service -> Get Started
- In the Register a Product Type menu, select Device.
- Fill in and save the following values:
Device Type Info
- Device Type ID: my_device
- Display Name: My Device
- Click Next
Security Profile
- Click on the Security Profile drop down and choose “Create a new profile”
- General Tab
- Security Profile Name: Alexa Voice Service Sample App Security Profile
- Security Profile Description: Alexa Voice Service Sample App Security Profile Description
- Click Next
Client ID and Client Secret will be generated for you.
![]()
- Now click on the Web Settings Tab
- Make sure the security profile you just created is selected in the drop-down menu, then click the "Edit" button.
- Allowed Origins: Click "Add Another" and then enter https://localhost:3000 in the text field that appears.
- Allowed Return URLs: Click "Add Another" and then enter https://localhost:3000/authresponse in the text field that appears.
- Click Next
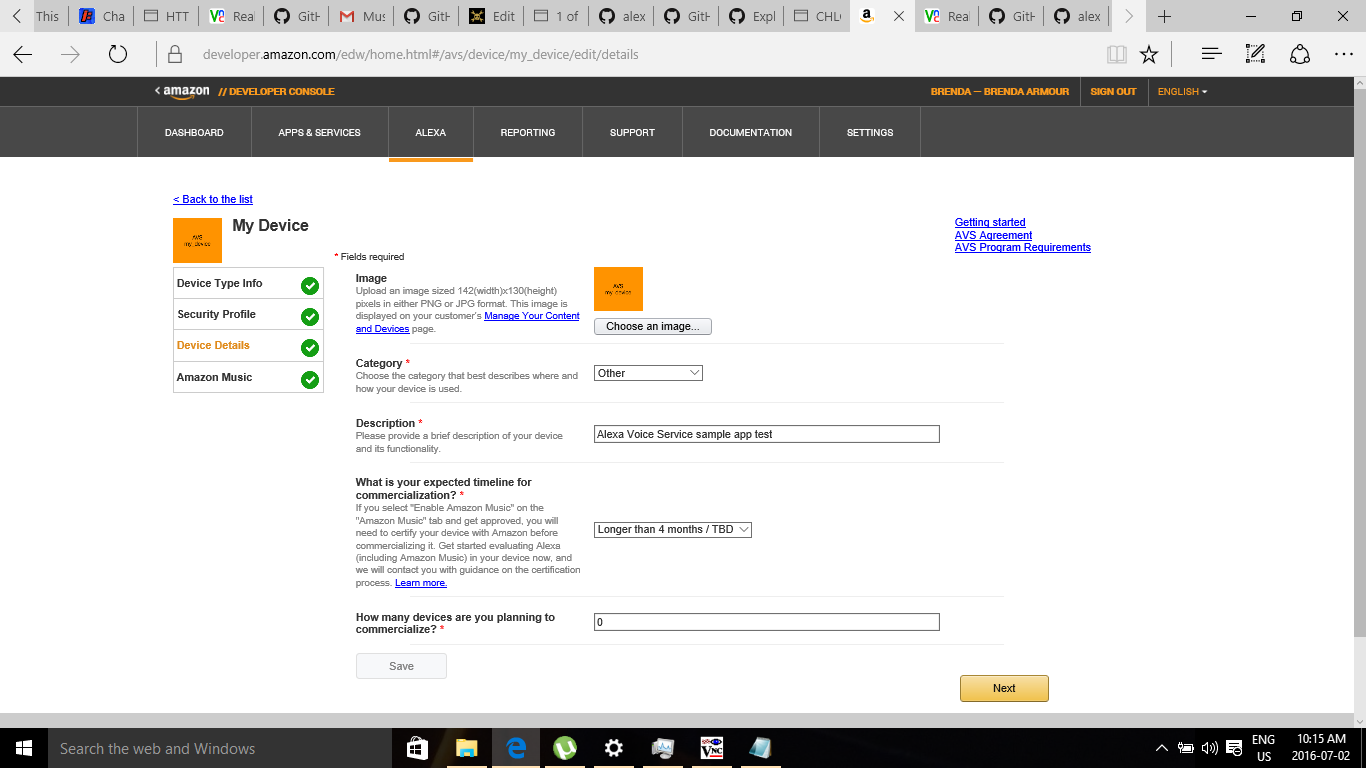
Device Details
- Image: Save the following test image to your computer, then upload it:
- Category: Other
- Description: Alexa Voice Service sample app test
- What is your expected timeline for commercialization?: Longer than 4 months / TBD
- How many devices are you planning to commercialize?: 0
- Click Next
![]()
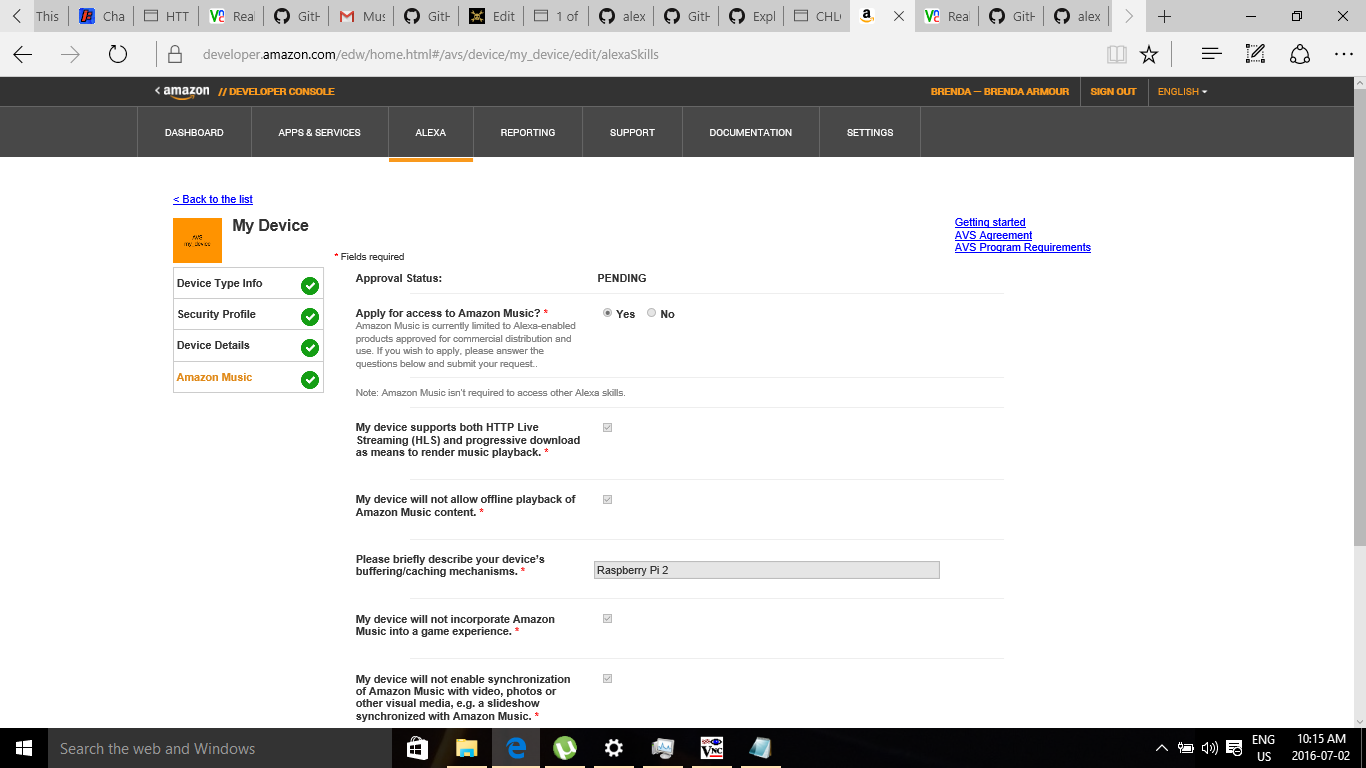
Amazon Music
- Enable Amazon Music? Yes. Because music is a significant part of the project I did apply. Status is pending.
- Click the Submit button
![]()
You are now ready to generate self-signed certificates.
STEP 6- Enable Security Profile
- Open a web browser, and visit https://developer.amazon.com/lwa/sp/overview.html.
- Near the top of the page, select the security profile you created earlier from the drop down menu and click Confirm.
- Enter a privacy policy URL beginning with http:// or https://. For this example, you can enter a fake URL such ashttp://example.com.
- [Optional] You may upload an image as well. The image will be shown on the Login with Amazon consent page to give your users context.
- Click Save.
- Next to the Alexa Voice Service Sample App Security Profile, click Show Client ID and Client Secret. This will display your client ID and client secret. Save these values. You’ll need these.
Login to the Raspberry Pi via VNC
Open config.js:
nano /home/pi/Desktop/alexa-avs-raspberry-pi-master/samples/companionService/config.js
Edit the following values:
- clientId: Paste in the client ID that you noted in the previous step as a string.
- clientSecret: Paste in the client secret that you noted in the previous step as a string.
While pasting the values, be careful to enclose them in single quotes.
Type ctrl-X and then Y, and then press Enter to save the changes to the file.
STEP 8 Run the serverIMPORTANT: This must be done via VNC, not SSH. So, make sure you’re logged into your Pi via VNC.]
Login to the Raspberry Pi via VNC
In your terminal window, type:
cd /home/pi/Desktop/alexa-avs-raspberry-pi-master/samples/companionService
npm start
The server is now running on port 3000 and you are ready to start the client.
STEP 9 Start the clientIMPORTANT: This must be done via VNC, not SSH. So, make sure you’re logged into your Pi via VNC
Open a new terminal window/tab (SHIFT+CTRL+T in Raspbian) and navigate to:
cd /home/pi/Desktop/alexa-avs-raspberry-pi-master/samples/javaclientBuild the app
Download dependencies and build the app by typing:
mvn installWhen the installation is completed, you will see a “Build Success” message in the terminal.
Run the client app:
You are now ready to run the client app by typing:
mvn exec:execObtain Authorization from Login with Amazon- When you run the client, a window should pop up with a message that says something similar to:
Please register your device by visiting the following website on any system and following the instructions: https://localhost:3000/provision/d340f629bd685deeff28a917 Hit OK once completed.
DO NOT CLOSE THIS WINDOW YET
Copy the URL from the popup window and paste it into a web browser. In this example, the URL to copy and paste is https://localhost:3000/provision/d340f629bd685deeff28a917.
NOTE: Due to the use of a self-signed certificate, you will see a warning about an insecure website. This is expected. It is safe to ignore the warnings during testing.
- You'll be taken to a Login with Amazon web page. Enter your Amazon credentials.
- You'll be taken to a Dev Authorization page, confirming that you’d like your device to access the Security Profile created earlier.
Click Okay.
- You will now be redirected to a URL beginning with https://localhost:3000/authresponse followed by a query string. The body of the web page will say device tokens ready.
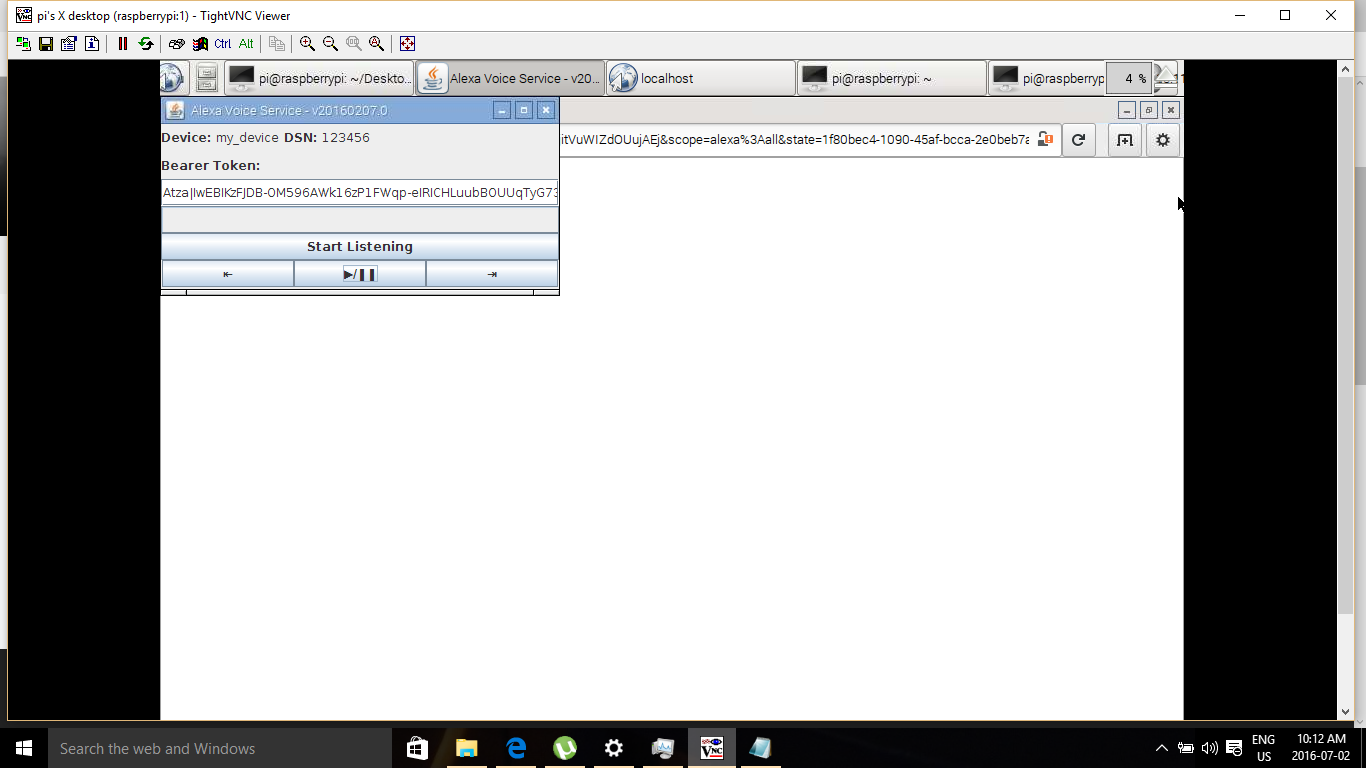
- Return to the Java application and click the OK button. The client is now ready to accept Alexa requests.
- Click the Start Listening button and wait for the audio cue before beginning to speak. It may take a second or two before you hear the audio cue.
Press the Stop Listening button when you are done speaking.
![]()
-
Adding Video and Indicator Lights to Dashboard
06/27/2016 at 17:23 • 0 commentsI spent Sunday improving the Dashboard. I was still interested in streaming live from You Tube. I also wanted to test everything out. So the test subject was me in a motel room with no air conditioning. Its hot and humid and very uncomfortable. I found out that yes you can live stream from the Raspberry Pi camera and after some tweeking had a nice green healthy stream. Below is my live stream from my room. Not too much happening !
You cannot live stream ddirectly from the FreeBoard pane but you can capture the video from your live stream.
-
Clouds Happen PiAUISuite for Music Part 1
06/21/2016 at 17:40 • 0 commentsMy Dashboard is almost ready. I decided to add voice controlled music based on this study:
http://mentalfloss.com/article/70539/7-scientific-studies-about-how-animals-react-music
This contains a summary and links to 7 studies on how music can impact the lives of animals. Music can reduce agitation, promote sleep, and improve mood, and lower stress and anxiety. Dogs prefer classical over heavy metal. Apparently cats are more pick and there has been research on music that appeals to them. You can hear a sample at this link.
Cows enjoy calm music—like R.E.M.'s "Everybody Hurts," Simon & Garfunkel's "Bridge Over Troubled Water," and Beethoven's "Pastoral Symphony”
So I will be expanding on this before the end of the contest. The best Voice Command software was PiAUISuite that was developed in 2013. I watch the video and knew this is what I wanted. But with changes since the first build, it was a challenge to get this running on the Raspberry Pi. After reading countless forums I found the following steps worked. After I post this, I will reproduce the setup on a different SD card for a final test.
![]()
Step 1: Setting up and testing the Microphone:
I have budget constraints and chose the low cost Logitech c170 webcam with a microphone included. I paid $22 CND for it and it works like a charm. When I first tested this with aplay I received just static noise. So I had to configure my microphone for the raspberry pi. First you need to load the drivers.
sudo modprobe snd_bcm2835sudo nano /etc/modprobe.d/alsa-base.congoptions snd-usb-audio index=1To save it you need to CTL+X. If the module is blank just add the code, Same for the next step.
Then:
sudo nano /etc/asound.confpcm.!default { type plug slave { pcm "hw:1,0" } } ctl.!default { type hw card 1 }sudo rebootTo save it you need to CTL+X before you reboot.
Run this command and say something:
arecord -D plughw:1,0 -f cd test.wavPlay it back
aplay test.wavOkay so I received my recording back..”testing 123” and know my mic is working.
As a side note – I’m pushing the sound to my RCA TV using HDMI connection to the Pi. I had to run a few commands:
sudo nano /boot/config.txtUncomment the line by deleting #
hdmi_drive=2Step 2: Install Dependencies
sudo apt-get install -y libboost-dev libboost-regex-dev youtube-dl axel curl xterm libcurl4-gnutls-dev mpg123 flac soxStep 3 Install PiAUISuite:
git clone https://github.com/StevenHickson/PiAUISuite.git

cd PiAUISuite/Install

./InstallAUISuite.sh
During the install a number of questions will be asked for the commands.conf file. General consensus instructs us to say yes to all the questions. To get this all to work I did a manual rather than an automatic setup for VoiceCommand so said no. .My threshold was different than the default. An once I had the correct threshold I could see the recording as mono and signed. I'll post my .commands.conf file in the log.
Step 4: Replace the tts file:
We have to replace the tts (Text to Speech) with this: The file is in the VoiceCommand folder.
#!/bin/bash


#since google ended TTS, this script
replaces tts with pico2wave.


if [ $# -lt 1 ]


then               #an argument was not entered -
pico2wave needs something to say


/usr/bin/pico2wave -w /tmp/tempsound.wav "I have nothing to
say."


/usr/bin/aplay -q
/tmp/tempsound.wav


rm /tmp/tempsound.wav


exit 0


fi


speech=$@


/usr/bin/pico2wave -w
/tmp/tempsound.wav "$speech"


/usr/bin/aplay -q  /tmp/tempsound.wav


rm /tmp/tempsound.wav


#!/bin/bash


#since google ended TTS, this
wrapper-script replaces tts with pico2wave.


#version 0.2 -now rudimentarily handles
language -l param.


if [ $# -lt 1 ]


then                  #no argument entered - i need
something to say


/usr/bin/pico2wave -w /tmp/tempsound.wav "I have nothing to
say."


/usr/bin/aplay -q /tmp/tempsound.wav


rm /tmp/tempsound.wav


exit 0


fi


if [ "$1" = "-l"
]    #-l in event where user explicitly
defines language.


then                   # Note: always assumes $2 is
'en' or a valid language option.


lang=$2


if [ $lang = "en" ]
#TODO: cant find the real source of en, but if


then                      # i see
'en' I'm hard coding  en-US.


lang="en-US"       #US
English, mofo, do you speak it


fi


shift 2


speech=$@


/usr/bin/pico2wave -l $lang -w /tmp/tempsound.wav "$speech"


/usr/bin/aplay -q /tmp/tempsound.wav


rm /tmp/tempsound.wav


exit 0


else                  #else lets go straight to
speech-output


speech=$@


/usr/bin/pico2wave -w /tmp/tempsound.wav "$speech"


/usr/bin/aplay -q /tmp/tempsound.wav


rm /tmp/tempsound.wav


fi
Step 4: Modify two Lines
Update PiAUISuite/VoiceCommand/speech-recog.sh old line -f cd -t wav with -f S16_LE –d
Change this line - > arecord -D $hardware -f cd -t wav -d
And:
update PiAUISuite/VoiceCommand/voicecommand.cpp function GetVolume(string RecordHW,...) Again, look for -f cd -t wav with -f S16_LE –d7
Change this line -> run += " -f cd -t wav -d ";
Step 5: You may have to install an older version of g++
sudo apt-get install g++-4.8
makeThis is important to run this command. It compiles the changes and it required to make this work.
go to install folder and
sudo ./InstallAUISuite.shStep 5: Install Pico2Wave
sudo apt-get install libttspico-utilspico2wave -w lookdave.wav "Look Dave, I can see you're really upset about this." && aplay lookdave.wavStep 6: Test tts by running this script at the command line.
tts hello Brenda. What a fine day.More to come. Below is a test run:
Clouds Happen
This is a versatile system of hardware and software to evaluate outside weather conditions vs inside weather conditions.