Xasin
Xasin-
Next hardware rev. underway!
09/02/2019 at 19:54 • 0 commentsAlright!
Seems that now that I am out of the confines of my last project (who made DShot and drone ESCs so damn uncooperative :S), things have been moving very smoothly!As of today, I've already ordered enough components for 4 whole Lasertag sets off of DigiKey, with the PCBs following shortly, courtesy of Aisler.
If you want your own, you can find them right here:
https://aisler.net/Xasin/xasworks-lzrtagpcb/mainboard-esp32The whole thing has turned out a little more pricey than expected, with about 50€ worth of hardware per set, but this does include all sensors, batteries, speakers, etc., so it is a price I can accept!
Anyhow, enough talking, let's have a few pictures rolling in~
This side has been put chock full of any SMD, QFN and LGA components, making for easy hot air soldering, if you got it! Here we have all the beefy components - ESP, 1A 3.3V regulator, FT231 UART Bridge, etc. - get out your big soldering iron! The new board is a thing of beauty - and not just because the first revision was pretty nice~
It features a self-programming setup instead of RST and GPIO0 push buttons (which turned out to be pretty annoying to use), a much bigger regulator than the previous version, as well as a thicker supply capacitor near the ESP32 to prevent WiFi Brownout at higher power.
We also have the MAX audio amp on-board now (though soldering a breakout board on is easy), a LSM6DS3 IMU to play hot potato with your device or detect crashes, and a beautiful new navigation switch to change your weapon selection mid-game. That's right, you can have your SMG AND a pistol!
Or ... Well, whatever.There's also a little more protection like resistors to the external cable and a 3.3V ESD diode to make these boards tough as nails, and let's hope the new battery charge IC does not blow up like the previous ones did :S
Also, fun little side-note:
The ESP32's GPIO pins are now 100% maxed out!
Buuut I bet you can squeeze in more pins if you're smart enough ... Somehow <.<
For now we don't need any of that - and if we do, we use a I2C expander :P -
Next revision incoming!
08/28/2019 at 09:38 • 0 commentsWhew... It's been a while, hasn't it!
Don't worry, I never left this project alone - but taking breaks and getting a bit of variation in is healthy and fun, and I got to say, it was great working on the DSKorder and a small Hovercraft and stuff.
However, I've been idly collecting ideas, changes and improvements that I've been wanting to implement, and more importantly: I want to document the entire process, from soldering the hardware to setting up the Webserver.
It would be good practice for me, and helpful for anyone wanting to take inspiration or make their own sets.
So, what's planned for Revision 3.2:
There's a lot for sure, and I'll be chewing down on things over the next few months. In summary:
- The hardware will be polished. A few better support caps, charger IC, you name it. The MAX chip and a new I2C 6DOF gyro will now also be put on the board, and I'll optimize it for hot air flow resoldering~
- I'll also run a first larger batch of soldering. I intend to get at least four boards fully functional, which will finally allow me to try out proper games with friends!
- The software will get multiple new features! After cleaning up the current code and adding the IMU, I'm planning to rework the light control system to make custom light patterns easier to add. There's also going to be a new button to switch weapons on the fly, and a Filesystem based sound and weapon handler. This will give the server a lot more control by being able to upload new weapons on the fly, so... Wheee~
- The MQTT interface will be changed slightly, mainly to remove some load from the Lasertag sets themselves. Nothing major here ^^
- Speaking of the server, that thing will be polished a bit more too. After giving the Ruby backend a few small extra features to handle games smoother, I intend to add a SQL database to log events. That way, it's a bit easier to see what happened during a game, print statistics, that sort of stuff~
- Once all of this stuff is running smoothly, we'll get a Web interface! I've been playing with React, which is a fantastic backend for this sort of work. If everything goes well there will be a Player HUD, a big game statistics page to put on a screen or projector, and a game configuration window to mix and match game modules on the fly, set player teams, etc. This is definitely the most ambitious part, but it I get it right, it'll put this project into a truly professional grade of Lasertag system.
I'm really looking forward to this work, especially since I'll make sure it's well documented and reproducible for any guys here.
I'll also post updates on hardware and software here, so you can review it. The more eyes the better, since we all make small mistakes ^^'
-
Lack of documentation, or "Always expect people to buy it"
07/13/2019 at 09:53 • 0 commentsThere's an important lesson for everyone here at the bottom, please give it a read!
This morning I was greeted by a lovely message from Aisler, telling me that my project had been bought by a couple of people!
That isn't fully unexpected, as I was told a FabLab was working on implementing my Lasertag Project as a small workshop course, but it still comes with a problem:The PCBs uploaded to Aisler are faulty
No, it's not a major problem, or something that requires the people that did buy them to throw them away.
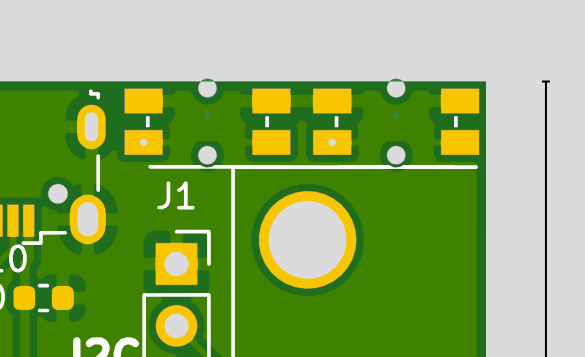
The problem is the following: In the top right corner of the front of the PCB, a trace coming from the RESET and GPIO0 buttons is shorted against the ground pad.
The good news is that it is easy to cut with a scalpel, and the rest of the PCB is functional - so for those that did already buy the PCB, don't worry, it will still work!!The bottom pads of the buttons, where you can also see the vias, are the "output" pins. They should not be connected to ground, but they are. Cutting them with a scalpel will resolve the issue, and you can not damage anything by accidentally leaving the fault in. If the ESP32 does not boot up, but 3.3V is present, this is likely the problem.
Other things worthy of note to get it running:
- You will need a set of 0603 resistors and capacitors to solder up the set. I did not include them in the Aisler parts list, because those are components I always have on hand from a lot of other projects myself.
- You will need PMBT2222A (or similar BEC SOT-23) transistors for the IR LED and vibration motor (I always keep those on hand as well, they're fantastic little BJT transistors <3)
- You will need a 480mAh LiPo battery, preferrably with built-in protection. For germans, I can highly recommend eckstein-shop.de for those
- You will need an Antenna for the ESP32, preferrably a PCB antenna with sticky backside to mount in the casing.
- For the external vest detector piece, you will need 40kHz VISHAY IR Receivers, as well as a bunch of WS2812 LEDs to chain together. Oh, and a D-SUB cable, the ribbon cable mounted ones are great!
- You'll also need a I2S Amplifier chip. The MAX98357a is perfect for the job!
My lesson: Always be vocal about the state of the project
I feel a bit bad for the people that bought the PCBs and now have to go through the process of reworking them.
If I had been a bit more vocal about the state of the project, i.e. mentioning that the PCB needs reworking, the Aisler parts list isn't fully complete, then maybe people would have waited a bit longer, or would have been more prepared to deal with these issues.The way I made it seem was that the project was fairly easy to build, and ... That's my mistake.
However, this should also be a lesson to anyone trying to buy or build projects here on HackADay:
Nothing will be perfect. Mostly, we're all just a bunch of nerds having fun with these things - or at the very least, I know I am!There will be undocumented flaws, incomplete parts lists, or other little quirks in the process that the person building them dealt with and ... Never really wrote down, because it didn't seem like a big deal.
As a maker, the best we can do is to put a huge "WORK IN PROGRESS" above the things that aren't quite ready yet.
And as the person trying to build it, we should always make sure the project is replicable: Please, ask about the status of PCB etc.
If the maker says "The PCB needs a bit of rework", then that means it's not ready yet.Continue if you wish, but at your own risk to deal with all those little quirks the Maker left in.
-
Ready player one!
05/03/2019 at 16:27 • 0 commentsBoy, it's been a long time since my last project update, hasn't it?
A good number of things came up, including but not limited to the DSKorder project (who's also getting a project log soon <.<), university exams, holiday ... A good bunch of stuff.But, there's one really important thing to note:
The System is now fully functional!
---------- more ----------Yes, I mean "fully" fully. Not a "I can connect" fully. Not a "I can make it blink on command" fully.
After spending a good bit of time to polish up the code features and make it compatible with my old ESP2866 boards, the new set now does everything the old ones did, but better, while still playing nicely with the code I already have, including the phone app!I've also gone ahead and improved a few things:
- I added proper "Game start" or "Kill score" etc. sounds, instead of just playing a small linear note ramp.
- I added the option of selecting from various gun profiles. Wanna have a quick, three-shot handgun, while your friend goes for a slow but deadly sniper rifle? Absolutely do that!
- A few internal things were changed to make the system more flexible in the long run, like support for grenades in the IR signal.
- The 3D printed casing has also gone through a new revision, to add a proper speaker holder and Multi-Material printed side-plates. It's extra fancy now :>
Also, for those that are extra sneaky you can see the new PCB antenna in the top of the core case! That green just shines through so much nicer than with paper diffusion, and the two pieces come together near seamlessly <3 In other news, the IR LED of the Revision 3 hardware has been installed and tested. Range is as good as before, and I love the precision. You can hit a select person with a bit of aiming, but it's forgiving enough to not require 100% accurate hits on the sensor - wonderful!
Up next
Will probably have to be a slight redesign of the hardware of the system. I'll definitely be ditching the analog Audio Amp I wanted to use in the first place, and directly integrate the MAX audio chip. I might add a third NeoPixel to the casing itself for a bit more fancy, but that's optional ...
But to be quite frank, this thing already does everything it should, so once I get to my next lecture free time I might throw out a few euros, get a bunch of revised boards from LCSC, and build a playable amount of sets!
-
Putting a proper case on things!
03/04/2019 at 20:34 • 0 commentsWhew, it's ... Been a month already?
Oh boy, I better update you guys. I don't want people starting a mutany D:In any case, progress has been going steadily and nicely! The last month did have a rather tough exam phase in it that kept my productive hours at bay, but I was able to tweak a number of systems!
More precisely, the current state is:- WiFi and MQTT work (the data still needs to be interpreted, but that's a trivial task)
- The IR system is starting to take shape - TX already works, I still need to solder up a receiver to test RX.
- Sounds and weapon systems have been tuned a little to fit a new speaker I got.
- The battery readout and status indicators now do what they're supposed to, but ...
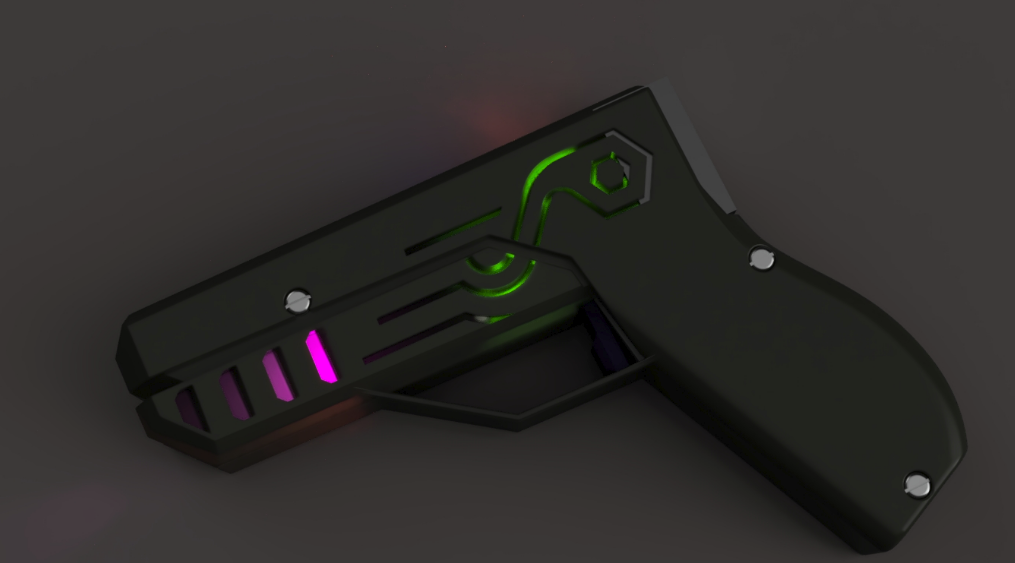
The most important change of the last few weeks is the completion of the first revision of my brand new casing!
Just have a look at this gorgeous render:And, of course, the whole thing has been test-printed and assembled already!
Yes, it looks as good as in the computer <3That thing there? It's the antenna I ordered in the slightly wrong size. Doesn't fit inside the case, still works for testing purposes! ![]()
Oh yeah and the actual lighting? Looks freaking awesome!
The viewing angle is a bit disturbed at the moment, since the printer I was working with didn't have a fitting multi-material setup. In the second version of the print the slots will have some clear filament filling it, creating a bit of a better light diffusion. However, the whole thing is still quite impressive!In the gif above the test idle pattern is flashing, with a few "I WAS HIT!" markers flickering in between.
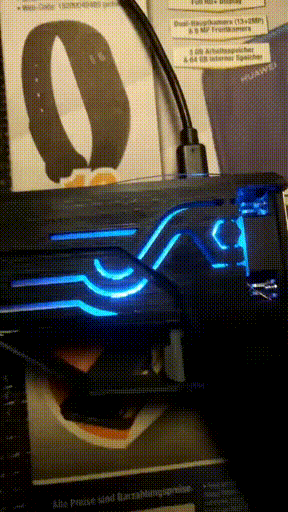
Oh yeah, and of course the gun also reacts to shooting:
Note: The front LED isn't installed in the nozzle section just yet. Usually the fire flashes will appear in the four front reliefs, this is just a dirty POC All in all I'm super happy with the progress this project is making, but I do feel like taking a small break.
There's a different project (called the DYSKorder >:3) I wanted to work on for a while, and I got a bit veeeeryy into this ...But yeah, this is still alive and kicking some serious ass at this point!
-
Rev. 3 all ready!
01/27/2019 at 11:24 • 0 commentsSo!
My PCB materials finally arrived! A week later than expected, sure (gee thanks Aisler for no explanation), but the PCB's quality is impeccable!
Traces are clean cut, the enig-finish is wonderfully shiny, and I think they even chose a thicker kind of copper than what you get from LCSC.
Just look at that gorgeous chip:
Now, I didn't want to post an update until I had something interesting to show you guys, so I took a few days to solder up and program the chip.
Just as I expected the ESP32 was an absolute pleasure to work with, and apart from a small reversed diode that caused one of the PMBT2222A to blow up, everything worked out really well!The fully finished piece looks fantastic, and has tons of new features, so I am incredibly happy about it!
The only thing I'd like to change would be the audio amplifier chip. I discovered that the ESP32's DAC can only handle up to 10kHz of updates - after I had ordered the chip. Luckily the MAX98357A, a proper audio I2S DAC with up to 32 bits at 44.1kHz, is available on a breakout for just 5€, so I got one of those and wired it up.
The next revision will obviously have the chip on-board, but for now, it works great!Have some pics of the current revision:
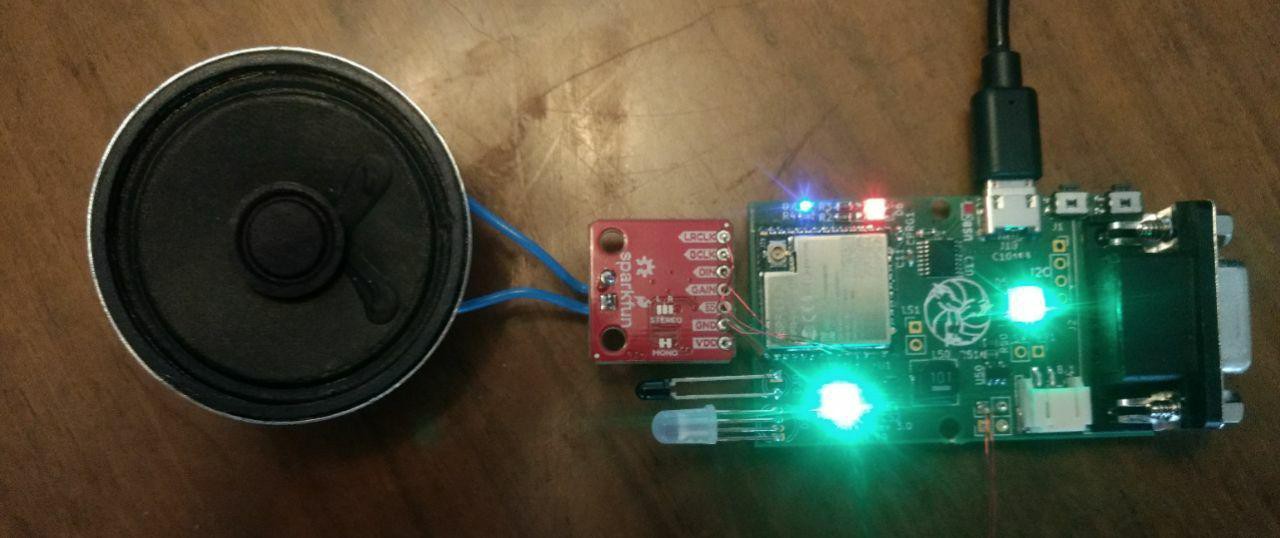
![]()
Just look at those lights in action! This set has a proper connection status indicator (blue), battery charge indicator (red/green dual LED), and four WS2812 spread out over the body to provide lighting inside the casing. Hell yeah <3
And a few quick videos of the audio system in action. It's really impressive what a few cheap but well-chosen components can do!
I'll be working on completing the software for now, and will be ordering a second revision of the PCB with a few fixes, the new audio chip, etc.
I suppose I could also already get started on designing a new casing for this PCB, but that's a secondary concern.Besides, the huge speaker of this current version will be hard to fit into ... Anywhere :P
The later versions will probably use a 3cm diameter speaker, but I just had this one laying around, and it seems to work fine! -
Ordering some hardware
01/05/2019 at 22:38 • 1 commentAlright!
After a few days of intense number-crunching, I've finally wrapped up the PCB design. The new chips do everything I want them to on a small 35x50mm board.
They'll be ordered from Aisler, and if you wanna grab a hold of a few of your own, the project's public! Find it here!
All the necessary PCB Schematic files are on GitHub, and I'll be writing a code library soon.That feature is just too handy, isn't it? This is what the board will look like, with that gorgeous ESP32 WROOM on the side, and my brand new logo in the middle! <3 I will be getting the boards after a good night's sleep. Aisler supposedly delivers within a week, and shipping from and to Germany won't take more than two days, so we'll be getting results very soon!
I encourage you guys to go through my PCBs, found on GitHub. If you spot anything odd, or have an improvement, feel free to open an issue or leave a comment!
-
Revision 3 incoming!
01/02/2019 at 20:30 • 0 commentsI don't know about you guys, but I certainly always get a bit antsy when I got free time and nothing to do.
Luckily, that's not the case!
I might have mentioned that I wanted to rework the hardware to use the ESP32. After multiple very positive experiences, I am happy to say that I officially started working on the next version with said controller!
The improvement will be noticeable, in a lot of aspects:
- The RGB LEDs will be replaced by WS2812, which are going to make for MUCH better visual effects than before.
- Using only one powerful MCU instead of an ESP8266 and an AVR will make developing and maintaining code easier.
- The WiFi will be much better! (NodeMCU + MQTT loves to swallow up packets :c)
- There'll be real sound! Instead of a piezo buzzer, I've decided to use the ESP32 I2S + a small audio amp chip (the TDA301) to be able to play back much nicer sound effects. I might even be buying myself a small unity asset for that ... Hehe
- There'll be proper power filtering, 3.3V LDO, and a built-in charger + USB<->UART bridge. Again, all making developing and maintaining devices easier. Heck, maybe I'll even throw a charge indicator LED in there!
I've got a small request: If any one of you guys knows a bit more than me (i.e. "nothing") about audio systems, I'd love a pair of second eyes on the amplifier, just to make sure it doesn't blow up.With a bit of luck those PCBs will be ready to go by the end of this week. I'll be ordering them from Aisler too, so expect assembled and beeping chips by the end of January!
-
App-solute progress
10/02/2018 at 18:41 • 0 commentsWhew!
Finally, I got this lazy butt moving on something I've been wanting to have for my Lasertag project (or actually, anything that has the tiniest bit of WiFi capability) - a proper App!Thanks to my student helper job making me learn Qt, I recently found myself possessing that last tool I needed to make an appealing, responsive UI, without worrying about the graphics and the "how" behind it too much.
QML is just too good in that regard.Enough of this though, let's have some pictures!

The front page - This'll hold the most important stats. Life, Ammo left, a small map, and a list of teammates and their status. 
The slightly more developed settings page. Connection status, server IP and (later) login data, as well as a custom name and profile icon link can be entered here - all stored persistently! The whole thing is still in the works, but thanks to the Qt MQTT library, it was easy to integrate in the running system - it'll receive game data as quickly as the sets itself!
As an added bonus, the "Material Style" was used to get a unified, sleek look, and some of the theme colors are adjusted live to match your current theme color. Pretty neat, huh?
In the future I'll fine-tune the front page to be easy to read, while still holding the important information, and add other gimmicks like an enemy proximity radar, but ... That's still a while off.
-
Adding a few more bits
09/05/2018 at 16:36 • 0 commentsThe lasertag MCU board, in its curent state, is powered by an AVR microcontroller, which is in control of all vital functions. It blinks the LEDs, creates the sounds and vibration patterns, and much more. To add Wi-Fi, an ESP-01 was added in the later versions, communicating via UART.
Both are simple chips to use and program, and have always been my go-to device for projects that need a small but powerful processor, or need a little bit of Wi-Fi capability.
Slowly though I am starting to feel like a device with more "juice" to it would provide more flexibility and more interesting features, as well as reduce some of the problems I am getting with for example the ESP<->AVR communication, the fairly slow Wi-Fi speed of the ESP-01, and the hardware limitations of the AVR.For this reason, over the next few weeks I will be working my way into the ESP32, programmed in C++
If all goes well it will have enough power as well as hardware features to take over the job of both the ESP-01 AND the AVR, reducing the complexity of the main board and code!
Additionally, it'll bring in juicy new features like Bluetooth, capacitive touch support, high-speed 16bit LED PWM, faster WiFi, and potentially even proper sound playback.Let's see how this goes, shall we!
LZRTag - Flexible DIY Lasertag
An easy to build, program, modify and use AVR and ESP based Lasertag system for everyone!