Close
0%
0%

8 GHz Sampling Oscilloscope

8 GHz BW, up to 1 TS/s ET Sampling
I have ceased active development on this project. Please don't ask.

Public Chat
Similar projects worth following
I have ceased active development on this project. Please don't ask.

A basic open-source multi-GHz sampling oscilloscope for experimenters on a budget. Still a work-in-progress, with key pieces on separate PCBs, but showing bandwidths in the 7-8 GHz range with >= 100 GSa/s equivalent-time sampling, and around 500 k comparisons/second real time. So far.

Also note: I have ceased active development on this project. Please Don't ask.

Note: this writeup is somewhat out of date, as it doesn't cover many results that I ended up discussing at Supercon 2019. Until I get a chance to update these pages, you can check out the video of my talk:


Here is a link to the slides from the talk [50 MB PDF warning!].

If you are interested in getting involved with this project, please join us in the public chat: https://hackaday.io/messages/room/282439


This project is the culmination of some of the experiments over on #The Rise and Fall of Pulses. It may or may not have been obvious what the goals of that project were, but this scope was one of  them. There are a handful of other designs in the pipeline as well at this stage, using various approaches to the GHz+ waveform sampling problem.

This particular project uses a latched comparator as a voltage sampler, specifically the ADCMP582 from Analog Devices. Built on SiGe, this $20 (single-quantity) comparator has a sampling aperture of 5 ps, and a typical front-end bandwidth of 8 GHz. This ultimately limits the bandwidth of the resulting instrument, but other factors in the current design reduce the system bandwidth into the 6 GHz range. Very preliminary tests estimate the rise time of the scope to between 50 and 70 ps, corresponding to between 7 and 5 GHz bandwidth, respectively. I'm calling it 6 GHz for now, and I expect it can be improved somewhat,

The basic idea is similar to a simple "toy" version I made on the other project with comparators I had on-hand at the time.

This project is a work-in-progress. Specifically, the first prototype that produced these results doesn't have the capability to calibrate its own timebase, which experiences serious drift with temperature. I have a prototype of the timebase calibrator on another PCB, although the two have yet to be integrated. So, it's not a scope you can just build and use quite yet.

Another thing that has yet to be integrated is an extended timebase that would allow you to capture longer sweeps. The first prototype is limited to sweeps of 10 ns, and while this is probably OK for many uses of a 6 GHz sampling oscilloscope, longer sweeps are sometimes very useful.

A word of caution: don't get too excited about this project until you know the difference between a sampling oscilloscope and a real-time oscilloscope: they're vastly different beasts, suited to different purposes, and behave in different ways. The ubiquity of cheap, real-time, (but low-bandwidth) digitizing scopes has created expectations that sampling scopes, or even analog scopes, can't meet. For an introduction, you can check out this article on ElectronicDesign.

As usual, the real information for this project is in the build logs.

It will be open-sourced, but I'm not posting the design files for the first prototype, because it's lacking too many things to be practical. If someone really wants to get a crack at the design files, ping me. The schematic and and board layout are in PDFs in the files section of the project for reference.

ted-yapo-supercon-2019.pdf

Slides from my talk at Supercon 2019

Adobe Portable Document Format - 38.13 MB - 11/22/2019 at 15:50

Preview

adcmp582-sampler-schematic-updated.pdf

Adobe Portable Document Format - 38.07 kB - 08/27/2019 at 11:09

Preview

adcmp582-sampler.pdf

First prototype sampler layout

Adobe Portable Document Format - 301.22 kB - 08/23/2019 at 13:25

Preview

  • Looking at Stuff

    Ted Yapo08/25/2019 at 21:01 0 comments

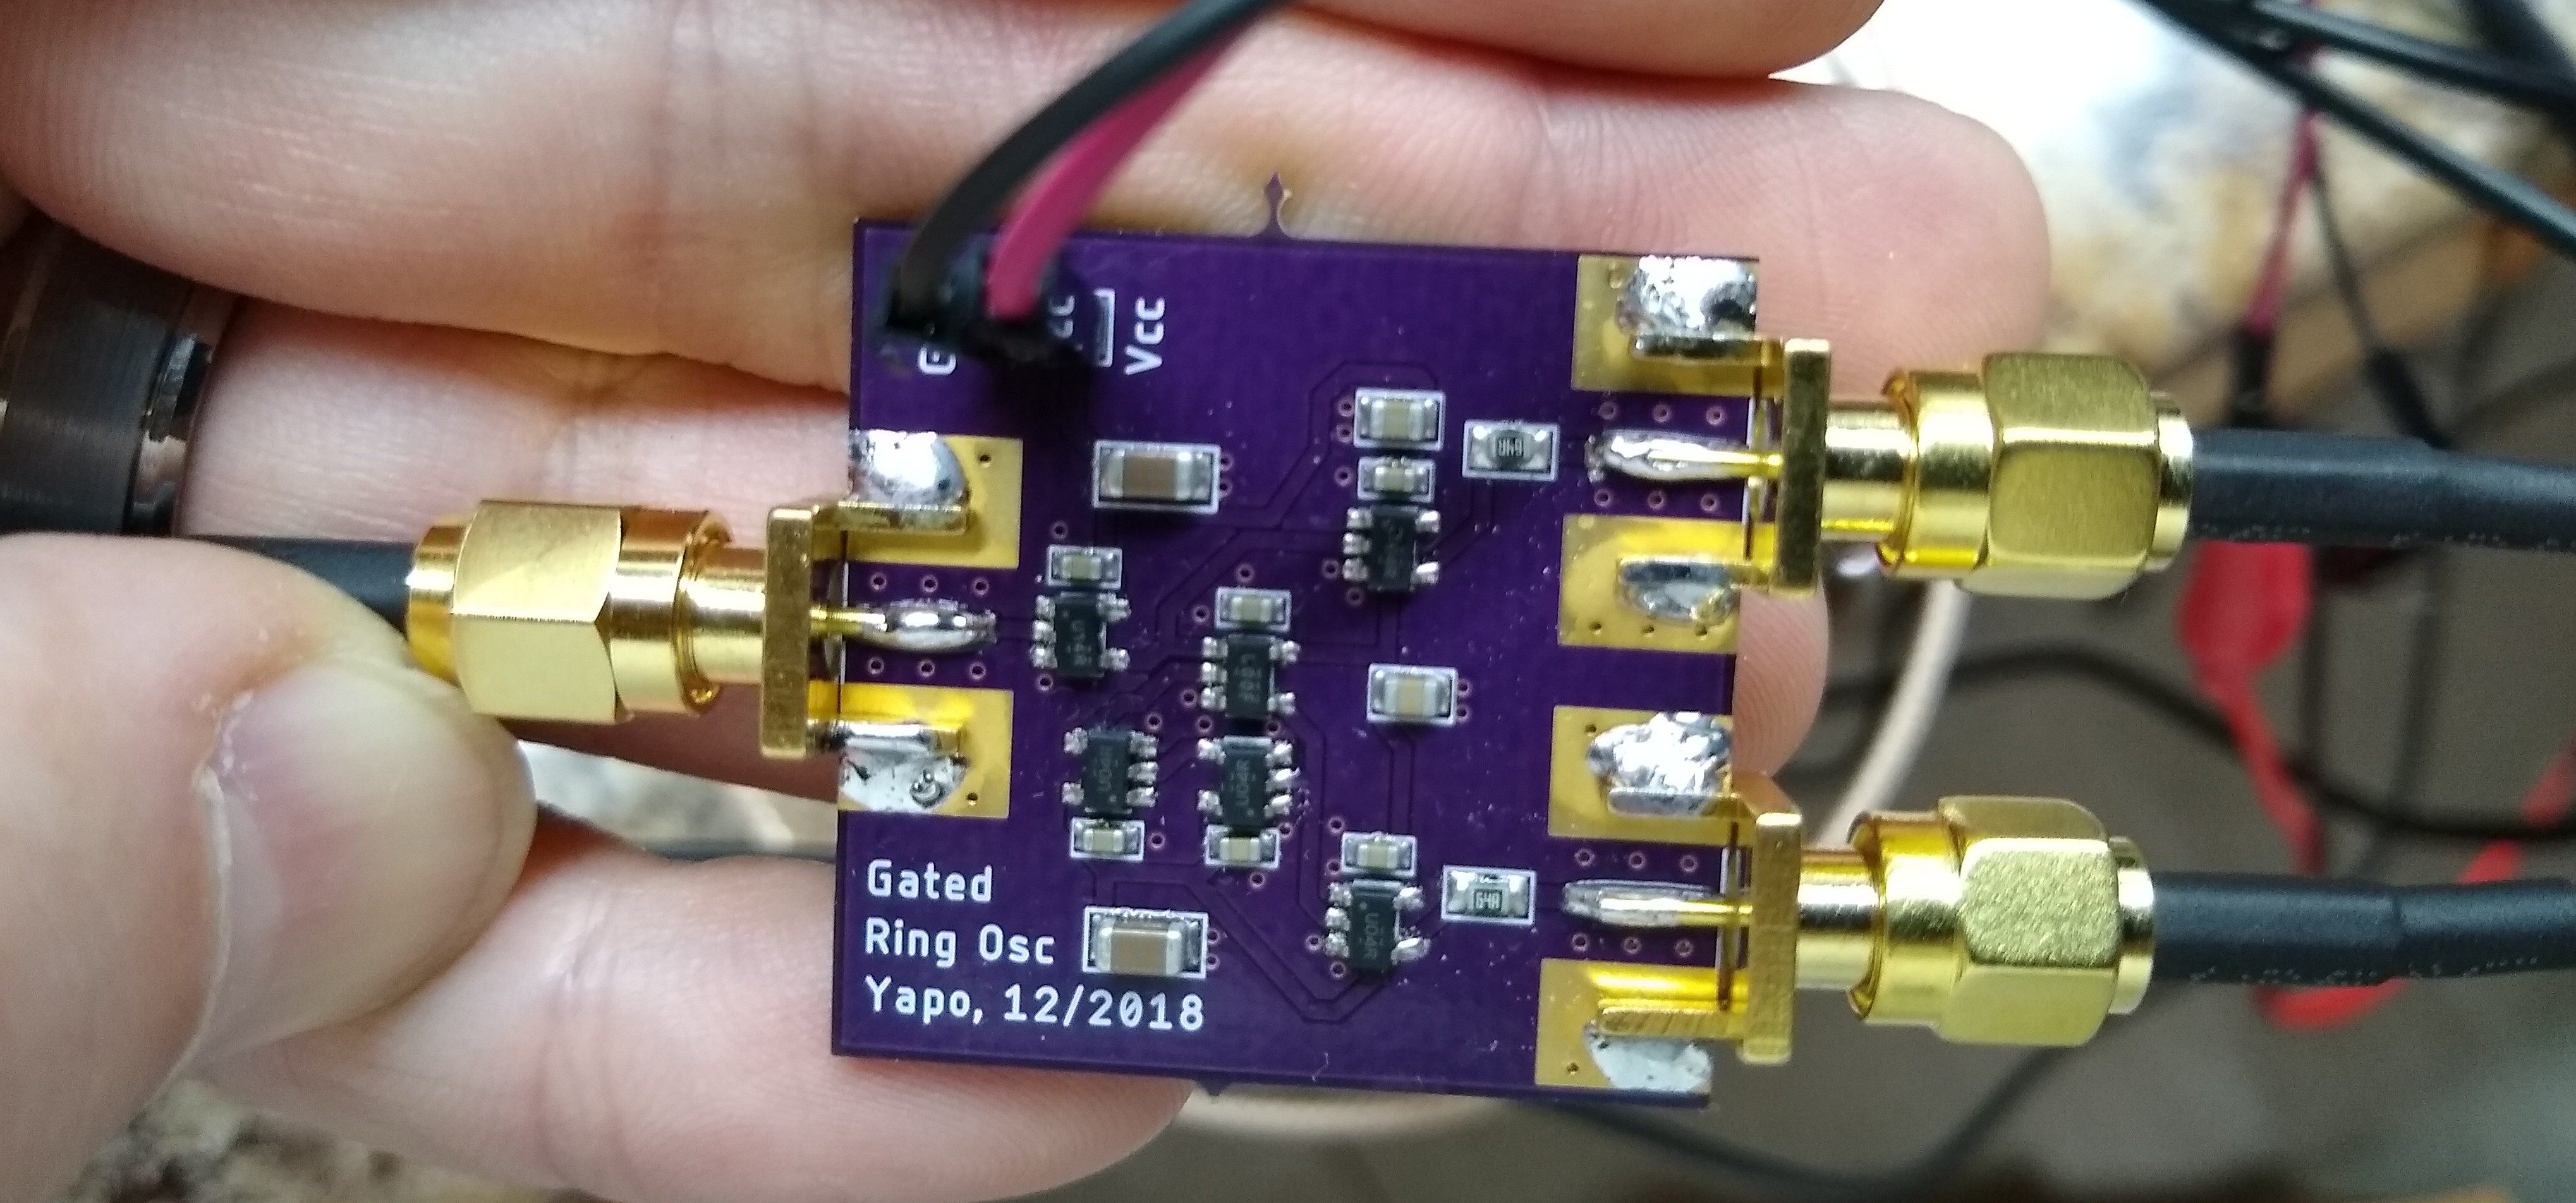
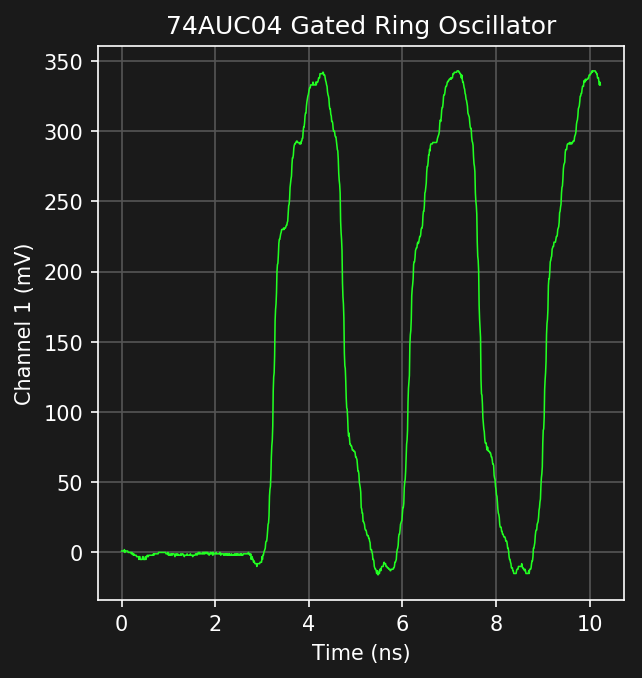
    An oscilloscope is for looking at waveforms, so I started digging around for some stuff to look at. I found the 74AUC gated ring oscillator I had discussed on another project, and fired it up. 74AUC logic outputs have interesting steps in their transitions because of their unique 3-stage output driver structure optimized for 50-65 Ohm transmission lines.

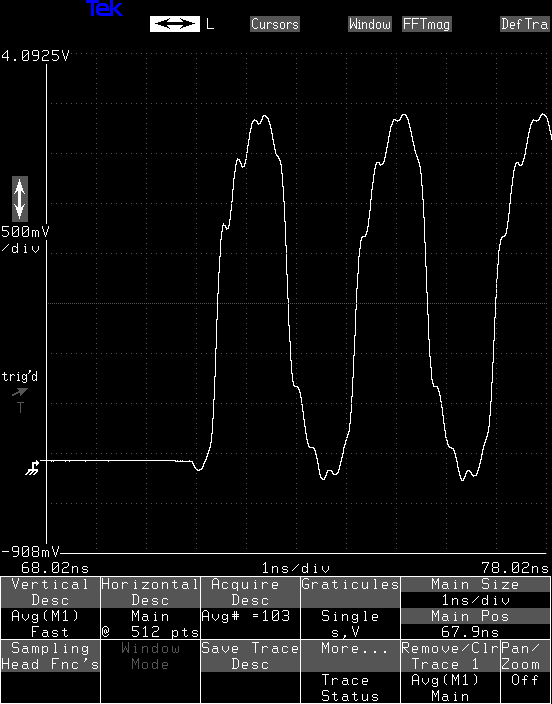
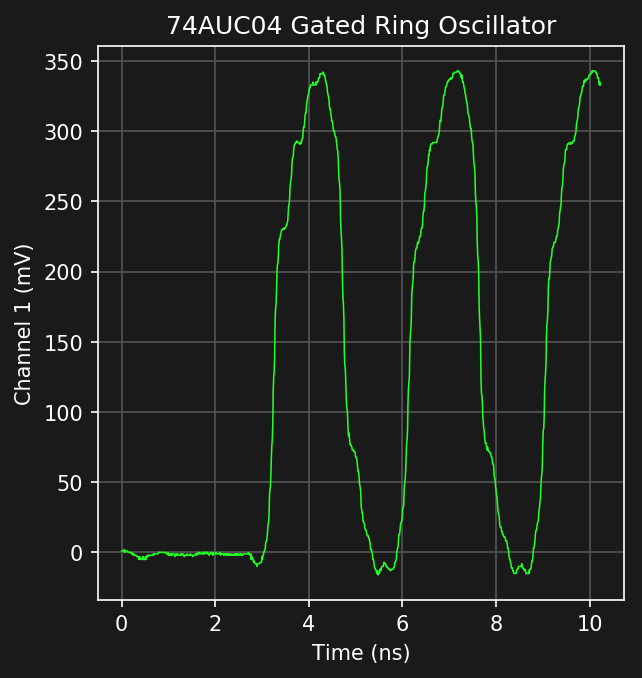
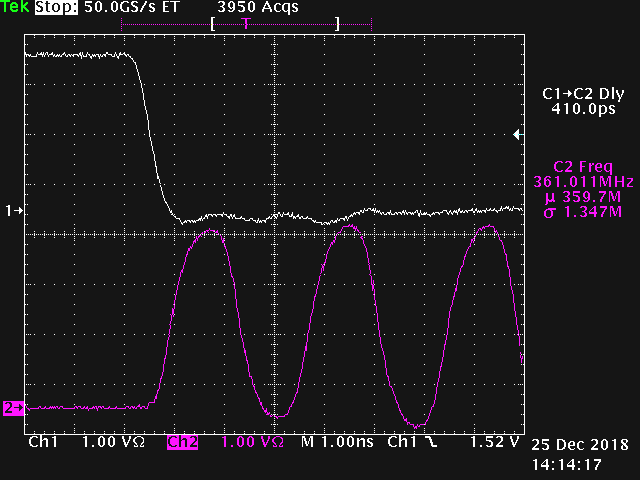
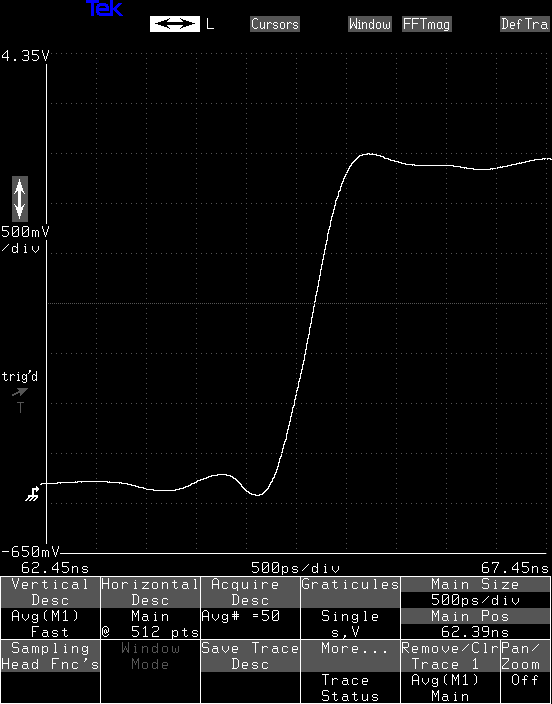
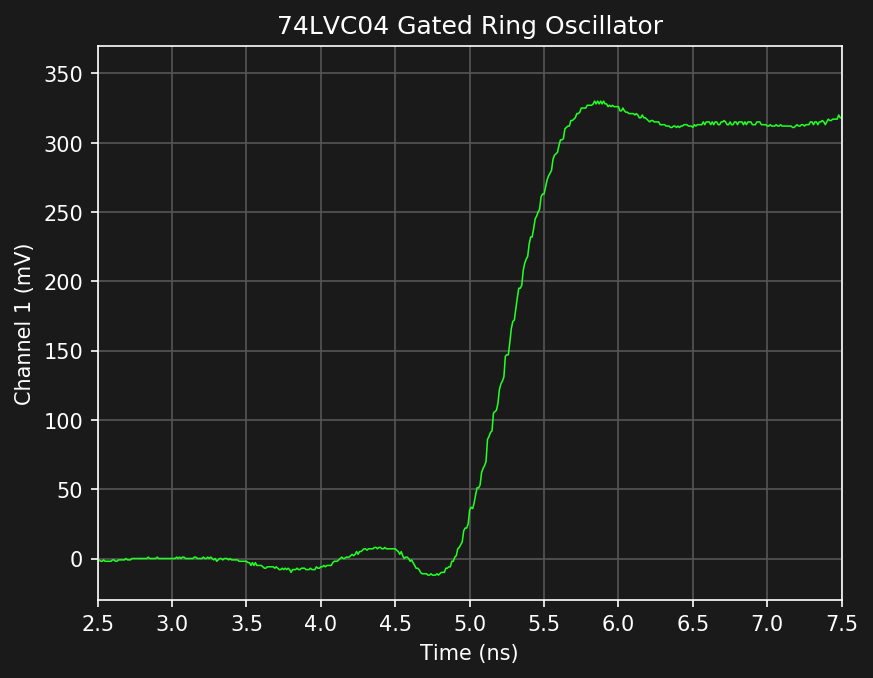
    This oscillator, made with very-fast 74AUCxx gates, starts up quickly after the gate input transitions, and oscillates at around 360 MHz. Here is what the output looks like, just after startup, on the 20 GHz Tektronix scope and my prototype sampler of around 6.4 GHz:

    You can see the three-stepped outputs on both scopes, although there is more detail in the left image from the Tek scope, but that's a 20 GHz instrument, so it's not really a fair comparison. Note that on a 1 GHz scope (image at end of log), you can't make out the steps at all.

    To get a more apples-to-apples comparison, I ran the Tek signal through a TL-11 delay line. This beast made to accompany the 11801 scope is a 47 ns analog delay line with a 70 ps rise time, which equates to a 5 GHz bandwidth. It's essentially a long, precision coax-cable-in-a-box. This should simulate what the signal would look like on a 5 GHz scope, or so I thought. Here's what you get:

    I can't explain the slow rising envelope at all. Ideally I would run the signal through the delay line for both scopes for the comparison, but I can't do that at the moment - the 47 ns delay messes up timing. But, in any case, some of the fine details are lost with this "5 GHz" simulated Tek scope, so it indicates that some of those details probably are above the 6.4 GHz 3dB cutoff of the prototype.


    For reference, here's the waveform as I captured it on a slow 1 GHz oscilloscope back in December. With a 1 GHz scope, the finer details of the transitions are blurred, and you can't see evidence of the 3-stage output drivers at all.

    Lol - check the date. That's what I was doing on Christmas day at two in the afternoon!

    EDIT 20190827

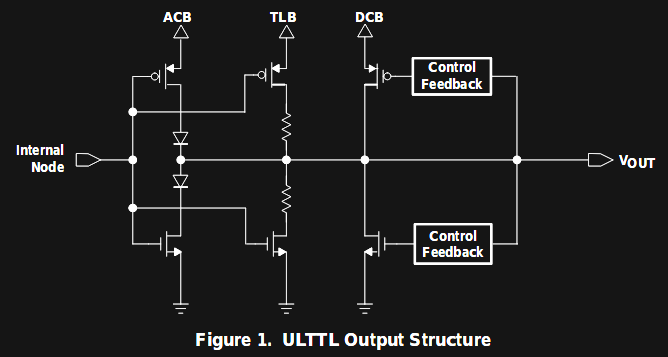
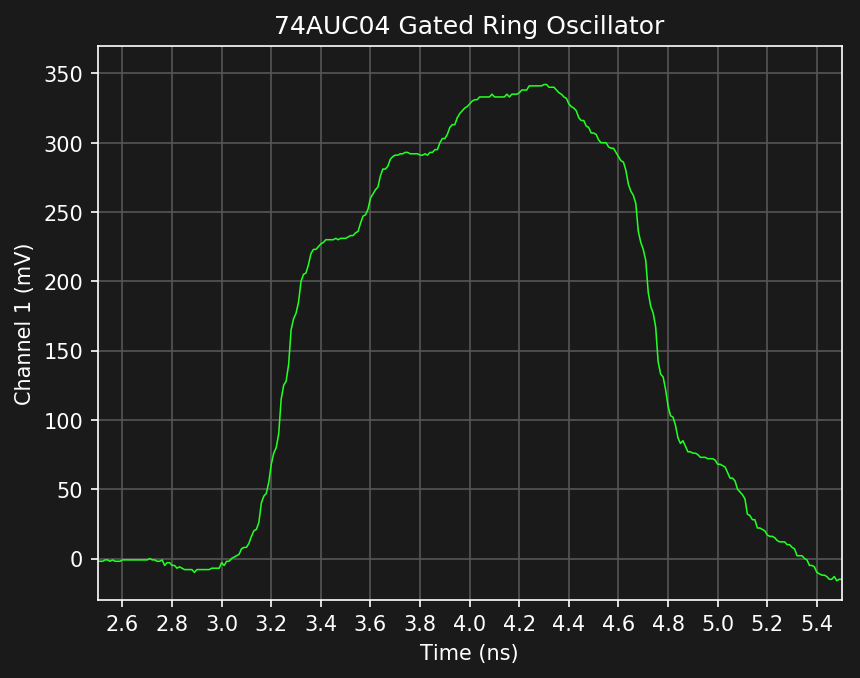
    Here's the details of the 3-stage output driver in a 74AUCxx gate from TI's appnote, and a zoomed-in look at the stepped output waveform it produces. The steps are about 200 ps long.

    At least, I think that's what you're seeing here. I need to put one of these gates on a PCB that just produces a step so I can see what happens later in the transition. Supposedly, the three stages switch over longer periods. Boards have been ordered.

    UPDATE 20190828

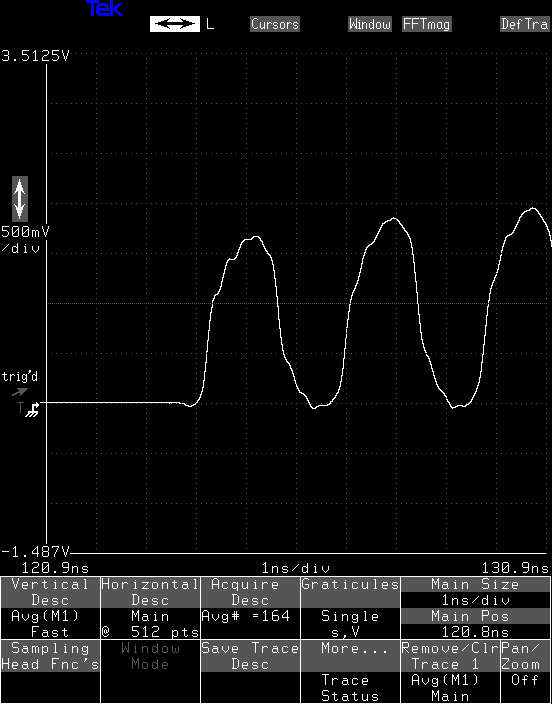
    I found another copy of the ring oscillator PCB and populated it with 74LVC parts. These are slower than the 74AUC, but have a traditional 2-transistor CMOS output structure. The transitions don't show the step artifacts, which points to them really being caused by the 3-stage outputs of the 74AUC gates rather than a reflection phenomenon on the PCB. Here are the Tektronix vs my sampler images:

    There is less noise in the Tek trace, but it also has been averaged 50 times. I could probably do better than I currently am.

    But, I'm still not entirely convinced that I'm seeing artifacts from the 3-stage output drivers in the 74AUC parts. When the new boards come back, I should get a more definitive answer.

  • More Accurate Bandwidth: 6.7 GHz

    Ted Yapo08/23/2019 at 16:21 0 comments

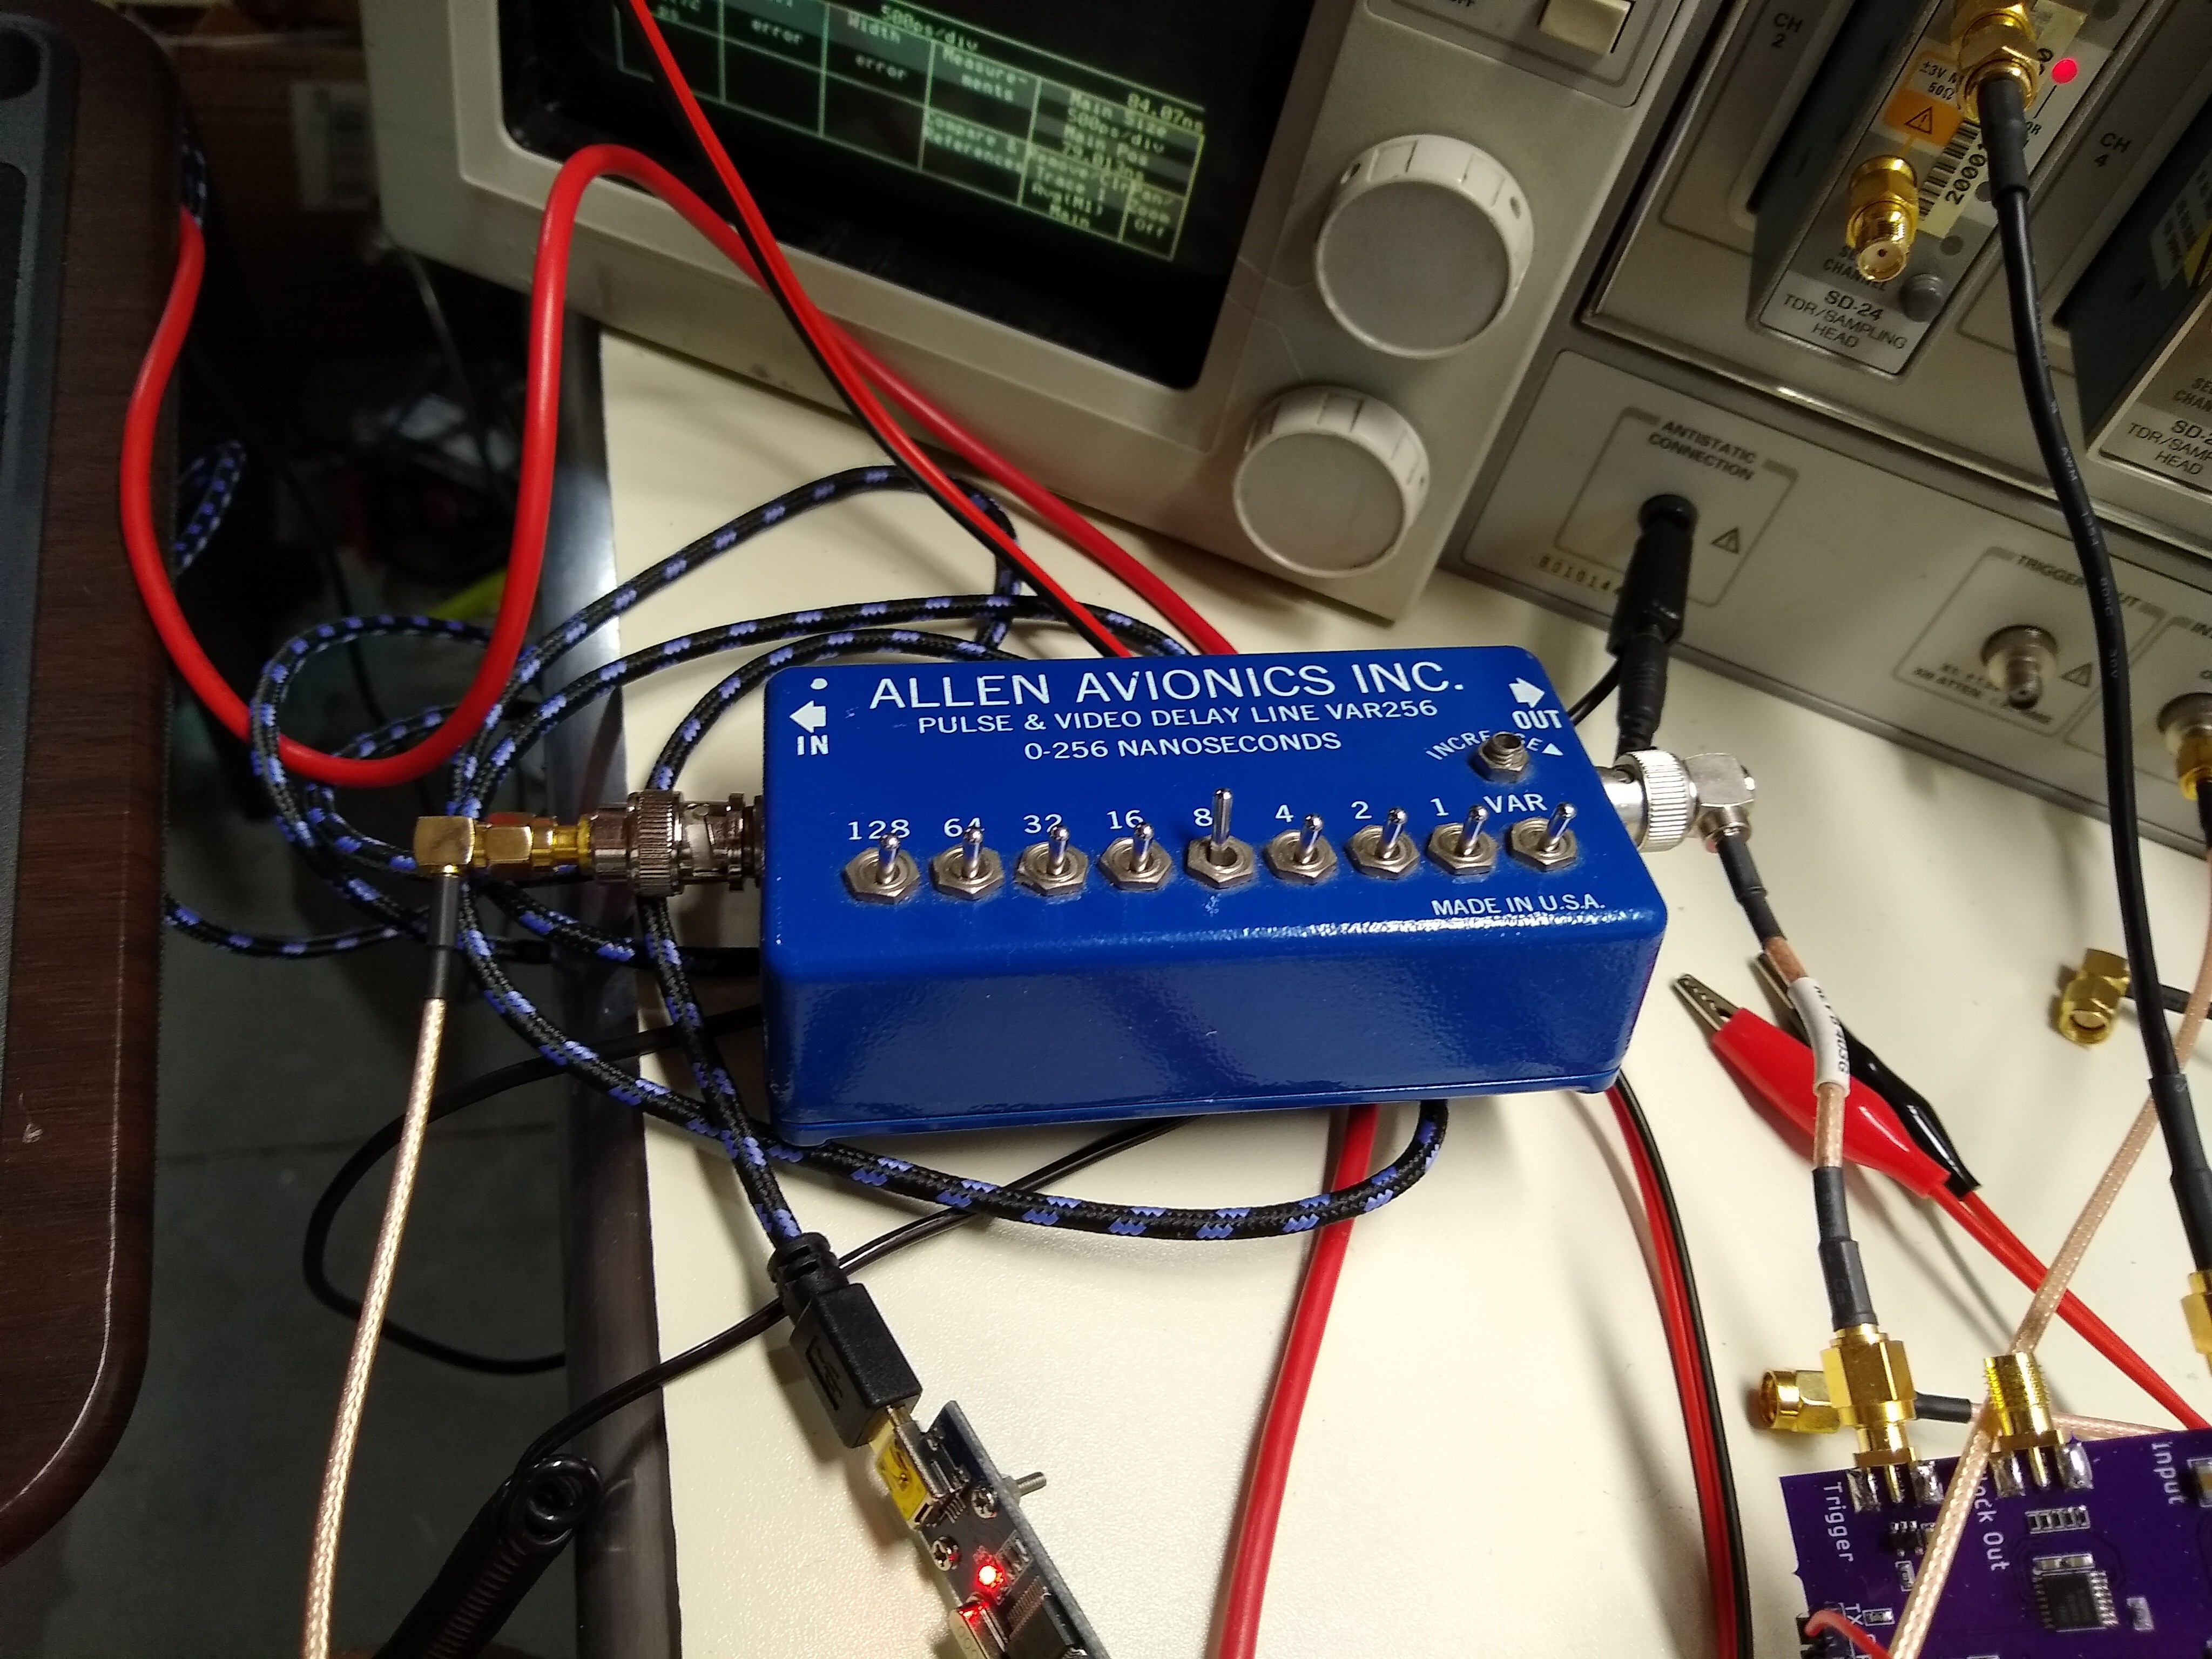
    It took a little doing, but I was able to measure the bandwidth of the prototype sampler using the TDR step generator built in to the Tektronix SD-24 head. I had to drag out an old Allen Avionics switchable delay line to get the triggering right.

    This was also the first test of external triggering for the sampler. It worked :-)

    The delay line has a very low bandwidth, and even though it's only delaying the trigger pulses here, it can cause problems by slowing the trigger edge resulting in timing jitter. I haven't determined how much of an effect this actually has on the measurement yet, but it can only result in an artificially low bandwidth estimate, so it's OK for now. I really should just cut a piece of low-loss coax to the right length (which appears to be 8 ns) and use that as a delay. Maybe later.

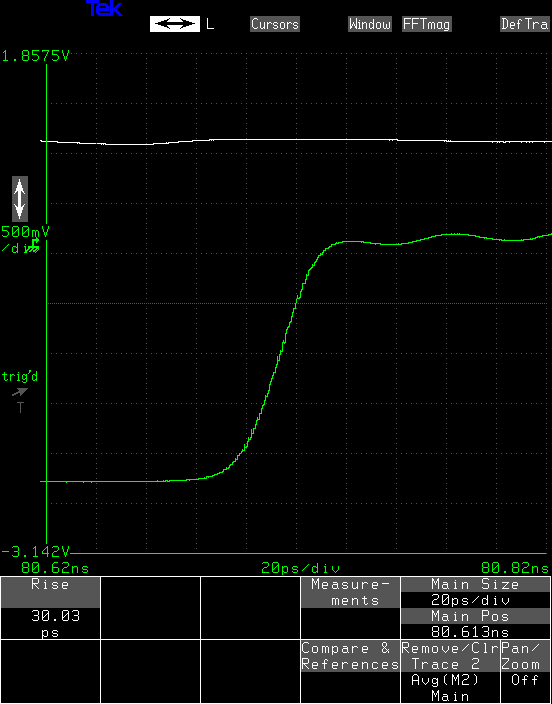
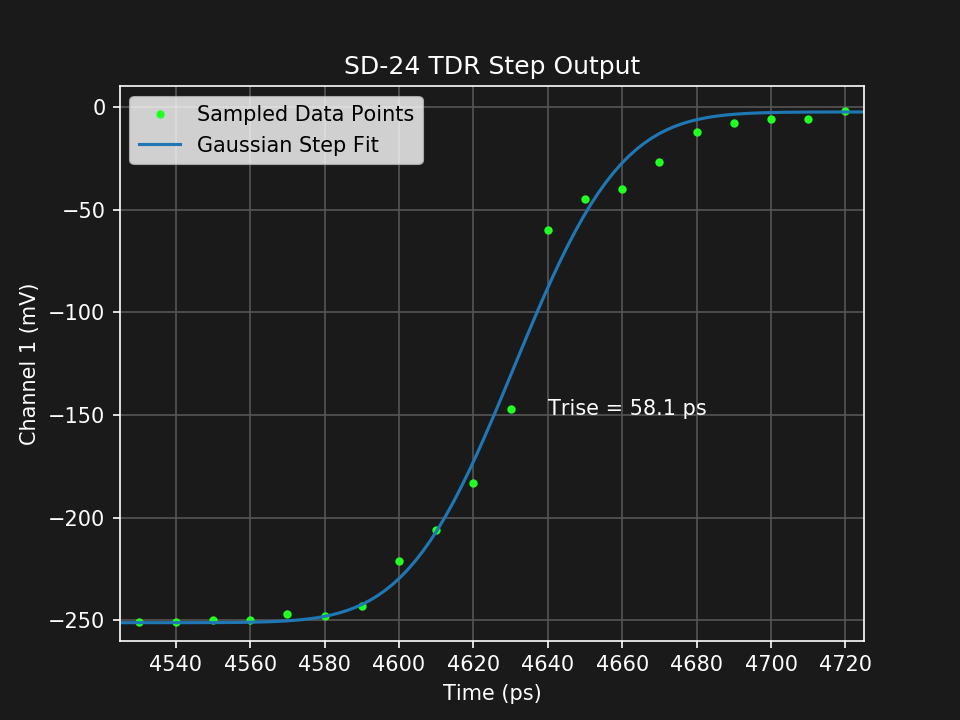
    The Tek scope measures the rise time of the TDR pulse as 30 ps:

    This is at the end of a short section of RG-174 cable, which is lousy for this kind of work, but is flexible enough to connect between two inputs on the same SD-24 head. The rise time of the step measured internally to the head is 24 ps.

    Using the same trick as before, namely, fitting a Gaussian step function to the prototype sampler response, I come up with a measurement of 58.1 ps.

    Again, using the same logic as before, and correcting for the step response of the SD-24 head, the actual step is probably close to sqrt(30^2 - 17^2) = 25 ps.

    Using this to estimate the response of the prototype, we get Trise = sqrt(58.1^2 - 25^2) = 52.4 ps.

    A scope with a Gaussian response and a rise time of 52.4 ps has a bandwidth of 6.7 GHz.

    What did I estimate the first time? (checks notes) oh, yeah, 6.4 GHz. Pretty close.

    I'm calling it 6 for now.

    I might be able to get some better measurements by averaging more in the sampling process. It might be worth some experiments, but without an accurately calibrated timebase, it probably wouldn't mean all that much.

  • What's the F̶r̶e̶q̶u̶e̶n̶c̶y̶ Bandwidth, Kenneth?

    Ted Yapo08/23/2019 at 15:47 0 comments

    In the initial testing, I tried several approaches to estimating the bandwidth of the first sampler.

    ADCMP606 Step

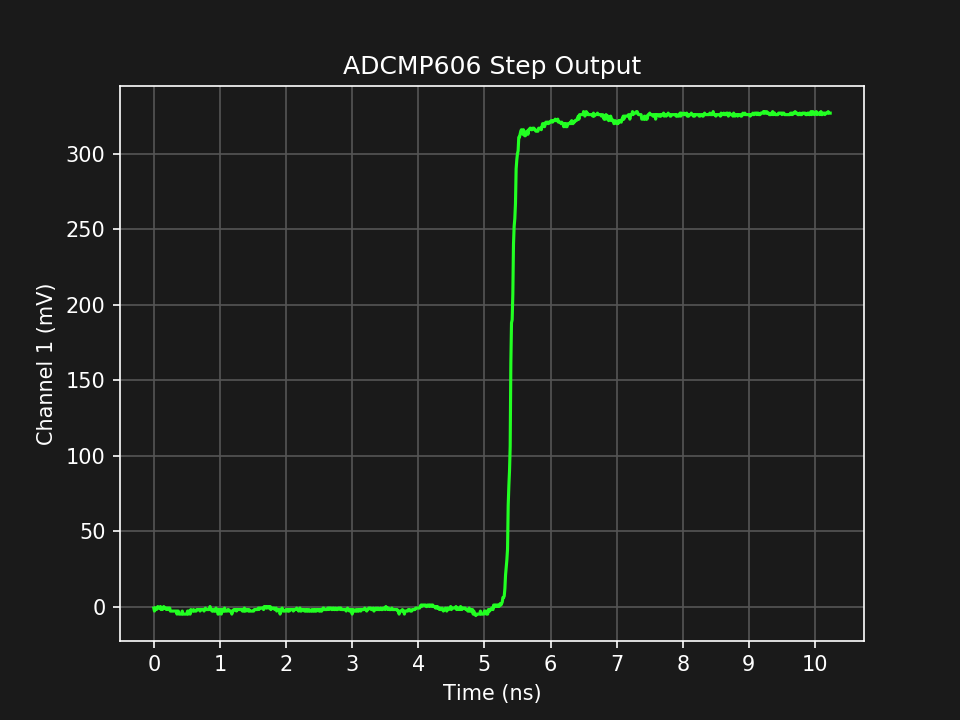
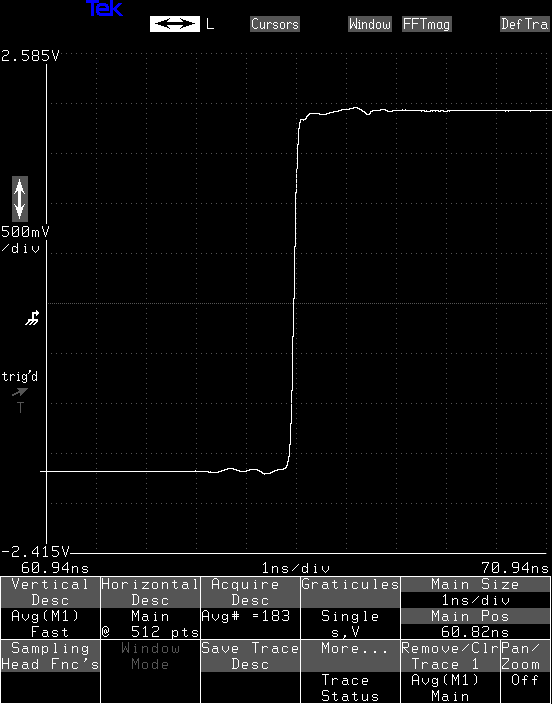
    The ADCMP606 step generator was the first experiment over on #The Rise and Fall of Pulses , and in some ways the most successful. It just uses an ADCMP606 CML-output comparator to generate a moderately fast rise-time step, typically 160 ps according to the datasheet.

    Here's the output measured with the sampler:

    and with the Tek 11801B/SD-24:

    The traces look similar, but again they were triggered slightly differently, which could cause some discrepancies. The differences right after the edge are most likely caused by some reflections from the sampler itself. Matching on the front-end needs work.

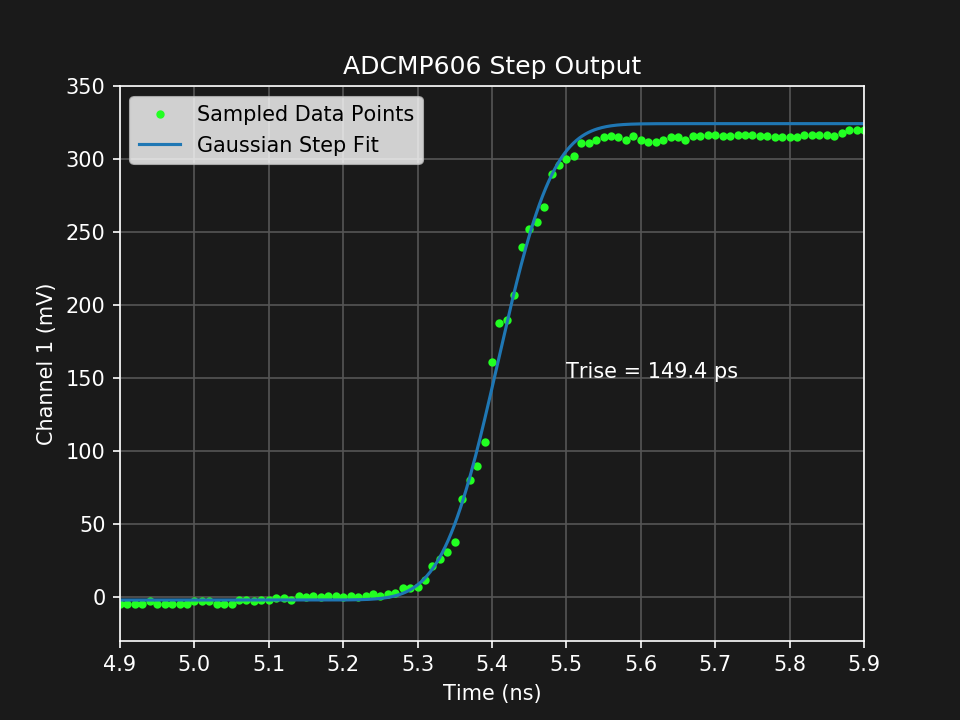
    To estimate the sampler bandwidth from this, I fit a Gaussian step to the data points, and calculated the rise time of the fit function:

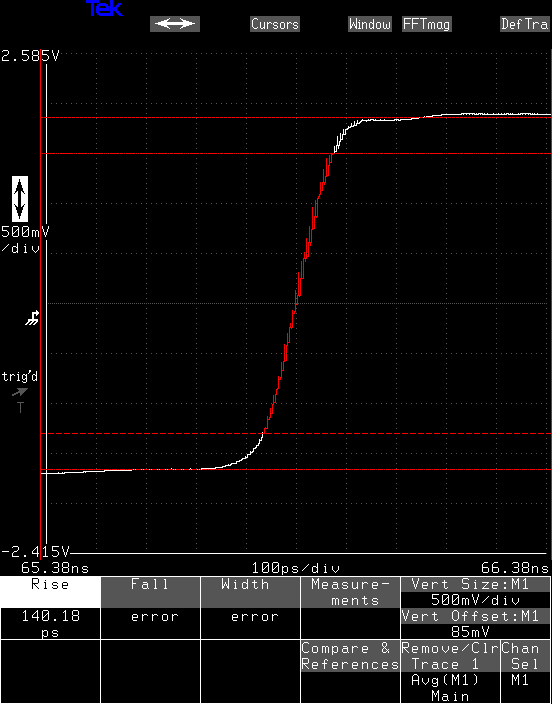
    The Tek scope measures the same 10%-90% rise time at 140 ps.

    The SD-24 head has a maximum rise time of 17 ps, so the step from the ADCMP606 is probably closer to sqrt(140^2 - 17^2) = 139 ps. From this, we can estimate the rise time of the prototype sampler = sqrt(149.4^2 - 139^2) = 55 ps.

    A 55 ps rise time for a scope with a Gaussian response implies a bandwidth of 0.35/55e-12 = 6.4 GHz.

  • First Measurements

    Ted Yapo08/23/2019 at 14:31 0 comments

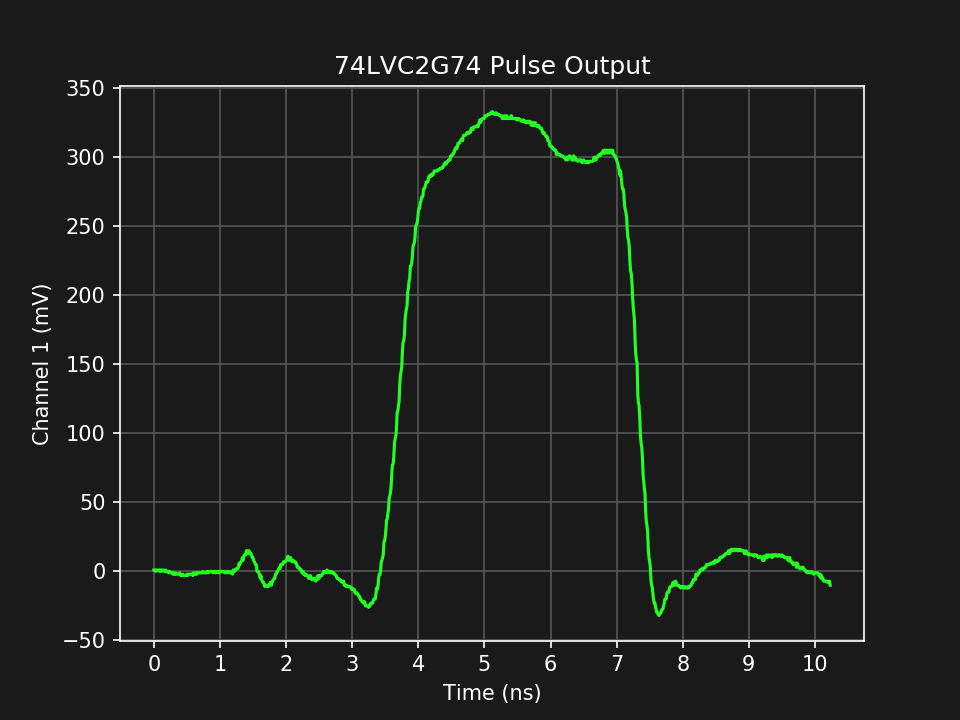
    I have been told that at a certain oscilloscope manufacturer the first measurement with a new scope design is sometimes called "green on screen," like "first light" for telescopes and "first ping" for routers. This is the first waveform captured with the first prototype sampler:

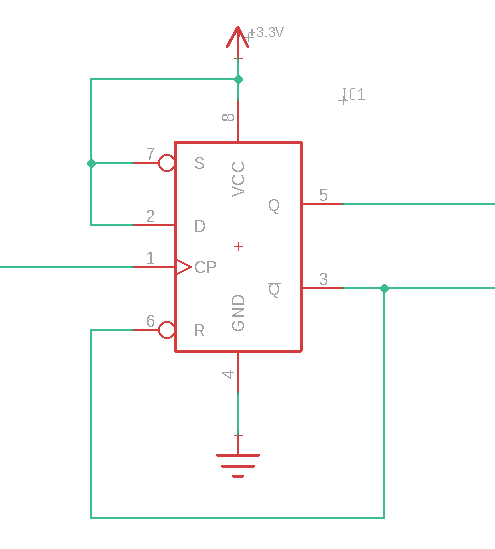
    It's the output from a pulse generator made with a 74LVC2G74 flip-flop with the data line tied high and Q-bar output tied to the Reset-bar input. I'm using a pulse generator like this (but with faster 7 4AUC logic) in another sampler design. Don't use this in your logic circuits, people, it's just for analogy-stuff :-)

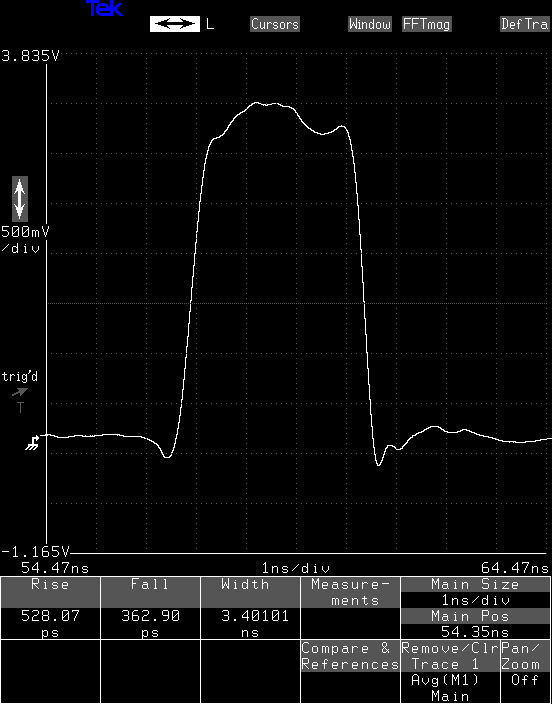
    For reference, here's the output of the same circuit captured with a Tektronix 11801B scope and 20 GHZ SD-24 head:

    There is an extra wiggle on the left baseline of the trace from my sampler. The test setup to capture these two traces was not identical, and I suspect there may be a ground-bounce issue causing the difference. It needs some further investigation.

    Overall, however, the result doesn't look too bad for a first test. The waveforms are pretty close otherwise, and the result would certainly be usable in some cases. I know there are some reflections happening in the front end which are sure to corrupt the waveform somewhat, and these may be responsible for some of the small differences here, but I think the result shows promise.

  • Overview and First Prototype

    Ted Yapo08/23/2019 at 13:23 2 comments

    The scope works using a comparator to sample the input waveform. This is an old idea, which seems to date back to S. P. McCabe III's Masters Thesis in 1975, "A sampling voltage tracker for analyzing high speed waveforms." I haven't read it yet, but next time I'm in Los Angeles, maybe I'll swing by UCLA and have a look.

    This approach was finely honed by a team at NIST, who wanted to use such a sampler for high-resolution measurements of RF waveforms, initially to replace thermal sensors in true-RMS-reading RF voltmeters. Since the NIST work is US-Govt. funded, the papers they published are not protected by copyright. Here's a good introduction, highlighting some of their latter work on the idea.

    The basic idea is to capture a single comparison result at each trigger. So, at the first trigger, you ask if the waveform at the trigger time is above or below a specific voltage. By trying a number of voltages, and recording the greater/less-than answers from the comparator, you can eventually deduce the voltage at that time. If you've ever explored successive-approximation analog-to-digital converters, you'll recognize a similar process. Unfortunately, the binary search used in most SAR ADCs is sensitive to noise, and is not always suitable for a sampling oscilloscope. There are a number of alternative approaches, and a small body of literature on research in this area. The simplest (and perhaps slowest) method is just to try all possible voltages. It's dumb, but it works, and is resilient in the presence of noise.

    Schematic

    I'm just going to link the PDF schematic here. The ADCMP582 comparator is the front-end. An MCP1501 2.048 V reference, MCP4921 12-bit DAC, and ADA4000 op-amp form the reference voltage generator that the input sample is compared to. The reference voltage has a range of -2 to +3 V, covering the entire input range of the comparator. In future versions, this may be reduced to +/- 2V. This DAC uses SPI and is relatively slow. I'm currently evaluating faster, parallel DACs.

    I swapped op-amps at the last minute in the design, and accidentally connected the inputs backwards (doh!), so these are incorrect in the schematic and board layout, and the board requires a little rework to swap these pins before it will work correctly.

    An SY89296U programmable delay line handles timing of the samples. This allows 1024 different sample points, spaced nominally 10 ps apart, for an equivalent time sample rate of 100 GSa/s. On the first sampler prototype, this timebase is uncalibrated. I have a prototype timebase calibration board which has proven a way to calibrate the timebase, and it will be intergrated into the next version.

    Since the comparator and delay line are ECL parts, there's a little ECL interface logic to connect to the CMOS parts of the design.

    The brains of the PCB is a PIC16F15376 8-bit microcontroller. I chose this because of familiarity with the 8-bit PIC world and previous experience with the built-in peripherals. The inclusion of a 32-bit uC here wouldn't accelerate the design much and simply add complexity to this first prototype. The next spin currently has an FPGA to handle anything that should go faster.

    Another key component is the Si53360 clock distribution buffer. This CMOS part handles the clock and trigger timing while adding very little jitter (120 fs RMS). The two inputs to the clock fanout part allow the sampler to be triggered from an external source, or to generate its own sampling clock. This functionality directly parallels the Tektronix 11801 sampling oscilloscope. It works pretty well.

    Board Layout

    Again, a link to a pdf of the layout. This first prototype was put together quickly to get some data before a next spin, so it's a little rough. At these speeds, though, there's no substitute for measurements with the actual device, so it makes sense to build and test early and often. This is just the first prototype which contained enough stuff to...

    Read more »

View all 5 project logs

Enjoy this project?

Share

Discussions

parragoriouse 0 wrote 03/31/2024 at 12:56 point

hello, i know that this project is no longer under development but i was wondering whether the pdf schematic and pdf board layout plus you'r talk are the only available files to this project and whether a board or gerber file exists?

  Are you sure? yes | no

jean-claude.bernengo wrote 11/01/2020 at 09:47 point

Hello,

I really like your project and I think I have skills to help you : I used for years an HP TDR head 1817A with plug-in 1815. This arrangement is specified at 18 ps rise time, and uses tunnel diodes as generator. When it appears on the market (1972), fitted on 580 scopes, it was an outstanding set-up. Unfortunately, sampling diodes (very fragile) are now unavailable, and my device is out of work.  Leo Bodnar sampling head is very impressive, but difficult to get in Europe, and I envisaged to build my own system.
Your approach seems very promising, and i'd like to be involved in the project, if I can help in any manner, my goal being to replace the old HP stuff by some cheap and up to date in a time of flight measurement system specialized in Skin Research.
       

  Are you sure? yes | no

dadanto wrote 05/24/2020 at 09:15 point

Ted, are you thinking of turning this idea into a slightly commercial product?
Something like a semi-finished device for assembly.

I think it will have a big effect.
I think everyone would agree to burn a few hundred dollars to have such a device.
I am engaged in the production of georadars. (GPR)
I can help somehow.

Best regards

  Are you sure? yes | no

Ted Yapo wrote 05/24/2020 at 15:40 point
please join us in the chat for this project:

https://hackaday.io/messages/room/282439

  Are you sure? yes | no

dadanto wrote 05/24/2020 at 08:55 point

Hi Ted

Great project.
I enjoy him a lot.
I'm thinking of trying these comparators.
You gave the scheme and the board.
I have a question, with what software can this oscilloscope be observed?
What product board did you design it for?
Thanks in advance.

Anton

  Are you sure? yes | no

Ted Yapo wrote 05/24/2020 at 15:39 point

the software has not progressed beyond the experiment/prototype stage yet; it is not usable for anything else than proof-of-concept tests

I don't understand the question about which 'product board'

  Are you sure? yes | no

snss24 wrote 03/02/2020 at 18:18 point

very impressive project ! 

  Are you sure? yes | no

Reginald Beardsley wrote 02/10/2020 at 23:25 point

VNA by TDR measurement is simply the FFT of the TD data converted to magnitude and phase.  The length of the TD series determines the FD sample spacing.  Longer is closer.  But those can be zero padding  which you need to add anyway for other reasons.

That's the traditional Wiener-Shannon-Nyquist solution.  A better choice is compressive sensing as developed by Donoho and Candes in 2004.  But more work to implement.  However, for about 5x the effort, you get a 5-8x improvement in resolution for the same number of samples.  The cooler part is that you could turn reflection events into distributed capacitive, inductive and resistive elements for the same computational effort, though probably another 5x increase in labor to implement.

Everything else is  attended to by the CAL process just as with a VNA in the FD.

Have Fun!

Reg

  Are you sure? yes | no

MS-BOSS wrote 02/17/2020 at 19:38 point

A slight note on the FFT (I got trolled by this in my thesis): Before running FFT on the signal acquired by TDR with step generator, differentiate the data first, then run the FFT, then the calibration and then IFFT and integrate the output. Without the differentiation, you get massive spectral leakage. Then, windowing and zero padding is practically unnecessary unless you want to improve the spectral resolution.

  Are you sure? yes | no

Reginald Beardsley wrote 02/10/2020 at 22:28 point

I started to work on VNA via TDR, but dropped it when I saw the nanoVNA.  The math is quite straight forward, at least to a retired research level reflection seismologist.

I am acutely interested in sampling scopes.  I've got a pair of 11801s, 2x SD-22, 6X SD-26 and 1x SD-24 and deathly afraid of anything dying as there is no service data available from Tek,  though the Tek museum has a huge trove of service data which is awaiting approval for release by Tek's lawyers.

Leo Bodnar uses a Maxim MAX3946 laser diode driver which has a 26 ps rise time for the square wave generators he sells.  I highly recommend them.  I have BNC units with 1 MHz & 10 MHz square wave outputs and a 100 ps pulse output at 10 MHz repetition rates.  The 1 MHz and 100 ps units were by special request.

Have Fun!

Reg

  Are you sure? yes | no

MS-BOSS wrote 02/17/2020 at 19:29 point

MAX3798 is almost the same, but optimized for 50 Ohm operation and slightly cheaper.

  Are you sure? yes | no

Donnie Agema wrote 04/23/2020 at 10:48 point

Actually, there are service manuals for the scope and heads on the Tek site. Example:

 https://de.tek.com/search?keywords=11801&facets=_templatename%3dManual&sort=desc

  Are you sure? yes | no

MS-BOSS wrote 01/05/2020 at 19:58 point

Hi, the D flip-flops should be placed after the delay line. This way, once you reach high enough frequencies on trigger, the flip flops may sample before the ADCMP582 is latched.
Also, the flip-flops are only rated up to 450 MHz at 3.3 V and the LVPECL -> CMOS converter is only rated up to 275 MHz which limits heavily your trigger frequency. You may want to use an PECL flip-flop and then convert its output to CMOS. After doing so, the bottleneck of the trigger is shifted to the delay line.
For the autocalibration of the delay line, you may want to use the /EN pin as well. Otherwise, you risk oscillations at higher modes in very unlucky case.

  Are you sure? yes | no

Ted Yapo wrote 01/17/2020 at 15:23 point

thanks for the tips! I'm still parsing some of this, but in this design, the RT sampling frequency is ultimately limited by the DAC settling time. The inexpensive DACs on the board now settle in around 10 us, so this limits the sample rate to 100 kHz or so, coincidentally around the same as the Tek 11801B which is the second-hand commercial scope of choice at these frequencies. The flops can easily handle this. To sample inputs with a higher repetition rate, I use a trigger countdown. These days, this is most easily done with a chain of frequency prescalers normally used for PLLs. I haven't documented this part of the design yet :-)

Older commercial designs, including the 11801, used a tunnel-diode oscillator locked to a subharmonic of the input signal as a trigger countdown. Another magic diode!

  Are you sure? yes | no

crun wrote 04/22/2020 at 21:40 point

One thing that you can do when it is this slow, is use TOSLINK fibre to make an isolated connection.

  Are you sure? yes | no

kingcredie168 wrote 11/21/2019 at 03:07 point

Good job!

  Are you sure? yes | no

ThomasH wrote 11/19/2019 at 00:27 point

I just heard the amp hour podcast in which you talk about this project. And I discovered your talk. That is a really great project, I'm amazed by the 100$ BOM!

About a potential use case, I think it would be really useful to RE some small devices LCDs that are filling our trash bins... They are usually using MIPI interfaces at several hundred Mbps, and their datasheet are always under NDA (as well as the MIPI D-PHY specs if I remember correctly).

If you can use the devices to display a uniform screen, you literaly have millions of repetitive traces, so equivalent time sampling is perfectly adapted.

You can find high tech last gen smartphone LCD for quite cheap, imagine the potential of easily using them for hobbyist projects! (I know I'm getting excited ;) )

I'm definitely looking into building one! The only minor issue for me is using a PIC micro, I only rarely used them, I'm more into stm32 mcu's now.

Thanks you for your hard work!

  Are you sure? yes | no

Ted Yapo wrote 11/19/2019 at 18:29 point

That's an interesting use case, indeed! I'll have to look into it a bit.

The PIC is on the early prototypes only because I have used them for 20 years and there is near-zero technical risk and very little work involved for me to drop one on a board and get everything to work first time. I wanted to be able to focus completely on the unknown pieces of the design. The next rev will have a 32-bit ARM of some variety, and although I don't have as much experience in that area, I know there are many who do, so I can seek help as needed.

The sampler part itself is really simple, though. I think it shouldn't be much work to drop that into any number of different designs.

  Are you sure? yes | no

ThomasH wrote 11/20/2019 at 17:36 point

Makes a lot of sense to go to the lowest technical risk when prototyping of course ;)

  Are you sure? yes | no

droelfdroelf wrote 11/18/2019 at 21:58 point

Just saw your talk, awesome :) Speaking of TDR, you can transform the time domain to the frequency domain (basically FFT I guess) and use it as a VNA: https://www.evaluationengineering.com/home/article/13004984/distancetofault-is-spelled-tdr-or-vna

At least a simple one-port VNA (aka "antenna analyzer") should be doable.

  Are you sure? yes | no

Ted Yapo wrote 11/19/2019 at 18:20 point

Thanks for the tip! I've seen this done the other way to generate TDR results from a VNA, but you suggest an interesting twist. I think the major problem would be calibration. Somehow, you'd need to de-convolve out the response of the step generator and the sampler. I'll look around for some literature on the theory which might help wrap my head around the problem.

  Are you sure? yes | no

MS-BOSS wrote 01/08/2020 at 22:57 point

Find some literature about VNA calibration and look at the equations used for the calibration. In the frequency domain, division of the measured spectrum by calibrated spectrum of the pulse (and multiple reflections as well) happens. Although it may not be apparent, division in frequency domain equals deconvolution.
https://online.ece.nus.edu.sg/LRS/pdf/EE3104%20Lab1%20Manual.pdf
http://citeseerx.ist.psu.edu/viewdoc/download?doi=10.1.1.662.2977&rep=rep1&type=pdf
http://emlab.uiuc.edu/ece451/appnotes/Rytting_NAModels.pdf

  Are you sure? yes | no

Yang Li wrote 09/12/2019 at 02:27 point

Great work!! Could it measure a short impulse signal, say, 100 ps duration or just a fast rising step signal?

  Are you sure? yes | no

Ted Yapo wrote 09/14/2019 at 14:14 point

I estimate the rise time at around 50 ps so far, so it could probably just catch a 100 ps impulse, with around 10 samples. I have a generator that does a 172 ps impulse, which I can try to measure when I get a chance.

  Are you sure? yes | no

Simon Merrett wrote 08/23/2019 at 21:04 point

Hooray, Ted's back in business! 

  Are you sure? yes | no

Ted Yapo wrote 08/24/2019 at 01:56 point

It's always nice to come home.

  Are you sure? yes | no

Similar Projects

Does this project spark your interest?

Become a member to follow this project and never miss any updates