Grant Stankaitis
-
PWM motor testing
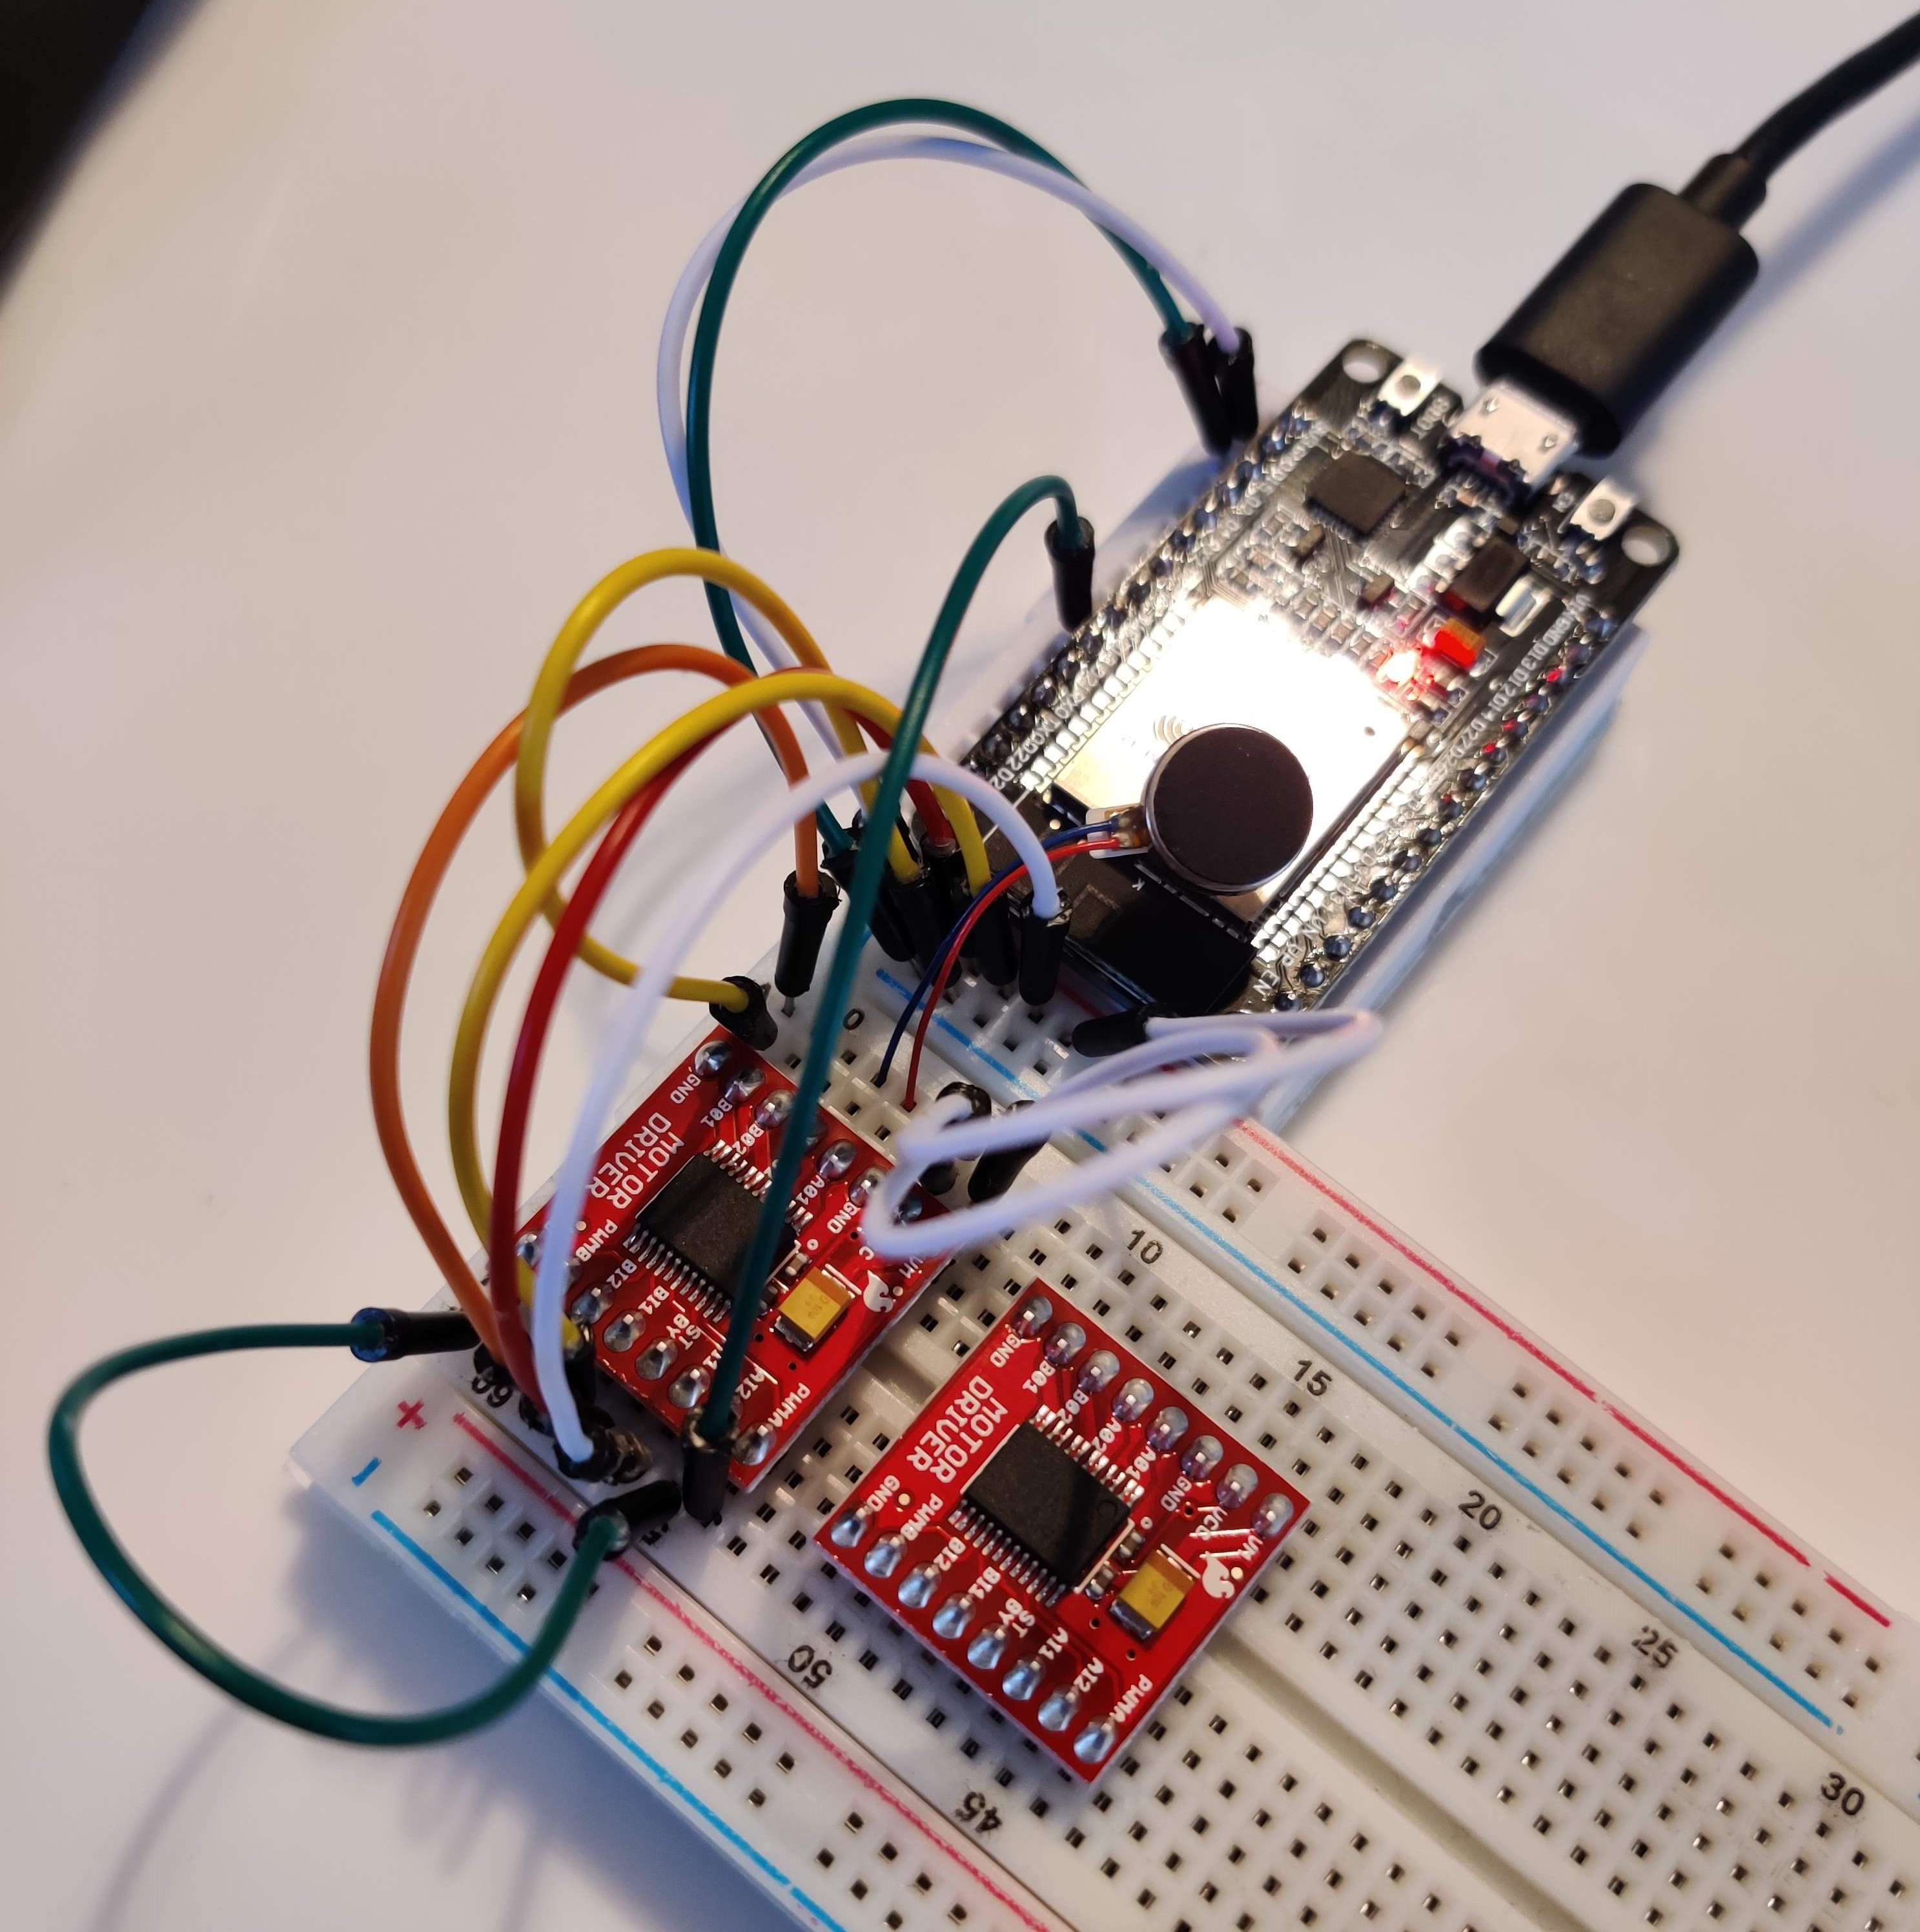
03/29/2020 at 23:32 • 0 commentsToday I worked on testing the PWM motor functionality of the system using the Sparkfun TB6612FNG motor drivers. As you can see in the picture below, I followed the schematic that the previous students used. To simplify things, I wrote out what the pins should be connected to.
- VCC, VM, BIN1, STBY, AIN1 ----> +3.3v
- GND, BIN2, AIN2 ----> GND
- A01, A02 ----> Motor 1 (I wired the red wire to A01, but I don't think it matters?)
- B01, B02 ----> Motor 2
- PWMA ----> ESP32 pin outputting PWM signal (PWMA corresponds to A01, A02/motor1)
- PWMB ----> ESP32 pin outputting PWM signal (PWMB corresponds to B01, B02/motor2)
![]()
Only one motor driver and one motor was connected for this test Below is the code that I used to test the motor:
import time
import machine
from machine import Pin

motor = machine.PWM(Pin(18))
motor.freq(1000)

while True: # On for 2 seconds, off for 2 seconds
  motor.duty(341) # Input different values here to test
  time.sleep(2)
  motor.duty(0)
  time.sleep(2)
My next test will be to wire up all of the motors and expand my program to sequentially send a signal to each motor.
-
PC to ESP32 communication via Mosquitto
03/25/2020 at 01:35 • 0 commentsAs I noted at the end of my last log, I was going to test message passing in the reverse direction, from the PC to the ESP32. I am happy to report that my test was successful! I have put the code below so there is a record of what was functional at this stage.
boot.py file. I have removed my network, password, and IP address for security.
import time
import array
from umqtt.simple import MQTTClient
import ubinascii
import machine
from machine import Pin
import micropython
import network
import esp

# wifi network credentials
ssid = '<YOUR_NETWORK>'
password = '<YOUR_PASSWORD>'
mqtt_server = '<SERVER_IP>'

# assigning what topic to subscribe to and publish to
topic_sub = 'motors'
client_id = 'ESP32'

# connects the esp 32 to the wifi network
station = network.WLAN(network.STA_IF)
station.active(True)
station.connect(ssid, password)

while station.isconnected() == False:
  pass

print('Connection successful')
print(station.ifconfig())
main.py file. I stripped the core functions from the main_PWM.py file, so I was able to verify that the functions that were previously written are operational. The only part that is missing are the PWM pulse instructions that are activated upon receiving a message from the server.
def sub_cb(topic_sub, msg):
	m_decode = msg
	dir_decode = m_decode.decode('ignore')
	print('dir_decode ', dir_decode) # Print to see the message
        # PWM pulse instructions will go here

def connect_and_subscribe():
	global client_id, mqtt_server, topic_sub
	client = MQTTClient(client_id, mqtt_server)
	client.set_callback(sub_cb)
	client.connect()
	client.subscribe(topic_sub)
	print('connected to %s MQTT broker, subscribed to %s topic' %(mqtt_server, topic_sub))
	return client

def restart_and_reconnect():
	print('Failed to connect to MQTT broker. Reconnecting ...')
	time.sleep(2)
	machine.reset()

try:
	client = connect_and_subscribe()
except OSError as e:
	restart_and_reconnect()

while True:
	try:
		client.check_msg()

	except OSError as e:
		restart_and_reconnect()
See the screenshots below to see the messages passed from my PC to the ESP32!
![]()
ESP32 console on the bottom left, messages sent on the right My next steps will be to test PWM motor functionality.
-
ESP32 communicating with Mosquitto
03/23/2020 at 06:08 • 0 commentsRead this before continuing!
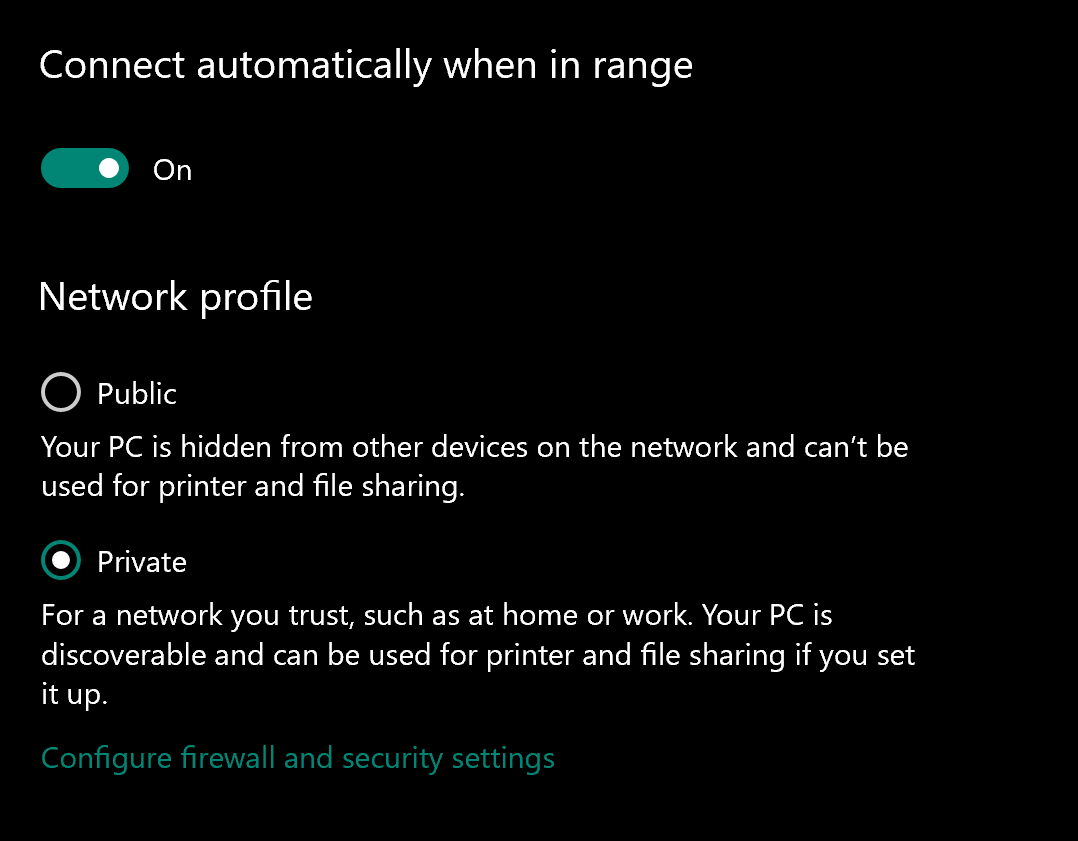
I spent a few hours trying to figure out why my ESP32 could not communicate with Mosquitto even though they were both on the same private, home network. I tried everything from reconfiguring the ESP32 to checking my network settings and routing tables. I knew it was a private network and I thought my firewall might have been limiting. It turns out, my home network was set as a public network in my wireless settings. Be sure to set your network to private so that your PC uses your private network communication settings instead of more restricted public network settings. This can be changed if you right-click on your active network and select 'Properties.'
![]()
Once I had that sorted out, my ESP32 instantly communicated with Mosquitto!
Below is some test code that I used to connect my ESP32 to my network.
import network

station = network.WLAN(network.STA_IF)
station.active(True)
station.connect("<WiFi SSID>", "<Password>")

if(station.isconnected()):
  print("Station connected!")
  print(station.ifconfig()) # Print IP address
ESP32 message passing
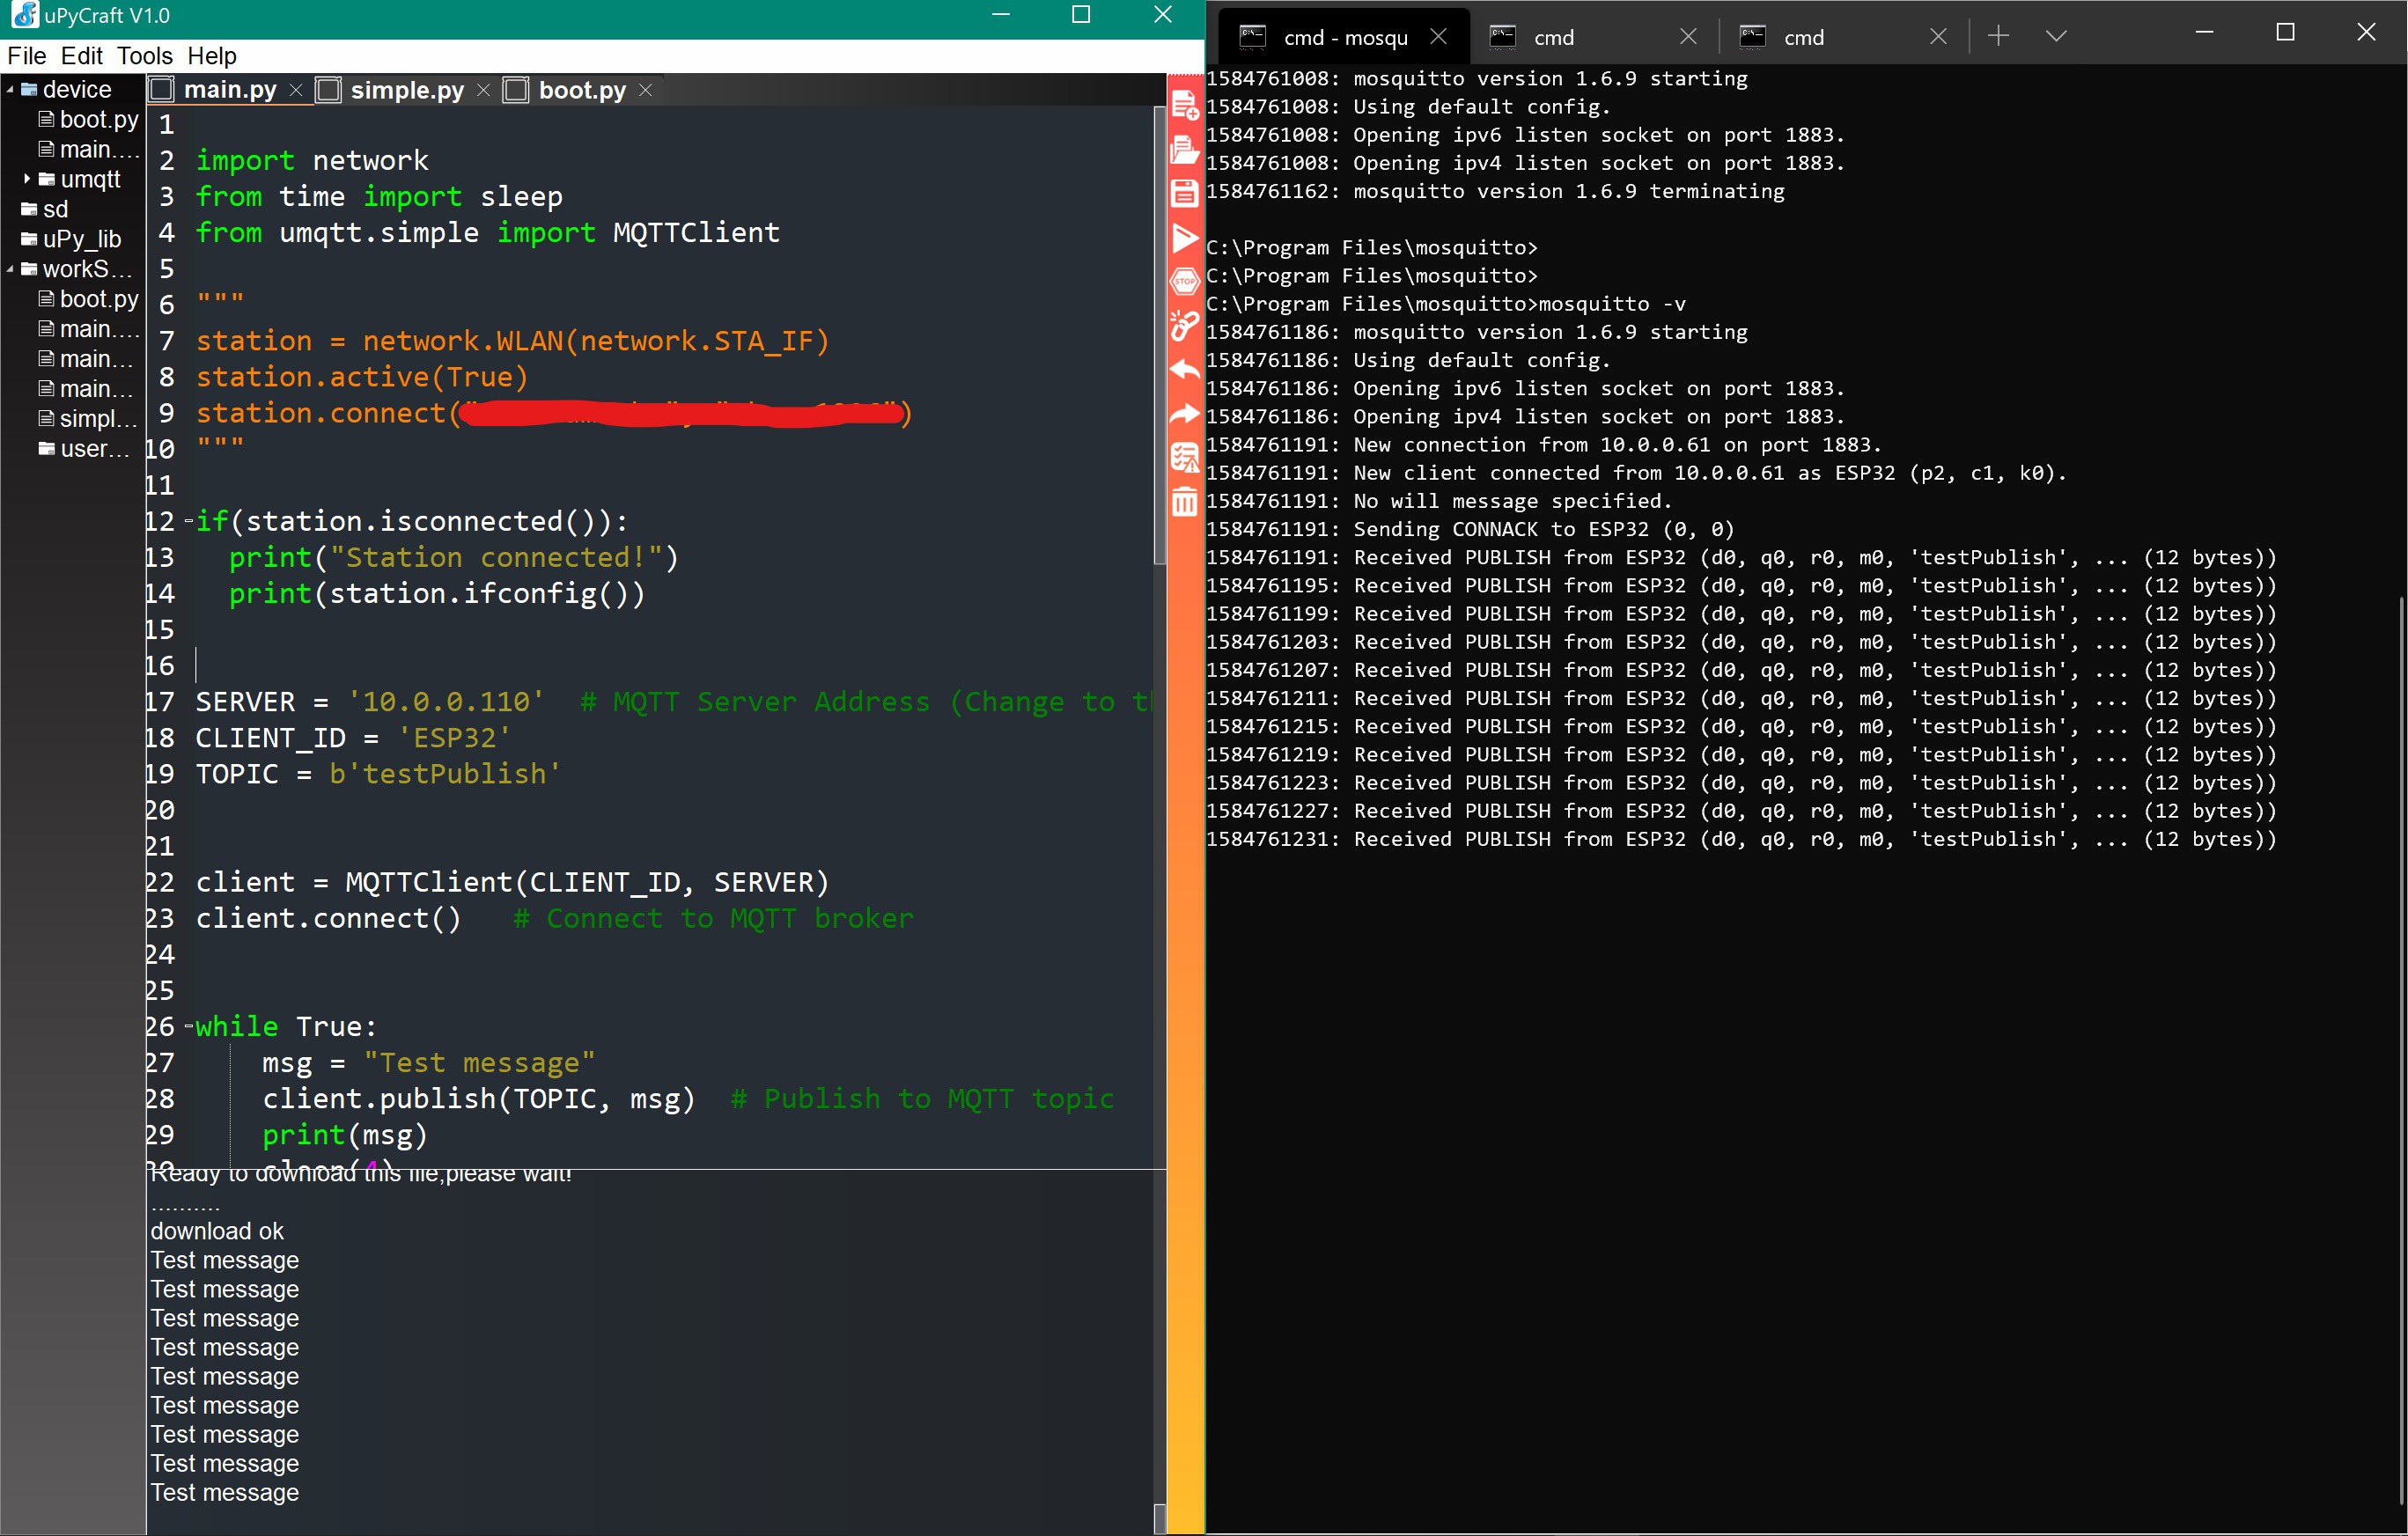
After tinkering with the main.py code, I was able to publish a message just as I did with the console windows in the previous post! In order to use the simple.py script to allow the ESP32 to communicate using the MQTT protocol, you need to create a new directory within the ESP32 to allow you to store simple.py within memory. To do this, right click 'device' in the file browser on the left-hand side of uPyCraft, and click 'New Dir'. Name this directory 'umqtt,' then drag and drop the simple.py script into the folder. It will then download to the ESP32. As you can see from the screenshot below, I was able to send messages to Mosquitto. In the console window on the right, you can see the ESP32 connecting and sending the messages to Mosquitto. On the left, the ESP32 is printing out the messages after they are sent.
![]()
Now that I worked out message passing, I will test it in the reverse direction as the project states, with messages being passed from the PC to the ESP32.
-
Communicating with Mosquitto
03/23/2020 at 05:22 • 0 commentsMosquitto background and helpful links
The previous students used Mosquitto to allow message passing between the ESP32 and a PC. Mosquitto is an open source MQTT server developed by Eclipse. Mosquitto is lightweight message broker and runs using the MQTT protocol. MQTT is a lightweight message passing protocol, best suited for small devices, like IoT devices. Below are some helpful links that allowed me to gain a better understanding of Mosquitto and networking with the ESP32.
MicroPython networking documentation
MQTT tutorial (this is what the previous students used)
Set up Mosquitto on PC
Here is the process that helped me successfully set up Mosquitto on my PC. I followed the last link above ('MQTT tutorial') to set up my environment. I followed this tutorial to help me set up Mosquitto- follow the steps in the section titled 'Manual Install Windows.' The download link for Mosquitto is in the article, but in case anything changes, the download can be found on the Mosquitto download page. Be sure to install Mosquitto as a service while using the installer.
Launching Mosquitto
There are two ways to launch Mosquitto. One way is via Windows Task Manager, another is via command line. I prefer to use the command line because it allows me to see when messages are being sent. If you start it using Task Manager, there is no way to see when messages are sent/received.
To start Mosquitto from Windows Task Manager, launch task manager (via Ctrl + Alt + Del). When the Task Manager window pops up, click on the tab labeled 'Services.' Then, search for 'mosquitto' in the services (the quickest way is to click on a random service, then type 'm' on the keyboard to jump to the services that start with 'm'). When you find mosquitto, then you can right-click and click 'Start,' The service status should then change to running.
Preferred method: To start Mosquitto from the command line, open a new Windows Command Prompt (shortcut: hit the Windows key, then type 'cmd'). Once the command prompt opens, you need to change to the install directory of Mosquitto. Mine was found under "C:\Program Files\mosquitto". It should have installed in your Program Files under a folder named 'mosquitto.' Once you are in this directory,
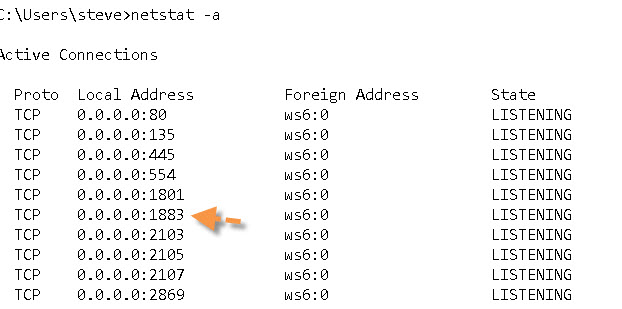
you can type 'mosquitto' to launch mosquitto. 'mosquitto -h' can be used for help. Every time I start mosquitto, I start it in verbose mode so that I can see console messages, and all of the messages that are being sent/received. To start mosquitto in verbose mode, type 'mosquitto -v'. You can verify that your mosquitto instance is running by running a quick netstat command. In a separate command prompt window, run 'netstat -a'. Netstat provides information and statistics about protocols in use and current TCP/IP network connections. As you can see from the screenshot from this tutorial used above, your mosquitto instance should be listening on port 1883. To stop mosquitto, use Ctrl + C.
![netstat-windows]()
Testing Mosquitto
The easiest way to test Mosquitto is by launching multiple command prompt windows, then subscribing them to the same topic. See the screenshots below of successfully sending a message!
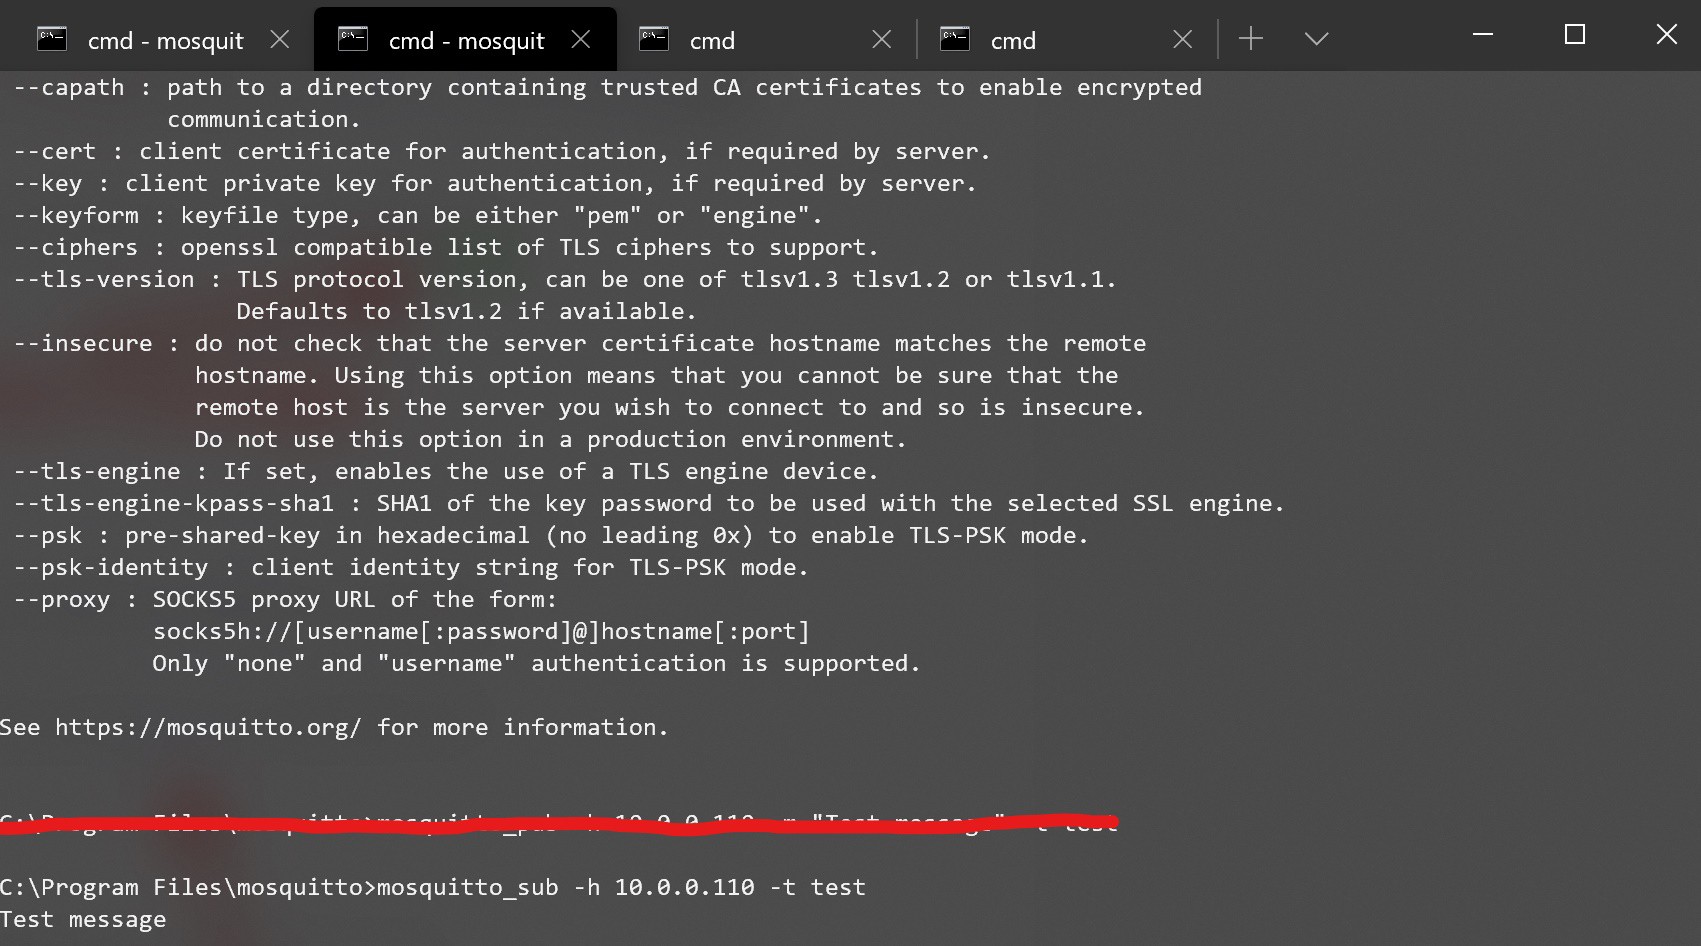
Below, I subscribed to 'test' topic, then a message shows up when sent by other client!
![]()
Ignore the red line, I messed up my query ![]()
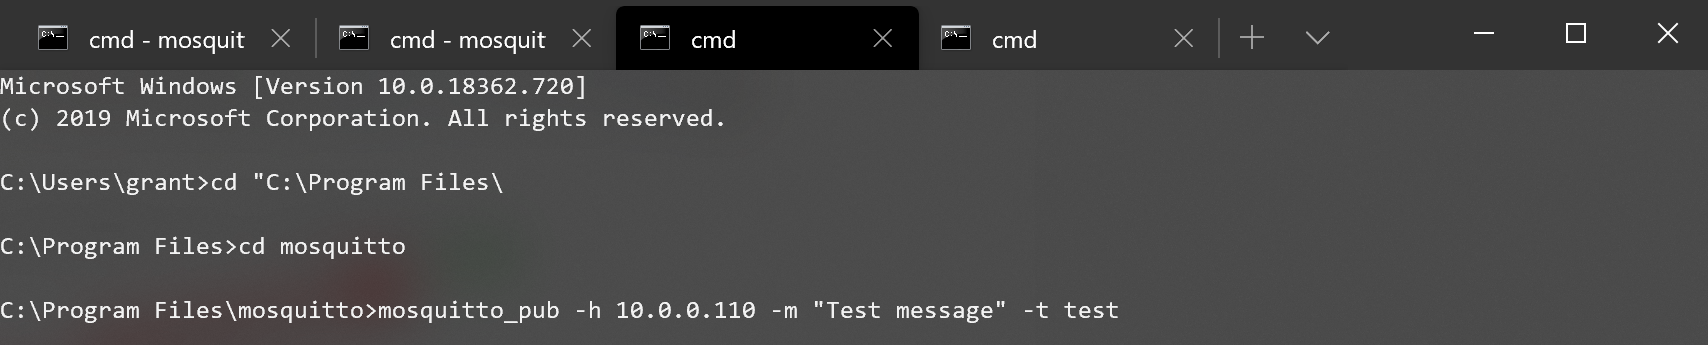
Published 'Test message' to the 'test' topic. This is the message that shows up for the other client above! ![]()
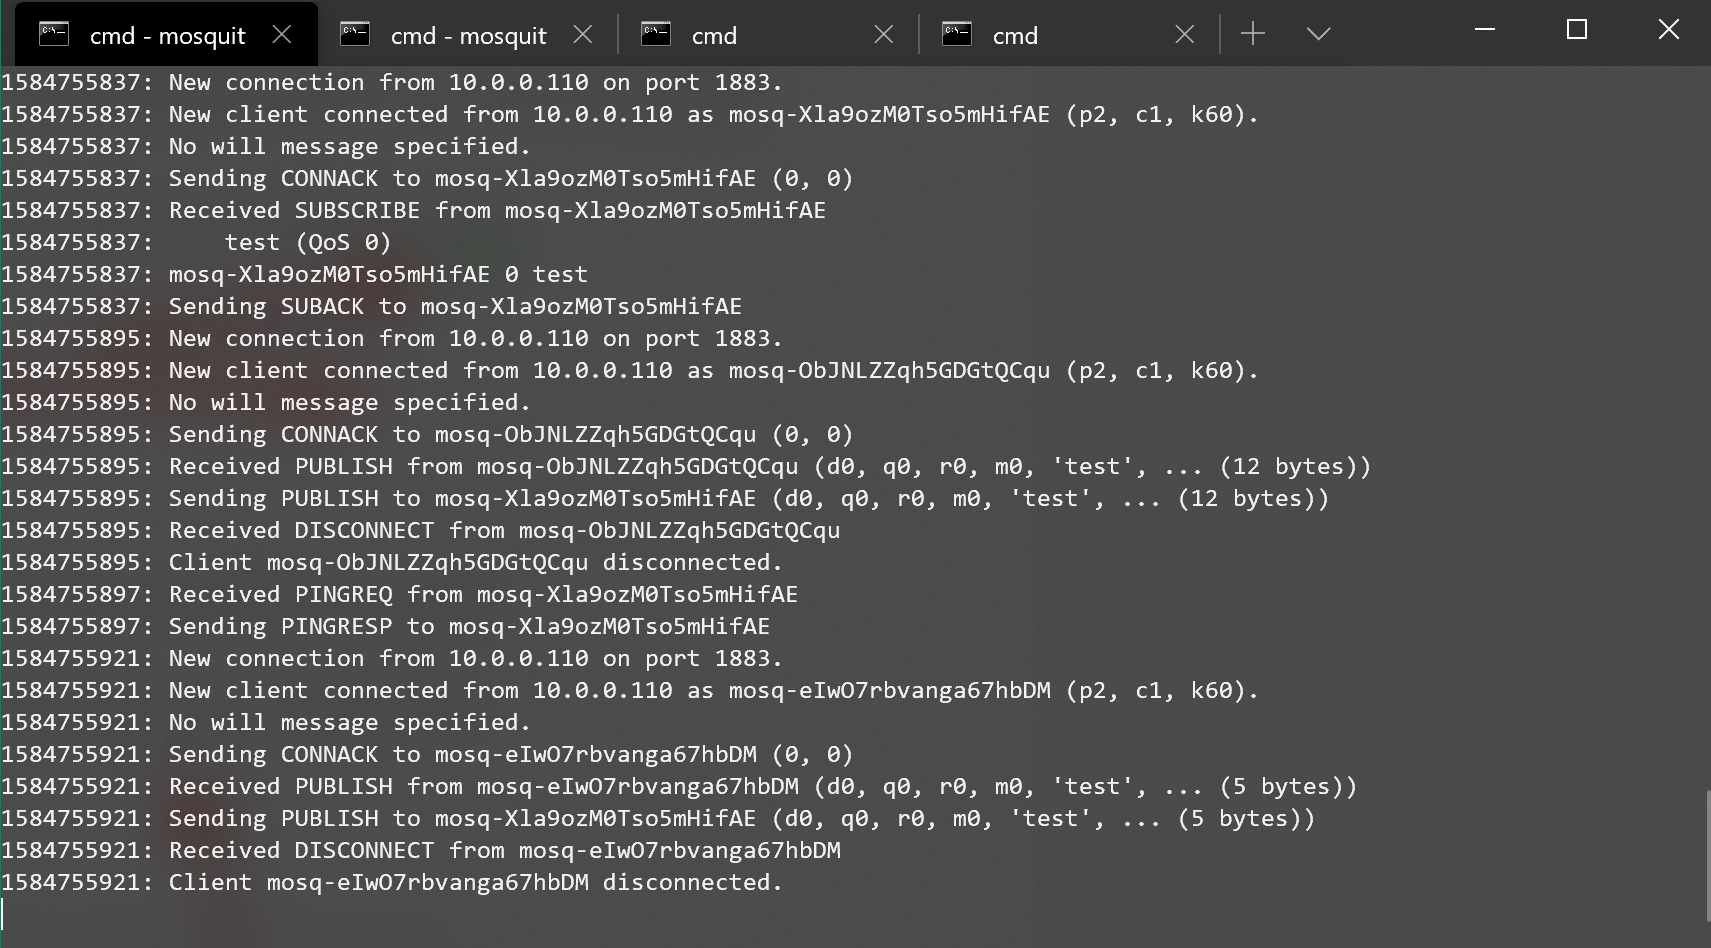
Console output from the running mosquitto instance Since this log has become long, I will detail my ESP32 communicating with Mosquitto in the next log!
-
Testing wireless connectivity + uPyCraft IDE
03/23/2020 at 04:27 • 0 commentsTo start off, I tested the ESP32 wireless connectivity using the built in examples in Zerynth. I tried the 'WiFi_Scan' example, and was able to successfully discover all of the available WiFi networks in my vicinity.
Since the ESP32 program that was developed for the Haptic Sleeve contained multiple modules (boot.py, main.py, simple.py), finding a way to utilize these within Zerynth was a challenge. I realized that Zerynth was flashing FreeRTOS, a real-time operating system, when the ESP32 was virtualized. There are benefits to using an RTOS as I learned in my embedded systems course, however they can be confusing to work with. I found that there was no way for me to configure the FreeRTOS boot script through Zerynth. Based on the programs/modules, I was able to conclude that the previous students that developed the code were solely running the code on the board without an operating system. To replicate the project for now, I searched for an alternative IDE that allowed me to interface directly with the ESP32 without an operating system. In the future, I think it will be very beneficial to run the ESP32 on FreeRTOS, so that is something we can think about switching over. It won't be too difficult to figure out how to optimize the code for the operating system.
uPyCraft IDE setup
Here is where uPyCraft IDE comes in. Surprisingly, it is a fully-featured IDE. It reminds me of the Arduino IDE, but I still prefer Zerynth as an IDE. It has a built in console that communicated directly with the firmware running on the ESP32, as well as a file browser which allows you to drag and drop programs onto the board. I followed these links to get everything set up and configured with the ESP32.
uPyCraft getting started with ESP32
I tested the same LED blink code below using uPyCraft to upload the code, and it works perfectly!
from machine import Pin

led = Pin(2, Pin.OUT) # Onboard LED
button = Pin(0, Pin.IN) # BOOT button

while True:
  if(button.value() == 0): # LED off when button released
    led.value(1)
  else: # LED on when button pressed
    led.value(0)
In my next log, I will detail how I tested and verified wireless connectivity with Mosquitto server.
-
ESP32 test code
03/11/2020 at 18:24 • 0 commentsAfter getting Zerynth set up and working properly with my ESP32, I worked with both the Zerynth example code snippets and wrote some of my own code.
Uploading code to ESP32
To upload the code to the ESP32, there is the Build menu in Zerynth in the uppermost menu bar. Once clicked, there are dropdown options for Verify and Uplink. Verify will compile your code, verifying it and checking for any errors, and Uplink will perform the same verification, along with uploading the code to your ESP32.
Zerynth examples
Instructions for how to use the Zerynth examples can be found here.
Below, I have written my own bit of code to test that both the onboard ESP32 button and LED work.
When the button is depressed, the onboard LED light will turn on!
pinMode(BTN0, INPUT)
pinMode(LED0, OUTPUT)

while(True):
    if(digitalRead(BTN0) == 0):
        digitalWrite(LED0, HIGH)
    else:
        digitalWrite(LED0, LOW)
Now that I have verified connectivity and the functionality of the ESP32, my next steps will be establishing wireless connectivity with our server.
-
Zerynth getting started
03/11/2020 at 18:16 • 0 commentsPrepping environment to program the ESP32
Once Zerynth is installed and launched, there are a few things that need to happen before you can start programming the ESP32 with MicroPython. The steps are fairly straightforward, and I followed this documentation link to get everything set up.
The steps are as follows:
- Install drivers for ESP32 (may require a reboot)
- Connect ESP32 board to PC
- Register ESP32 with Zerynth
- Virtualize ESP32
- Test code!
During these steps, Zerynth will handle the firmware flashing to make the ESP32 MicroPython compatible!
Note on connecting the ESP32 to PC via micro USB: Be sure to use a known quality cable. One cable that I used was able to provide the board with power, but no data connectivity. When I switched cables, my PC was able to recognize the device.
Registering and virtualizing ESP32
Within Zerynth, you're able to register and virtualize your ESP32 board. The registration process allows Zerynth to build a virtual machine for your specific device. The created virtual machine can be virtualized (i.e. burned on the device).
I followed this section from the same link above to connect, register, and virtualize my ESP32.
Notes on selecting your virtual machine: There are a few options for the VM within Zerynth, all of which use FreeRTOS. We may need to register for a premium account in order to get the full features/more advanced options with FreeRTOS. I haven't had any issues yet relating to this, so we will test the functionality with what is provided, and if need be, we can look into the premium account option.
-
IDE for programming the ESP32 using MicroPython
03/10/2020 at 21:25 • 0 commentsI decided to use Zerynth as the development environment for the ESP32.
I chose Zerynth because it provides a useful all-in-one package that makes programming the ESP32 easier.
This link explains the main points behind using Zerynth.
"What you DON’T need:
- you don’t need to clone any repository from Github or copy/paste scripts from here and there in the web;
- you don’t need to drag-and-drop any file in any folder or via FTP;
- you don’t need to install Python on your PC (Zerynth installs its own distribution of Python under the hood);
- you don’t need “esptool” to flash your ESP32 and you don’t need any binary file;
- you don’t need to install Putty or similar software on your PC (Zerynth Studio comes up with its own serial monitor)."
Download Zerynth
The link to download Zerynth can be found here. Download the file and click through the installer as necessary.
Zerynth initial setup
For the initial setup of Zerynth after the installation is complete, follow these steps:
- Accept license agreement
- Optional: Click online to clone code from online repository (like GitHub)
- Select the latest version to install (r2.4.2). Zerynth will download and install the required packages.
- Click "Start Zerynth!"
- You will need to create an account to user Zerynth. I signed in to Zerynth using my Chapman Google account.
-
Helpful links for ESP32 development
03/10/2020 at 21:10 • 0 commentsFor this project, we will be programming the ESP32 using MicroPython. Below are some helpful links to MicroPython and ESP32 documentation.
Some things to be aware of when powering the ESP32 from the 5v/3.3v pin:
On the 5v pin, you can supply anywhere from 5-12v DC, the on board voltage regulator will step down the voltage.
NEVER supply more than 3.3v on the 3.3v pin, it has no voltage regulator.
Haptic Sleeve
Sleeve worn on the arm to provide haptic feedback while performing handwriting exercises.