Close
0%
0%

GPS Driven Clock

This clock displays the time and day of the week directly from a GPS receiver.

Similar projects worth following
After developing the control electronics and driver software for the LED matrix displays in the previous project, I wanted to use them for something. With the schedule disruption that comes with not working, keeping track of the day of the week became more of an issue. I have some little GPS modules left over from another project. I also have a few of the SAMD21J18 boards left from my SmallPi project. I wanted to dim the display based on ambient light, so I added a sensor next to the display to sense room light. For time zone configuration and a few options, I added an 8 position DIP switch. All of it will be packaged up in an aluminum case. A large part of this project is re-used from previous projects.

This project re-uses a few boards from previous projects and adds a couple of new ones. Some software ties everything together.

Existing boards:

   LED Matrix Driver boards. On the front side of the chassis.

   SmallPi SAMD21J18 controller board. The middle board on the back side of the chassis.

   GPS Receiver board. The leftmost board on the back side of the chassis.
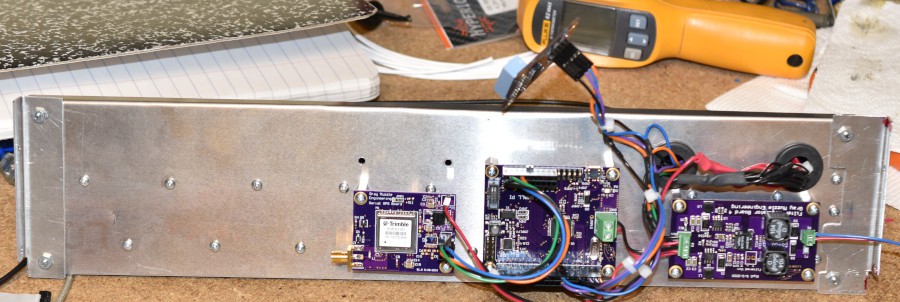
Back side of the Chassis
Back side of the chassis showing GPS, processor, power and DIP Switch Boards.

New Boards:

   Ambient Light Sensor board. Lives next to the leftmost display module on the front of the chassis.

   DIP Switch board. Visible sticking up on the wiring harness.

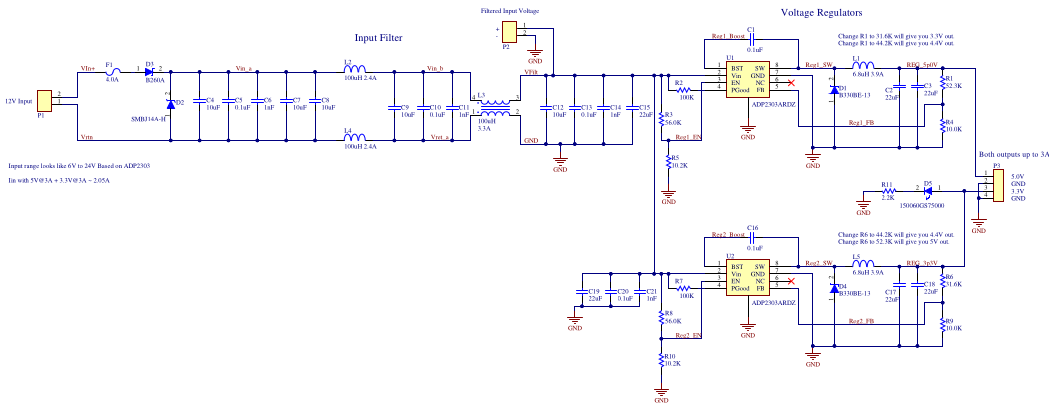
   Input power filter/regulator board. The rightmost board on the back side of the chassis.
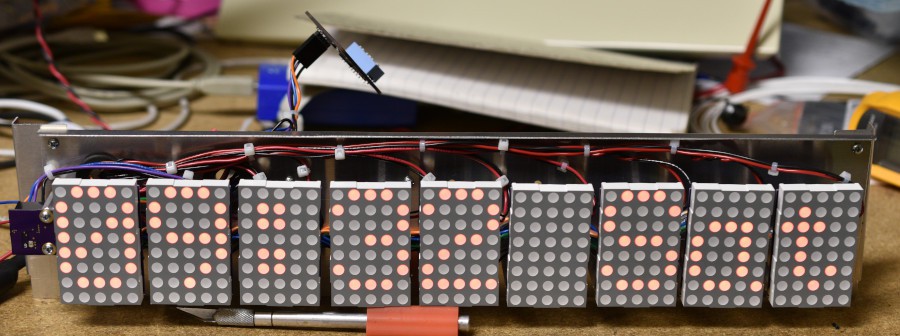
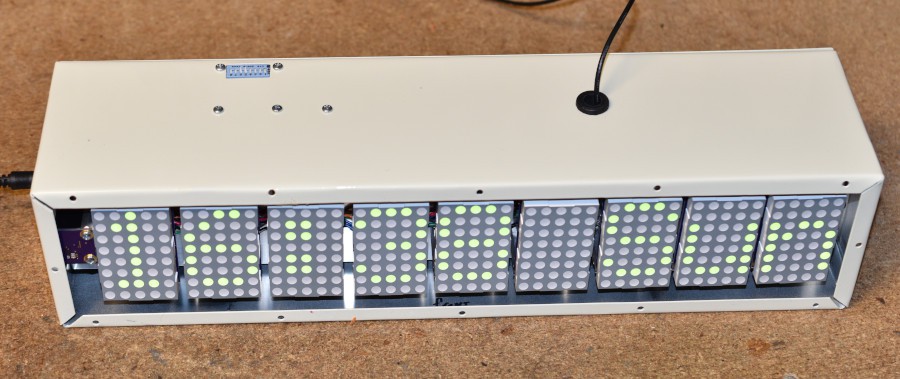
Front Side of Chassis
Front Side of Chassis showing the LED Matrix displays and the Ambient Light Sensor.

Communication with the LED Matrix modules is via an I2Cbus. There are 18 devices on this bus, so it can get pretty busy at times. It clocks at 400KBPS and the bus is spread out over about 18" of wire. I was a little concerned about this many devices that are spread out over this much distance, but it looks reasonable on an O'scope and I don't see any signs of data errors in operation. The ambient light sensor and the DIP switch are also read over an I2C bus. A different bus was used for these two just to separate them from the display module traffic.

When I started the project, I thought about developing all of the firmware for the project on my desktop machine and then porting it over to a microcontroller when all the features were implemented. This is why I chose to put the DIP switches on the I2C bus (with a TCA9534 I/O Expander chip). It is also why I picked an Ambient Light sensor module with an on-board ADC (BH1726NUC-E2). In the end, I decided it was not worth the effort on a project this size to take this approach and just did the development on the SAMD21J18 part.

Communication with the GPS receiver is done with a UART. It is running at 4800baud which is the "standard" for NMEA traffic.

A serial debug console connection is also available. This will mostly be used to see what the GPS reciever is doing. The Copernicus II seems to be a pretty generic GPS receiver. The sensitivity is OK but not outstanding. I suspect that running this in our wood framed house with asphalt shingles may be marginal for getting a fix unless it has a window view. Time (and the debug port) will tell on this one.

The SAMD21 family uses something they call Sercom modules to support UART, I2C and SPI communication. I wanted to run 4 of them for the communications described above. The SAMD21E18 only has 3 of those modules accessible, so that drove the choice to use the SAMD21J18 based board.

I started using the Copernicus II modules in another application several years ago. I had most of the software to parse and control these modules left over from that. It still took some work to add parsing for a couple of additional messages and control over a couple of aspects of the receiver. Also, the original code was developed to run in a lot fatter environment, so there was a lot of error handling and parsing of marginally useful stuff that needed cleaning up.

All timekeeping is done in the GPS receiver. The firmware that is running on the SAMD21 parses the NMEA messages from the receiver, converts the "Time of Week" output value to local time and day of week, and formats it for display. I thought a lot about doing the timekeeping in the SAMD21 processor and disciplining it from the GPS data. If the GPS fixes inside my house prove to be intermittant, I will implement the local timekeeping, but I wanted to see whether this idea would work.

Time is extracted from the NMEA messages from the "Time of Week" parameter. "Time of Week" is the number of seconds since midnight on Saturday night, in GPS time. GPS time differs from UTC time by a varying amount. When this was written,...

Read more »

Switchpad_I2C.pdf

Schematic for ESD protected DIP switch board with I2C read.

Adobe Portable Document Format - 139.29 kB - 09/19/2020 at 20:24

Preview

Bill of Materials-Switchpad_I2C.csv

Bill of Materials for ESD protected DIP switch board with I2C read.

Comma-Separated Values - 929.00 bytes - 09/19/2020 at 20:24

Download

AmbientLightSensorI2C.pdf

Schematic for Ambient Light Sensor breakout board

Adobe Portable Document Format - 49.33 kB - 09/19/2020 at 20:22

Preview

Bill of Materials-AmbientLightSensorI2C.csv

Bill of Materials for Ambient Light Sensor breakout board.

Comma-Separated Values - 608.00 bytes - 09/19/2020 at 20:22

Download

FilterRegulator_Bd4.pdf

Schematic for 2 channel switching regulator board

Adobe Portable Document Format - 197.83 kB - 09/19/2020 at 20:28

Preview

View all 6 files

  • 1 × SAMD21J18 Microcontroller board See SmallPi in my project list
  • 9 × LED Matrix Driver Modules See my project list
  • 1 × Trimble Copernicus II GPS Receiver board See my GPS Receiver project
  • 1 × Ambient Light Sensor board This is a breakout board. Schematic in the file section
  • 1 × I2C Switchpad board. ESD and RF protected DIP Switch board. Schematic in the file section.

View all 7 components

  • Power Supply Issues, cont'd

    Bharbour09/20/2021 at 15:45 0 comments

    In the previous log, I mentioned that the system was particular about the source of the 12VDC input. With certain wall warts and power bricks, the +12V would not turn on. In some cases, it would destroy the buck regulator chips on the power supply board.

    The new power supply PCBs came back from OSHPark, and I built the first one up this weekend. After talking with a friend who knows a lot about power supply design, I decided to replace the inductors in the input power filter with simple wire bridges. Testing the new board with a variety of 12VDC  sources, the system will power up with all of the sources that it had problems with previously. It looks like the regulated wall wart power supplies do not like powering up into an inductive load. Most of the wall warts available now, are the regulated variety, so this is a useful piece of information.

    I did a preliminary set of tests to see if removing the input filter inductors is going to cause more conducted emission problems from the power supplies. To perform these tests, a circuit called a Line Impedance Stabilization Network (LISN) is inserted between the power source and the thing being tested. A spectrum analyzer is connected to the LISN to observe the Radio Frequency energy coming out of the thing being tested.

    I used two of the power supply boards, one with the input filter inductors populated and one with them bridged out. A 5 Ohm power resistor was used as a load.

    At very light loads, the input filter inductors made a large difference. The signal levels below 1.5 MHz on the board with the filter inductors were about 50dB lower than the board without the filter inductors. I didn't test above 1.5MHz on this test setup.

    The regulator board has two separate regulated outputs, 5V and 3.3V. Two separate regulators provide these outputs.

    With either the 5V or 3.3V output loaded with the resistor, the filter inductors did not make a lot of difference between 1.5 and 11 MHz.

    Between 11 and 50 MHz, the signal levels  out of the board without the filter inductors are about 12dB higher than the board with the filter inductors. The filter inductors are clearly doing something (beside blowing up regulator chips).

    09/23/2021 As an added scrap of conformation on the inductors, I have another filter/regulator power supply board that uses a completely different switching regulator chip but a similar input filter. This board would not operate on wall warts either. I built up one of these boards this week with the filter inductors bridged out and this new board works fine with the wall warts that I tested with.

  • Power Supply Issues

    Bharbour08/14/2021 at 00:55 0 comments

    This clock has been operating just fine for the last 11 months until about a week ago. We had a power outage due to an electrical storm. When the power shut down, it oscillated on and off rapidly for about 30 seconds. Apparently, this fried the buck regulator chips on the power supply board and sent +12V out on the 3.3V and 5V rails. The stuff running on the 5V rail had LDO (linear) regulators between the 5V supply and the loads, and they survived. The display driver boards were running directly off the 3.3V rail and when it went to 12V, all 9 of the display driver boards were killed.

    Rather than repair the display driver boards, I have substituted different design driver boards from the work that I did on the display drivers last year. This was less expensive and fairly simple to do. The mechanical mounting plate for the displays needed to be re-designed and fabricated. The replacement display boards use the MAX7221 driver chips, so they have a SPI interface rather than the I2C interface of the original boards. The cable change  for the SPI interface was simple to do. The display driver software for the MAX7221 chips is substantially different below the top level than the I2C software, but the top level function calls for the driver library are almost identical. I swapped in my replacement library and only had to do minor edits in a few spots. The MAX7221 drivers run on +5V, so the whole system is operating on +5V now.

    The most difficult part was to get the physical layer SPI drivers to work. My driver library calls the Atmel/Microchimp ASF low level drivers to deal with the hardware interface. The ASF libraries have been a big disappointment: the documentation stinks and the code is strangely architected and buggy as hell. The serial driver was so bad that it was easier to code my own than use the ASF library. The SPI functions are close to that point. 

    Another project was running on the same design filter/regulator board as this clock was, and it also failed in a similar manner in this storm. Since both systems failed, there is a regulator board design problem. Now that the whole clock system is running on +5V, I have another filter/regulator board design using different regulator chips that may be suitable. The switching regulator on the substitute regulator board is an older design which runs at much lower frequency than the one being replaced. Right now, there are significant noise spikes on the +5V power rail, and when using the 12V wall wart power supply that the system was running on, the GPS is having problems getting a fix. When running on a good quality bench power supply, it is OK. The noise spikes may be from the older regulator, or the different display driver chips. This is still to be determined.

    I think that I am not done with the power supply issue. In addition to fixing the noise problem, I need to look at adding an overvoltage crowbar circuit or a hot swap power controller between the 5V regulator and the rest of the system. This is to protect the system from similar failures in the future. Shorting the switching transistor is one of the most common failure modes on a buck regulator system. The rest of the system needs to survive this.

    Hot Swap power controllers make excellent protective devices. Originally designed to go on PCBs that get inserted into a powered up system like a server rack and protect the system and the PCB from transient events related to plugging in the PCB. They have undervoltage and overvoltage sensing to disconnect the PCB power from the input power supply. They have overcurrent sense to disconnect the output from the system in the event of a problem on the PCB. Lastly, they have a linear "soft start" feature to control the current while the capacitors on the PCB charge up to the system voltage.

    Once I have the power supply problems sorted out, I will edit this log and post the results.

    9/10/2021 Update

    Power Supply Board Schematic
    Power Supply Board Schematic


    Here is the schematic for...

    Read more »

  • Input Power Filter Testing

    Bharbour10/05/2020 at 18:29 0 comments

    From the Project Description:

    "There is some debate about the use of multiple parallel capacitors of different values in filters. The parasitic inductance of capacitors mean that large capacitors that are capable of supplying the instantaneous current demands stop looking like capacitors at disappointingly low frequencies. Electrolytic capacitors are really bad in this respect, but the ceramic chip caps suffer from it as well. Lower value capacitors have lower parasitic inductance, so they continue to behave like capacitors to higher frequencies, but won't supply much energy. The most obvious solution to this is to put some smaller value chip caps in parallel with the high value caps in the expectation that the high value caps will supply the instantaneous current while the low value caps will provide low AC impedance to higher frequencies. I have seen several competent people claiming that this idea does not work. I have also heard some people claiming that it does work. I want to see for myself, so the input filter design used here has sites for a range of capacitors.

    The new PCBs came back from OSH Park on Friday. In order to test the behavior of the input filter and to attempt to determine if the parallel capacitors spanning a range of values contributed to better high

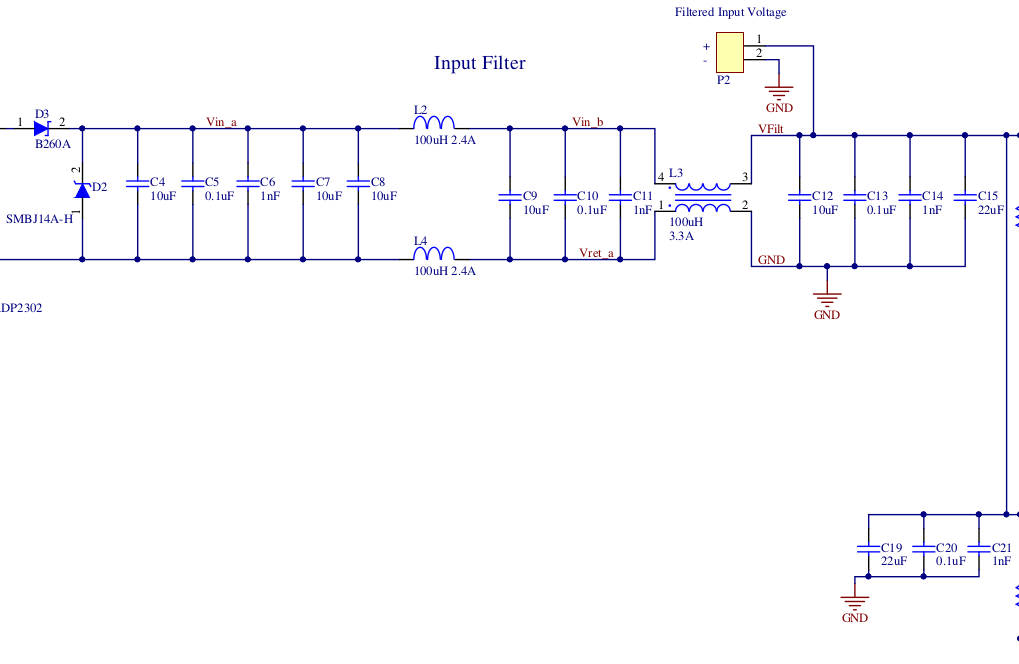
    Input Filter section of the Filter/Regulator board
    Input Filter section of the Filter/Regulator board

    frequency filtering, I populated all of the inductors on the board and just the 10uF caps C4, C7, C8, C9, C12

     and tested the board with my home built Scalar Network Analyzer, sweeping from 100KHz to 30MHz.

    Next, I populated the 22uF caps C15, C19 and repeated the sweep.

    Then I populated the 0.1uF caps C5, C10, C13, C20 and ran another sweep.

    Finally, I populated the 1nF caps C6, C11, C14, C21 and ran the last sweep.

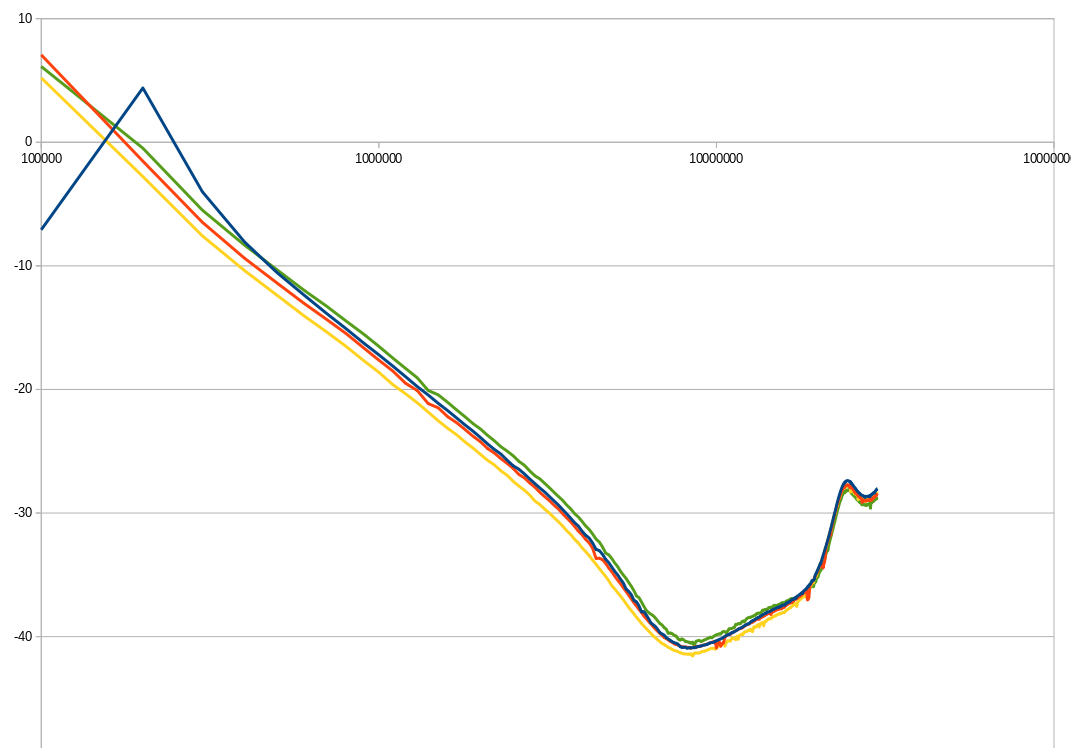
    The results of the 4 test runs were almost indistinguishable from each other. This is the behavior that I would expect if the individual caps just combined into one capacitor "blob". It is possible that 30MHz is not high enough to see the individual capacitors contributions, but I am not set up to test to higher frequencies right now.

    Plot of Amplitude in dB vs Frequency through the input filter.
    Plot of Amplitude in dB vs Frequency through the input filter.

    The plot shows Attenuation in dB on the Y axis and Frequency plotted logarithmically on the X axis.

    The blue trace is with only the 10uF caps and the inductors populated. I am not certain what the extra peak is around 200KHz. The traces appear to converge as the frequency increases. I was expecting that the traces would start to diverge around 5 to 8MHz, as that is where the manufacturers data sheets show the parasitic effects becoming dominant on the large capacitors.

    I believe that the minimum around 8MHz is the parasitic capacitance in the inductors L2 and L4 reducing their effective impedance. This is supported by the fact that all of the plots show a very similar feature.

    Until I can test this farther, I am going to assume that paralleling a span of capacitor values does not work as I hoped.

  • Put the covers on after powdercoating

    Bharbour09/21/2020 at 00:09 0 comments

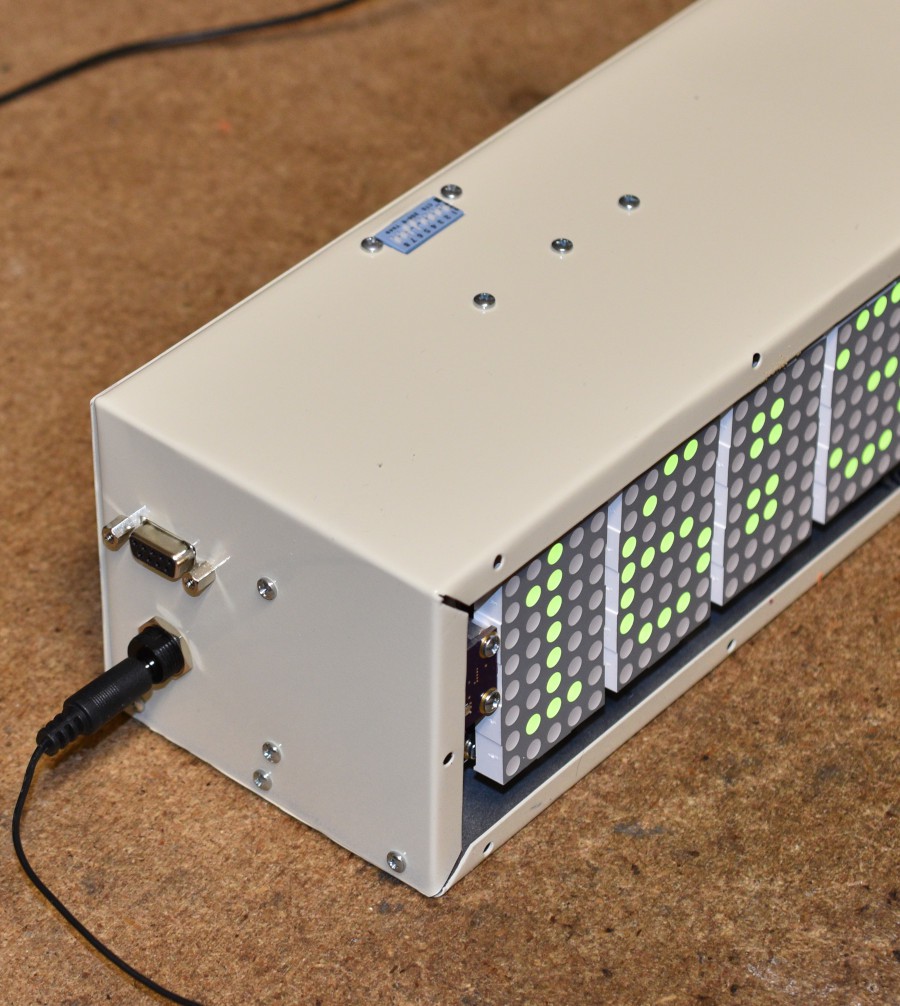
    The project looks a lot more finished after powdercoating the case. The case is formed out of 0.030" 5051 aluminum. This case design does not require any welds. Nutserts were used on several of the machine screw holes because it would be difficult or impossible to get a conventional nut into the case.

    The cable coming out the top of the case is for the GPS antenna. Right now, the little patch antenna is not working to get a fix in my shop. A higher gain antenna with a view out the window is on the other end of that cable, and it works fine. I will get a higher gain patch antenna to sit on the top of the case and see if that is sufficient to get reliable fixes inside the house.

    Front and Top View
    Front and Top View
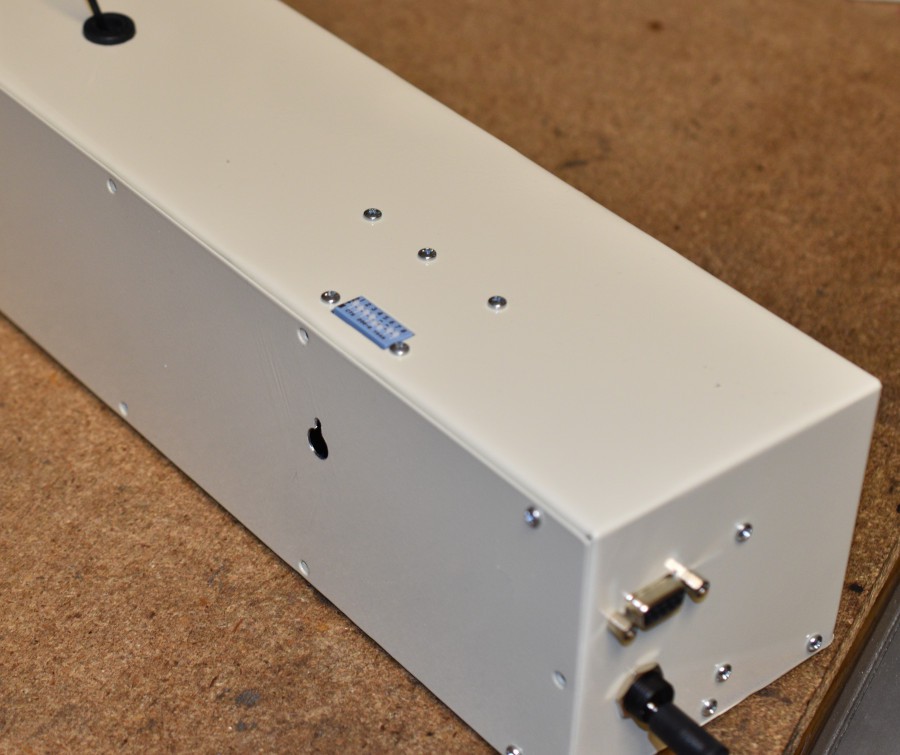
    End and Top View
    End and Top View

    The DIP switch, Debug console port and power connection are visible in the end and top view shown.

    Rear Quarter View
    Rear Quarter View

    The slots in the back cover will be used to hang the clock on the wall.

    The last step is to put a neutral gray filter on the front of the box. It should increase the contrast and conceal some of the details inside the box.

    Finally, I got the plastic for a cover/filter for the front of the box.

    Front View of Display, through the gray cover/filter
    Front View of Display, through the gray cover/filter

View all 4 project logs

Enjoy this project?

Share

Discussions

Ken Yap wrote 09/21/2020 at 04:07 point

Nice work. 👍 Wish I was as handy with case construction as you are.

  Are you sure? yes | no

Bharbour wrote 09/21/2020 at 11:59 point

Thanks! It has taken a lot of time and scrap metal to get to this point :)

  Are you sure? yes | no

Similar Projects

Does this project spark your interest?

Become a member to follow this project and never miss any updates