-
More testings on different NES games!
09/21/2024 at 06:53 • 0 commentsFrom the previous log it is mentioned that only Mapper 0 and 4 games can be put into these consoles.
However, some of the games in the 400-in-1 console contains Mapper 4 that are converted from Mapper 2 such as Jackal. Those games are running without CHR-ROM and only CHR-RAM instead.
Earlier on, when such games are inserted into the console with the custom menu, it gives a black screen, or garbage output.
Then, checking how did the game selection in 400-in-1's original menu works, it is noticed that there is a specific sequence, and a specific range of number that gives these converted games a correct tile output.
I have rearranged the loading of these OneBus registers ($401x) following the ones in that original menu:
jumpToProgramInRAM:
    lda _zR410A
    sta $410A
    lda _zR410B
    sta $410B
    lda _zR4100
    sta $4100
    lda _zR4105
    sta $4105
    lda _zR4106
    sta $4106
    lda _zR4107
    sta $4107
    lda _zR4108
    sta $4108
    lda _zR4109
    sta $4109
Since these games does not run on CHR-ROM, the configuration of the OneBus registers at $201x are not involved. However, the bottom nibble of the $4100 must be between 0x04 and 0x0F for these games to work I'm not entirely sure why, and it works on both the emulator, and on the handheld itself.
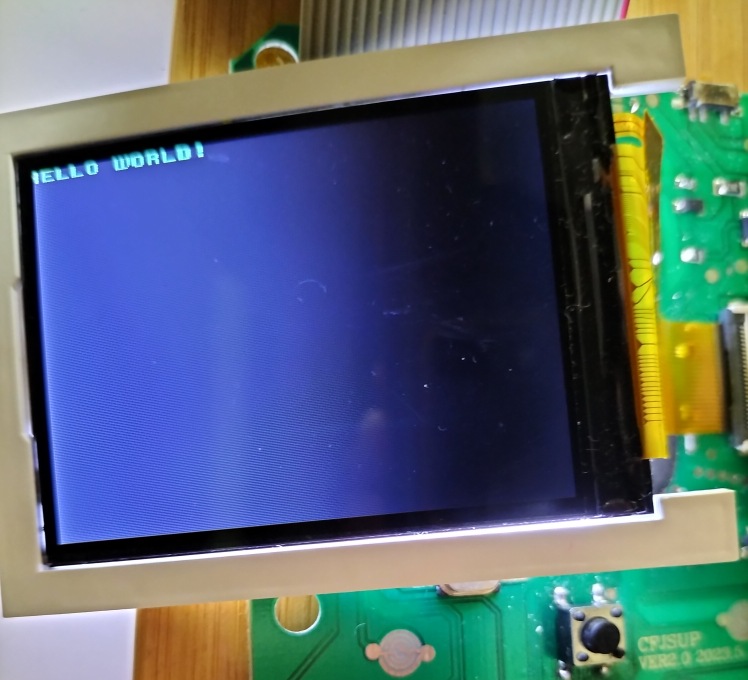
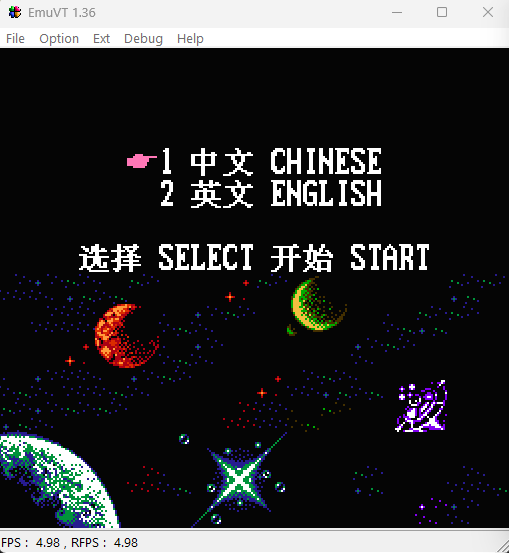
Well, here it is - at least it loaded correctly! :D
Note: I have tested other Mapper 0 games with only CHR-RAM. It doesn't work at all on both the EmuVT and the handheld too.
-
Custom games in action!
08/31/2024 at 09:05 • 0 commentsCould I load its ROM another new code? That's the question!
That was the question back in 2020 - well, to answer this time, yes it works! However it need effort to understand the OneBus, then the ROM dumping process, and finally to recompile the menu with the part of the dumped ROM code that initialises the TFT.
The video: some experimentation with MMC3-mapper games here - it works normally on the handheld. Currently Mapper 0 and MMC3 games worked well. If not mistaken, the ones with MMC1 requires modification of the code (to be compatible to MMC3) which is not covered in this research.
As usual - I'm still in the process of compiling instructions on how to build the custom menu, and also to find a way to build a more economical flasher + dumper so you do not need to use the T56 programmer! :D
-
Update and a git website added!
08/23/2024 at 14:06 • 0 commentsThese handhelds can be actually programmed with another game, by further testings, provided if you get the registers (especially the $41xx OneBus-related) correct.
However, you need to dump its original ROM and try to work around its bit-swaps and the TFT initialization routines.
As writing the ROM dump analysis and the such is a bit too difficult inside the log entry, I have separately written a Github page on this one: https://nyh-workshop.github.io/Custom-ROM-Sup-Game-Box-400in1/
-
Loaded a "Hello World" app inside!
06/23/2024 at 03:11 • 0 commentsOkay, so I managed to examine the dump some more and trying to strip the startup code to its bare minimum.
However, on this particular newer dump, the code is significantly more complex than the previous one, due to the TFT init routines (that covers many other models apart from the GC9306), and also many other unknown registers such as 0x413x are being accessed.
Instead of stripping it first to see if it works or not, I grabbed the whole first 512K (0x80000) of the code and pasted into another empty bin file.
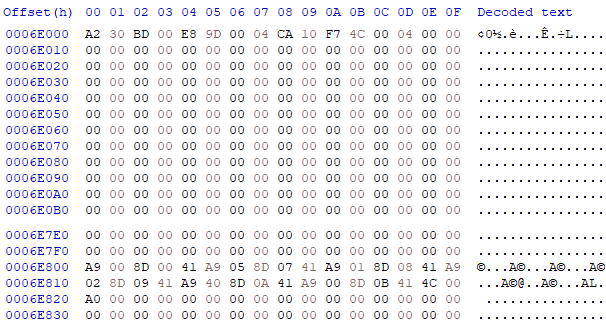
The startup code is just too much work to strip at the start so I filled the majority of the menu code from 0x6E000-0x6EFFFF with zeros and replaced it with another jump to another area away from that first 512K - to 0x82000:
; org 0x6E000:
cpyToRAM_Loop LDA $E800,X
              STA $0400,X
              DEX
              BPL cpyToRAM_Loop
              JMP $0400

; org 0x6E800:
          LDA #$00
          STA $4100
          LDA #$05
          STA $4107
          LDA #$01
          STA $4108
          LDA #$02
Converting this back to 6502 machine code and paste it, it should look like this:
These NOAC's bankswitching methods have to be copied into the RAM area and run it for it to work. Else, it won't go to the new address.
Of course, I tested this in the EmuVT 1.36 to see if it jumps to the address. When it does, I actually proceeded into writing more code at the 0x82000 onwards.
Note: The backlight seemed to be only switched on after the TFT init routine!
Compile this in ASM6F and paste the code into the section 0x82000:
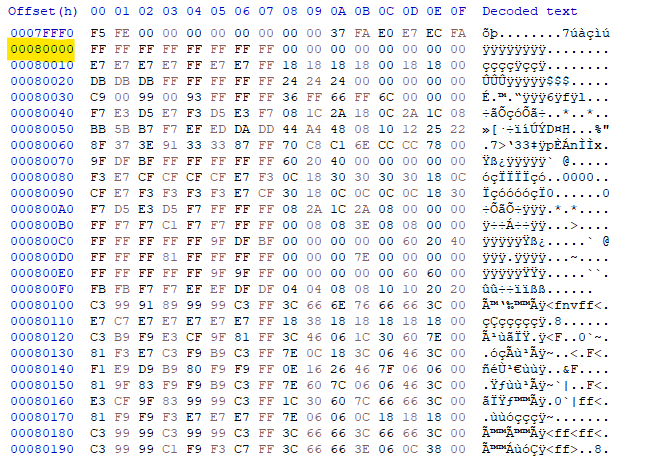
helloText EQU $A200

; ------------------
; main program here:
; ------------------
.org $A000
main_app:

    ; diasble interrupts on APU:
    lda #$40
    sta $4017
    lda #$00
    sta $4010

vblankwait1:
    ; First wait for vblank to make sure PPU is ready
    bit $2002
    bpl vblankwait1

enableBacklight:
    lda #$1f
    sta $413f
    lda #$0b
    sta $4138
    lda #$0f
    sta $4139

    ; clear RAM:
    tax
Init_ClearRAM:
    sta $000,x
    sta $100,x
    sta $200,x
    sta $300,x
    sta $400,x
    sta $500,x
    sta $600,x
    sta $700,x
    inx
    bne Init_ClearRAM

Init_PPU_chr:
    lda #$00
    sta $2012
    lda #$00
    sta $2013
    lda #$00
    sta $2014
    lda #$00
    sta $2015
    lda #$00
    sta $2016
    lda #$00
    sta $2017

    lda #$20
    sta $2018
    lda #%00000000
    sta $201A

    ; fill background with one value for 8 tiles:
    lda $2002
    lda #$20
    sta $2006
    lda #$00
    sta $2006
    ldy #$00
FillAllBackground:
FillBackground:
   lda #$00
   sta $2007
   inx
   cpx #$ff
   bne FillBackground
   iny
   cpy #$04
   bne FillAllBackground

    ; Fill palette with 0x0f, 0x30, 0x30, 0x30:
    ; $3f00 = 0x0f
FillPalette:
    lda $2002
    lda #$3f
    sta $2006
    lda #$00
    sta $2006

    ldx #$00
FillPalleteLoop:
    lda #$0e
    sta $2007
    lda #$0e
    sta $2007
    lda #$2a
    sta $2007
    lda #$0e
    sta $2007
    inx
    cpx #$04
    bne FillPalleteLoop

PrintText:
    lda $2002
    lda #$20
    sta $2006
    lda #$00
    sta $2006
    ldx #$00
Print0:
    lda helloText, x
    cmp #$00
    beq PrintDone
    sbc #$20
    sta $2007
    inx
    jmp Print0
PrintDone:

Init_PPU:
    lda #%10000000
    sta $2000
    lda #%00001010
    sta $2001
    lda #$0
    sta $2005
    sta $2005

here:
    jmp here
; ------------------
NMI:
    rti

.org helloText
    .db "HELLO WORLD!", #$00
Wait - you need to put the CHR into the area 0x80000 too. Sample CHR file provided - get the "chicago_oblique_basic.chr". I got the sample CHR from the NesDev forums, and paste it at the 0x80000 area. It should look like this:
After all is done, program this bin into the NOR flash using the T56 programmer (or any other equivalent). You should be seeing this one:
-
Dump dissected - and new issues with the Teensy 4.1!
06/23/2024 at 02:20 • 0 commentsWhew! I have a bit of breathing space this weekend so I went to look into the new dump from the earlier logs.
The strange part is, this particular dump from the later Sup 400-in-1 models are always different than the year before. This model "CFJSUP Ver 2.0 2023.5.18" still have the same old menu from the previous ones, but the startup codes are different.
To summarize it, this one does:
1. Jumps to addresses next to each other for a few times.
2. Then branches into an area where the opcodes have swapped bits 4-5.
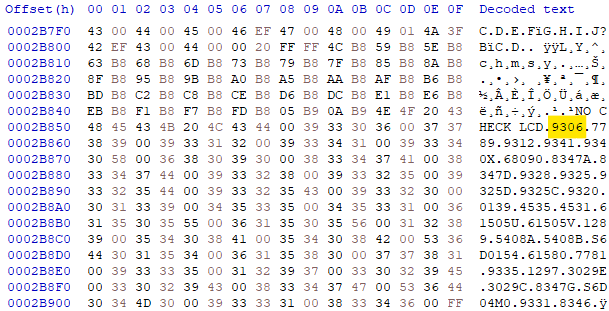
3. It goes into a startup - and the TFT init routines are more complex this time: it actually includes many other models inside for convenience. There are a list of the TFT models in the area around 0x2B000:
Highlighted one is a GC9306, which the handheld is having right now, and being selected too.
4. After all is done, it goes into address 0x6E000, where the game menu is in. Else, it goes to 0x6A000 where the "Aaronix" test app is there if you hold B and Y during reset.
On other story, my Teensy 4.1 flash emulator doesn't work all the time! When this is connected to the mentioned console, it does not work anymore. Even with the new PCB design I made too. It kept disconnecting and it becomes unresponsive. I guessed overclocking the Teensy 4.1 has its limits, even with the heatsink and the fan blowing on top of it! Guess that I need to use an actual NOR flash for this one! (Note: Use a 2.54 female header on the Teensy 4.1 slot! Do not solder this Teensy 4.1 directly onto it!)
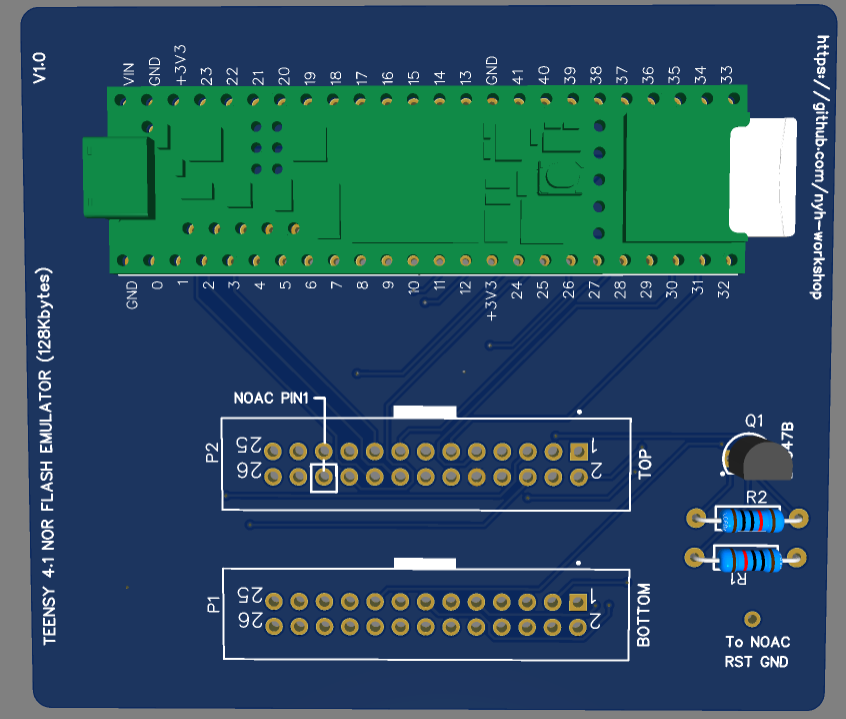
(This PCB does the same thing from this log, but more neat and I can use the headers. These headers are connected to the nor flash breakout board on the handheld console)
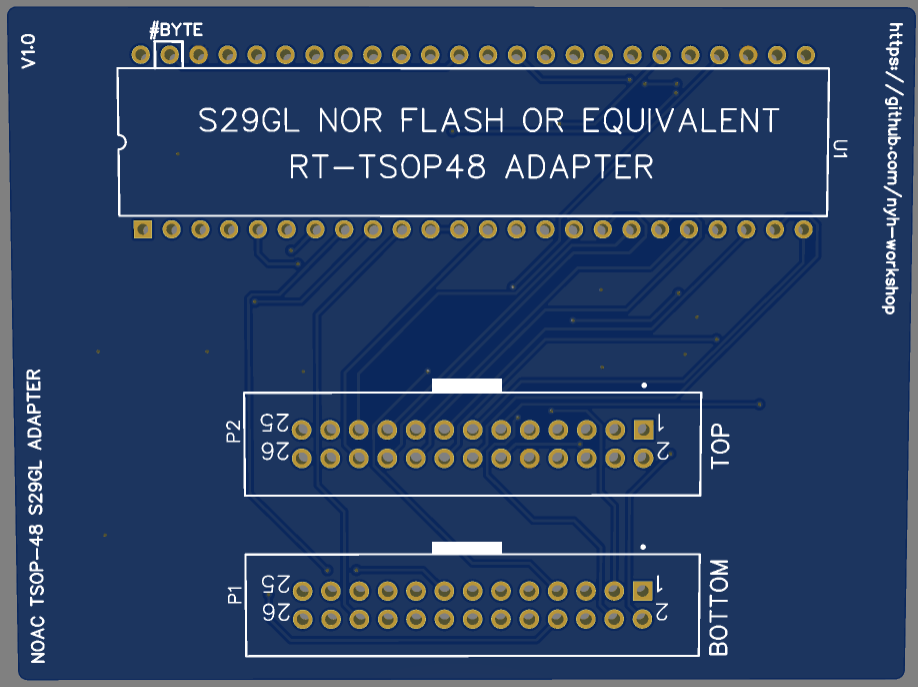
But luckily, I also designed the NOR flash adapter in case things doesn't go right with the Teensy 4.1 solution, or I needed to test if a TSOP-48/56 NOR flash (with the RT-TSOP48 adapter) works on this console (same thing here - make sure you use 2.54 female header on that RT-TSOP48 slot!):
Plugging it in and cannibalizing the flash (S29GL064) from another one of the cheap consoles, load it up with the same dump through the T56 programmer, I managed to get the dump to run on the flash (but with only 8 megabytes!)
Is there any chance for it to load a custom app even without using the Teensy 4.1 NOR flash emulator??
-
Opcodes has its bits swapped??
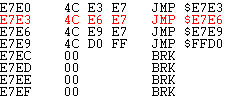
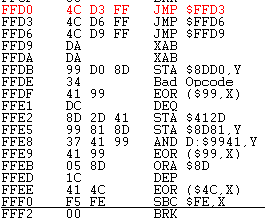
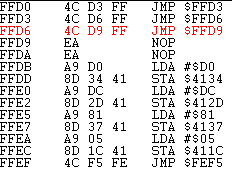
04/11/2024 at 03:51 • 0 commentsAfter from the previous log, I took a look in the EmuVT's debugger and noticed that there are many jumps to a nearby locations and "strange" opcodes that don't make any sense:
Hmm... looks like some of the stores especially at the $412D could make sense, since these stuff often use the registers around that address. And the jumps too. Look at the end with the "F5FE" - looks like a jump to the main startup code?
Wait... I recalled about chatting about those VT-02 OneBus systems at NesDev Discord, and also these NesDev article: https://www.nesdev.org/wiki/NES_2.0_Mapper_256, and another BGC article: http://bootleg.games/BGC_Forum/index.php?topic=2412.0
Something reminded me that there could be swapped bits somewhere in the opcodes. After checking these instructions on a pen and paper, bits 4 and 5 at the opcodes are actually swapped!
After swapping these bits manually in HxD and pasted this modified code back, it runs on the EmuVT now!
These newer Sup 400-in-1 handhelds are having these strange bit-swaps at the addresses, and this one having a bit-swap at its opcodes before the startup happens!
-
Another new romdumper - this time it's faster!
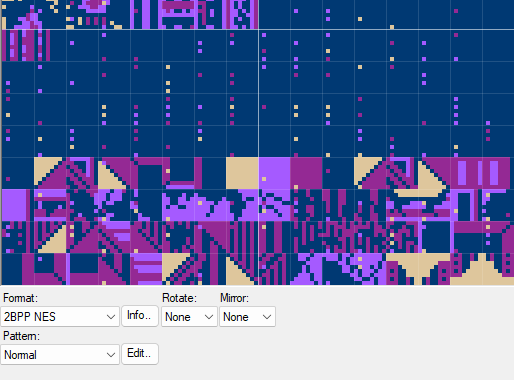
04/11/2024 at 03:32 • 0 commentsWhen trying to dump a newer Sup 400-in-1 ROM on my Raspberry Pi based dumper, the thing doesn't load well in the emulator. There are many corruptions in the ROM when viewed through the YY-CHR app. The little dots at the empty area are those corruptions:
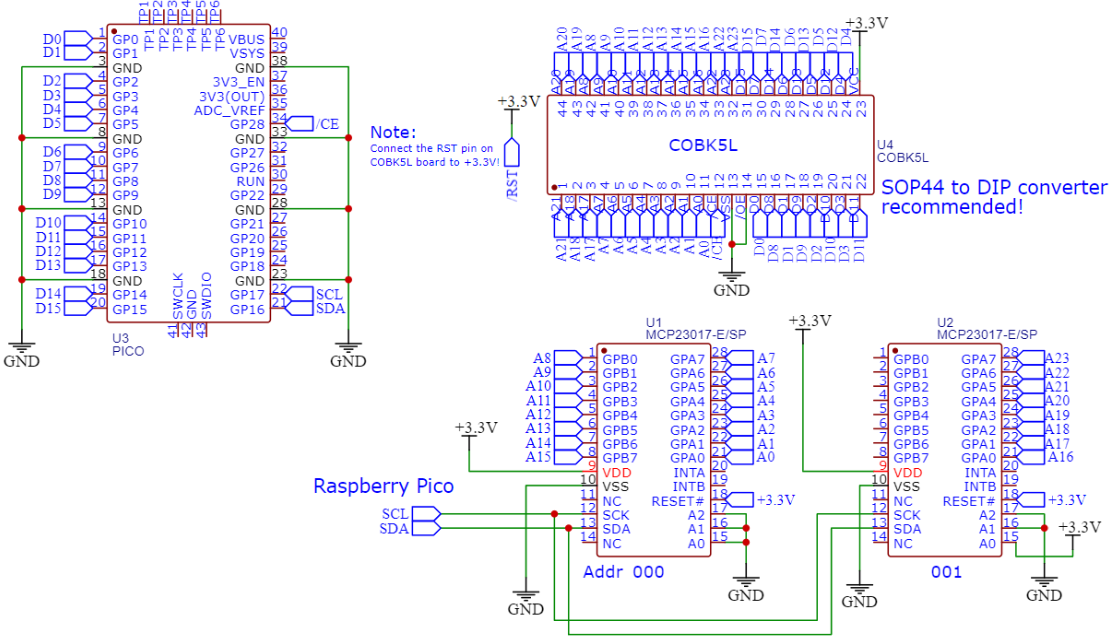
Plus, this thing takes a whole day to dump and it's really slow, and I have a better idea to port this whole thing to a Raspberry Pico instead. After figuring out the newer problems such as the MCP23017s couldn't be detected and these corruptions, I had modifications to the circuit:
This time, it dumps really fast and about 35 mins later I get the 16 megabytes ROM dump. You can check this ROM dumper here too if you want a faster alternative!
However, when trying to run it in the EmuVT - it just gives me a black screen and it doesn't work! What gives?
-
Dissecting the startup!
03/31/2024 at 03:41 • 0 commentsAs mentioned in the previous logs, if you have used this method, you may able to get the dump and run this binary in the EmuVT emulator.
So on about last year, I actually dissected the flow of the program and written it into a piece of paper. This analysis does not include how the game menu works and the test screen - only the startup.Using the EmuVT emulator and putting breakpoints one by one, I managed to see things like:
- Getting the starting address at $7FFFC.
- Initializing registers at $412B and $412C.
- Dumping about 15 values into the $4200.
- It went on jumping back and forth around addresses $60000 and $70000. Most of the TFT startup and the menu, and Aaronix test screen logic are situated at $60000.
- OneBus switching seems to be performed in RAM.
- The TFT initialization seems to follow a pattern. There are multiple loads and stores, and digging the pattern in Google, the model is actually GC9306. Datasheet here.
- The register $4233 possibly controls the 16-bit parallel LCD outputs to be a GPIO or the parallel LCD. When it is set at $84, this might becomes a GPIO - during the TFT initialization it does this. When done the initialization routines, this is set at $04.
- The functions that write the command and data to the TFT uses $4230 and $4231. At $4233 again if it is a write command, $94 is written. If it is a write data, $D4 is written.
- Finally, around the starting point of the game menu, $412C is written $0F to enable the backlight.
These are also verified using the homebrew flash emulator that dumps part of the ROM ($60000-$80000) into the Teensy 4.1.
With the flash emulator, using the stripped ROM, I managed to try adding a while loop at certain places in the ROM (usually 4C xx xx) to 'halt' the program. This is useful when I want to see when the backlight gets switched on. Initially, it is thought that the backlight is switched on at the TFT initialization routines. However, putting the command inside does not work (backlight doesn't lit up), and I had to try adding this 'halt' between the function calls when the menu is running. When one of the locations are being known to switch on the backlight, I focused into it and found out that putting the $0F into the $412C actually does this thing.
I dumped two of these ROMs (one bought in 2020, and another somewhere later) and one of them have swapped bits 1-2 and 9-10 at the data pins! Some of them have very different starting vectors too - one started at $FF00, and one at $FEF5. However, they all use the same mentioned registers and these apps could possibly work on another similar Sup 400-in-1 consoles.
One more issue - where are the registers that controls the external sound speakers?
-
It is working, but might not be fully functional!
03/23/2024 at 16:54 • 0 commentsAfter looking at the code and checking the Teensy 4.1's processor datasheet, it is known that there are edge interrupts on a row of GPIO pins. It means, if any pins at GPIO6-9 are changed, it triggers an interrupt.
I'm suspecting that the polling of the address lines by Teensy couldn't catch up with the speed of the switching addresses at the NOAC. Having the pin change interrupt makes it easier for the NOAC to catch the instruction that is fed from the Teensy pins.
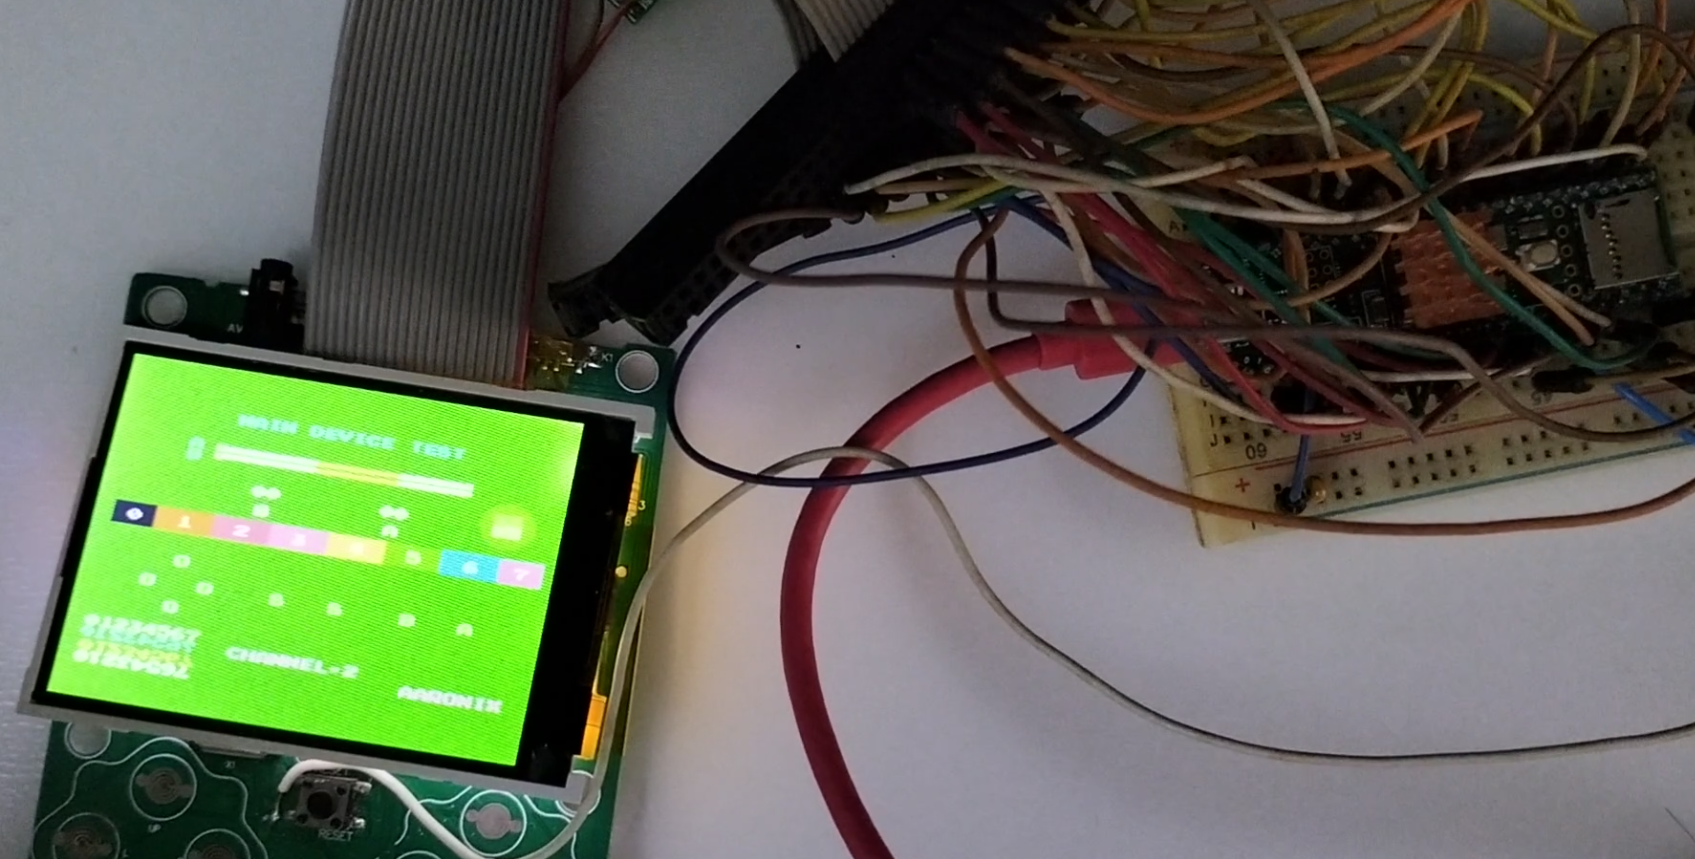
And... yes, there's the game menu, and it jumped into the test screen when I hold the A + B before the thing starts:
Unfortunately, there are limitations - the Teensy needed to be overclocked to 912MHz to do this successfully, and a heatsink is required. I am now figuring a way to have a fan to blow on the heatsink, and also to write up short pieces of 6502 code to make it run on that NOAC.
And here's the Github page if you are interested in replicating the project.
-
Partially working, needs more improvements!
03/23/2024 at 15:42 • 0 commentsFrom the previous log... what would happen when a short piece of code is being loaded and run after applying the reset?
And for a short description on how this is done:
- Dump the ROM according to this log - make sure it can run in the emulator!
- On the ROM, using the hex editor such as HxD, cut out the range of address 0x60000-0x80000.
- Still in the hex editor, create an empty new binary file and paste it in. Save it separately!
- In the Teensy's application, the binary file is being received through Ymodem (using this method) from the PC.
- After receiving the file, the app resets the NOAC on the PCB.
- The app rapidly polls for the address changes (A0-A17) and pushes the data (D0-D15) with the responses from the /OE and the /CE pins too. (Or in other words it's called an EEPROM emulator!)
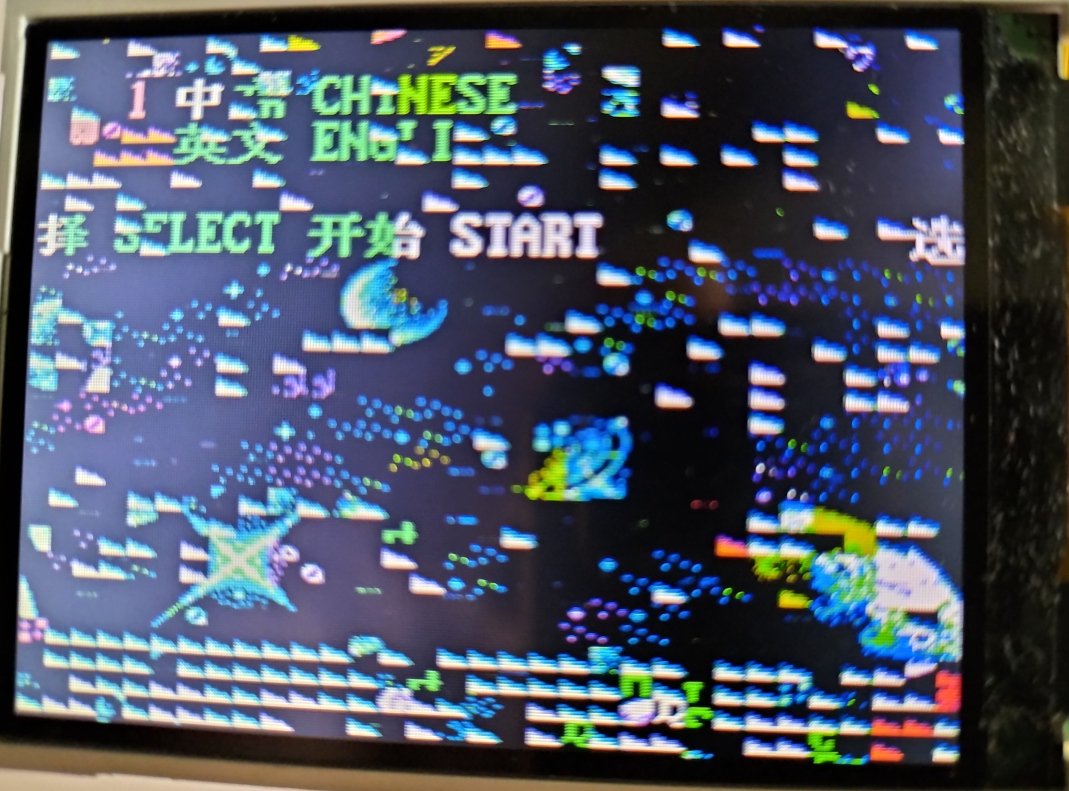
Well, it kinda works... but it's a whole lot of mess out there:
The code was running but the screen was garbled with full of noises and artifacts running around. You can see bits of the menu and the Aaronix test screen and that's much about it.
Was the Teensy not working fast enough? Or there are wiring mistakes? Hmm... Figuring this out....
Dissecting a hand-held NOAC console (Sup 400-in-1)
This is an attempt to understand how these little things work, and what we can do on it.