Close
0%
0%

Old Roomba, new tricks

Add mapping and MQTT-interfacing with ESP8266 and an IMU

Similar projects worth following
Using an ESP8266 module, control my Roomba 632 that I bought on Ibood some years ago.
It will clean my house, won't look like something I hacked together and is a perfect platform for experimentation.

Progress:

Ok. This project will take a while... A lot of stuff coming together on this one. 

I found out that the Roomba I've had for some years has a serial port and an open interface.

It's basically a iRobot Create 2, but this one can also clean my floor:

https://edu.irobot.com/what-we-offer/create-robot 

The Roomba is a 632 (600 series) without any scheduling or mapping capabilities... for now.

The interface allows me to not only send basic commands, but also to get full sensor readings. On everything from motors, bump and cliff sensors etc. 

As always, the plan is pretty simple. Add microcontroller, some soldering, some typing, done!

Goals: 
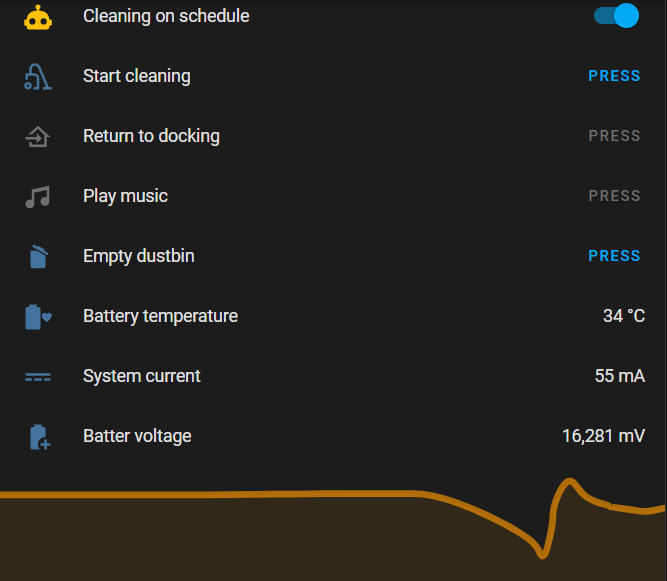
V - Add control with MQTT in Home Assistant for scheduled cleaning & viewing status and map;
V - Play MacGyver theme song & The Imperial March (and any other song with MIDI notes);
V - MQTT-autodiscover and state updates;
V - Read sensorstream data with all relevant sensors for mapping and autonomous driving;
V - Add IMU and use it's onboard Digital Motion Processor;
V - Get data from wheel encoder readings for travelled distance;
V - Get data from IMU-readings for direction of travel;
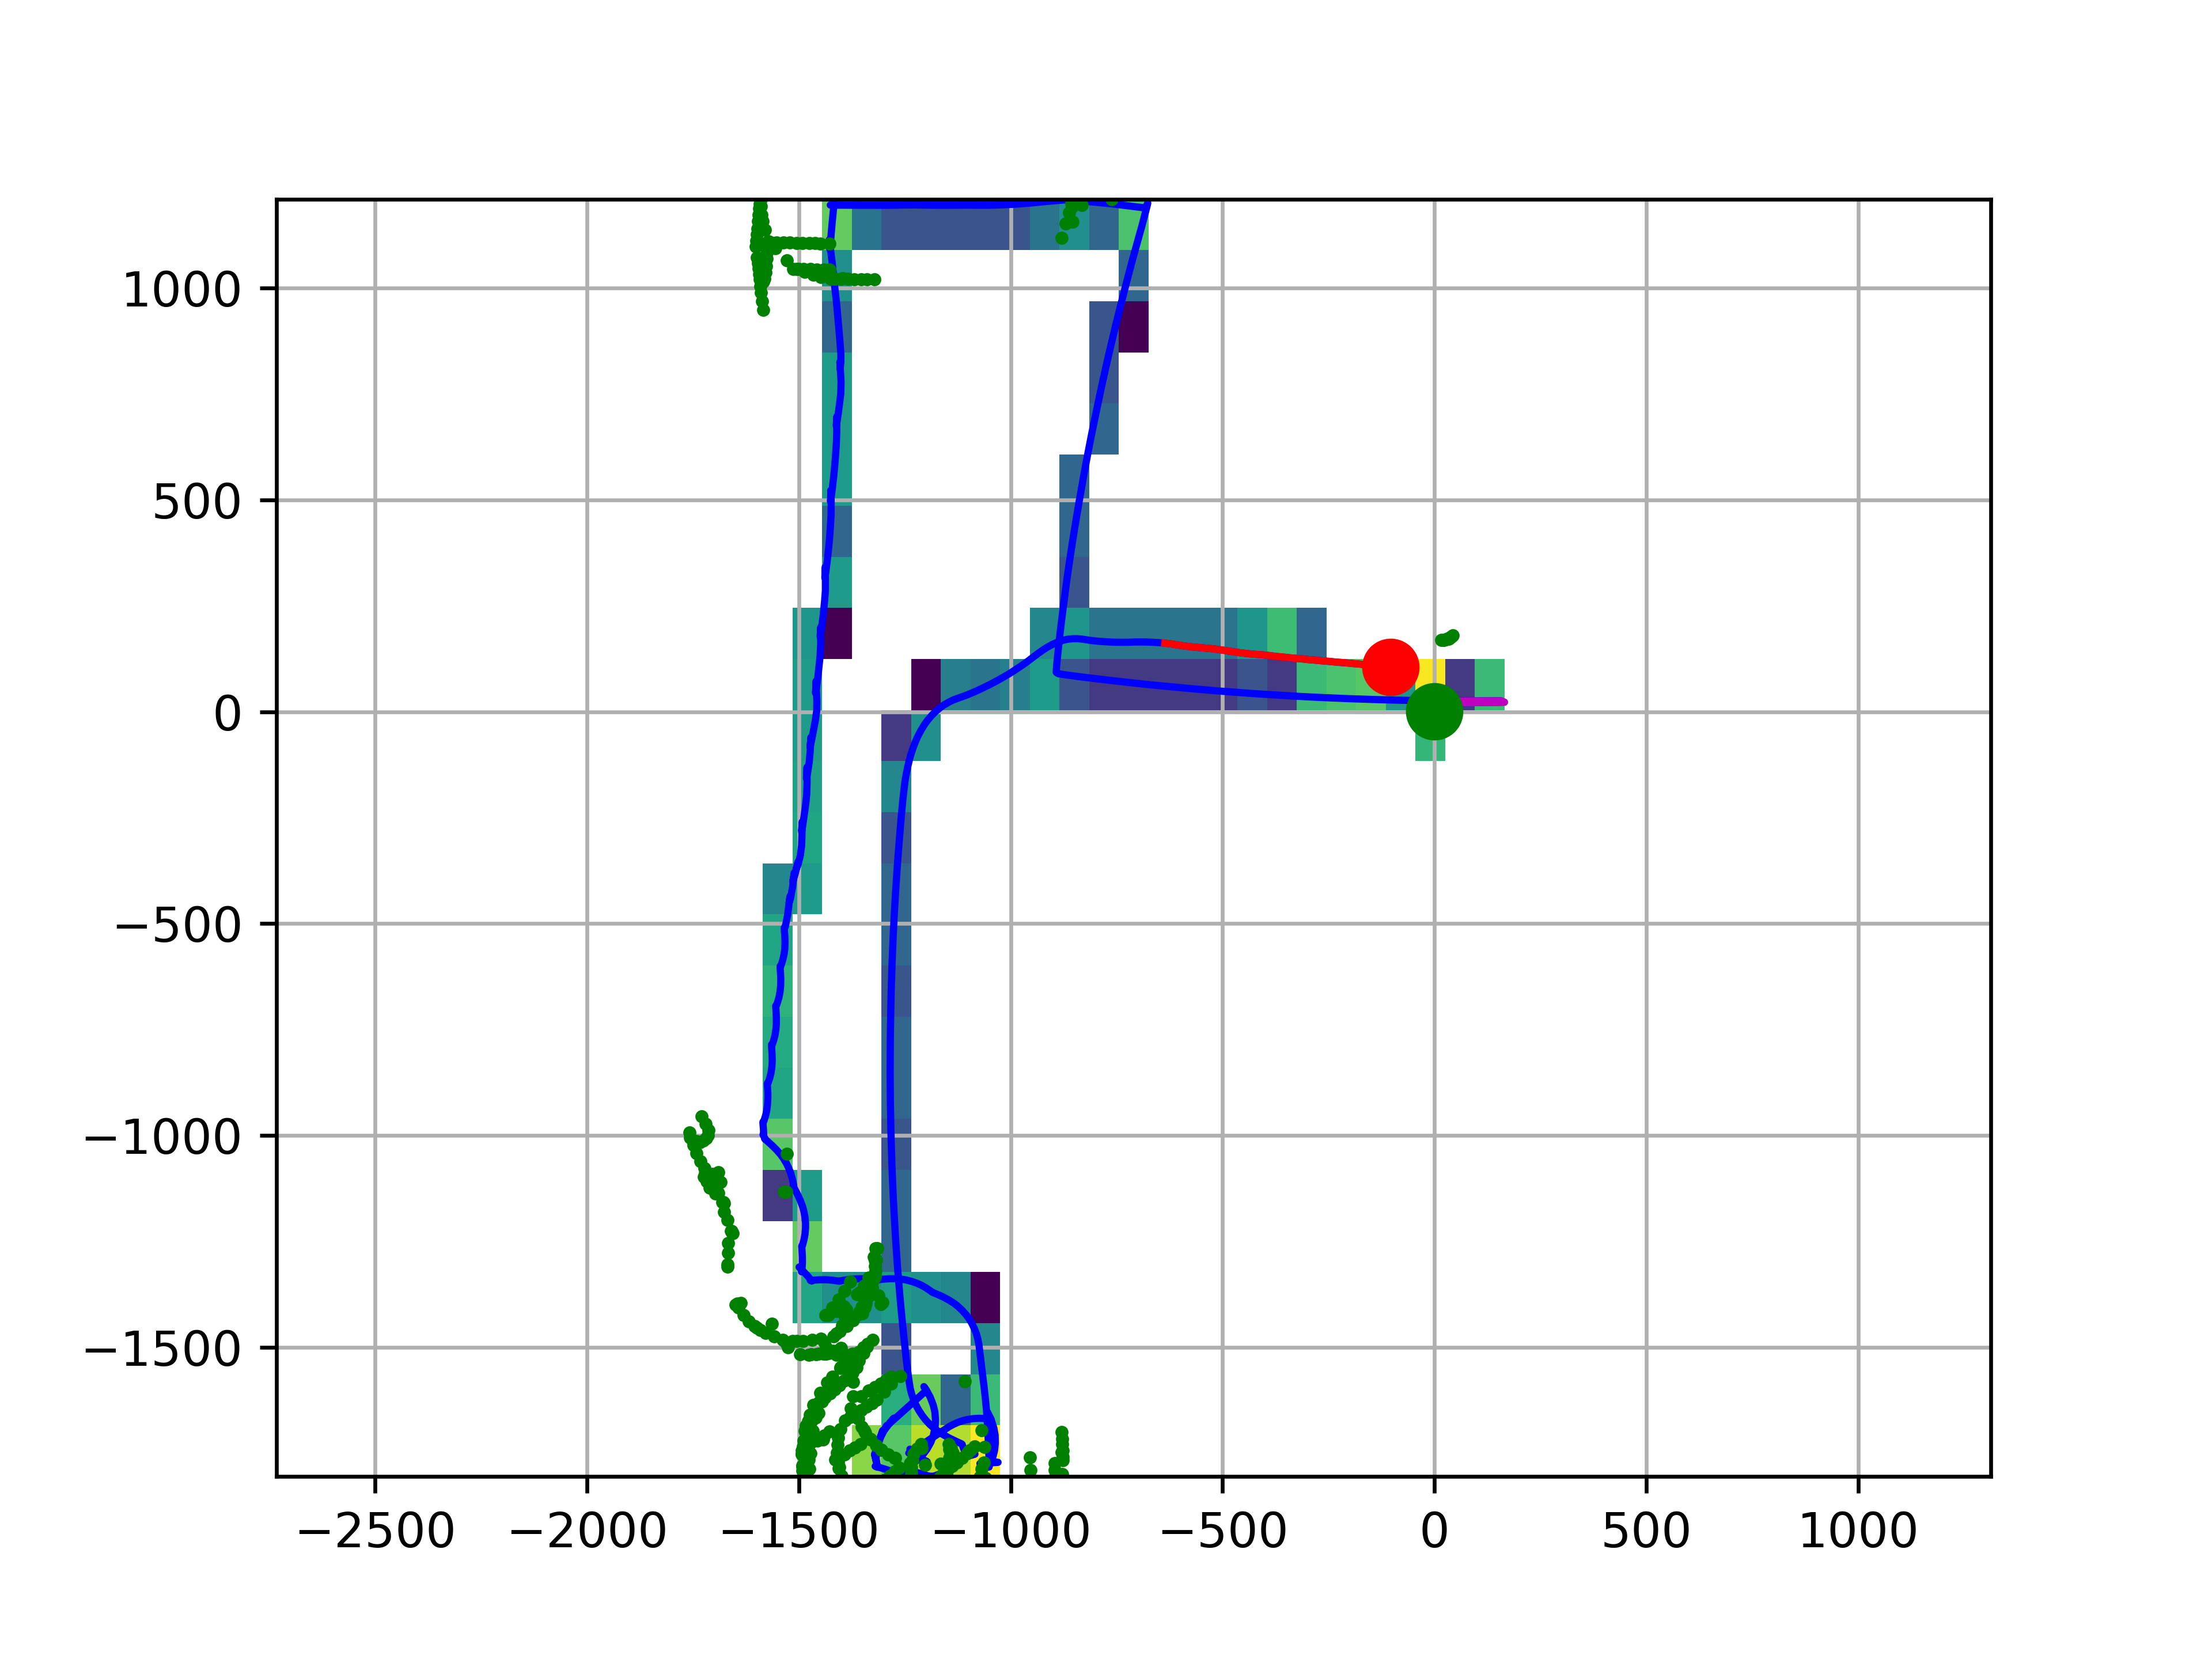
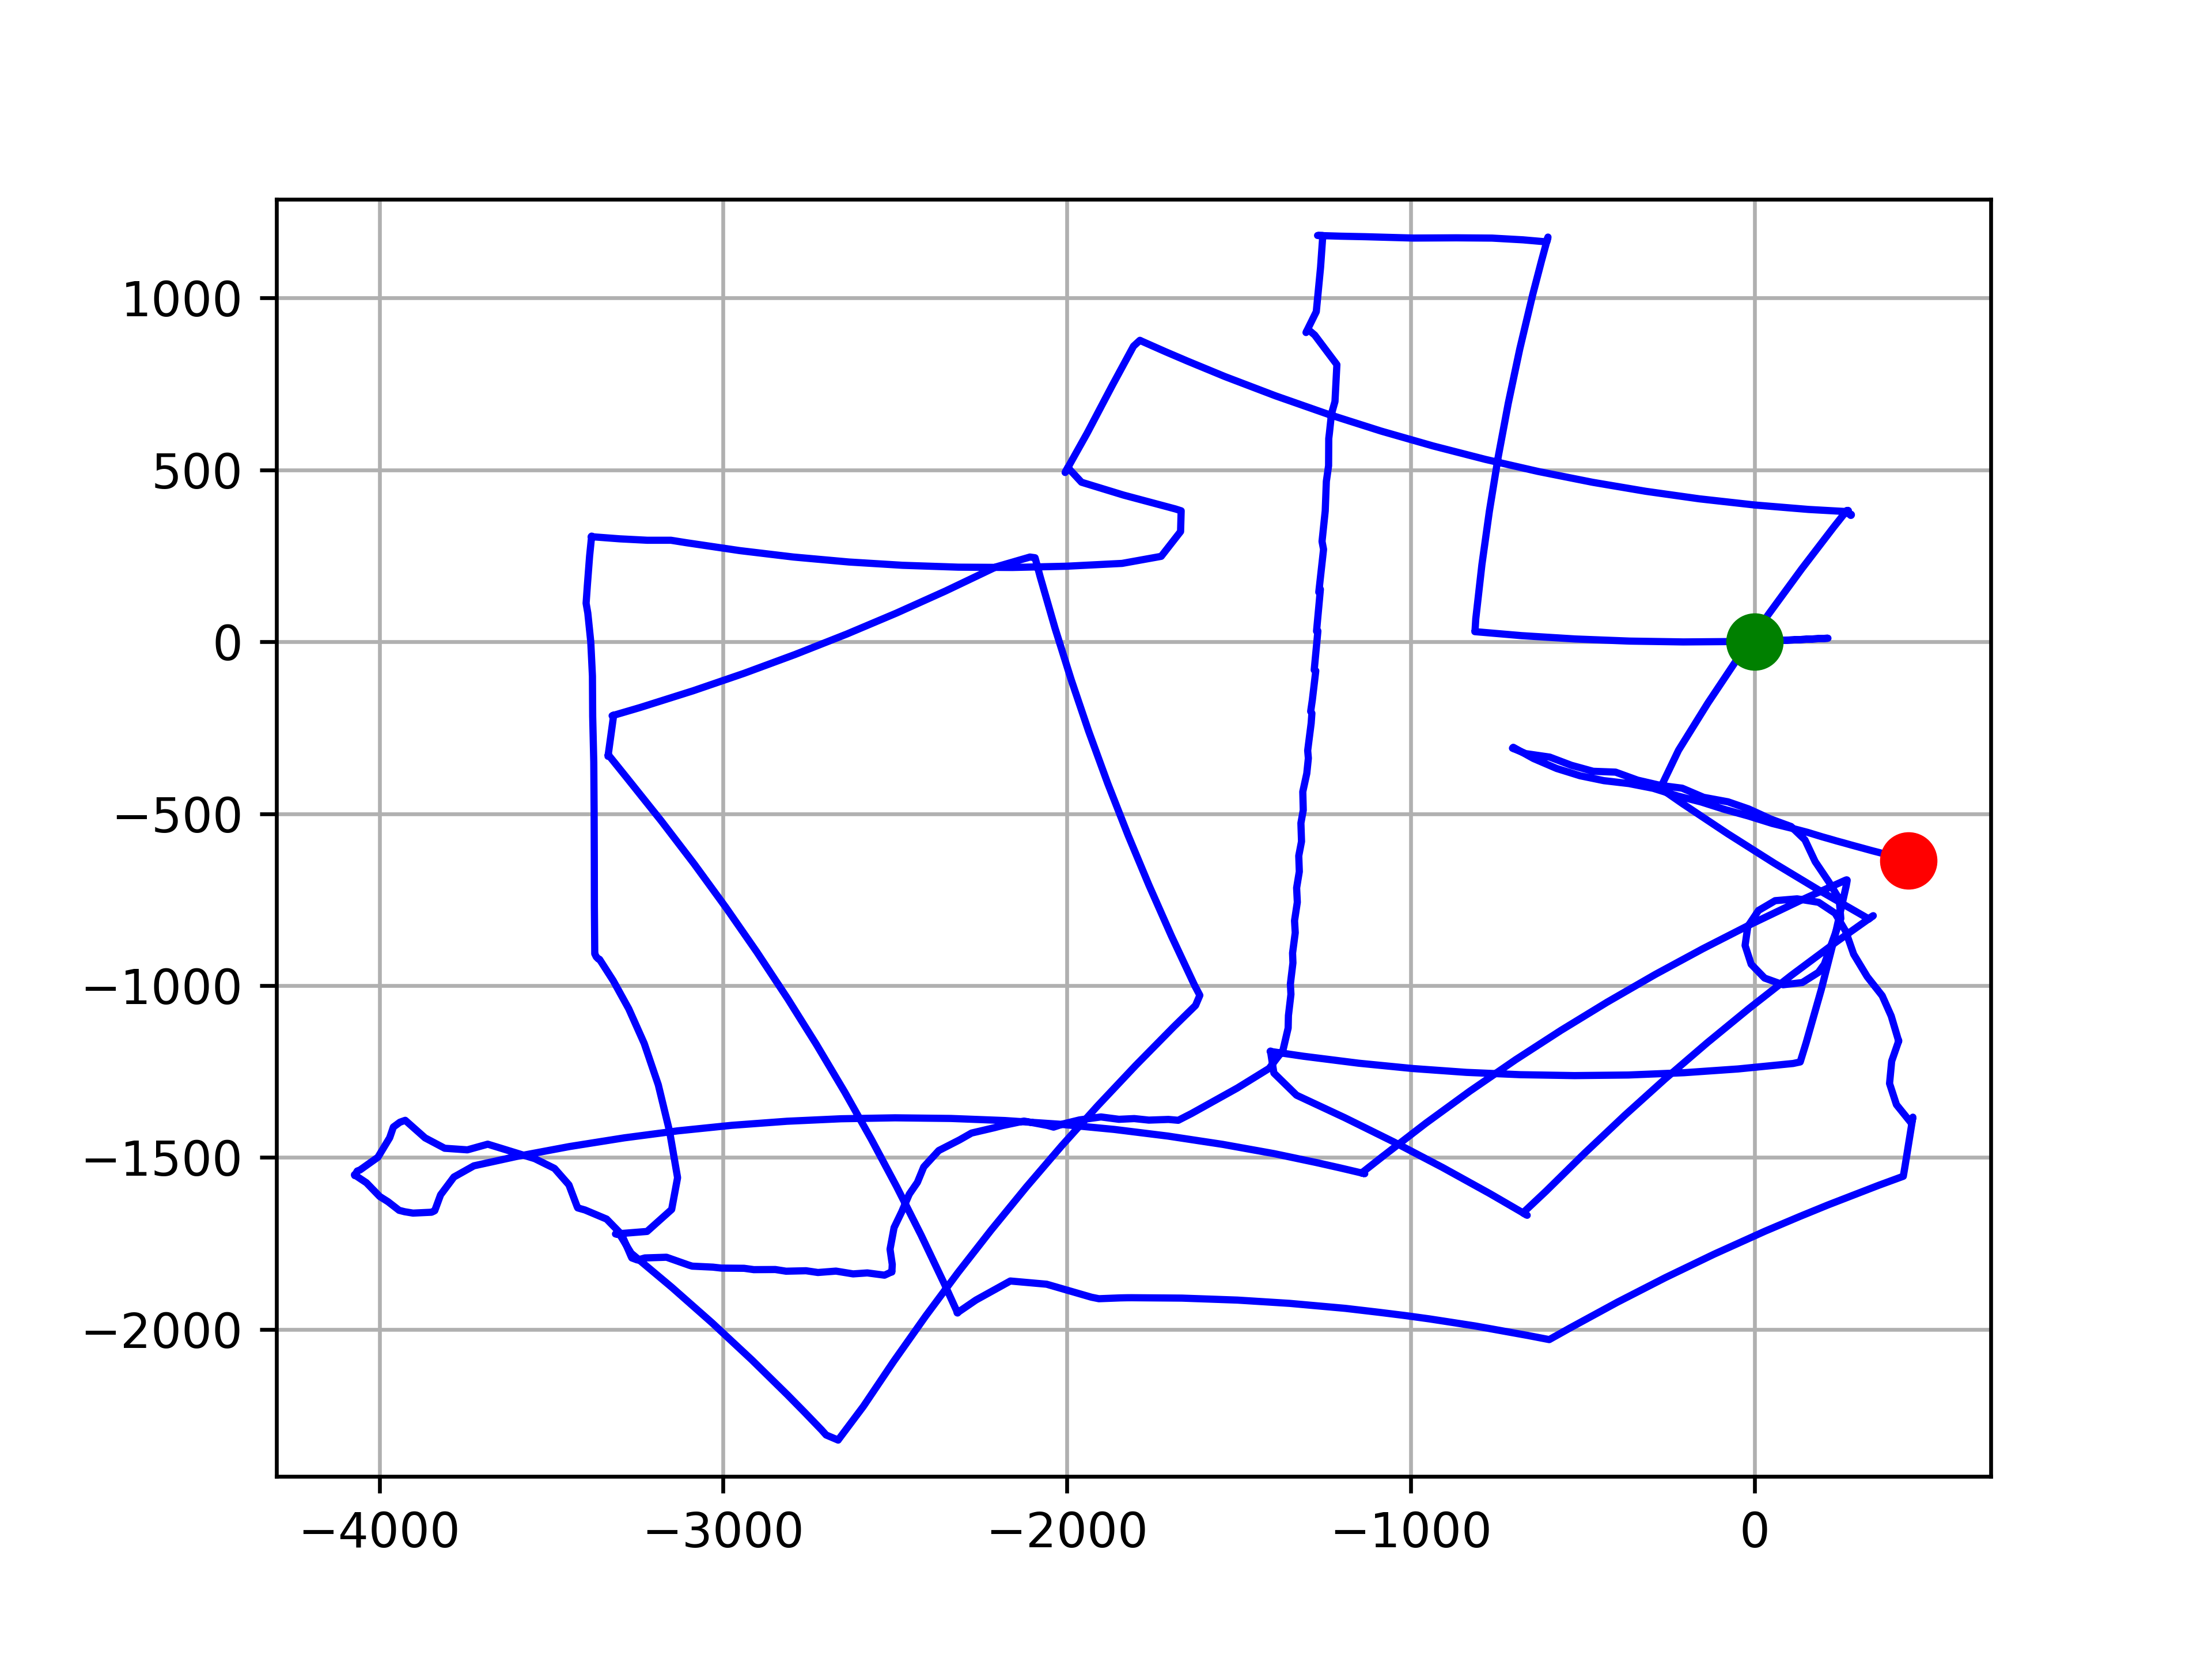
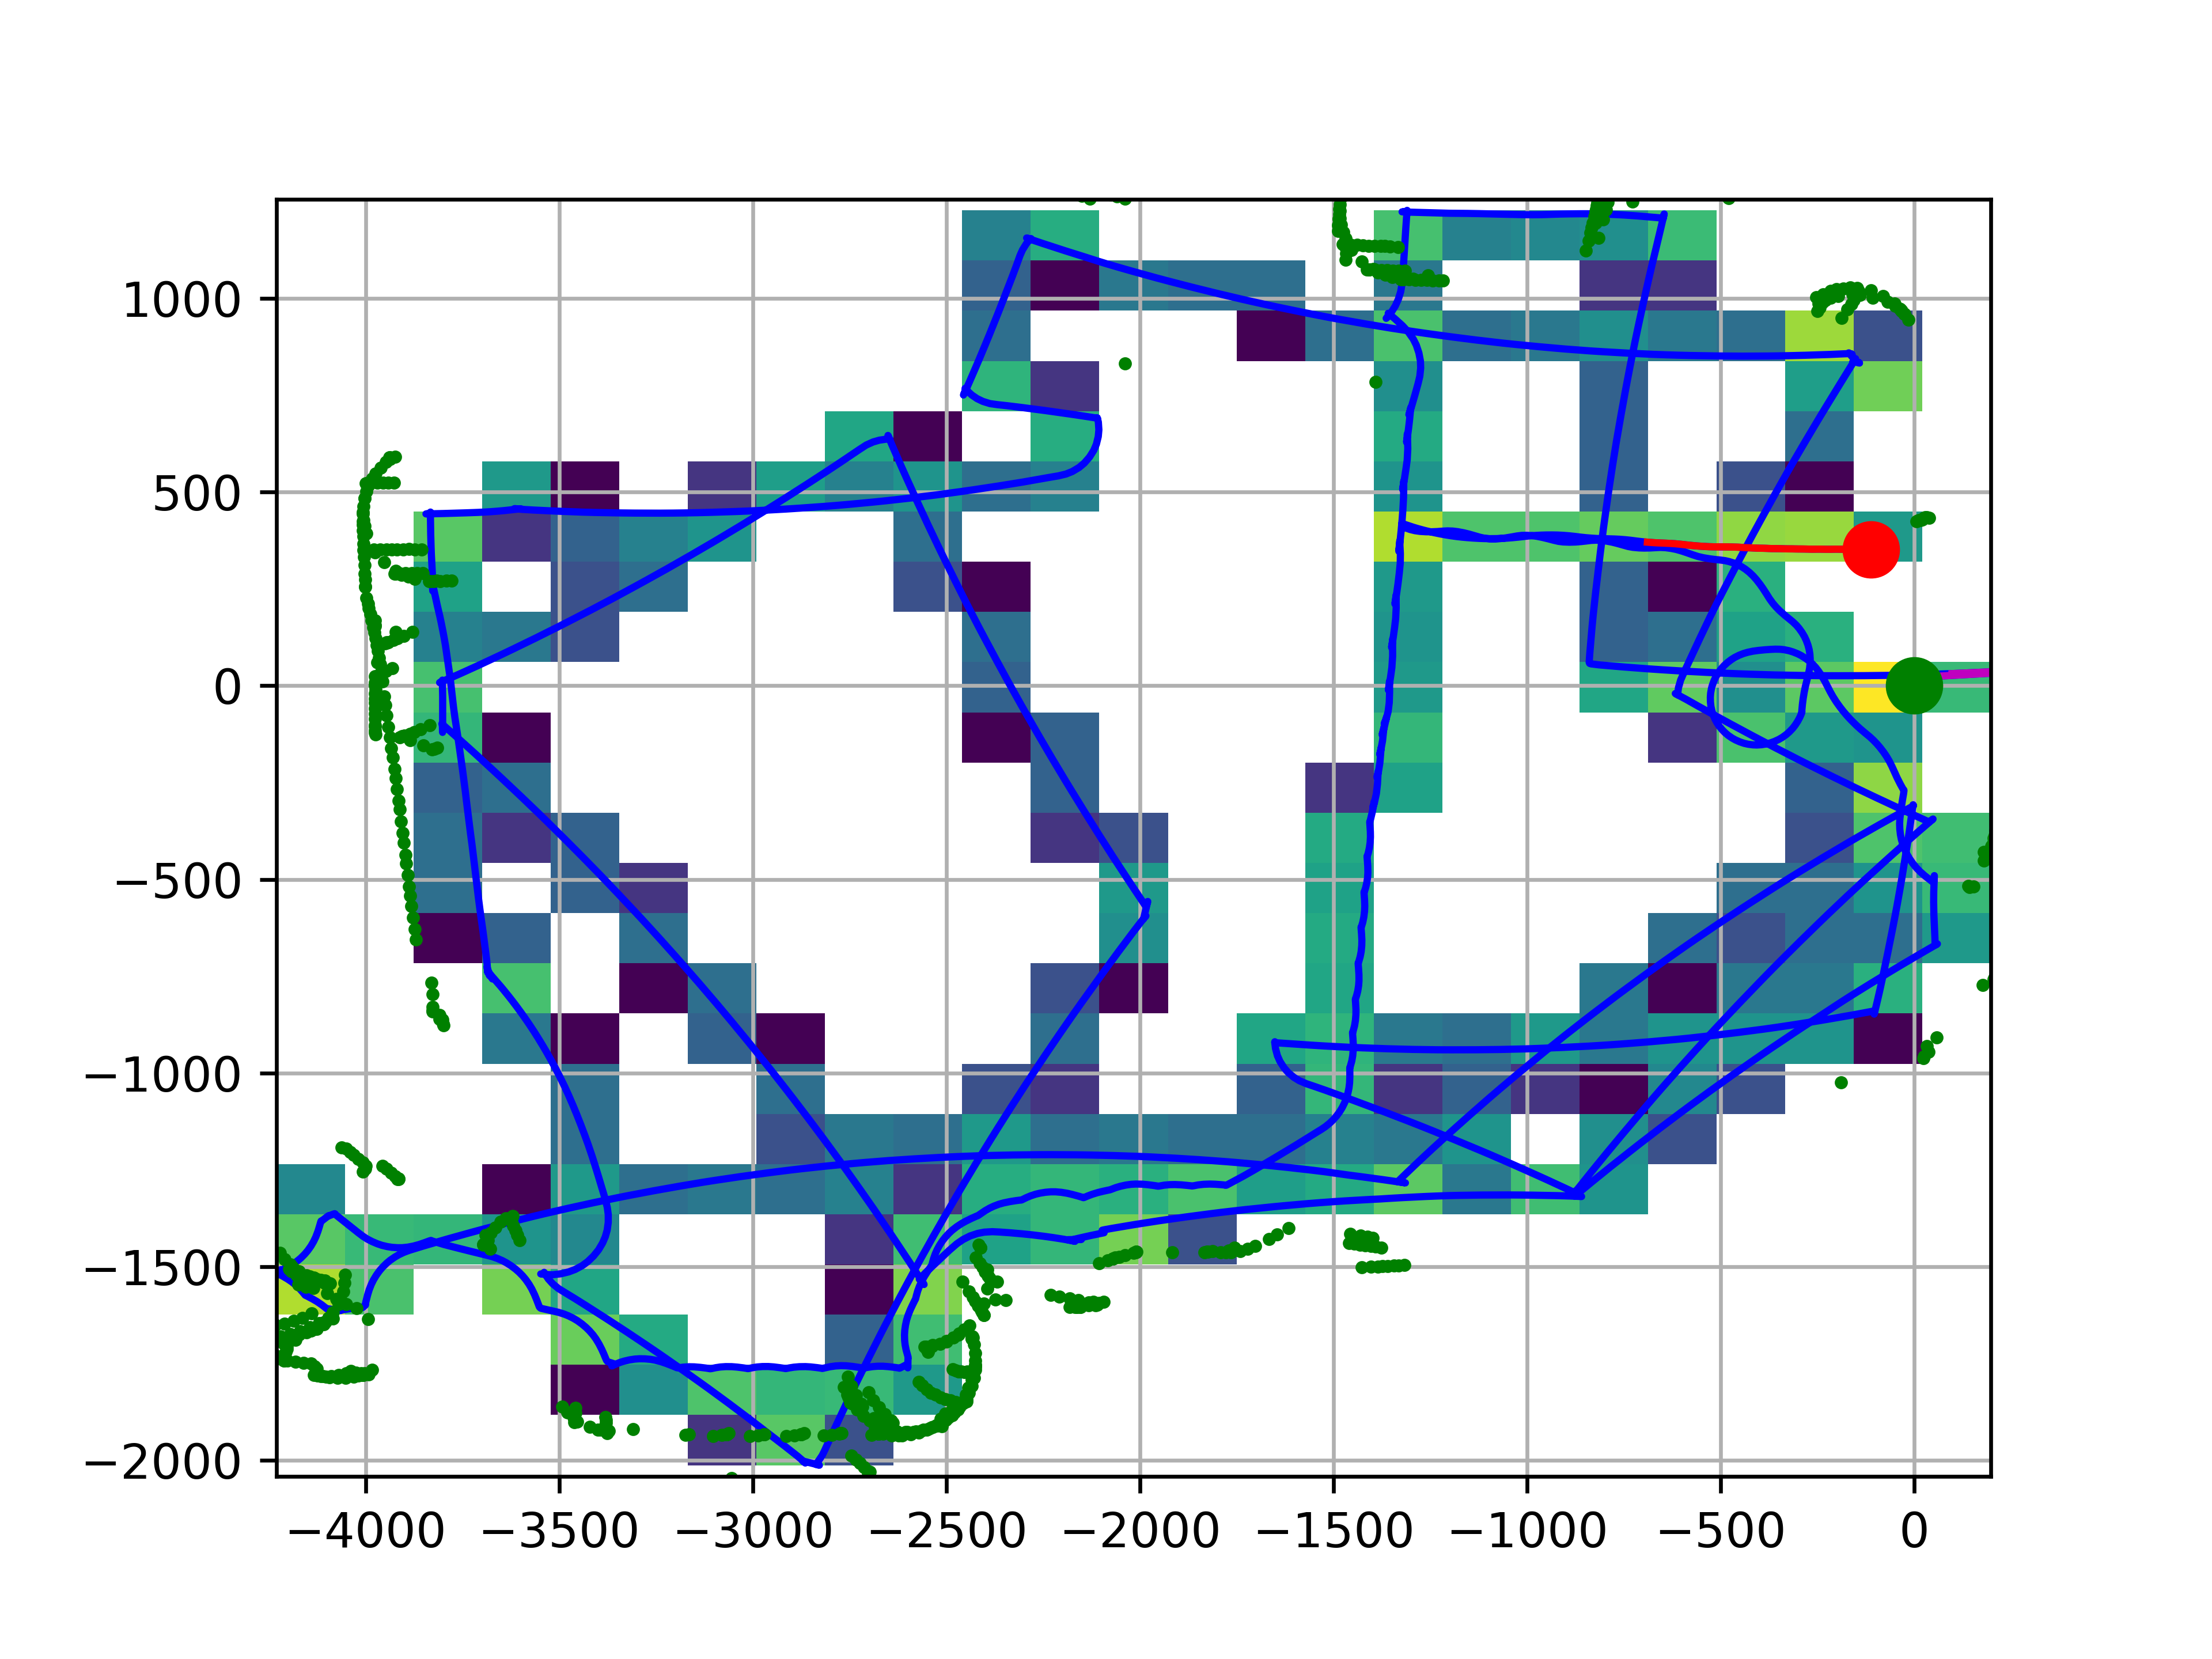
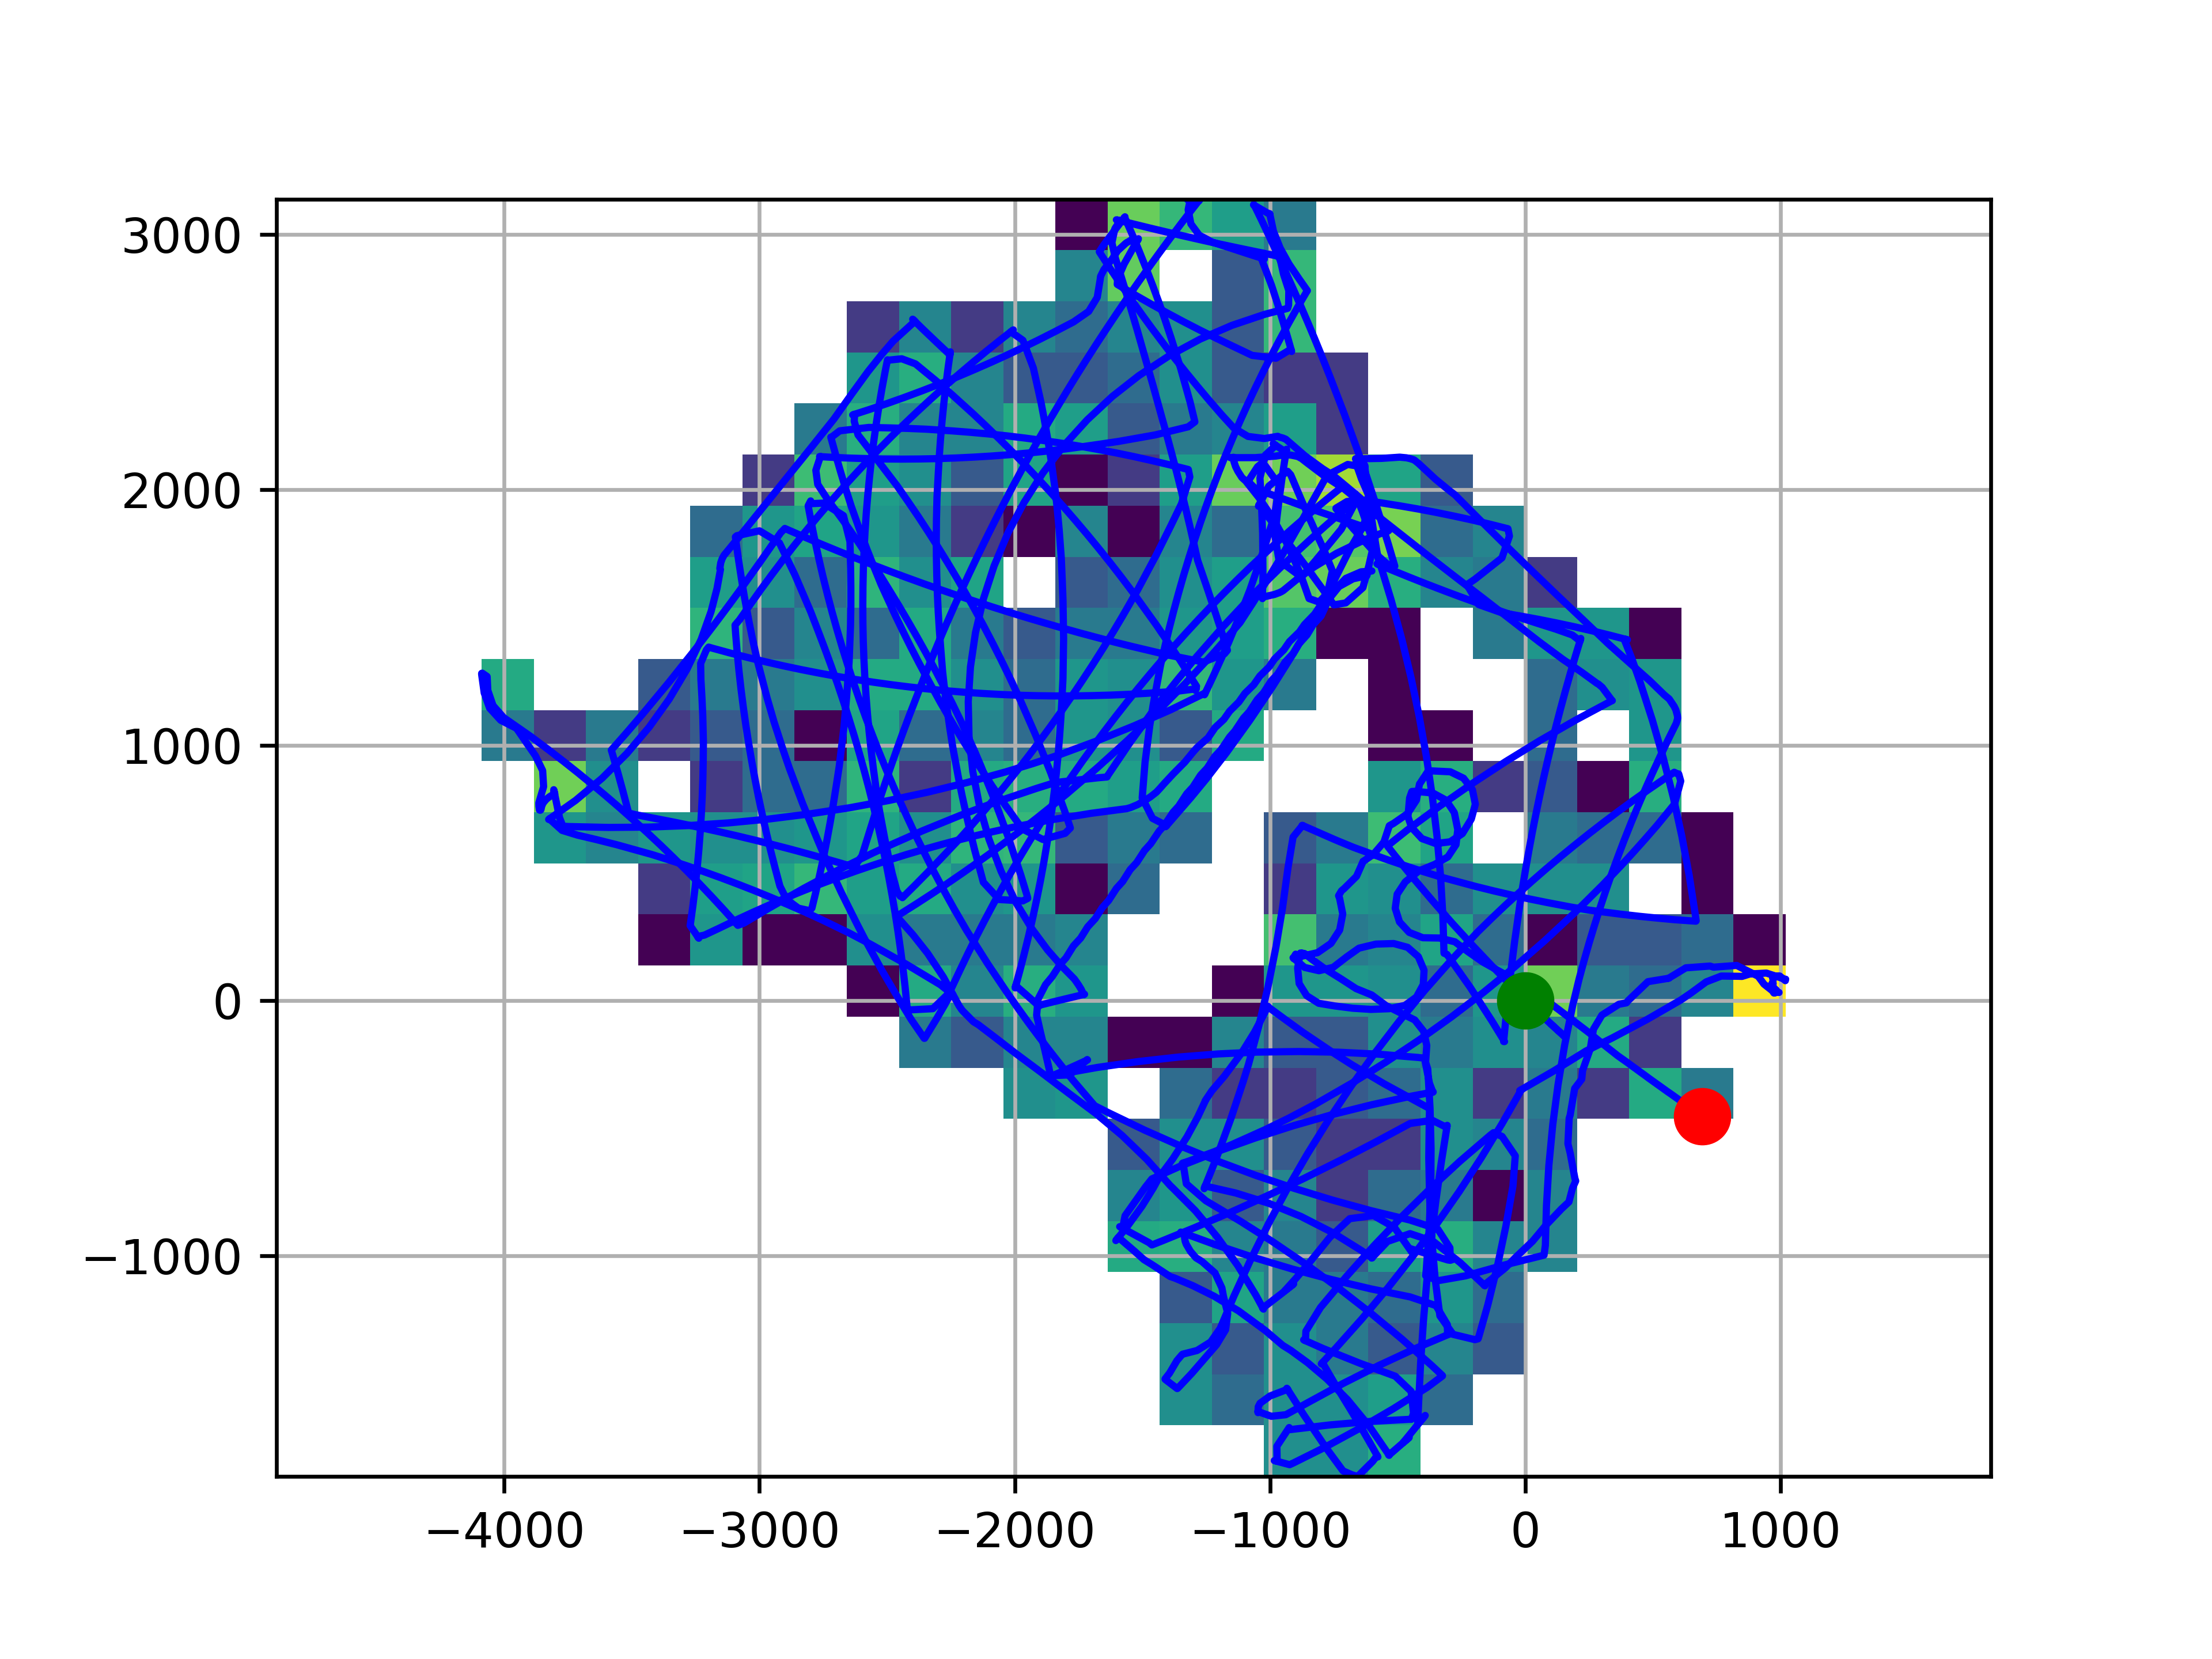
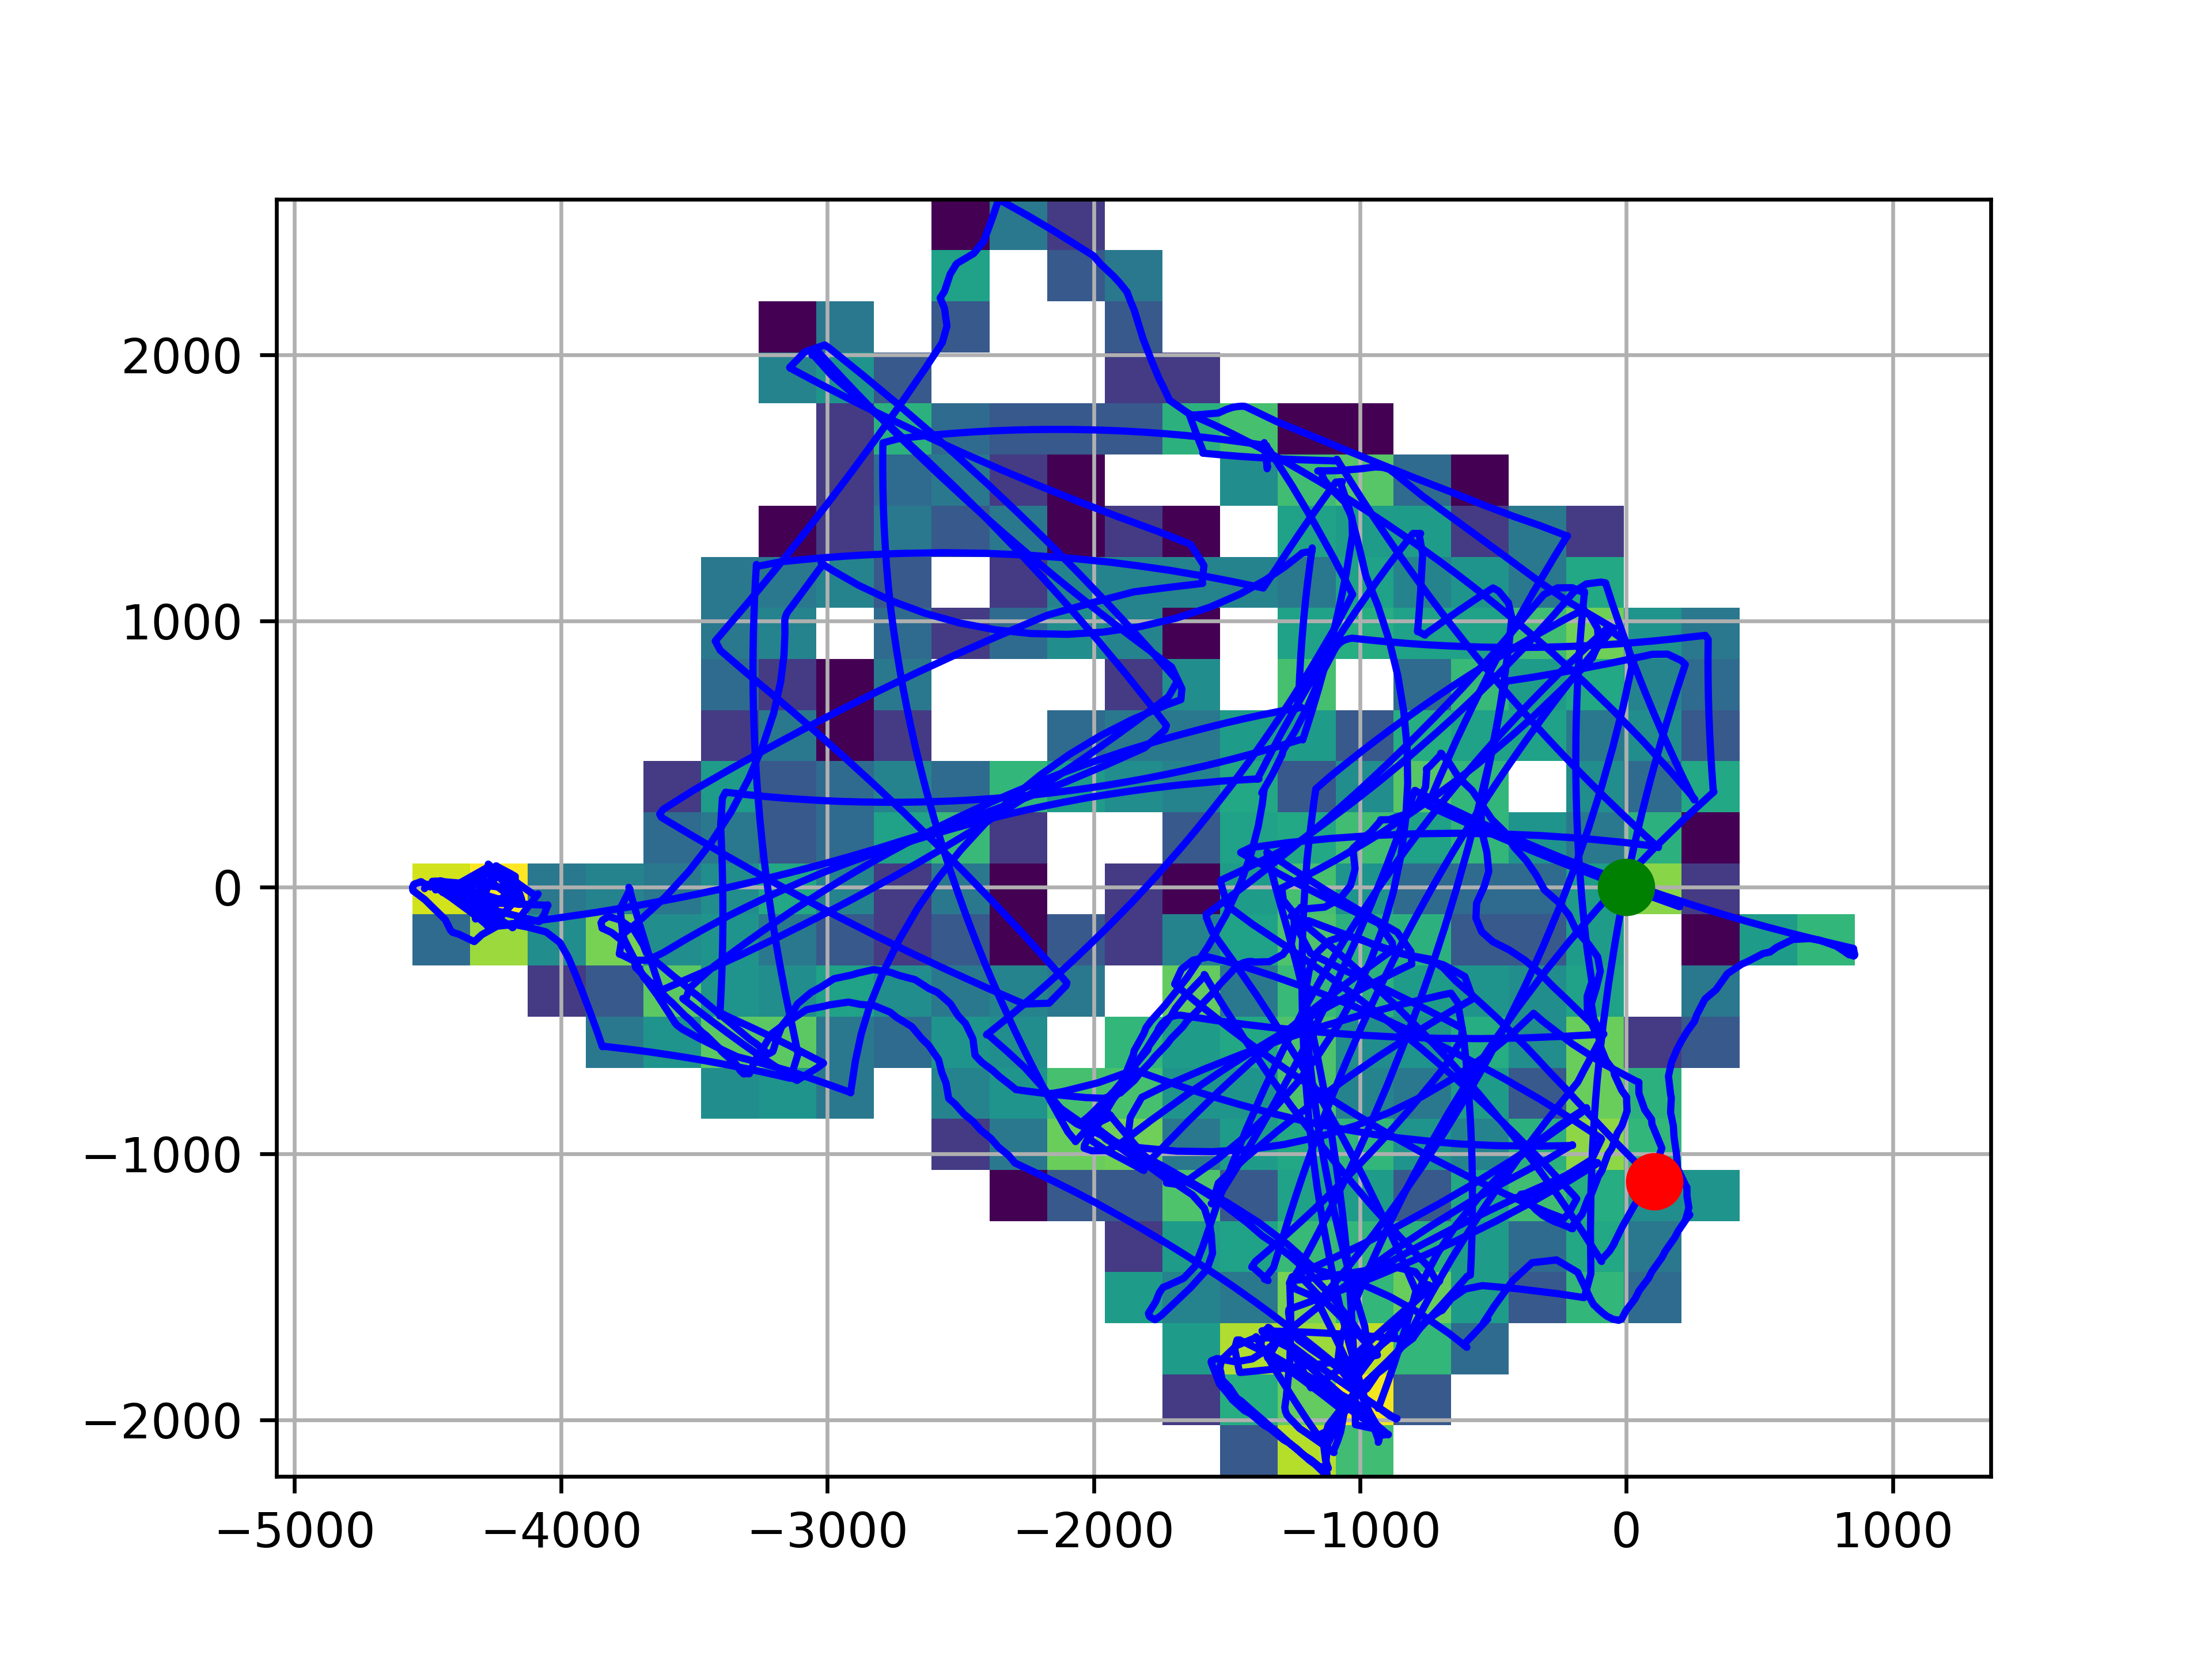
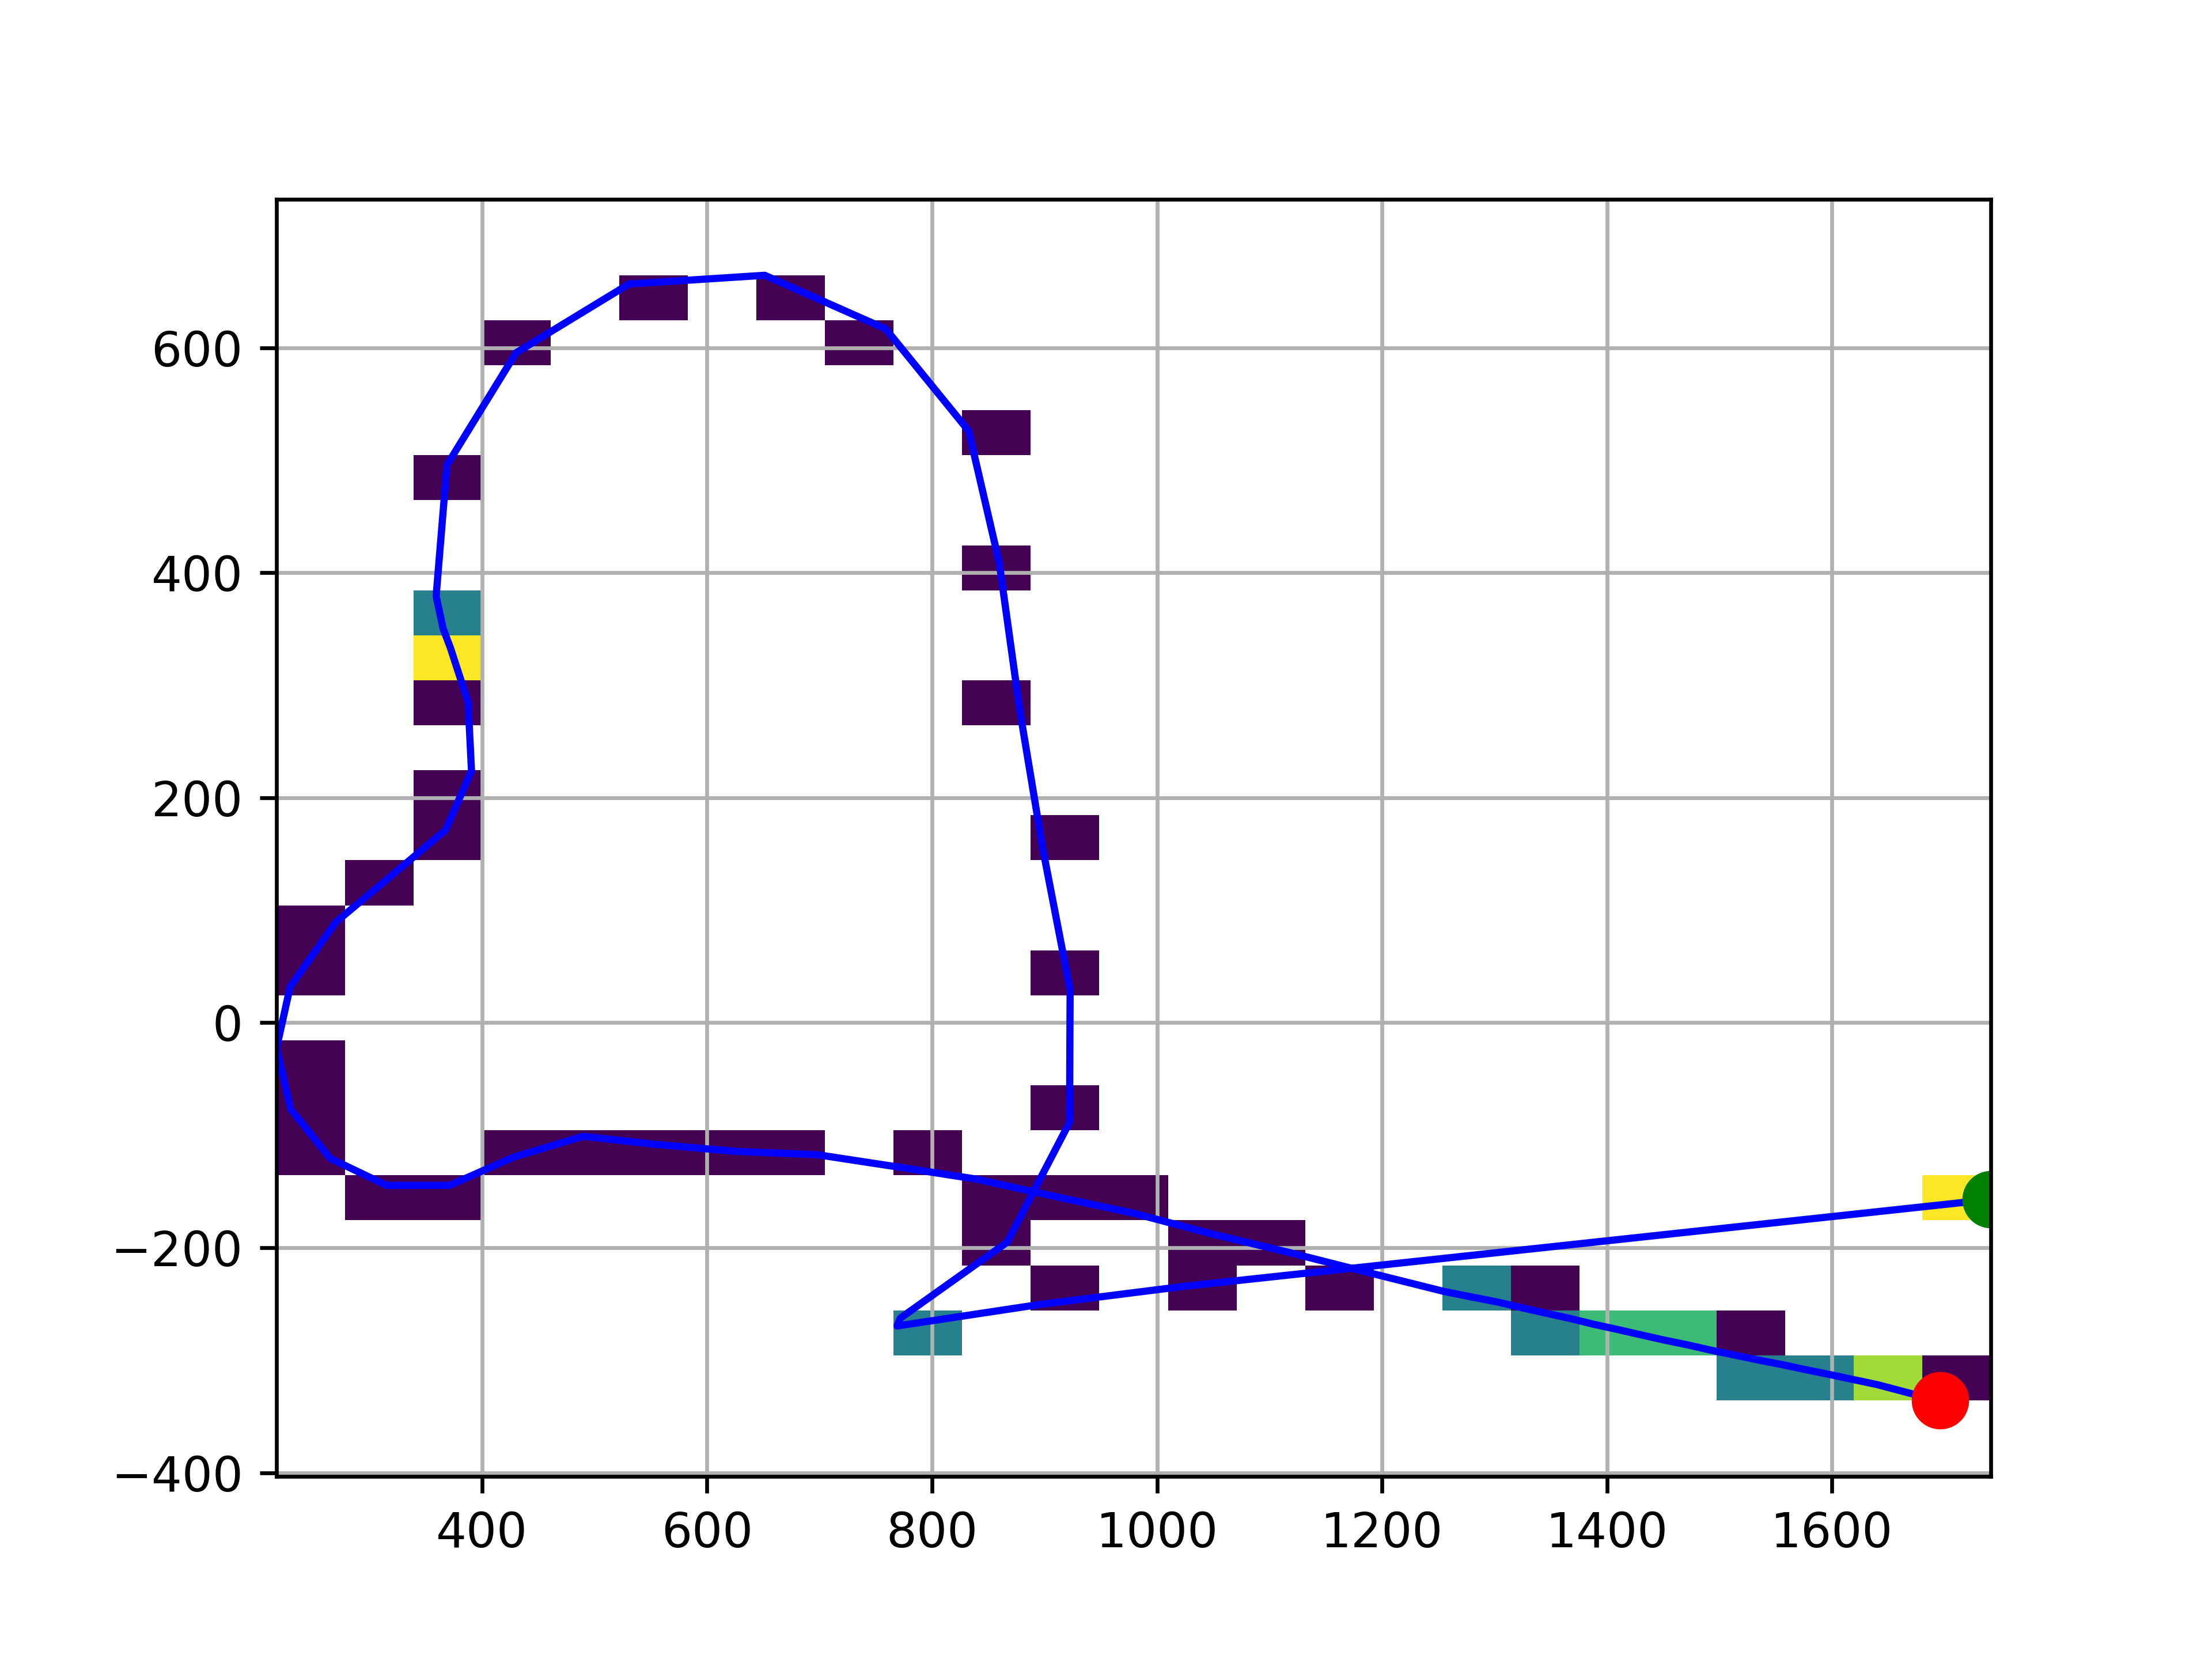
V - Calculating pose as XY coordinates;
V - Mapping. Both live and post process;
V - Correct vectordata with closed loop;
V - Make it rock solid stable;
o - Integrate sensor readings to improve accuracy; 
o - Direct control;

For starters, I want to be able to let Home Assistant send a CLEAN command via MQTT on a schedule. [DONE]

In the long run I want to add a IMU (MPU6050) and integrate this with the sensordata (odometry) from the Roomba to get mapping data. Tracks like you get with a handheld GPS. [DONE]

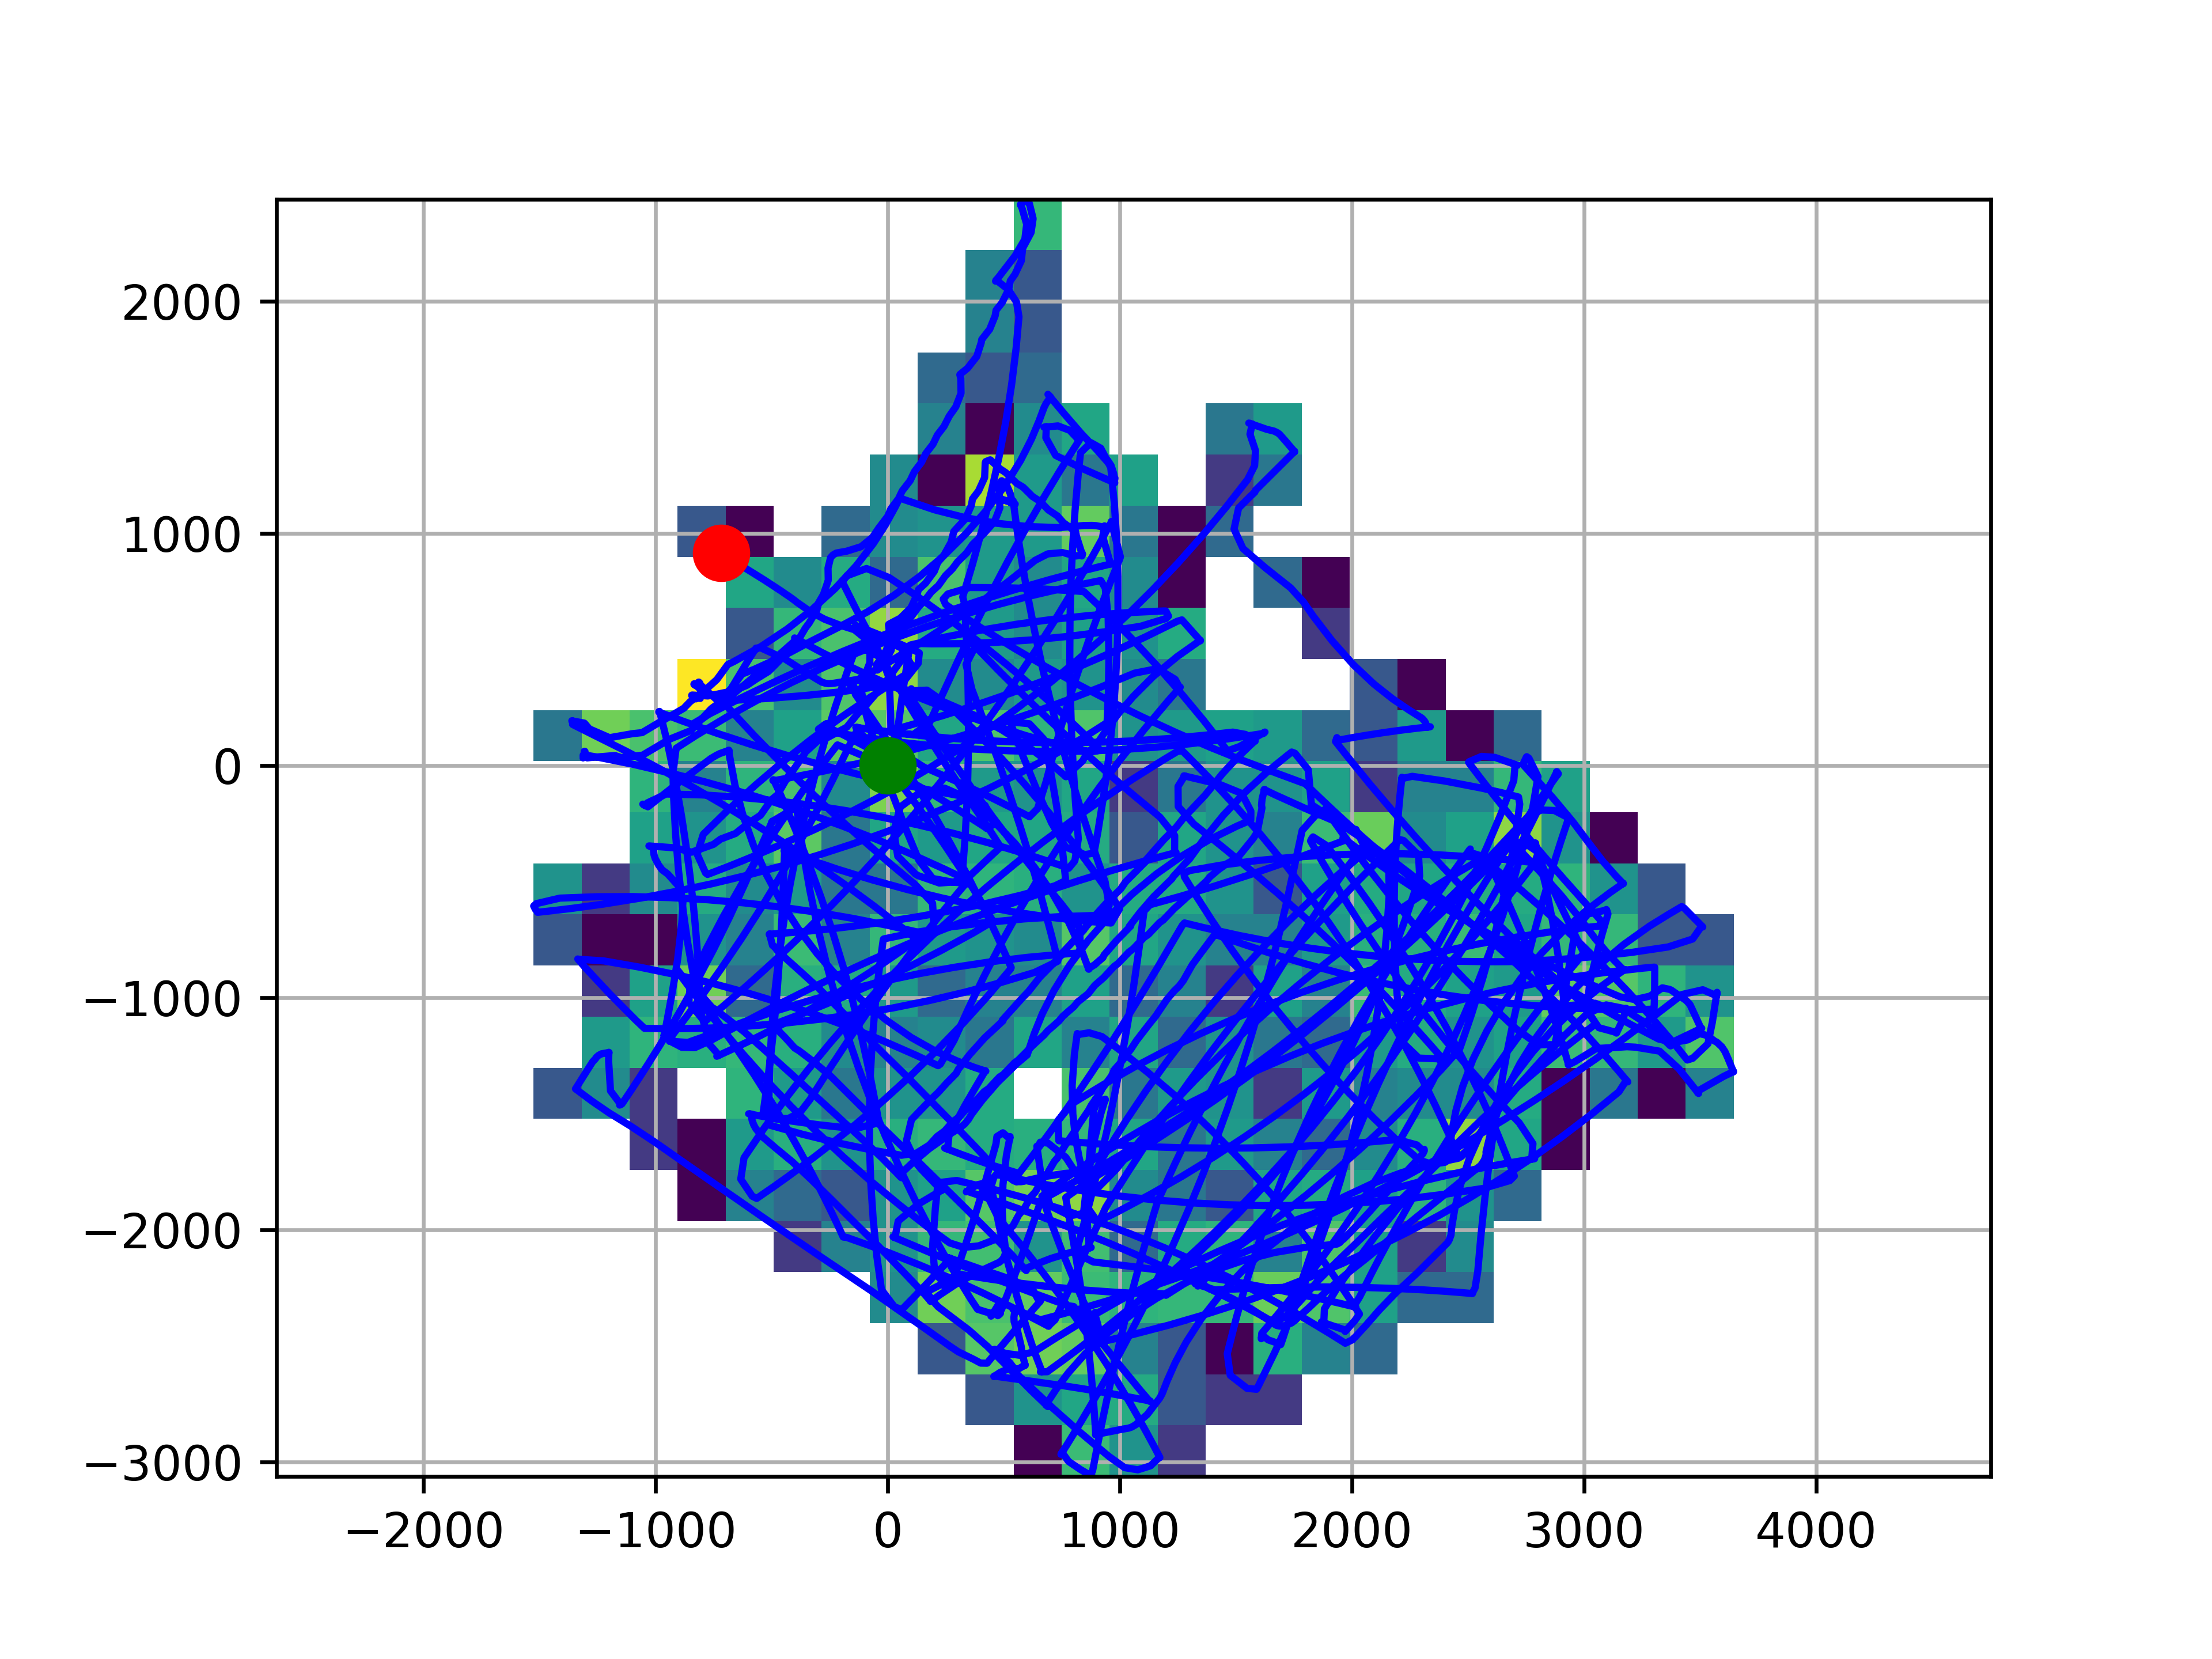
Then maybe do some loop-closing geodesy magic [DONE] and take full control of the driving and cleaning.

Roomba_MQTT_daemon.py

Python service/daemon to run on a Pi for logging, mapping and to do loop closures and error correction. V2025.08.06

x-python - 16.13 kB - 08/06/2025 at 16:57

Download

Roomba632_2025-05-29_Stable.zip

Latest Roomba library. Running stable.

Zip Archive - 13.40 kB - 06/02/2025 at 07:53

Download

2025-05-23_Roomba_Stable.zip

Current stable version of sketch

Zip Archive - 7.35 kB - 06/02/2025 at 07:45

Download

2025-05-24_Roomba_KISS.zip

A clean and simple sketch to test the hardware. Only OTA, MQTT and simple Clean & Dock commands. No MPU6050, no Roomba library, no odometry, scripting etc.

Zip Archive - 3.24 kB - 06/02/2025 at 07:45

Download

2025-04-23_libraries.zip

Needed Arduino libraries

Zip Archive - 502.61 kB - 04/23/2025 at 20:38

Download

View all 15 files

  • 1 × iRobot Roomba 632
  • 1 × ESP8266
  • 1 × IPEX antenna WiFi antenna for the ESP8266: https://hackerstore.nl/Artikel/1026
  • 1 × Buck step down DC/DC converter 3.3V
  • 1 × MPU6050

  • Unlimited POWER!! (2)

    Simon Jansen07/08/2025 at 13:24 0 comments

    It's the power, stupid!

    Power, always power stability issues. I had some really weird problems I couldn't diagnose. When docked, nothing to worry about. Stable for days / weeks.

    But when the Roomba was on the move, the connection would drop out and the ESP would need a full reset.

    First, I thought it was some software glitch / memory leak. So I made a very simple version of the software running on the ESP. This only has OTA and a MQTT connection with Home Assistant. No Roomba632 library, no positioning, sensorstream or MPU shenanigans.  (this would actually be enough for most tinkerers to make your Roomba "connected")

    This did not solve the problem. It must be hardware related then...

    Next suspect was the WiFi connection / access point. So I implemented a sensor for the signal strength to diagnose. Tried different WiFi access points. Changed out the antenna. But none of this solved the stability. 

    When closely observing the Roomba, it would mostly drop out when it was bouncing around almost getting stuck. My next hypothesis therefore was power issues. When it would almost get stuck of in a difficult position, the motors draw extra power. I'm sure this does not help for a stable power situation. Because the ESP is running at 160MHz instead of 80MHz, this situation is not helpful.

    How about a quick hack to ultimately rule out power stability? All one needs is a separate, stable and mobile power source. AKA batteries:

    battery hack

    6 AA batteries in 3 battery holders will do the trick!

    Believe it or not, it's ugly but it works! Much rejoicing!  

    I ordered a big fat 3300 uF 6.3V electrolytic capacitor. This gives a smooth and stable power rail for the ESP. 

    3300uF

    All problems are solved and power will never be an issue again. Right? 

  • Let's get loopy

    Simon Jansen05/27/2025 at 14:02 0 comments

    We're closing the loop!

    While I'm waiting on some stuff to make the Roomba run more stable (guess what, I'ts POWER-ISSUES!), I'm checking off the next thing on my to-do list. That's charting Roomba's travels post-process. And look at the results!:

    Raw:

    Post-Processed:

    I already had a python script running as a daemon on a raspberry pi. This listens to published events and data on the MQTT-broker (running on Home Assistant).

    There are two important events to listen to: start-run & end-run.

    Then there are two data-streams. 1 pose-data calculated real-time by the Roomba. This has X,Y coordinates that are used for a live map.

    2. Raw data containing motorencoder data, real-world yaw by the MPU (for now) and stuff like light-bumpers for wall detection. These values are recorded to a logfile, later used in post-process.

    The positional data is used as a first approximation. The starting & ending position is both on the charging dock. Same position and same pose. This means a closed loop and therefore a loop closing error to correct.

    The first few positions are used to get a starting angle. The last few positions as a ending angle (as a rolling average).

    As long as the total accumulated drift is less than half a full circle, the difference between starting and ending angle can be linearly "smeared" out over the recorded yaw-values when post-processing.

    The same can be done with starting and ending coordinate.

    Python gives some output:

    start run
    
    Started mapping run
    end run
    Full run is complete. Save logfile and start postprocess
    2558  lines recorded
    Average opening Theta:  0.00093772
    Average closing Theta:  -0.19936671270879255
    Closing error0.20030443270879256
    Error correction:  7.830509488224884e-05
    dX: 487.2798  dY: -646.4786

     Using both angle and coordinate correction is a bit too much. 

    So now I'm experimenting with full angle correction and half of the coordinate correction. We'll see after more runs :)

    Full python script:

    #!/usr/bin/env python
    # (c) 2022-09-06 S.E.Jansen.
    
    # MQTT-layer for Roomba logging
        # Listen for the start and stop of cleaning event
        # Log raw and positional data to file
        # Loop closing and error correction on positional data
        # Render map from positional data as a imagefile
        # Post imagefile to camera entity for Home Assistant
        # Log wall sensors
        # Render image from postprocess
        # Render walls in postprocess image
    
    import time
    import datetime
    import MQTT_Config
    import json
    import paho.mqtt.client as paho
    import csv
    import matplotlib.pyplot as plt
    import matplotlib.colors as col
    import io
    import numpy as np
    
    #Roomba device info for Home Assistant autoconfig
    DeviceName = 'Roomba632'
    DeviceID = '01'
    DeviceManufacturer = 'iRobot'
    DeviceModel = '632'
    
    DISTANCEPERCOUNTL = 0.4525 #(pi * 72.0 / 508.8) mm / count
    DISTANCEPERCOUNTR = 0.4400 #(pi * 72.0 / 508.8) mm / count
    WHEELDISTANCE = 247.0 #mm center wheel <-> center wheel
    
    fieldnames = ['EncoderLeft','EncoderRight','Theta','AccelX','AccelY','GyroYaw','LightBumperLeft','LightBumperFrontLeft', 'LightBumperCenterLeft','LightBumperCenterRight','LightBumperFrontRight','LightBumperRight']
    PosXdata, PosYdata = [], []
    WallXdata, WallYdata = [], []
    StartXdata, StartYdata = [], []
    EndXdata, EndYdata = [], []
    linecount = 0
    sum_closing_theta = 0
    sum_opening_theta = 0
    closing_error = 0
    error_correction = 0
    PreviousEncoderLeft = 0
    PreviousEncoderRight = 0
    Theta = 0
    PosXcoo = 0
    PosYcoo = 0
    WallXcoo = 0
    WallYcoo = 0
    
    poseLogFilename = './Roomba/Logs/poseDummy'
    poseLogFile = open(poseLogFilename + ".csv", 'w')
    poseLogWriter = csv.writer(poseLogFile)
    rawLogFilename = './Roomba/Logs/rawDummy'
    rawLogFile = open(rawLogFilename + ".csv", 'w')
    rawLogWriter = csv.writer(rawLogFile)
    
    liveFeedCounter = 0
    Xdata, Ydata = [], []
    
    #MQTT callback functions
    def on_message(client, userdata, message):
        data = message.payload
        global poseLogFilename
        global poseLogFile
        global poseLogWriter
        global...
    Read more »

  • Ich liebe es, wenn ein Plan funktioniert!

    Simon Jansen05/19/2025 at 10:47 0 comments

    It's actually working and functional!

    I have maps of cleaning sessions:

    And a button to summon the Roomba from it's dark abode:

    I'm very happy with the way it works at the moment. I think I will let it run for a few weeks now to test stability.

  • Enhance!

    Simon Jansen05/18/2025 at 09:28 0 comments

    Reading more sensordata from the datastream

    There was enough time in handling of the datastream to add more sensorpackets. So now the datastream includes bump sensors, wheel drops, cliff sensors & light bumpers:

    case datastreamStarting:
    	if ((millis() - commandTimer) > COMMANDTIMEOUT){
    		//setup datastream
    		Serial.write(OCDatastream); //start stream
    		Serial.write(19); //19 packets
    		Serial.write(7);  //1- Bumps & wheel drops U 1
    		Serial.write(9);  //2- Clif left U 1
    		Serial.write(10); //3- Clif front left U 1
    		Serial.write(11); //4- Clif front right U 1
    		Serial.write(12); //5- Clif right U 1
    		Serial.write(14); //6- Wheel overcurrents U 1
    		Serial.write(15); //7- dirt detect U 1
    		Serial.write(21); //8- Charging state U 1
    		Serial.write(22); //9- voltage U 2
    		Serial.write(23); //10- current S 2
    		Serial.write(24); //11- Battery temp S 1
    		Serial.write(25); //12- Battery charge U 2
    		Serial.write(26); //13- Battery capacity U 2
    		Serial.write(34); //14- Charging sources available U 1
    		Serial.write(35); //15- OI mode U 1
    		Serial.write(37); //16- Song playing? U 1
    		Serial.write(43); //17- Wheel encoder counts left S 2
    		Serial.write(44); //18-Wheel encoder counts right S 2
    		Serial.write(45); //19- Light bumper U 1
    		//Number of packets 19, with 25 databytes 
    		//serial write startDatastream
    		dataState = datastreamWaitingForHeader;
    		//Set timer
    		messagetimeouttimer = millis();
    	}
    	break;
    case datastreamCheckingData:
    	if(Serial.available()){
    		checksum += Serial.read(); //Addition to checksum should give 256 on rollover of byte to 0
    		if (checksum == 0){
    			//checksum passed
    			bumpAndDropByte = databuffer[1];
    			bumpRight = bitRead(bumpAndDropByte, 0); 
    			bumpLeft = bitRead(bumpAndDropByte, 1);
    			wheelDropRight = bitRead(bumpAndDropByte, 2);
    			wheelDropLeft = bitRead(bumpAndDropByte, 3);
    			
    			cliffLeft = databuffer[3];
    			cliffFrontLeft = databuffer[5];
    			cliffFrontRight = databuffer[7];
    			cliffRight = databuffer[9];
    			
    			wheelOvercurrentByte = databuffer[11];
    			sideBrushOvercurrent = bitRead(wheelOvercurrentByte, 0);
    			mainBrushOvercurrent = bitRead(wheelOvercurrentByte, 2);
    			rightWheelOvercurrent = bitRead(wheelOvercurrentByte, 3);
    			leftWheelOvercurrent = bitRead(wheelOvercurrentByte, 4);
    			
    			dirtDetect = databuffer[13];
    			chargingState = databuffer[15];
    			batteryVoltage = (databuffer[17] << 8) | databuffer[18];
    			current = (databuffer[20] << 8) | databuffer[21];
    			batteryTemp = databuffer[23];
    			batteryCharge = (databuffer[25] << 8) | databuffer[26];
    			batteryCapacity = (databuffer[28] << 8) | databuffer[29];
    			docked = bitRead(databuffer[31],1);
    			OImode = databuffer[33];
    			songPlaying = databuffer[35];
    			encoderLeft = (databuffer[37] << 8) | databuffer[38];
    			encoderRight = (databuffer[40] << 8) | databuffer[41];
    			
    			lightBumpersByte = databuffer[43];
    			ltBumperLeft = bitRead(lightBumpersByte, 0);
    			ltBumperFrontLeft = bitRead(lightBumpersByte, 1);
    			ltBumperCenterLeft = bitRead(lightBumpersByte, 2);
    			ltBumperCenterRight = bitRead(lightBumpersByte, 3);
    			ltBumperFrontRight = bitRead(lightBumpersByte, 4);
    			ltBumperRight = bitRead(lightBumpersByte, 5);
    			//debugVal = lightBumpersByte;
    			
    			p_encodersReady = true;
    			errorCounter = 0;
    			if(docked){
    				dataState = datastreamStopping;
    			}
    			else{
    				dataState = datastreamWaitingForHeader;
    			}
    		}
    		else{
    			//checksum failed
    			errorCounter++;
    			dataState = datastreamWaitingForHeader;
    			if (errorCounter == DATASTREAMMAXERROR){
    				dataState = datastreamStopping;
    		   }
    		}
    	}
    	//timeout
    	else if ((millis() - messagetimeouttimer) > CHARGINGMESSAGETIMEOUT){
    		//dataState = datastreamWaitingForHeader;
    		errorCounter++;
    		dataState = datastreamStart;
    		if (errorCounter == DATASTREAMMAXERROR){
    			dataState = dataReset;
    		}
    	}
    	break;

     The state machine for handling of the charging message is also improved. (I think) It would go to an idle state sometimes when on the charging dock. This would somehow mess up all kind of things....

    Read more »

  • Unlimited memory!*

    Simon Jansen05/04/2025 at 14:26 0 comments

    Songs and driving scripts are now stored in and read from PROGMEM. This means we can use large scripts (for calibration or as consistent cleaning routes) without running out of memory.

    //Starwars' Imperial March
    const uint8_t imperialMarch[] PROGMEM = {
      N_A4,  32,  N_A4,  32,  N_A4,  32,  N_F4,  23,  N_C5,  10,  N_A4,  32,  N_F4,  23,  N_C5,  10,  N_A4,  42,  0   ,  32,  N_E5,  32,  N_E5,  32,  N_E5,  32,  N_F5,  23, N_C5,  10,  N_G4S, 32,
      N_F4,  23,  N_C5,  10,  N_A4,  42,  0   ,  32,  N_A5,  32,  N_A4,  19,  N_A4,  10,  N_A5,  32,  N_G5S, 21,  N_G5,  11,  N_F5S,  8,  N_F5,   8,  N_F5S, 16, 0    , 21,  N_A4S, 16,  N_D5S, 32,
      N_D5,  21,  N_C5S, 11,  N_C5,   8,  N_B4,   8,  N_C5,  16,  0    , 23,  N_F4,  16,  N_G4S, 32,  N_F4,  23,  N_A4,   8,  N_C5,  32,  N_A4,  24,  N_C5,   8,  N_E5,  42, 0    , 32,  N_A5,  32,
      N_A4,  19,  N_A4,  10,  N_A5,  32,  N_G5S, 21,  N_G5,  11,  N_F4S,  8,  N_F5,   8,  N_F4S, 16,  0    , 21,  N_A4S, 16,  N_D5S, 32,  N_D5,  21,  N_C5S, 11,  N_C5,   8, N_B4,   8,  N_C5,  16,  
      0   ,  23,  N_F4,  16,  N_G4S, 32,  N_F4,  24,  N_C5,   8,  N_A4,  32,  N_F4,  24,  N_C5,   8,  N_A4,  42,  0     ,42
    };
    //macGyver theme song!
    const uint8_t macGyver[] PROGMEM = {
      N_B3, 16, N_E4, 16, N_A4, 16, N_B4, 16, N_A4, 16, N_B3, 16, N_E4, 16, N_B3, 16, 0   , 16, N_E4, 16,  N_A4, 16, N_B4, 16,  N_A4, 16,  N_E4, 16,  N_B3, 16,  N_E4, 16,
      0   , 16, N_E4, 16, N_A4, 16, N_B4, 16, N_A4, 16, N_B3, 16, N_E4, 16, N_B3, 32, 0   , 16, N_A4, 16,  N_D5, 16, N_C5, 16,  N_D5, 16,  N_C5, 16,  N_B4, 16,  N_A4, 16,
      N_B4, 48, N_A4, 76, 0   , 4,  N_A4, 48, N_G4, 76, 0   , 4,  N_B4, 14, 0   , 2,  N_B4, 48, N_A4, 76,  0   , 4,  N_A4, 48,  N_G4, 32,  N_A4, 72,  0   , 8,   N_C5, 12,
      0   , 2,  N_C5, 12, 0   , 2,  N_C5, 12, 0   , 2,  N_C5, 12, 0   , 2,  N_C5, 12, 0   , 2,  N_C5, 12,  0   , 2,  N_B4, 64,  N_F4S, 16, N_A4, 32,  N_G4, 80,  N_C5, 14,
      0, 2,     N_C5, 32, N_B4, 32, N_C5, 16, N_B4, 16, N_A4, 16, N_G4, 16, N_E5, 32, N_A4, 64, N_C5, 14,  0   , 2,  N_C5, 80,  N_F4S, 16, N_A4, 32,  N_G4, 76,  N_C5, 14,
         0,  2, N_C5, 32, N_B4, 32, N_C5, 16, N_B4, 16, N_G4, 16, N_E5, 32, N_A4, 64, N_B4, 64, N_C5, 16,  N_B4, 16, N_A4, 16,  N_C5, 32,  N_B4, 16,  N_A4, 16,  N_D5, 32,
      N_C5, 16, N_B4, 16, N_D5, 32, N_C5, 16, N_B4, 16, N_E5, 32, N_D5, 16, N_E5, 16, N_F5S,32, N_B4, 32,  N_G5S, 48,N_F5S, 32, N_F5, 32,  N_B4, 32,  N_G5, 16,  N_E5, 16,
      N_B4, 16, N_F5S, 16,N_D5, 16, N_A4, 16, N_E5, 16, N_C5, 16, N_G4, 16, N_D5, 16, N_B4, 16, N_G4, 16,  N_C5, 16, N_E4, 16,  N_B4, 16,  N_D4, 16,  N_C5, 16,  N_B4, 16,
      N_A4, 16, N_G4, 16, N_A4S, 32,N_A4, 32, N_G5, 16, N_G4, 16, N_D5, 16, N_G4, 16, N_D5S, 16,N_D4S, 16, N_A4S, 16,N_A4, 16,  N_G4, 16,  N_G3, 16,  N_D4, 16,  N_G3, 16,
      N_D4S, 16,N_G3, 16, N_A3S, 16,N_A3, 16, N_G3, 14, 0    , 2, N_G3, 14, 0   , 2,  N_G3, 14,0     , 2,  N_G3, 14, 0   , 2,   N_G3, 14,  0   , 2,   N_G3, 14,  0   , 2,
      N_G3, 14, 0   , 2
    };
    const uint8_t Square[] PROGMEM = {
      RMDriveF, 20, //50cm
      RMTurnL, 64,  //quarter turn L
      RMDriveF, 20, //50cm
      RMTurnL, 64,  //quarter turn L
      RMDriveF, 20, //50cm
      RMTurnL, 64,  //quarter turn L
      RMDriveF, 20, //50cm
      RMTurnL, 64,  //quarter turn L
      RMDriveF, 20, //50cm
      RMTurnR, 64,  //quarter turn R
      RMDriveF, 20, //50cm
      RMTurnR, 64,  //quarter turn R
      RMDriveF, 20, //50cm
      RMTurnR, 64,  //quarter turn R
      RMDriveF, 20, //50cm
      RMTurnR, 64,  //quarter turn R
      RMDriveF, 20, //50cm
      RMHalt        //Stop
    };
    
    const uint8_t Empty[] PROGMEM = {
      //RMDriveRawBL, 50, 50, 32, //Velocity: reverse 150, Arc: Left 500mm, Time 32*128ms=4sec
      RMDriveR, 40,
      RMTurnL, 64,
      RMDriveF, 16,
      RMTurnL, 128,
      RMHalt
    };
    
    const uint8_t CallibrationRun[] PROGMEM = {
      //RMDriveRawBL, 50, 50, 32, //Velocity: reverse 150, Arc: Left 500mm, Time 32*128ms=4sec
      RMDriveR, 40,
      RMTurnL, 128,
      RMTurnL, 128,
      RMTurnR, 128,
      RMTurnR, 128,
      RMDriveF, 16,
      RMHalt
    };

    With snippets..

    const uint8_t *p_songPointer;
    int p_songNumberOfBytes;
    const uint8_t *p_scriptPointer;
    unsigned long p_undockedTimer;
    
    void playScript(const uint8_t *script);
    void playMusic(const uint8_t *song, size_t songNumberOfBytes);
    
    void Roomba632::playScript(const uint8_t *script){
    	//memcpy(script,script,sizeof(script));
    	p_scriptPointer = script;
    	p_startScriptFlag = true;
    }
    
    void Roomba632::playMusic(const uint8_t *song, size_t songNumberOfBytes){
    ...
    Read more »

  • Aye, aye, captain! Leaving dock!

    Simon Jansen04/29/2025 at 07:19 0 comments

    Call it "side projects" or "rabit holes", but we're here now and we're doing it.

    The goal is to have a button in Home Assistant for when I need to empty the bin. The button will let the Roomba come from under the bed and present itself. That way I can empty the bin or do some other work on it. When I'm done I'll press the "dock" button and send it on it's way. 

    I begin with adding a button for MQTT-autodiscover, availability handling of the button and scripting of a path to drive:

    The first problem I ran into: It won't run my scripts when docked. This is apparently by design:

    void Roomba632::handler(){
        //state machine for high level states
        switch (roombaState){
            case roombaHome: //Charging
                //Check flags in appropriate order of prirority
                if(p_cleanFlag){
                    SendCleanCommand();
                }
                else if(p_playMusicFlag){
                    p_playMusicFlag=false;
                    //SendPlayMusicCommand();
                }    
                if (dataState < chargingMessageWaitingForHeader){
                    roombaState = roombaIdle;
                    EventStateChange();
                }
                break;

     It doesn't "listen" to the scriptflag when docked. So a simple fix there. Just insert:

                else if(p_startScriptFlag){
                    roombaState = roombaPlayingScript;
                    EventStateChange();
                }
    

    Now it will undock, but will run only a part of the script. What happens is: 

    • It will drive away from the base;
    • Charging message will be lost;
    • After CHARGINGMESSAGETIMEOUT (3sec) the datastream is started;
    • Serial.write(OCStart): this puts the Roomba in "Passive" mode;
    • Driving needs "Safe" or "Full" OI-mode so driving stops;

    Nothing we can't handle. The OCStart command should only be given if the current OI-mode is Off or Passive (roomba.OImode < Safe);

    Mode command should only be given if current OI-mode < OI-mode to set. 

    This way, starting the datastream (or any other action) should not interfere with current operations. 

    -- update 03-05-2025--

    Library is now doing all of the things as mentioned above. One of the problems I ran into was the time needed between commands. Updated Roomba632 lib and latest sketch are uploaded to files.

    So now I really have my button in Home Assistant to get the Roomba from under the bed to present it's dustbin. What will I do with all the time I saved..

  • Code update

    Simon Jansen04/23/2025 at 20:37 0 comments

    I have made a few changes to the codebase. 

    • If there is no response from the Roomba (no data stream and no charging message) the data stream is started 5 times. If that has no effect, the Roomba is reset with an OC:7. This is repeated a few times. If that also does not get a response, a call-back function is triggered in the main Arduino sketch. This is a device trigger event that can get a response in Home Assistant with an automation. Although I was not able to test this properly, I can see the right commands being sent over serial (from the mock-up ESP running the same software connected to a PC);
    • There are more call-back functions. A "started_cleaning event" is added;
    • Latest libraries for I2C / MPU6050 are used;
    • Extra's library with main-loop counter is changed. The counter now is an unsigned long to prevent rollover;
    • The done cleaning event is also called in more states. For instance, when in "docking" state. This means that we can give the "docking" command while it's cleaning and the mapping will finish;
    • The ESP exposes more information for troubleshooting to Home Assistant. For instance: The amount of free memory and heap fragmentation. This should give early signs of memory leaks;
    • Newer version of ArduinoJSON library is used. The amount of allocated memory is better matched now;
    • Roomba-state on startup is now "docked" and availability states are set;
    • ESP8266 is running on 160MHz now. This seems to give the needed headroom for a stable WiFi connection;
    • Full MPU data is now available for the posing algorithm in a stable manner;

    Newer software will be added to the files section here.

    I'm ready for more!

    It's clearly not done yet. One of the weird things I can see is the amount of "main loops per second" will sometimes be doubled with some sketch-uploads. If I re-upload the same sketch the next day, the number will drop again. I was hoping it had something to do with the way I count the number of main loops, but I can't find the problem. There is no rollover. 

    Seems to be solved by removing the memory snapshot from the main loop. Running at ~25k loops/sec when docked now and ~10k when cleaning with full logging, pose calculation and magic.

    It has plenty of spare processing at the moment, so I will ignore it for now. Any ideas? 

    Next up, scripting?

  • Are we having fun yet?!

    Simon Jansen04/16/2025 at 10:03 0 comments

    It's been a while. But we're back!

    The roomba has been doing it's scheduled job for quite a while. And I must say, I'm impressed with the stability of the whole setup. 

    The battery needed replacing after two years. The roomba also would quit outputting serial data a few times and needed a reset. But it would run beautifully for months at a time! 

    In the meantime the house got some changes and additional occupants. The complete (digital) infrastructure was also changed,. The mapping service now runs on a different / separate Raspberry Pi. Home Assistant had a complete reinstall and runs on HAOS. 

    The roomba has been in storage for almost a year during construction works. But when I turned it back on the MQTT-autodiscovery worked like a charm!

    It has been cleaning the bedroom now. 

    I'm running into a few stability now and usability issues which I want to address:

    • Unexplained crashes. The ESP would need a hard reset;
    • WiFi dropouts (connected to the crashes?);
    • Watchdogtimer does not trigger and reset the ESP; 
    • If "done cleaning" event is not received, mapping algorithm on Pi also won't stop;
    • State changes and availability messages are not ideal; 
    • It needs a "come out from under the bed so I can change your dustbin" routine;
    • MQTT-autodiscover should be device-based instead of component based;

    So stay tuned! We're back!

  • Logs and maps (part 5)

    Simon Jansen09/06/2022 at 17:33 0 comments

    Quick update on the update

    Writing live map image to buffer instead of file. Reduces load quite a bit. 

    img_buf = io.BytesIO()
    plt.savefig(img_buf, dpi=50, format='png')
    img_buf.seek(0)
    poseLogImageString = img_buf.read()
    poseLogImageByteArray = bytes(poseLogImageString)
    client.publish(MQTT_Config.HA_name + "/camera/" + DeviceName + "_" + DeviceID + "/map",poseLogImageByteArray,0,False)
    img_buf.close()

    It's still not fast enough for a real live feed though. Other small changes I made are: using "zorder" to make sure the scatter plot with dots is on top. Changing the size of the dots with s=120 and setting the resolution for both live-map and post-process-map with "dpi".

    Updated python script is uploaded.

    I guess, now it's time to do the deep dive into the accuracy of the positional data...

  • Logs and maps (part 5)

    Simon Jansen09/03/2022 at 10:22 0 comments

    Quick update: better live mapping:

    I noticed the live mapping would slow down and fail. This was because of the way I used the scatter plot function. I added a new layer with just one dot for each value. 

    Now I clear the plot and map out the complete path it took with a red dot on its last position. This works much better.

    Updated python script is uploaded to files.

View all 36 project logs

Enjoy this project?

Share

Discussions

Simon Jansen wrote 04/30/2025 at 07:52 point

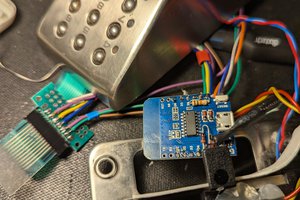
Just curious, anyone out there using these instructions and/or library? Are you using the Roomba part or the Home Assistant part? Did some of the info here solve any problem or did it create new ones?

  Are you sure? yes | no

Simon Jansen wrote 08/15/2022 at 18:43 point

I'm not using anything proprietary though. Just the OPEN API which iRobot has mostly/fully documented and encourages tinkering. One of the reasons why I went for an iRobot device in the first place.

It's a shame you can't document and share your progress any further. I'm sure never to buy anything from Shark in your support :)

  Are you sure? yes | no

Simon Jansen wrote 08/15/2022 at 18:38 point

Thanks for the support Jon and Holy Sh*t for your project dude! Not cool!

  Are you sure? yes | no

Jon Steel wrote 08/15/2022 at 16:40 point

Great Work! You have a nice approach that will hopefully not get your toes stepped on, unlike what has happened with my project.

  Are you sure? yes | no

Similar Projects

Does this project spark your interest?

Become a member to follow this project and never miss any updates