Johann Elias Stoetzer
-
Testing all setups...
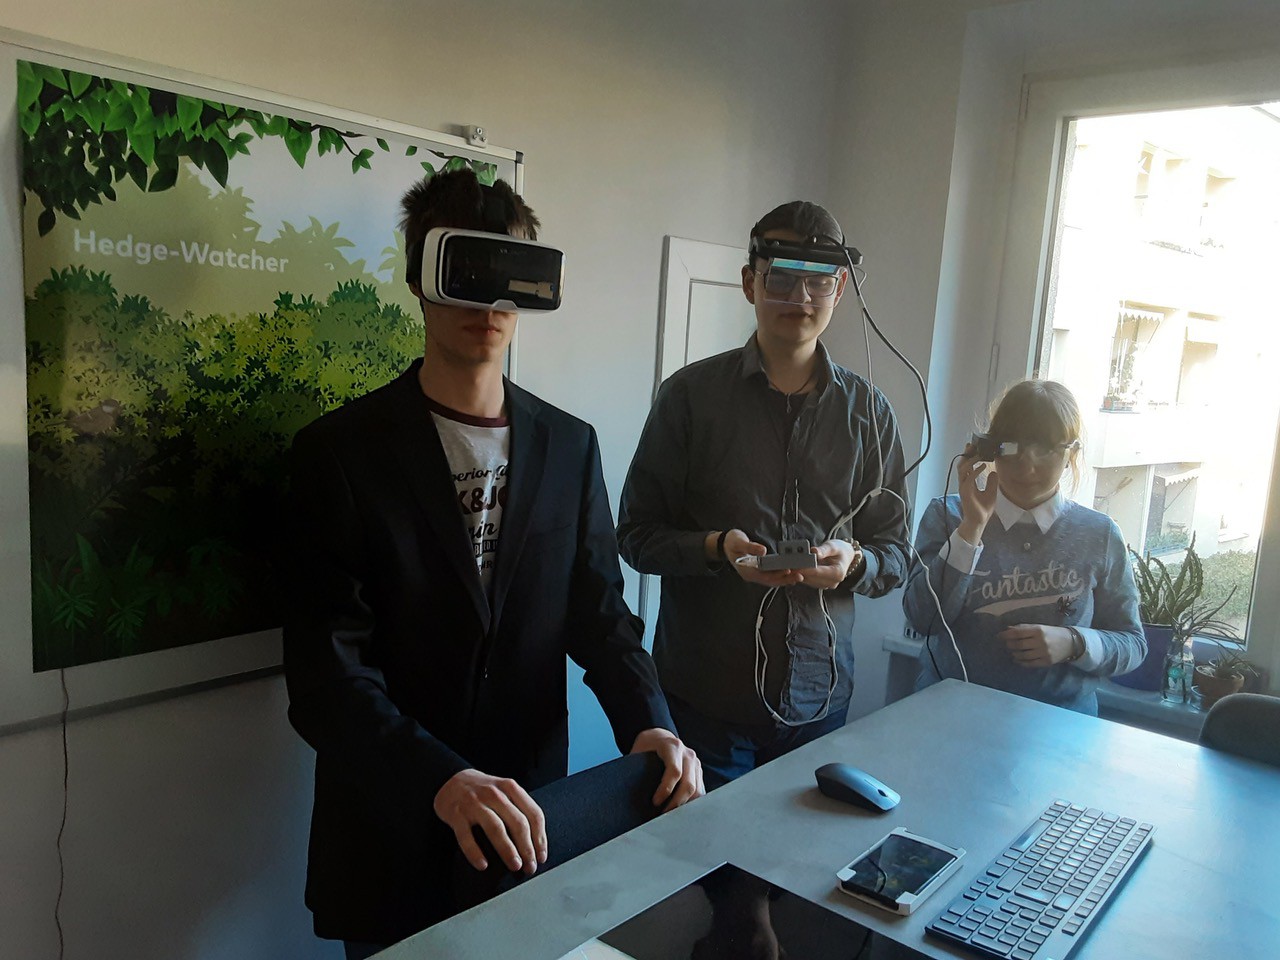
10/09/2022 at 09:27 • 0 commentsNo, not in public for now... just a short impression of how our team looks like wearing these thermal imaging solutions for saving the birds....
![]()
We will update the log with some more high res pictures of the prototypes in operation - we submitted this project to the German STEM competition... and for the test with the jury, we didn't want to scare any birds :-)
So we printed the picture in the background (do you spot the bird?) ... and put a small Peltier element at the back of the poster right where the bird is, to simulate body heat. You can see the wires powering the Peltier running down to the power supply...
So no birds were harmed in the making of the prototypes :-)Now, just imagine us with a big, running hedge trimmer in our hand -- we think that Steven with the VR headset would look most scary. Probably another approach to saving the birds - scaring away all people who want to trim hedges during bird breeding time?
Shall we do a real-world test for a video? What do you think - let us know in the comments, please!
-
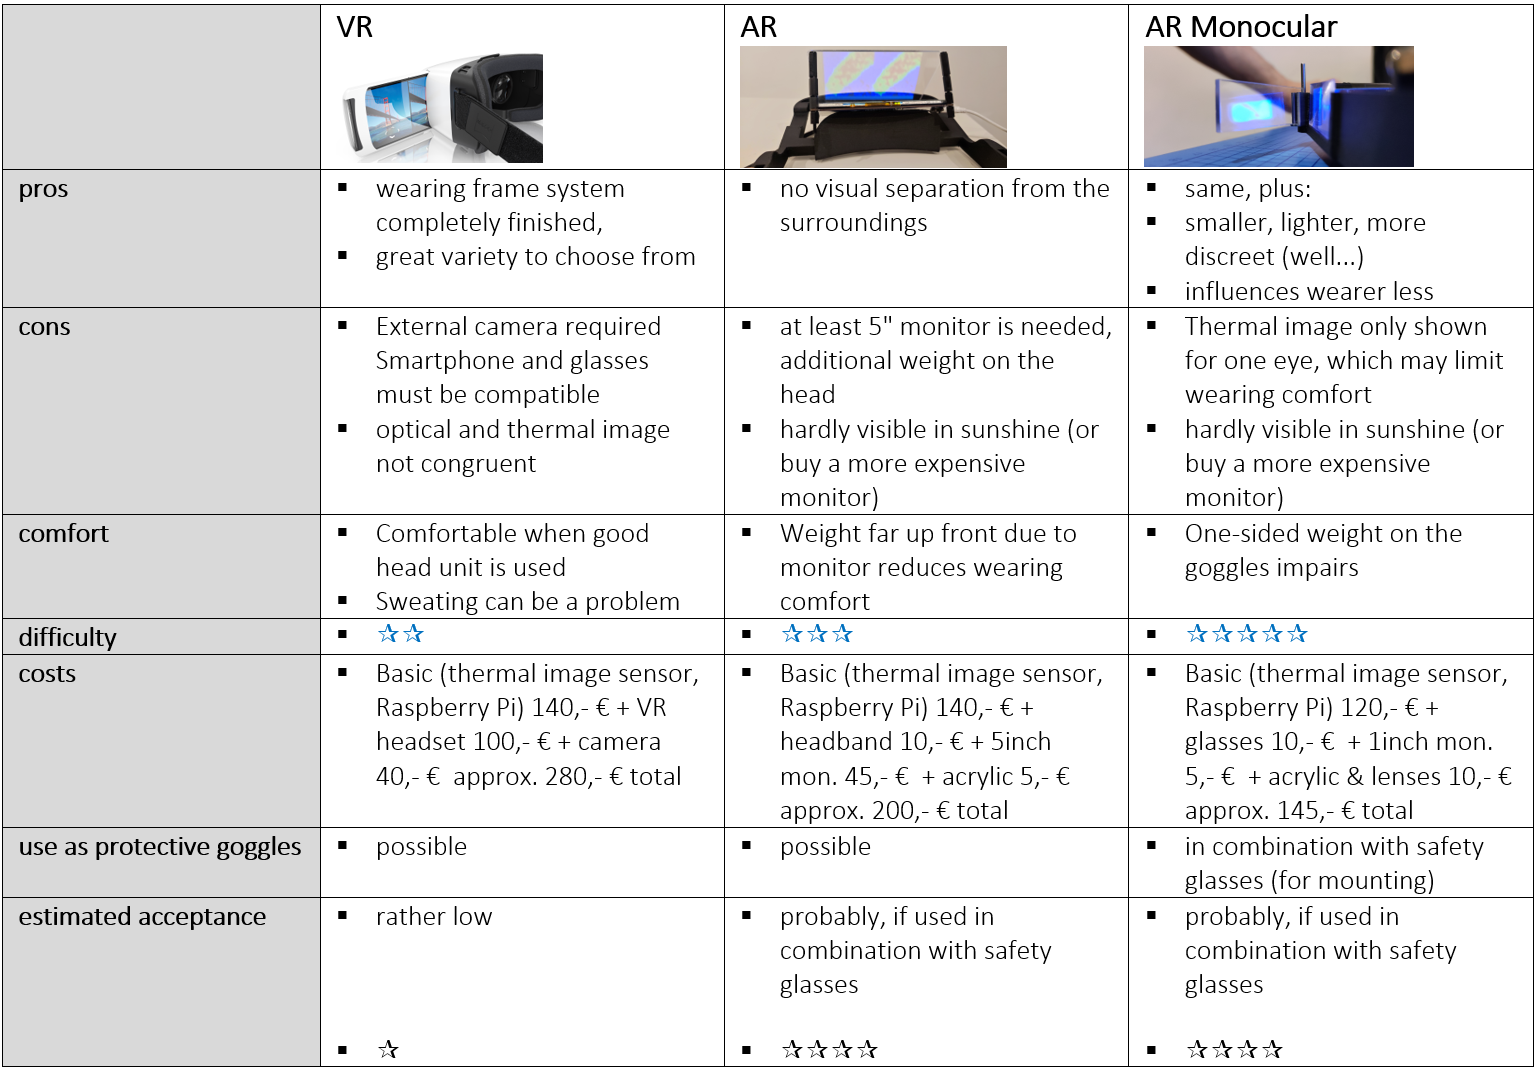
What suits you best: AR, Ar-mono or VR?
10/09/2022 at 08:23 • 0 commentsAfter showing the different options and building 3 different prototypes for our mission "save the world", ehhh... "at least safe the birds while trimming your hedges", it is time to look back and reconsider the different approaches more systematically :-)
Wel, all of them work, which is great, but what would you choose?
We tried a comparison based on:
- pros and cons,
- comfort wearing them,
- the challenge of (re)building one (should be doable for non-hackaday-readers as well!)
- material costs
- purpose as protective gear as well
- estimated acceptance (the most fun part!)
(since we could not edit the table in the log-editor well enough - here' a picture instead of text)
![]()
Each approach has its unique pros and cons.
But the most fun part would definitely be trying these out - in public :-) !!
-
Considering VR-Headset
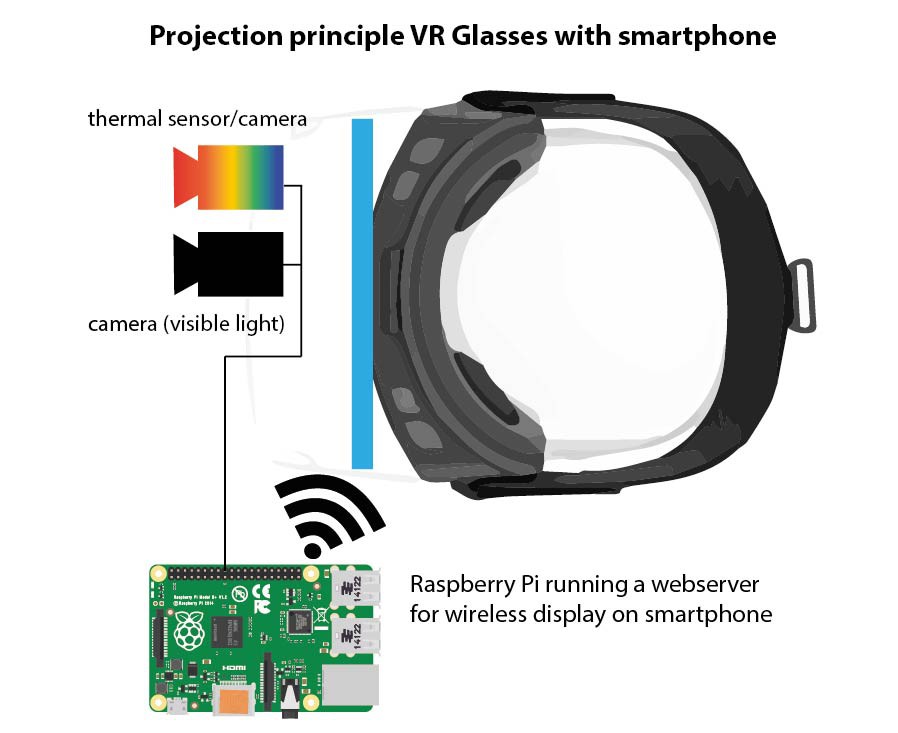
10/09/2022 at 08:10 • 0 commentsThe last prototype we discuss is the VR setup... using existing products like cardboard (or better) goggles combined with a smartphone acting as the display:
![]()
This time we can't use optics to blend the thermal image and visible environment into each other, because the user will be completely "shielded" from the environment, just seeing the pictures on the smartphone (well, yes, that's the plan with VR setups!) ;-)
Therefore, we need to capture both the image in visible light and the thermal image, combine them in software, and display the result twice on the smartphone screen. We already discussed that - in order to save money and not use up too many parts - we designed the Raspberry Pi case serving the AR headset already with a "normal" camera for visible light build-in... so it can be used on the AR headset and simultaneously on the VR one as well :-)
As shown in the projection principle, we run a small webserver on the Raspberry Pi that simply displays the pictures captured and combined (while at the same time putting out the thermal-only image to the TFT screen for the AR headset).
See, no wires! At least not between the Raspberry Pi and the smartphone in this setup :-)
-
AR Headset - setting up and tests
10/09/2022 at 07:57 • 0 commentsWith the "computing and sensing"-in-a-box ready, we assembled the TFT screen and the headset - since we are using one screen for both eyes, we had to show the thermal picture twice... that's why the same image appears two times ;-)
![]()
It was quite assuring to see that the theory (of projecting from TFT display to a transparent screen) works out fine in reality :-)
Next step was of course trying it on for real...
![]()
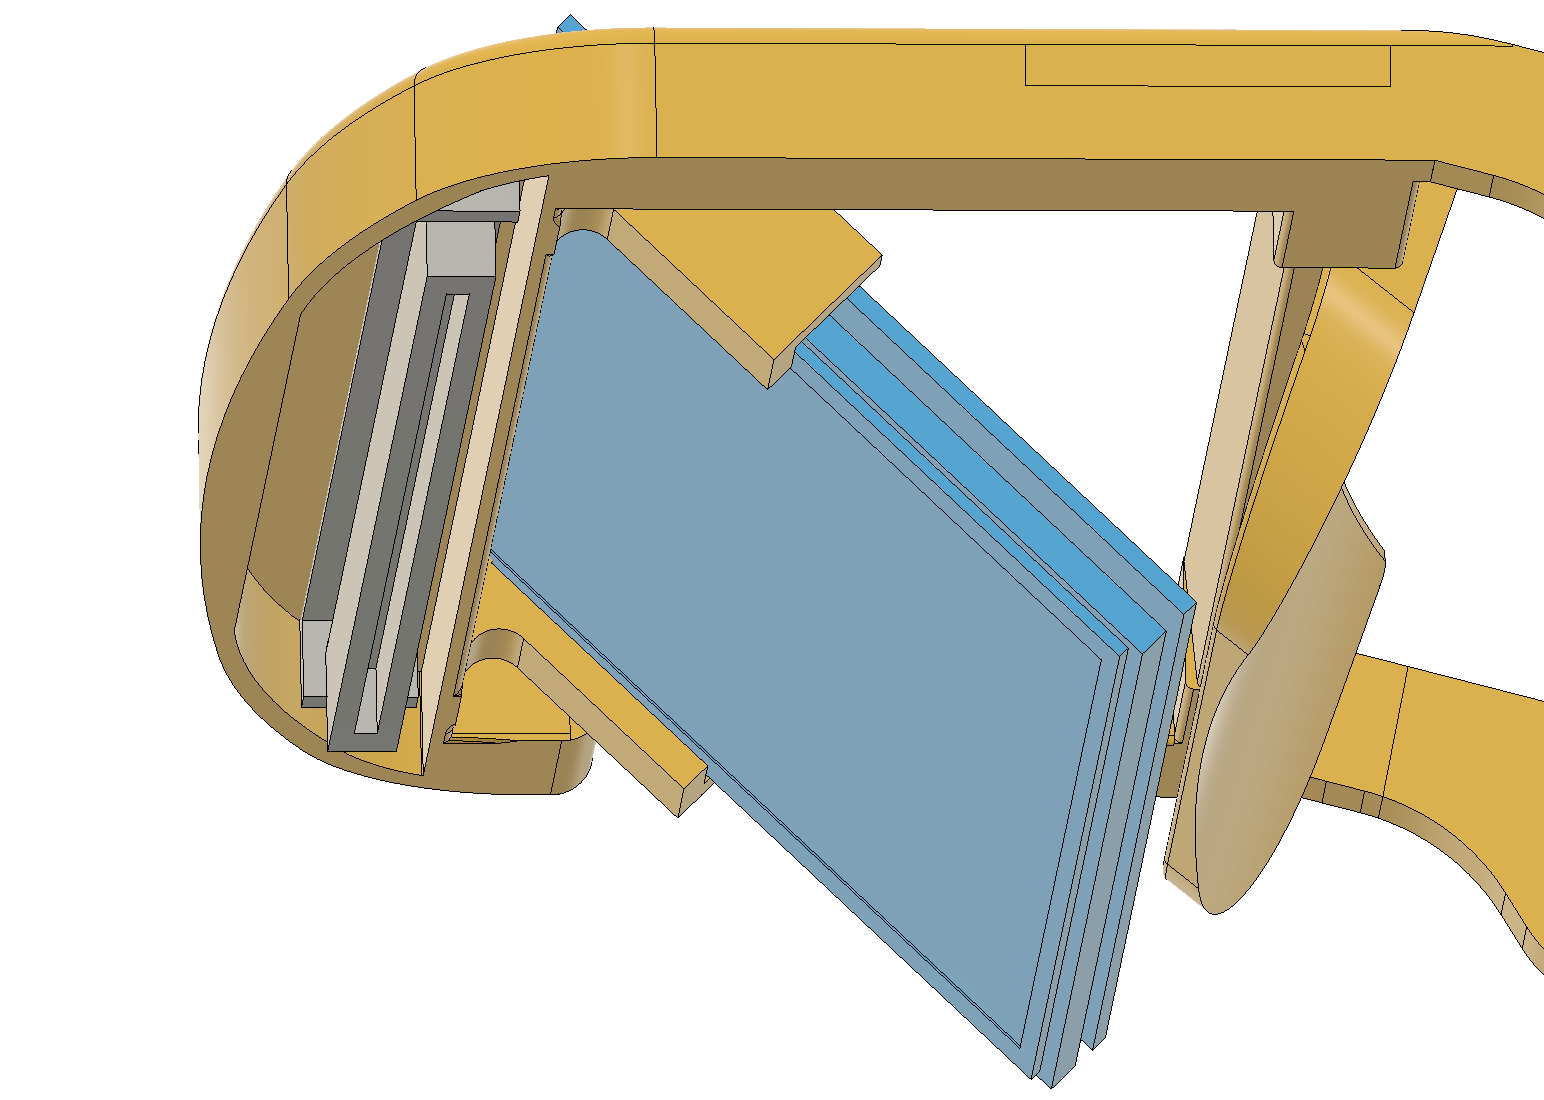
With this "real-world test" (wearing it, not cutting hedges), we realized we need to be able to tilt the transparent screen according to the person wearing it... so, back to CAD, and doing a little add-on to the 3D.design of the headset:
![]()
It is the grey part, that can swivel back and forth...
And now - our AR headset is ready as well! We will post some pictures of the final prototypes in comparison later...
-
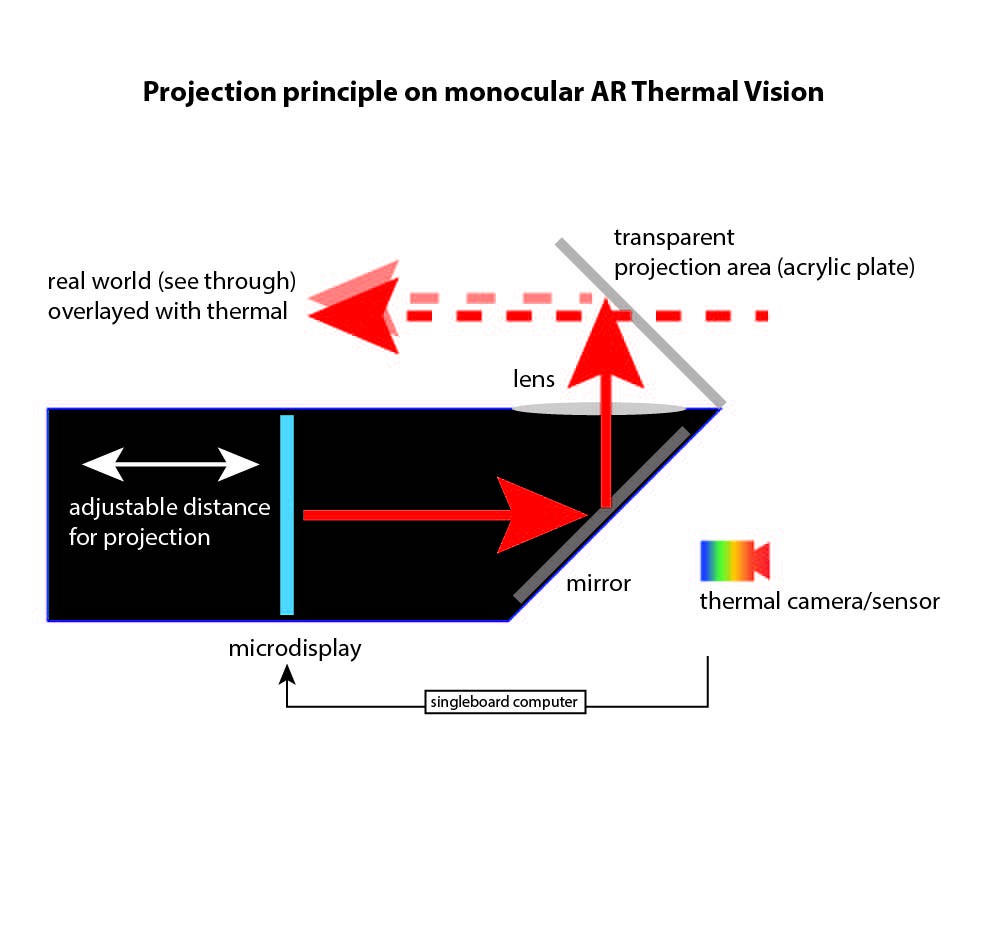
Considering Augmented Reality: AR Headset
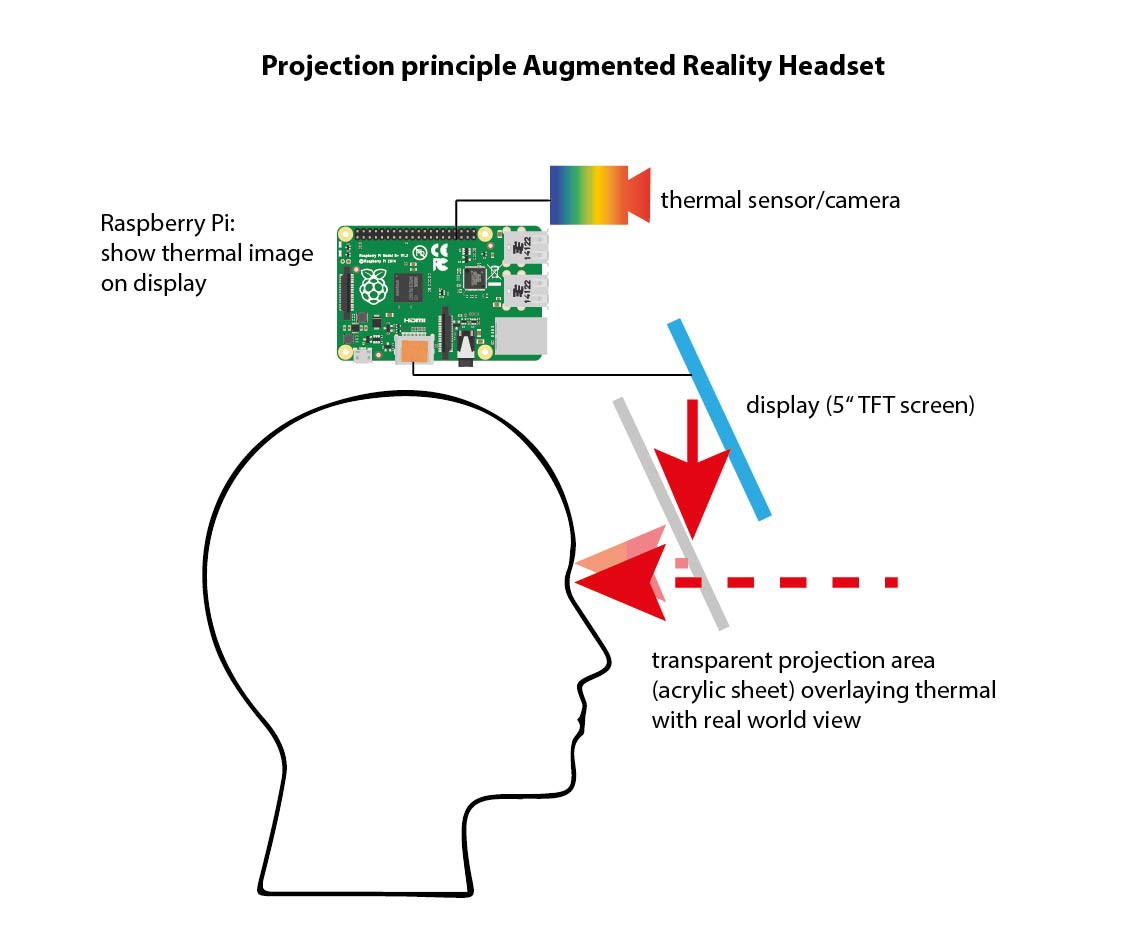
10/08/2022 at 19:51 • 0 commentsThe second approach we discuss is the AR headset, which will show the thermal vision for both eyes. Therefore, the display must be mounted in a way to allow reflection from a screen for each eye plus a pass-through of the view to the real world.
This is how it should work in principle:
![]()
Similar to AR glasses like hololens, we will have a screen above a transparent acrylic plate - it is just a simpler design with one screen for both eyes and no curved transparent screen - maybe this can be sourced online if you would like to experiment with it :-)...
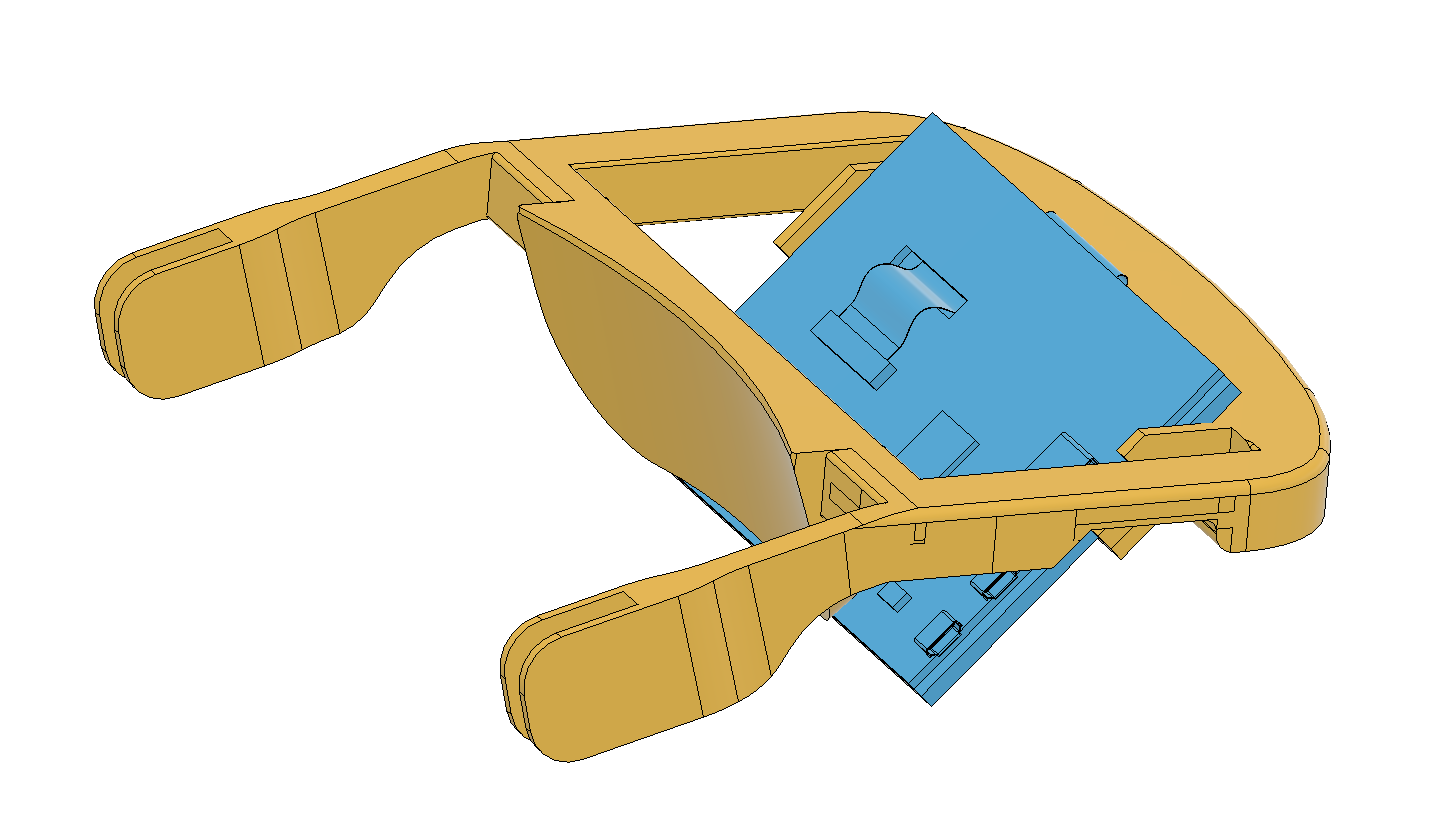
This design had the same advantage of simplicity - no real-world camera is needed; optics will take care of the overlay between real-world and thermal pictures. This time, our prototype will be attached to the head... and we found a nice 3D design on Cults3D, we used:
![]()
https://cults3d.com/en/3d-model/gadget/penelope-zero-diy-augmented-reality-display-indigo4 The TFT display slides in at the front, the forehead rests against the curved area... this was a big help being able to contribute to this design!
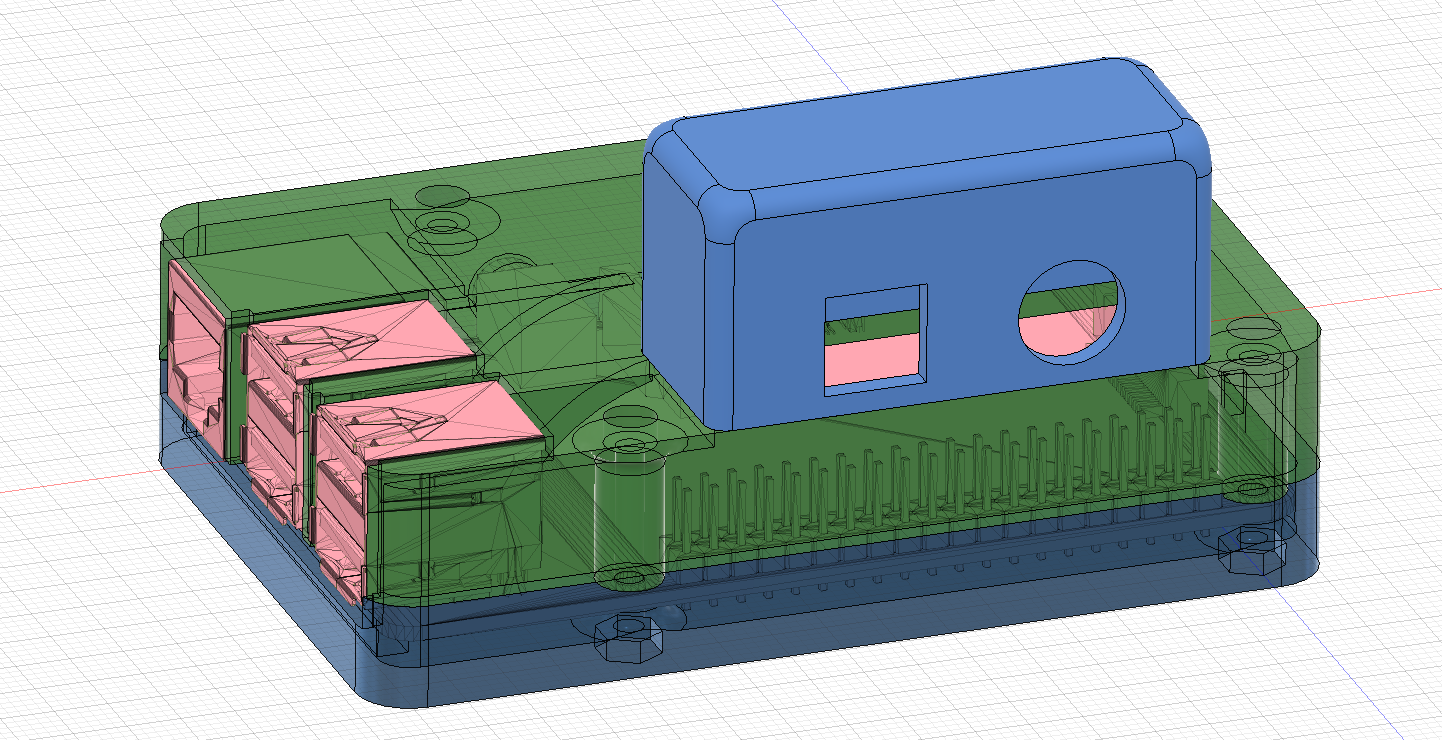
We decided to use a Raspberry Pi case and attach the sensor/thermal module at the top, so both will rest above the display:
![]()
Since we decided to build 3 different prototypes - but we only had 2 thermal sensors - we changed this design a bit and included a Raspberry Pi camera module here. It is not needed for the AR setup, but we can use the same hardware setup for the VR version - no need for a second Raspberry Pi and a third thermal camera... we can be a bit "sustainable" even when prototyping :-)
In theory, we could mount the combined Raspberry Pi with cameras on top of this AR-frame (or use it on top of a VR google)... -
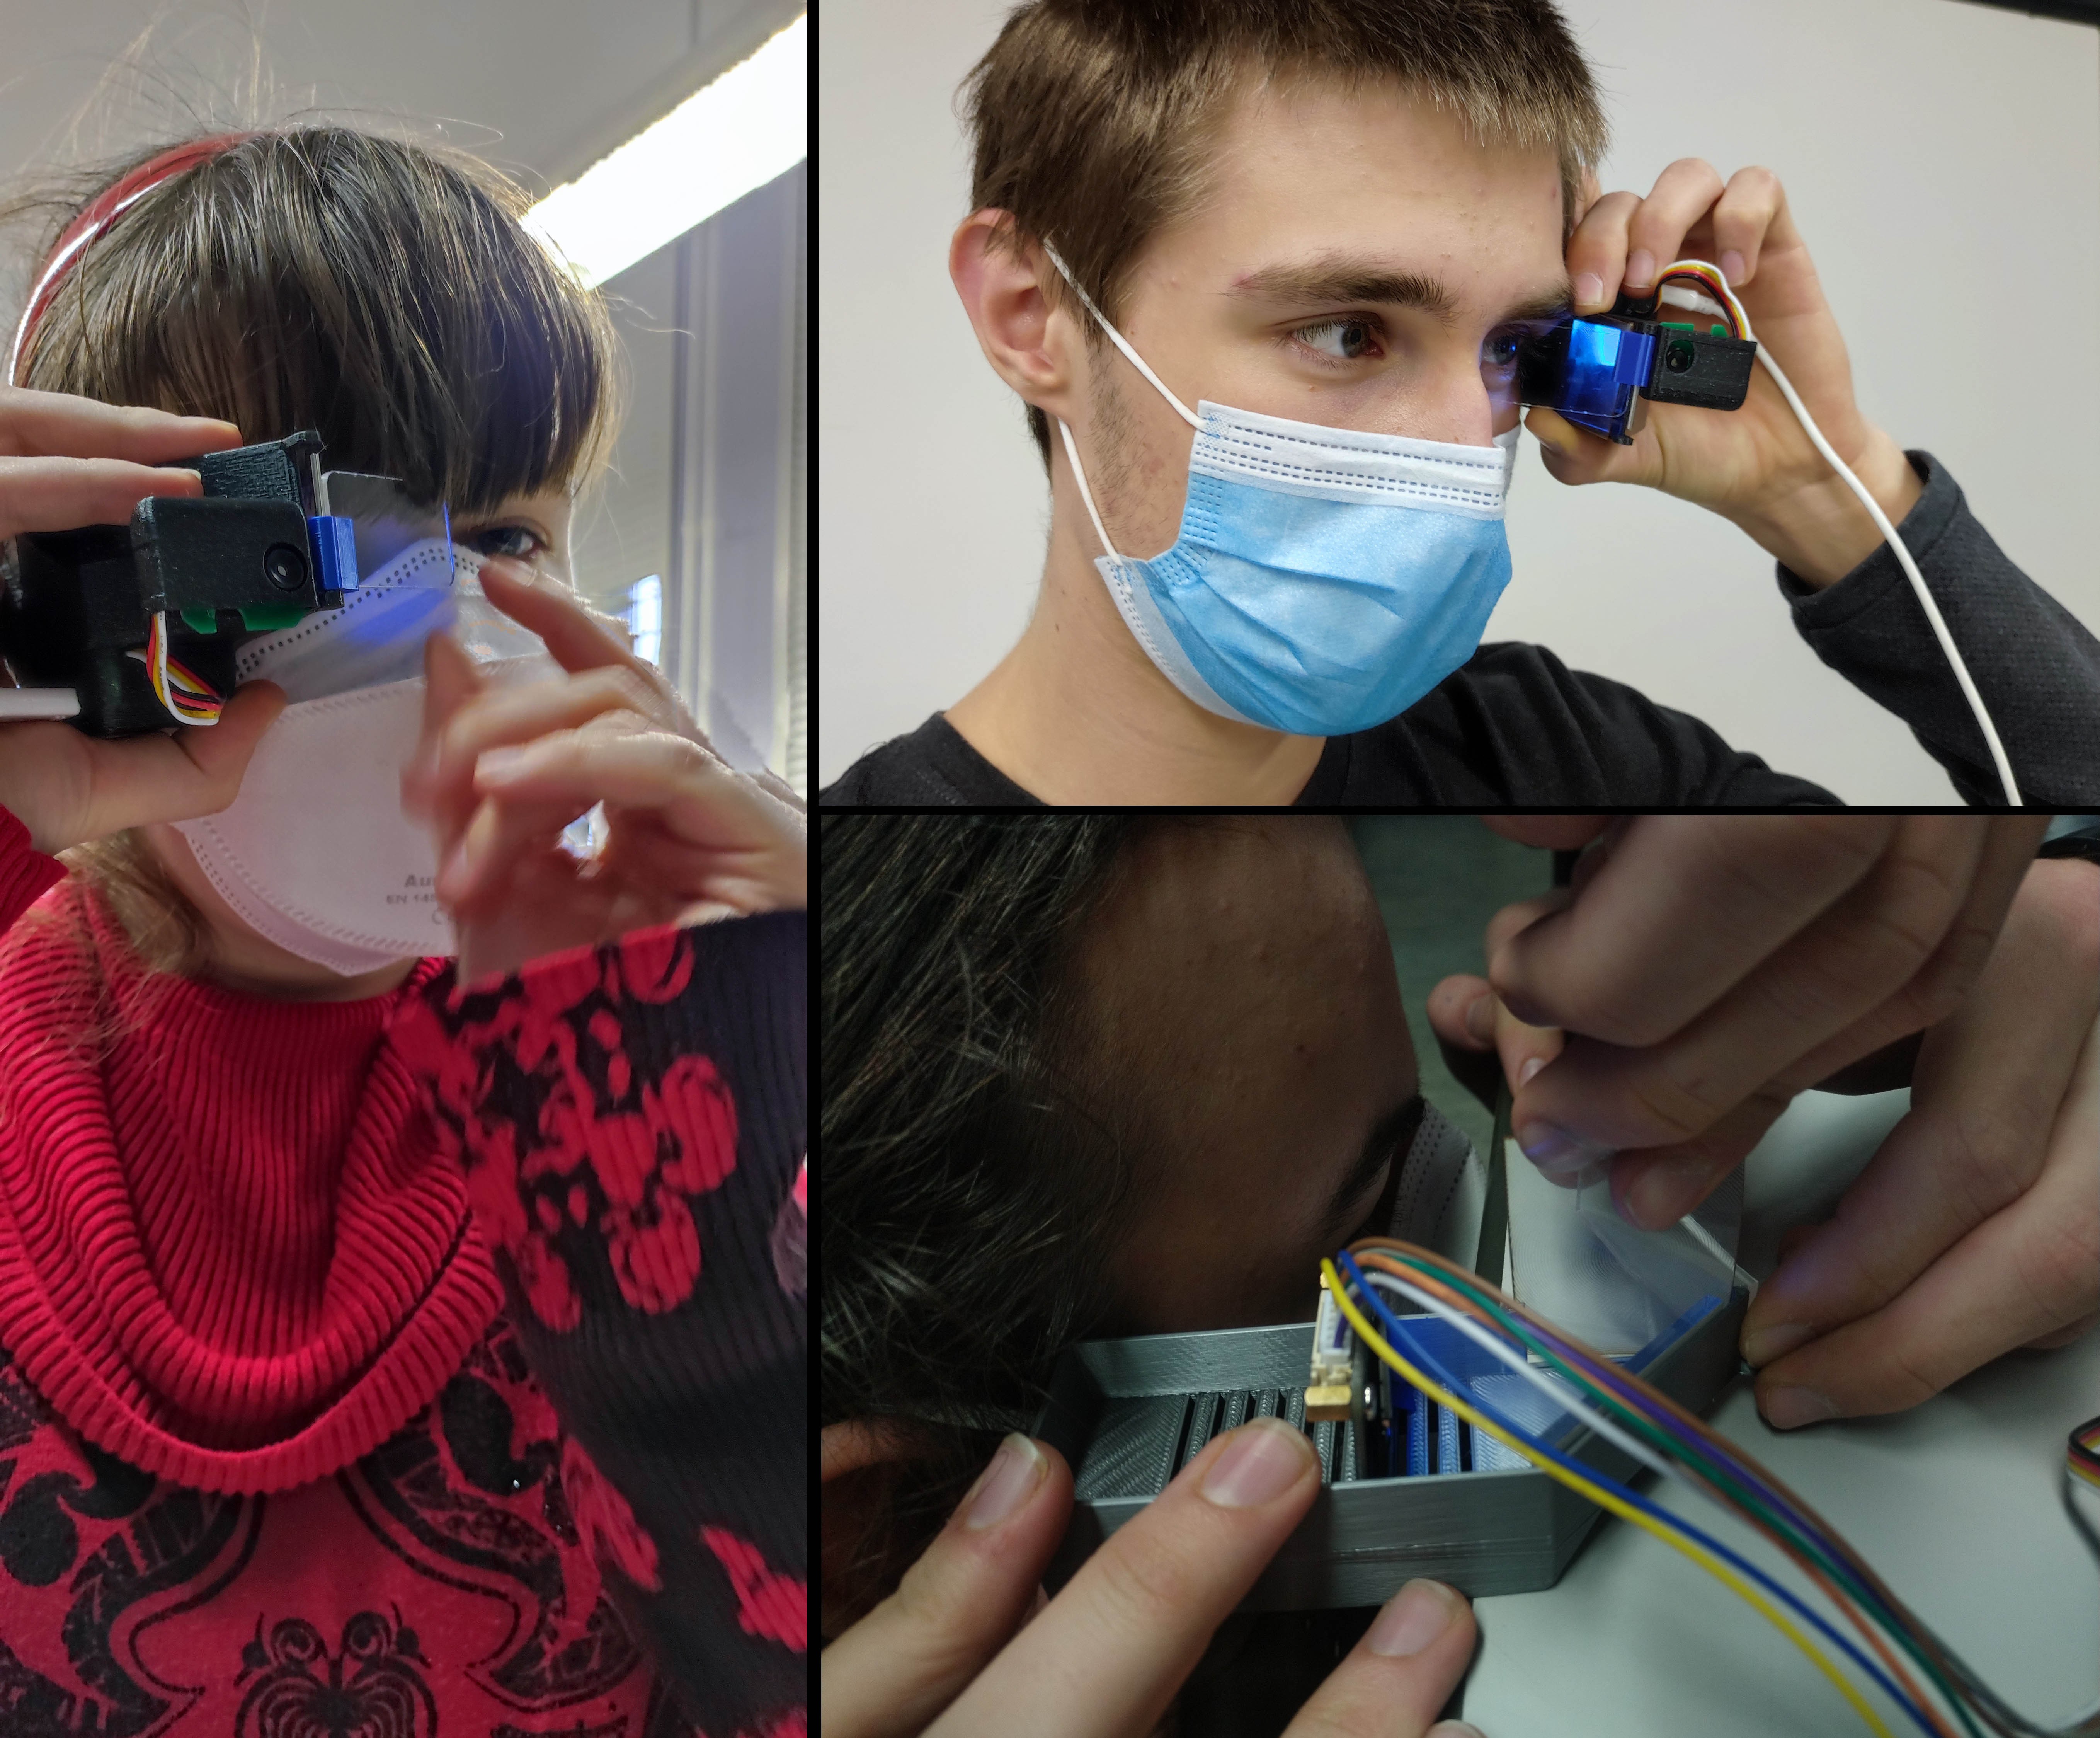
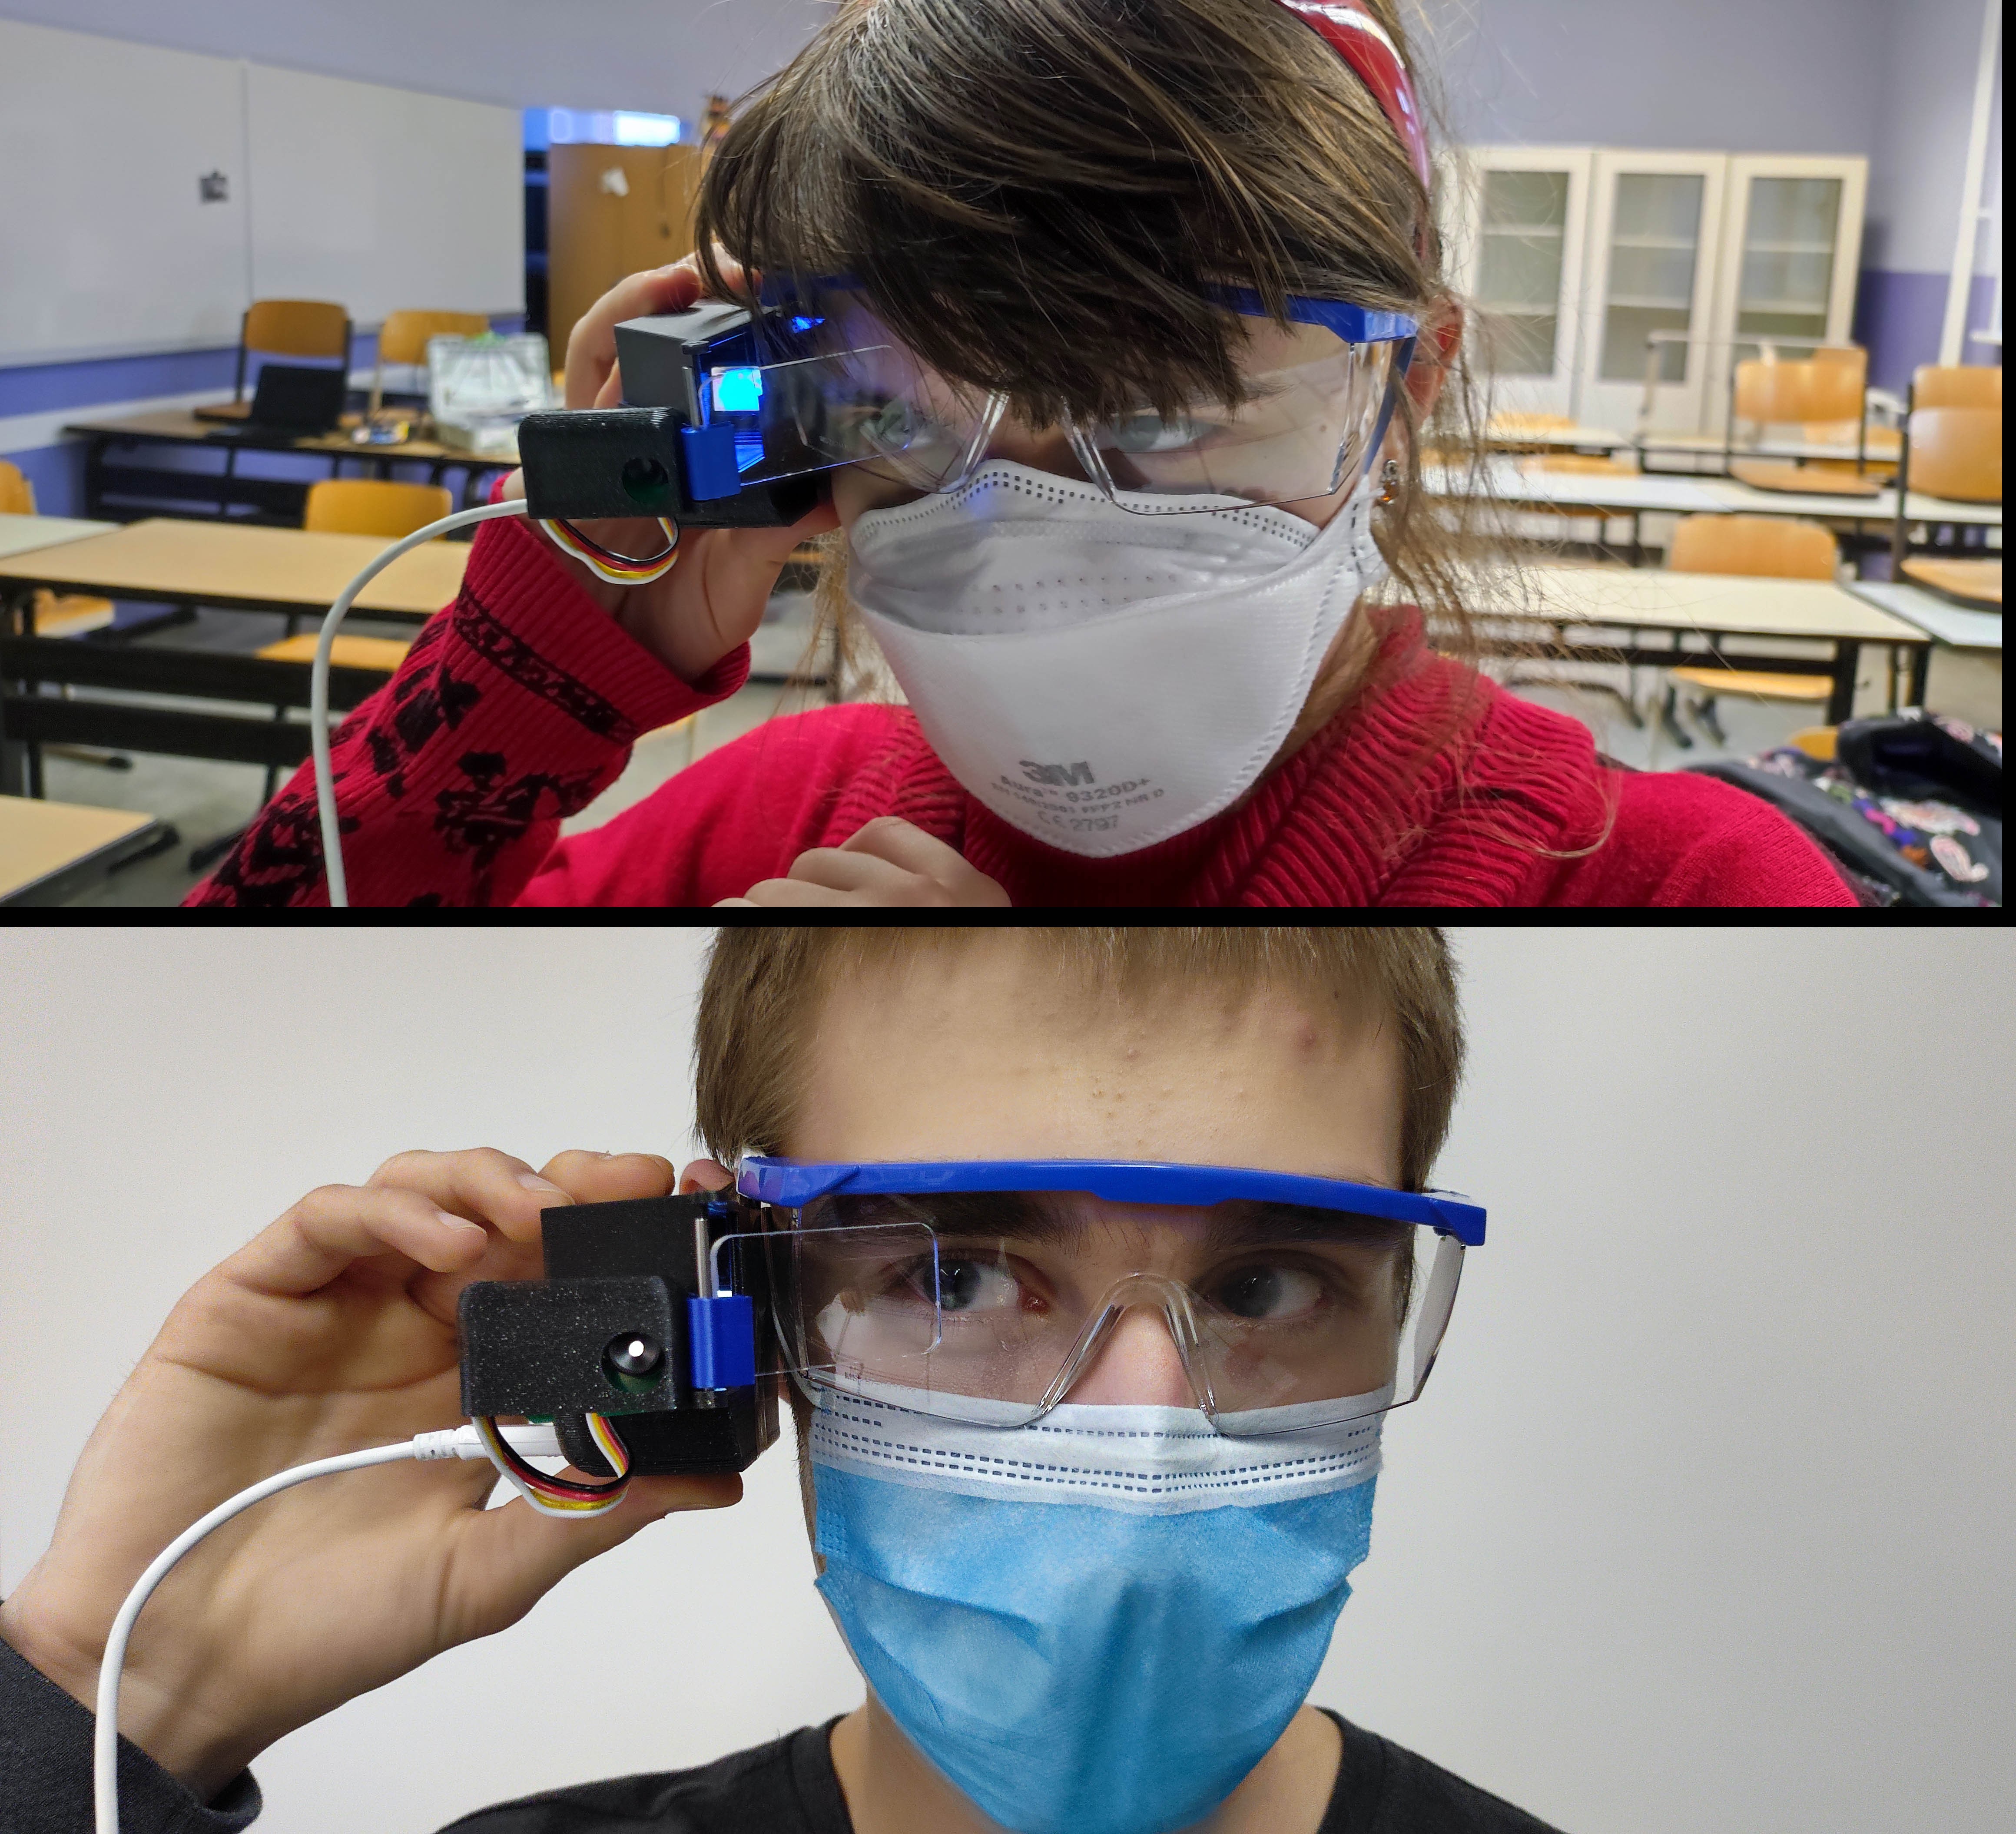
Looking like a Borg - wearing AR monocular
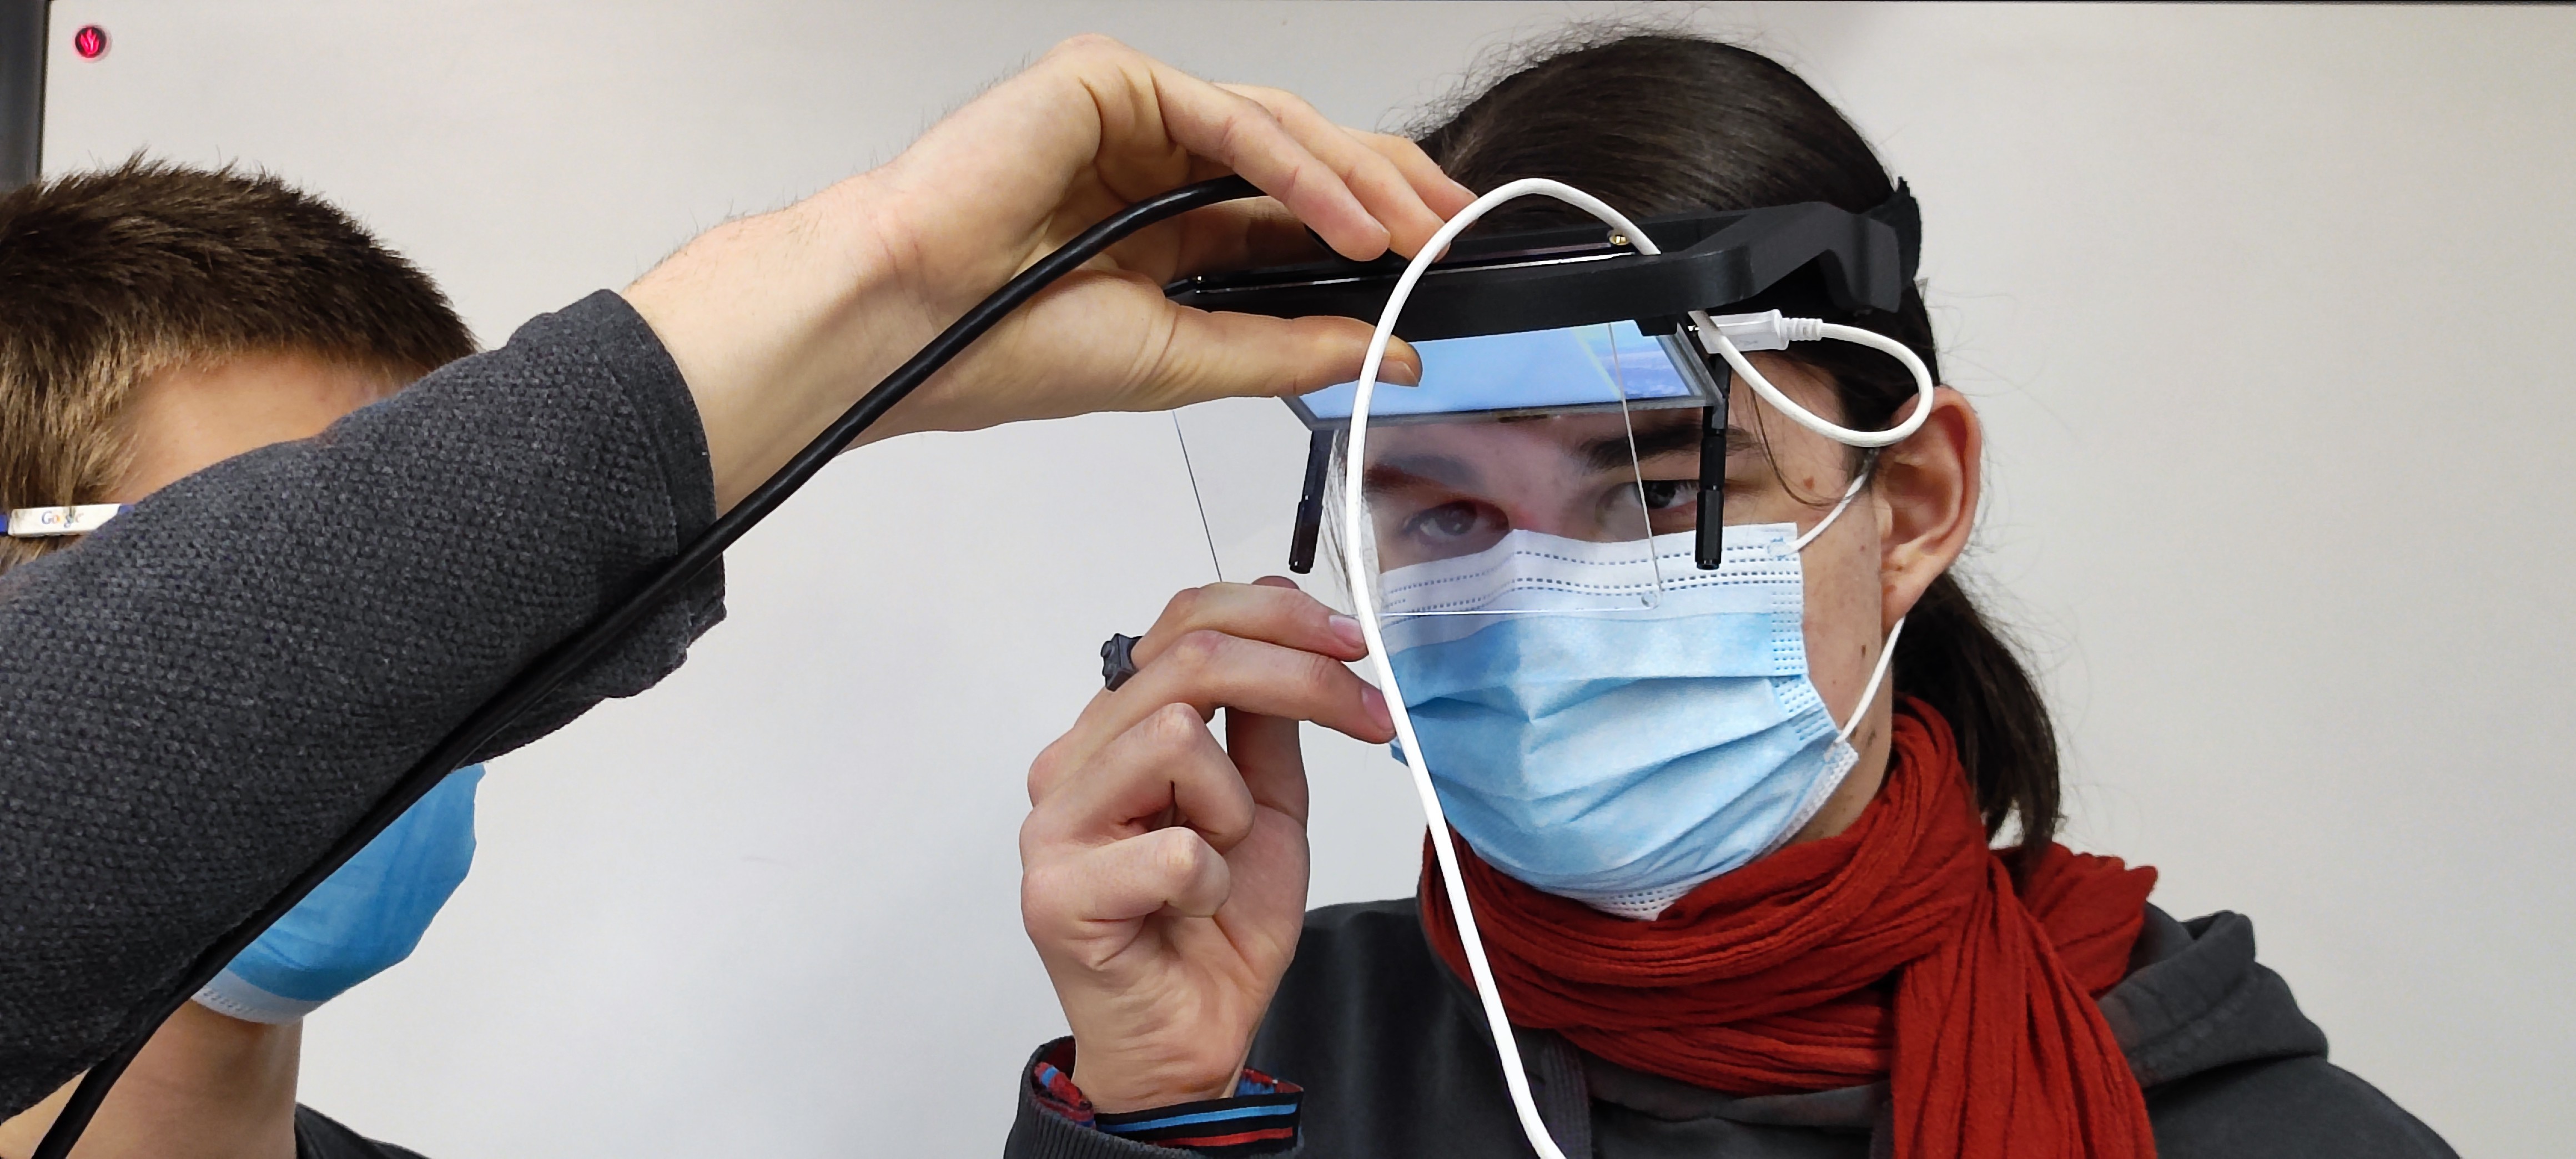
10/08/2022 at 17:01 • 0 commentsThe next step was trying the AR glasses - for real :-) And then optimizing the position of the transparent screen, and the display and selecting the right magnification, because the display is quite "far" from the eye (distance screen-mirror + mirror-scren+screen-eye)...
This was a lot of fun - even if we look very concentrated :-)
![]()
It was during Covid restrictions, we had to wear masks, so you can't see us smile anyway :-)
How would you fix a monocular like that? Initially, we discussed safety glasses! They might be a good idea anyway if you are working with power tools like a hedge trimmer... so here we go:
![]()
After all, we are very happy with the success - we have fulfilled our requirements and design targets!
It is a working prototype, operated by an external power bank. But we think this might even be better than having a LiPo battery next to your face - you know, just in case... :-)
Plus it would add more costs (battery + charging circuit) and weight to one side of the safety glasses. -
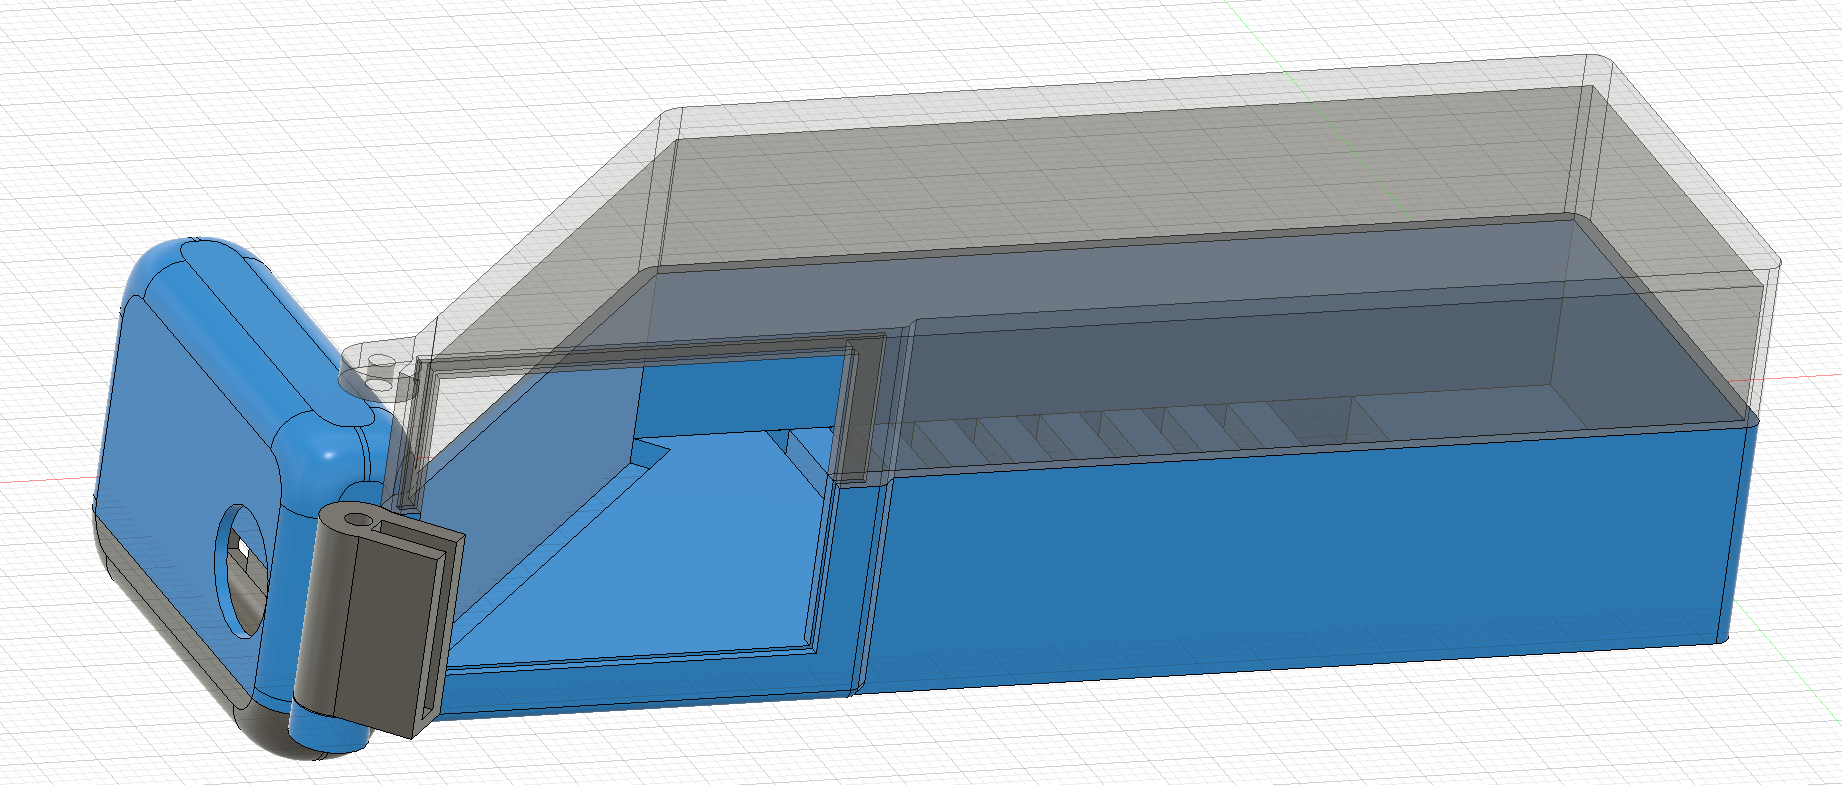
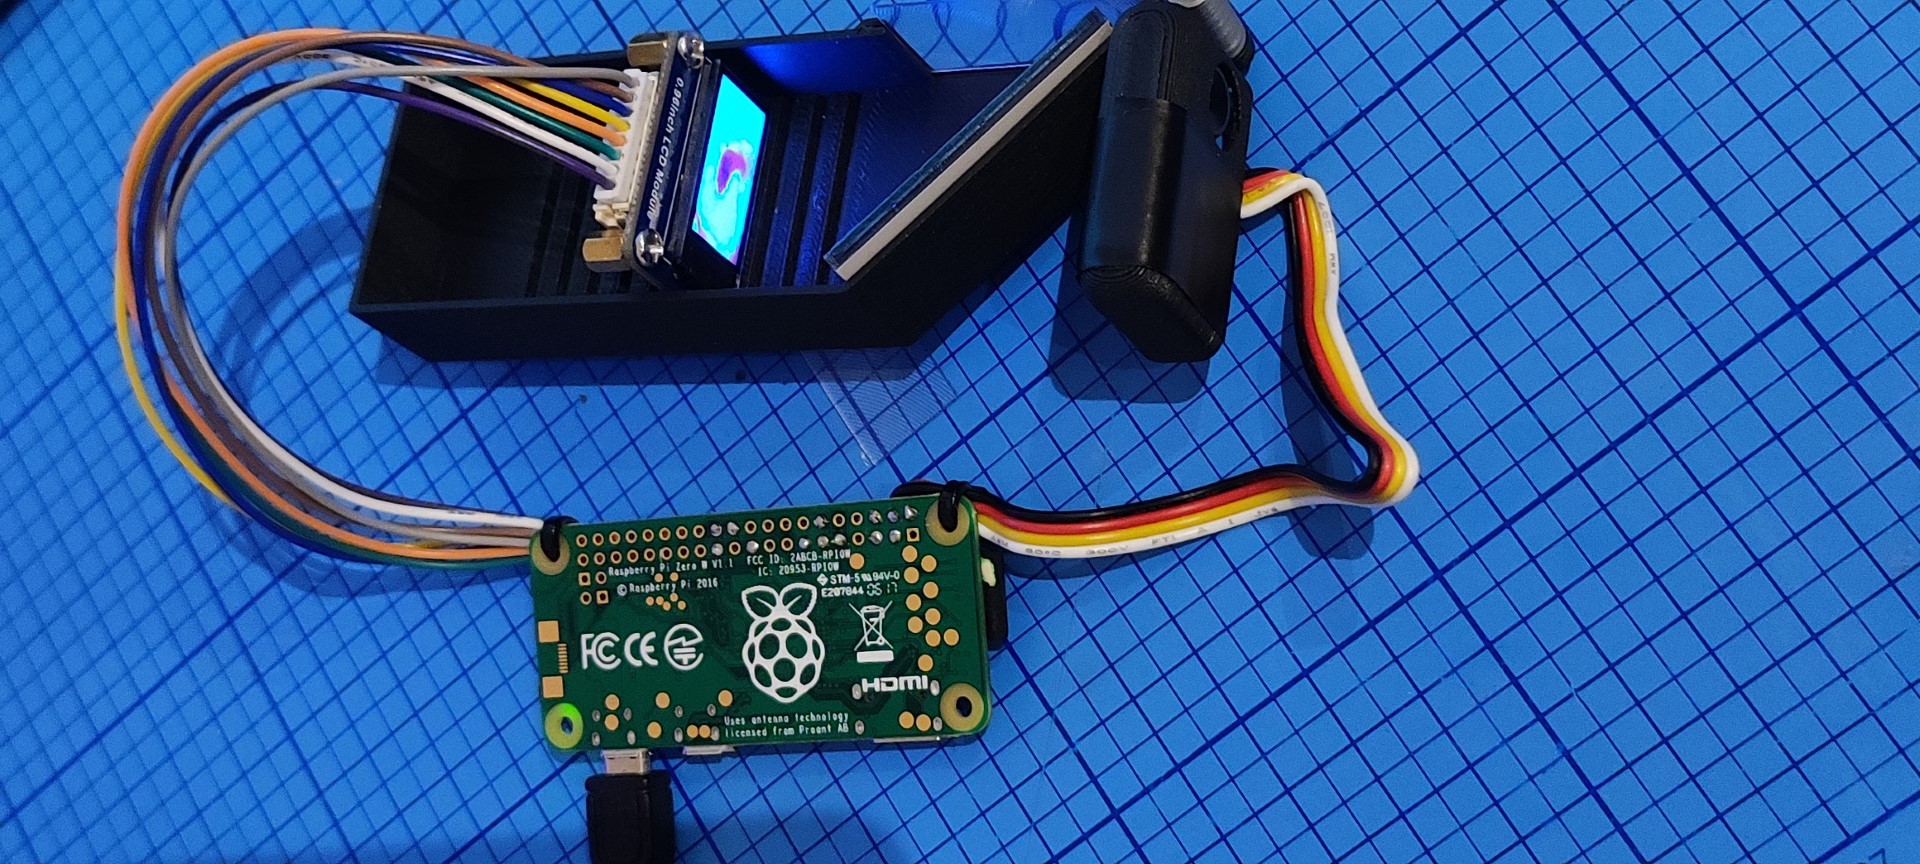
3D-printed case - first assembly
10/08/2022 at 16:34 • 0 commentsAs seen from the previous picture, it was a bit messy to test ;-) - the next steps had to be a proper case (later printed in black for less internal reflections)... this would allow for more precise alignment and testing (distances etc.):
![]()
The upper part is switched to semi-transparent to have a better look inside... there are multiple mounting options to slide the display in (precisely the circuit board, so the screen would sit directly on the printed part).
The small case at the front will contain the thermal sensor, while the "window" will be covered by a magnifying lens. We used fresnel lenses (2 of them added) to achieve a good magnification. The mirror acrylic sheet will sit on the angled wall.
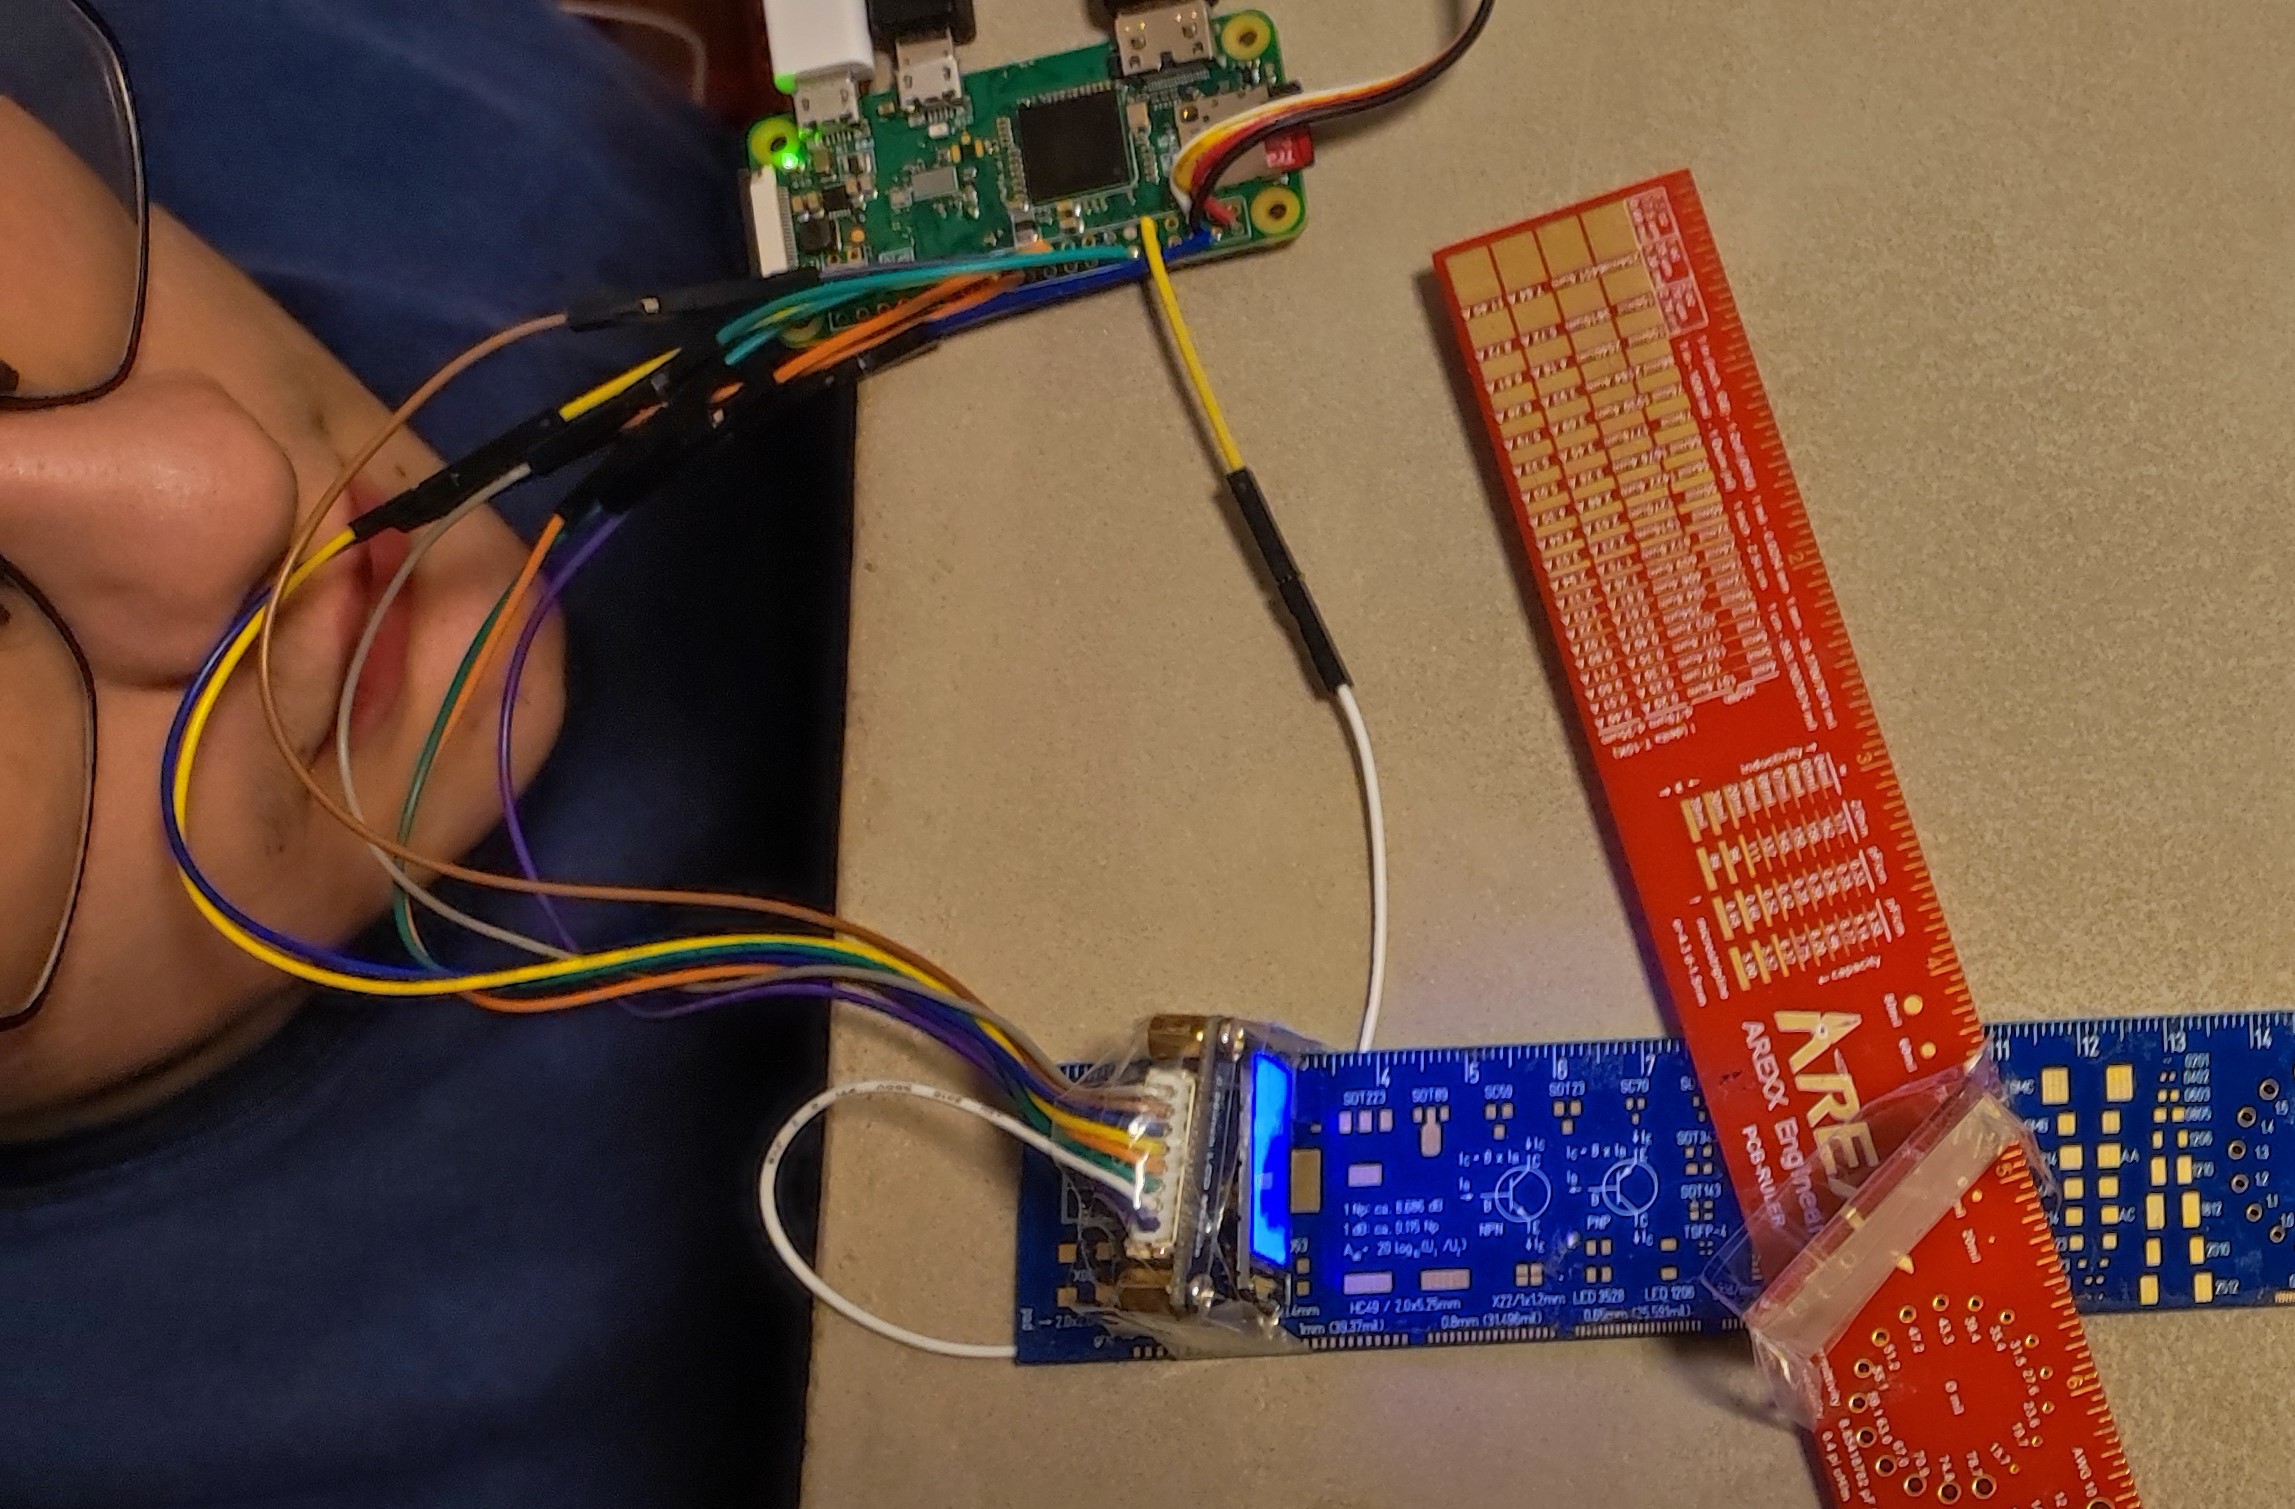
The sensor and display are now soldered to the Raspberry Pi Zero W:
![]()
So we finally had a good way to test the prototype - wearing it!
-
First Tests of AR setup
10/08/2022 at 15:39 • 0 commentsWe chose a simple 0.96-inch LCD display, that is widely available and quite cheap as well. The thermal sensor was more difficult because in order to detect even smaller temperature gradients (23°C outside, a bird might have 25°C), a good thermal and optical resolution would be key - but also expensive, quickly beyond any "reasonable" costs for our project...
Nobody would use this setup to protect animals if it would cost twice as much as an electric Hedge trimmer :-)The least expensive Sensor we found, the AMG8833 has only 8x8 pixels - and this seemed to be too little. Our best choice then was the MLX9640 which allows 32x24 pixels, 12 times better optical resolution.
First, we wanted to test the mini display and check on lenses needed, mirrors, and optimal distances for projection:
![]()
First test of AR principle The next steps included a 3D-Design to fit the display, Raspberry Pi Zero, thermal sensor, and later ideally also batteries - for now, we use a simple powerbank.
-
Considering Augmented Reality: AR glasses
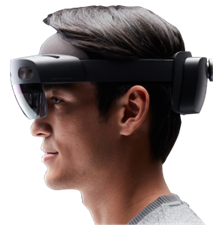
10/08/2022 at 15:22 • 0 commentsFor our purpose, it is not necessary to immerse the viewer in a completely artificially created scene, but rather to expand the visual perception of a real situation in such a way that optically camouflaged small animals become visible. If one wants to add optical sensory impressions, it is called Augmented Reality (AR).
The main difference between augmented reality (AR) and virtual reality (VR) is that reality is augmented (AR) rather than replaced (VR).
![]()
Example: AR headset from Microsoft. What exactly can this augmentation look like? It is additional information that is to be inserted into the user's field of view as seamlessly as possible - and again, the visual impression is then created as if the overlays are part of the perception of the real scene.
This information can take many forms: it can be text messages, images, directions, and even animated representations for computer games or assembly instructions.
For our project, an augmented reality representation has the advantage that only a thermal image pointing to the animals needs to be added to our own visual perception. For our prototype, we therefore do not need an additional camera for the visible spectrum compared to the VR representation.Related" to augmented reality are "AR smart glasses", which usually superimpose information on one side of the field of vision, e.g. text messages or directional information.
We initially decided on a system that, like smart glasses, only displays the thermal image in one eye. The design requirements we set ourselves were that it should be possible to mount it on the side of a pair of protective goggles:
This is how it (should) work:
![]()
For the first tests, we looked for small color displays and a thermal sensor that were as inexpensive as possible.
Hedge Watcher
Save breeding songbirds with VR and AR thermal imaging during hedge-trimming work