Guyrandy Jean-Gilles
-
Touchscreen Assemblies Have Arrived!
09/29/2023 at 06:46 • 0 commentsI ordered GDEY042T81-FT02 earlier in September and didn't expect it to ship for ages, but they've arrived in just 2 weeks! I also ordered the DESPI-C03 development board also made by Good Display to ease development.
---------- more ----------![]()
It's important to note the this display uses the SSD1683 driver instead of the UC8176. With luck, I can setup the tool chain such that the code can compile for GDEW042T2 or GDEY042T81 with a single compiler flag. I'm in the process of refactoring the code to follow the separation of concerns paradigm to make this a reality.
Also, the GDEY042T2-FT02 specification page claims the touch IC is FT6336, but the actual part has both FT6206 and FT6336 labels. From the existing libraries I've found, there shouldn't be too big a difference.
![]()
With the arrival of new displays and the portable power solution, I have quite a bit of firmware to write with all the hardware changes:
- FT6XX6 touchscreen driver
- SSD1683 display driver
- Front light Driver
- BQ27441-G1 battery fuel gauge driver.
Also remember, the whole point of the touchscreen is to add a virtual keyboard so book lovers can type in their book server's URL on the final device. I'll have to at least do 1 and 2 on the above list before I can implement a virtual keyboard. I'll probably also have to figure out partial refresh with LVGL. Either way, the future updates will be software focused as a bring up new components.
For the latest status updates please visit the project's Gitlab repository.
-
Power Management Layout (Sponsored by PCBWay)
09/26/2023 at 15:47 • 0 commentsPaying Bills
![]()
PCBWay graciously offered to sponsor this revision of the board. With them I've had the flexibility to source parts from multiple trusted sources. They are also quite thorough with their file approval process to avoid any surprises once boards ship. Thanks PCBWay!
Update
I've avoided adding a battery solution since I wanted to focus on prototyping the e-reader features. The previous version of hardware and software had the minimal feature set an e-reader requires, so I finally bit the bullet and implemented portable power. I decided not to implement power on the HAT version of the hardware as that's uncommon for that form factor. I consider that version of the hardware done with buttons as inputs. Once I have touchscreens, I'll do a revision of the HAT.
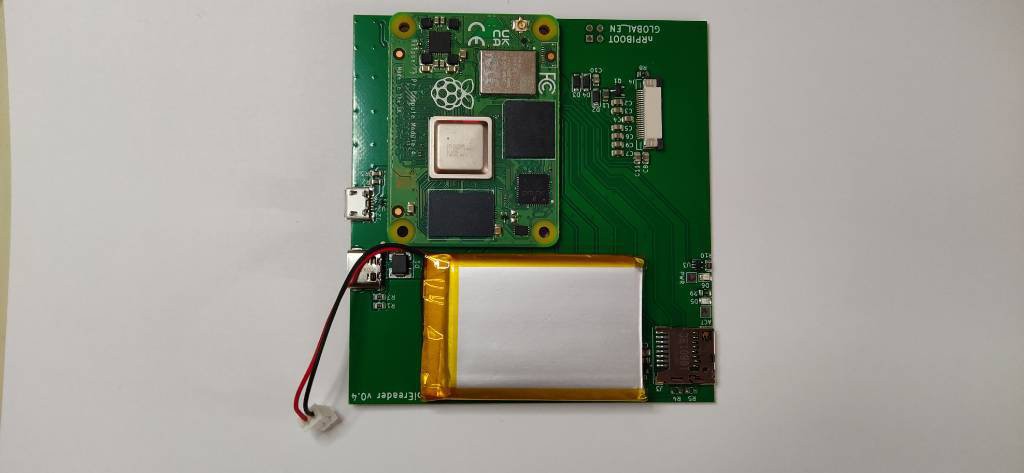
With respect to portable power, my goal was to keep the device as thin as possible which effectively required a lithium polymer battery. Sparkfun sells a 1250 mAh lipo battery that perfectly fits the carrier board.
---------- more ----------![]()
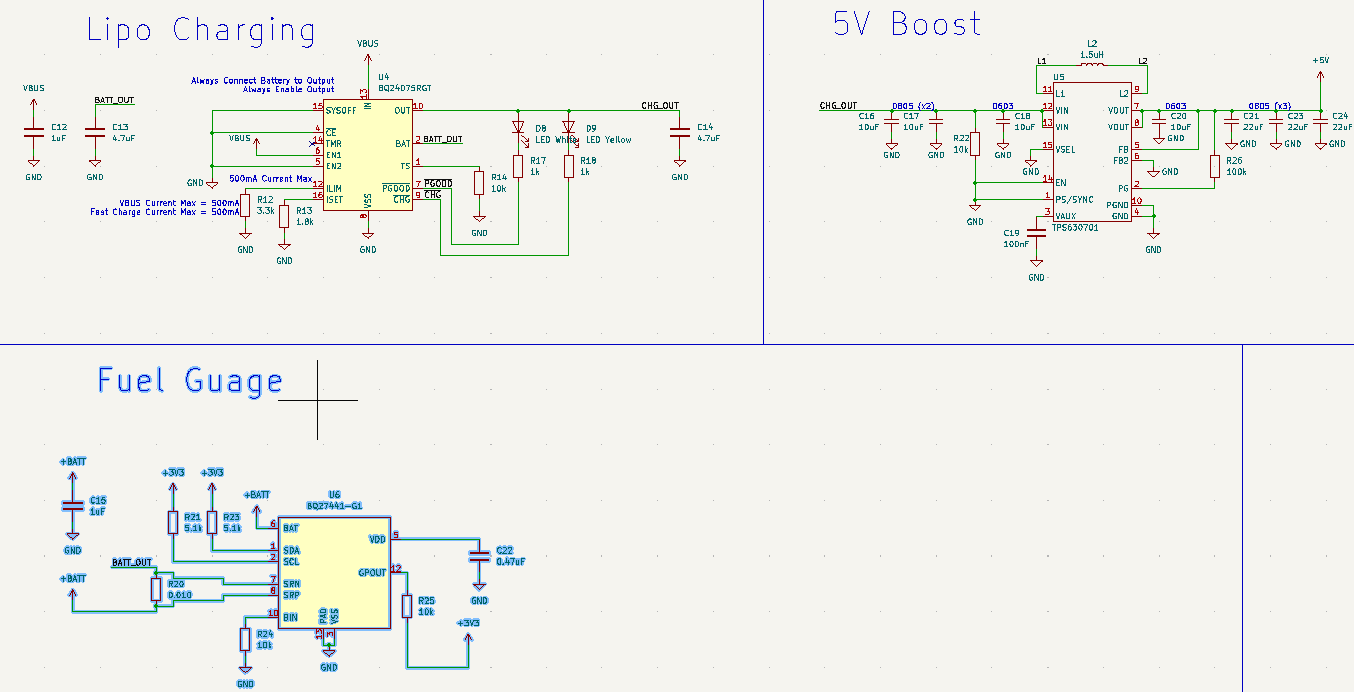
I also lifted the design of Sparkfun's battery babysitter and their buck-boost converter to create the charging circuit, 5V regulation, and battery status monitoring. TI's BQ24075 charges the battery and has built in protection circuitry. TI's BQ27441-G1 monitors the battery's charging status, amount other things, and communicates via I2C. Finally, I'm using TI's TPS63701 as a fixed 5V voltage boost converter.
![]()
I've configured the ICs to only draw 500 mA from a USB micro connector. I could've pulled as much as 1.5 A from a USB C connector but 1) The tolerances needed to route the connectors I had access to would increase the price and eliminate cheap PCB houses as manufacturers since I want data and power coming from one USB connector. 2) This is a low power e-reading device, so fast charging is not necessary. 3) Limiting current from USB to 500 mA makes the design a little less layout sensitive. Given the physical layout of the Compute Module 4 form factor, if one connector supplies power and USB data, I can either make the 5V power trace short OR make the USB data traces short. I can't do both so I decided to keep the USB data traces short.
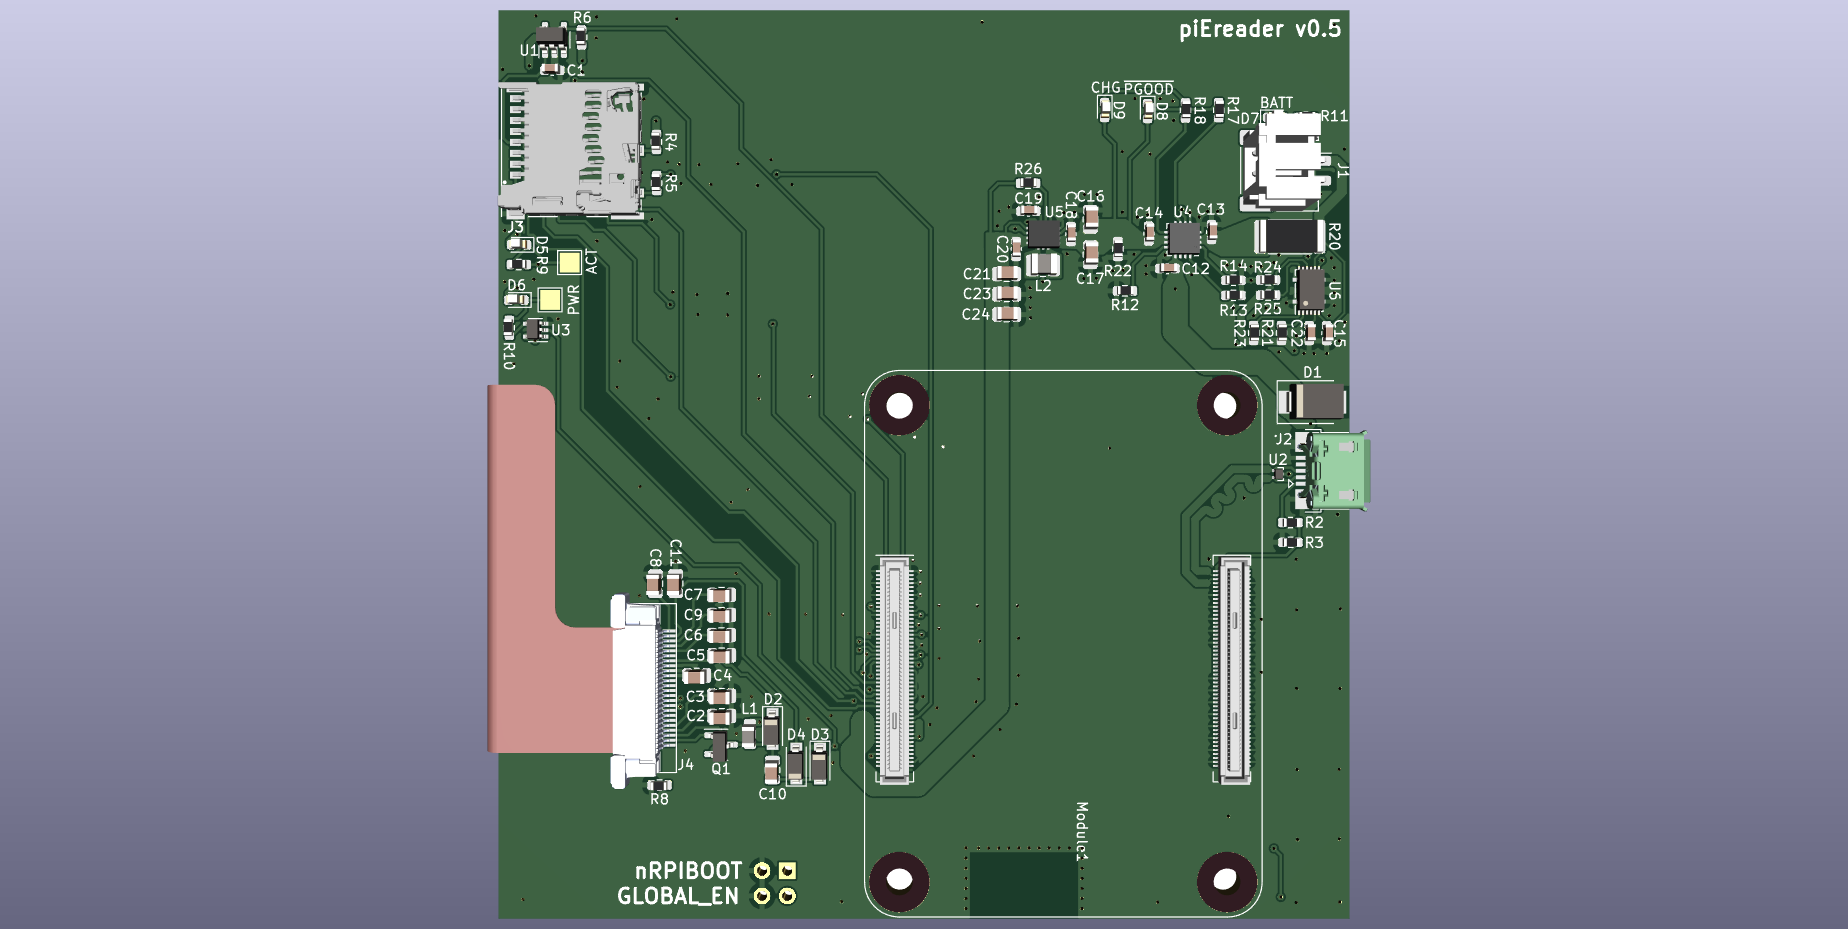
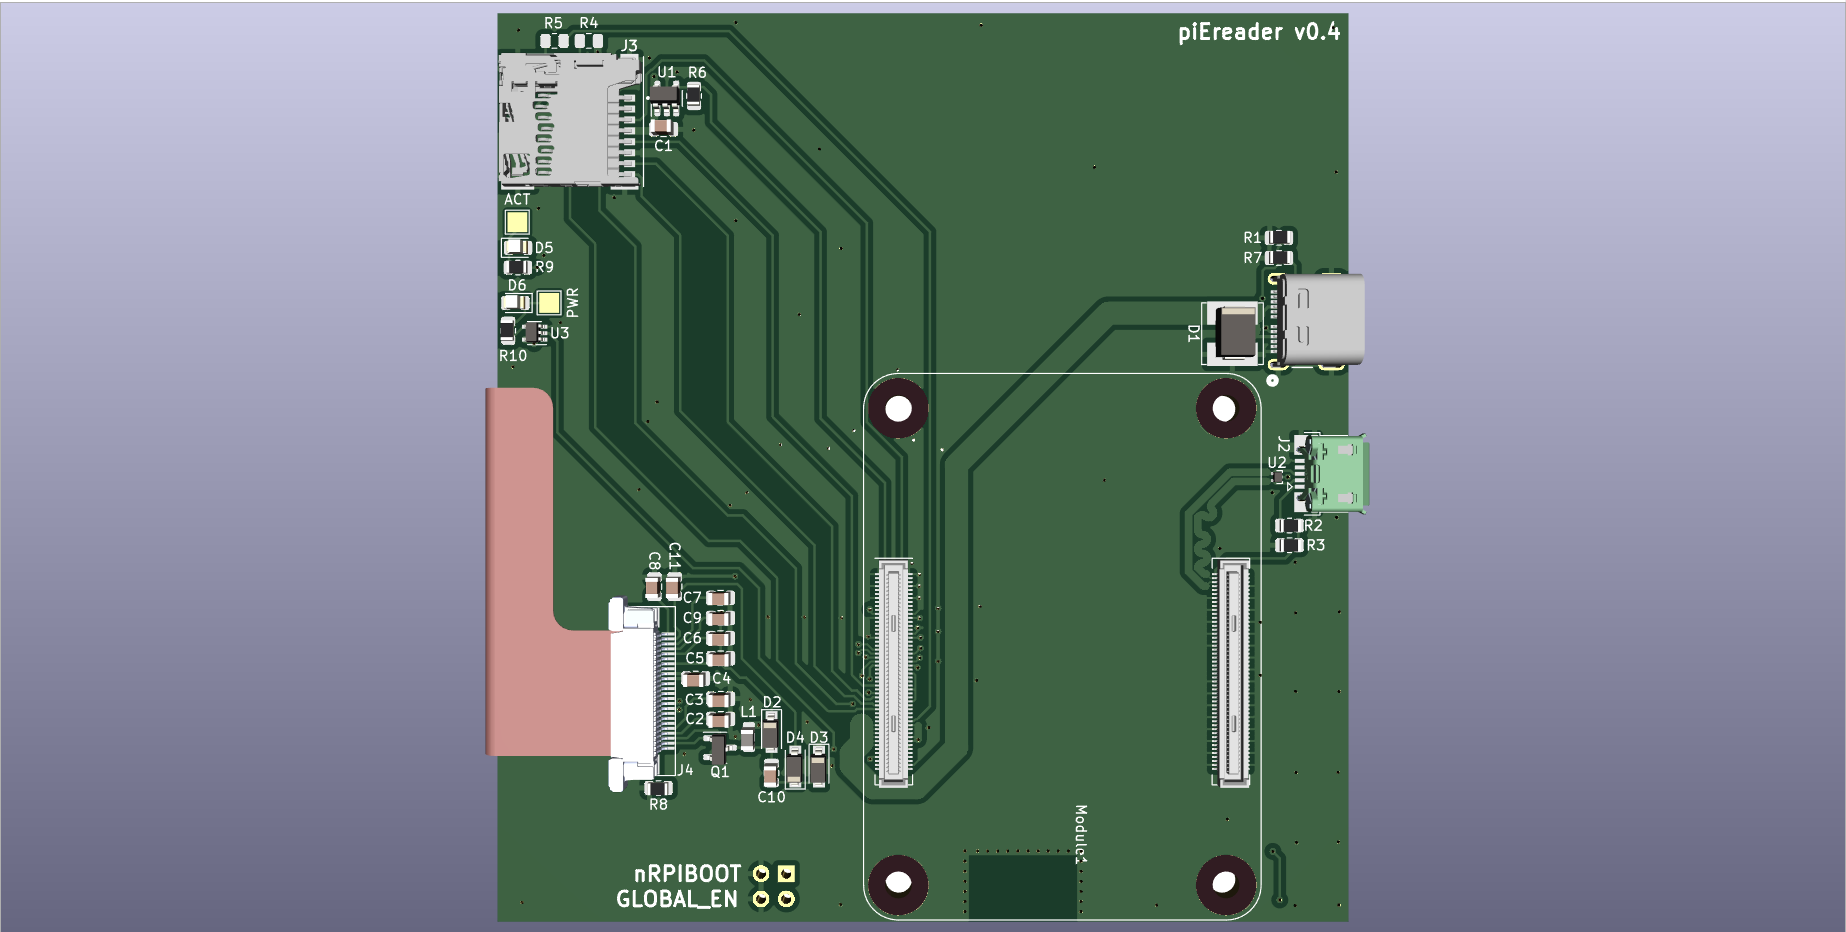
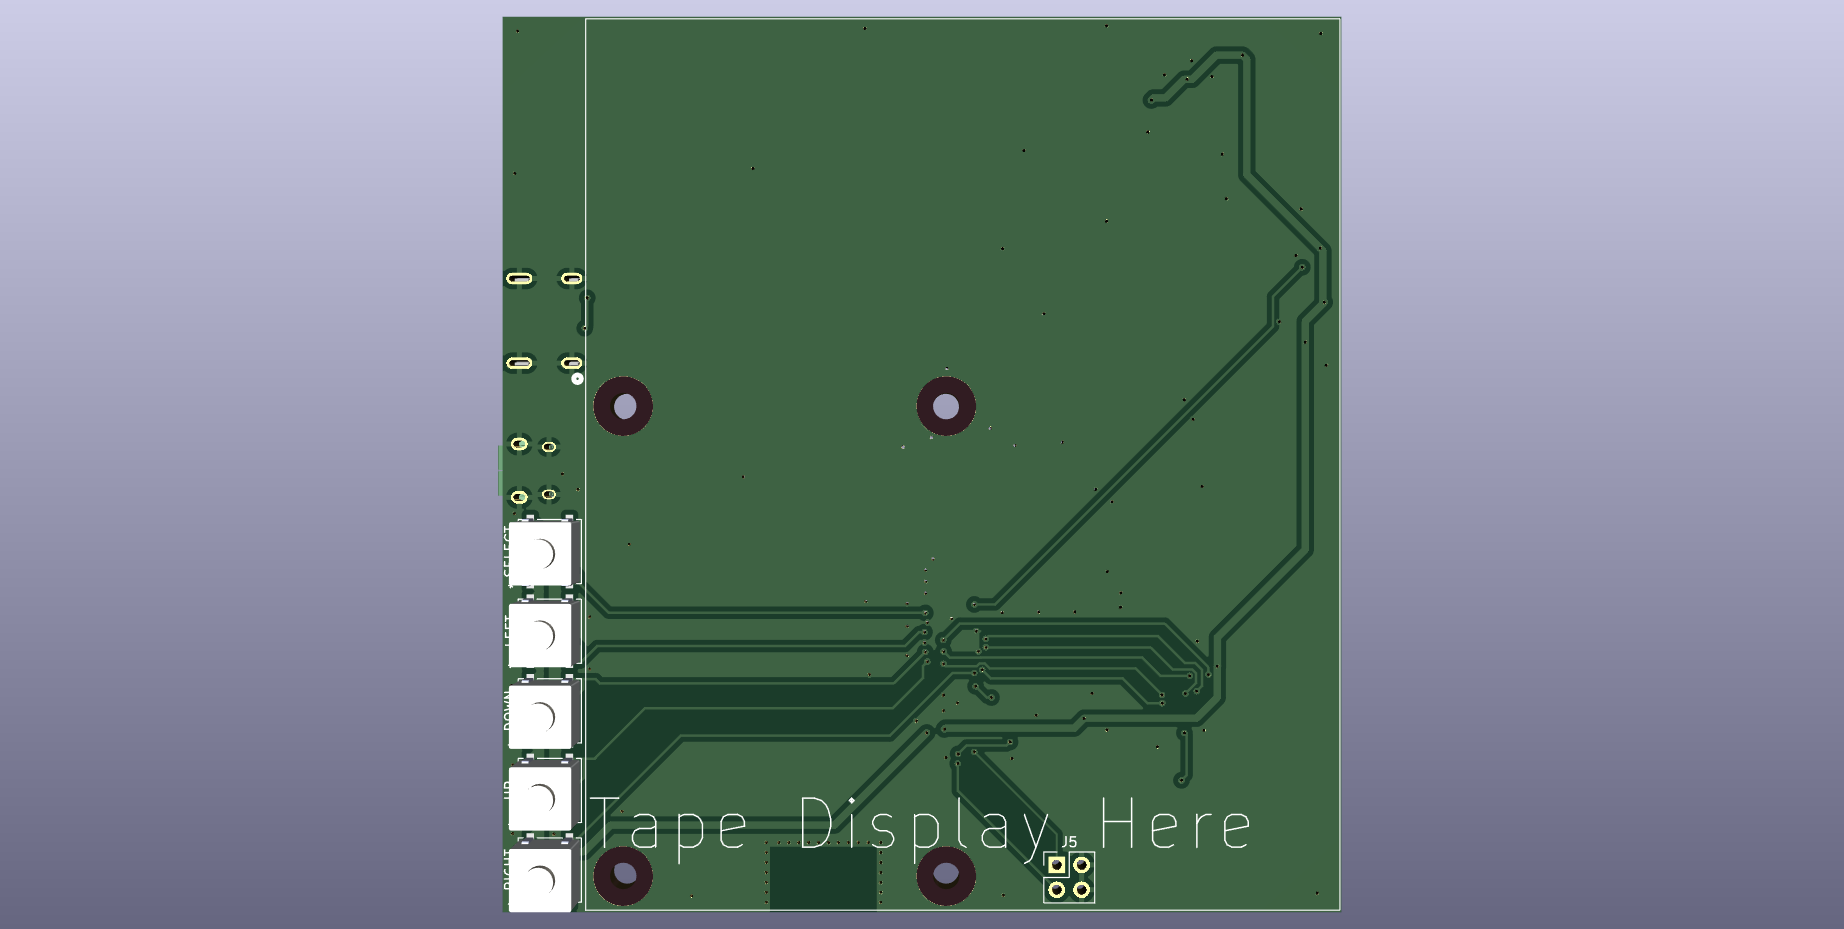
If I was pulling the max 1.5 A out of a USB C connector I might've gone with a 4 layer design or at least 2 oz copper, but I'll stick with 2 layers and 1 oz copper because I think I can get away with it. Below is the updated layout followed by the previous version's layout.
![]()
![]()
Notice that the newest version has only one USB connector. Also notice that the SD card connector flipped 180 degrees because I routed it incorrectly last version. Remember, I don't have any CM4 Lite modules to test the SD card circuitry so I don't have a way to validate that part of the hardware.
We'll see if there are any hardware bugs when I get the boards from PCBWay. For more details on the design and most up-to-date status, check the project's Gitlab repository.
-
Sourcing a Touchscreen
09/11/2023 at 15:49 • 0 commentsLast log I mentioned a 4.2" e-paper, touchscreen, and front light assembly. I've recently bought four directly from the manufacturer. The expected lead time is 45 days, but since it's shipping from China I wouldn't be surprised if these displays end up as a Christmas present.
While waiting for the above assembly to come into stock, I tried to source second options and there really isn't anything else that's as cost effective. First off, the mode e-paper sizes (for this application) are 4.2", 6", and 7.5". So I'd need to find a touch screen in one of those sizes. Adafruit sells a 7" touch screen which could be used for a 6" display in a non-ideal situation, but ideally the touch screen and e-paper are the same size. DFRobot also sells a 7" touch overlay but that seems to specifically be for the LattePanda. Orient Display sells a 4.3" capacitive touch screen but it's end-of-life. Newhaven Display sells a 4.3" resistive touch screen, but the bounding box doesn't fit the one used in this project (96.7mm x 55.5mm vs 84.8mm x 63.6mm). NKK Switches' FT series could be used for 6" and 7" displays, but just the touch screen would equal the cost of the 4.2" e-paper, touchscreen, and front light. The only reasonably priced 6" e-paper display I could find, that's not from an ethereal eBay seller, is GDE060B3 from Good Display which is $30.
NOTE: I'm an not criticizing anyone who buys parts from eBay. But I want to source parts from traceable suppliers so other people can easily duplicate this project.
There's a purchase page for a 6" e-paper, touch screen, and front light assembly from Good Display but it's sold out and I'm not sure it's still being produced. Even if it was, I can't find how to drive the IC, HX8705-B. It seems like it does not have a built in display buffer and I can't find a development kit or even a recommended application circuit. At $60, it's right on the cusp of what I'd call affordable for a hobbyist project, but if I can get my hands on one, it could make for some fun hacking.
So I currently only have one option in stock: GDEY042T81-FT02 from Good Display which cost $28 each. According to Good Display, they manufacture this part about once a quarter. Certainly not ideal, but it's a reliable source for the time being.
-
Carrier Board PCBs are in!
09/04/2023 at 06:28 • 0 commentsThe computer module 4 carrier boards are back from the manufacturer and they work!
![]()
The design is 6.5mm thick and probably as thin as it'll be using off the shelf modules. Last log I mentioned the lack of portable power. It's about time it was incorporated into the design. I'd like to use a thin, off the shelf battery available from multiple distributors, but that might be asking for a unicorn. I'll let you know how my search goes and if you have any suggestions please let me know!
Also, since this is a portable device, I want book lovers to be able to add, remove, and edit URLs to fetch books using only the eReader. This effectively requires a virtual keyboard and thus a touch screen. Good Display sells a kit of a 4.2" raw e-paper panel, backlight, and touchscreen but it's currently out of stock. According to representatives from Good Display, the kit will be available a week after the writing of this log.
In the meantime, I'll focus on a portable power solution. Once that is complete and a touchscreen, and ideally backlight, is implemented, I'll probably focus on refactoring the code.
For the most up-to-date software, hardware, and road map, please visit the project's repository.
-
Compute Module 4 Carrier Board Layout
08/21/2023 at 03:11 • 0 commentsSo far the hardware of this project has followed the Raspberry Pi Hat form factor. The last PCB was about as slim as I could get it following that spec and using tactile switches as inputs.
![]()
![]()
As I said in the last project log, I'm not set on sticking to the Raspberry Pi platform, but Pi form factors are standard, so the easiest way to slim down the hardware with minimal software changes is to produce a carrier board for the compute module 4.
![]()
![]()
This layout wasn't as simple as replacing the 2x20 headers connectors with 100 pin Hirose connectors. The carrier board needed to handle power input, SD cards, and USB traces. You'll notice a USB C and USB micro connector. The former is for 5V power and the latter is for USB client connections. I could've routed both in a single USB C connector but I don't want to be debugging USB right now. The layout is stolen from Shawn Hymel and it worked for him so why try something new.
I have compute modules with eMMC but they are still hard to source and I want to be able to use SD cards if need be. Routing the SD card traces and the 24-pin ribbon cable connector resulted in a sea of vias. That plus the USB data traces should have lead me to a 4 layer board, but I'm a frugal engineer and routed everything on two layers. Hopefully it all works.
Notice the lack of battery hardware. If this was a final production layout I would've taken the time to implement portable power, but that will come in a later board revision.
For the latest software and hardware files, please visit the development branch of the project's repository.
-
Initial Commit
08/14/2023 at 16:22 • 0 commentsIf you haven't figured out already, I'm not very good at naming things. I don't have a name for this project yet, or this project log, but the goal is simple: give e-book lovers control over their library.
---------- more ----------For centuries, if a book lover bought a book, they owned it. Currently, if an e-book lover buys an e-book (or any digital product) they are not buying the book, they are buying a license to read the book. In many cases, licenses can be modified or revoked without the seller notifying the book lover. This can lead to strange scenarios like Amazon secretly deleting purchased copies of 1984.
This project aims to at least mitigate this problem by giving book lovers an open source hardware and software solution that truly allows them to own their e-books. The hardware currently follows the Raspberry Pi hat form factor due to its ubiquitous nature, but I hope to generalize the firmware so it does not need to be run on a Raspberry Pi. There is currently a firmware version that runs on the Pine64-LTS.
The project leans on the Calibre E-Book Management software to host and serve a book library. Read the Calibre documentation on how to run a book server with that software. Here's a demo of the hardware and software working together: https://cdn.hackaday.io/files/1923668230186944/Version%203%20Demo.mp4Visit the repository for the most up-to-date road map, hardware and software files, and intricate details of the project.
FLOSS Book Serving System
An open-source ereader that can display books from an open, self-hosted server