Dan Julio
-
Software Architecture
03/31/2025 at 02:08 • 0 commentsI think that this project came out very nicely and the people I gifted clocks to seem to genuinely appreciate them, but the technical part that most interested me is the web-based GUI interface. I first implemented this for my Tiny1C tCamMini thermal imaging camera and adapting it for this project was pretty quick and easy.
I am in no way a web developer. Learning HTML, CSS and javascript and all the other technologies employed in a modern web page seems overwhelming to me - and typically not what I have to worry about as an embedded systems engineer. But I do know C, and LVGL, and networking pretty well. I have done a lot of commercial and personal projects using LVGL and I find it to be a very useful embedded systems GUI library. Some years ago I wrote an experimental project that used a web browser canvas as the display buffer for LVGL and sent the pixmap updates to the web browser over a web socket. It worked surprisingly well but didn't scale well to larger displays, 32 bit pixels or highly dynamic graphics because of the amount of pixel data that had to be shoved through the web socket.
When I started the Tiny1C camera, I wanted a responsive web based GUI served from an ESP32 but the idea of spending weeks or months learning how to create a traditional web page felt unachievable. However, the LVGL folks have long been using emscripten to encapsulate demos in web pages. Emscripten compiles traditional code (like C) to Web Assembly that can run in a web browser. It can use other libraries like SDL to render 2D images in a canvas. The LVGL developers simply wrote a LVGL driver on top of SDL which allows a LVGL C program to be compiled and run in a web page. Really cool.
I thought well what if I send commands instead of pixel data over the web socket and let the entire GUI portion of the program be compiled for and run in the web browser. The benefits would be much, much less data sent over the socket and the incredible performance of modern computers running the Web Assembly would offload the ESP32 of all graphics requirements. So I implemented a simple SET/GET/RESPONSE command protocol with helpers that are registered on both sides implementing the commands. It works really well. And was easy to port because I only had to rewrite the command handlers and specific LVGL GUI functionality the clock would need.
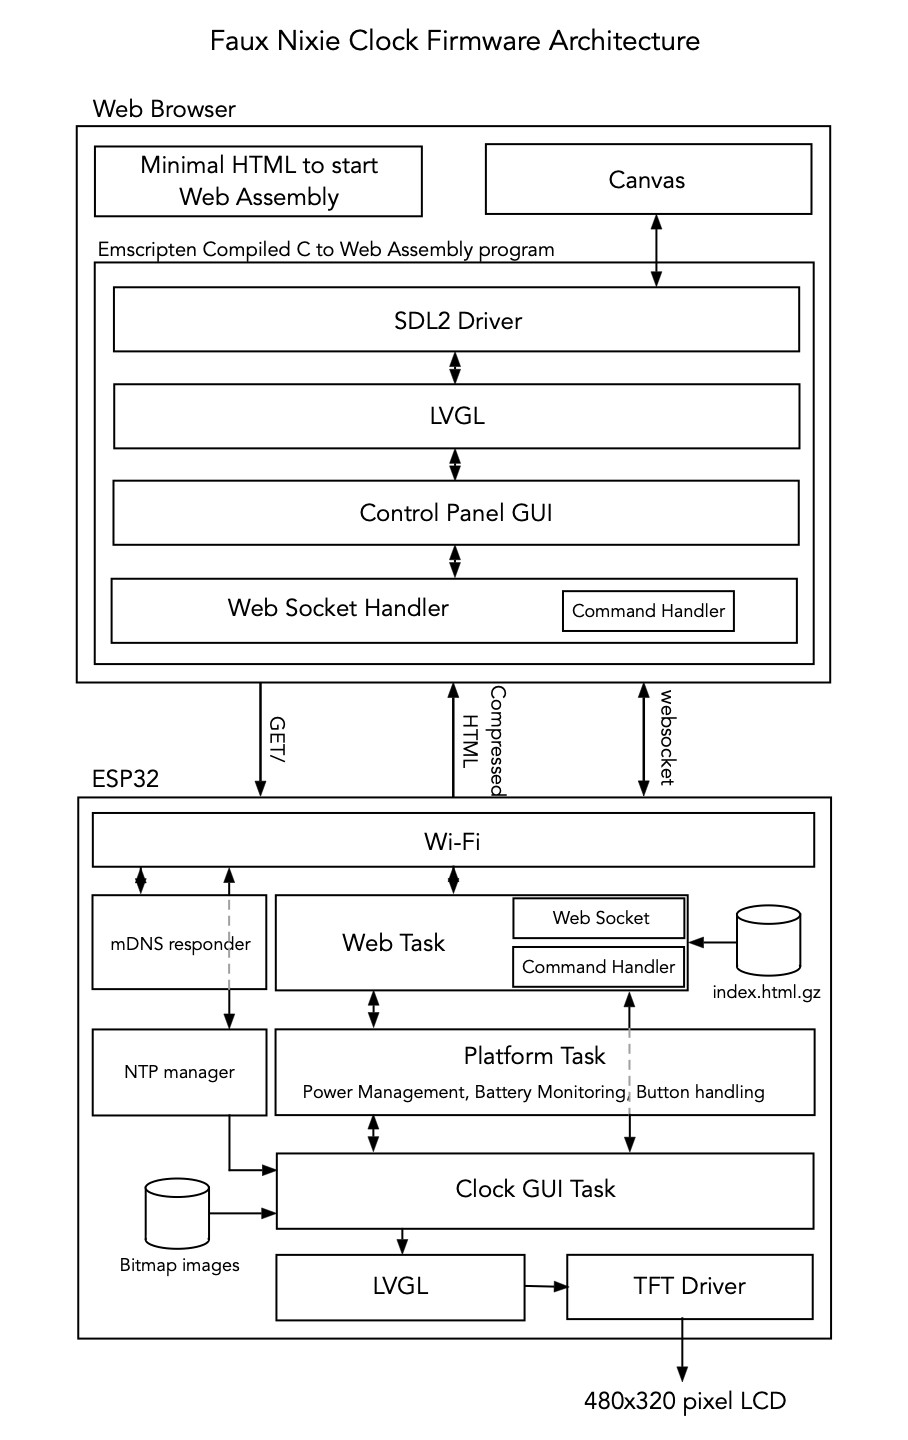
How it works in practice is that the program is now split into two parts. One built by Emscripten that includes the GUI code, and one built by the Espressif IDF that includes the clock code. A neat thing is that they share some code (e.g. the command code). The Emscripten project includes a very simple HTML page that calls the Web Assembly program when it's loaded. The Web Assembly program then initiates a web socket with the ESP32 and they both start processing commands. In reality the compiled Web Assembly program is pretty big. So I ended up compressing the built file which is stored in the ESP32 binary and sent by the ESP32's web server to the web browser initially which uncompresses and runs it.
![]()
To see how it works, consider the LCD Backlight Brightness slider in the GUI control panel (each control is its own module) When the control panel starts running the Brightness slider loads a GET Brightness command which is sent to the ESP32. The ESP32 then gets the brightness from persistent storage and sends it back with a RESPONSE command. The RESPONSE command references the original command so the command processor knows to execute the handler associated with brightness which updates the LVGL slider object. When the user drags the slider then a LVGL callback is called periodically and it loads a SET Brightness command which is received by the ESP32 which then updates both the LCD backlight brightness and persistent storage.
User navigation around the GUI, for example moving between the main control page and a sub-page like the Wi-Fi / Network sub-page, is completely invisible to the ESP32, except for handling the GET commands which the newly displayed page sends the ESP32 to get the current state to display.
In fact the Faux Nixie Clock actually has LVGL running in both the web browser and the ESP32. But on the ESP32 it's pretty simple. It displays the bitmap nixie "digits", a "nixie" colon, the date and an optional status message. Not particularly taxing but LVGL made the job easy and with anti-aliased fonts, the entire display looks good.
I suspect a seasoned web developer might roll their eyes at this approach but it let me build a pretty good and responsive web interface in a fraction of the time which is important when you have a couple weeks until Christmas.
-
Operation
03/30/2025 at 23:17 • 0 commentsIt's a clock so it's pretty easy to operate :-) It has a power/wifi-reset button and a web-based control panel.
The button - a remotely mounted copy of gCore's power button - serves a few purposes.
- Short press to turn on
- Short press to turn off
- Medium press (greater than 2 seconds, less than 5 seconds) to reset the Wi-Fi to the factory default (Access Point) setting
- Long press (longer than 5 seconds) to activate gCore's built-in PMIC power-off (Useful if the ESP32 crashes or locks up)
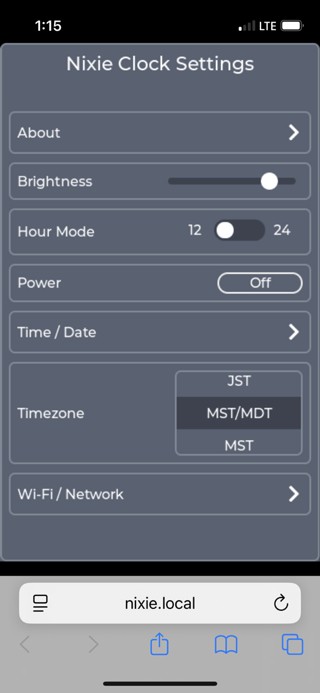
By default the clock presents an Access Point named NixieClock-NNNN where NNNN is a set of 4 hexadecimal characters from the ESP32's unique MAC address. There is no password initially, but you can add one later. To access the clock's control panel, connect a desktop computer or mobile device to that network. The clock runs a mDNS responder that lets is respond to an URL of "nixie.local" so you don't have to worry about IP addresses. Navigating to that location will bring up the main control panel.
![]()
Most of the controls are self-explanatory.
About displays firmware versions, network information, memory utilization and the like.
Brightness allows setting the LCD backlight brightness.
Power lets you remotely turn the clock off.
Timezone lets the clock automatically handle daylight savings time and what hour offset to use when getting the time remotely from the "pool.ntp.org" server.
Time / Date allows manually setting the clock, either using the host computer's clock or manually through the keypad.
![]()
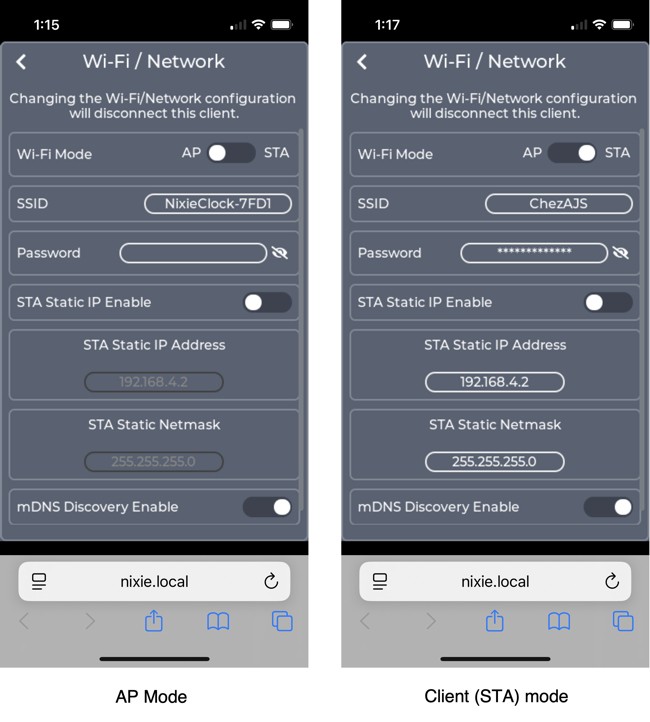
Wi-Fi / Network allows configuring the clock to connect to an existing Wi-Fi AP so it can access the time server and also, if necessary, giving it a static IPV4 address.
![]()
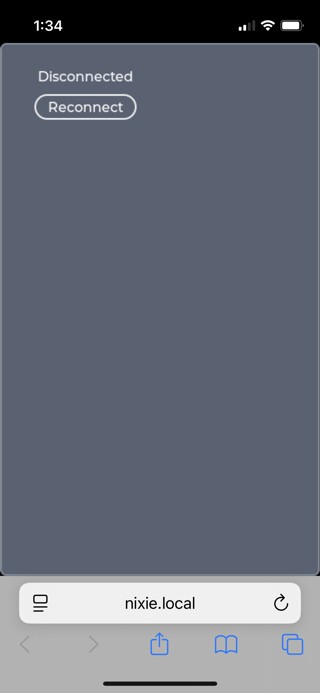
The web-browser control panel can remain resident in the browser and will allow reconnecting to the clock when the connection is interrupted.
![]()
Faux Nixie Clock
A desk clock using high-quality bitmap images of the nixie numbers with Wifi network-based time updates and a web-based controls.