Close
0%
0%

USBridge-KVM 2.0

Ultra-Low Latency IP-KVM with AI-Ready BIOS-in-Terminal, Drive Emulation, and Immutable Snapshots.

Similar projects worth following
I designed USBridge-KVM 2.0 to completely rethink infrastructure management at Layer-0. It's a hardware-level recovery tool built to bypass destroyed or ransomware-locked operating systems, combining ultra-low latency with bare-metal automation.

BIOS-in-Terminal & AI-Ready: On-board OCR converts raw KVM video into live SSH text. Automate BIOS configurations via Python, or connect AI agents directly via MCP for autonomous diagnostics.

Ultra-Low Latency: Native Moonlight integration pushes streaming latency down to 25-50ms, finally eliminating the sluggish "jelly" KVM cursor.

Virtual Media Emulation: Mount local VDI/VMDK images over the network as standard physical drives via USB OTG.

Immutable Btrfs Snapshots: Hardware-isolated storage guarantees your recovery images remain pristine and untouchable by the host server.

USBridge-KVM 2.0: How I Reimagined the IP-KVM, Added AI, and Beat Latency

That is how the USBridge-KVM 2.0 project started—a compact, professional-grade stack for direct infrastructure management. Looking back at a year of continuous engineering iterations, I want to share how this idea evolved into a production-ready device.

The Graphical BIOS Problem & the Birth of BIOS-in-Terminal

The biggest architectural flaw in classic KVMs was transmitting a heavy 1080p video stream just to change the boot order in the firmware or configure a RAID array. That felt highly inefficient to me.

Therefore, I developed the BIOS-in-Terminal technology. Instead of piping raw pixels, the onboard processor intercepts the raw HDMI signal at the hardware level. Using local optical character recognition (OCR) algorithms, the device converts the graphical BIOS interface into an interactive text stream on the fly. I can simply connect to the KVM via standard SSH and configure the server right in my terminal. It works entirely offline and is a lifesaver over high-latency or unstable LTE/satellite connections.
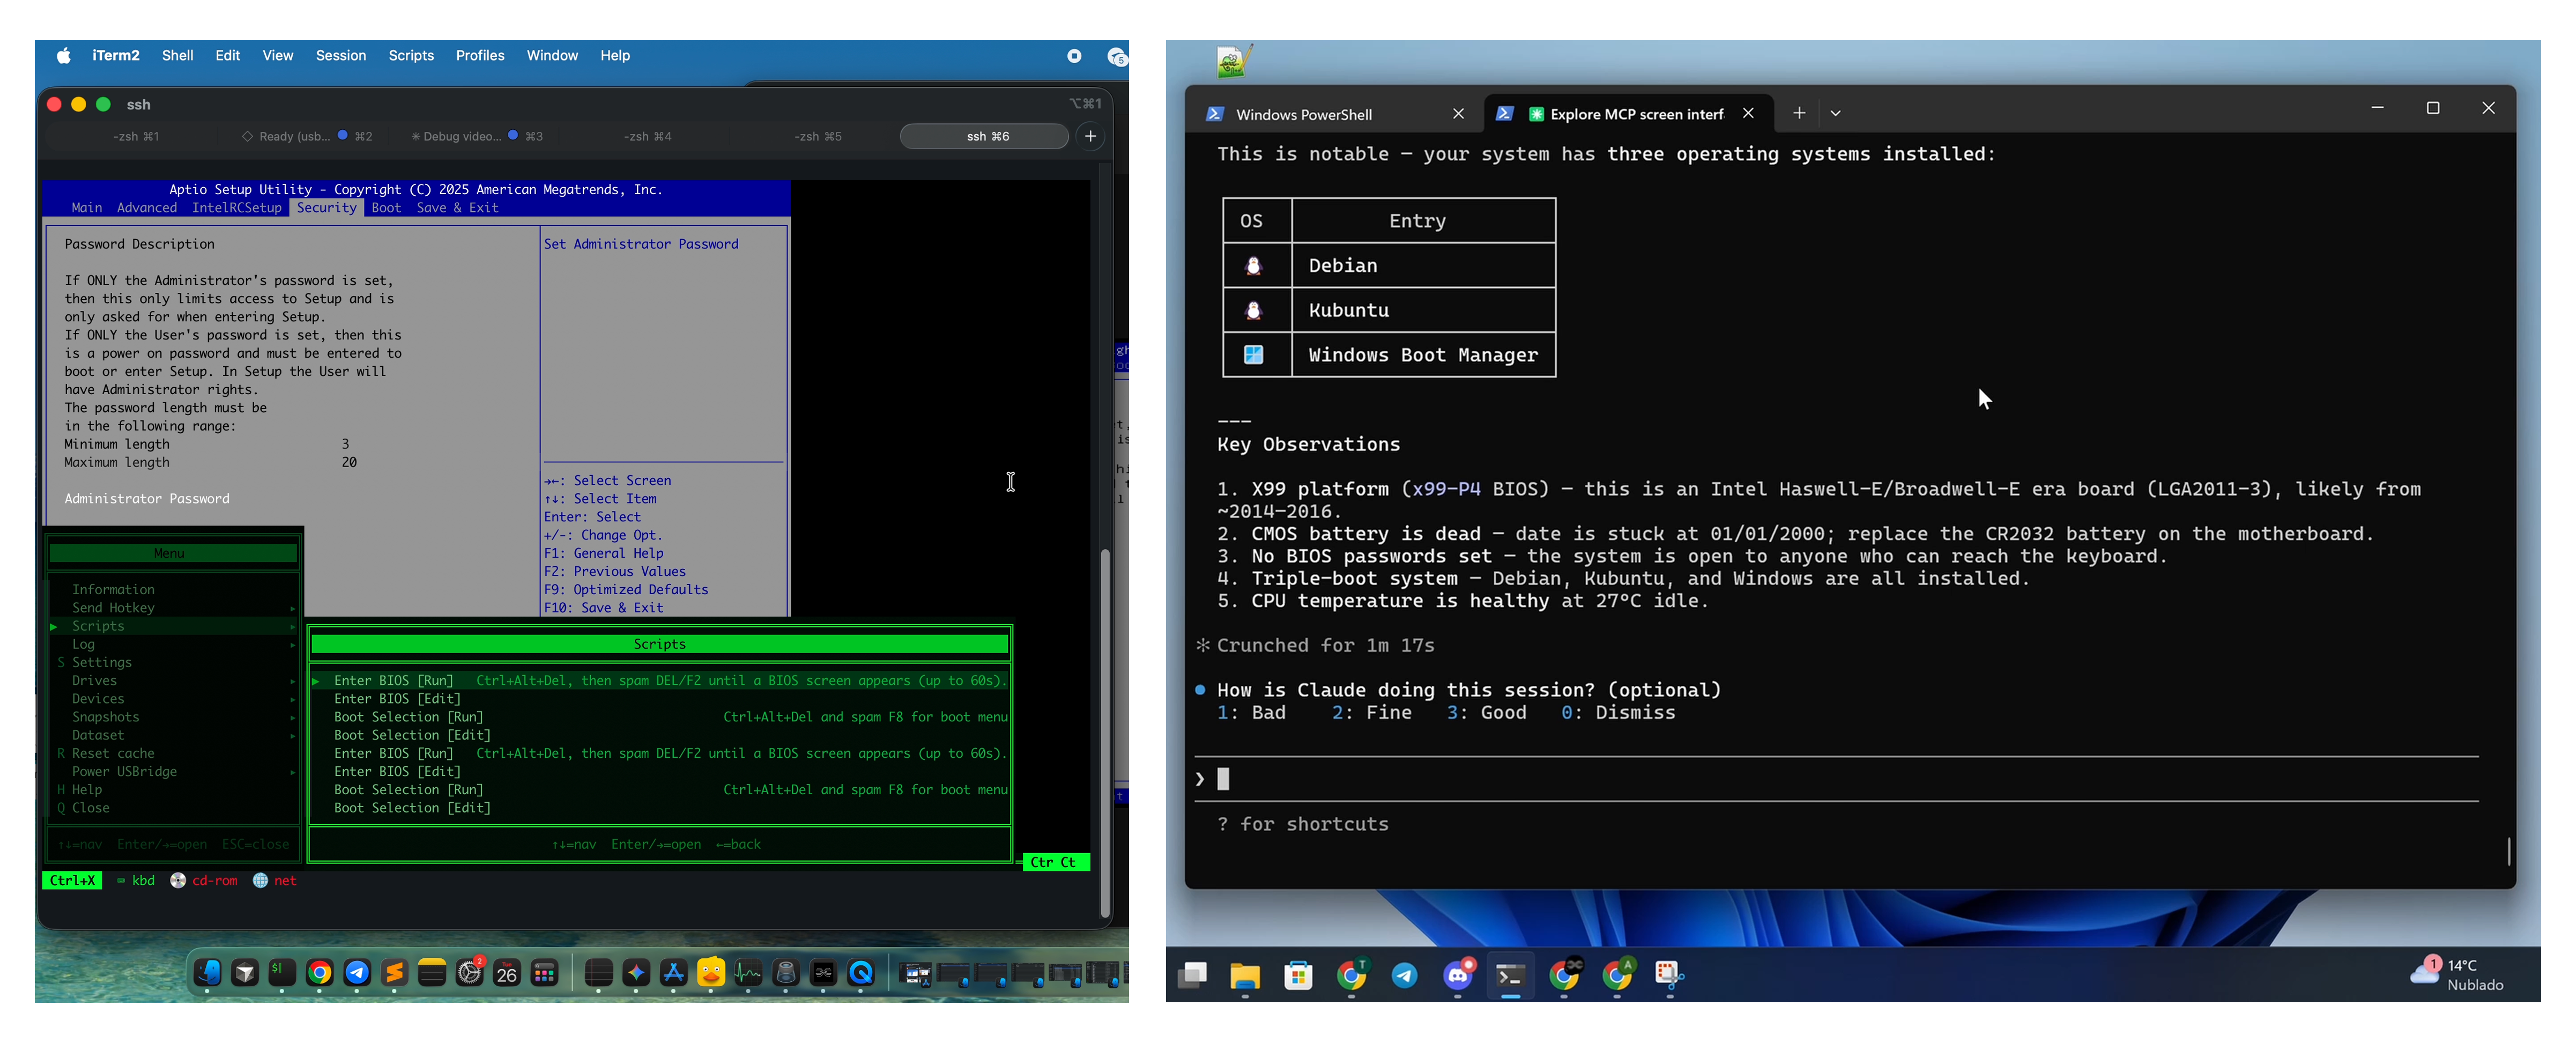
Translating pixels into text opened entirely new doors for automation:

  • Painless Scripting: I built in an automation engine that supports Starlark (Python) scripts. Instead of relying on fragile pixel-matching algorithms, scripts can reliably wait for specific strings (like error codes) to appear before sending keystrokes.
  • Hardware-Level AI Agents: Thanks to the MCP (Model Context Protocol), I was able to connect language models to the KVM. The AI can now independently "read" the terminal screen, navigate through BIOS menus, and perform autonomous hardware diagnostics.

Ultra-Low Latency: Moonlight Integration

Everyday server management shouldn't feel like working underwater. To eliminate input lag, I became the first to natively integrate the Moonlight streaming protocol directly into a hardware IP-KVM.

I optimized the entire video capture and encoding pipeline at the hardware level (up to 1080p @ 45 FPS / 720p @ 60 FPS via UVC). The results exceeded my expectations:

  • 720p: 25–50 ms
  • 1080p: 50–75 ms

These metrics hold true even when routing traffic through secure Tailscale networks (Zero-Config Mesh VPN). The latency is so low that it allows for comfortable gameplay in fast-paced platformers—not to mention the instantaneous response when administering servers.

Drive Emulation & Btrfs Isolation

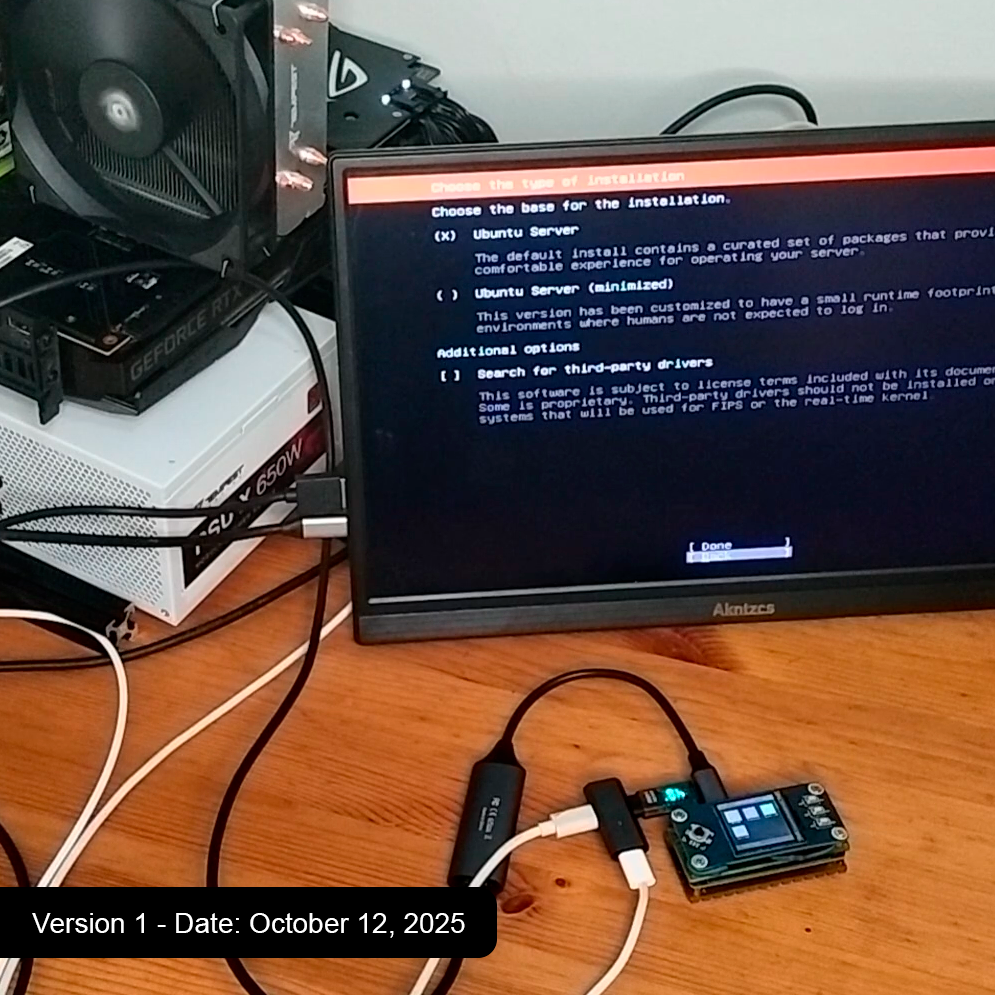
I had long wanted to permanently eliminate the need to physically plug bootable USB drives into server racks. By leveraging the USB OTG capabilities of the Radxa Zero 3W, I implemented hardware-level drive emulation. I can now mount ISO, VDI, or VMDK images directly from my workstation. The target server recognizes them as standard physical hard drives.

To compensate for network latency during data transfer, I utilized high-speed caching in the LPDDR4X memory. And to protect my "golden images," all new session writes are redirected to a separate layer (Read-Write Overlay).

For security, I implemented an immutable snapshot subsystem based on Btrfs:

  1. Hardware Isolation: A compromised target server has no physical path to modify or delete existing backups.
  2. Ransomware Protection: When changes occur, the original files are never overwritten—only the delta is recorded, and the new state is instantly frozen as read-only.
  3. Zero Vendor Lock-in: All data can be read natively on any standard Linux system.

Hardware Power Management Module

Proper bare-metal administration is impossible without independent power control that works regardless of the host's state. That is why I designed a dedicated expansion module for direct management at the physical level.
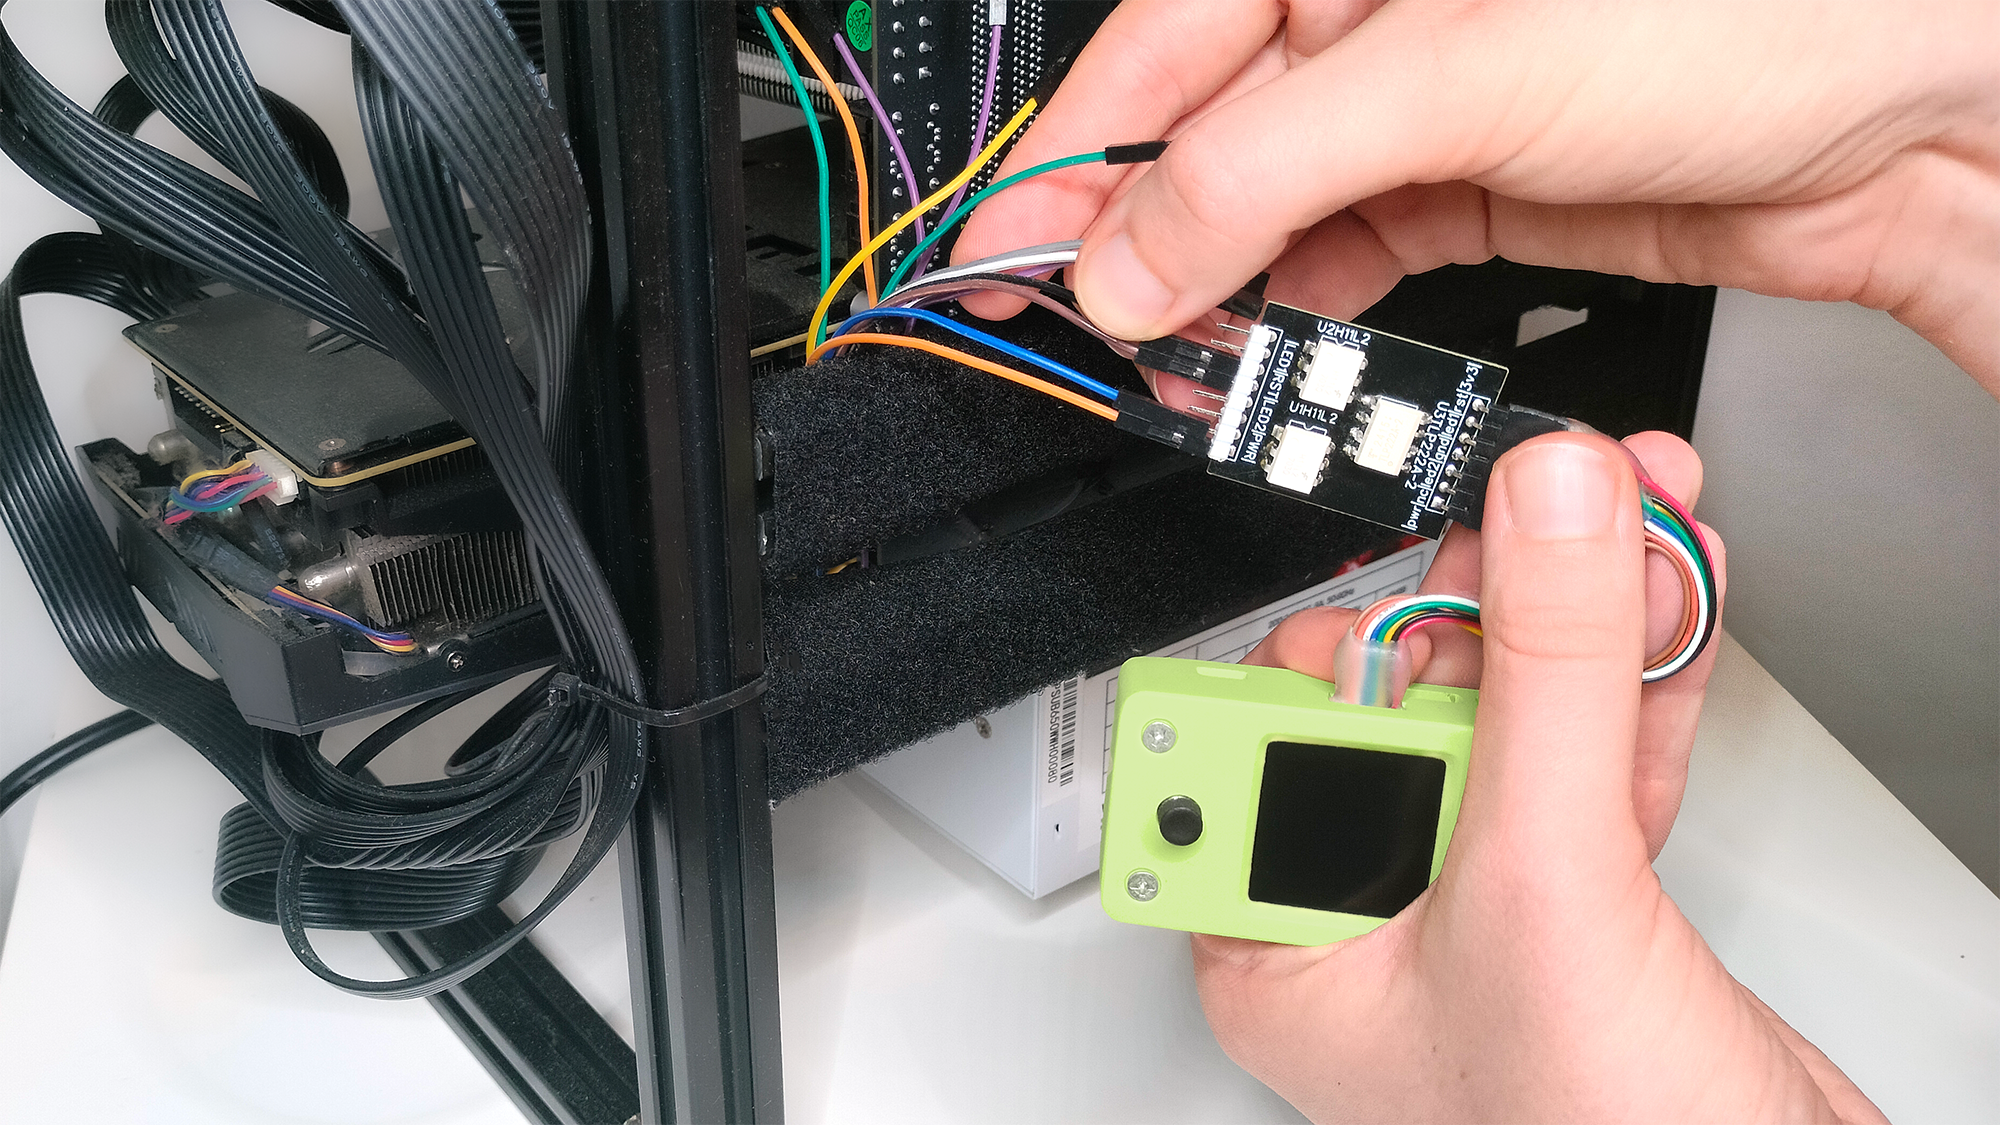
The module gives me absolute control over the machine:

  • Hardware Power & Reset: The module connects (via an 8-pin GPIO header) directly to the front-panel jumper connections of the motherboard. This allows me to perform graceful shutdowns, hard resets, or cold boots bypassing the operating system entirely. This is...
Read more »

USBridge_KVM_v2_Mechanical_Parts.7z

Complete CAD package for the USBridge-KVM 2.0 enclosure. Includes production-ready STL and STEP files for the main chassis and tactile buttons. The design is specifically optimized for SLS (Selective Laser Sintering) 3D printing with PA12 Nylon to ensure high dimensional accuracy and thermal stability for the internal RK3566 SoC.

x-compressed - 807.46 kB - 04/30/2026 at 12:02

Download

Flip-HAT_IPS_Display_Gerbers.zip

Production-ready Gerber files for the Flip-HAT 1.3" IPS Display Carrier Board. This PCB acts as the signal bridge for the integrated 240x240 screen, handling routing and power for real-time status monitoring. Compatible with standard fabrication services like PCBWay.

x-zip-compressed - 44.46 kB - 04/30/2026 at 12:01

Download

  • 1 × Radxa Zero 3W Rockchip RK3566 SoC with 2GB LPDDR4X RAM. The core of the system.
  • 1 × Custom Power management module Hardware-level interface for Power/Reset control and LED monitoring.
  • 1 × HDMI Video Capture / USB Video Bridge 1080p UVC capture module used for real-time BIOS video processing.
  • 1 × 3D Printed Enclosure Custom chassis optimized for SLS printing with PA12 Nylon.
  • 1 × USB-C Cable High-quality cable for power and OTG data connectivity.

View all 7 components

  • The Assembly Process: Building USBridge-KVM 2.0 from Scratch

    Amira day ago 0 comments

      I spend a lot of time in my home lab, perfecting the manufacturing and assembly process for the USBridge-KVM 2.0. Before scaling production for the upcoming Crowd Supply campaign, I need to personally inspect every step of the assembly process to ensure the hardware meets my strict reliability and thermal performance standards.

      I recorded a full walkthrough of the entire assembly process—from PCB assembly and component soldering to final testing and packaging.

    • Building these units by hand has been a crucial step to iron out any minor physical tolerances and optimize the assembly sequence before I hand the finalized design off to the factory for mass SMT assembly.

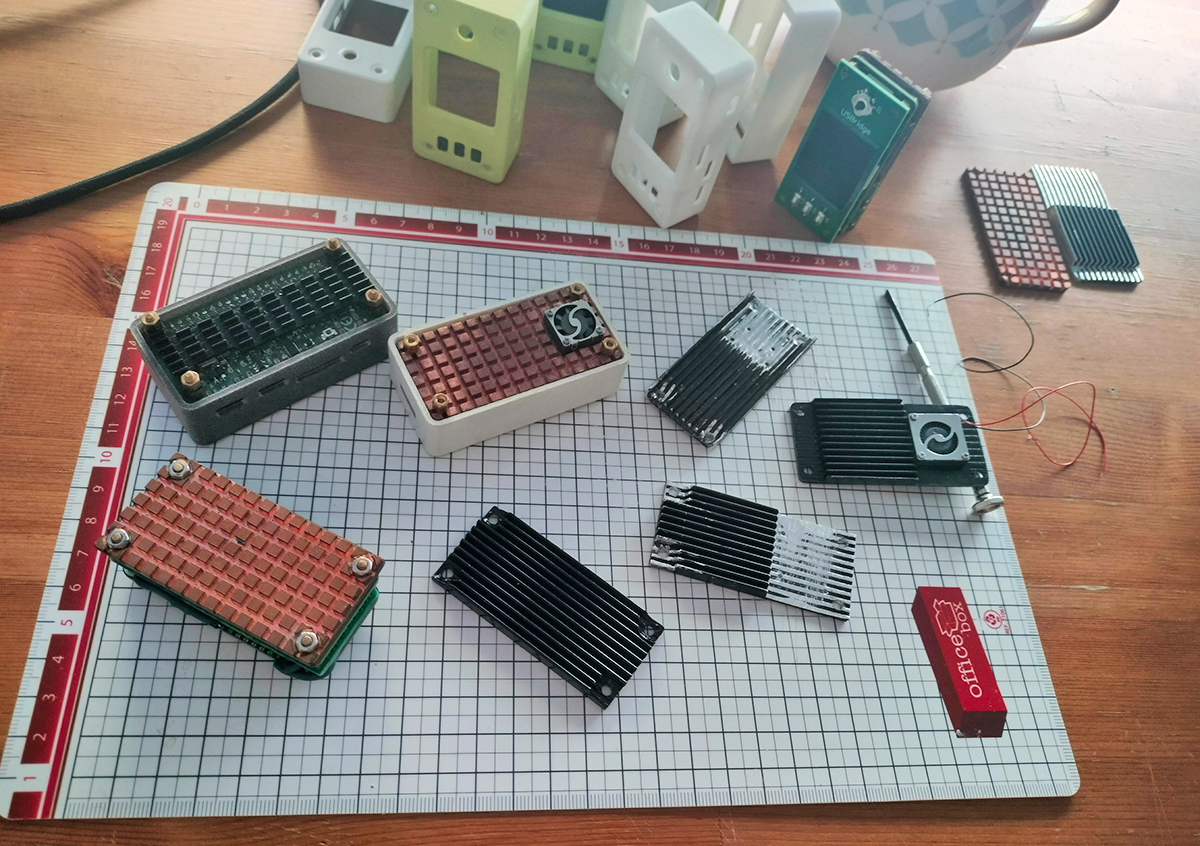
  • Log #4: Anatomy of a radiator – from raw aluminum to the finished product.

    Amir05/25/2026 at 12:50 0 comments

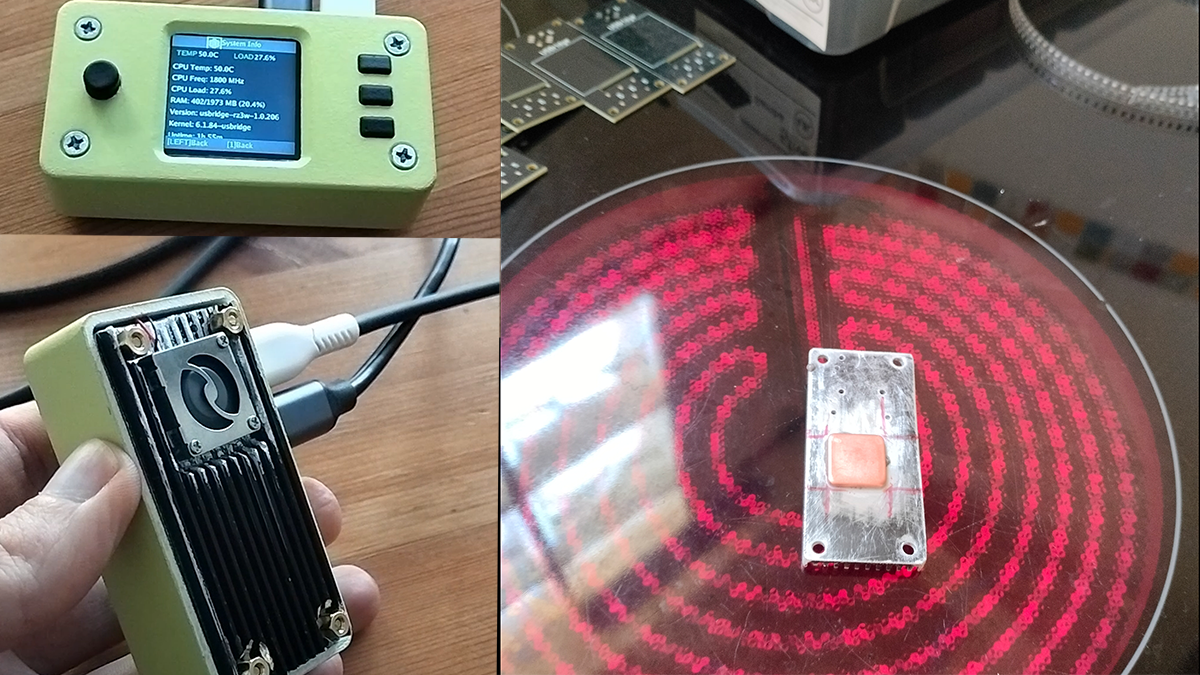
    I'd like to share behind-the-scenes details about the colossal amount of manual R&D and physical iterations that went into perfecting just one component of the USBridge-KVM 2.0.

    I started with standard, off-the-shelf aluminum fin extrusions and solid copper blocks. Since I'm not a professional lathe operator, I had to manually cut, file, and fit the aluminum extrusions. Every millimeter mattered to ensure the active turbine fan would fit perfectly in the case and air would be efficiently exhausted from the sides.

    Perfectly aligning the custom cooler mounts and mounting standoffs took several tries. A fraction of a millimeter off meant improper contact with the SoC or misalignment of the assembly inside the SLS 3D-printed case.

    Testing various thin-layer paints ensured a clean and professional-looking surface without isolating the aluminum or causing bubbling under constant thermal loads.

    James Dyson famously created 5,127 prototypes before completing his first vacuum cleaner. While I'm nowhere near that legendary number, my approach to hardware development remains the same: every component, no matter how passive it may seem, requires maximum effort to achieve the perfect balance of form, function, and reliability.

  • Feeding Text-Mode BIOS into Claude AI via SSH (Automation & Analytics)

    Amir05/17/2026 at 11:02 0 comments

    We decided to feed the digitized BIOS text directly into the Claude AI system to see how well the LLM model can analyze hardware configurations, detect anomalies, and assist with troubleshooting.

    The Setup & Workflow:

    • Host Connection: The USBridge captures the video output from the target machine (even during early boot/BIOS stage).
    • On-Device OCR: The KVM processes the video frames and converts the BIOS interface into a lightweight text stream.
    • SSH Streaming: The text is rendered inside a standard terminal window over SSH.
    • AI Integration: The digitized BIOS output is passed to Claude. As you can see in the video, the LLM perfectly parses the text layout, identifies the menu structure, and can provide real-time recommendations or even generate configuration scripts based on the active screen.

    Traditional IP-KVMs just send heavy, compressed video pixels. You can't grep a pixel, and you certainly can't easily feed a video stream of a BIOS error into an automation script. By converting the BIOS into text, USBridge makes the lowest level of PC architecture completely machine-readable. Imagine automated OS provisioning that can read BIOS errors, or AI co-pilots that can configure your motherboard settings remotely when a server crashes.

    Check out the video demo below to see Claude in action analyzing the KVM text stream!

    CrowdSupply: https://www.crowdsupply.com/usbridge-technologies/usbridge-kvm-2-0

    • Log #3: Taming the Thermals — From 70°C to 50°C

      Amir05/14/2026 at 16:35 0 comments

      As I neared completion of the USBridge-KVM 2.0 hardware design, I encountered a significant thermal limitation. Processing raw HDMI video signals for real-time text recognition and streaming 2K video over SSH requires substantial computational resources, especially for a compact build based on the Radxa Zero 3W.

      In my initial builds, I used a standard axial fan combined with 4-millimeter thermal pads to bridge the gap between the SoC and the heatsink. Under heavy loads, the processor temperature quickly rose to 70 °C. To ensure long-term stability and prevent thermal throttling, this was unacceptable.

      I decided to redesign the entire thermal scheme, making two major changes:

      Copper interface: I abandoned the thick and inefficient 4-millimeter thermal pads. Instead, I soldered a 2-millimeter copper pad directly to the heatsink. This provides a solid-metal interface with high thermal conductivity, which significantly reduces thermal resistance.

      Turbine cooling: I replaced the axial fan with a high-static-pressure fan (turbine). Unlike axial fans, which struggle to operate in tight enclosures, the turbine fan draws heat horizontally through the radiator fins and expels it from the side of the enclosure.

      The performance gain was immediate. After these modifications, the unit now maintains a stable 50.8°C under the same intensive load — a massive ~20°C drop.

      This iteration ensures that the device can handle continuous 2K video streams and OCR processing without any performance degradation. The thermal design is now ready for the production-grade SLS 3D printed enclosures.

    • Log #2: BIOS-to-Text in Action

      Amir05/04/2026 at 12:31 0 comments

      People keep asking me the same question: “Okay, but how does it actually work?” Let me show you.

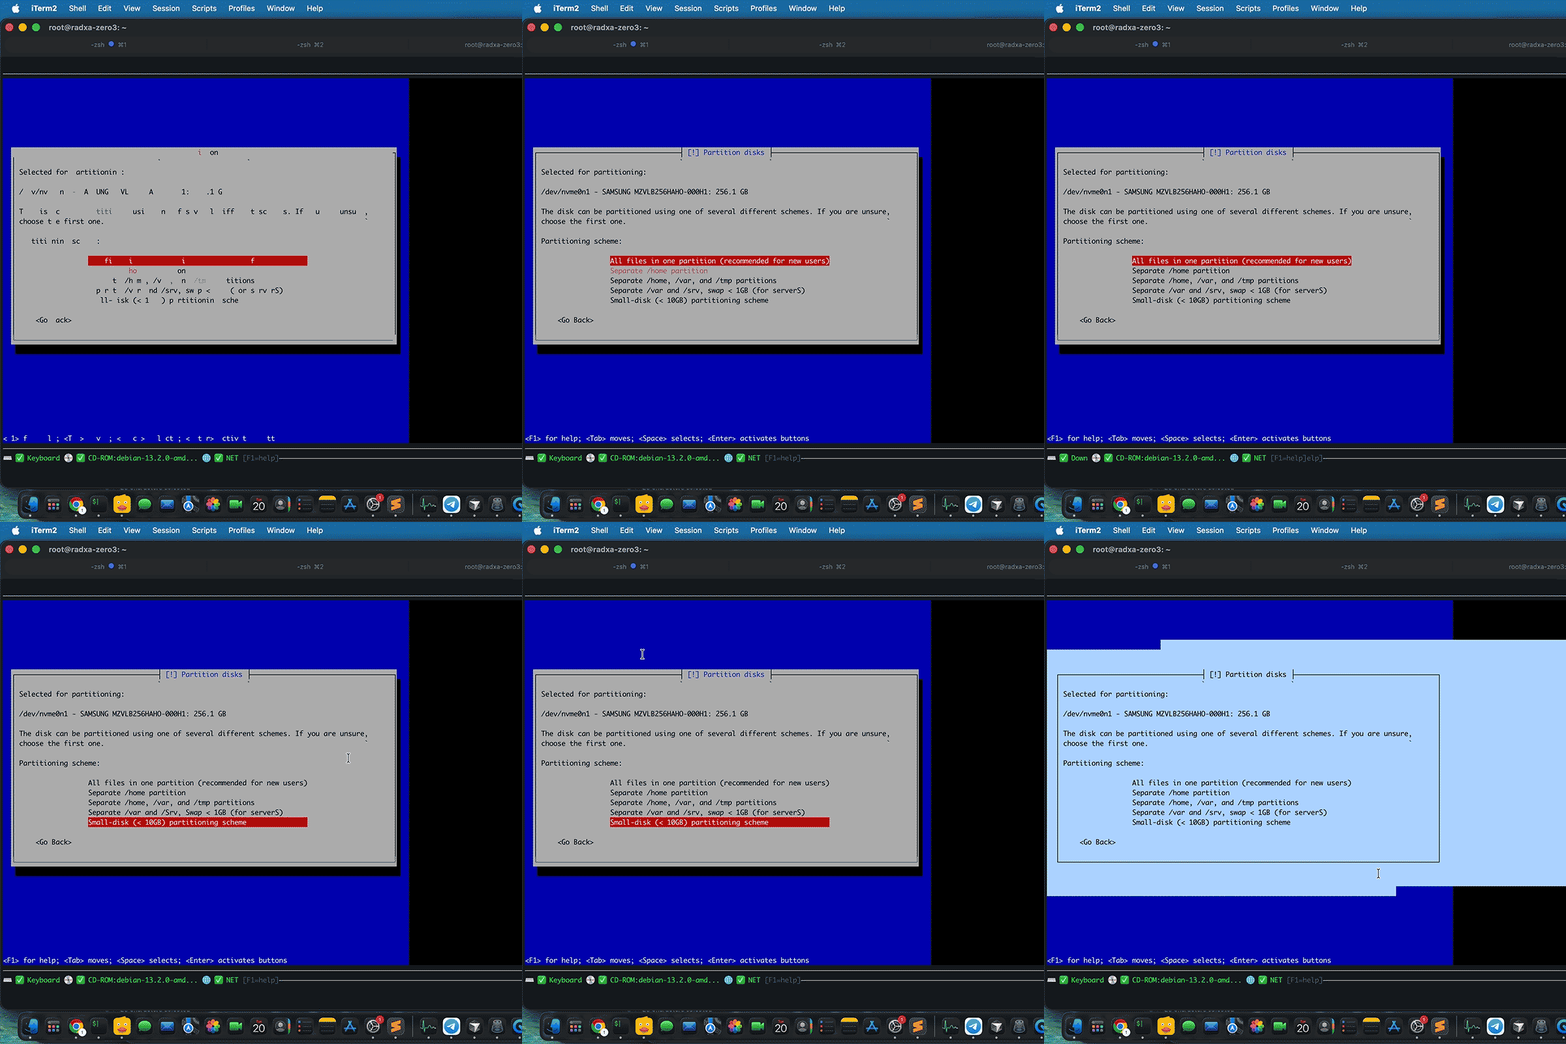
      The GIF above shows a real-time SSH session. This is an actual BIOS screen—not a video stream or a screenshot. The device captures the raw video feed from the server, processes it using a built-in OCR model (running on the RK3566 NPU), and converts it into interactive text in real time, completely offline. Key presses are transmitted back via hardware HID emulation.

      All of this operates at a speed of ~10 kbps. For comparison: a standard video KVM requires 5–20 Mbps for the same screen. This means the system works perfectly over a 4G connection, a satellite link, or unstable hotel Wi-Fi—anywhere you’d normally give up and book a flight to the data center.

      What you can do in this mode: navigate menus, change boot order, copy serial numbers and MAC addresses directly from the terminal, run Expect scripts in the firmware menu, and execute automated BIOS operations. No monitor, no emergency cart, no agent on the host.

      This is the part of the project I’m most proud of. Everything else—virtual media, snapshots, power management—are useful features. But this one changes your perception of managing “bare-metal” hardware.

      Next blog post: immutable snapshots and why the host can’t touch them.

    • Log #1: The Genesis — Why BIOS-to-Text?

      Amir04/30/2026 at 11:54 0 comments

      I've always found traditional KVM-over-IP solutions to be unnecessarily heavy. Pumping a 1080p 30fps stream just to toggle a BIOS setting or configure a RAID array is complete overkill, and it inevitably falls apart over high-latency or low-bandwidth links.

      The concept for USBridge-KVM 2.0 grew from one simple question: Why am I streaming pixels when BIOS information is essentially just text?

      I decided to build a Layer 0 (L0) debugging interface that processes the video signal directly on the device, converting it into an interactive, SSH-native text stream. This does more than just save bandwidth; it fundamentally changes how we handle infrastructure automation.

    View all 6 project logs

    Enjoy this project?

    Share

    Discussions

    Similar Projects

    Does this project spark your interest?

    Become a member to follow this project and never miss any updates