Wassim
-
STM32 Hello World and PS4 Joystick to Servo
05/13/2017 at 18:49 • 0 commentsGit Repo for the Hello world samples
Samples Content
- 01_pio_mbed_BlinkLed : using mbed from PlatformIO
- 02_pio_arduino_BlinkLed : using Arduino from PlatformIO
- 03_pio_mbed_Pwm : pwm signal on pin PB_4 with 20 ms period
- 04_pio_mbed_uart : 2 UARTS Serial3 for log and Serial2 with uart callback echo character
- 05_pio_mbed_nRF : Not finished, mbed libraries from within platformIO was a bit confusing
- 06_mbed_cli_Hello_BluePill : Switching to the mbed command line (using version 2 here)
- 07_mbed_cli_os_Hello_BluePill : switch to the os which is version 5
- 08_mbed_cli_os_BluePill_Target : adapted the mbed-os to compile for the Bluepill target
- 09_mbed_cli_nRF : STM32 with the #Home Smart Mesh RF configuration
- 10_hello_servomotor : simple servo motor examples
- 11_servo_uart_control : UART interface to control a servo motor from a Raspberry Pi using a Playstation 4 Joystick, the Raps code is here. Note that the PWM is 16 bits and the Joystick refresh rate is 10 ms for a 20 ms servo period, so the control cannot be more fluent.
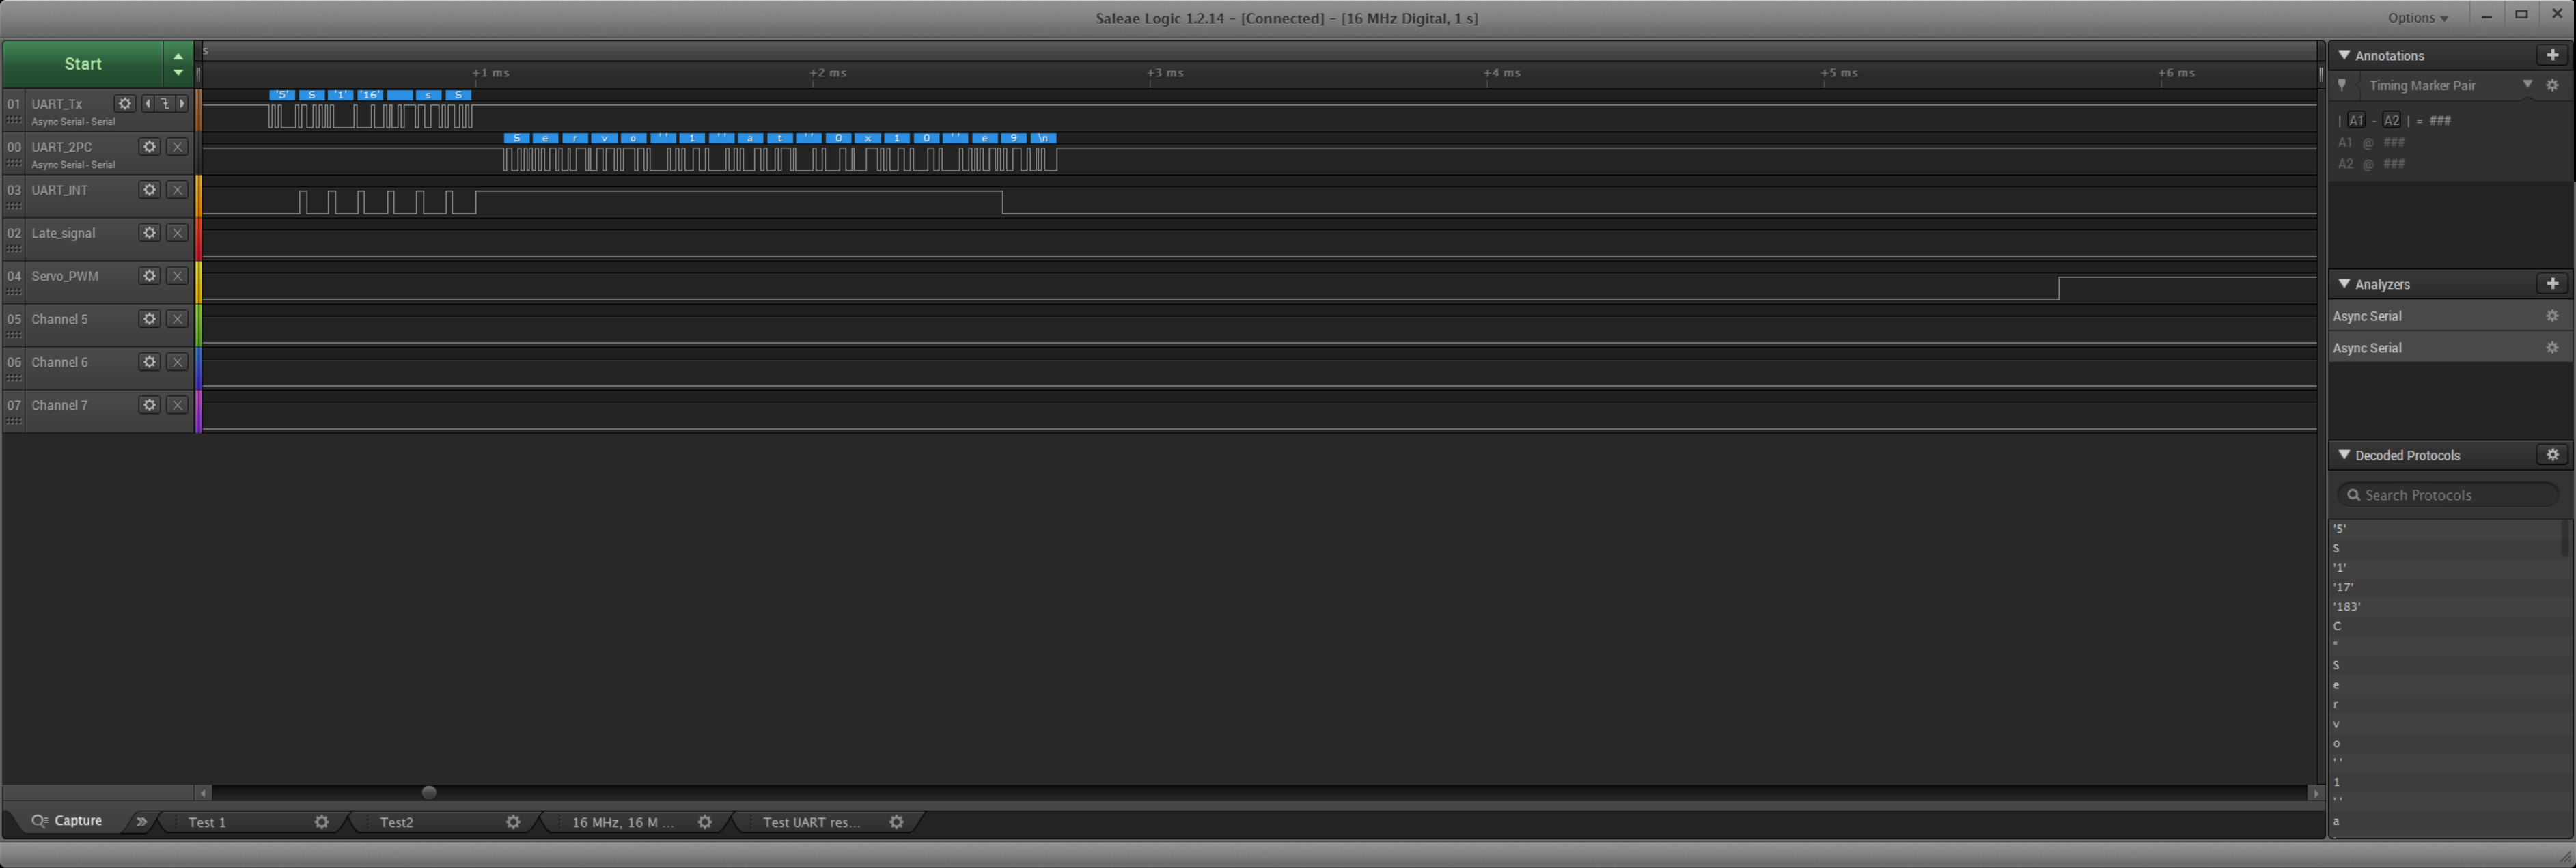
Testing the Servo UART protocol
- Below we can see the binary command going out of the Raspberry pi, the anylzer is beeing smart here changing the values randomly to characters or ascii code depending on his wish.
- The STM32 with its 72MHz handles an UART callback in 21 us. 4x times faster than one character duration. The last interrupt contains the printf which is in text so takes much longer ~ 1.5 ms.
- Still 8.5 ms are free in the 10 ms period in which the Raspberry pi is sending new servo position commands.
- Every 10 ms the rasp polls the joystick and if there is an update, sends a new servo command.
![]()
-
Build results analysis : GUI to check the MAP file
04/30/2017 at 11:08 • 2 commentsProblems
- we've seen in the main details of this project different build size results for the same source code depending on the build environment.
- When the Flash size does not fit the build size any more, well, the whole concept of the dev kits selection breaks down and we have to opt to a more expensive device, in the case of the Bluepill, that can really hurt.
Solution
- Start by having a look inside the build result, first a size summary
arm-none-eabi-size -B -d -t .\Bluepill_hello.elftext data bss dec hex filename 55240 2496 872 58608 e4f0 .\Bluepill_hello.elf 55240 2496 872 58608 e4f0 (TOTALS)Yes, but that does not help, well the next level of details is to look into the map file,
- First you have to generate it by passing the right command to the linker, the "-Map" below
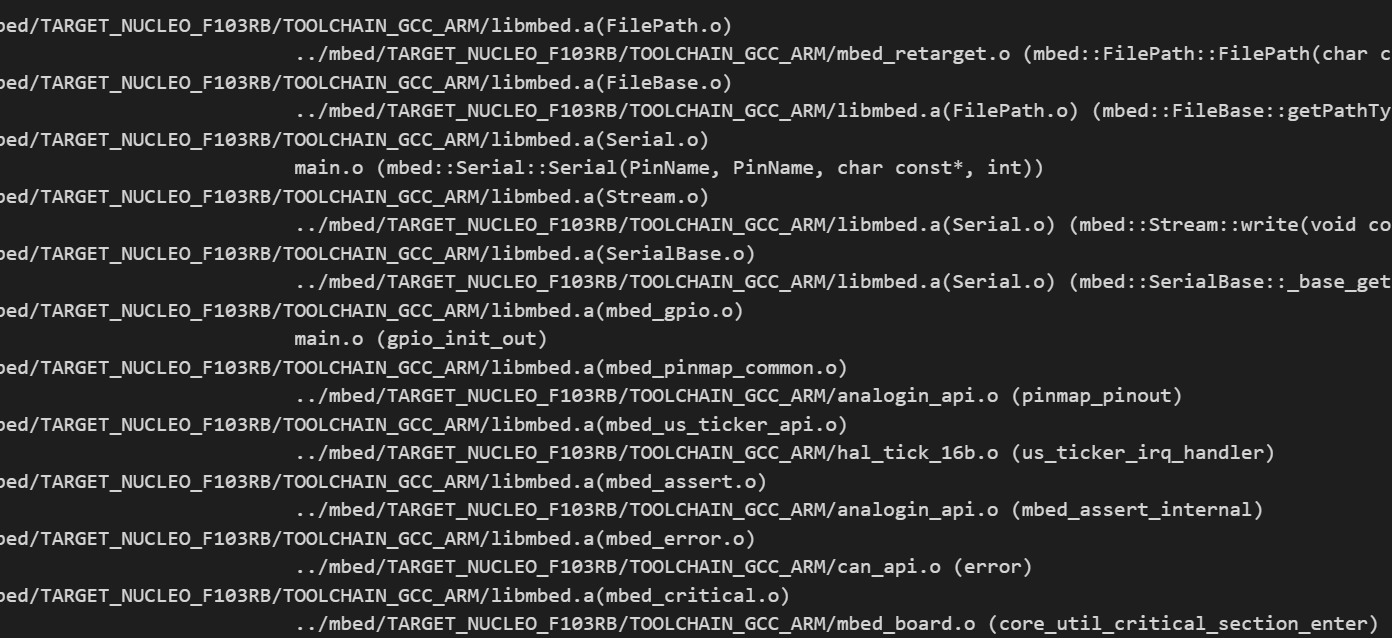
LD_FLAGS :=-Wl,-Map=output.map -Wl,--gc-sections -Wl,--wrap,main -Wl,--wrap,exit -Wl,--wrap,atexit -mcpu=cortex-m3 -mthumb- Basically, we're done, but the result looks so ugly, how could any human understand anything ?
![]()
- Hopefully some smart people thought about this problem, and provided an out of the box, easy to use solution to display all the details at all levels, libs, modules,... The magic AMAP tool from sikorskiy.
I just had to drag and drop the map file, it complies with the "intuitive" qualification, and also with the "flexibility" as it works with command lines. It shows all results of size by Module, by file, by section.
![]()
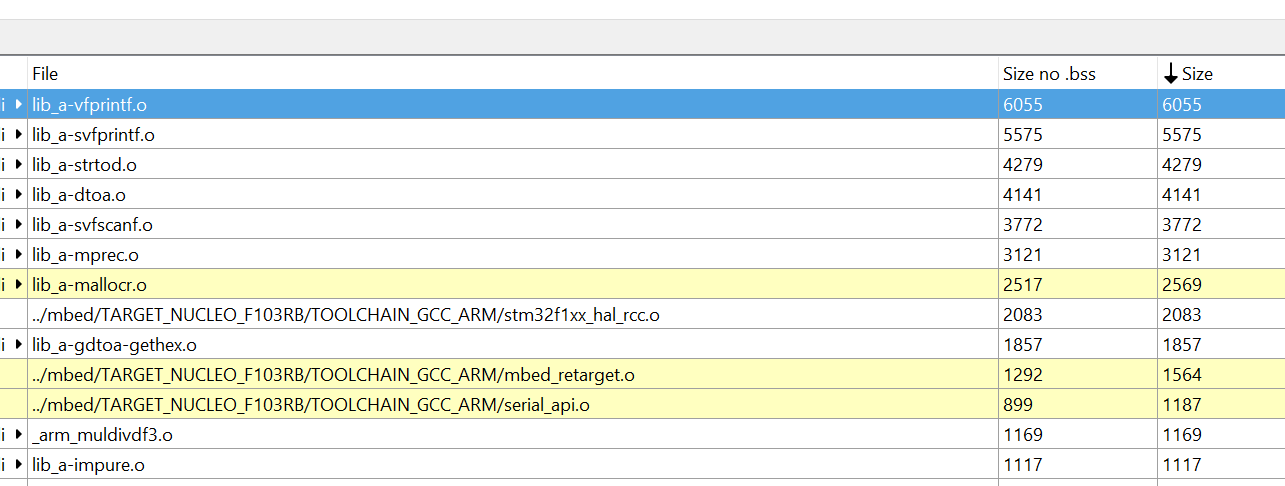
It is also possible to sort by size:
![]()
Conclusion
- Contrary to my expectations, the memory was not eaten by the mBed, but by the libc.a.
- The AMAP is a great tool to figure out what went wrong in the build chain
- Bad news here, if you were expecting all the magic to work for you by adding optimization flags to do everything, well this does not look to be the case here, so many questions raise,
- do we rebuild the library or do we link it as is ? And there come more questions,
- which magical build toolchain are we using ?
- What does platformIO do behind the scenes, how does mbed online generate its makefile ?
- Finally to resolve all of these questions, I'll try to stick with more standard build chains that I can understand, better than have easy to use ones, which modification gets much harder than the well documented existing ones.
-
pwm 'hello world' Arduino vs Mbed
04/15/2017 at 12:13 • 2 commentsI expect the Arduino to be easier, was in a hurry to see some pwm output, so I started with it.
Note that I'm testing with PB4 which after checking the pinout (at least), does support the hardware pwm functionnality, I'm not interested in any soft pwm, and I also expect libraries to do the necessary configuration for me.
new Arduino Project
- Create the project
pio init --board bluepill_f103c8 --project-option="framework=arduino"- Add the main.cpp
#include <Arduino.h>

void setup()
{
  pinMode(PC13, OUTPUT);
  pinMode(PB4, PWM);
}

void loop()
{
  analogWrite(PB4,0);
  digitalWrite(PC13, HIGH);
  delay(200);
  analogWrite(PB4,255);
  digitalWrite(PC13, LOW);
  delay(1000);
}
Result = Fail !
Fail !It keeps hanging, no LED plinking, well, you could debug it, but no, welcome to Arduino, I do not have serial connected to my board (early dev phase) and USB is out of flash size.
After some googling I found another API for PWM :
  pwmWrite(PB4,0);
  pwmWrite(PB4,200);
this is a uint16 api, looks more promisingResult = Fail !
Is this a framework supposed to be easier for newbies ? Not even the simplest peripheral has a unified API, why do we say that the STM32 is supported by this framework then, if I have to manipulate registers to get my pwm to run ?
new Mbed Project
- Create the project
pio init --board bluepill_f103c8 --project-option="framework=mbed"- Add a main.cpp
#include "mbed.h" DigitalOut myled(PC_13); PwmOut my_pwm(PB_4); int main() { my_pwm.period_ms(20); while(1) { my_pwm.write(0.5); myled = 1; // LED is ON wait(0.2); // 200 ms my_pwm.write(0.0); myled = 0; // LED is OFF wait(1.0); // 1 sec } }- research steps, googling "mbed pwm", first hit had a note to go to the latest pwm API page, and there, surprisingly, a simple example !!! not like all supposedly professional APIs where of course, who needs simple examples.
- compile and flash
>pio run
>pio run -t upload
Result = SuccessThe LED is blinking, the quick measures show correct behavior of the PWM pio, did not check it with oscillo yet, but sounds correct.
Conclusion
Arduino (-1)
Mbed (+1)
PlatformIO (+1)
The context of this project is the STM32 Bluepill, Arduino might be better for 8bits or AVR, but for the Bluepill, mbed defeats arduino on its own field of excellence which is the simplicity of use for the very simple peripherals. PlatformIO here again shows how easy it is to compare different frameworks by still using the same commands.
-
new mbed Project from online to the command line
04/14/2017 at 09:00 • 0 commentsmbed versioning mess
Even after reading about it, it took sometime to realize that version break changed the component name, so we have :
mbed mbed 2 library mbed-os mbed 5 os and libraries New mbed online Project
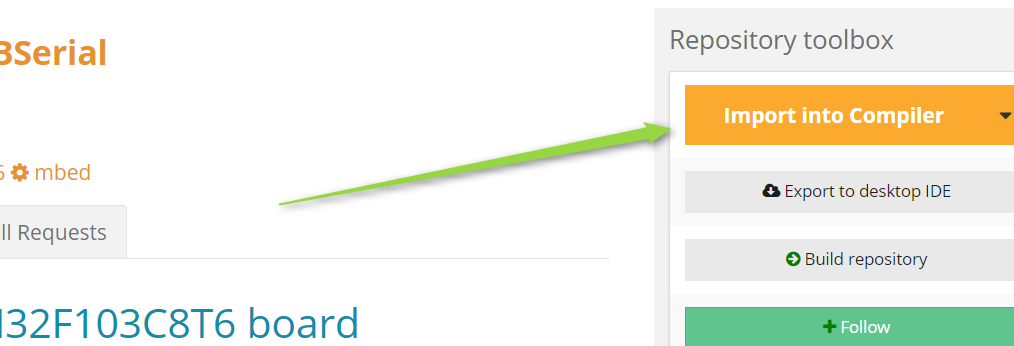
To create the project online, simply follow the link and click on import into Compiler
https://developer.mbed.org/users/hudakz/code/STM32F103C8T6_USBSerial/
![]()
- Update all libraries and dependencies (right click update)
- compile
- a bin file is automatically downloaded, ready to flash but by your own
No need to comment, out of the box compilation
Funny enough, the result is 1 KB beyond the Free Keil MDK limit, so won't be able to use the free version to recompile it offline.
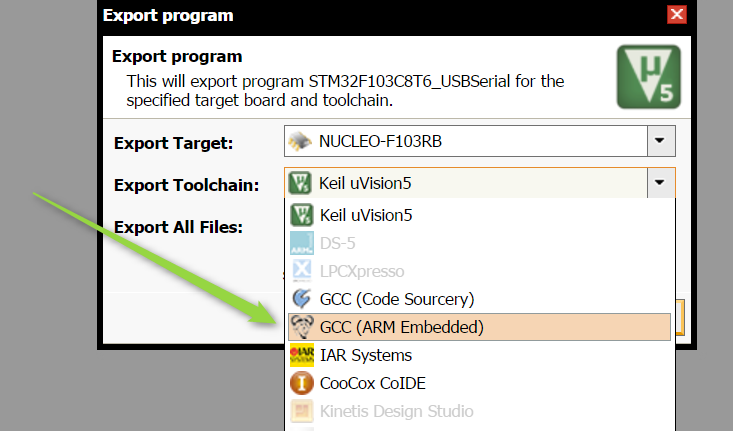
STM32F103C8T6_USBSerialNUCLEO_F103RB.bin 33 KB Export to the free world
![]()
The export is very simple, but note that you're moving from the arm compiler into the gcc compiler, and that won't be without consequences.
- The exported project has a makefile that you can compile by calling make
- make sure an arm gcc toolchain is within our path
- could be the official install "C:\Program Files (x86)\GNU Tools ARM Embedded\5.4 2016q3\bin"
- or even the platformIO toolchain "C:\Users\User\.platformio\packages\toolchain-gccarmnoneeabi\bin""
After the build, what a surprise !!!!!
PS D:\Projects\STM32\mbed\STM32F103C8T6_USBSerial> arm-none-eabi-size -B -d -t .\BUILD\STM32F103C8T6_USBSerial.hex
   text    data     bss     dec     hex filename
      0   68320       0   68320   10ae0 .\BUILD\STM32F103C8T6_USBSerial.hex
      0   68320       0   68320   10ae0 (TOTALS)
STM32F103C8T6_USBSerial.bin 67 KB As you might have noticed that goes beyond the Bluepill Flash size.
- That the export from arm compiler to gcc doubles the code size is somehow impressive, is the arm compiler that efficient or is this a misconfiguration ?
- Answer to this question lay in the library, after the AMAP analysis tool allowed me to figure out that it's a library problem, a quick search resulted in such links : an explanation is here.
- Possible solution : check how to include other libs than the compiler default ones, stack overflow post.
Next steps will cover creating mbed cli and platformIO projects and try to manage the dependencies "mbed-STM32F103C8T6" and "USBDevice_STM32F103" to make them work. Understanding how to modify the environment parameter is crucial for such cases that require optimization.
mbedCLI
The idea here is not to create a tutorial on how to use mbed CLI, for that and other install and use steps please refer to the up link. Here is meant to have a quick view on possibilities and a reminder for steps and commands.
To use the GCC (Free and open), one way is to configure a system variable
MBED_GCC_ARM_PATHor simply in "mbed_settings.py"
# GCC ARM
GCC_ARM_PATH = "C:\Program Files (x86)\GNU Tools ARM Embedded\6 2017-q1-update\bin"
import an existing project with mbed CLI
>mbed import http://mbed.org/users/hudakz/code/STM32F103C8T6_Hello/
>cd mbed
>mbed update
>cd ..
>mbed compile -t GCC_ARM -m NUCLEO_F103RB
Not updating it gets a compiler error, I don't know if this is a dependency mistake or a configuration error.
The target "BLUEPILL_F103C8" not recognised (only recognized in platformIO) you have to build for the Nucleo. Reason behind this is that the Blue pill does not have an mbed drag and drop ability, I find this reason funny. so here the hack is the already patched main including the right header before mbed.h and very important is to call yourself the confSysClock();
#include "stm32f103c8t6.h"
#include "mbed.h"
int main() {
    confSysClock();     //Configure system clock (72MHz HSE clock, 48MHz USB clock)
Better way to import a project by knowing what is going on
clone the complete repo or just copy the content of the sub directory test project, note you can also create a new project this way which I find more convenient as the whole thing is just around 1 KB.
The ".mbed" contains all the magic, tool chain, target,...
TOOLCHAIN=GCC_ARM
TARGET=NUCLEO_F103RB
ROOT=.
I do not knwo why the mbed has a different file extension for its library reference in the "mbed.bld"https://mbed.org/users/mbed_official/code/mbed/builds/794e51388b66There you could check and change the version manually if you wantand we're using a library, where there could be many, each should have a .lib file with one line :
http://mbed.org/users/hudakz/code/mbed-STM32F103C8T6/#9fbbea76d6f6And you're ready to go. The mbed import does both create the file reference and download the whole thing, which we have here in separate steps. Now when we want to download the content after having committed the new project for example :mbed deployand to compile, as we already declared the toolchain and target, it is an easy to type command :mbed compilembed vs mbed-os
no big difference, the size difference was coming from the usage of the printf function.
Error with mbed-STM32F103C8T6
I got this error, which only happens if you do not compile in steps
[ERROR] .\mbed-os\targets\TARGET_STM\pinmap.c: In function 'pin_function':although the code does not compile with the library added, even if not being used, removing the library compiling, then adding it solved the problem.>mbed compile >ERROR... >mbed remove mbed-STM32F103C8T6 >mbed compile >mbed add http://mbed.org/users/hudakz/code/mbed-STM32F103C8T6/ >cd .\mbed-STM32F103C8T6\ >mbed update >cd .. >mbed compileError Debug
- The build log have identical compile command line
- what differs is that every compile includes a special generated file ".includes_3e6572221c5360985dfa2ac639f88542.txt"
- there it's possible to see the include path, that in case of an added library, its include is put in the beginning " -I./mbed-STM32F103C8T6"
And that explains the missing declaration of "STM_PIN_INPUT" that comes from "PinNames.h" file overridden by the library "mbed-STM32F103C8T6"
- Once the error is understood, the fix is here, not more as a lib but committed to the project's dir
Solution add patching mbed-os to support the Blue pill
- The only differences between the builds are the mcu name TARGET_STM32F103RB and TARGET_STM32F103C8
- These two targets are identical, only differ in the Flash size
- If that is really a reason not to support a smaller size then patching the file "STM32F103XB.ld" down to 64K, should be a problem but in fact no, it compiles.
- The error coming from "RTX_Conf_CM.c" require "OS_TASKCNT" to be defined, which is defined for the F103RB in here "mbed_rtx.h"
It is enough to copy paste the section for the 103C8
#elif defined(TARGET_STM32F103RB) #ifndef INITIAL_SP #define INITIAL_SP (0x20005000UL) #endif #ifndef OS_TASKCNT #define OS_TASKCNT 6 #endif #ifndef OS_MAINSTKSIZE #define OS_MAINSTKSIZE 128 #endif #ifndef OS_CLOCK #define OS_CLOCK 72000000 #endif #elif defined(TARGET_STM32F103C8) #ifndef INITIAL_SP #define INITIAL_SP (0x20005000UL) #endif #ifndef OS_TASKCNT #define OS_TASKCNT 6 #endif #ifndef OS_MAINSTKSIZE #define OS_MAINSTKSIZE 128 #endif #ifndef OS_CLOCK #define OS_CLOCK 72000000 #endif- To be sure, I searched for all locations using "TARGET_STM32F103RB" and found another one in "RTX_CM_lib.h" so patched as well
#if defined(TARGET_MCU_NRF51822) || defined(TARGET_MCU_NRF52832) || defined (TARGET_STM32F334R8) ||\ defined(TARGET_STM32F070RB) || defined(TARGET_STM32F072RB) || \ defined(TARGET_STM32F302R8) || defined(TARGET_STM32F303K8) || defined (TARGET_STM32F334C8) ||\ defined(TARGET_STM32F103RB) || defined(TARGET_STM32F103C8)- And now we can enjoy an mbed-os supporting the "BLUEPILL_F103C8" as a build target
- I forked the mbed-os to test the FIX, and sent it back through a pull request, let's see if it interests the mbed-os owners to take that modif.
- in the meanwhile it is possible to compile with the blue pill target by using this mbed-os version
mbed remove mbed-os
mbed add https://github.com/wassfila/mbed-o
All is not lost : reduce gcc compile size with libg_nano
- As the section title mention, it is possible to use much smalled libaray for such a mcu purpose which is the "libg_nano.a", it comes by default with the gcc compiler install under lib\thumb\v7-m.
- it is not necessary to pass it as argument with -l but there is a special flag for that purpose
"--specs=nano.specs"A dirty hack was to change the file "mbed-os\tools\profiles\develop.json"
{
    "GCC_ARM": {
...
       "ld": ["-Wl,--gc-sections", "-Wl,--wrap,main", "-Wl,--wrap,_malloc_r",
               "-Wl,--wrap,_free_r", "-Wl,--wrap,_realloc_r",
               "-Wl,--wrap,_calloc_r", "-Wl,--wrap,exit", "-Wl,--wrap,atexit",
               "-Wl,-n","--specs=nano.specs"]
    },
or create another json file and pass it after the "mbed compile --profile" command.Conclusion
- We successfully manged (not without pain, debug and difficulties) to switch from the online compiler to the offline cli commands
- in these steps we've seen lots of things from within the most importants
- managing dependencies with mbed cli
- adding blue pill support for Nucleo projects
- patching the mbed-os to support the Blue pill as a target
- Full control over the build chain by finding all flags
- passing the magic flag that saves the Blue pill life together with the mbed-os
-
new Arduino Project with PlatformIO command line
04/14/2017 at 08:15 • 0 comments- >pio init --board bluepill_f103c8 --project-option="framework=arduino"
- then update content of platformio.ini
Content of the platformio.ini
[env:bluepill_f103c8]
platform = ststm32
board = bluepill_f103c8
framework = arduino
The main.cpp#include <Arduino.h> void setup() { pinMode(PC13, OUTPUT); } void loop() { digitalWrite(PC13, HIGH); delay(200); digitalWrite(PC13, LOW); delay(1000); }The compiler is the same "arm-none-eabi-g++" and the result isarm-none-eabi-size -B -d .pioenvs\bluepill_f103c8\firmware.elf text data bss dec hex filename 6284 1920 312 8516 2144 .pioenvs\bluepill_f103c8\firmware.elfSo the Flashed code size is : 8 KB -
VSCode Configuring and Debugging
04/14/2017 at 08:06 • 2 commentsConfiguring Includes in VSCode
In VSCode you'll see the "mbed.h" underlined in green as not found
![]()
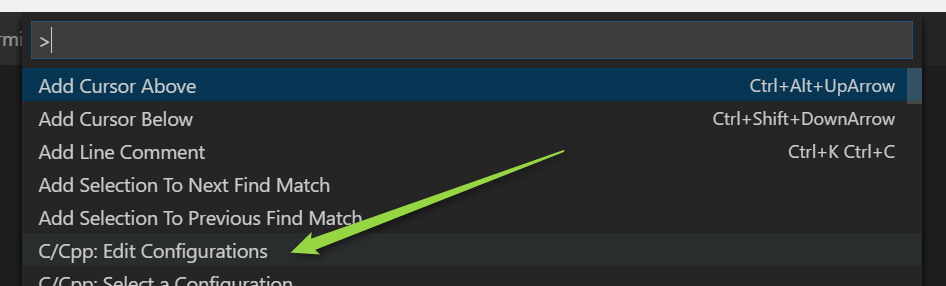
- press "ctrl+shit+p" and click on "Edit Configurations"
![]()
- Under the includePath of your matching operating system, add the include
        {
            "name": "Win32",
            "includePath": [
                "C:/Program Files (x86)/Microsoft Visual Studio 14.0/VC/include/*",
                "C:/Users/User/.platformio/packages/framework-mbed"
            ],
            "browse": {
                "limitSymbolsToIncludedHeaders": true,
                "databaseFilename": ""
            }
        }
You should now be able to navigate, such as right click and the "Go to Definition" would open the file for you in VSCode![]()
Before debugging
- You might want to finish compiling and flashing first
Debugging with VSCode (Start is right then got stuck)
well, haven't we seen this tool somewhere already ? Going back to the ".platformio\packages\tool-stlink" we find all of
st-flash the flash utility used with the command line above st-info retrives information (flash, srma,... see help) st-util this is the magic utility that changes your ST-Link HW+SW into a gdb server - run "st-util" from the command window (outside VSCode)
- From VSCode, click on "Debug" icon or menu, then click on config
I'm using this configuration
{
    "version": "0.2.0",
    "configurations": [
        {
            "type": "gdb",
            "request": "launch",
            "name": "Debug Microcontroller",
            "target": "extended-remote /dev/cu.usbmodem00000000",
            "executable": ".pioenvs/bluepill_f103c8/firmware.elf",
            "cwd": "${workspaceRoot}",
            "autorun": [
                "monitor tpwr enable",
                "monitor swdp_scan",
                "attach 1",
                "load .pioenvs/bluepill_f103c8/firmware.elf"
            ]
        },
    {
        "type": "gdb",
        "request": "attach",
        "name": "Attach to gdbserver",
        "executable": ".pioenvs/bluepill_f103c8/firmware.elf",
        "target": ":4242",
        "remote": true,
        "cwd": "${workspaceRoot}"
    }
    ]
}
With this, you can connect to the gdb server, load the program, but then I failed to step, I got an error, so here's where any help would be appreciated. I think the platformIO are working on an IDE with an integrated debug, well I bet it is the continuation of this process. But with the useful correct configuration that I'm probably missing.
-
New mBed Project with PlatformIO command line
04/14/2017 at 07:59 • 0 commentsProject creation
- Create an empty directory, here called "test_pio"
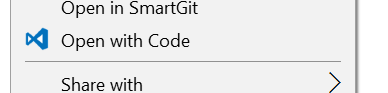
- what I usually do is "right click" "Open with Code"
![]()
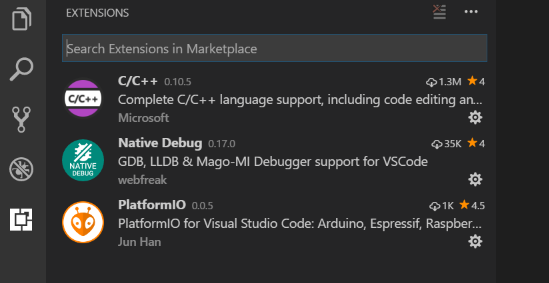
- in VSCode I have 3 plugins installed
- C/C++
- Native Debug
- PlatformIO
![]()
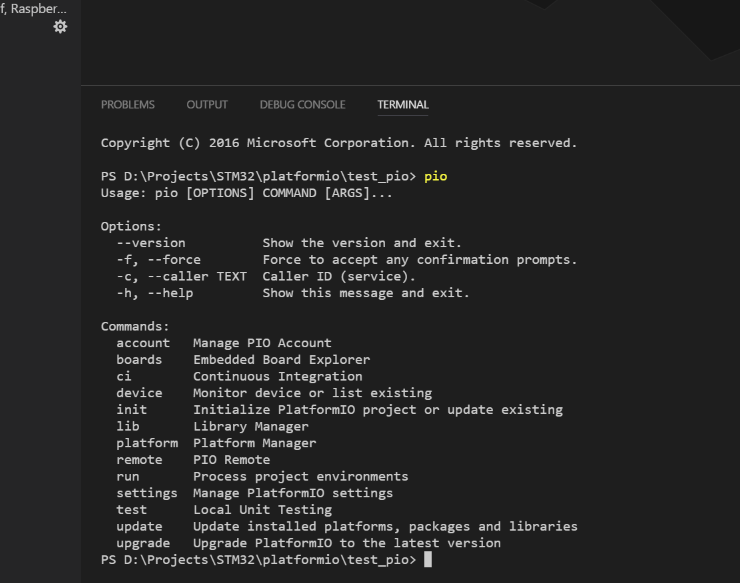
Actually, I'm not sure if the PlatformIO plugin is needed here, as I work with the command line, if I open any terminal outside VSCode and I type "pio", I get the help, so one way or another, make sure that opening a terminal in VSCode at least, allows pio to run:
![]()
- Get familiar with the command lines for example by running :
test_pio> pio boards
...
test_pio> pio device list
COM6
----
Hardware ID: USB VID:PID=0483:374B LOCATION=1-10
Description: STMicroelectronics STLink Virtual COM Port (COM6)
Note that the device list should show the STLink if it is connected- I'm using a Nucleo-F030 but any other could fit using its ST-LinkV2-1
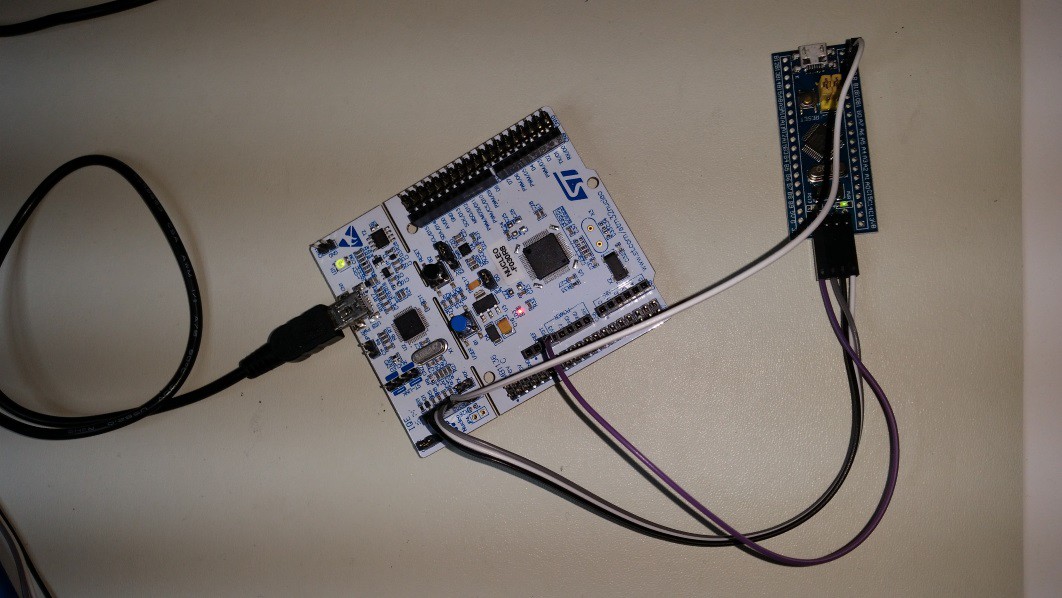
- Check lots of wiki on the web on how to connect the BluePill STM32 and don't forget the Reset PIN
![]()
- As you have checked the names in the help boards already the command to start a new project is "pio init --board bluepill_f103c8" which results in the following output
test_pio> pio init --board bluepill_f103c8 The current working directory D:\Projects\STM32\platformio\test_pio will be used for project. You can specify another project directory via `platformio init -d %PATH_TO_THE_PROJECT_DIR%` command. The next files/directories have been created in D:\Projects\STM32\platformio\test_pio platformio.ini - Project Configuration File src - Put your source files here lib - Put here project specific (private) libraries Project has been successfully initialized! Useful commands: `platformio run` - process/build project from the current directory `platformio run --target upload` or `platformio run -t upload` - upload firmware to embedded board `platformio run --target clean` - clean project (remove compiled files) `platformio run --help` - additional information- One single important file was created (other directories less important) which is the platformio.ini
; http://docs.platformio.org/page/projectconf.html
[env:bluepill_f103c8]
platform = ststm32
board = bluepill_f103c8
framework = mbed
The default framework selected was the mbed, but the bluepill_f103c8 is also supported by the arduino
- create a new file under src called "main.cpp" with this content
#include "mbed.h"
DigitalOut myled(PC_13);
int main()
{
    while(1)
    {
        myled = 1; // LED is ON
        wait(0.2); // 200 ms
        myled = 0; // LED is OFF
        wait(1.0); // 1 sec
    }
}
Inside of PlatformIO
Now part of the mystery of platformIO is beeing revealed, if we navigate to where the framework-mbed is we find the rest of the company, and it tells already that the arduino is using the stm32duino, the tool-stlink that we'll see later on,...
![]()
Before compiling, how did the magic of the platformIO got to know the PC_13 that I set for the LED ?
.platformio\packages\framework-mbed\targets\TARGET_STM\TARGET_STM32F1\TARGET_BLUEPILL_F103C8\PinNames.h
from which here is an extract, PIOs are defined as enums, and this was done for us by Mr mBed.
* OF THIS SOFTWARE, EVEN IF ADVISED OF THE POSSIBILITY OF SUCH DAMAGE.
******************************************************************************* */
#ifndef MBED_PINNAMES_H
#define MBED_PINNAMES_H
#include "cmsis.h"
#include "PinNamesTypes.h"
#ifdef __cplusplus extern "C" {
#endif
typedef enum { PA_0 = 0x00, PA_1 = 0x01, PA_2 = 0x02, PA_3 = 0x03,
Still before hitting compile, how is the compiler going to know which cpu do we use, on the main, we only included mr mBed. Well that is something done for us by the nice platformIO people here, who leverage the powers of python, and json files for configuration which keep us in familiar environment with the VSCode which configuration is also json, not sure if that's related but that's currently the fashion.
looking at the file .platformio\platforms\ststm32\boards\bluepill_f103c8.json there is the rest of the magic that's going to help our compiler
{
  "build": {
    "core": "stm32",
    "cpu": "cortex-m3",
    "f_cpu": "72000000L",
    "ldscript": "stm32f103xb.ld",
    "mcu": "stm32f103c8t6",
    "variant": "stm32f1"
  },
  "frameworks": [
    "mbed",
    "arduino"
  ],
  "name": "BluePill F103C8",
  "upload": {
    "maximum_ram_size": 20480,
    "maximum_size": 65536,
    "protocol": "stlink"
  },
  "url": "http://www.st.com/content/st_com/en/products/microcontrollers/stm32-32-bit-arm-cortex-mcus/stm32f1-series/stm32f103/stm32f103c8.html",
  "vendor": "Generic"
}
and there we see that this blue pill supports mbed and arduino by this current platformIO version, we even have a link to the official ST datasheets. The Generic vendor is about the BluePill which design is Open I think.
can we hit compile now ? We still don't know which compiler is going to jump, but let's see.
I could not find where the build log is, if someone know please let me know, otherwise please mr platformIO give us a build log output by default or at least with an option. As I'm under windows using the Power shell the pipe is as follows with the run command
Compiling by calling "pio run"
- hit the "run" which is all what is about compiling, flashing,... with sub options, and I do like the --verbose option
pio run -v | Out-File build.logAlthough everything is piped to a file, well not everything as I get lots of yellow output on my screen have no clue why, if someone could tell me ?And here more revelations in the build log (download link) from which an extract
[04/08/17 20:24:33] Processing bluepill_f103c8 (platform: ststm32, board: bluepill_f103c8, framework: mbed)
Collected 8 compatible libraries
Looking for dependencies...
Project does not have dependencies
arm-none-eabi-gcc -o .pioenvs\bluepill_f103c8\FrameworkMbed-hal-d30ab\mbed_gpio.o -c -std=gnu99...
Well it's the good old gcc with its arm-non-eabi-gcc which is in a directory we spotted earlier:".platformio\packages\toolchain-gccarmnoneeabi\bin" and this is the toolchain exactly as you would have installed it from the official site.Note that the good thing about windows is that after installing 10 IDEs using amr-gcc, I have it duplicated 10 times on my drive, that's why we pay for bigger drives and faster cpus to search them, but at least, all of them are one click install without worrying about versions, they could all be different I wouldn't realize, go solve that problem under a unified install system.So what's the result what did we got ? Well the nice platformIO even called a gcc helper for us to check the size :arm-none-eabi-size -B -d .pioenvs\bluepill_f103c8\firmware.elf text data bss dec hex filename 27880 2188 452 30520 7738 .pioenvs\bluepill_f103c8\firmware.elf [SUCCESS] Took 5.53 secondsSo we have 28 KB to flashJust a summary, please correct me if someone see's I describe it wrong:text : is the program sizedata : is the ram content, but as it is initialized, I think it goes in Flash as wellbss : is the non initialized global data, so doesn't care about it for the flashdec and hex are the total in decimal and hex.So from the flash later on I got the conclusion:So, small comment about the 28KB for 4 lines sound insane, but knowing that there's an OS behind that is turning the wait into a low power sleep mode justify the overhead.but wait, why do I need platformIO to query the size of an elf file ?I think platformIO is managing the paths, but if you want to type a command line using a program you might have to add it to your path, now that you know what's under the hood, you simply do it like this (I'm using PowerShell so could be different for the path update) And then give it a -h to discover more options
>$env:Path += ";C:\Users\User\.platformio\packages\toolchain-gccarmnoneeabi\bin"
>arm-none-eabi-size -B -d .pioenvs\bluepill_f103c8\firmware.elf
>arm-none-eabi-size -h
Flashing by calling also "pio run" or just by your own
- time to run your program, for that the flashing is hidden by the run command with these options:
platformio run --target upload -vyou see the -v option behind, well I like platformIO for such things, when you run it without, it suggests that "-v" would give you more info and actually, only then you see the flashing command line:st-flash write .pioenvs\bluepill_f103c8\firmware.bin 0x08000000
STM32 BluePill Frameworks Evaluation
The STM32F103 BluePill, what's under the hoods of mbed, platformIO, Arduino,...