Close
0%
0%

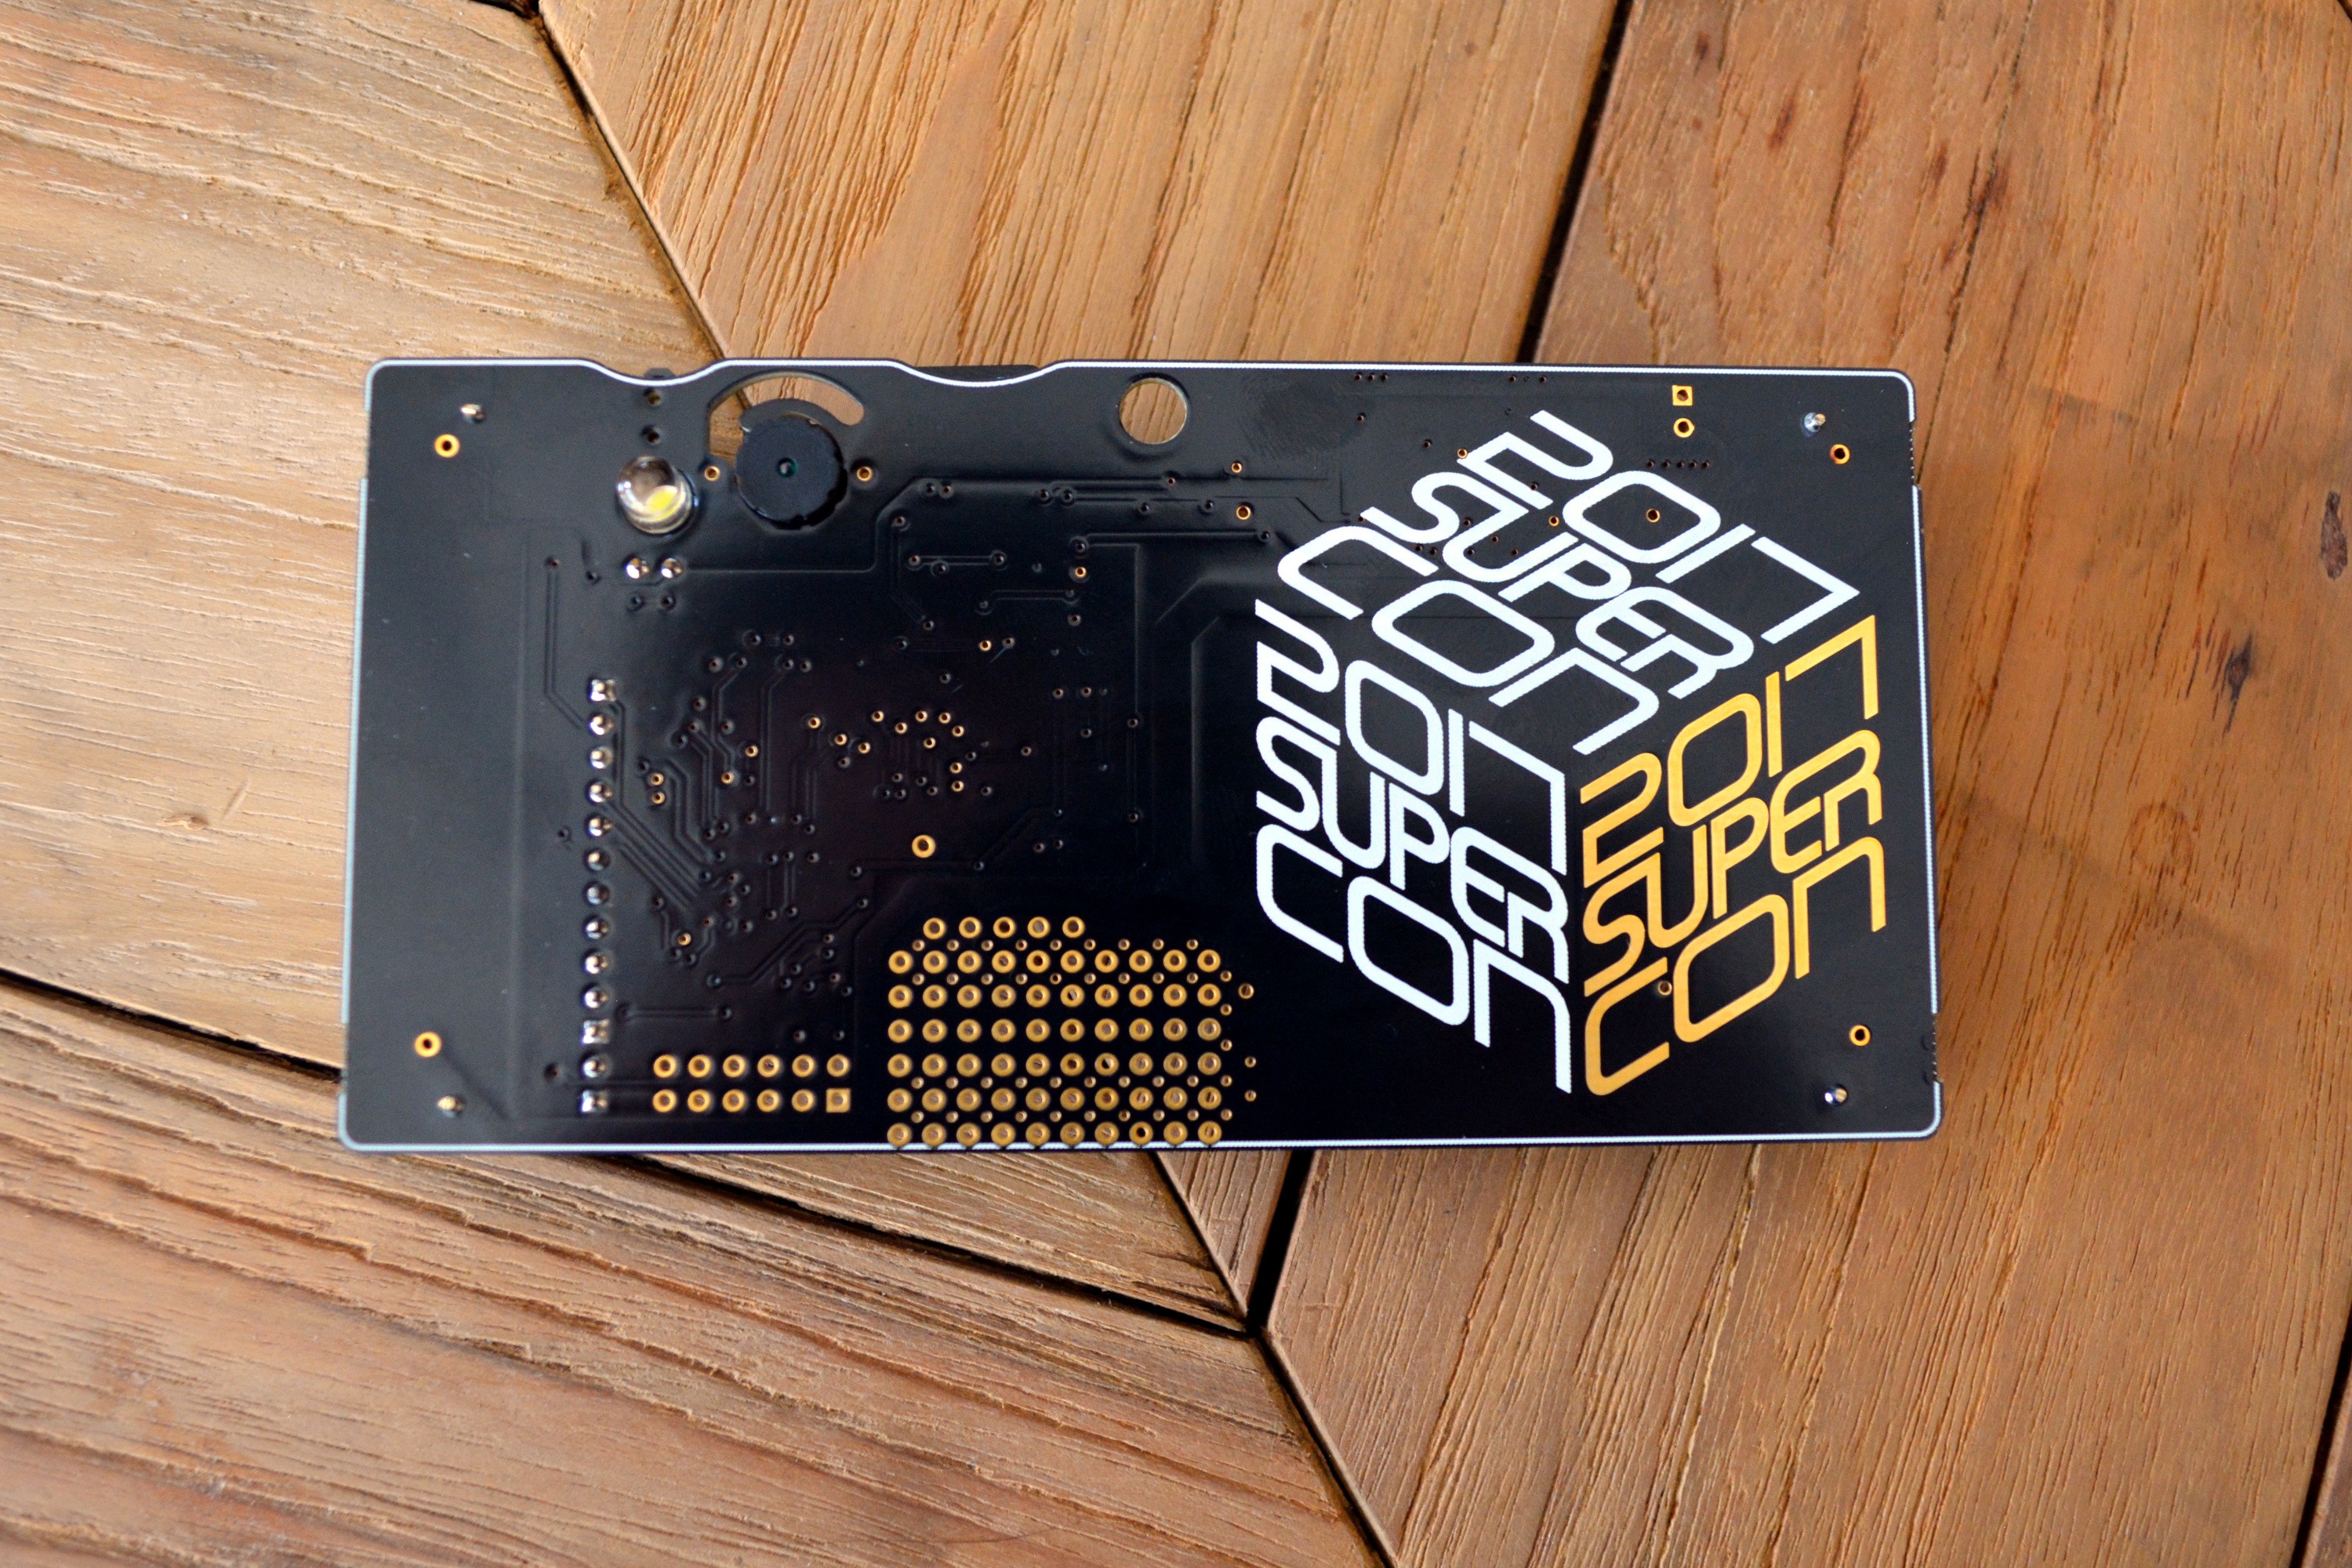
Camera badge for Supercon 2017

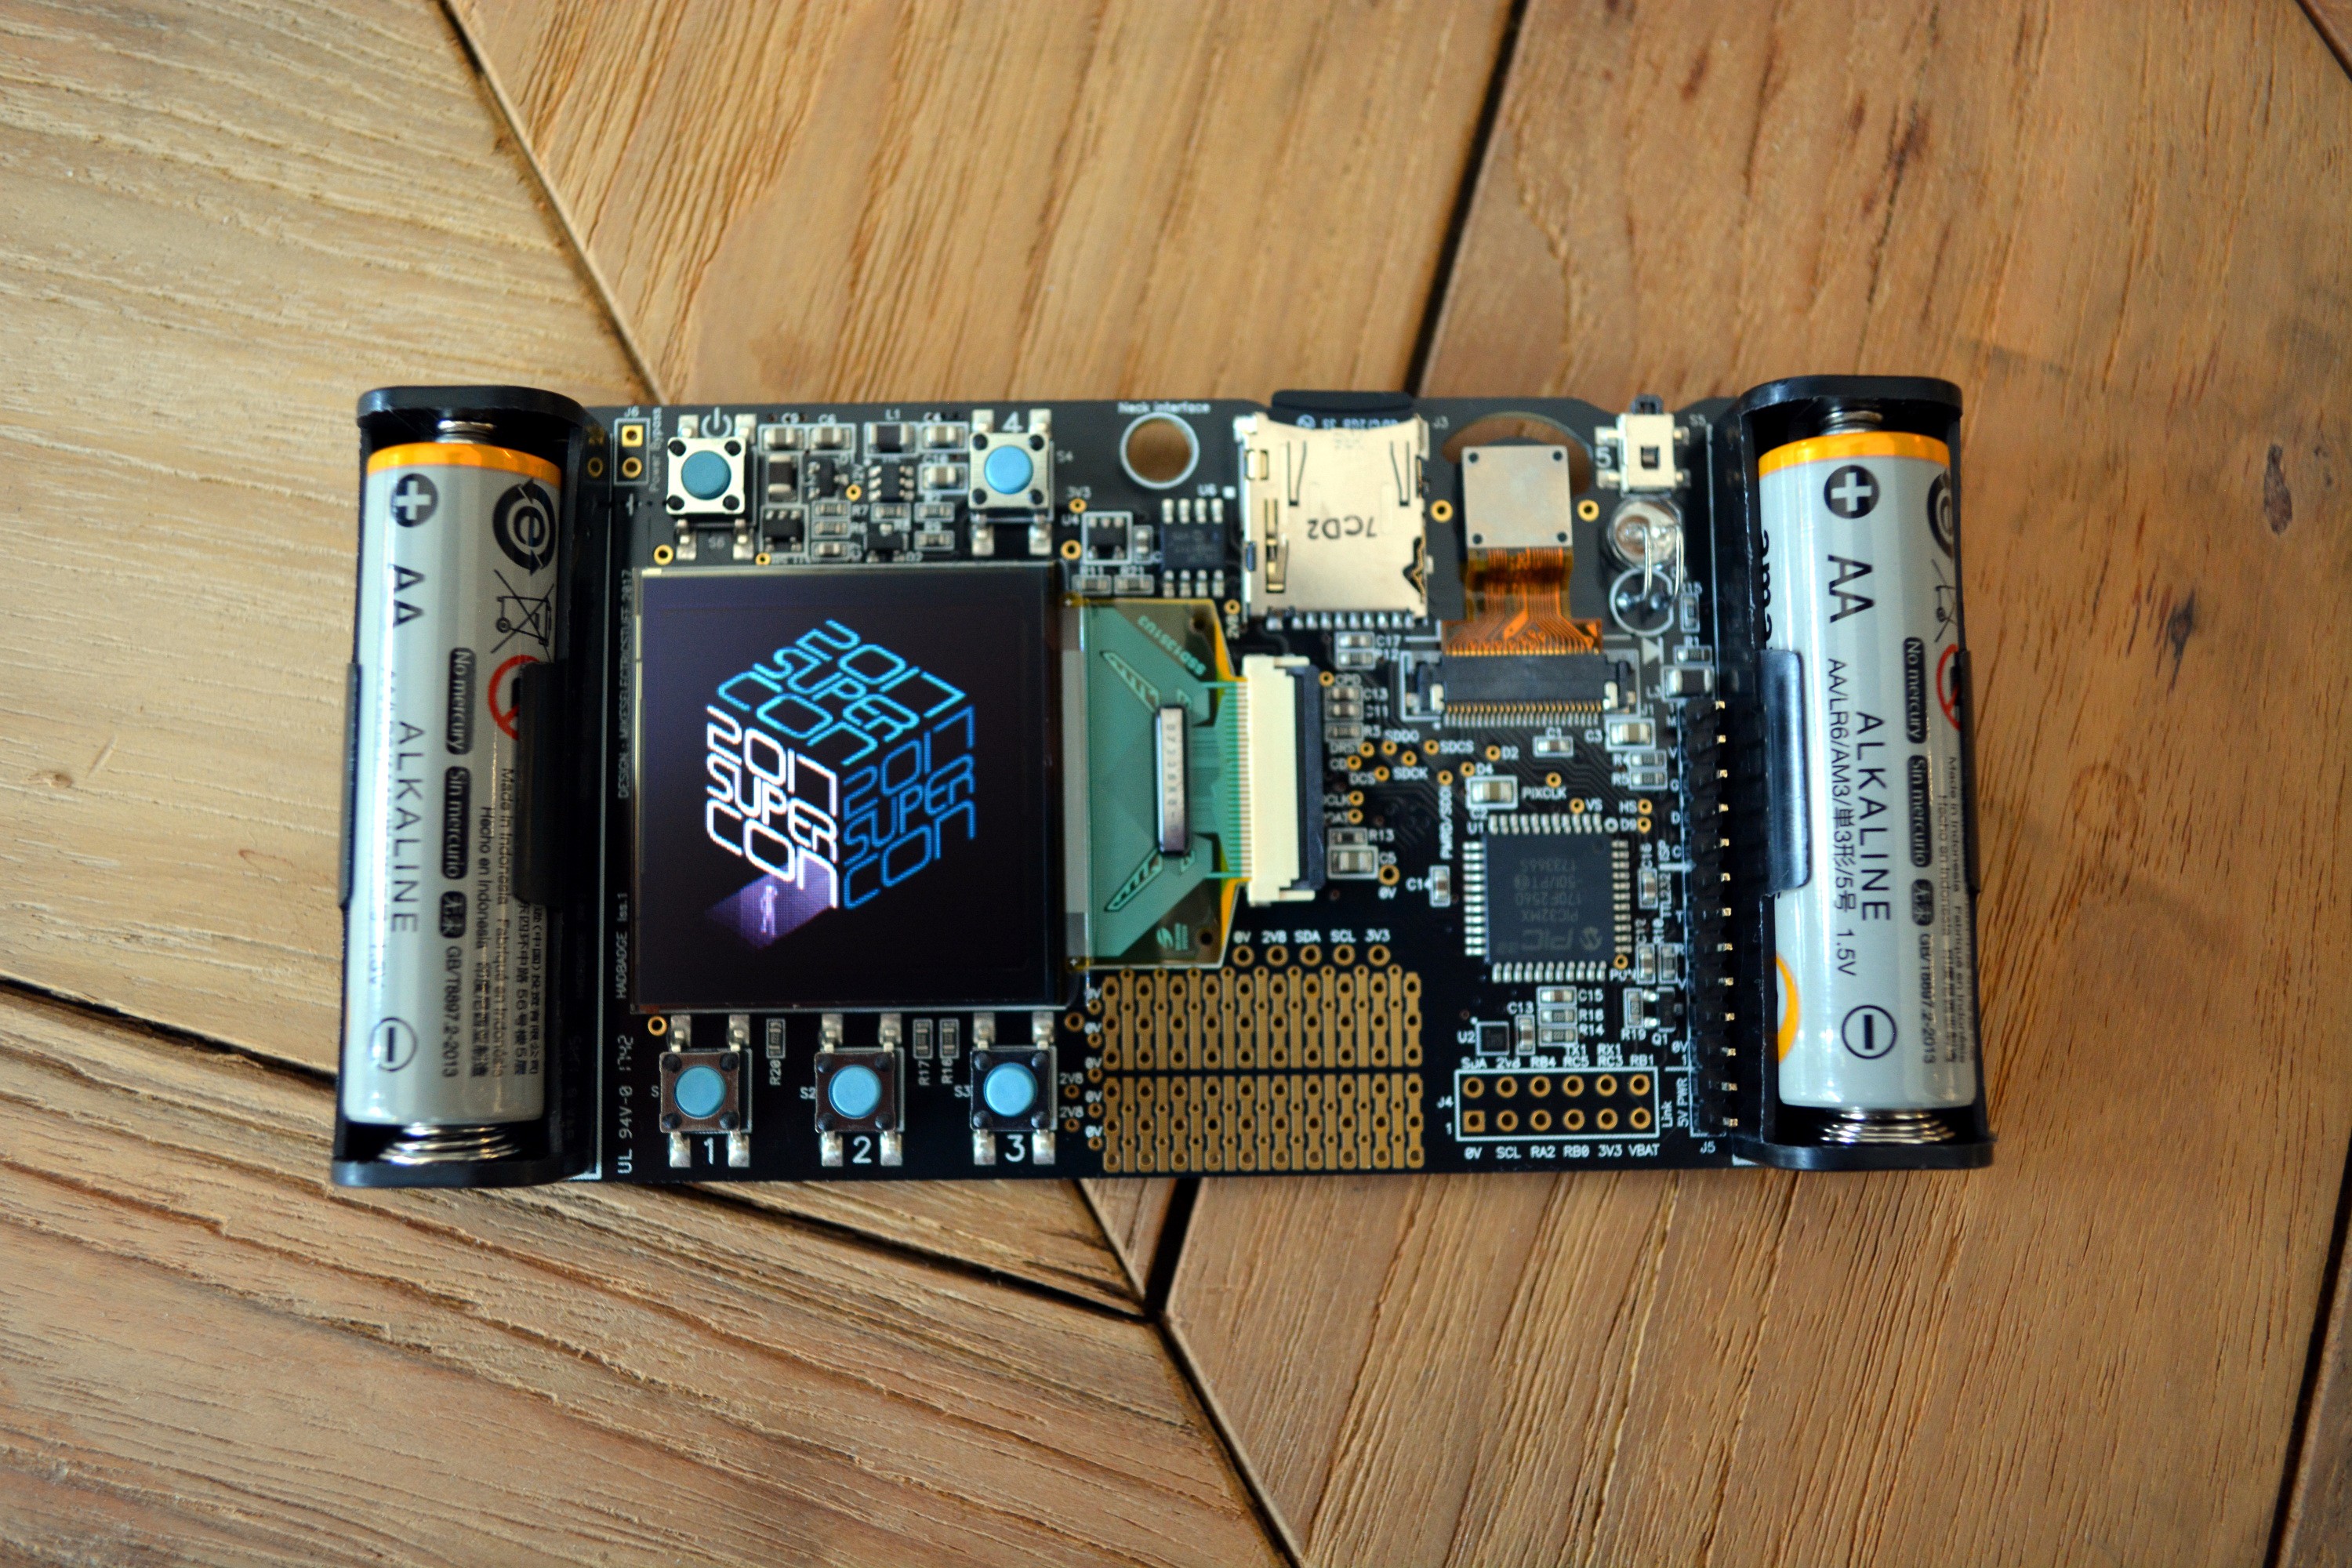
Conference badge for the 2017 Hackaday Superconference
Features: camera module, 128x128 OLED display, MicroSD card socket and accelerometer

Similar projects worth following
This is the official documentation for the 2017 Hackaday Superconference hardware badge. The badge was conceived of and designed by Mike Harrison (aka. mikeselectricstuff ).Everyone who goes to Supercon this year will get one of these badges. They are designed to be hacked and we have awards for the best film made using the badge's camera, as well as the the best hardware and software hacks. What you create during Supercon will be demonstrated live on stage before the closing ceremonies on Sunday.Currently shown is the badge prototype, two of which were built. It is being assembled by, and with generous support from MacroFab. The PIC32MX170F256D and SRAM were donated by Microchip.
Youtube video describing functionality and hardware : https://youtu.be/2WY3O26YYl8

A limited number of the extra badges are available on Tindie.

General description and firmware functionality

Other sections :

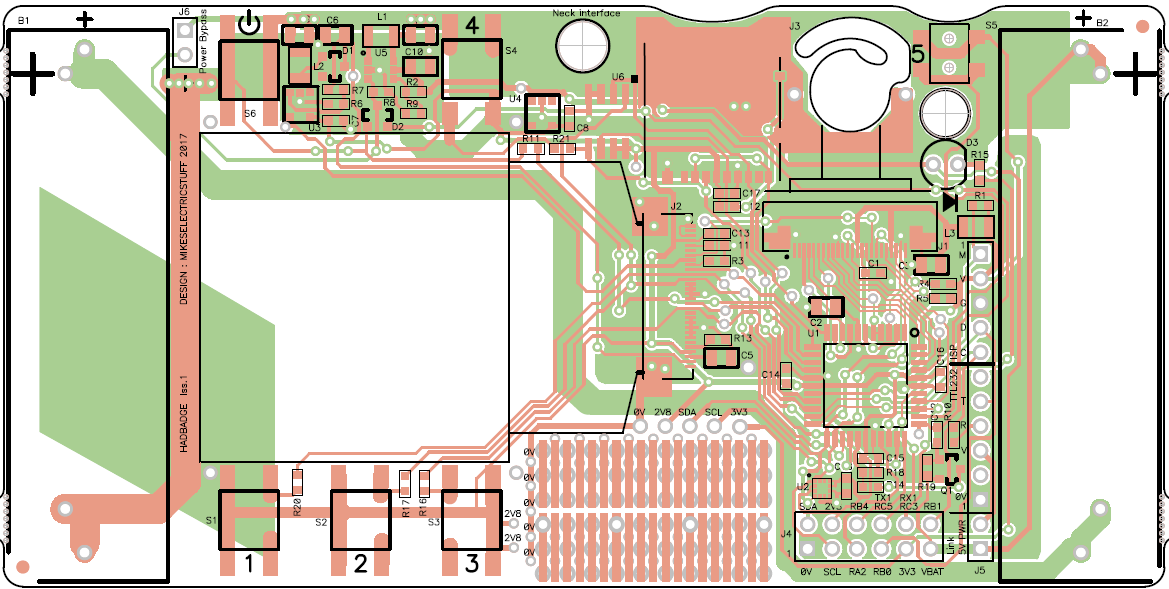
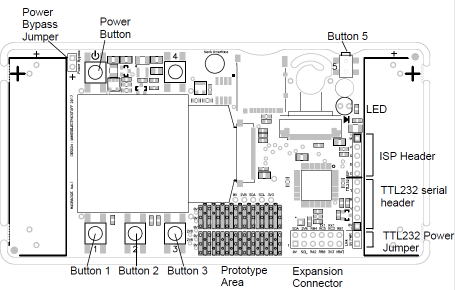
Button numbers and header locations

Power control : Pressing the power button turns the badge on. Pressing and holding a couple of seconds turns off.
Holding the power button at startup will display all the power-up button functions.
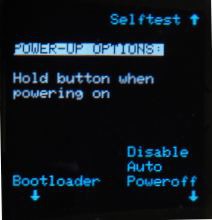
Auto powerdown : the device will power down if no button is pressed, or no significant accelerometer movement is detected for 10 minutes.
Holding button 3 on powerup disables the powerdown timeout. Holding button 4 on powerup performs a hardware selftest (see later).

Splashscreen : At startup, if SPLASH.AVI exists on the card, it will be played once. Embedded framerate is ignored  -it plays at maximum rate. This should be a short file to avoid excessive startup delays. If SPLASH.AVI does not exist, it looks for SPLASH.BMP and if present, displays it for a second or so. 

At startup, a menu is displayed allowing selection of various applications.
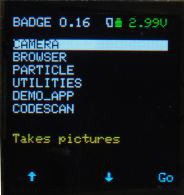
The menu screen also shows the battery voltage ( coloured green, yellow or red to show status), and a card symbol to indicate when a MicroSD card is inserted and successfully mounted.  

MicroSD card support : FAT16 or FAT32, no long filename support.

Camera application
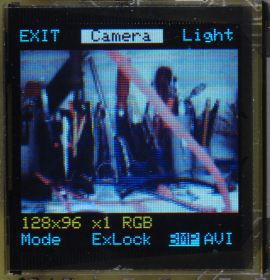
Displays live camera image.

Button 1 selects the recording format (resolution, zoom, colour/mono).
Button 2 locks the camera's auto-exposure value
Button 3 toggles between still ( BMP) and video (AVI) recording.
Button 4 Toggles the illuminator LED
Button 5 takes an image, or starts AVI recording, and stopped with any button.

Images are stored in the CAMERA folder, Videos are stored in the CAMVIDEO folder. (folders will  be created if not present)  The filename will be the first unused name in the form "CAMnnnn.BMP" or "CAMnnnn.AVI", where nnnn is a number. If you delete files, new captures will be given the number of the deleted file(s) until the "gap" closes. 

File formats : 

  • Saving BMP : resolution 128x96,  8 bit mono or 24 bit colour ( expanded from 565),
  • Saving AVI : resolution 128x96, 8 bit monochrome or 16 bit RGB565
  • Higher resolutions, using SPI SRAM to expand memory is currently under investigation.

Video framerates : 128x96 Colour 3-10fps, mono 5-16fps. Zoomed modes will have slightly lower framerates. Rate is extremely dependent on teh individual SD card.  Frame rate in AVI file will be set to the avarage capture rate measured over the whole recording, so should play back at similar speed to recording, but may have occasional "lumps" due to SD card timings.

Initial testing of SD cards shows that smaller cards (256MB and below) can be substantially faster, with write speeds up to 330KBytes/sec, vs. 80-150Kbytes/sec for larger (512MB+) cards. The utilities application has a speed tester to allow quick selection of cards for maximum speed. 

Note that all camera modes crop an image from the whole sensor area, but the camera's auto-level control acts over the whole sensor, therefore bright lights outside the field of view may cause the exposure to be significantly non-optimal. This effect will be more noticeable in the zoomed modes, where a smaller part of the sensor is visible.


File compatibility with software packages.

** PLEASE ** let us know in comments about non-Windows software options.
Sample files are included in the files section.

VLC (Windows and Android) : Plays monochrome...

Read more »
cambadge.X_withpuzzles.zip

MPLABX project 1.03 including puzzle source.

x-zip-compressed - 1.27 MB - 11/16/2017 at 16:52

Download

badgeboot.x.zip

Bootloader MPLABX project. V1,03. NB older versions have issues with production badges. MPLABX 4.05 (appears to be OK with 4.0x)

x-zip-compressed - 840.65 kB - 11/11/2017 at 00:35

Download

cambadge.X.zip

MPLABX project for badge V1.03 excluding puzzle sources (These will be added after the event.) MPLABX 4.05 (appears to be OK with 4.0x) Use this version as a base, not any previous ones due to hardware issues on production badges.

x-zip-compressed - 1.77 MB - 11/10/2017 at 07:42

Download

splash.bmp

Static splashscreen included on SD card

Bitmap Image File - 48.12 kB - 11/10/2017 at 06:50

Preview

splash.avi

Animated splashscreen included on SD card

Audio Video Interleave (AVI) - 2.17 MB - 11/10/2017 at 06:50

Download

View all 31 files

  • Production Finshed, Badges Have Arrived

    Mike Szczys11/08/2017 at 00:22 2 comments

    Numerous boxes arrived today from Macrofab, the Contract Manufacturer who handled fabrication of the badge. After quickly unwrapping the first board, we popped in a microSD card and are happy to report the production run is a huge success. 

    We have many more images to share so join us below for more.

    Read more »

  • Hardware description

    Mike Harrison10/11/2017 at 11:11 4 comments

    Schematic (PDF)

    Power supply

    Supply is from two AA cells, nominal supply voltage is 2 to 5V ( startup). Once running it will continue to operate down to about 1.2v, depending on load ( in particular OLED content). 
    Incoming power feeds a MCP1640B boost regulator U5, which boosts the supply to 3.3v. 
    If the incoming supply exceeds 3.3v, the regulator bypasses, connecting the output to the input, so this must be bourne in mind if  the 3.3v supply is used to feed 3.3v-only devices, as the 3.3v rail will be close to the input voltage for inputs >3,3v  This is not an issue with alkaline AA cells, but may cause unwanted smoke if supplied from other power sources.

    The 3.3v supply is then regulated down to 2.8v by U5 which supplies all onboard devices except the OLED boost supply and white LED.
    The OLED boost regulator U3  provides nominally 12.7v for the OLED. The input to the boost inductor comes direct from the battery, but the boost regulator is supplied from the 2.8v supply. This to allow operation when the battery voltage falls below U3's minimum supply voltage.

    Power on/off control is via the MCP1640's ENABLE input. The power button forces the device on via D2A. When the MCU starts, it then holds the pin high using IO pin RA4 via D2B, and can power down by setting this pin low. The state of the power button can be read via RA7.

    Battery voltage sensing
    Q1 switches on a voltage divider to allow the battery voltage to be measured. As Q1's source may be higher or lower than the PIC's 2.8V supply, C12 is used as a level shifter. The POWERCON signal is set low for a very short period while the ADC samples. This period is short enough that the 3.3v supply is not affected by the momentary turn-off of U5. Battery voltage is measured relative to the PIC's internal voltage rererence, so correct results are obtained if the 2.8V rail starts to drop out.

    Camera

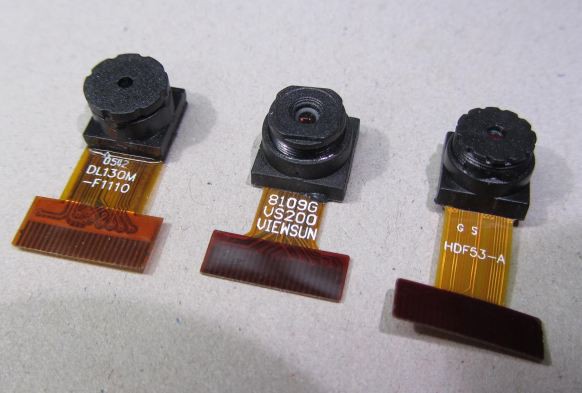
    The camera module uses the OV9650 sensor from Omnivision. There are a number of slightly different modules available on Ebay and Aliexpress. The ones pictured below have been tested & found to work with the badge hardware. There may be slight differences in lens field of view between module types.

    This sensor is one for which quite a lot of documentation has escaped ( see files section ), though this should still be treated with caution as descriptions of the registers are incomplete, sometimes misleading or just wrong.

    The PIC reads data from the camera via the parallel master port (PMP) peripheral, via DMA transfers triggered by counters clocked by  the pixel clock. The basic method used is described in This video

    The method described in the video only  captures single pixels every <n> pixels, where n>1 , as the counters cannot generate a DMA request on every clock. This works for monochrome format as you only need the Y component of the YUYV output sequence.
    This technique has been further developed In order to capture adjacent pairs of pixels necessary for the RGB565 colour format.
    This works by doing 2-byte DMA transfers, and relies on the pixel clock period being the same as the time between the two consecutive DMA transfers. There is a small amount of jitter on the time of the second transfer, but by selecting the PIXCLK phasing, this is kept within the data-valid time of the camera data. For slower capture rates it may be possible to tweak the 2-byte transfer timing using the PMP peripheral's wait-state configuration.

    The camera's POWERDOWN line is controlled by one of the OLED's GPIO pins. This is of limited use in practice, as when the camera module powers down, it jams the I2C bus for a second or so as the core voltage discharges ( causing the regular accelerometer reads to hang) , so this should not be used for routine on/off control, but only if a soft powerdown mode is needed. The camera's sleep I2C commands allow the camera...

    Read more »

  • Hardware hacking

    Mike Harrison10/11/2017 at 11:04 3 comments

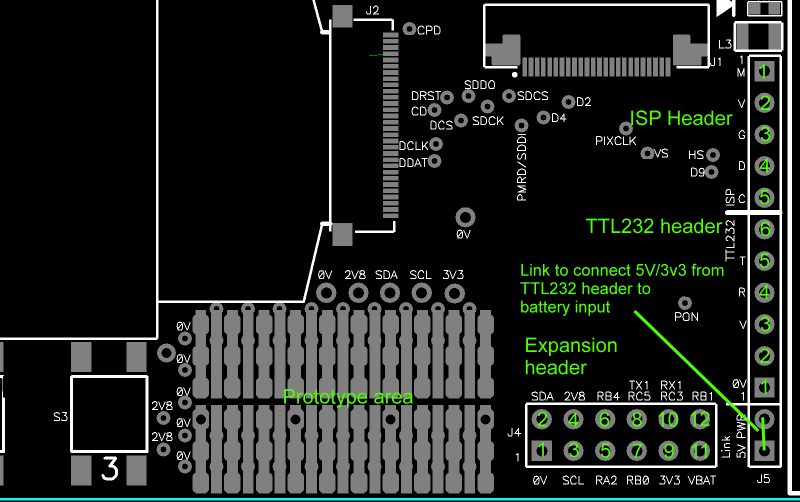
    Expansion header and hardware test/access points

    DXF of board layout for mechanical dims

    PIC32MX1xx datasheet

    PIC32MX1xx errata

    Expansion header pins

    PinFunctionComments.
    See Datasheet section 11.3 for pin remapping details. Only functions that don't clash with existing badge functionality are listed below. IC - input capture, OC = Output compare (e.g.  PWM)
    10VGround. Also on ISP header pin 3 and TTL232 header pin 1
    Also available on several pads around prototype area
    2I2C SDA2.8v levels.
    Used onboard by accelerometer and camera
    Also available at edge of prototyping area
    3I2C SCL
    2.8v levels
    Used onboard by accelerometer and camera
    Also available at edge of prototyping area
    4+2.8VLogic supply. Also on ISP header pin 2
    Also available at edge of prototyping area
    5RA2/RPA2PIC pin 30. I/O or mappable peripheral RPA2
    Set to output by default
    RPA2 can be mapped to inputs INT2,T4CK,IC1,IC5,OCFB, and outputs SDO1,SDO2,OC4,OC5,REFCLKO
    6RB4/RPB4PIC Pin 33. I/O or mappable peripheral RB4
    Set to output by default.
    RPB4 can be mapped to inputs INT4,T2CLK,IC4,REFCLKI and outputs U1TX,OC1,C2OUT
    7RB0/RPB0/PGD1/AN2PIC pin 21. I/O or remappable peripheral
    Configured as UART2 TXD by default.
    Also on ISP header pin 4 and TTL232 header pin 5
    Shared with ISP, so add at least 2K2 in series if driving pin to avoid interfering withe programming functionality.
    RPB0 can be mapped to inputs INT1,T5CK,IC2,OCFA and outputs U2TX,OC3,C1OUT
    Analogue channel 2 ( need to set ANSELB bit 0)
    8RC5/RPC5PIC pin 38. I/O or remappable peripheral.
    5V Tolerant.
    Configured as output by default. Reconfigured as UART1 TXD the first time u1txbyte() is called.
    Note as this pin is shared with PMA3, it is subject to device errata.
    TL;DR : no problems if used as mappable peripheral or input, but to use as output you need to set the corresponding bit in PMAEN and write the output value to PMADDR instead of LATC 
    RPC5 can be mapped to inputs INT4,T2CK,IC4,REFCKI and outputs U1TX,OC1,C2OUT
    9+3.3VOutput of 3.3v boost regulator.
    Note that if the incoming supply is >3.3v, this pin will rise to the input voltage!

    10RC3/RPC3PIC pin 36
    Configured as input with pullup by default. UART1 RXD by default.
    Reconfigured as UART1 RXD the first time u1txbyte() is called.
    RPC3 can be mapped to inputs INT2,T4CK,IC1,IC5,U1RX,SDI2 and outputs SDO1,SDO2,OC4,OC5,REFCLKO
    11VBATUnswitched battery supply
    12RB1/RPB1/PGC1/AN3PIC pin 22
    Configured as UART2 RXD by default.
    Also on ISP header pin 5 and via 2k2 resistor R10 to TTL232 pin 4
    Shared with ISP, so add at least 2K2 in series if driving pin to avoid interfering with  programming functionality.
    RPB1 can be mapped to inputs INT3,T3CK,IC3,U2RX,SDI1 and outputs SDO1,SDO2,OC2,C3OUT.
    Analogue channel 3 ( need to set ANSELB bit 1)


    Power
    Sugested maximum draw from +3.3v or +2.8v is 200mA, maybe 300mA for brief periods.
    If the OLED starts dimming, you're pulling too much!
    Power may be fed into VBAT if batteries are not fitted, however note that if the supplied voltage exceeds 3.3v, the 3.3v rail will output the incoming supply voltage. This is not a problem for the badge up to about 5V, but be aware of possible dissipation issues in the 2.8v regulator if you are also pulling a lot from 2.8v.
    If you have 3.3v -only devices and want to supply from >3.3v ( e.g. lipo), you should use your own 3.3v regulator. You can use the 2.8V rail as an enable to switch your local 3.3v supply if needed.

    Firmware support for hardware

    All I/O used by the badge is intialised in inithardware() in hardware.c

    UARTs :

    u1txbyte(c) and u2txbyte(c) Send 1 byte to UART1 and UART2 respectively. Baudrates are initialised with values in cambadge.h
    UART1 is not mapped to pins at startup, but is mapped, and the UART configured, on the first call to u1txbyte()
    A simple receive handler is set up for UART2 - this is in serial.c - see code for more details.

    I2C :

    On-board I2C device addresses : Camera 0x60 Accelerometer 0x3A (8  bit addresses).

    ... Read more »

  • Firmware hacking and adding new applications

    Mike Harrison10/11/2017 at 11:00 0 comments


    Firmware APIs

    These are not documented here, but in the globals.h include file. This avoids the need to keep this page synchronised with the current firmware version as features are added or modified.

    Tools required

    Microchip MPLABX (4.0x) and XC32 1.44 (free version). You do NOT (thankfully) need Microchip Harmony.
    Although the project compiles using the MPLAB XPRESS online IDE, it does not appear to be possible to download the generated .hex file so it's not useful.

    If you want to get more serious you will want a PIC programmer such as PicKit 3 or MPLAB ICD3/4, or a 3rd-party programmer that supports the PIC32MX170F256D. When installing MPLABX, if you have a Microchip hardware programmer, also install IPE (MPLABX installer installs it by default), which is used for device programming outside MPLABX - this will be useful for restoring the bootloader.

    The firmware is compiled with -01 optimisation, which is the highest available in the free version of XC32. Higher optimisation levels in the paid-for compiler (available as a free trial) may improve speed for compute-heavy tasks ( like particle demo), but things like display and camera grab/save are mostly limited by hardware clock rates etc. so won't see much benefit.Teh compiler flag compiler flag -fno-aggressive-loop-optimizations appears to be needed to avoid some problems seen with -01 optimisation. this is all set up in the project.

    There are two MPLABX projects - cambadge and camboot.
    See files section for latest version of cambadge project.
    Camboot is the bootloader, which you will only need if you want to modify the bootloader.

    The cambadge project is compiled to a .hex file  ( <project path>.cambadge.X\dist\Normal\production\cambadge.X.production.hex) which can then be loaded from the MicroSD card via the bootloader, or programmed directly onto the device via the ISP header using a programmer such as PIckit 3 or MPLAB ICD3/4. (The ICD  programmers are significantly faster than Pickit 3 - it may actually be quicker to use the MicroSD card+bootloader method than a Pickit 3!).
    For fastest programming speed within MPLABX, be sure to select  the MPLABX option "Maintain active connection to hardware tool" in options->embedded.

    Note that direct programming will overwrite the bootloader! To restore it, you need to program this .hex file which contains the factory-programmed image containing the bootloader and early application code. This can be programmed using MPLABX IPE.

    Important note when using a hardware programmer
    As the power is soft-switched, when a programmer starts programming the PIC, the power-control line will float, and turn off the power, so programming will fail. To avoid this you need to hold the power button for the duration of programming.
    An alternative is to fit the header at J6 (next to the power button), and put a jumper on it. this holds the power always on, avoiding the need to press the button.
    The jumper does not affect the use of the power button asn an input. With the jumper fitted, if the badge wants to power down (e.g. timeout) it will sit in a screen showing "awaiting powerdown" and a button to allow a reset.

    The linker file  ( link_forboot.ld ) has been set up to compile to the correct memory locations for use with the bootloader, but also patches a jump into the reset vector, so the same .hex file will run standalone when programmed direct via a device programmer. This avoids the need for seperate standalone and bootloader build variants. 

    Project Files

    apptemplate.c : Demonstration application for use as template for user applications
    browser.c
    : file browser application
    cambadge.c  : main(), main menu polling loop
    camera.c
    : Camera application
    codescan.c : Barcode reader application
    display.c : OLED display drivers and display formatting/font stuff
    fileformats.c : Routines for parsing, displaying and creating...

    Read more »

  • Bootloader

    Mike Harrison10/11/2017 at 10:59 0 comments

    Bootloader

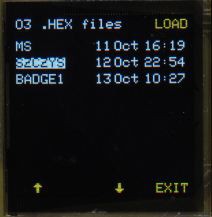
    A bootloader is included which allows  firmware programming from .hex files from the SD card.

    At startup, the bootloader first verifies a checksum on the application area, and if valid, enters the application code after approx 1 second. Pressing the bottom-left button during this period (or holding it when turning on) allows manual entry to the bootloader menu If  the application checksum is invalid, it displays a warning message and allows the user to enter the bootloader menu or attempt to run the application code anyway (the latter will usually fail). The checksum is created by the bootloader when it has finished programming the flash, ensuring that a failed or incomplete programming operation will not result in a valid sum.
    The bootloader uses the PIC user ID config locations in the hex file to verify that the code is intended for the badge hardware. A warning will be displayed if there is a mismatch. Any addresses in the hex file outside the application area will be ignored.

    While the bootloader is active, the LED will blink periodically. This is mostly to indicate that the bootloader is running, in the case of a faulty display, to distinguish from lack of power etc.

    The bootloader will power down after 2 minutes of inactivity.

    Flash memory usage

    0x1D00 0000 to 0x1D00 7BFF : Bootloader
    0x1D00 7C00 to 0x1D00 7FFF : Reserved for application nonvolatile settings.
    0x1D00 8000 to 0x1D03 FFFB : Application code
    0x1D03 FFFC to 0x1D03 FFFF : Checksum on application code. 32-bit sum of all bytes in application area, LSByte first
    0x1FC0 0000 to 1FC0 0BEF : Reset vector and boot area (part of bootloader)

    Files

    See files section for bootloader MPLABX project and combined bootloader+application code .hex file

View all 5 project logs

Enjoy this project?

Share

Discussions

Eric Moyer wrote 03/07/2018 at 23:22 point

Hey all, I dug out my badge last week to mess around with it and the screen seems to have died.  I didn't store the badge with batteries installed and I tried out fresh batteries just to make sure it wasn't a power issue.  The reason I think it's the screen is that the "flash blub" still does it's thing when you turn it on.  Any recommendations for things to check and/or a process to follow to troubleshoot the issue would be extremely appreciated.

  Are you sure? yes | no

Jarrett wrote 03/07/2018 at 23:39 point

Look real carefully on the LCD connector, and maybe try to reseat the cable.

  Are you sure? yes | no

Eric Moyer wrote 03/08/2018 at 04:43 point

The LCD ribbon cable to connector looked fine but I did reseat the cable and it didn’t change anything. I also inspected the LCD ribbon cable for damage and didn’t see anything. Thanks for the suggestion. 

  Are you sure? yes | no

nardev wrote 11/23/2017 at 10:32 point

Is it possible to program PIC32MX170F256D with PicKit 2?

  Are you sure? yes | no

Jarrett wrote 03/07/2018 at 23:39 point

No

  Are you sure? yes | no

nardev wrote 03/08/2018 at 18:50 point

ah :( realized that immediately after...

  Are you sure? yes | no

InstantArcade (Bob) wrote 11/15/2017 at 07:31 point

I think I squeezed all I can from it, maybe I can get it t do a bit more or go faster if I switch to lookup tables and fixed point math, but here's my effort: 

  Are you sure? yes | no

Mike Harrison wrote 11/15/2017 at 07:35 point

Maybe use the accelerometer for control?

  Are you sure? yes | no

InstantArcade (Bob) wrote 11/15/2017 at 15:48 point

That certainly crossed my mind. A challenge for the weekend :)

  Are you sure? yes | no

Chris Morales wrote 11/14/2017 at 23:13 point

*** SPOILER ALERT ***  Oskar Klein is one of the answers that works but nothing displayed on the last puzzle *** SPOILER ALERT ***

  Are you sure? yes | no

Lucas Rangit MAGASWERAN wrote 11/14/2017 at 17:21 point

Is anyone still stuck on the ouija board cryptogram puzzle? I decoded it to **SPOILER ALERT** CREATOR OF KLEIN MANIFOLDS HUNTER. I've tried Felix Klein and other 10 character things but nothing works. **SPOILER ALERT**

  Are you sure? yes | no

David wrote 11/12/2017 at 06:10 point

This badge is great; I'm working on replacing splash.avi with my own 1-second video file. I have an AVI, MPEG-4 encoded at 128x128px 24-bit color but it isn't playing (works on my Mac though). Is there a codec I should be using instead of MPEG-4? Would there be any documentation on how the current splash video is created so that I can retrace those steps?

  Are you sure? yes | no

Mike Harrison wrote 11/15/2017 at 07:37 point

It's  all documented here - you need to convert to 16 bit RGB565, uncompressed, no audio. Virtualdub ( Windows only) will definitely do it, don't know about others.

  Are you sure? yes | no

T. B. Trzepacz wrote 10/30/2017 at 10:00 point

I downloaded MPLAB X but it doesn't install. Is there some other development environment that could be used that actually works?

  Are you sure? yes | no

Mike Harrison wrote 10/30/2017 at 10:27 point

MPLABX works for everyone I know who's used it - You may be able to get XC32 running on a command-line, but could be a bit of work - MPLABX generates its own makefiles from the project configuration so likely non-trivial. Probably worth spending at least some time getting MPLABX working than working around it. Check out the Microchip forums  - I'd guess any common issues will be discussed there,

  Are you sure? yes | no

T. B. Trzepacz wrote 10/31/2017 at 00:16 point

It hangs on "Installing". I've tried some things from the forums, but it just doesn't work. There seems to be no way to contact them for support... I filled out all the registration stuff and it still won't let me submit a support request. Perhaps you folks at Supplyframe have some pull with them and can get them to make their stuff work, but it seems impenetrable to me.

  Are you sure? yes | no

Roger wrote 11/01/2017 at 23:37 point

What OS are you running? On Linux machines, MPLAB X installer runs on the currently active Java runtime. I saw weirdness with open source Java and had to install official Oracle Java before I could run the MPLAB X installer. Afterwards I found the official instructions which also offered a text-mode install to bypass the Java requirement entirely. http://microchipdeveloper.com/mplabx:installation

  Are you sure? yes | no

T. B. Trzepacz wrote 11/02/2017 at 00:22 point

I'm running Windows 10, which is required for maybe 90% of commercial engineering software.
I did finally get it running, sort of. I had to create a new user account with admin privileges and restart and log in with that to do the install.
It still has trouble running on 4k displays, which I was partially able to solve by disabling scaling detection in the settings, but the icons are still painfully small. Evidently this is a problem for a lot of Java apps, and they are using something called "NetBeans" which is known to have issues.
A lot of Java programs seem to be really clunky, and I wonder why anybody still uses it...

  Are you sure? yes | no

Scott Swaaley wrote 10/26/2017 at 04:05 point

This is exciting! I'm trying to appropriately scope my hack and was wondering if you had advice on the best way to interface with an external device (like, perhaps, sending a bmp from the SD card to a raspberry Pi and receiving some basic data back). Are there enough slave select pins to do it via SPI? Or would I2C be better? Or heck, even UART?

  Are you sure? yes | no

Mike Harrison wrote 10/26/2017 at 08:34 point

UART would be easiest, and fairly fast - I don't know what baudrates the Pi can do natively - the PIC will only do baudrates that are integer fractions of 12MHz ( unless you change the PLL setup for a different clock) , but with a TTL232 USB-Serial cable you can do 3Mbaud, and it would plug directly onto the serial header.

  Are you sure? yes | no

Scott Swaaley wrote 10/27/2017 at 22:17 point

Thanks Mike. I have an idea a brewin' ...

  Are you sure? yes | no

Dylan.McNamee wrote 10/25/2017 at 18:35 point

Is there a chance that folks who can't make it to Pasadena can buy one of these?

  Are you sure? yes | no

Mike Harrison wrote 10/25/2017 at 22:10 point

I believe there may be plans for that - don't know details yet.

  Are you sure? yes | no

alexw wrote 10/23/2017 at 21:58 point

Roughly how much battery life are you getting with the 2 AA batteries?

  Are you sure? yes | no

Mike Harrison wrote 10/23/2017 at 22:07 point

Hard to say as it's very dependent on what the screen is displaying, plus whether the camera is on, and if the SD card is being accessed. From memory power draw varies between 40mA and 170mA at 3V, so should be 10+ hours worst case, 2-3 days best. It will squeeze most of the life out of the batteries - it cuts out at something like 0.6v per cell. "Off" mode draw is about 10-20uA from memory.

  Are you sure? yes | no

Jacob Christ wrote 10/23/2017 at 03:05 point

Can you post Gerber files or a dimensioned drawing of the board including xy locations of headers and lanyard hole xy position and radius?  Also, what will the FR4 thickness be assuming 62 mil.

  Are you sure? yes | no

Mike Harrison wrote 10/23/2017 at 07:35 point

Gerbers, and a DXF of the outline have already been posted in the files section. It is standard 1.6mm FR4

  Are you sure? yes | no

reindeerflotilla wrote 10/22/2017 at 08:16 point

Is there a hardware BOM file available anywhere?

  Are you sure? yes | no

Mike Harrison wrote 10/22/2017 at 09:55 point

I've added the Macrofab XYRS file to the files section, which contains part information

  Are you sure? yes | no

T. B. Trzepacz wrote 10/20/2017 at 19:37 point

Please forgive the probably stupid questions; I'm not familiar with this chip, and am having some trouble deciphering the datasheets...

Is it possible to assign the PWM output to any of the 6 available I/O pins?  How about the  UART? Is it possible to do so by loading applications through the bootloader, or do you need the PIC programmer?

I wanna do audio, and maybe MIDI, because that's what I do, and I'm trying to determine how to get an analog signal out of it...

  Are you sure? yes | no

Mike Harrison wrote 10/20/2017 at 21:07 point

Yes - look at the section on pin remapping towards the end of the I/O ports section of the datasheet. This shows which functions can be mapped to each pin. OCx (Output compare) functions will give you a PWM - with the 48MHz clock you should be able to get PWM at audio frequencies. Either or both UARTS are available on the pins if you want. Firmware can be loaded via a .hex file on a MicroSD card or via a programmer, though MicroSD will be a bit of a slow code/test/load cycle.

  Are you sure? yes | no

Mike Harrison wrote 10/20/2017 at 21:47 point

I've added the useful remappable pin functions to the header information table

  Are you sure? yes | no

Mike Harrison wrote 10/20/2017 at 19:25 point

No, ICD2 is not supported by MPLABX, and the part is likely be too new for any software that supports ICD2 to know about it. 

  Are you sure? yes | no

morgan wrote 10/20/2017 at 16:09 point

There are mentions of using an ICD3/4, will an older ICD2 work?

  Are you sure? yes | no

Jarrett wrote 10/20/2017 at 17:08 point

I can't say for sure, but it seems unlikely.

ICD2 was discontinued in September 2010, with no new parts being supported:

http://www.microchip.com/DevelopmentTools/ProductDetails.aspx?PartNO=dv164005

 This family was released May 2011:

http://ww1.microchip.com/downloads/en/DeviceDoc/60001168J.pdf

  Are you sure? yes | no

Similar Projects

Does this project spark your interest?

Become a member to follow this project and never miss any updates