MakerBlock
-
Repair # 16: Replacement for Bobbin Tire Brother XL 3500t
02/18/2018 at 07:20 • 0 commentsDate: 11/1/2017
![]()
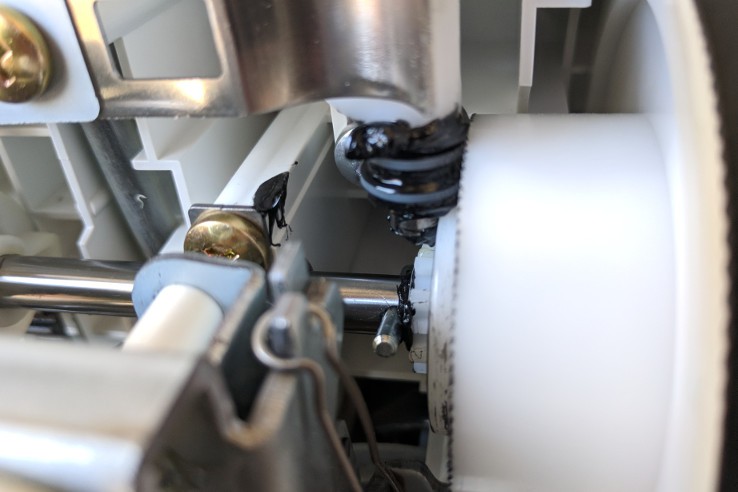
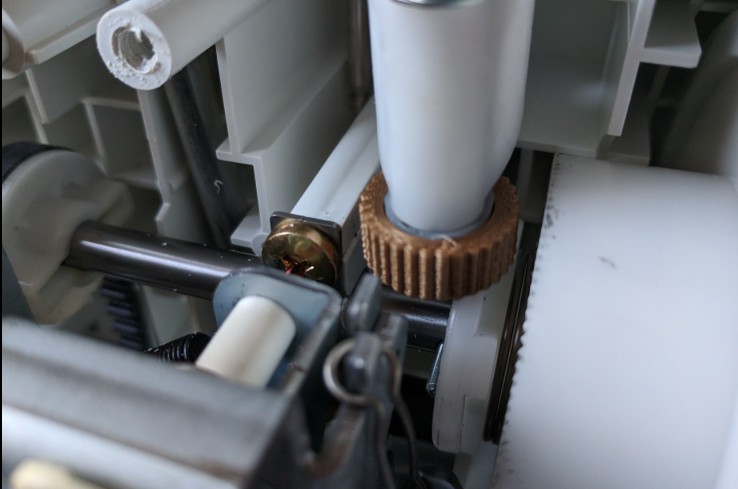
That black goo you see above is what's left of the original bobbin winder mechanism inside our Brother sewing machine. Apparently, rather than using a gear or just any other mechanism that makes sense, they manufactured these sewing machines with some kind of black rubber that melts into a viscus goo when it is confronted with friction.
The kind of friction required to wind a bobbin. As in a bobbin winder that melts into goo whenever it is asked to perform the sole task for which it was created.
The next problem is that once it's been melted into go, there's no long a part to measure for fit. The fix involved using a combination of cotton swabs, toothpicks, and paper towels to clean the rubberized goo out of the machine, then measuring the pin the old bobbin winder tire must have once fit on. I made some educated guesses about how big the bobbin winder tire should be, whipped up a design in OpenSCAD, printed, and installed it.
Since this contest entry is really a collection of entries, I've uploaded the STL and OpenSCAD files to Thingiverse here.
![]()
![]()
![]()
-
Repair # 15: Replacement Halloween Clown Hook
02/18/2018 at 06:47 • 0 commentsDate: 10/9/2017
![]()
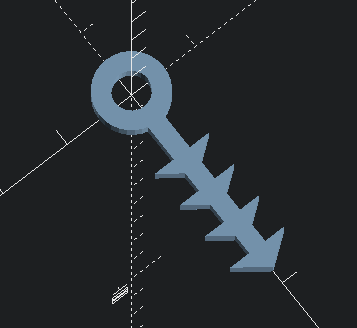
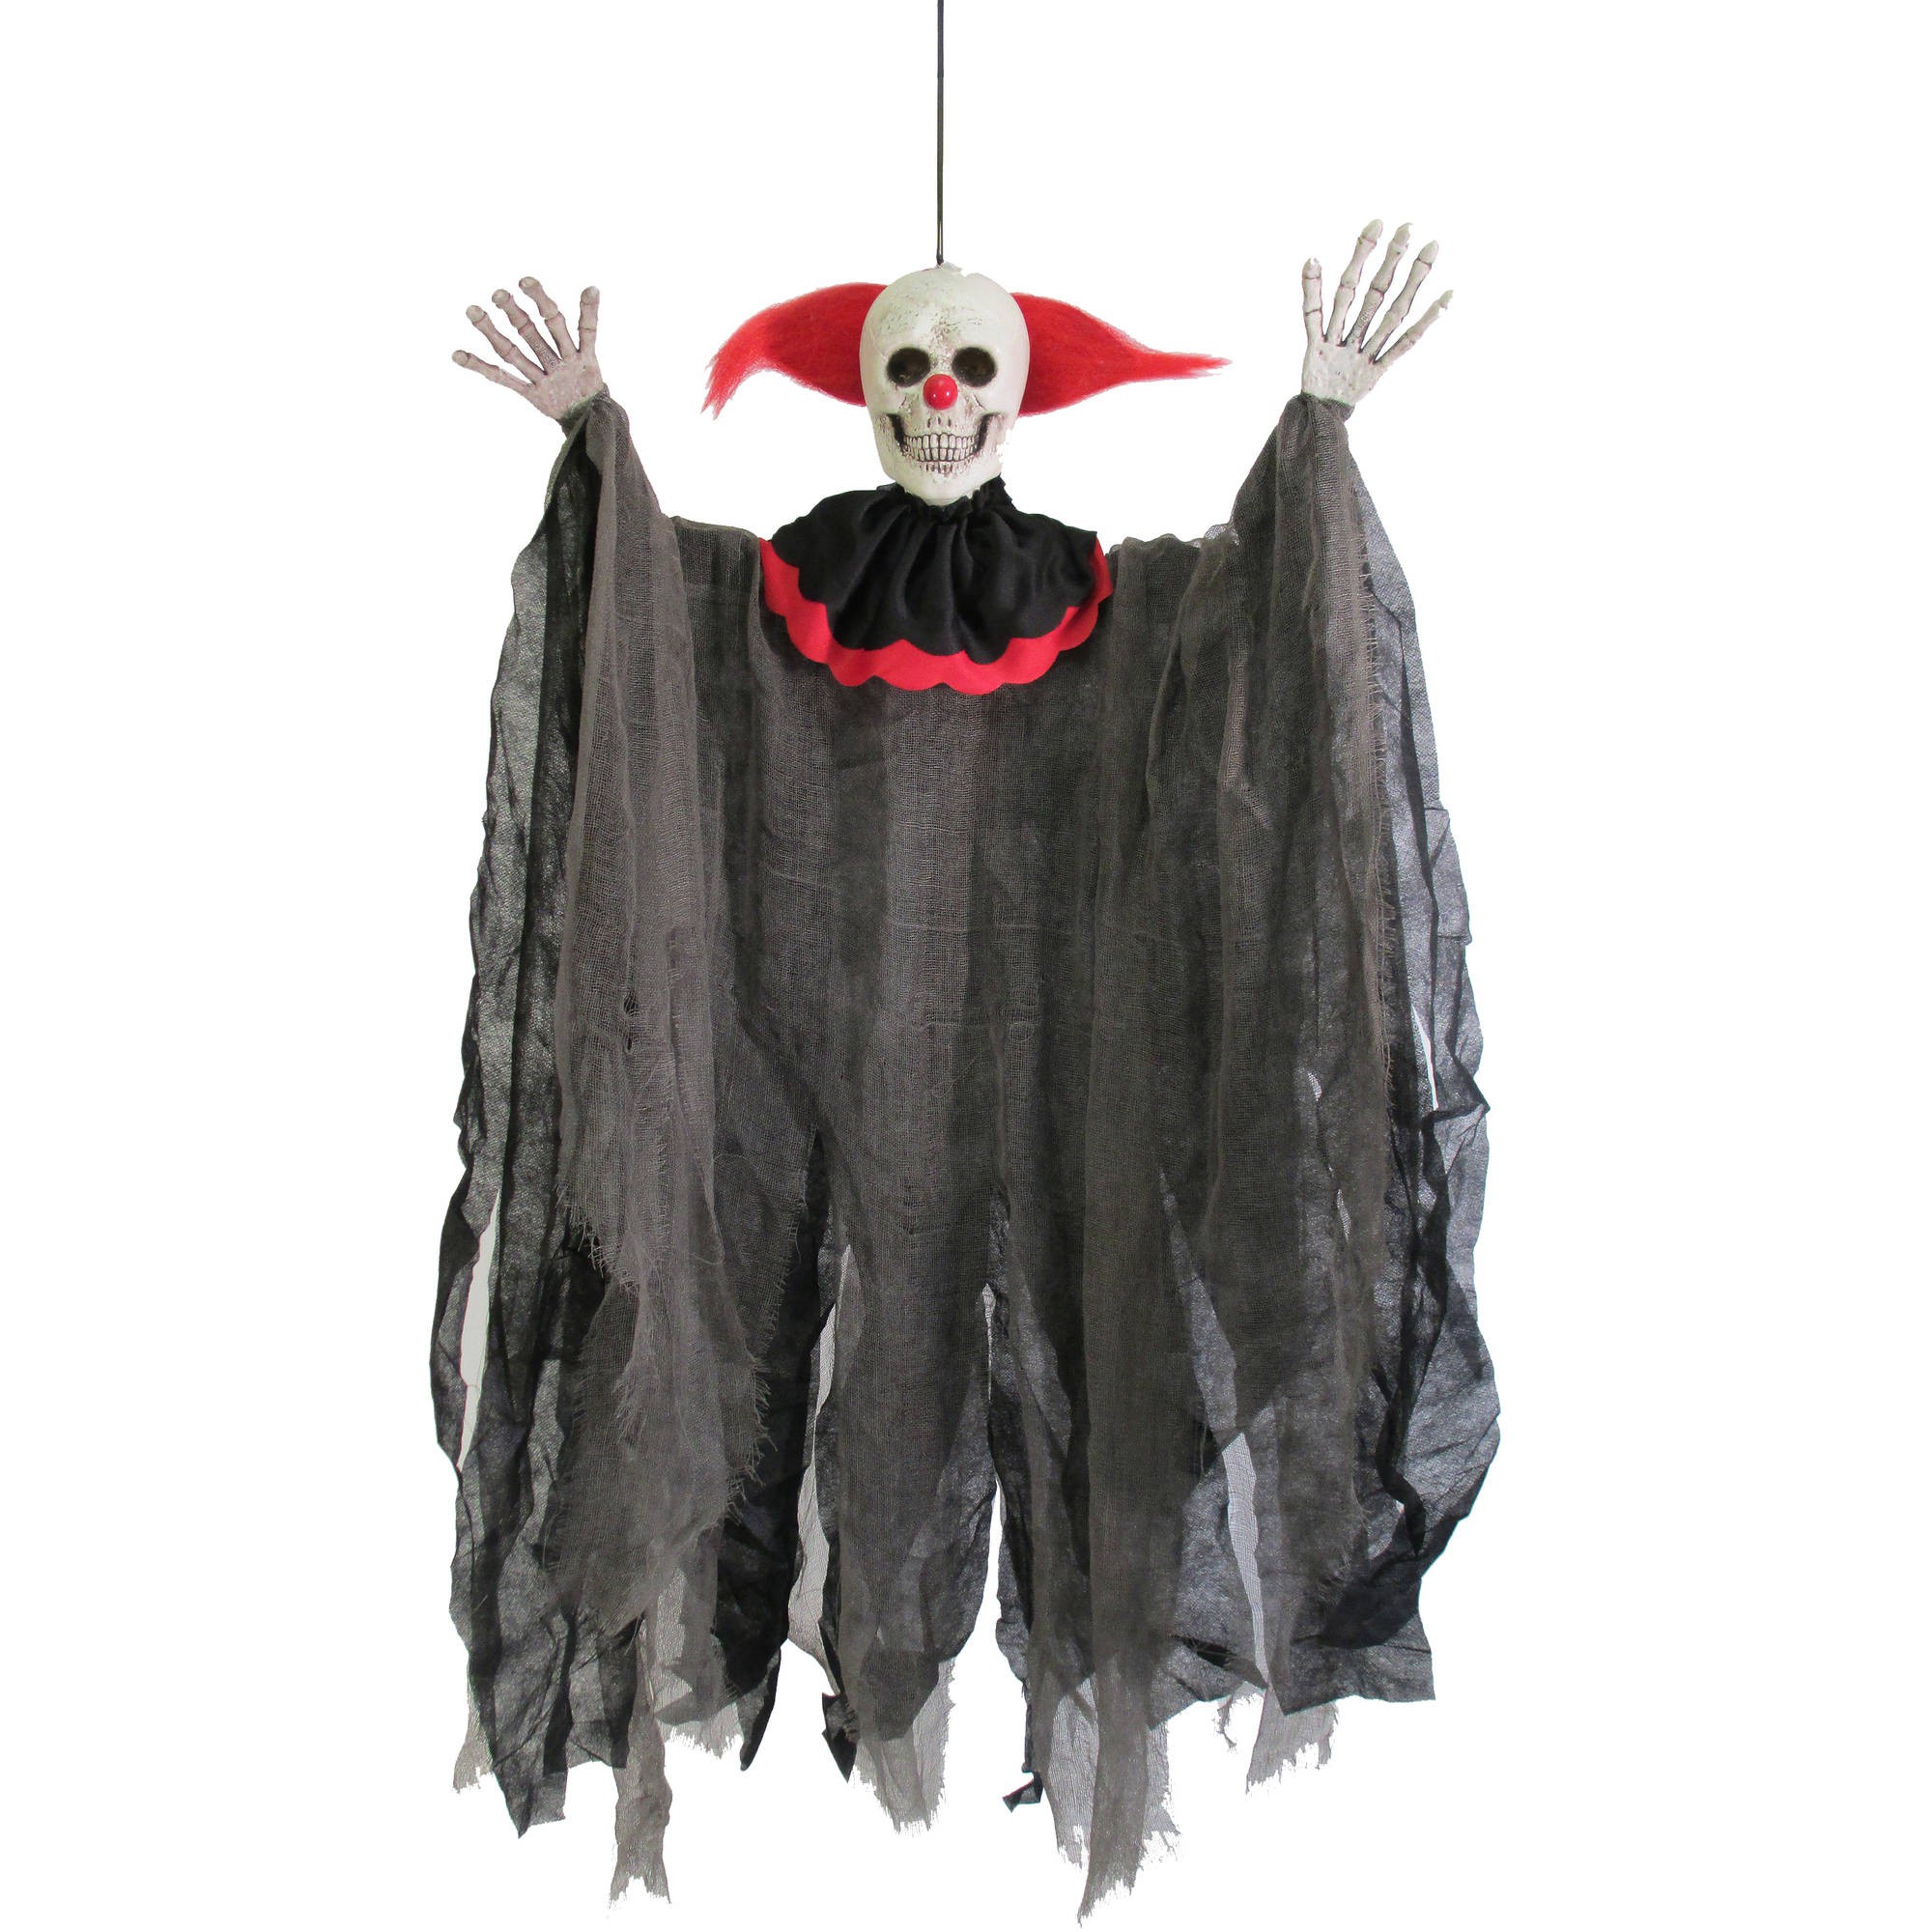
My neighbor came over a few weeks before Halloween to ask me for a favor. Their creepy Halloween evil clown decoration hanging on their front porch had fallen down. The thin plastic loop of plastic in the top of its head had snapped in the high winds last year. He wanted to know if I could fix it.
Yup. I sure can.
I took a pair of pliers and yanked out the bit of plastic still embedded in the top of the evil clown skull. What I discovered was that the bit of plastic was pretty close to the image above. I whipped up a quick model in OpenSCAD, printed four of them, and then shoved one into the clown skull. (The model is so small that it's almost as quick to print four of these tiny things as it is to print just one) I added a little hot glue for good measure and gave the fixed clown back to my neighbor.
![]()
Since this contest entry is really a collection of entries, I've uploaded the STL and OpenSCAD files to Thingiverse here.
-
Repair # 14: Replacement Fairy Wings
02/18/2018 at 06:20 • 0 commentsDate: 6/30/2017
![]()
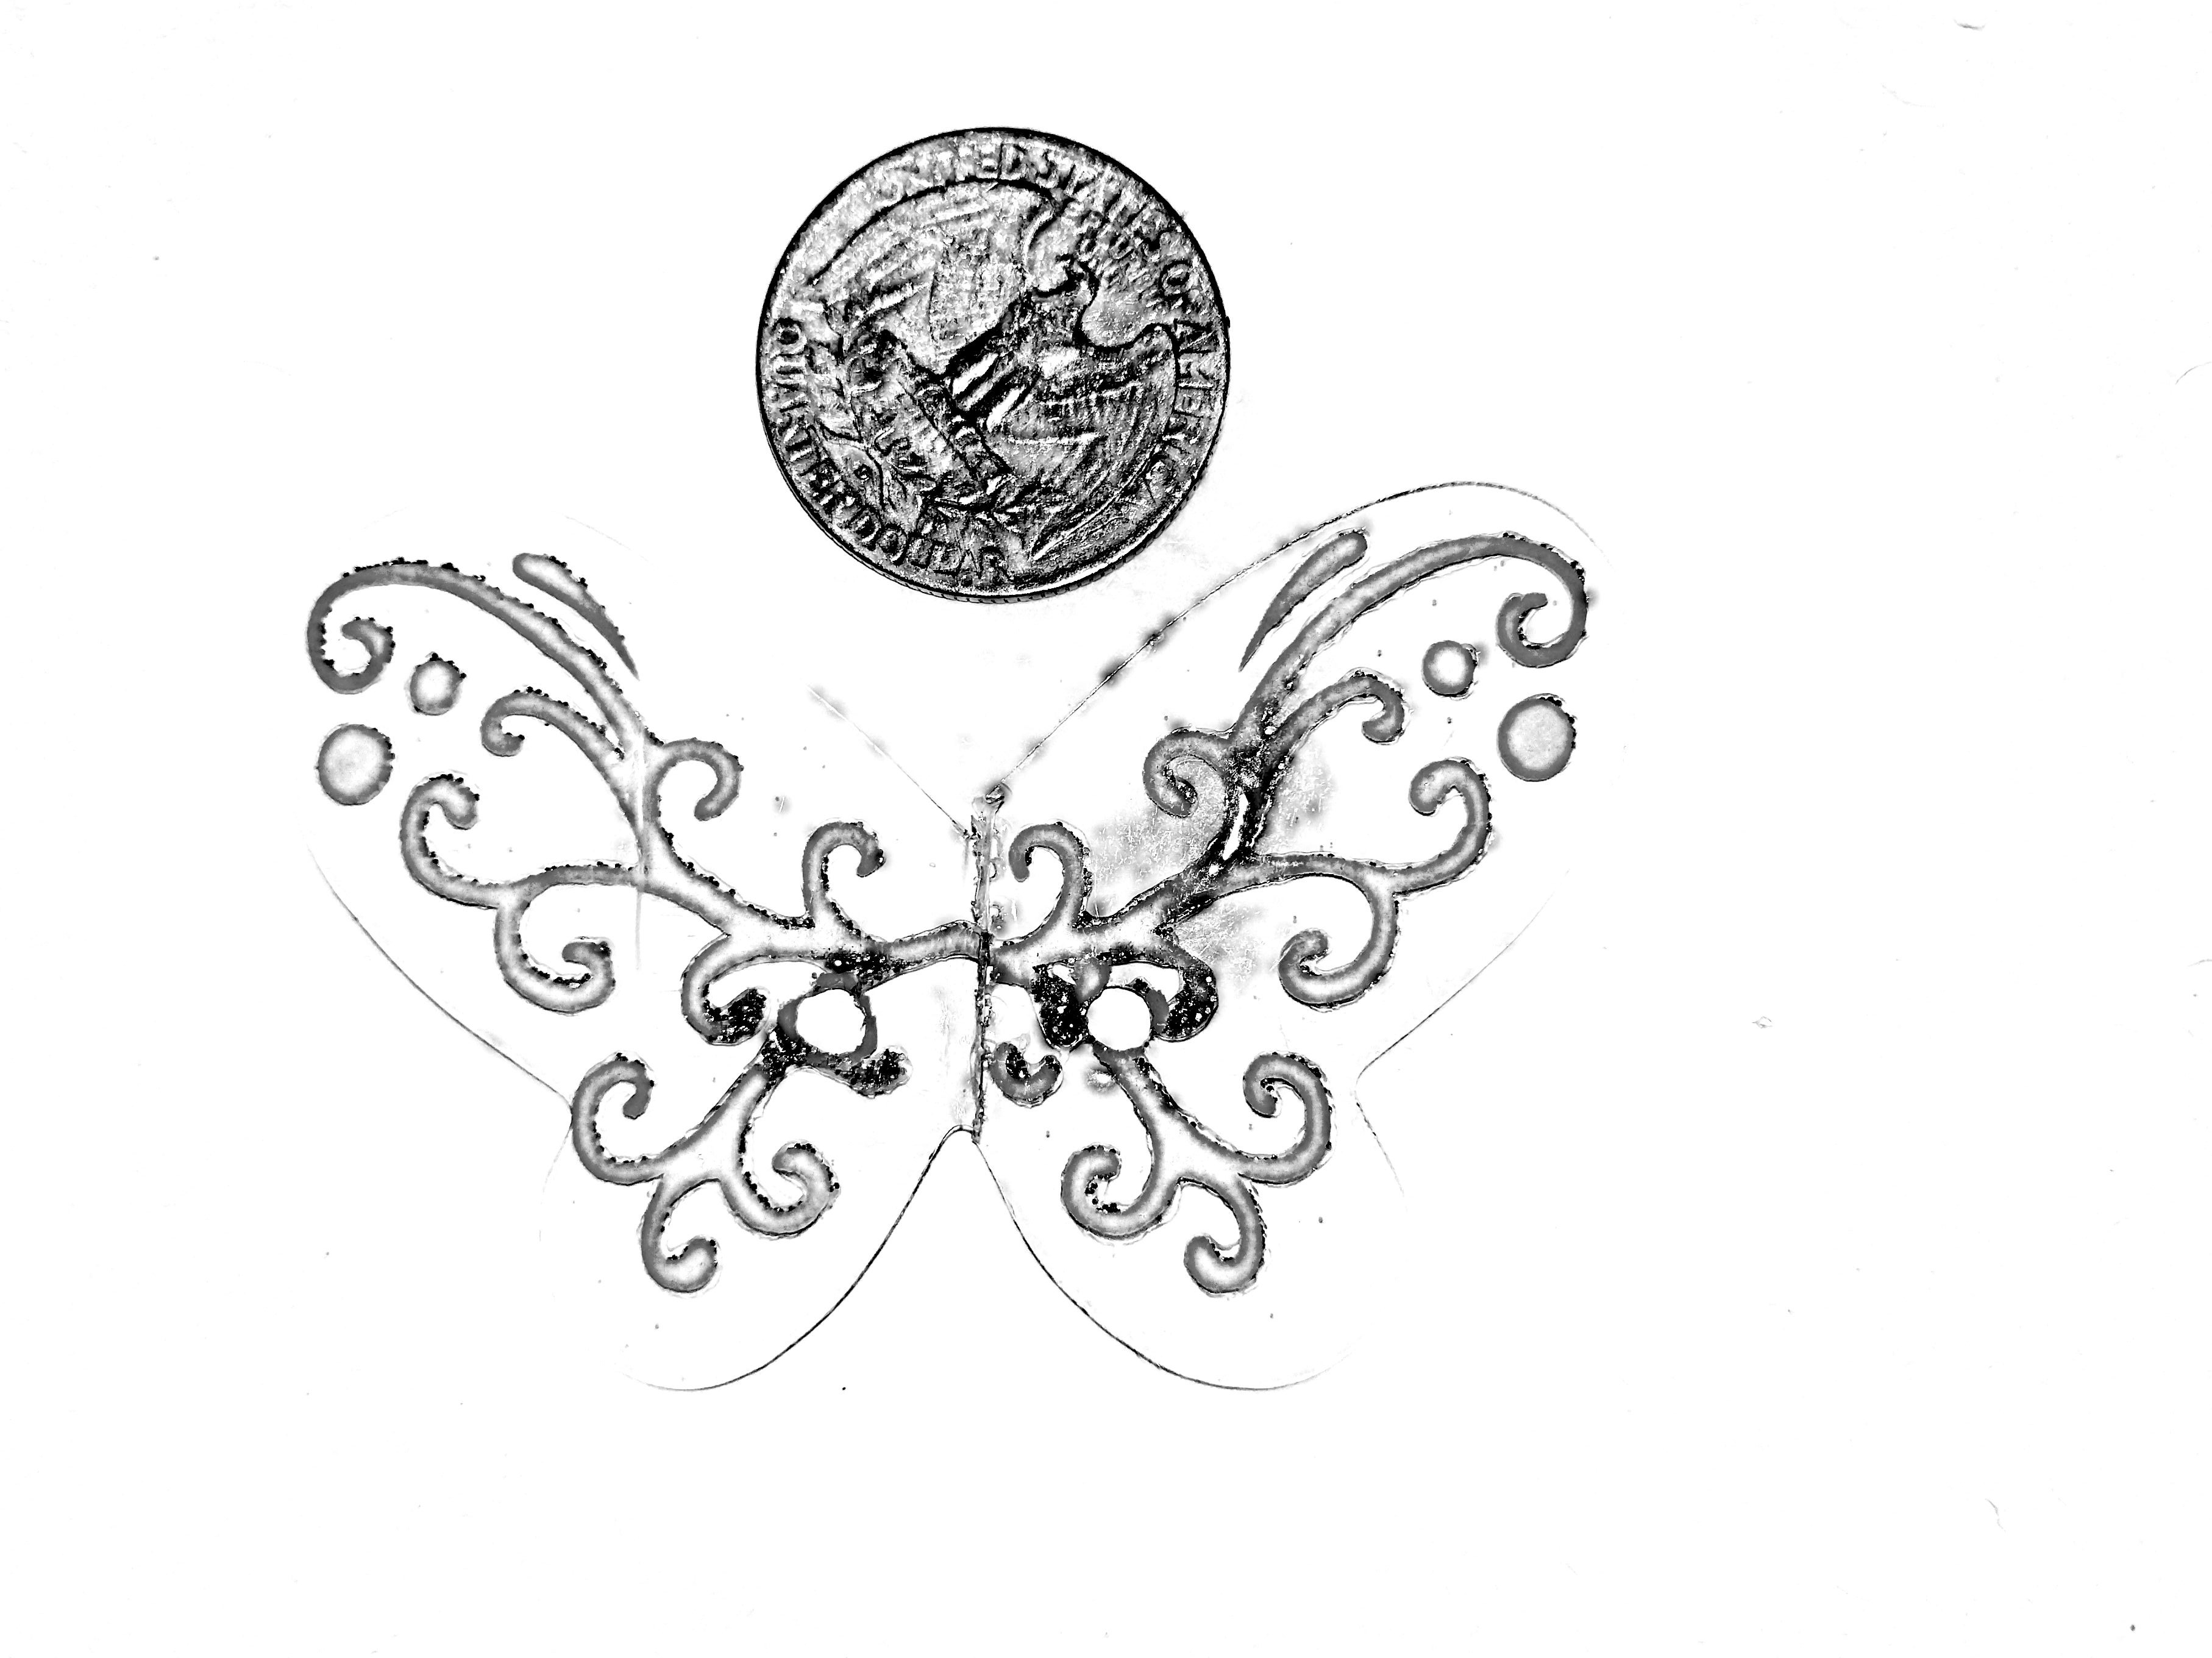
My daughter had this small tiny fairy with wings that were attached with a strip of elastic. She managed to tear the wings right down the middle. Above is a picture of what that looked like, with a quarter for scale. (You can see a line running down the middle of the wings where she tore it).
I turned the photo black and white using GIMP then traced the outline and the "veins" in Inkscape, and used the linear extrude function of OpenSCAD to create a thin set of wings with raised "veins." I scaled the wings in OpenSCAD until the image of the quarter matched the measurements for a quarter (24.26 mm). Once printed, a new strip of elastic put the wings back in place.
Since this contest entry is really a collection of entries, I've uploaded the STL and OpenSCAD files to Thingiverse here.
-
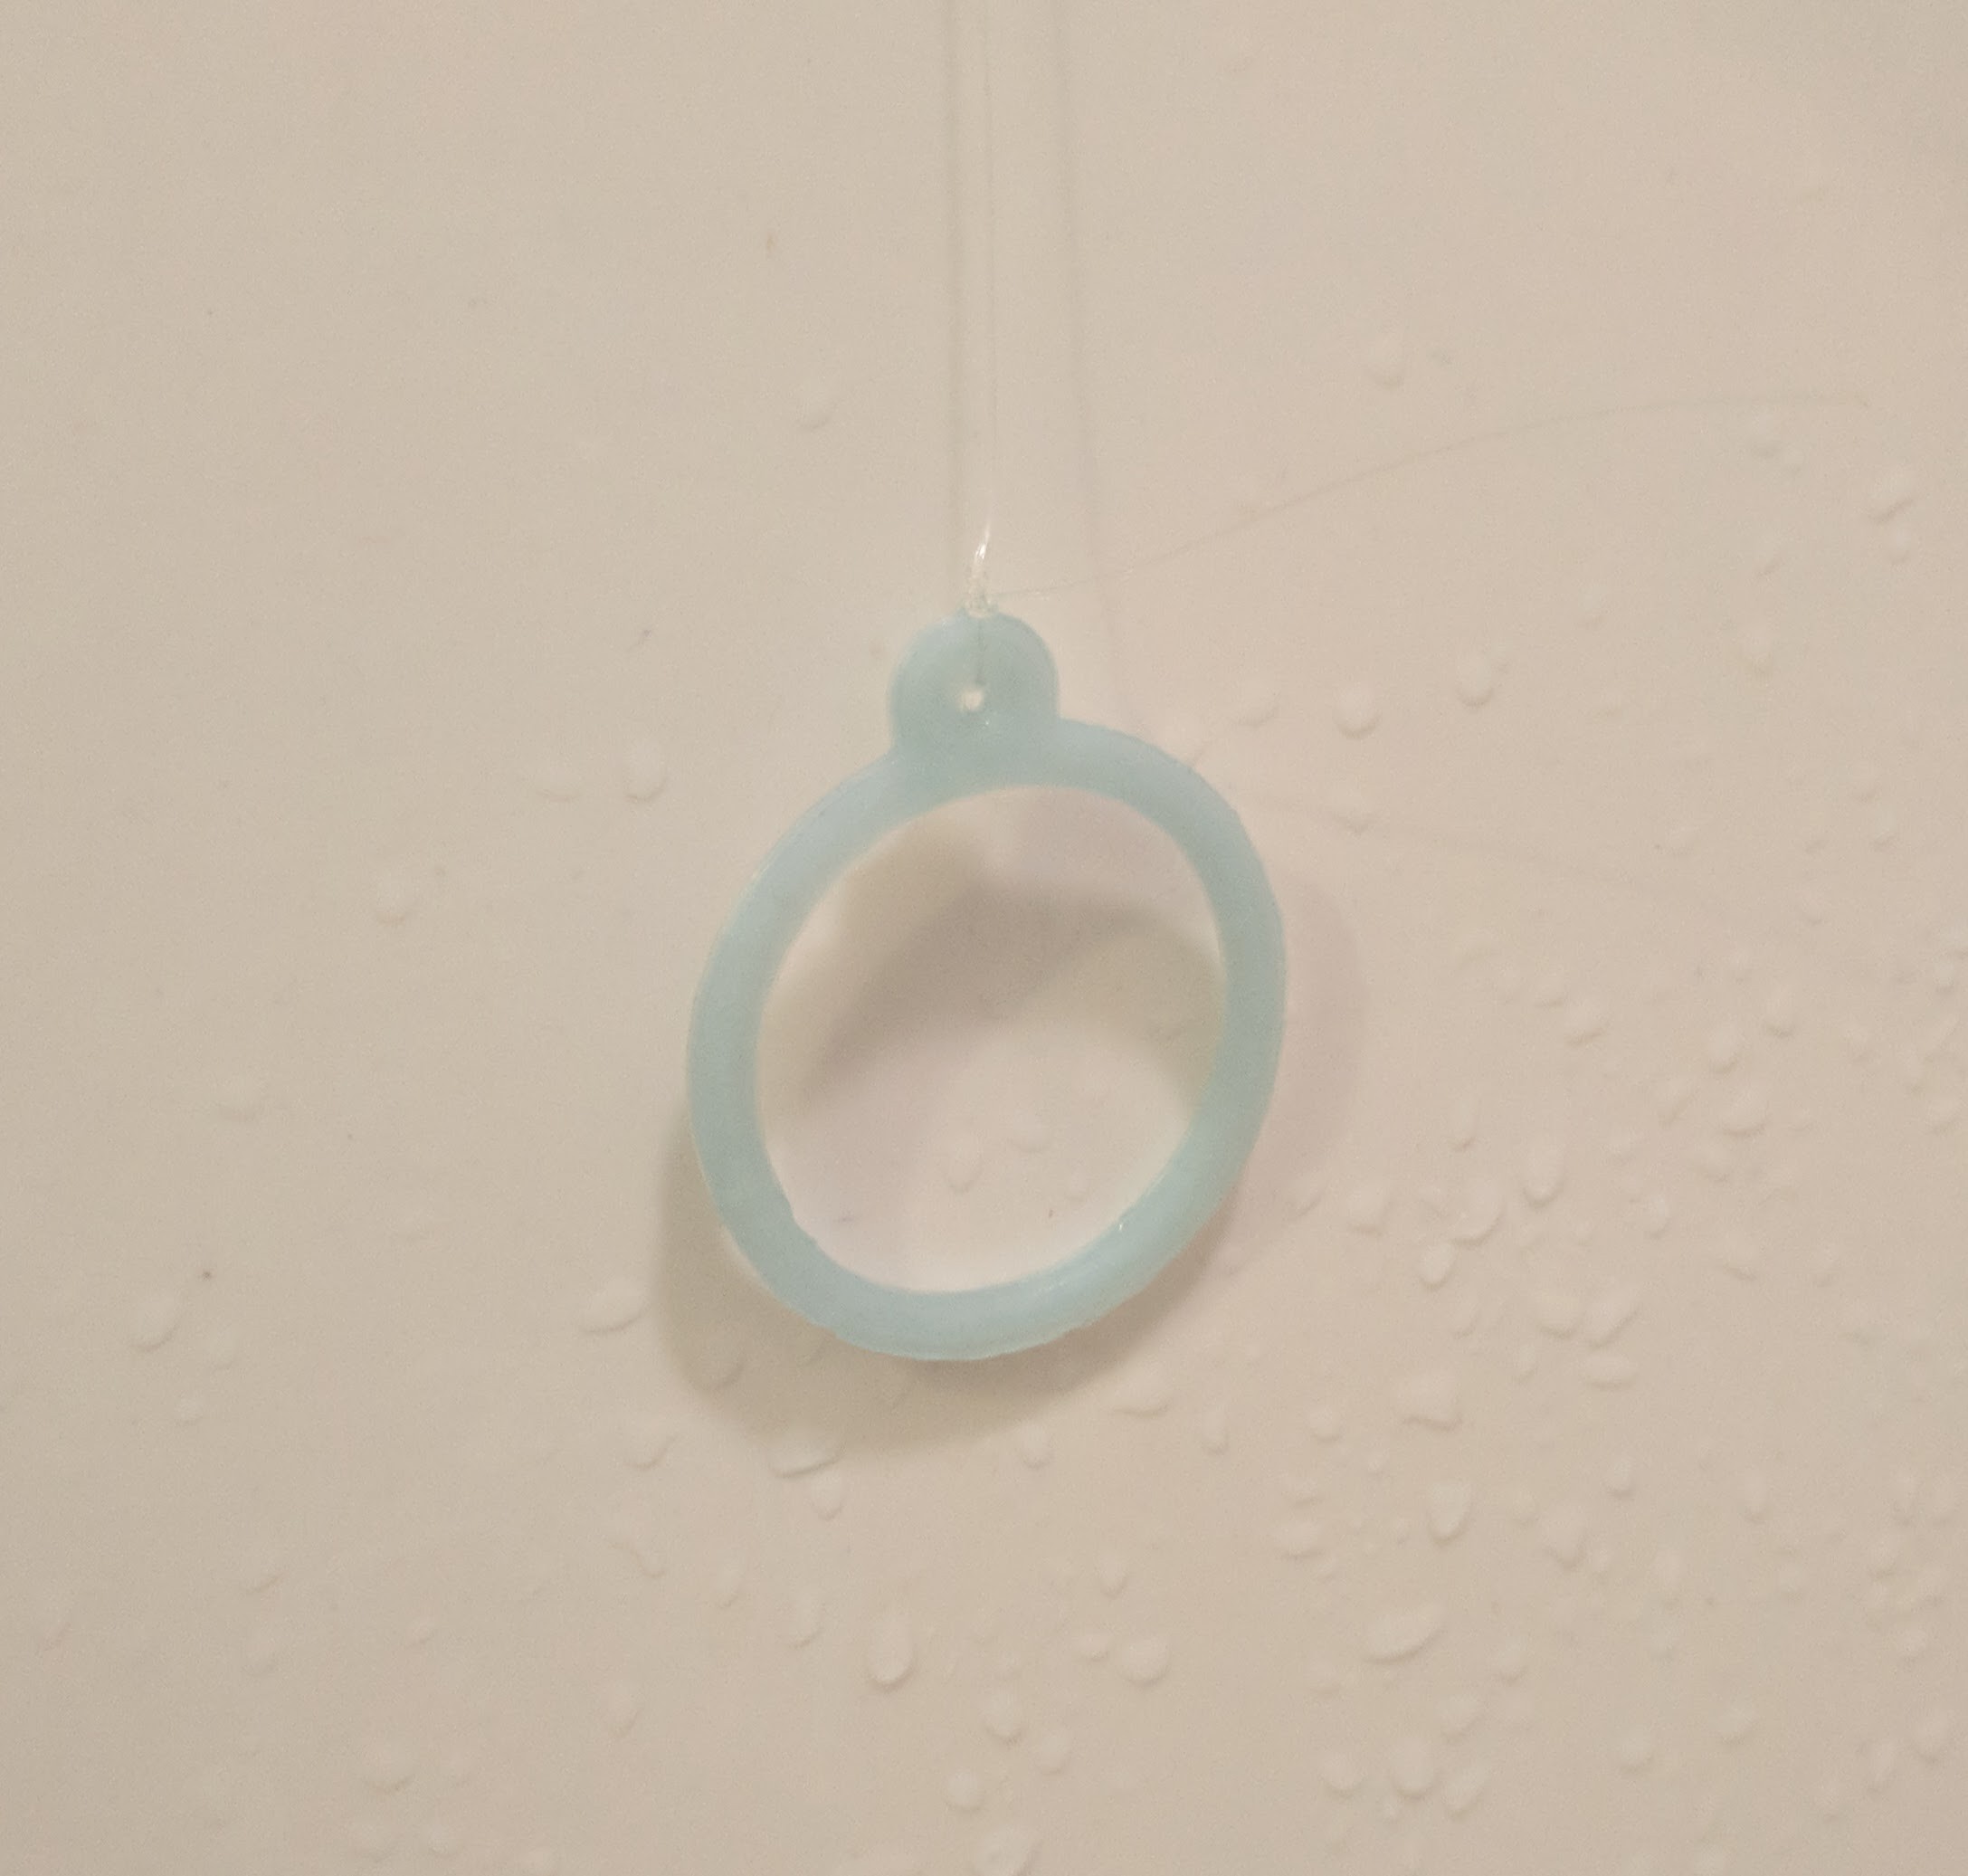
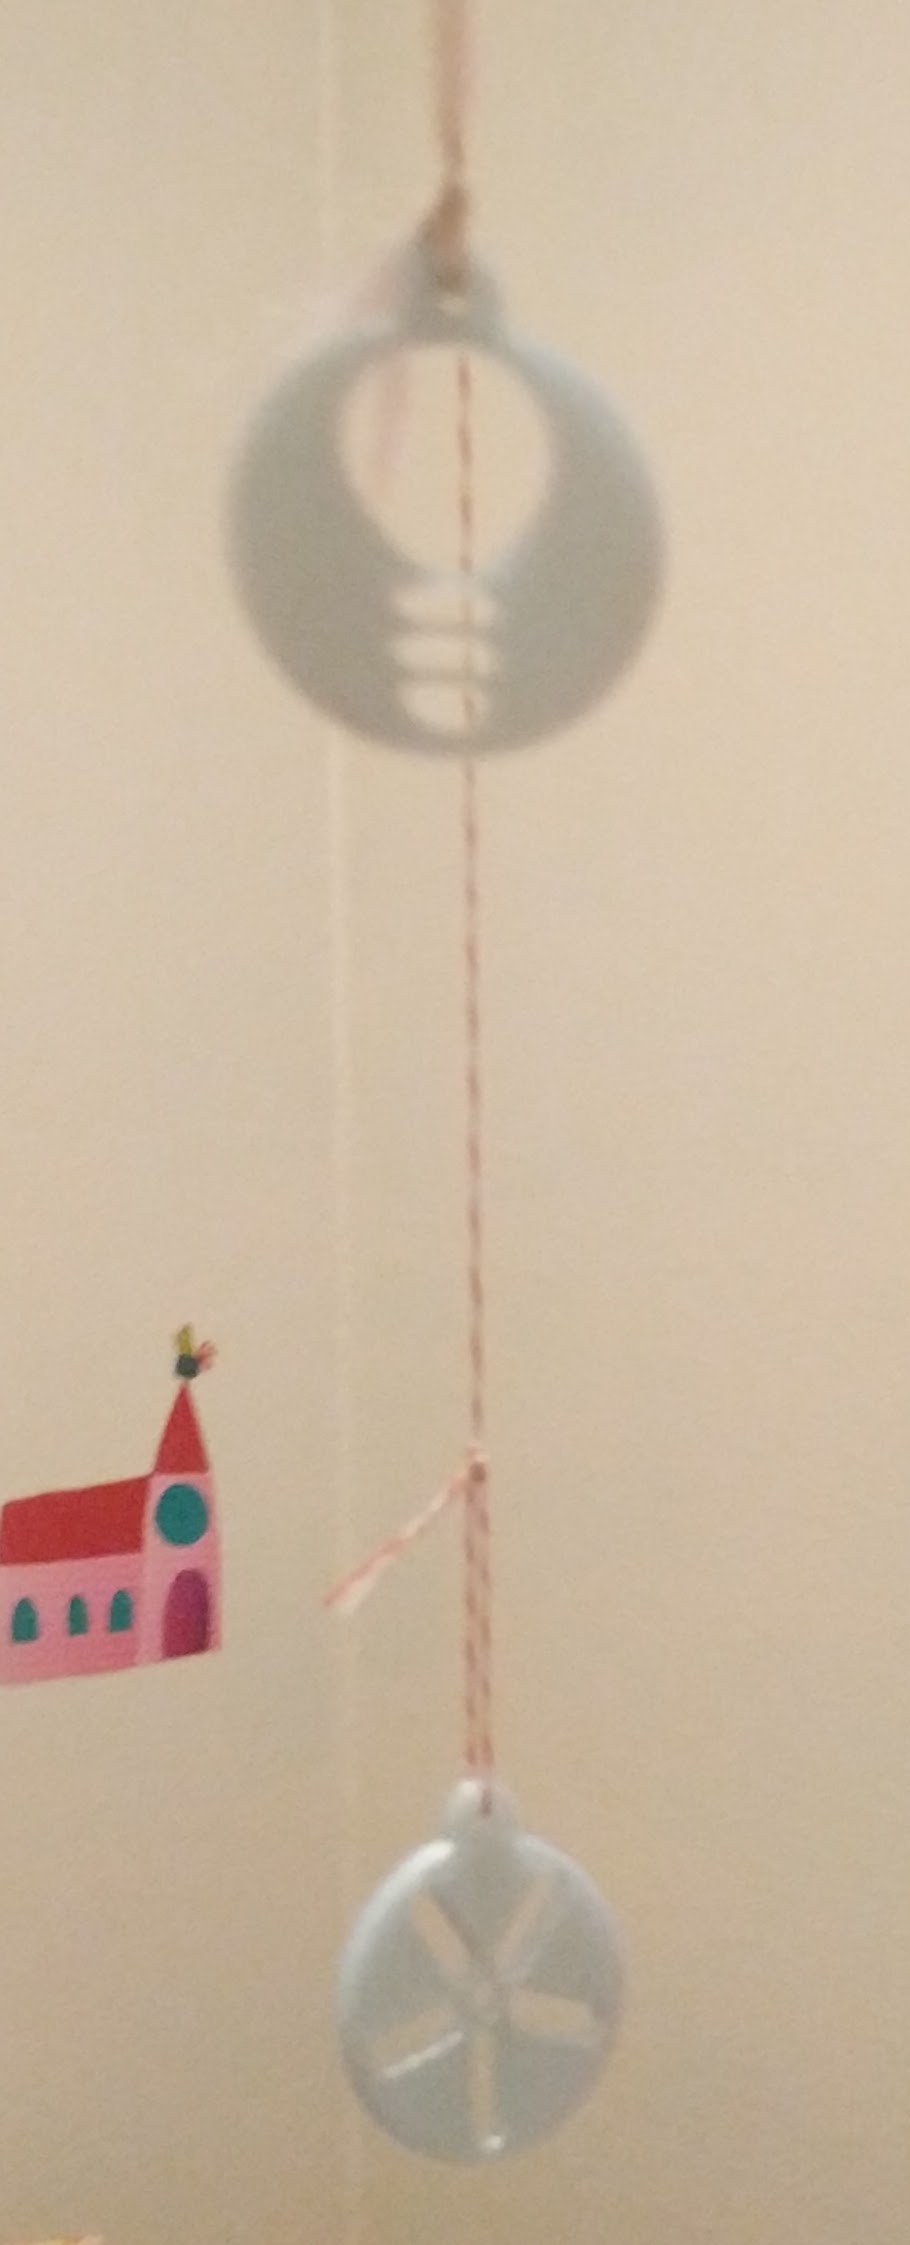
Repair # 11, 12, and 13: Fan, Light, and Shower Pulls
02/18/2018 at 05:17 • 0 commentsDate: 7/23/2017
![]()
We had been living in the house for about 18 months when I had finally had enough.
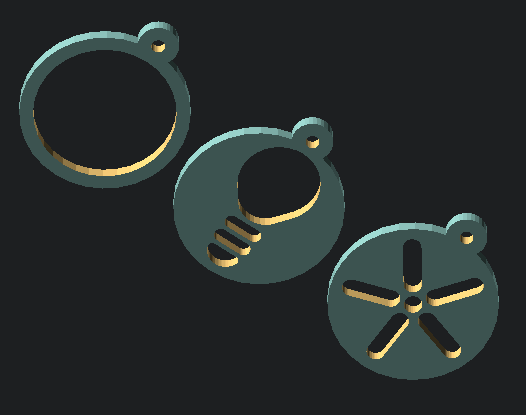
Someone (who shall remain nameless) had snapped the shower pull in our bathroom. (The shower head has this water saving device that shuts off water flow once the water is warm enough). Since I needed to create a new shower pull, I also turned my eyes to the pulls in my daughter's room. The fan has two cords - one to operate the fan speed and the other to toggle the light. However, since both cord pulls had been yanked off long ago and were now just dangling cords, they would sometimes get tangled up, and we would end up pulling the wrong cord.
I designed a new plastic pull for the shower that is just a ring, a pull for the light that has a light bulb shape cut out of it, and a pull for the fan that has a fan shape cut out of it. For a little extra flare, I printed all of them in glow in the dark plastic.
![]()
![]()
Since this contest entry is really a collection of entries, I've uploaded the STL and OpenSCAD files to Thingiverse here.
-
Repair # 10: MakerBot Replicator 1 Extruder Plunger Spacers
02/18/2018 at 05:03 • 0 commentsDate: 1/29/2017
![]()
About a year ago my MakerBot Replicator 1 started to have trouble extruding plastic consistently. After making sure there were no blockages and making sure the filament wasn't to blame, I pulled the extruder apart to find out what had happened.
Years of extruding plastic had worn a groove into the delrin plunger, basically making the extruder much looser than the machine was designed to operate. The plunger has these thin washers that sit behind it - placed at the factor to optimize the pressure of the delrin plunger against the filament. I designed these very thin spacer to fit behind the plunger along with the stock washers.
I know you're probably asking - why not just install the extruder upgrade every single other MakerBot operator is using??? Well, that day I had a 3D printer that was able to print (admittedly, poorly) the washers, and could have printed the extruder upgrade, but I didn't have screws, springs, etc needed to assemble the extruder. This fix got my printer working better almost instantly... and kept it going until the hardware arrived in the mail. :)
Since this contest entry is really a collection of entries, I've uploaded the STL and OpenSCAD files to Thingiverse here.
-
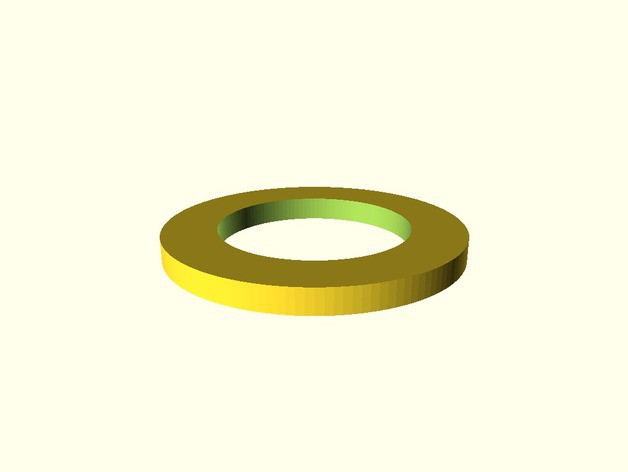
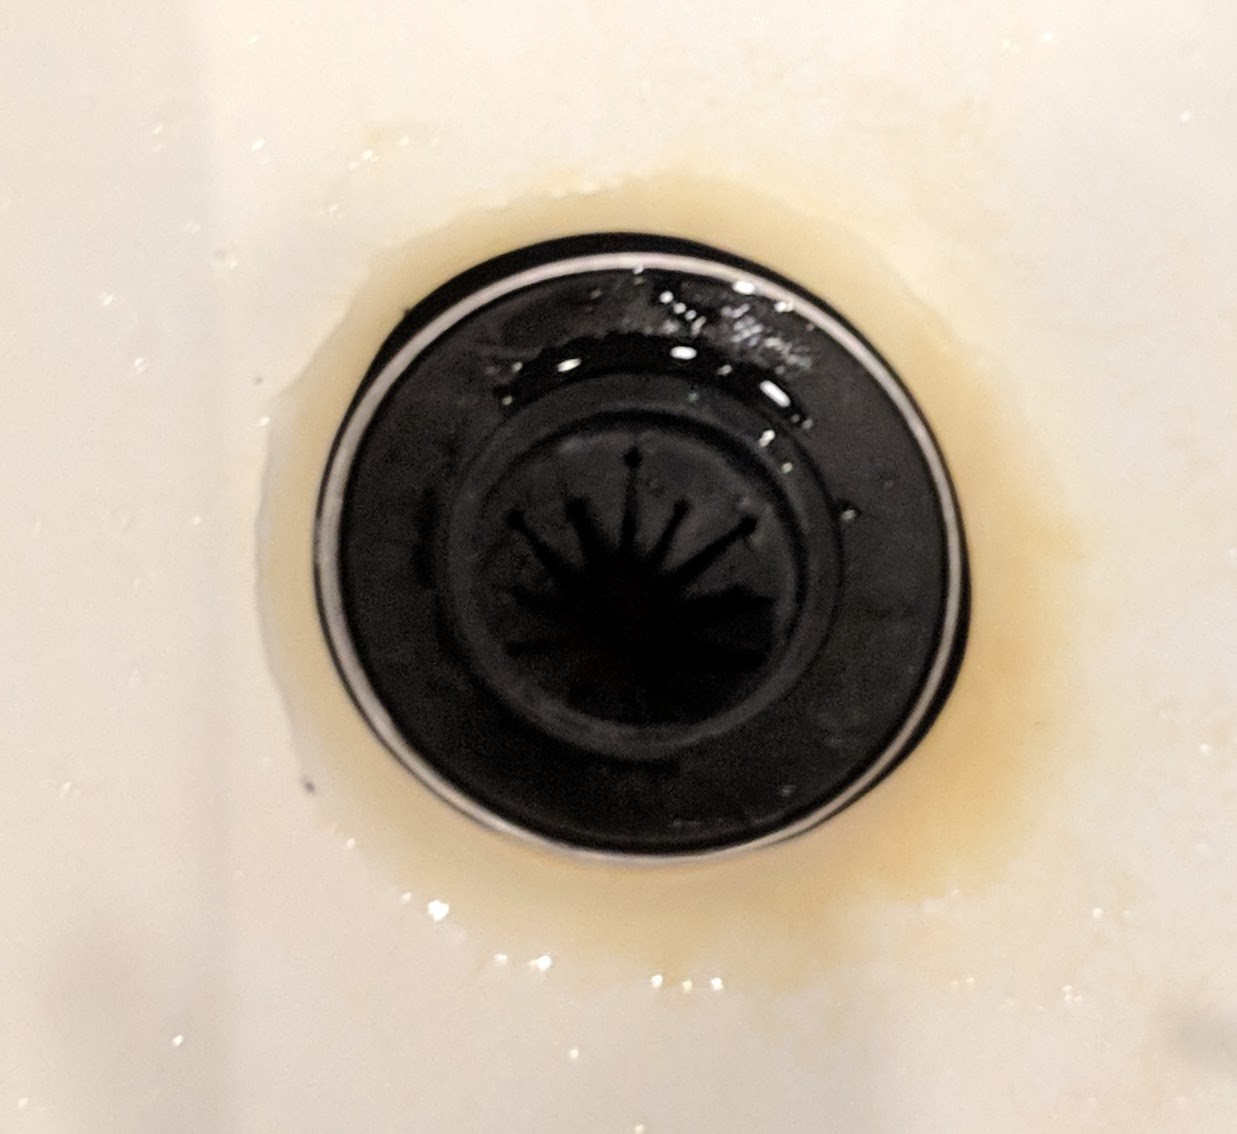
Repair # 9 : Garbage Disposal Drain Adapter
02/18/2018 at 04:39 • 0 commentsDate: 2/4/2017
The little bit of rubberized plastic for our sink was on it's last legs. It was always either falling down into the garbage disposal or coming out.
![]()
My wife asked me to replace the garbage disposal sink ring. Once I got to the hardware store, I discovered that they didn't have any sink rings for our specific model. So, I purchased one of each kind they had and returned home.
Since none of these fit our sink, I had to make an adapter that fit both our sink and the closest fitting sink rink. My trusty calipers made quick work of everything - measurements of the inner/outer diameters of the sink and sink ring, and OpenSCAD made quick work of the design.
It's a little difficult to see in the photograph above, but the wide black ring you see is the 3D printed part - while the sink ring sits down inside it.
![]()
Since this contest entry is really a collection of entries, I've uploaded the STL and OpenSCAD files to Thingiverse here.
-
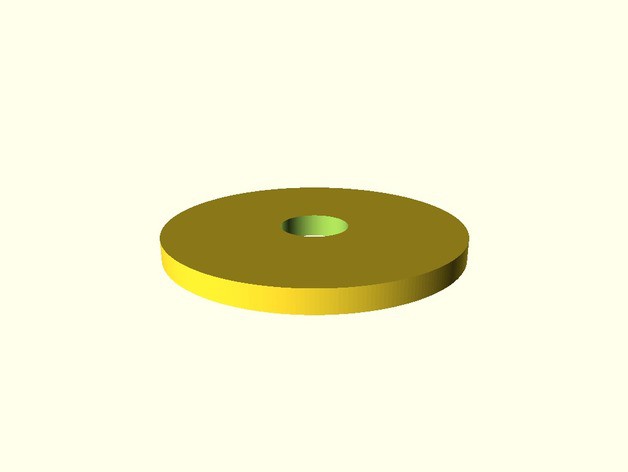
Repair # 8: Father-in-Law's Elliptical Handle Spacer
02/18/2018 at 03:56 • 0 commentsDate: 1/23/2017
Photo coming as soon as my father in law emails it to me :) In the meantime, here's a render...
![]()
When my in-laws were in town my father in law presented me with small, damaged, thin plastic disc with a hole in the center. Apparently this was a spacer that went on his elliptical handle and had somehow broken. Could I create a replacement?
Heck yes I can.
The calipers were brought out to measure the inner diameter, outer diameter, and thickness. The design is exceedingly simple - a cylinder subtracted from another cylinder.
Since this contest entry is really a collection of entries, I've uploaded the STL and OpenSCAD files to Thingiverse here.
-
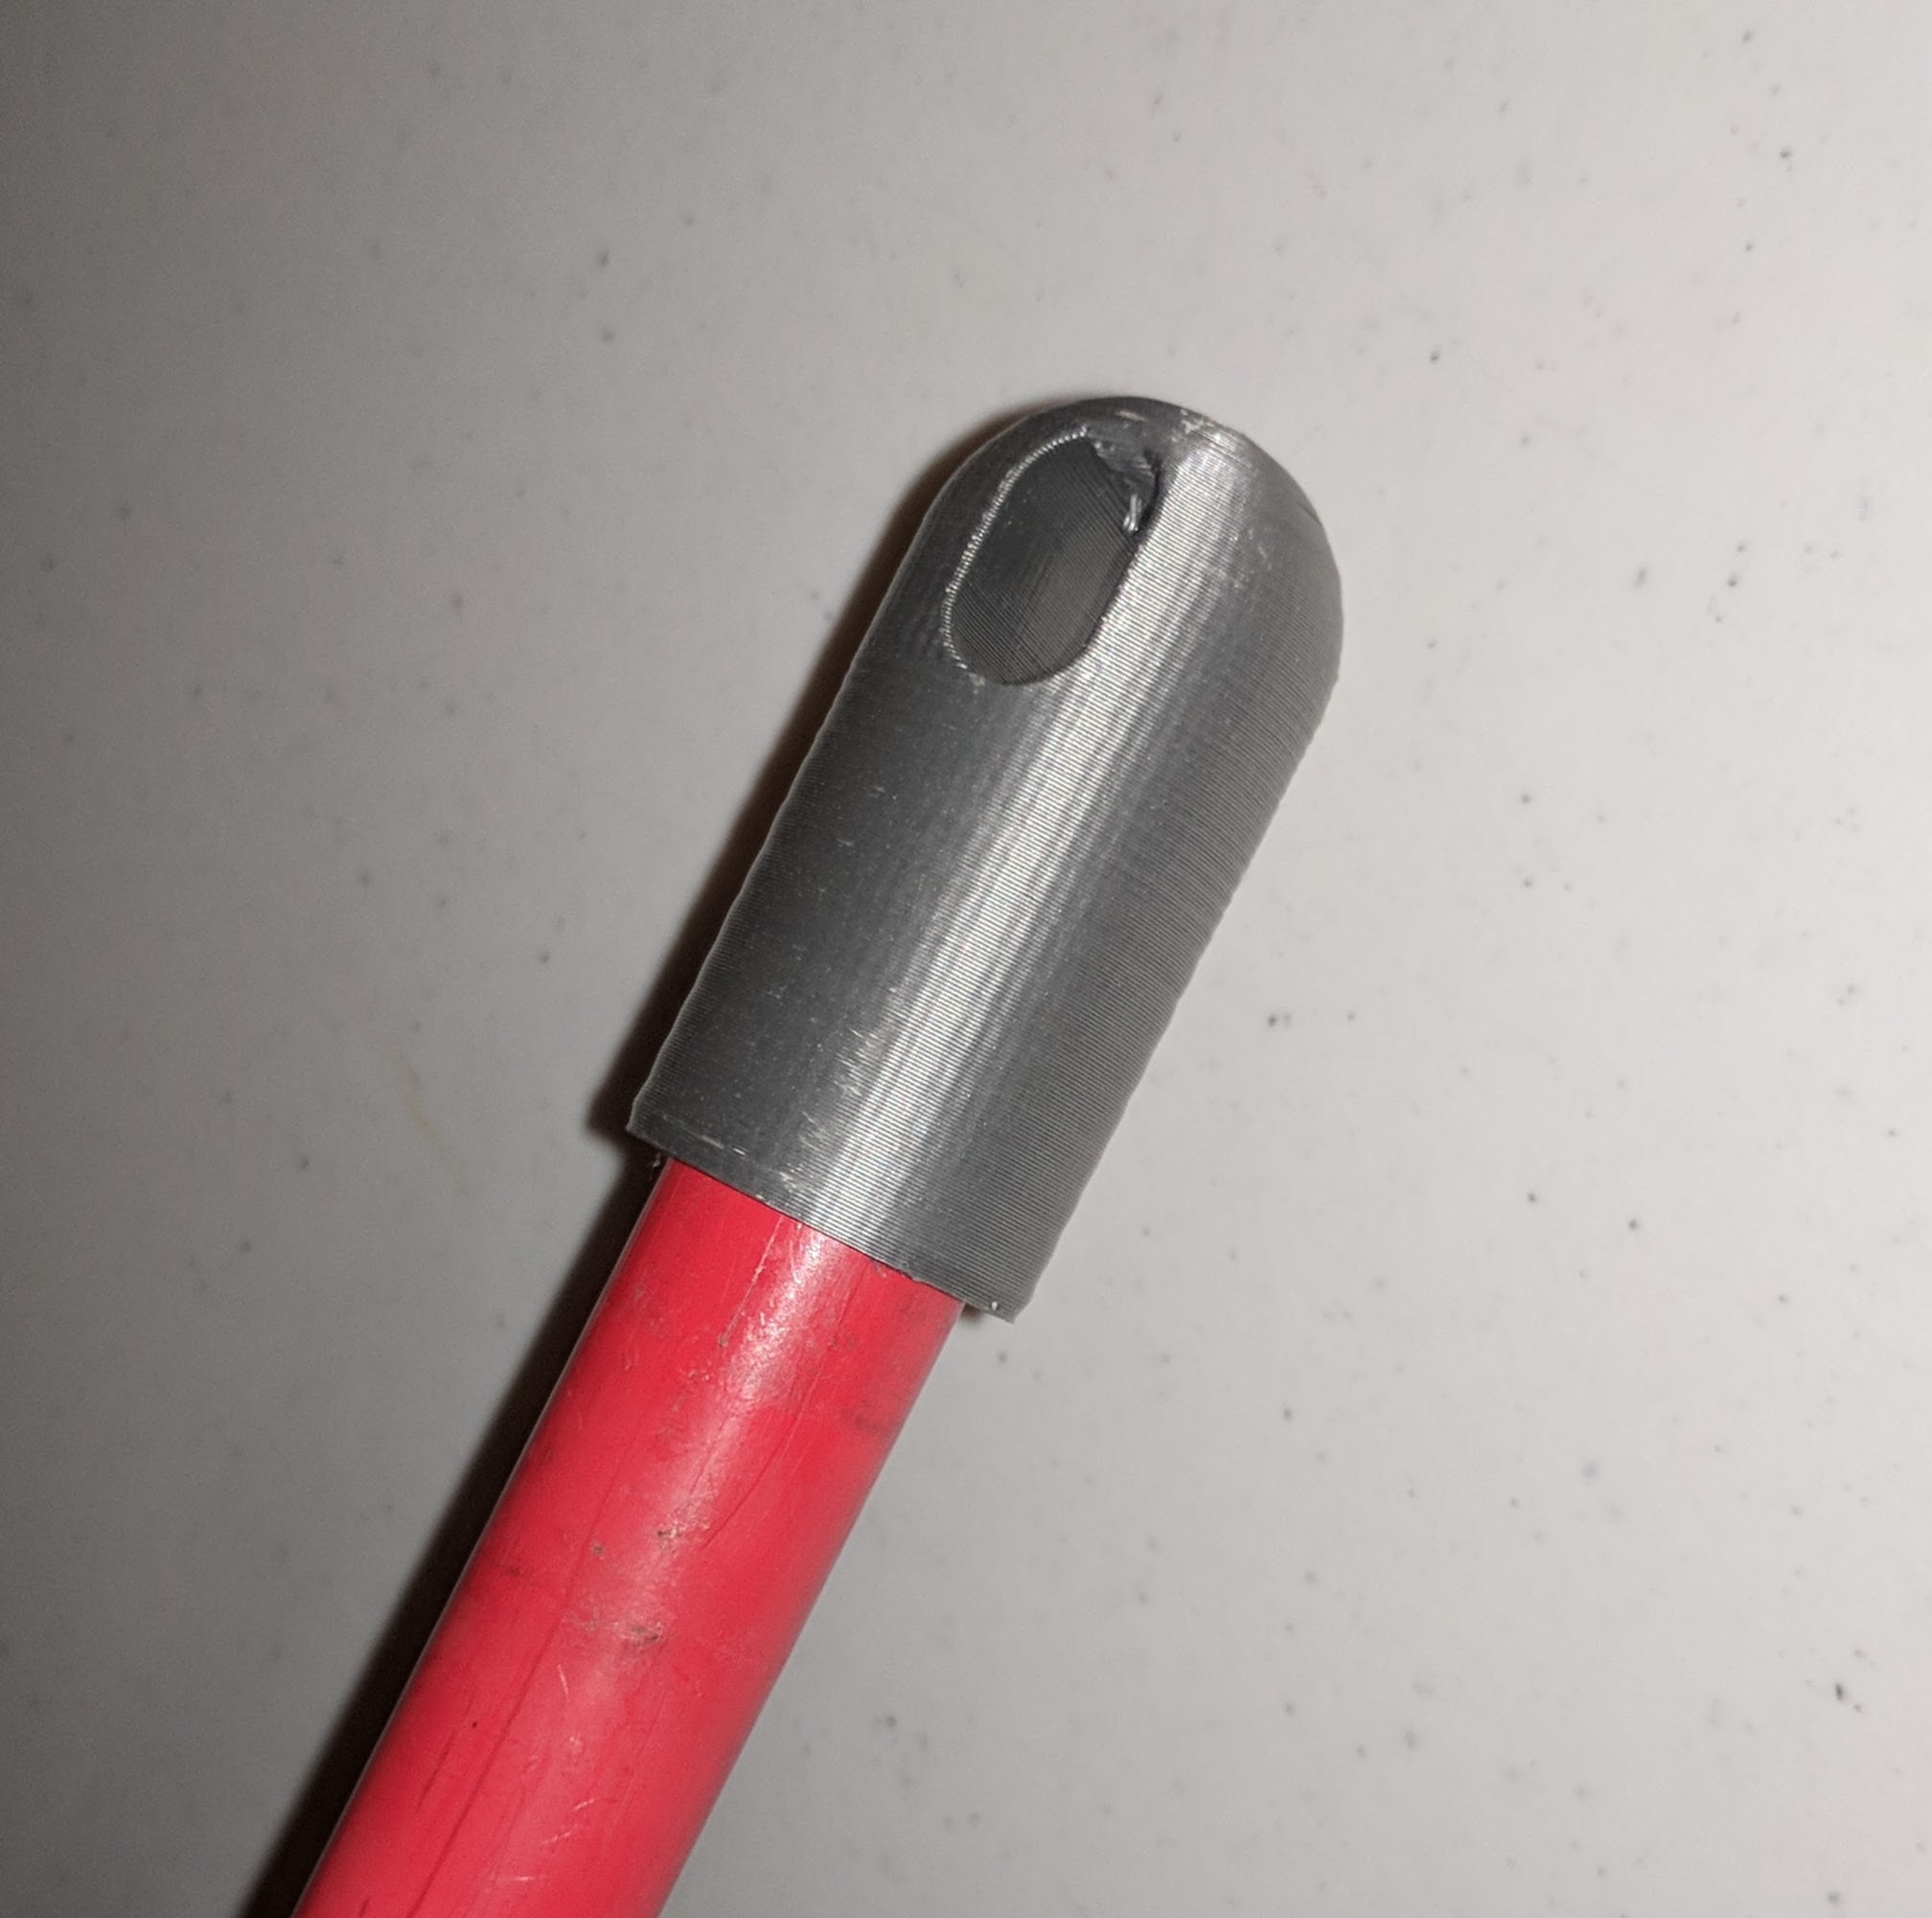
Repair # 7: New Broom Handle End Cap
02/18/2018 at 03:43 • 0 commentsDate: 9/5/2016
![]()
Not long after moving into our new home, I discovered the cap to the handle to our push broom was broken and quickly disintegrating. The old cap wasn't anything special - it was a thin and flimsy yellow plastic cap.
I measured the broom handle's diameter with my calipers, added an extra 0.2mm around the edges for good measure, and whipped up a new handle end cap. Not wanting to have to bother with this problem ever again, I decided to make the cap very thick (2mm), added a sphere at the top to make it less "scrape-y" than the old handle cap, and included a large hole for hanging the broom. (Even though I don't have anyplace to hang it yet...) Again, OpenSCAD was the big winner here.
I added copious hot glue to the perimeter of the handle and forced the cap down onto it. It's not going anywhere any time soon.
Since this contest entry is really a collection of entries, I've uploaded the STL and OpenSCAD files to Thingiverse here.
-
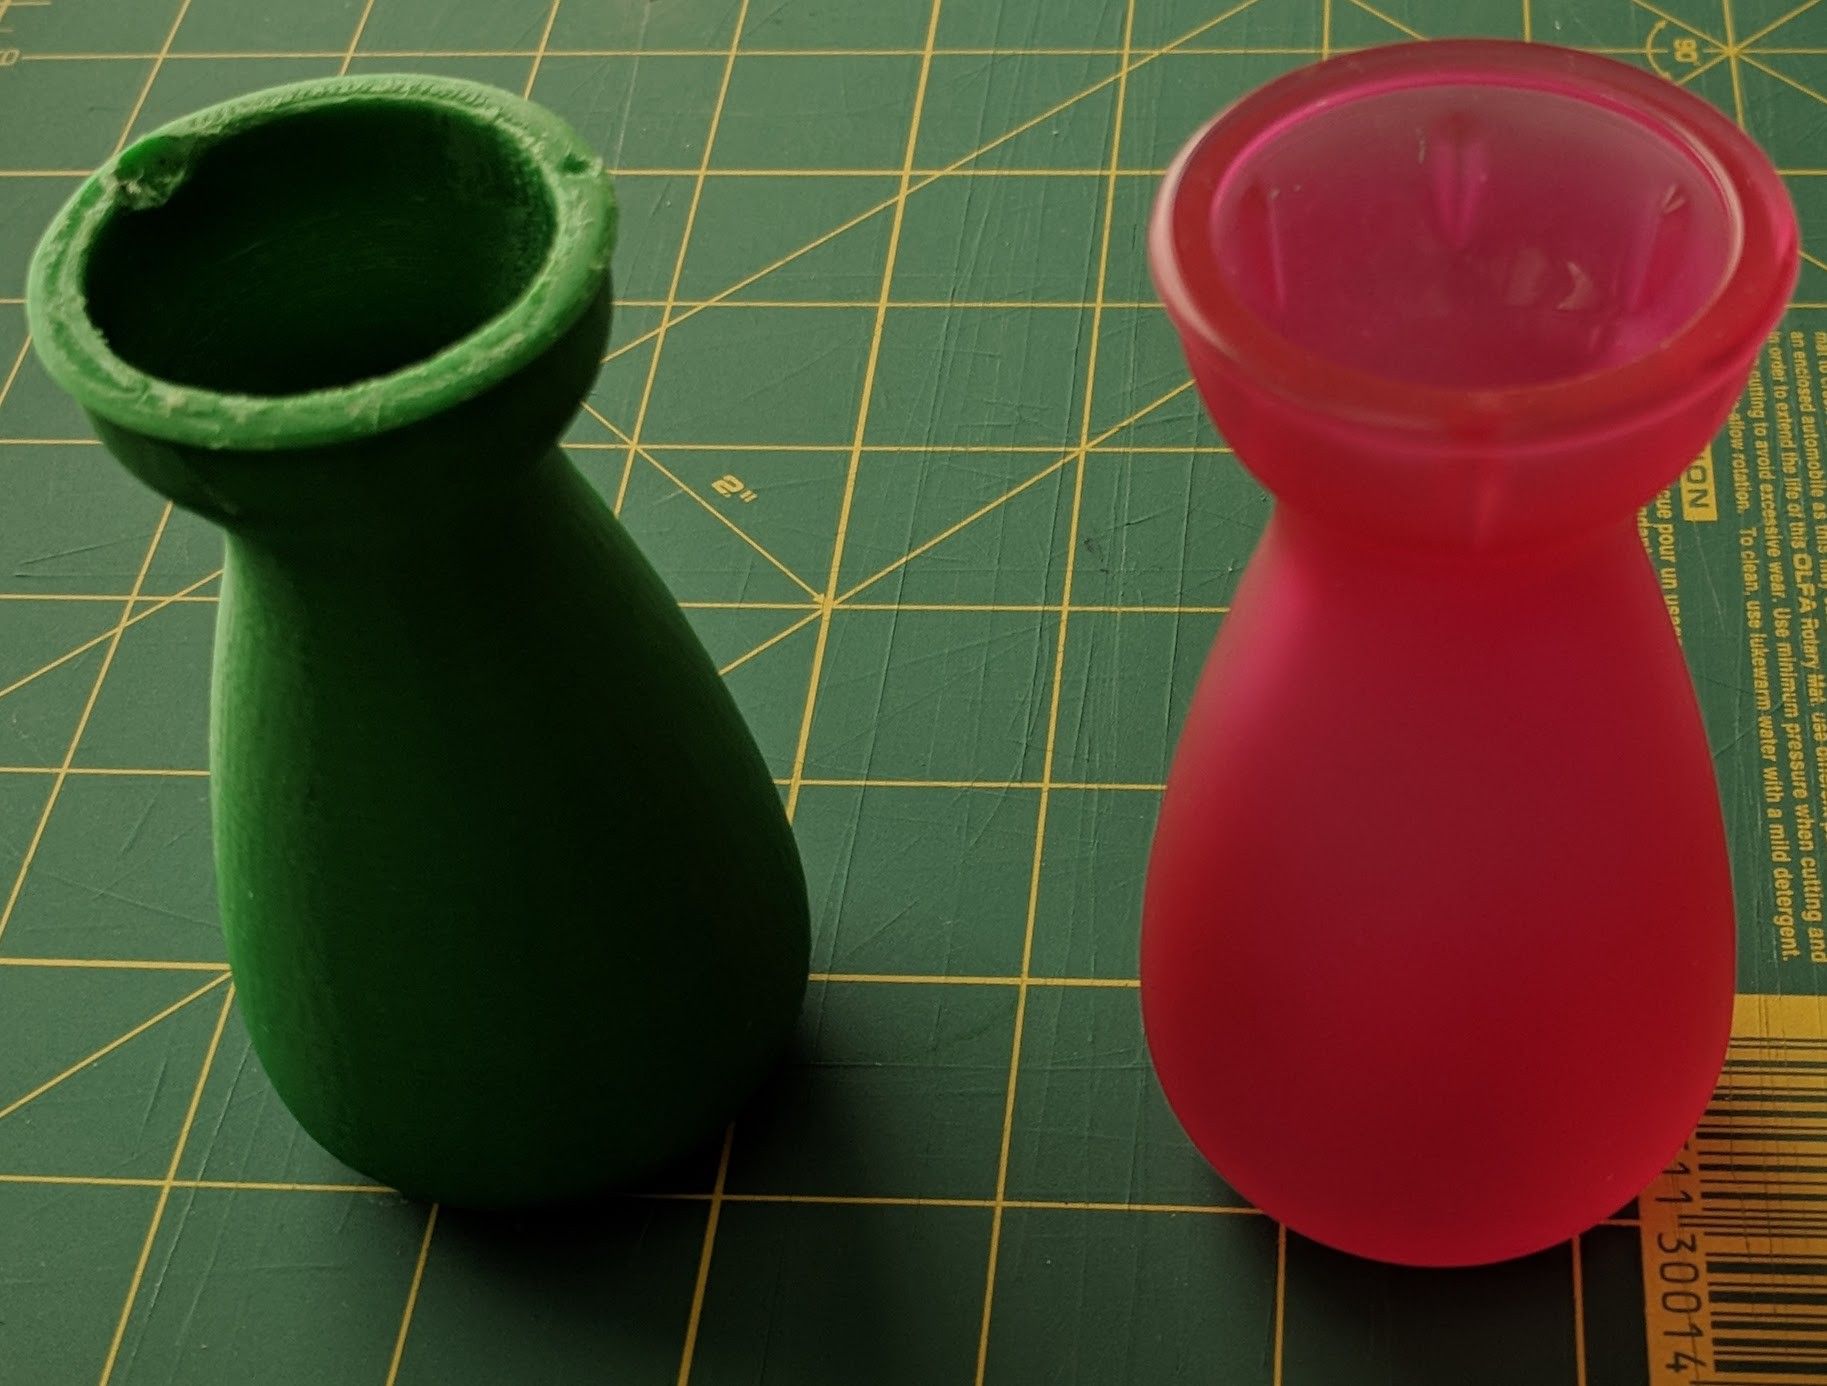
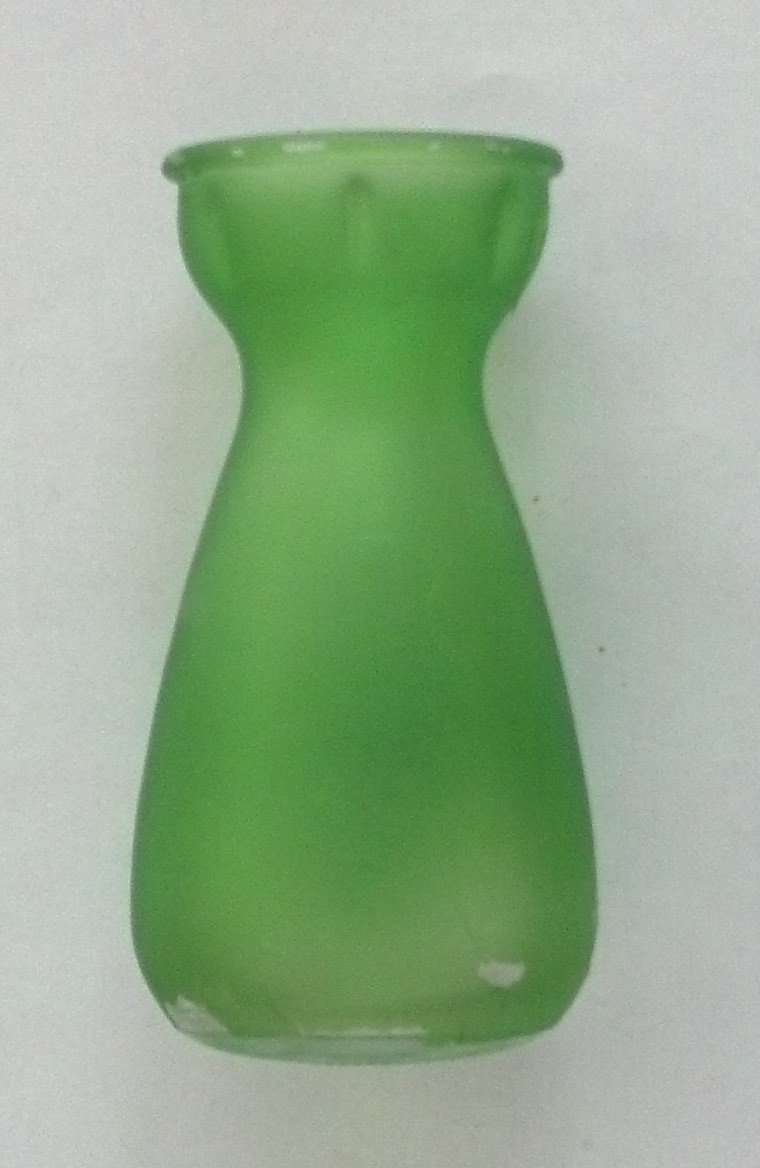
Repair # 6: Bud Vase Replacement
02/18/2018 at 03:33 • 0 commentsDate: 10/9/2016
![]()
We had a set of three small glass "bud" vases (red, green, and blue). These small vases are intended for use with a small number of flowers with short stems or perhaps for just a single flower. One of these poor vases suffered a fate similar to a certain Bathroom Covered Jar Lid (once again, the identities of the culprit withheld to protect Yours Truly).
My wife was curious as to whether I could create a replacement for their fallen comrade. Why yes. Yes, I can.
Using a process similar to both the Curtain Rod Finial and Plastic Horn Cap, I laid one of the intact vases on its side, took a picture as straight-on as I could manage, cleaned up the profile in GIMP, traced into an SVG in Inkscape, and then used the rotate extrude function in OpenSCAD. The real bud vase on the right has certain curvatures which would be difficult to print without supports, so I did modify the profile very slightly to make it easier to print. The plastic simulacra is not nearly as cosmetically pleasing as the glass originals, but it's really not noticeable at all once it's holding flowers.
![]() Since this contest entry is really a collection of entries, I've uploaded the SVG, STL, and OpenSCAD files to Thingiverse here.
Since this contest entry is really a collection of entries, I've uploaded the SVG, STL, and OpenSCAD files to Thingiverse here. -
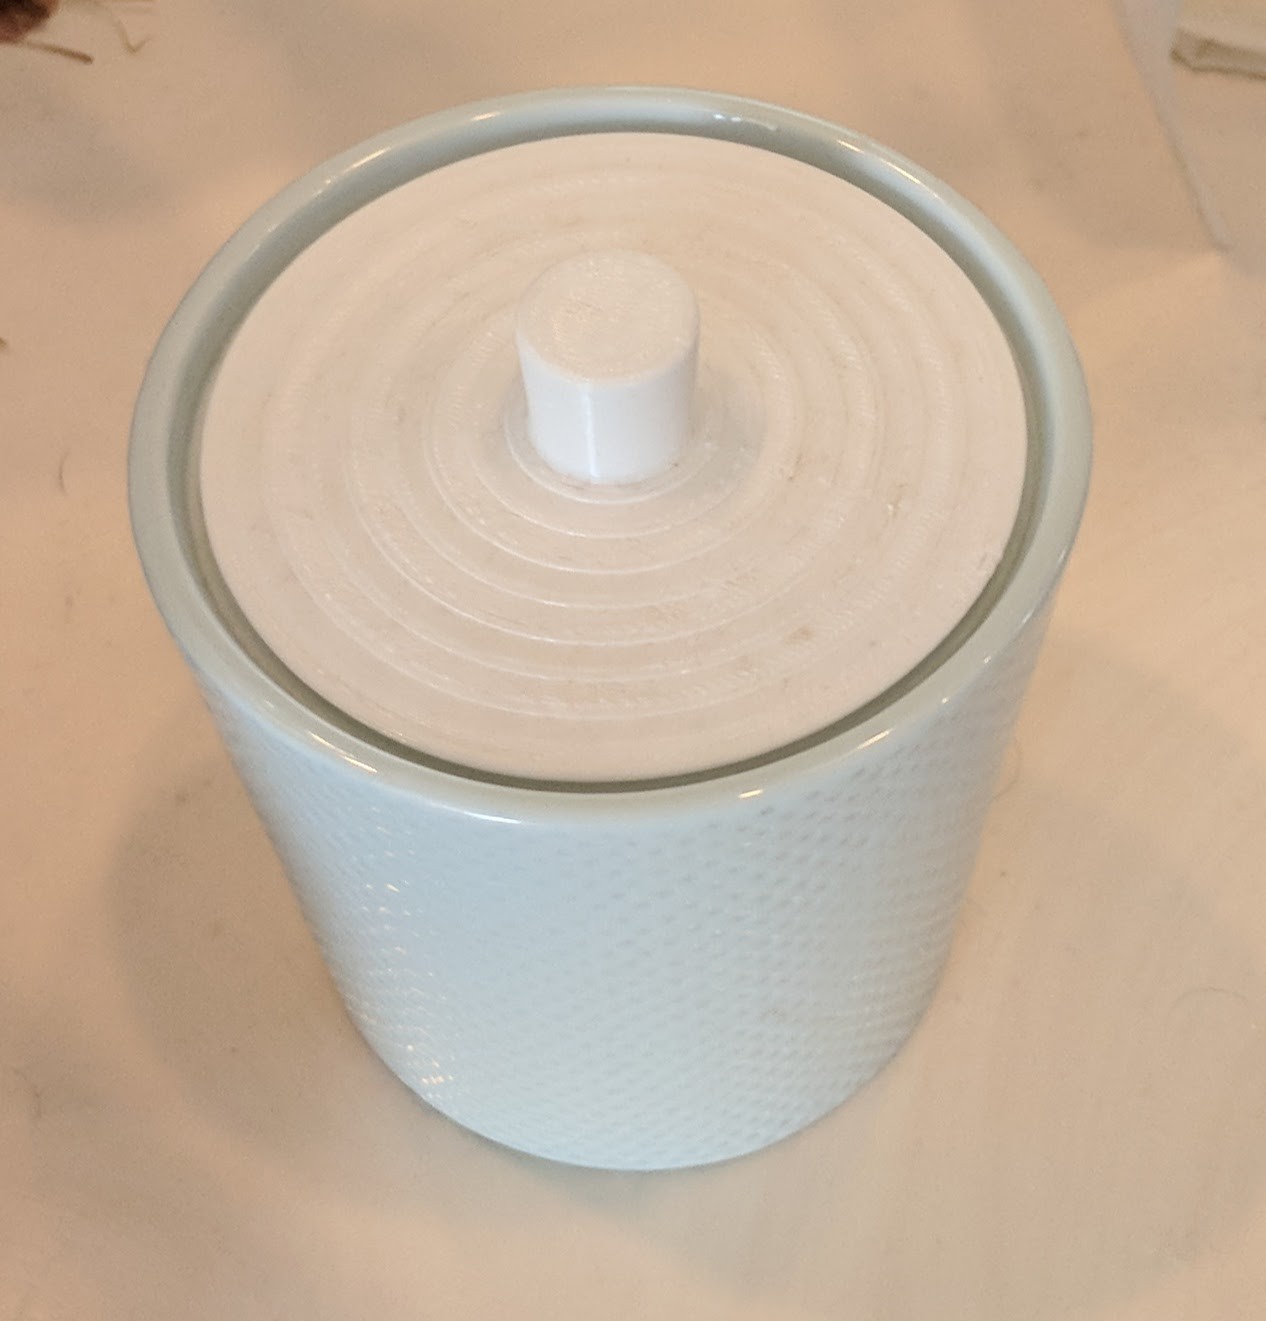
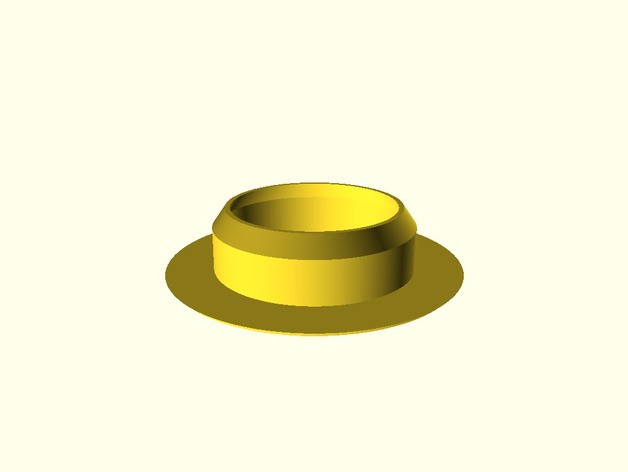
Repair # 5: Bathroom Covered Jar Lid
02/18/2018 at 03:22 • 0 commentsDate: ~ January 2016
![]()
I came home one day to discover the lid for our porcelain cup in our bathroom was missing. Apparently someone [identity withheld for my own protection] had dropped the lid - shattering it.
This simple replacement isn't the same color, texture, or composition as the original - but it still serves the same utilitarian purpose. And, even so, it's still in use to this day. All it took was a quick bit of measurement to determine the diameter and depth of the jar's lip to whip up a new lid in OpenSCAD, complete with a small tapered handle in the center.
Home Repairs with a 3D Printer
Since moving into a new home a little over two years ago, we've been fixing and improving things all over

 Since this contest entry is really a collection of entries, I've uploaded the SVG, STL, and OpenSCAD files to