Close
0%
0%

ESP8266-01 Breakout

Cool little ESP8266 Breakout Board / Flasher for NodeMCU

Similar projects worth following
Simple breakout that deals with level adjustments and such for programming the ESP8266 using a USB-Serial interface. More details to come.

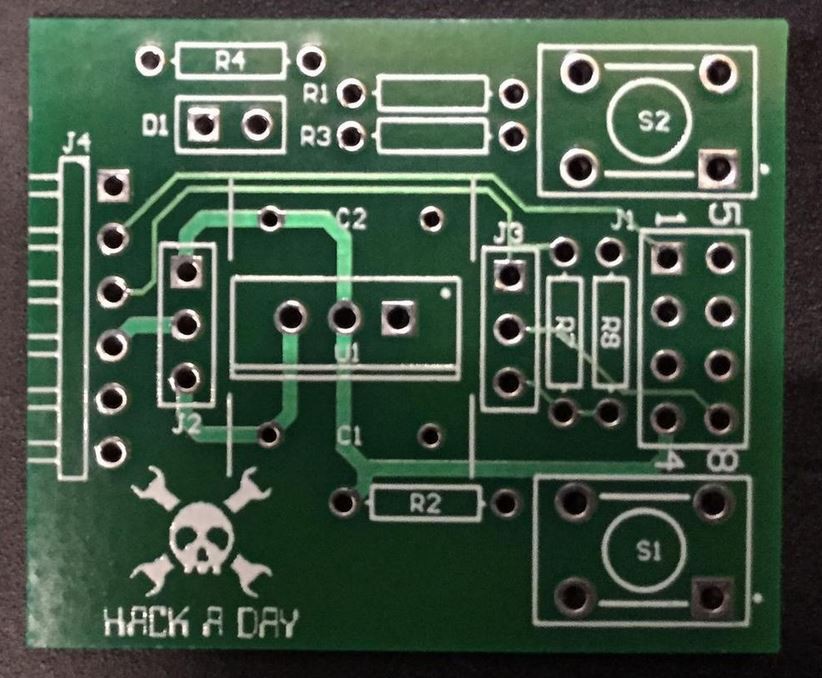
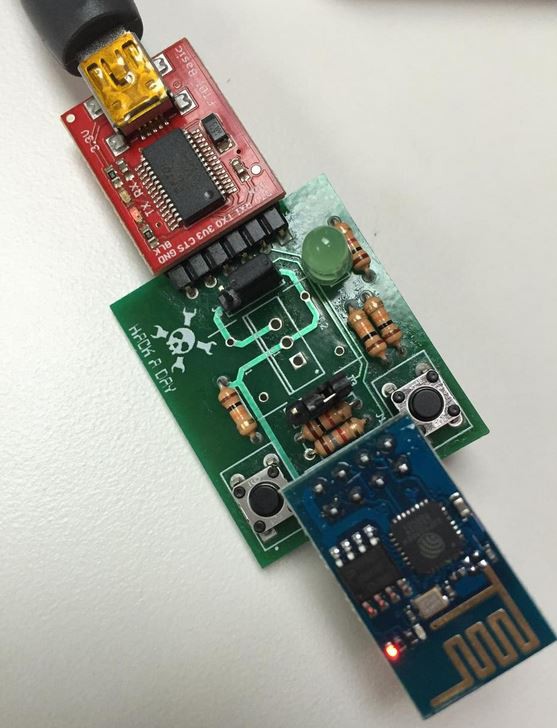
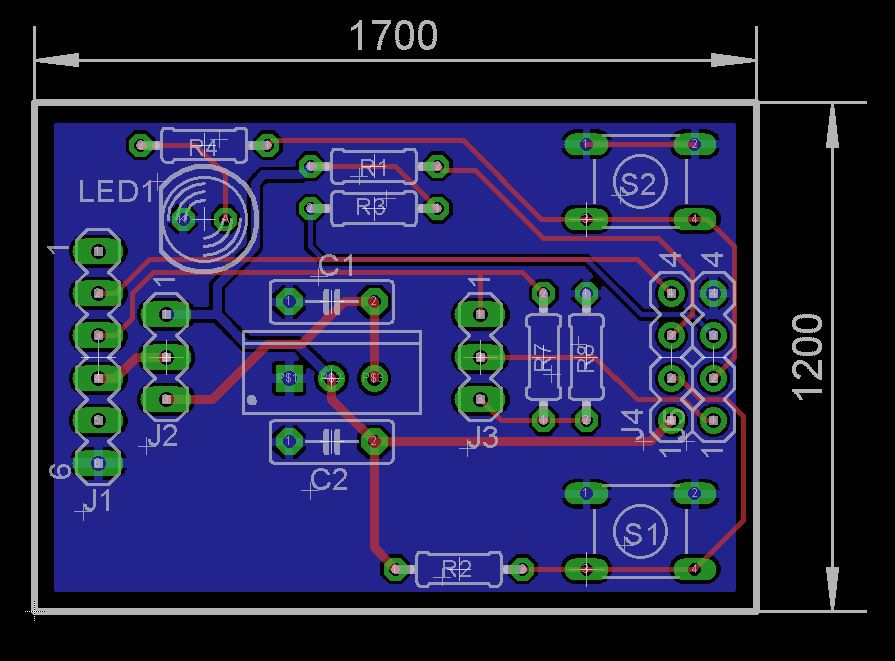
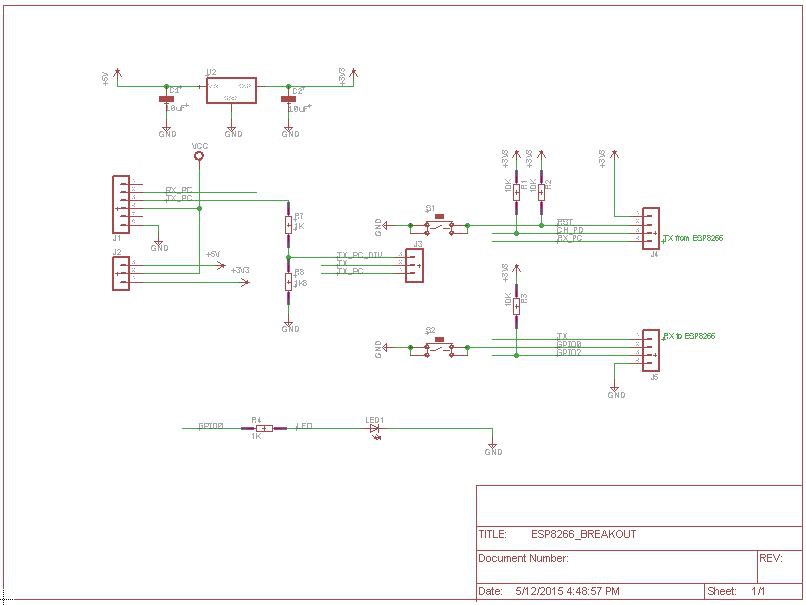
This project was designed for the Hackaday Worldwide LA Event and is used to interface a standard USB cable to the ESP8266-01 module. Having spent a fair bit of time using jumper wires and PTH resistors and regulators and such to make a typical 5V0 USB-Serial something ESP/3V3-friendly I decided to build a little board with a few features that simplified the whole workflow.

Firstly I added a regulator to provide the necessary 3V3 power when using a 5V0 input. I also added a few pushbuttons as the ESP8266 requires the GPIO0 is pulled low on startup (or low after a RESET) to put it into programming mode. The buttons on both RESET and GPIO0 provide this.

I also added an indicator LED and tried to do the whole thing thru-hole so anyone with minimal soldering skills could get in there and solder the board. The event was well received and this project includes both the design files and a copy of the powerpoint used during this event. For a complete video of the event, checkout the video below (it starts are ~17 minutes and audio is silent until then). The video takes you thru building a board in Eagle, NodeMCU and actually flashing the device in ~7hours.


  • 1 × 969102-0000-DA Standard PCB Jumper
  • 1 × PRPC040SAAN-RC Vertical heaader pins (breakaway) - male
  • 1 × ESP8266-01 ESP8266 WIFI module with 4x2 vertical header pins, bottom side
  • 1 × LM1117T-3.3 Power Management ICs / Linear Voltage Regulators and LDOs
  • 1 × LTL-4233 LEDs and Accessories / Light Emitting Diodes (LEDs)

View all 11 components

View all 4 project logs

  • 1
    Step 1

    Step 1. Get a USB to Serial Adapter (FTDI or Cypress are both good)

    Step 2. Get an ESP8266 board (this project is based on the -01 version of the board)

    Step 3. Get / build a board or breadboard a setup to handle the level translation between the USB port (5V0) and the ESP8266 (3V3) *this is what this project basically does, plus a few other interesting things* :)

    Step 4. Get NodeMCU repo from Github (the whole thing)

    Step 5. Flash the ESP8266 with NodeMCU (be sure to have GPIO0 low when you reset the device, prior to programming...must be low until programming starts)

    Step 6. Download ESPlorer from http://esp8266.ru/esplorer

    Step 7. Load an example LUA file containing NodeJS to the device by ESPlorer and Run

    Voila. Life is good. Unless it isn't. If that's the case, make comments.

View all instructions

Enjoy this project?

Share

Discussions

Anool Mahidharia wrote 06/04/2015 at 05:57 point

sweet! I'm going to fork this to use for a KiCad 101 talk at an up-coming Hackaday Prize Worldwide event in New Delhi.

  Are you sure? yes | no

technolomaniac wrote 05/20/2015 at 00:23 point

Woo hoo!  This little board is now avail for purchase in the Hackaday Store http://store.hackaday.com/products/esp8266-adapter-and-breakout-board-kit-includes-esp8266-01

For anyone that wants to hone their soldering skills.  Also includes the ESP8266-01 module.  

  Are you sure? yes | no

davedarko wrote 05/16/2015 at 13:42 point

Matt, once again, awesome presentation! I'm preparing my own board to take an ESP-01 and a ESP-12 as well. Is it important to pull up GPIO2 as well? I see a pull up resistor, but no word about it but read on CNLohr's blog post that it has to be high. 

  Are you sure? yes | no

George McKinney wrote 05/13/2015 at 11:02 point

Thank you for the weekend's 2-day marathon PCB design to assembly to firmware and coding workshop. I used the Github repository to get the web server running on the ESP8266. I added a couple pics to my fork (https://github.com/georgemck/ESP8266-01-BREAKOUT/tree/master/Files/Images). It was a lot of fun. Thank you again.

  Are you sure? yes | no

Lucas Rangit MAGASWERAN wrote 05/13/2015 at 14:24 point

Hey George, thanks for posting pictures of the board your soldered. Looks good _and_ it works! Did you also succeed in using Eagle CAD to lay out the board? If so, can you post it to you GitHub? I would like to compare with mine and discuss.

  Are you sure? yes | no

George McKinney wrote 05/14/2015 at 21:31 point

I think Matt's resources for the Eagle CAD are in his Github. I am going to try it with KiCAD though.

  Are you sure? yes | no

technolomaniac wrote 05/13/2015 at 20:54 point

Glad you enjoyed it!  If you create a project here on http://hackaday.io and link your github that'd be awesome.  then people can follow it and comment and improve on it (people who might not find it on github otherwise).  Just a thought ;)  

  Are you sure? yes | no

Lucas Rangit MAGASWERAN wrote 05/13/2015 at 04:54 point

This class was awesome. I put my implementation on https://github.com/lucasrangit/ESP8266-01-BREAKOUT  PICTURE . I got all the board design rules to pass! I tried to make mine longer and more narrow to match the proportions of the USB to UART and ESP8266-01 connected to it. What do you think?

I also wanted to share a tip that helped me with the routing. You can hide the airwires for the common signals such as Vcc or Ground, use the command "ratsnest ! +3V3 +5V0 GND". To show them again, use the same command without the "!". Also, remember to press the ratsnest button as you place components to redraw them with potentially shorter paths.

  Are you sure? yes | no

technolomaniac wrote 05/13/2015 at 20:59 point

Ahh, this is totally cool and thanks for posting the tips on hiding airwires (the ratsnest) for specific nets.  I've created a few extra comps including the buttons and a proper regulator, also adding a comp for a proper connector (4x2) in a bit.  Thanks for attending!  And thanks for following thru and building the PCB!  If you need more ESP modules, you can buy them in the hackaday store or via amazon.  

  Are you sure? yes | no

patrickleugue wrote 05/12/2015 at 17:53 point

Loved the session at the HAD World in Pasadena. Thanks for posting schematics and firmware files. Will be helpful in reproducing design and learning from it

  Are you sure? yes | no

technolomaniac wrote 05/12/2015 at 18:42 point

Super glad you enjoyed it!  I just uploaded some more content to the projects page and links to github for this project.  Eagle files will come online shortly.  

  Are you sure? yes | no

technolomaniac wrote 05/12/2015 at 18:44 point

Also just uploaded the powerpoint and opened the github repo for the files.

  Are you sure? yes | no

Ed Friesema wrote 05/11/2015 at 05:53 point

Thanks again for all of your gretat help  with this today

  Are you sure? yes | no

technolomaniac wrote 05/12/2015 at 18:42 point

Thank you for coming!  Look for more on this page!

  Are you sure? yes | no

jessica.c.kam wrote 05/11/2015 at 04:53 point

I completely agree with Ankush!

  Are you sure? yes | no

technolomaniac wrote 05/12/2015 at 18:43 point

Thank you thank you!   This is very humbling to have smart people to hang out with and build things with!  I am uploading all of the content including the powerpoint to this page now.

  Are you sure? yes | no

Ankush Dharkar wrote 05/10/2015 at 18:44 point

Cool Stuff! 

  Are you sure? yes | no

technolomaniac wrote 05/12/2015 at 18:43 point

Thank you for coming!  

  Are you sure? yes | no

Similar Projects

Does this project spark your interest?

Become a member to follow this project and never miss any updates