
-
How to Recover Data from an External Drive on Mac?
09/30/2026 at 11:20 • 0 commentsStorage device do not last forever, and external drives connected to your Mac are no exception. However, many drive-related issues are logical rather than physical. In most cases, the hardware is still functioning, but macOS can no longer access the stored data due to file system corruption, accidental formatting, improper ejection, partition damage, or mounting problems.
These are just some of the situations that can make files inaccessible, and in many cases, the data can still be recovered. With the right approach and recovery tools, you may be able to retrieve your lost or deleted files. This guide walks you through several ways to recover data from an external drive on Mac, covering both macOS’s built-in utilities and dedicated data recovery software.
How to Not Make It Worse Than It Already Is?
Data recovery is about prompt action. Files usually become unrecoverable not because of the original issue, but because of what you do after you notice that the data is missing. Before attempting any recovery method, keep these precautions in mind:
- Stop using the affected drive immediately. Avoid saving, copying, or modifying any data on it.
- Do not install recovery software on the affected drive. Install it on your Mac’s internal drive or another healthy storage device instead.
- Hold off on running Disk Utility’s First Aid. It can modify the file system, which may complicate recovery in some situations.
- Do not reformat or initialize the drive. These operations can overwrite file system information and make recovery more difficult.
Ways to Recover Files Lost from an External Drive on Mac
The methods below are arranged from the simplest and safest options to more advanced recovery techniques. Begin with the first method and move to the next only if necessary. For each approach, you’ll find guidance on when it’s appropriate, when it’s better to avoid it, and the exact steps to follow.
1. Check the Trash
When you delete a file on your Mac, the OS doesn’t immediately erase it and moves it to the Trash folder. This is different from Windows, which sends files from external hard drives to the Recycle Bin, but permanently deleted files from the USB flash drives and SD cards straight away. Your files may simply be sitting in the Trash waiting to be restored.
- Make sure the external drive is connected to your Mac.
- Click the Trash icon in your Dock.
- Look for the files you want to recover.
- Right-click any selected file and choose Put Back. The file will go back to where it was on the drive.
2. Restore from a Time Machine Backup
Time Machine is a native utility on macOS which is designed to create incremental snapshots of your system. Time Machine stores hourly backups for last 24 hours, daily backups for the previous month, and weekly backups for older data. It automatically deletes the oldest backup first when the backup drive fills up.
While it is one of the quickest recovery methods available, it requires prior setup and does not include external drives by default. To make sure that your external drive is backed up, you need to manually add it. Open System Settings > General > Time Machine and click Options. If your external drive appears in the "Exclude from backups" list, it isn’t being backed up, if not, your data is safely backed up.
- Click the Time Machine icon in the menu bar.
- Select Browse Time Machine Backups.
- Select the backup files/folders you want and click Restore.
3. Use Mac Data Recovery Software
When you don’t have a Time Machine backup and the Trash is also emptied, the best way forward is to use a free Mac data recovery software. It deep scans the drive’s storage sectors and rebuilds missing files directly from their internal data signatures. The files are recoverable as long as the drive is detectable in Disk Utility and the existing data is not overwritten.
- Download, install, and run the software on your Mac....
-
How to Fix Flashing Question Mark Folder Issue on Mac?
08/26/2026 at 11:26 • 0 commentsIssues on macOS can range from minor glitches to problems that prevent your Mac from booting altogether. A folder with a flashing question mark is one such case that appears on the screen during startup. It usually means that either the Mac is unable to locate its startup disk or it can’t detect a working macOS installation. As a result, the system is unable to complete the boot process.
Many factors, including startup disk issues like bad sectors, formatting errors, or directory corruption, can trigger this problem. Additionally, an incompatible or incorrectly installed macOS version can also cause the Mac to fail to start. Regardless of the reason, the error can interrupt your work and prevent you from accessing your files and apps. This guide will help you quickly fix the flashing folder with a question mark issue and get your system back on track.
Quick Ways to Fix the Flashing Question Mark Issue on Your Mac
Make sure you have a backup of your Mac before proceeding. In case there’s no backup, use a Mac data recovery software to recover all your important data, as some troubleshooting methods like running Disk Utility on a damaged directory may result in data loss. Before applying more technical fixes, try some basic workarounds like restarting your Mac.
If the error was caused by some minor software glitch, a simple restart can often resolve it. Next, check the peripheral devices like printers, scanners, or USB drives connected to your computer. Sometimes, they can interfere with the startup process and cause the flashing question mark folder issue on your Mac. Disconnect all external devices and check whether the error message disappears.
1. Check Startup Disk Settings
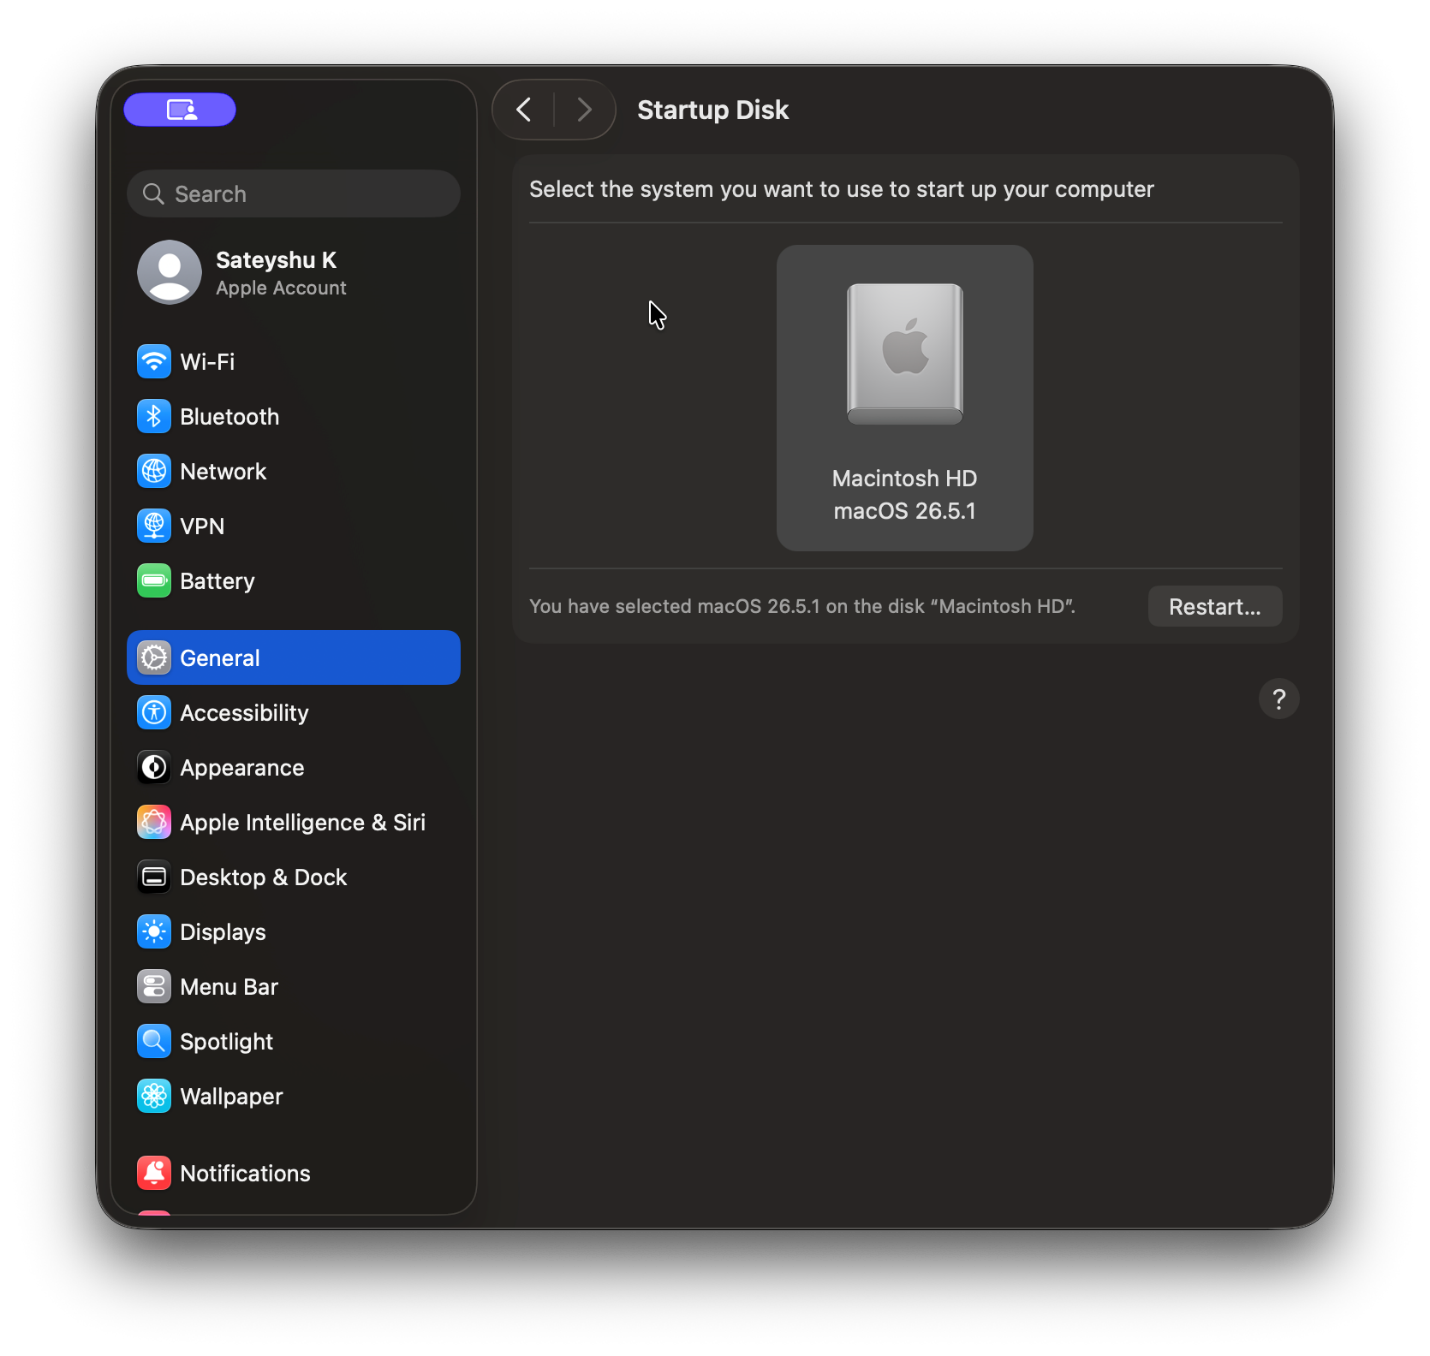
Make sure you are using the correct startup disk (usually named, Macintosh HD).
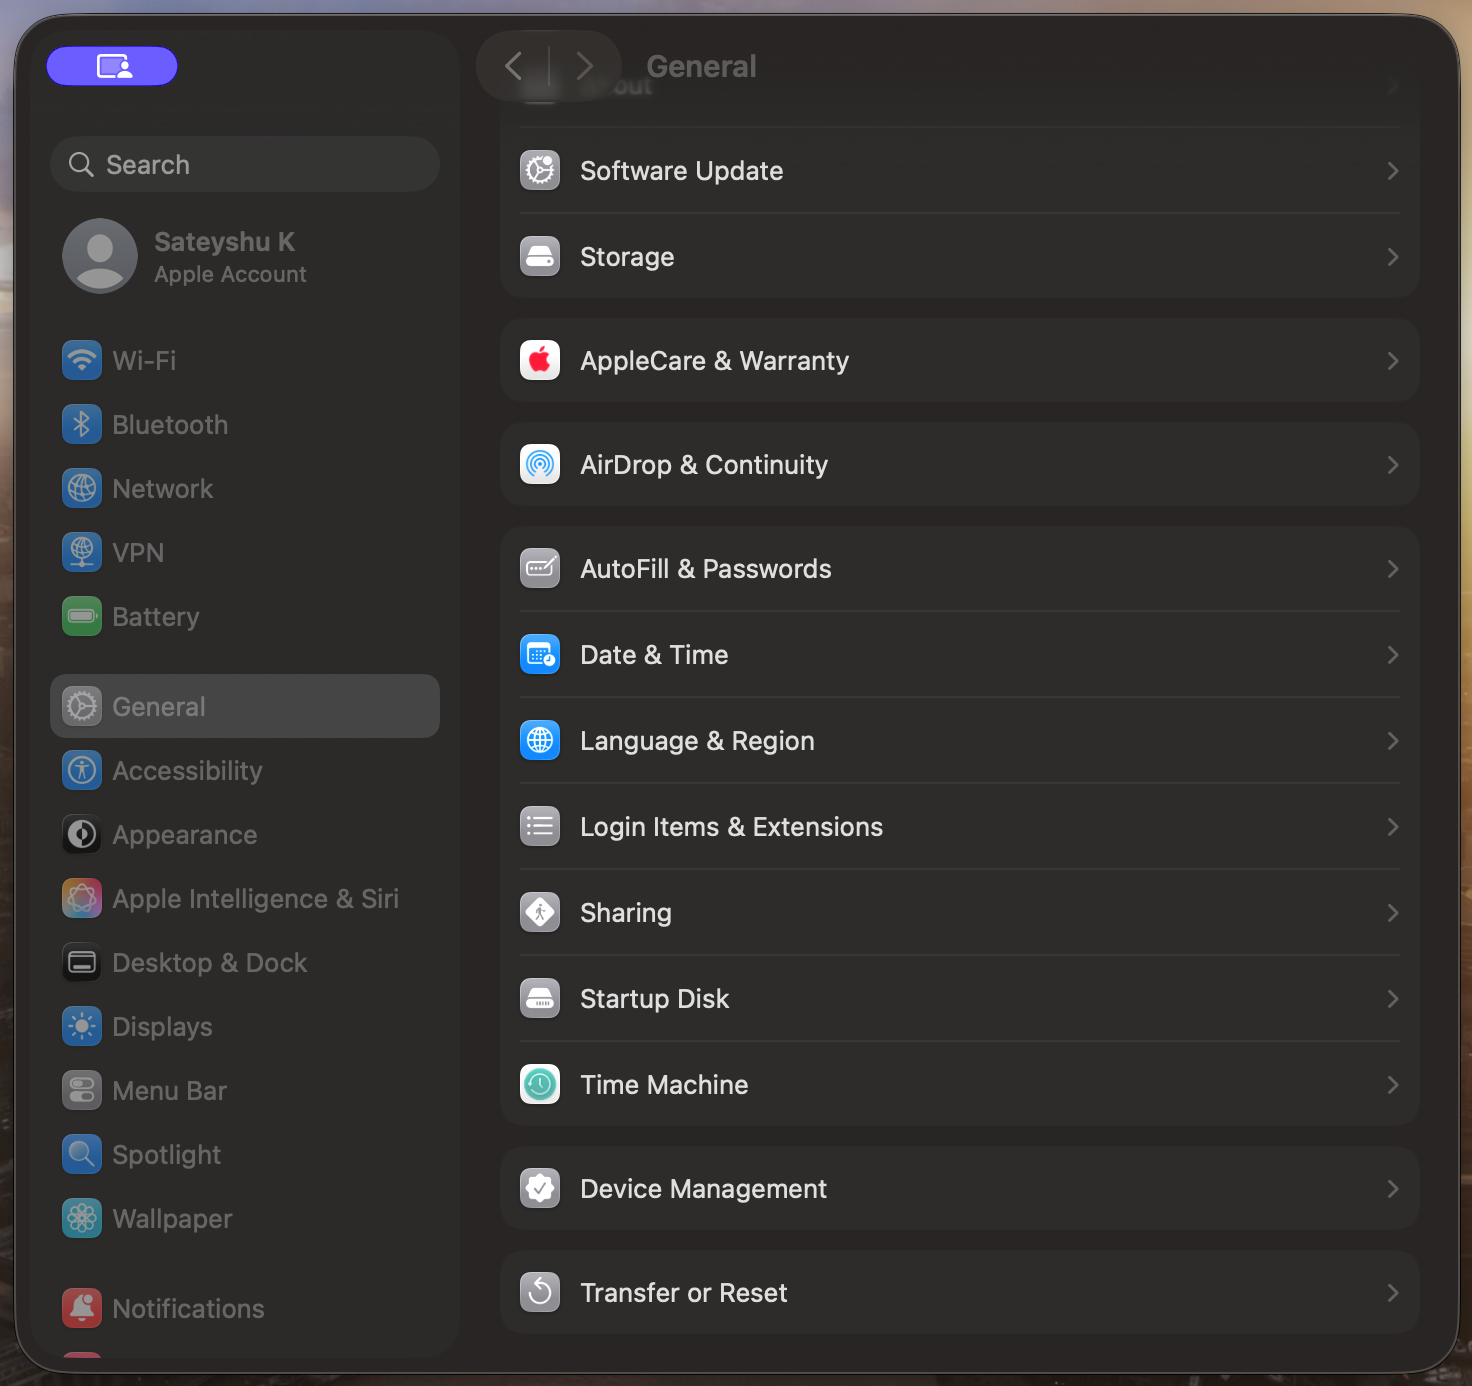
- Click on the Apple menu and open System Settings.
- Go to General > Startup Disk.
![]()
- Select the startup disk that has your OS installed on it.
- Restart your Mac and see if the issue is resolved.
![]()
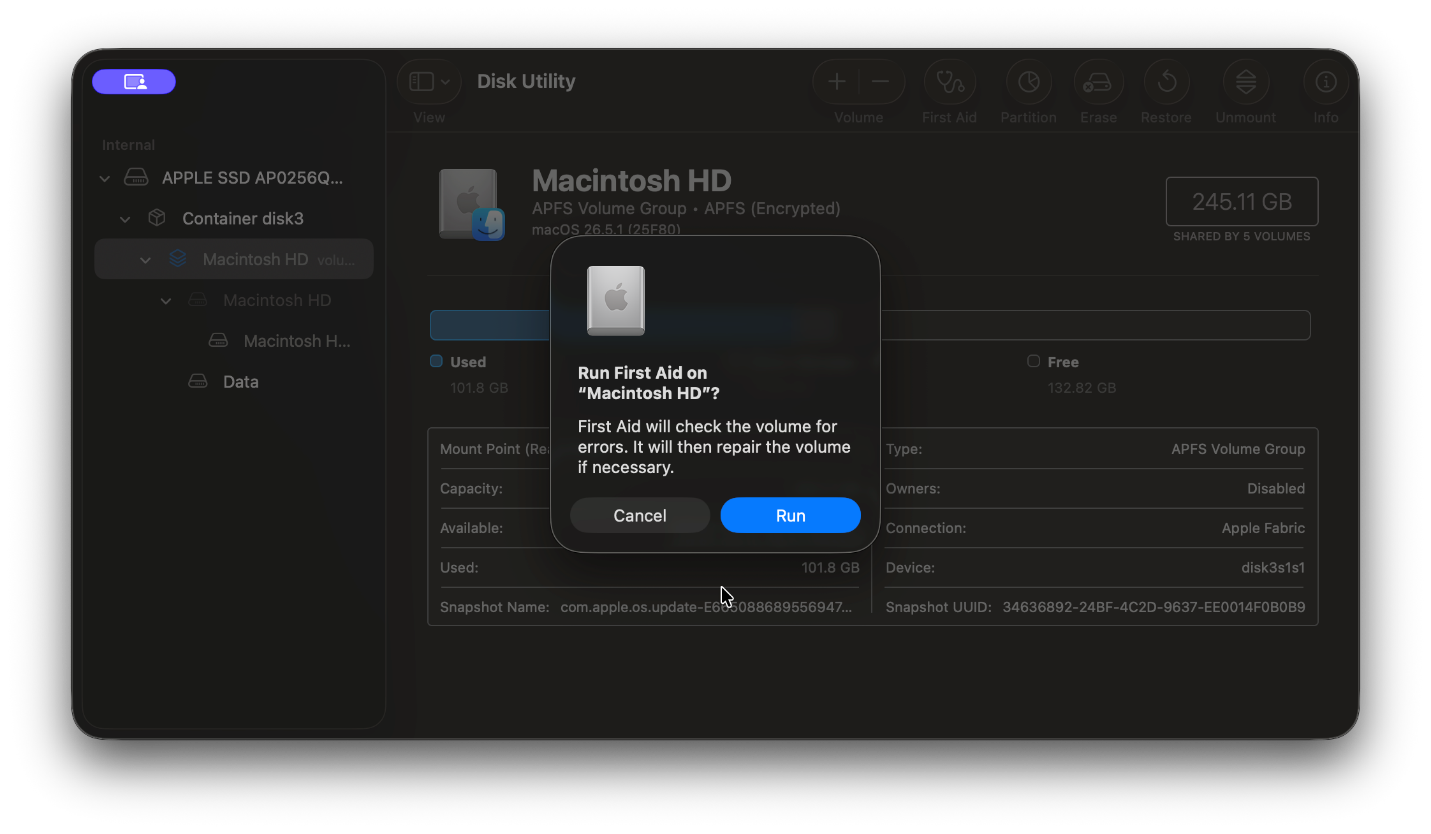
- Select your startup disk (Macintosh HD) from the left sidebar and click First Aid.
- Click Run and wait for the process to complete.
If the issue still persists, move on to the next method.
2. Repair the Disk in Recovery Mode
A flashing folder with question mark issue can occur if your startup disk has run into errors or has become corrupted. Use the First Aid feature in Disk Utility to checks the drive for file-system errors. It repairs common issues like damaged directory structures, invalid volume headers, and minor metadata corruption on both APFS and HFS+ volumes. The best part is that this feature can also be accessed via Recovery Mode, useful when the Mac is unable to boot up.
Here’s how to boot into macOS Recovery:
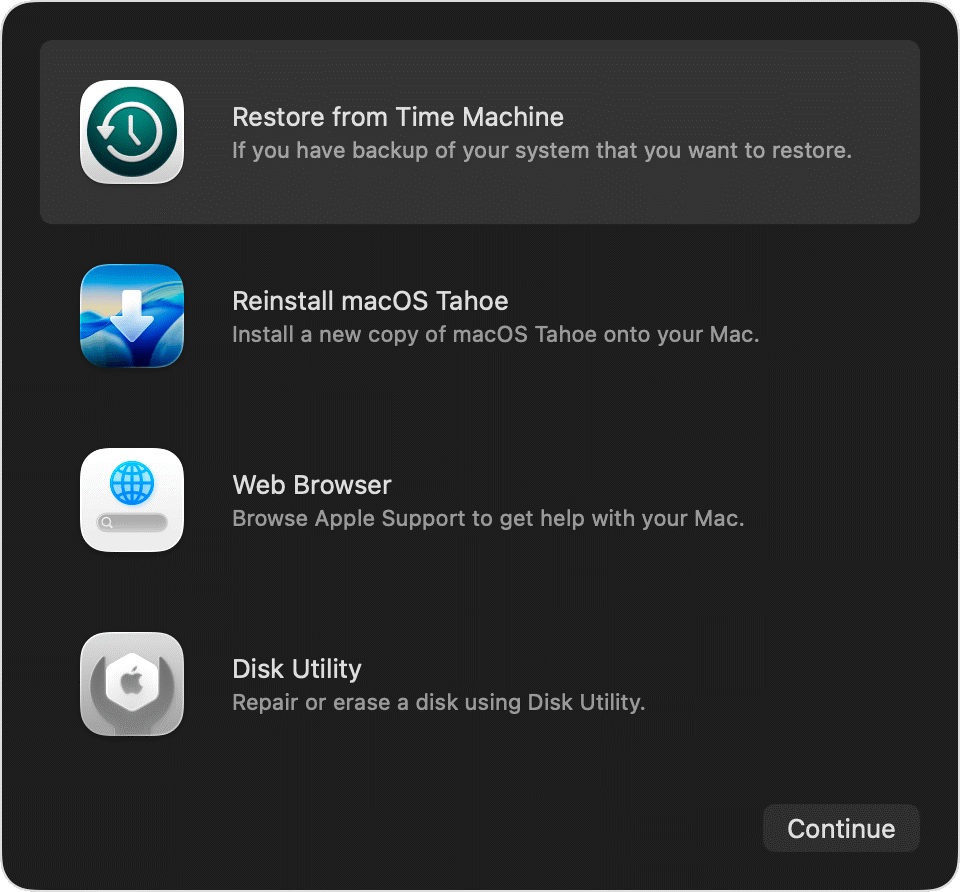
For Apple Silicon Macs: Shut the Mac down completely. Press and hold the power button until you see “Loading startup options”. Click Options > Continue. Next, select Disk Utility and click Continue.
![]()
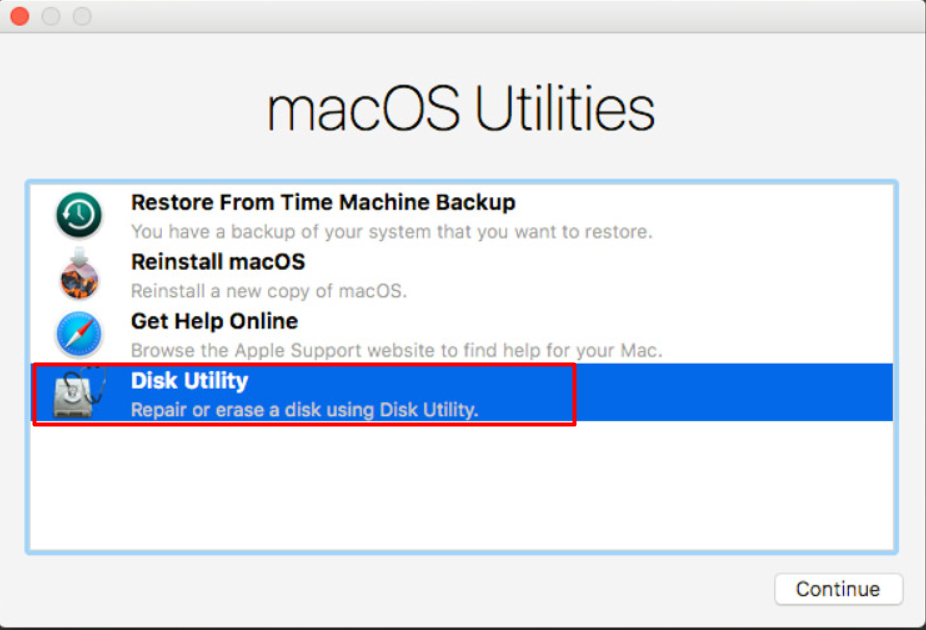
For Intel Macs: Restart while holding Command + R until the Apple logo appears. Your Mac will now boot into Recovery Mode. Select Disk Utility from the macOS Utilities window.
![]()
Once you have successfully accessed Disk Utility from Recovery Mode, the next step is to repair your disk using First Aid.
![]()
3. Reset NVRAM and SMC (Intel Macs Only)
Resetting NVRAM and SMC can help fix the flashing question mark folder by clearing corrupted system parameters which control how your Mac finds and powers its hardware components while booting up. Note that this method applies only to Intel Macs and it’s not possible to manually reset NVRAM and SMC on Apple Silicon Macs.
To reset NVRAM
- Shut down your Mac.
- Press the power button and immediately press and hold the following keys: Option + Command + P + R
- Hold the keys for about 20 seconds and then release.
- Reconnect the drive after macOS has fully loaded.
To Reset the SMC (Intel laptops...
Read more » -
How to Fix Flashing Question Mark Folder Issue on Mac?
08/26/2026 at 11:26 • 0 commentsIf the flashing question mark folder continues to appear even after trying all the troubleshooting methods above, the issue may be related to a hardware failure. In such cases, it’s best to seek professional help rather than trying to attempt further repairs yourself. You can contact Apple Support or visit and Apple authorized service provider to get your Mac properly diagnosed and repaired.1. Repair the Disk in Recovery Mode
Make sure you have a backup of your Mac before proceeding. In case there’s no backup, use a Mac data recovery software to recover all your important data, as some troubleshooting methods like running Disk Utility on a damaged directory may result in data loss. Before applying more technical fixes, try some basic workarounds like restarting your Mac.
If the error was caused by some minor software glitch, a simple restart can often resolve it. Next, check the peripheral devices like printers, scanners, or USB drives connected to your computer. Sometimes, they can interfere with the startup process and cause the flashing question mark folder issue on your Mac. Disconnect all external devices and check whether the error message disappears.Issues on macOS can range from minor glitches to problems that prevent your Mac from booting altogether. A folder with a flashing question mark is one such case that appears on the screen during startup. It usually means that either the Mac is unable to locate its startup disk or it can’t detect a working macOS installation. As a result, the system is unable to complete the boot process.
Many factors, including startup disk issues like bad sectors, formatting errors, or directory corruption, can trigger this problem. Additionally, an incompatible or incorrectly installed macOS version can also cause the Mac to fail to start. Regardless of the reason, the error can interrupt your work and prevent you from accessing your files and apps. This guide will help you quickly fix the flashing folder with a question mark issue and get your system back on track.
Quick Ways to Fix the Flashing Question Mark Issue on Your Mac
Make sure you have a backup of your Mac before proceeding. In case there’s no backup, use a Mac data recovery software to recover all your important data, as some troubleshooting methods like running Disk Utility on a damaged directory may result in data loss. Before applying more technical fixes, try some basic workarounds like restarting your Mac.
If the error was caused by some minor software glitch, a simple restart can often resolve it. Next, check the peripheral devices like printers, scanners, or USB drives connected to your computer. Sometimes, they can interfere with the startup process and cause the flashing question mark folder issue on your Mac. Disconnect all external devices and check whether the error message disappears.1. Check Startup Disk Settings
Make sure you are using the correct startup disk (usually named, Macintosh HD).
- Click on the Apple menu and open System Settings.
- Go to General > Startup Disk.
- Select the startup disk that has your OS installed on it.
- Restart your Mac and see if the issue is resolved.
If the issue still persists, move on to the next method.
2. Repair the Disk in Recovery Mode
A flashing folder with question mark issue can occur if your startup disk has run into errors or has become corrupted. Use the First Aid feature in Disk Utility to checks the drive for file-system errors. It repairs common issues like damaged directory structures, invalid volume headers, and minor metadata corruption on both APFS and HFS+ volumes. The best part is that this feature can also be accessed via Recovery Mode, useful when the Mac is unable to boot up.
Here’s how to boot into macOS Recovery:
For Apple Silicon Macs: Shut the Mac down completely. Press and hold the power button until you see “Loading startup options”....
Read more »
My Pages
Things I've Built
.
 Shree Kumar
 Dessislav Gouzgounov
 Stephen Holdaway
 Mike Moore
 Friedrich Menges
 Tony
Tony agp.cooper
 Solenoid
 Gintaras Valatka
 David Levi
 Francisco Piernas
 Erin RobotZwrrl
 Kn/vD
Kn/vD Ace
Ace Dave's Dev Lab
 Blade Master
 Adrian Prinz
 Tim Wilkinson