Jonathan Good
-
Moving away from Raspberry Pi
02/11/2025 at 14:50 • 0 commentsThe precursor of Gambit, Bishop, used a complex system of wiring that involved a Raspberry Pi acting as the main source of computing power, and a Arduino Mega controlling the hardware. As time passed, this implementation caused more and more problems to the point where it started to be unfeasible. Those problems are listed below:
- Serial connection – This setup required a serial connection to be established between the Pi and the Arduino. Not only was it a complex and very bug-prone piece of software, it also introduced additional delays. It was in fact the main reason why we had to wait a second or two for a state in the FSM to change.
- Expensive – Raspberry Pis ain’t cheap and like to fry themselves every once in a while
- Severed codebase – The codebase had to be split between the Arduino and the Pi which introduced unnecessary complexity
- Overkill – Upon further consideration we realised that we don’t actually need all this computing power
- Bulky – One of our main goals with Gambit was to make it more compact, and the raspberry Pi introduced some difficulties with that simbly by bying too big.
As such we switched to an Arduino Nano ESP32. Not only does it meet all our hardware requirements, it is also small and compact – mush smaller than a Mega. This made it easier to prototype with on a breadboard. One drawback is that we are missing out on enough computing power to run an advanced chess engine, however an ESP32 is able to connect to WiFi and as such can offload heavier computations to outside sources. Moreover it is able to handle simpler chess engines and thus will still allow users to play against it without internet connection. Best of all, we could finally leave serial connection hell behind.
-
Chess Piece Redesigns!
02/11/2025 at 14:49 • 1 commentOne of the main issues with our current chess pieces is that they are too light, causing them to repel each other whenever they get too close. While this isn’t a major problem—since the movement is minimal—it’s still an annoyance we wanted to fix.
Learning from Phantom Chess
We’re not the first to encounter this issue. Our inspiration project, Phantom, also faced a similar challenge. They solved their weight problem by adding a small steel ring to the bottom of their pieces and switching from plastic to wood—though this required a CNC mill.
Our Approach
We wanted to keep this project as home-build-friendly as possible. Not everyone has access to a CNC mill, so switching to wood wasn’t an option. Instead, we opted to:
- Increase the size of the pieces (one of the key suggestions from our peers).
- Modify our print settings by increasing infill density to make the pieces heavier.
Old Chess Pieces
![]()
New Chess Pieces
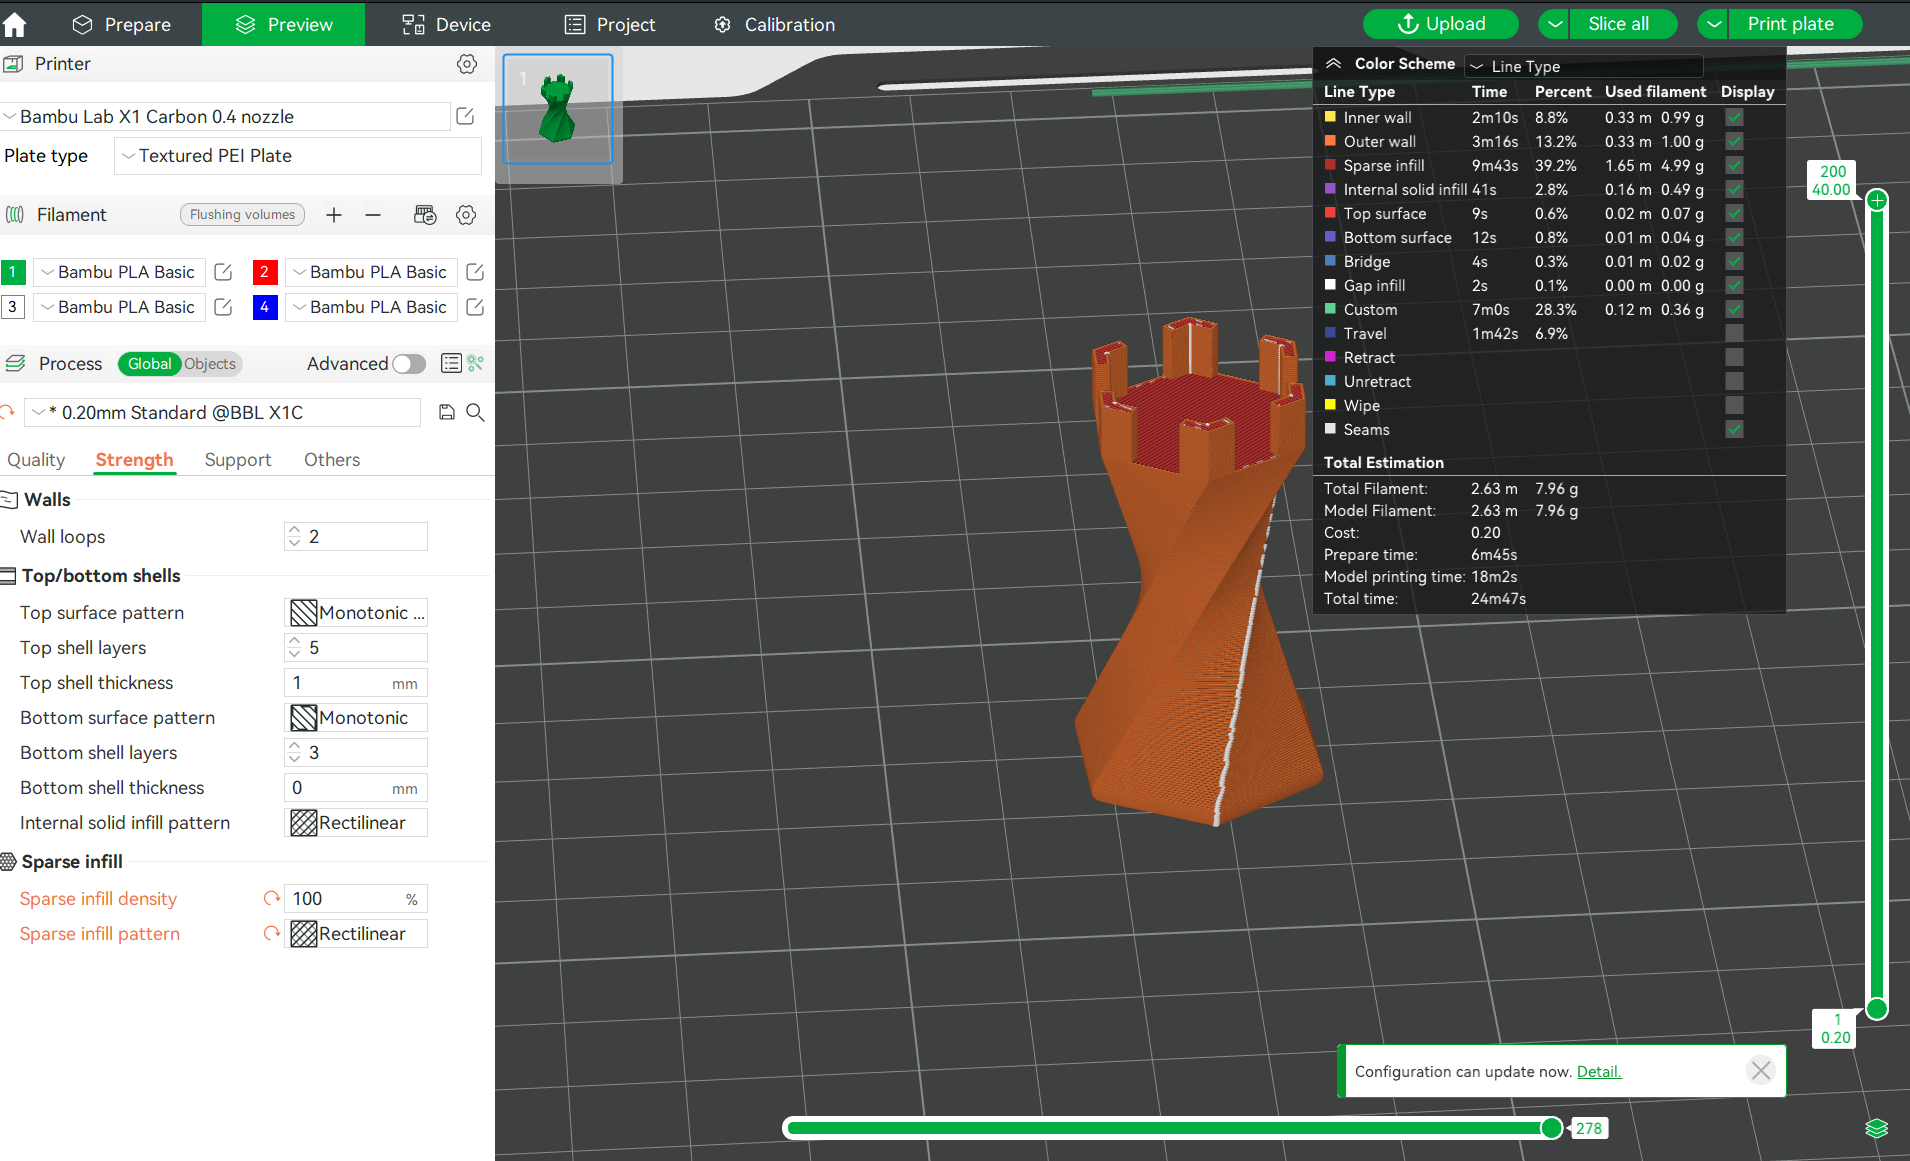
By increasing the size of all pieces and setting the infill to 100% on our Bambu A1 Mini, we managed to double the weight of each piece, significantly reducing unwanted repulsion.
Major Design Reworks
- The Pawn: We majorly increased its size—without this, simply setting the infill to 100% wouldn’t have been enough to add sufficient weight.
- The Knight: Completely redesigned! The previous version (which some dubbed a "Minecraft Villager") has been replaced with a version that better fits the twisted loft design of the other pieces.
---
Guide for Printing
Magnet Fit Tolerance
- Tolerance is always an issue when fabricating, and printing chess pieces is no different.
- We used 8mm x 3mm Neodymium Magnets from Amazon, with two magnets per piece.
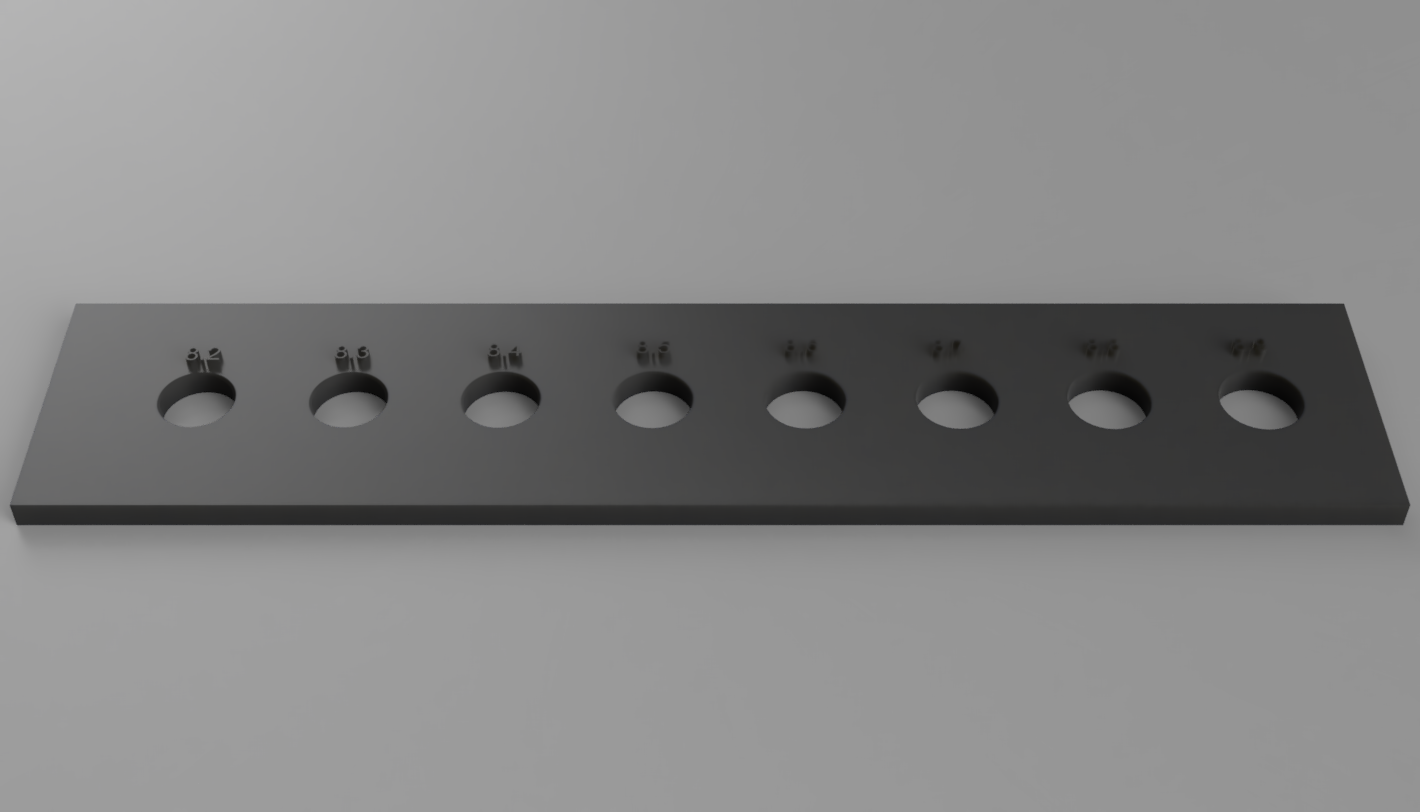
- Before printing the full set, we highly recommend printing our magnet size tolerance test strip:
![]()
This test lets you fine-tune the diameter of the magnet hole to ensure a snug fit—tight enough that the magnets don’t require glue, but loose enough that they can be inserted without excessive force.
Printing Settings- Print each piece with 100% infill to maximise weight and reduce repulsion.
-
Switching from Rust to C++
02/11/2025 at 14:45 • 0 commentsHow it started
Originally, a big part of the chessboard infrastructure, including the finite state machine, was written in Rust. This was done for several reasons: Firstly, the chess engine we were planning to use was written in Rust and so it would simplify the integration. Secondly, Rust had several very well made, well documented and easy to use packages for chess implementation. With the addition of it also being a fast programming language with the added benefit of memory safety, it seemed like an apt choice.
Rust was not ideal
After changing some parts of our system, most notably the switch from Raspberry Pi and an Arduino Mega to a single ESP32, as well as the introduction of platform.io in our project, that choice was no longer ideal. Rust is still an emerging language and so it posed some challenges when trying to integrate it with systems that are primarily suited for C++. As such, we decided to rewrite all of our code in C++. The biggest benefits of that was the easy integration with embedded systems infrastructure, as well as no more need to manage communication with the Rust and C++ parts through unnecessarily complex I/O algorithms.
Tit for tat
As with every decision however, there were also some drawbacks. First of all, we needed to spend more time on a problem that’s already been solved (FSM). One could argue that this switch would safe time in the long run since it would make us avoid many potential integration bugs in the future, but I digress. Secondly, the chess libraries were not nearly as easy to use. The library we settled on in the end, Nibble Chess, is very basic and I had to write a lot of the functionality that I took for granted with the Rust libraries myself. Finally using C++, an old and complex language, caused some difficulties by itself, but that is a story for another time.
Overall, the switch was successful, and we expect it to not only to make integration between individual components easier, but also improve latency and make the board more responsive thanks to lack of I/O communication between the FSM and the motor control.
![]()
-
Pieces Weights
02/11/2025 at 14:38 • 0 commentsDuring our testing sessions we stumbled upon an issue. The magnet would sometimes pull in pieces that it wasn’t supposed to from neighbouring squares. Moreover the pieces would sometimes repel each other when placed too closely. Eventually we narrowed down the problem down to the pieces simply being too light.
Several ideas passed through our heads: perhaps we could make the pieces bigger? But that would make moving pieces between squares harder. Add more magnets? But that would further exacerbate the problem. Maybe put a metal rod inside the pieces? Sounds complicated.
Eventually in the spirit of Occam’s razor, I figured out we can just set the infill during 3D printing to 100%. Teamwork makes the dream work.
![]()
-
We are not electricans
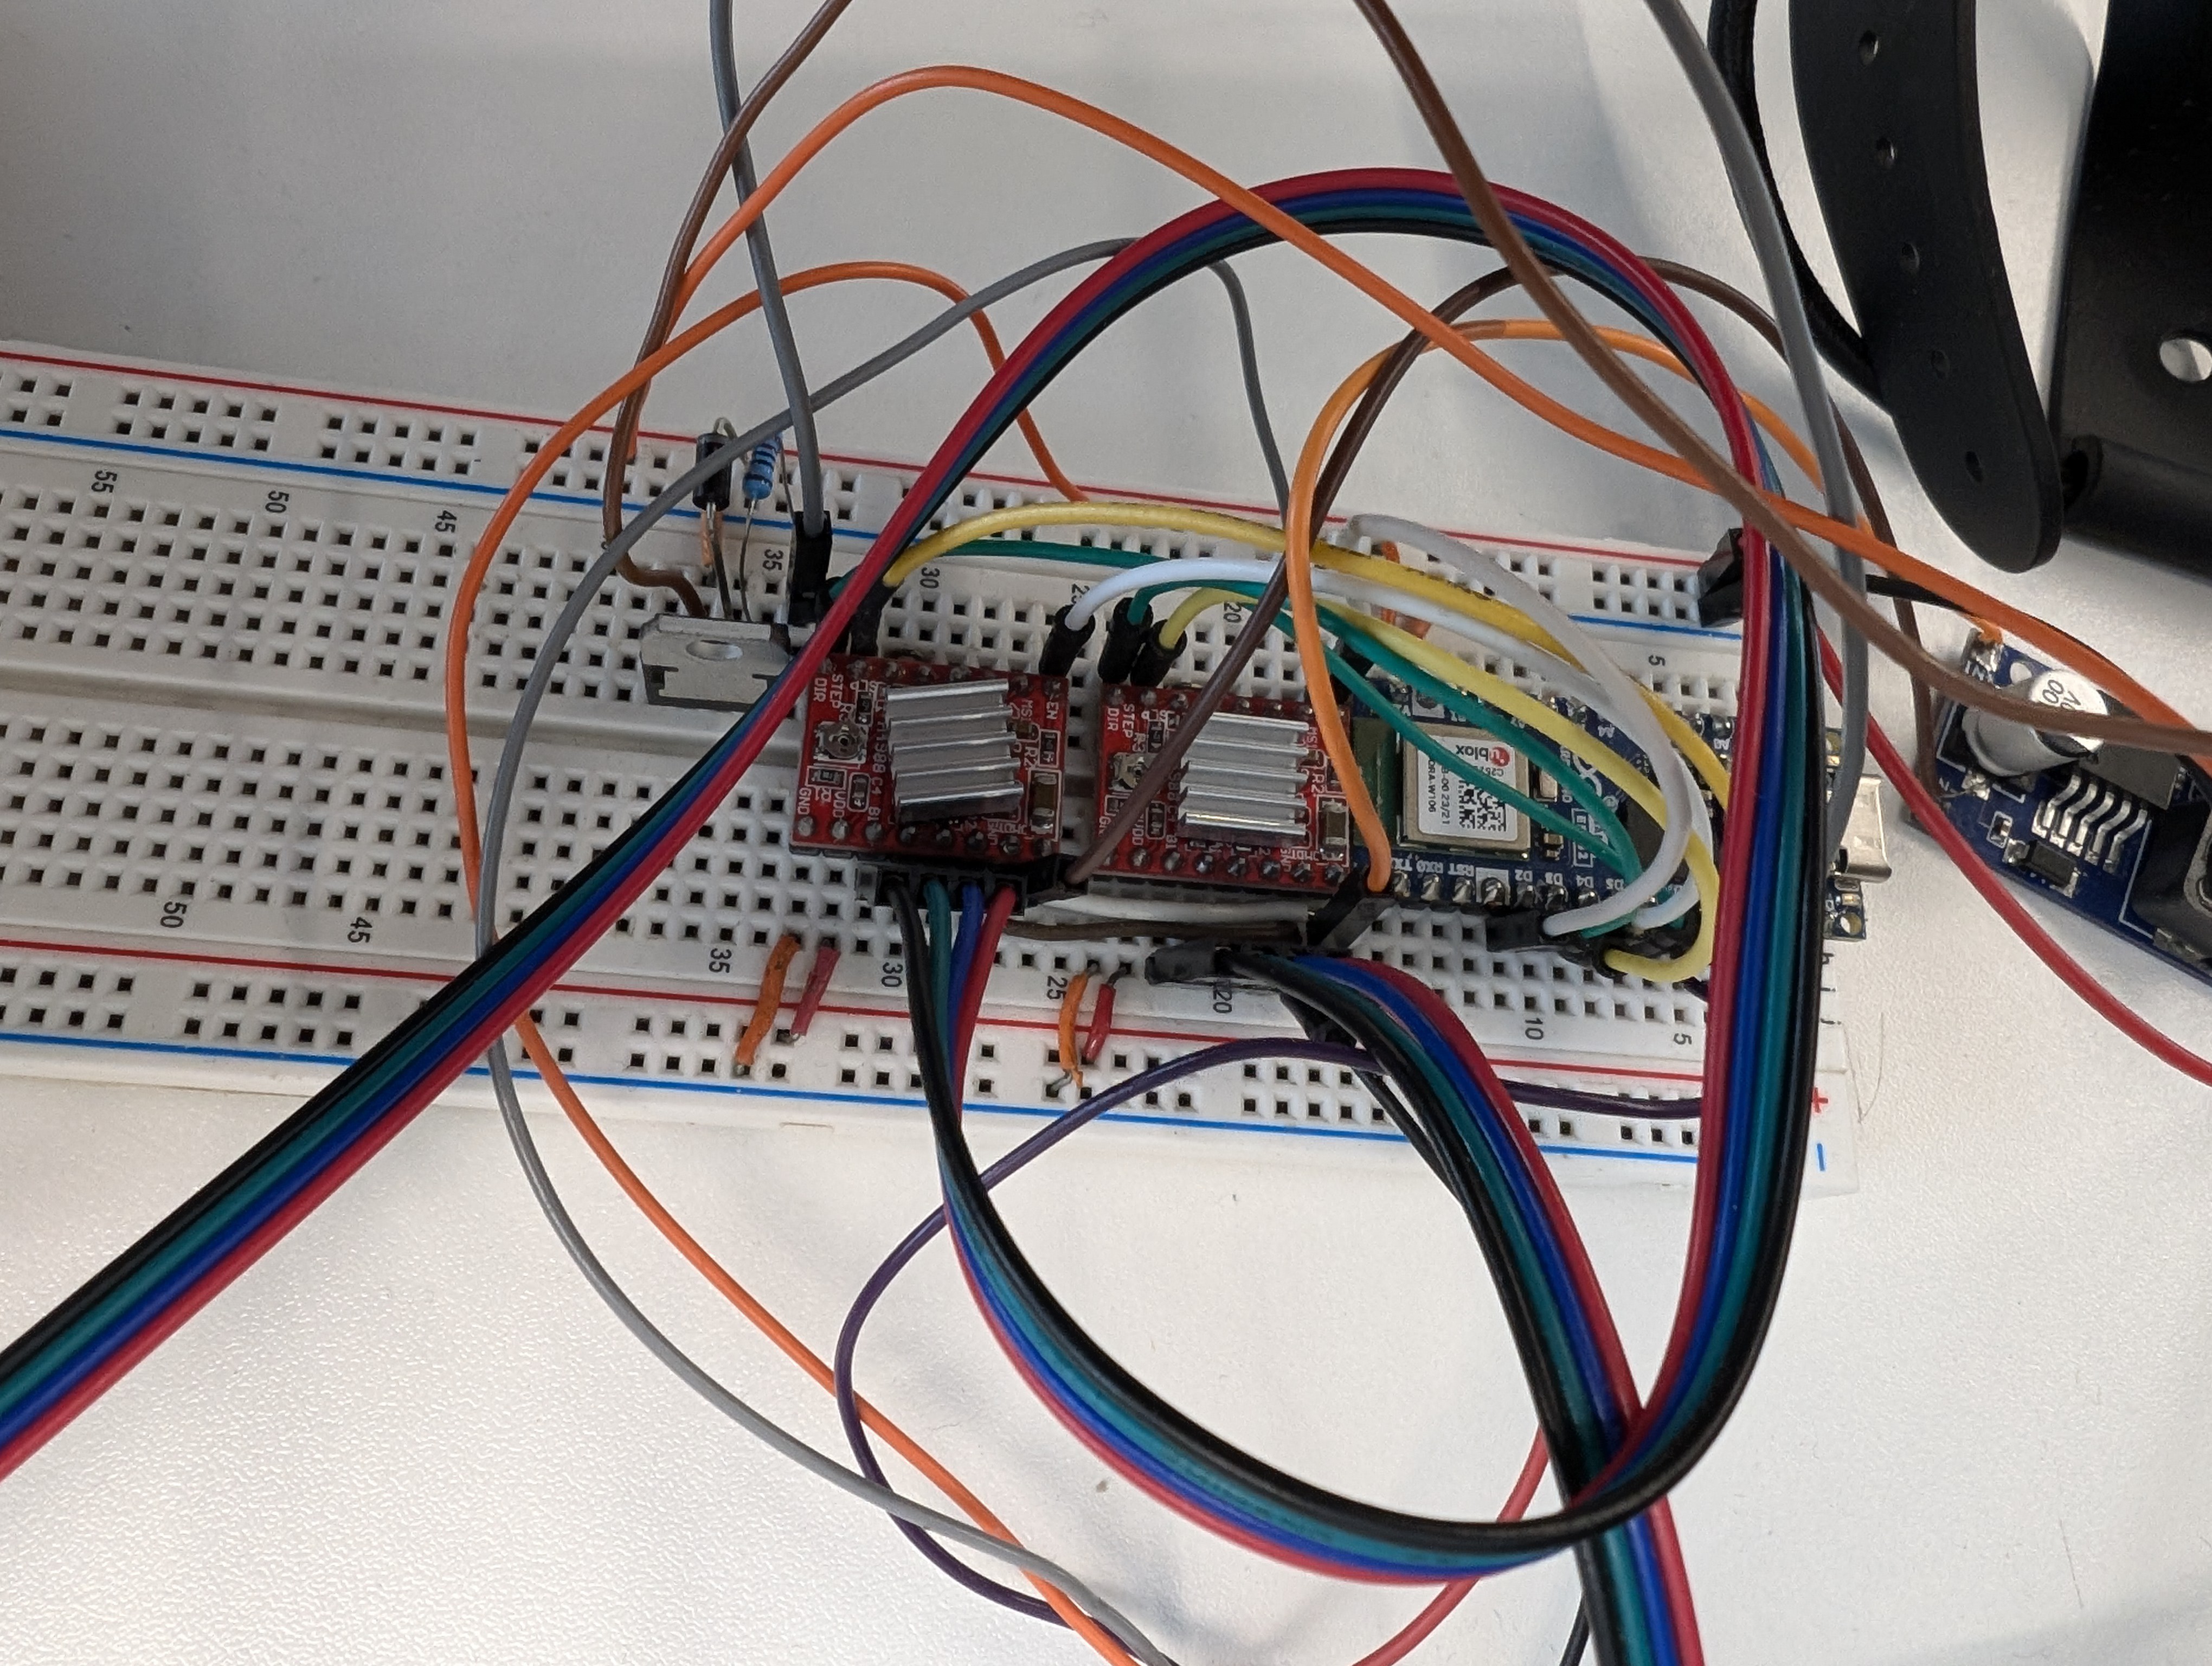
02/11/2025 at 14:33 • 0 commentsUp until now, we’ve been running motor control, chess piece detection, and electromagnet control through a breadboard. While this worked brilliantly for quick fixes and prototyping, now that we know all the electronic components needed for Gambit, it’s time to move away from the breadboard.
Why Move to PCBs?
One of the biggest issues with breadboards is their unreliable connections—cables can easily come loose if the board shifts. This was fine during prototyping, but now that our circuit is finalised, it’s no longer acceptable.
Component List
Power Input & Electromagnet Control
- 1x Buck Converter – Allows us to use a single power source, safely splitting power between the motors (12V) and the Arduino (5V).
- 1x Arduino Nano ESP32
- 2x Nema 17 Stepper Motors – Moves the electromagnet.
- 2x A4988 Motor Driver Chips – Controls the stepper motors.
- 1x Limit Switch – Calibrates the movement mechanism.
- 4x NPN Transistors – Acts as a digital switch for the electromagnets.
- 4x Rectifier Diodes – Stabilizes current from the electromagnets.
- 4x 240Ω Resistors – For digital signals from the ESP32.
![]()
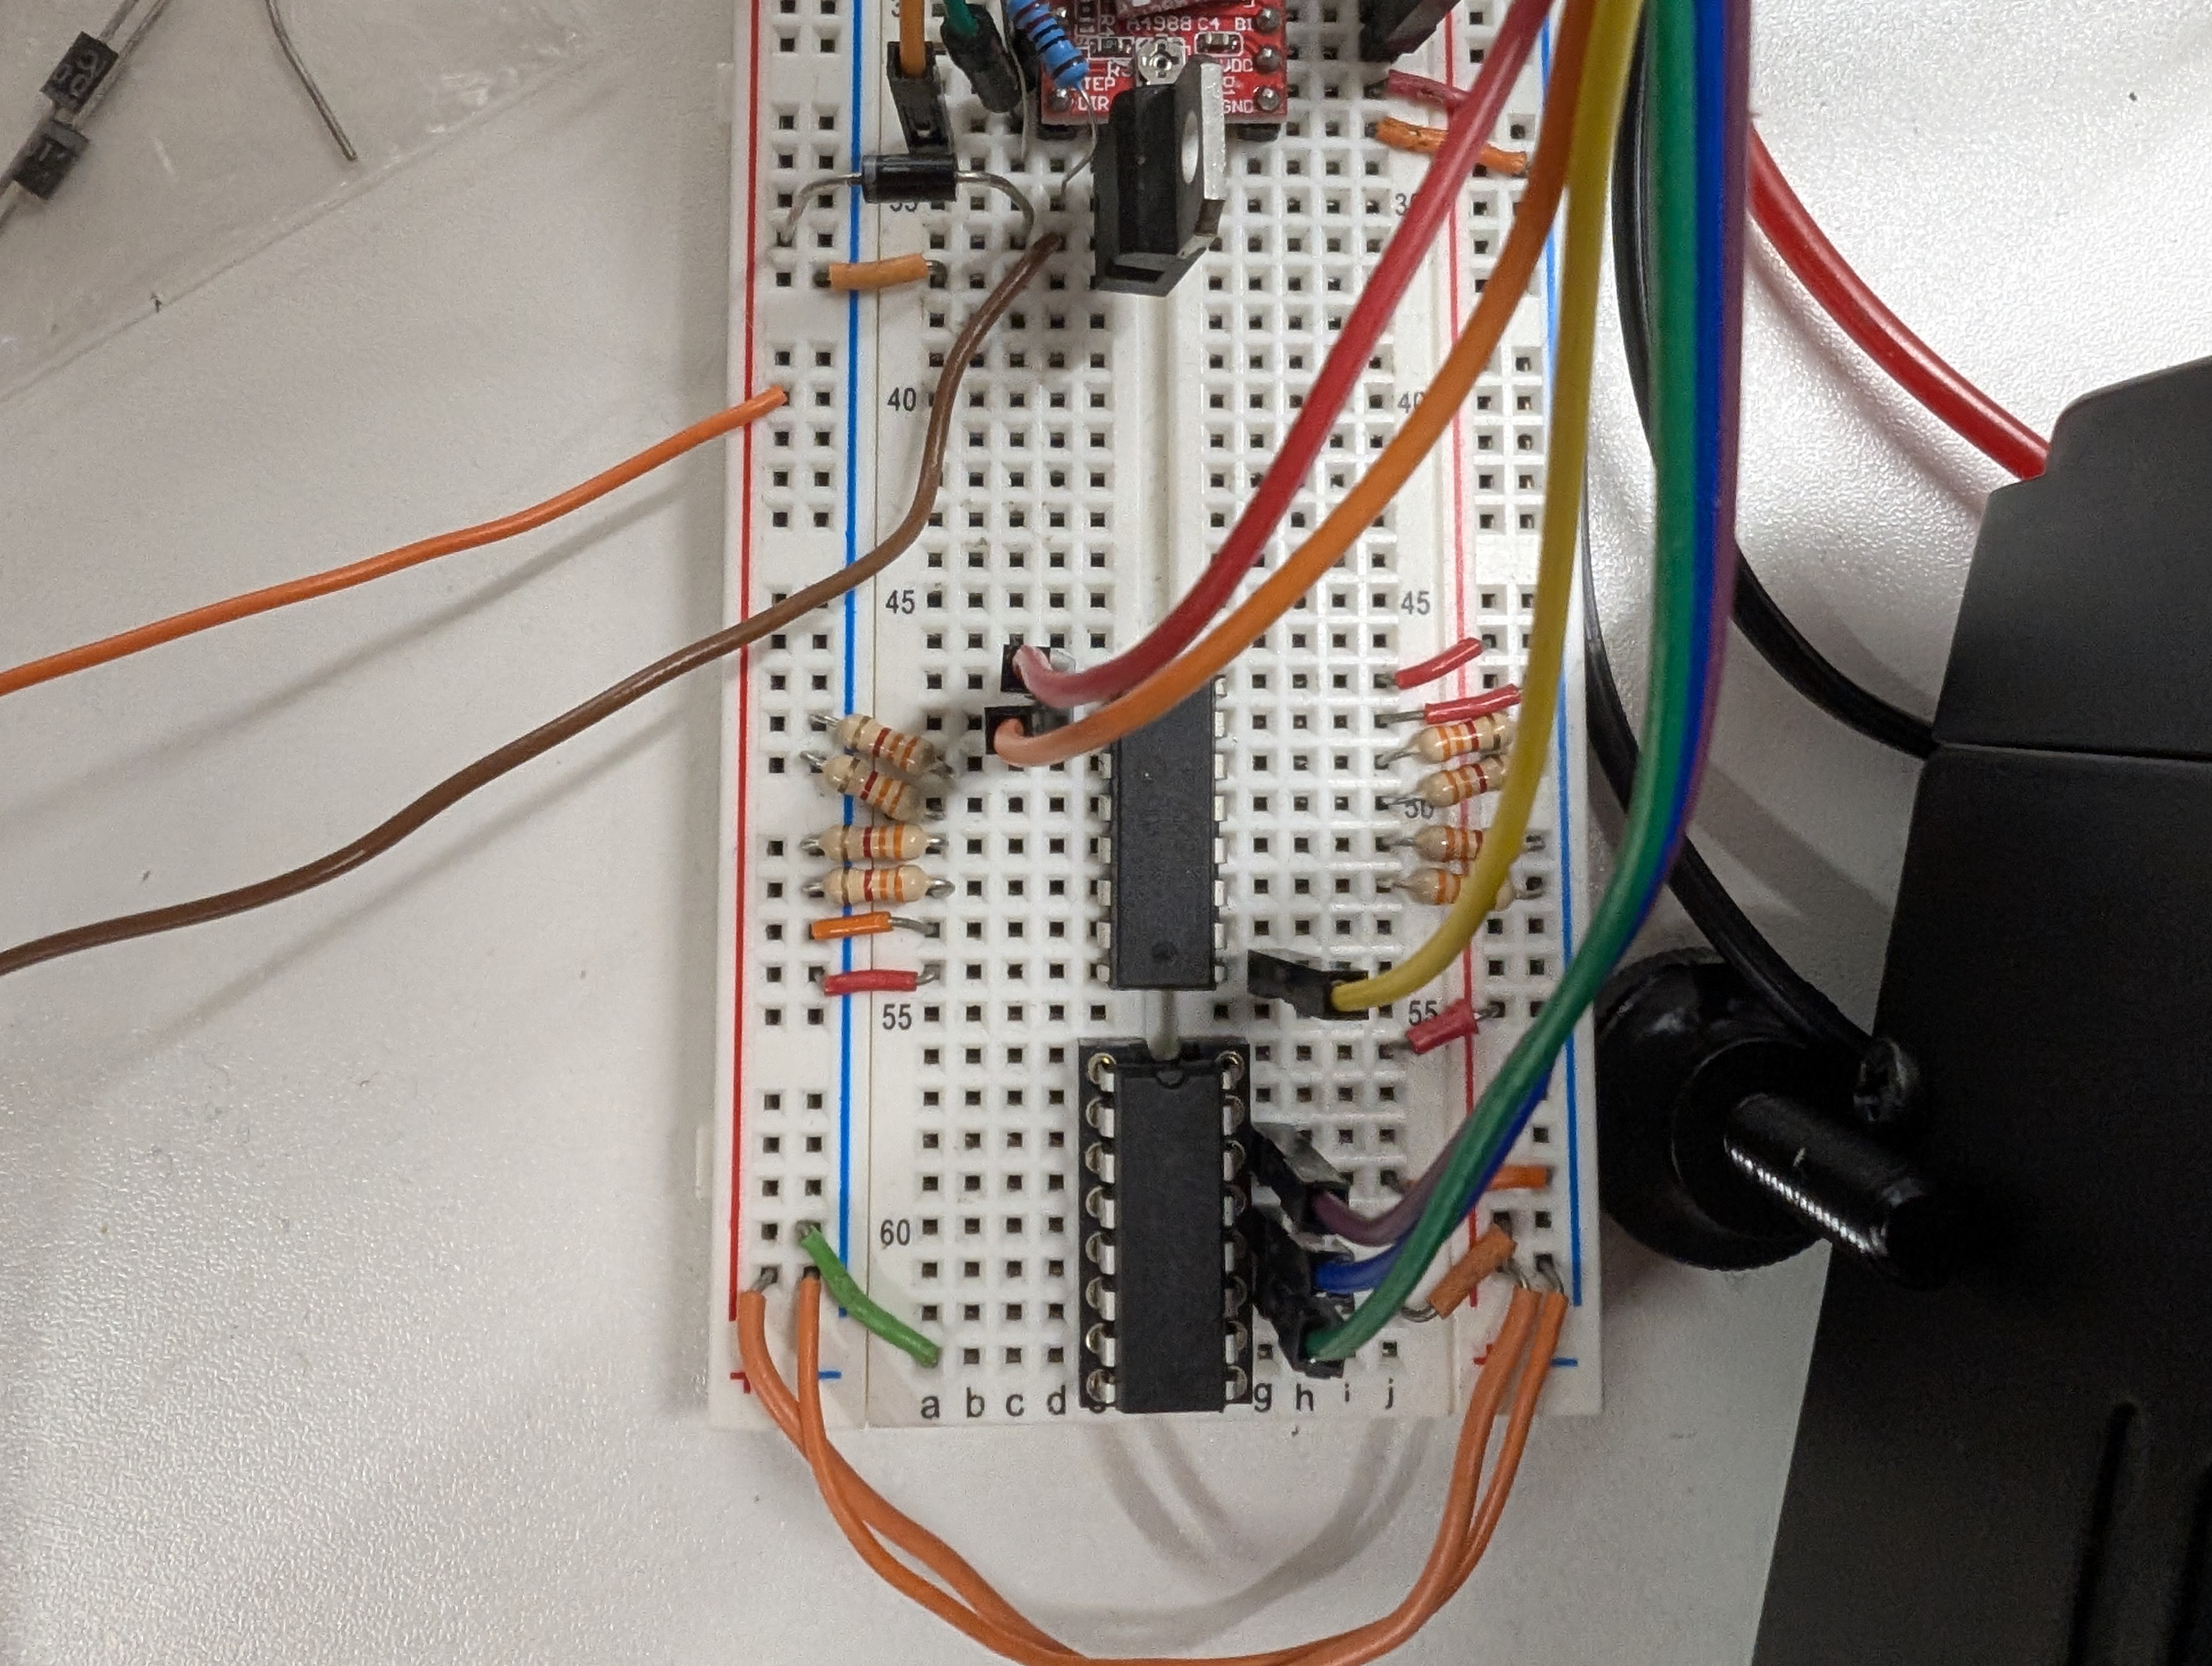
Chess Piece Detection
- 1x 74HC165N (Shift-In Register) – Reads the board’s columns.
- 8x 3.3kΩ Pull-Down Resistors – Stabilizes shift-in readings.
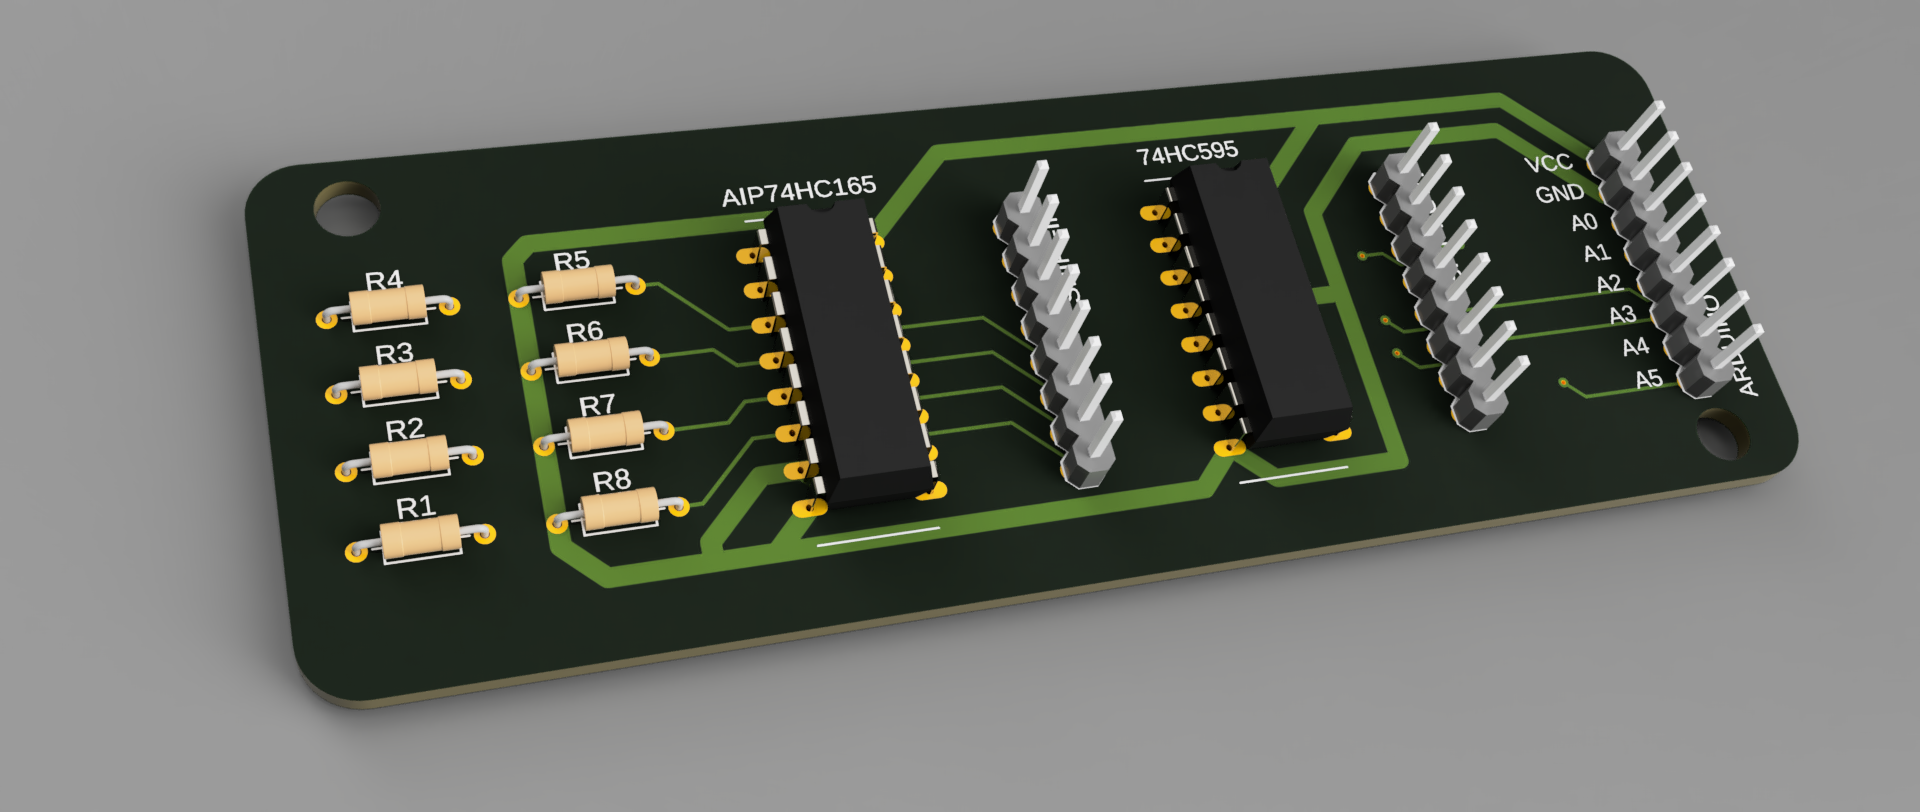
- 1x 74HC595N (Shift-Out Register) – Controls row activation (see our Detection Matrix blog).
![]()
Designing the PCBs
With the breadboard limitations in mind, I fired up Fusion 360 and designed two PCBs:
1. Motor & Electromagnet Control PCB
2. Detection Matrix PCBAfter finalizing the schematics, we sent the designs to JLCPCB, and within a week, the PCBs arrived. We were really impressed with how quickly they were fabricated!
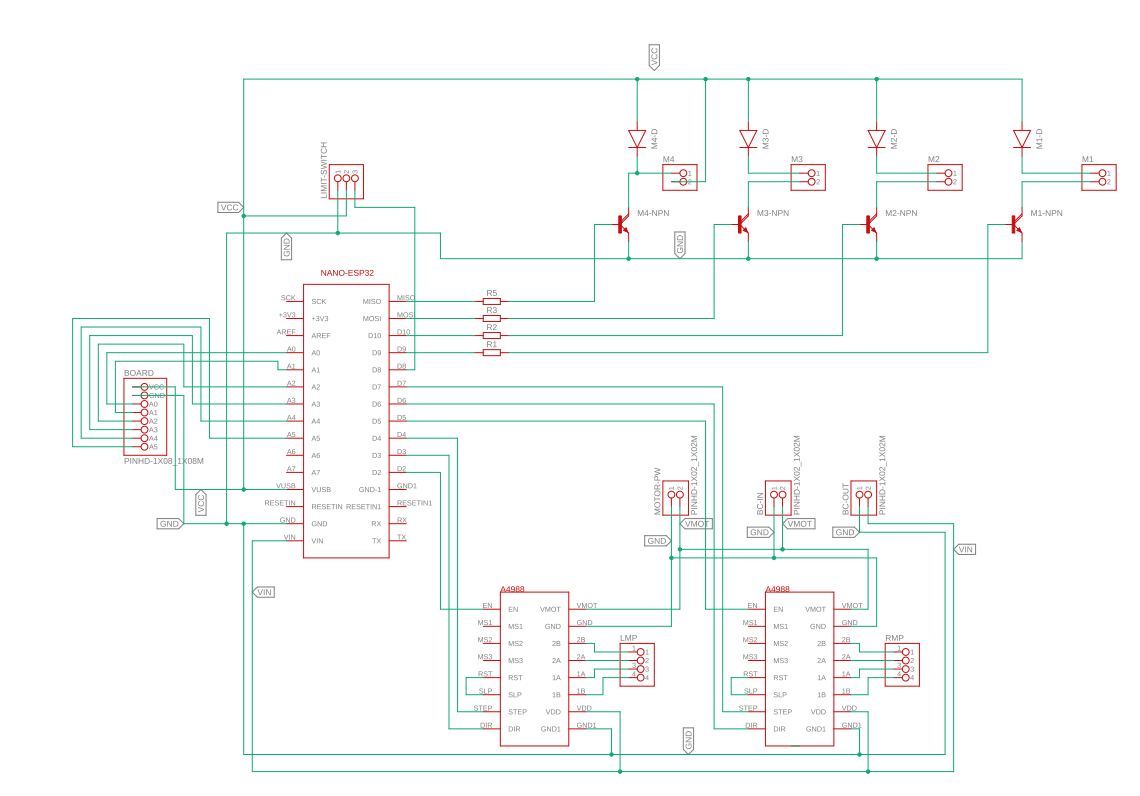
Motor & Magnet Control PCB:
Schematic![]()
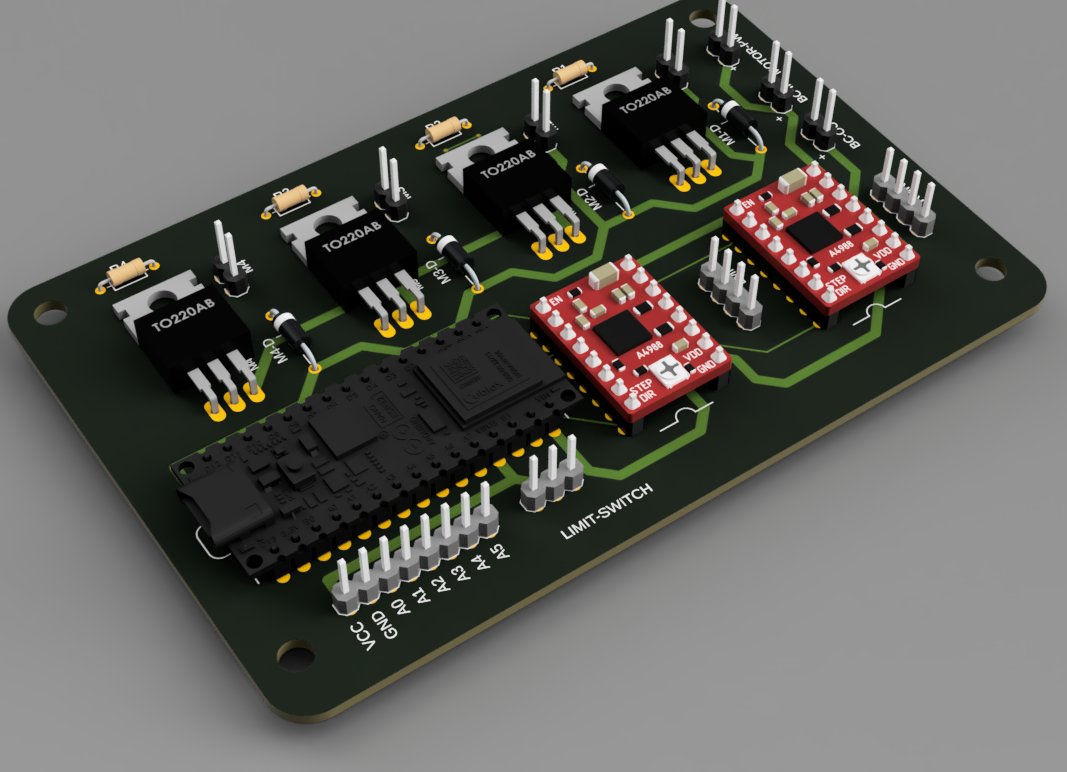
Render![]()
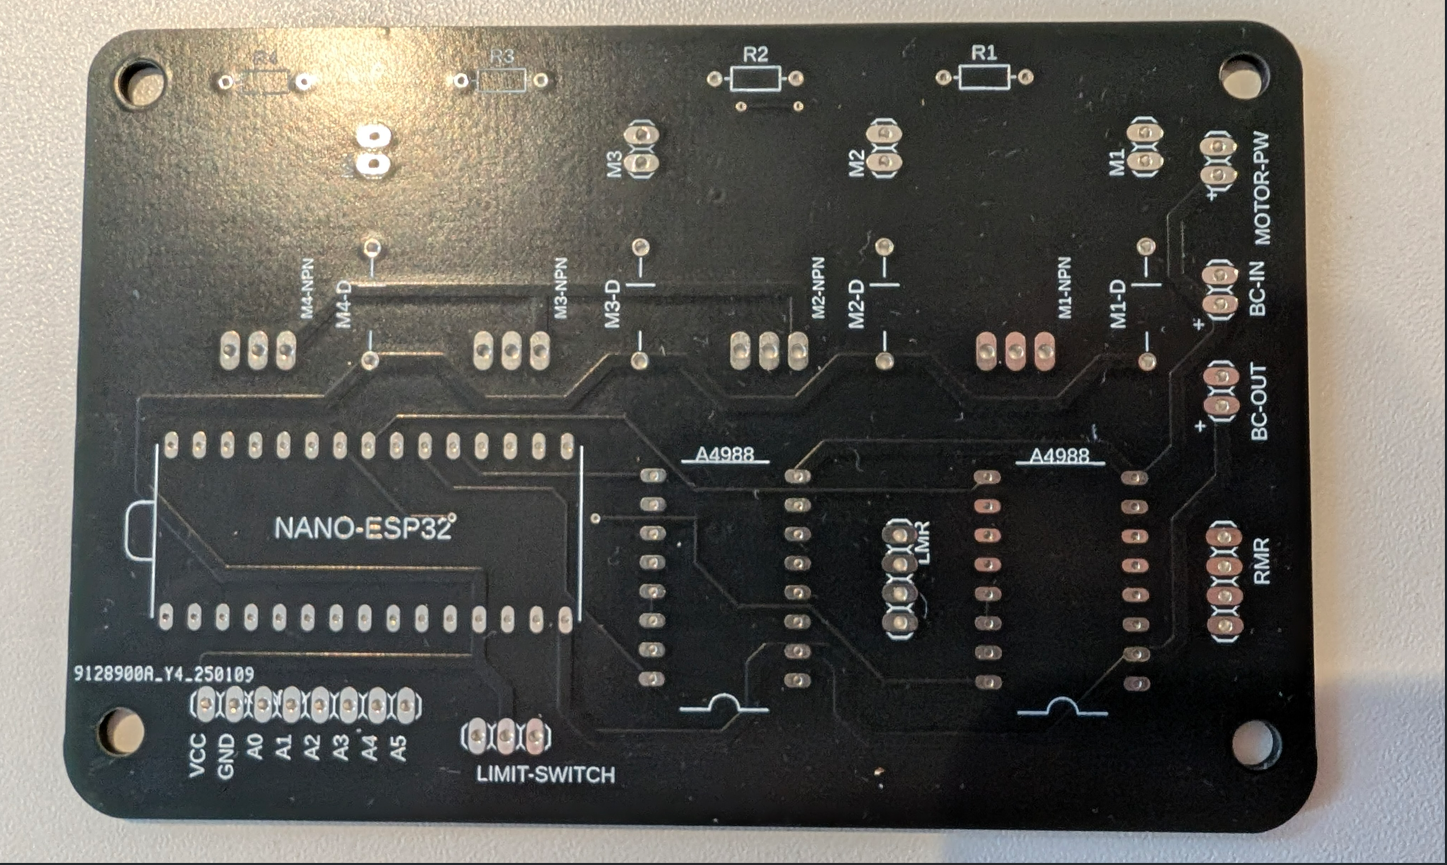
PCB![]()
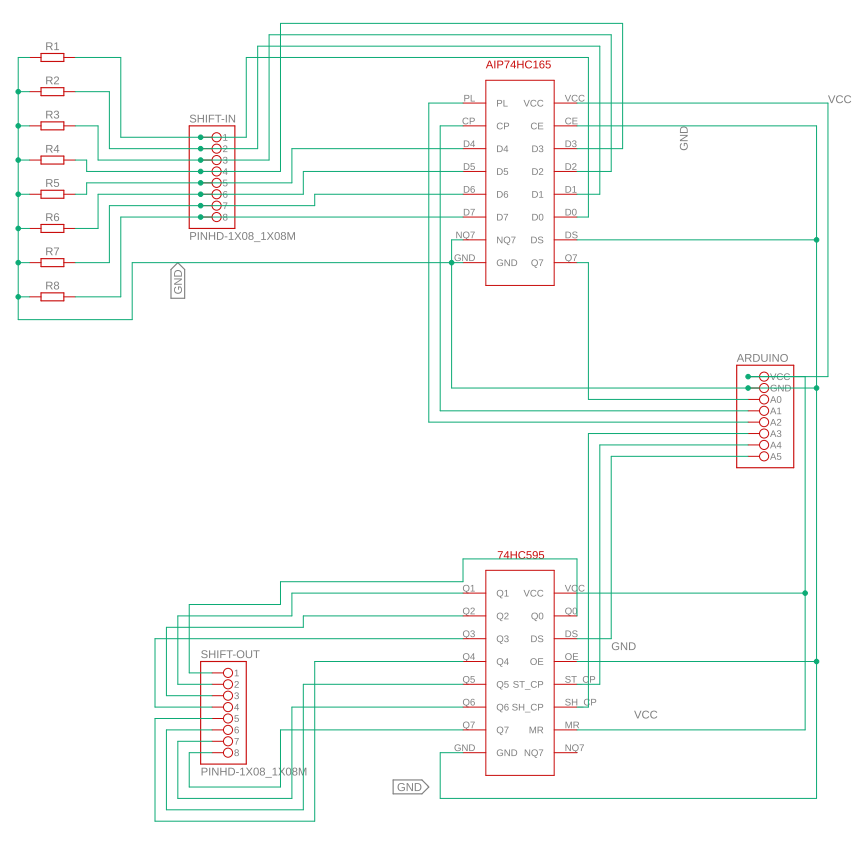
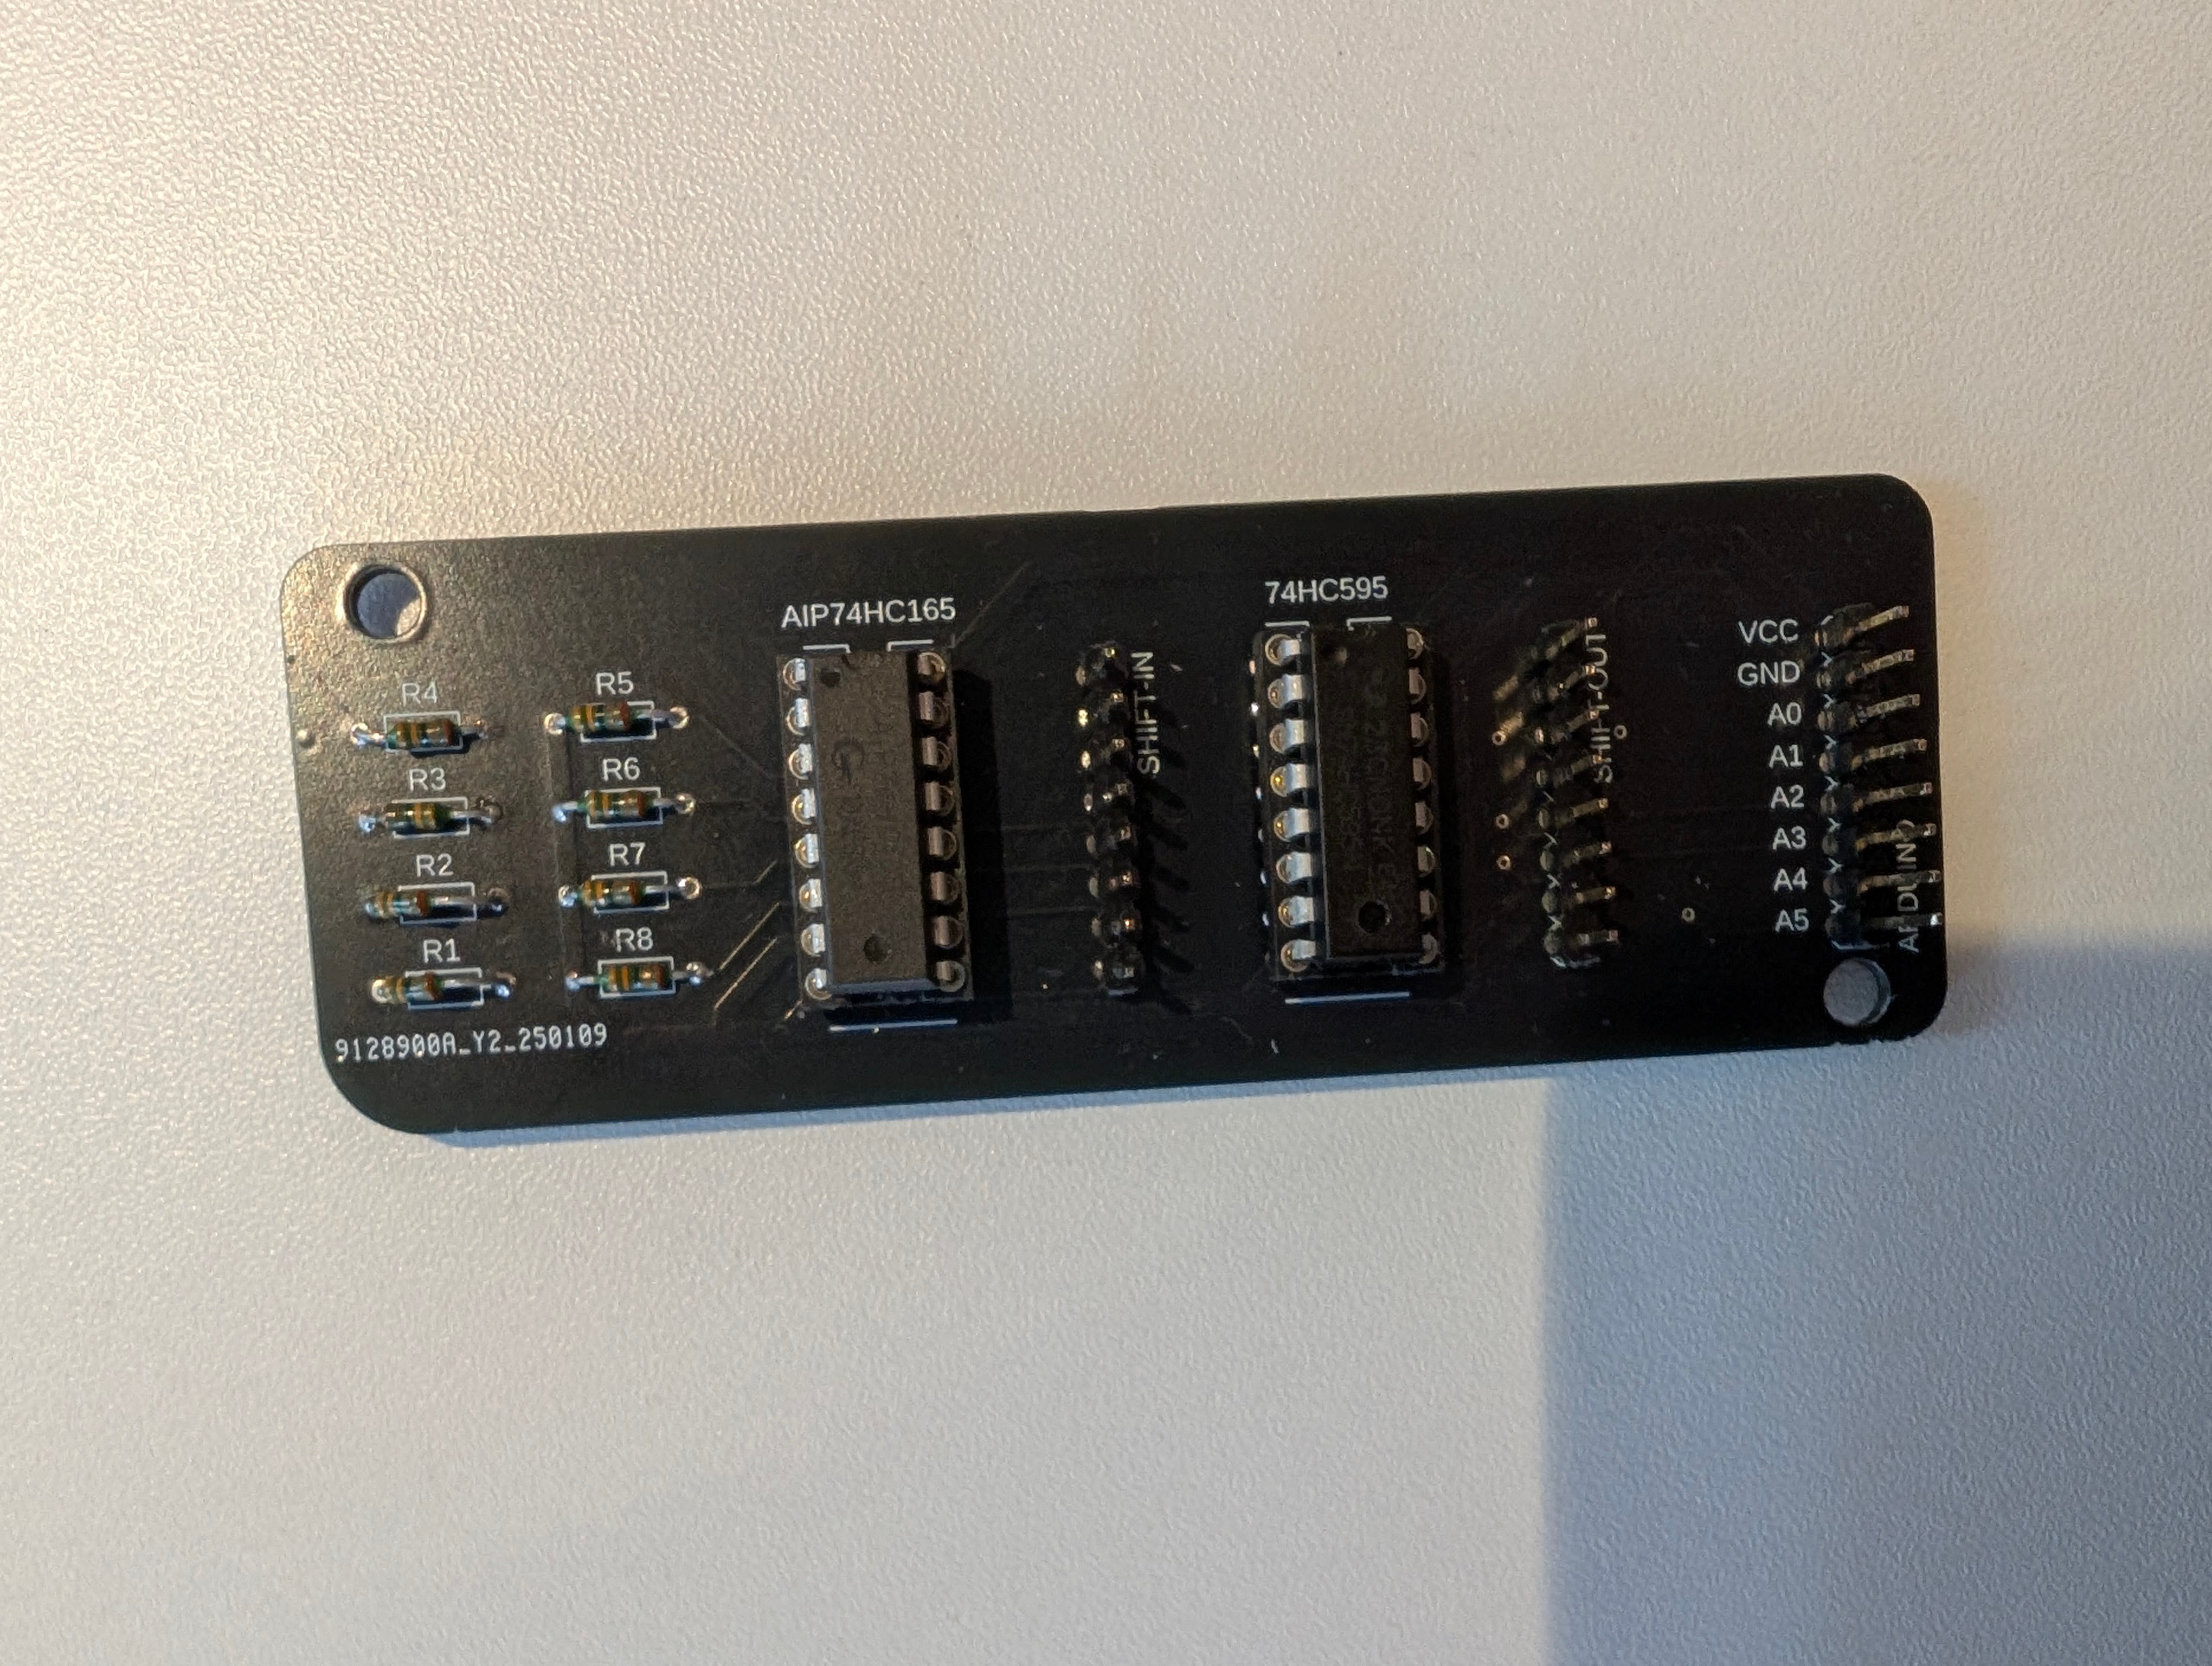
Detection Matrix PCB:
Schematic![]()
Render![]()
PCB![]()
The Not-So-Good News
Unfortunately, this is where our excitement ended.
- Motor-Magnet-Limit Switch PCB Issue:
I mistakenly used incorrect drill sizes for the Arduino and A4988 chips, making the holes too small. As a result, we couldn’t mount the chips to test the circuit.
- Detection Matrix PCB Issue:
After soldering all the components—chips, pin headers, and resistors—we ran into unexpected behaviour. The circuit would only work if we held our finger under certain pins (PL, CP, and CE). This issue never occurred with the breadboard version, so we’re currently investigating the cause. So far, we’ve narrowed it down to parasitic capacitance.
-
Finite State Machine
02/11/2025 at 14:25 • 0 commentsSetting the stage
During the main gameplay loop, the Gambit chessboard switches between two major states: the player move and the enemy move. The enemy move is straightforward enough – the state of the board is sent out, and a move from an external source is sent in. There is little wiggle room so the implementation is quite simple. The player move is a different story however. Gambit allows the user to play as if it was a normal chessboard, which comes with its own limitations. In order to implement this functionality, a finite state machine was created in order to track the player’s moves which is the topic of this blogpost.
The problem(s)
The main problem stems from the way that player input is received. In this case, the only source of player input are the reed switches scattered on the board. Those reed switches only know one thing each: if there is a magnet on top of them or not. They cannot be used directly to describe a complex action like moving a chess piece, especially since some moves require more than one pieces to be picked up and moved (eg. captures). There is one aspect of the reed switches we can exploit though: given a previous state of the board, every possible move has its own unique sequence of specific reed switches being switched on and off*. It makes sense if you thing about it – if at the start of the game the board detected a reed switch going off at e2, and then turning on at e4, then clearly the player must have moved a pawn from e2 to e4. Now if we could just monitor the player actions step by step – in this case 1. pick up pawn from e2, 2. put down pawn on e4, we can determine when the move is complete and effectively abstract the player’s atomic actions into a full chess move to update the board state and send it off for the next round. That is where the finite state machine comes in.
*there is one caveat to that statement: the board is unable to distinguish between promoting pawns to different pieces, but that problem can most likely be solved through other means, like the accompanying app.
The solution
The basic idea is that the state machine will be able to determine what the player is doing at any given moment. Are they holding a piece? Are they preparing to capture? Did they complete a move? Or are they just idling. A simple movement of a piece is simple enough but it soon gets more complicated with more advanced moves. A capture for example requires a sequence of atomic moves that’s longer by one. First you pick up your piece that’s doing the capturing, then you pick up the enemy piece that’s about to be captured, and finally you place down your piece on the captured piece’s spot. An even more complex move is castling. This requires a total of four steps: picking up the king, picking up the rook, placing the king and placing the rook. This is further exacerbated by the uniqueness of the castling move where the pieces do actions they wouldn’t be able to do otherwise. All in all, the FSM has to handle all those cases.
Robustness
One of the most important aspects of the FSM is robustness. Players might come with their own habits when it comes to moving pieces: for example some people might prefer to pick up the enemy piece before picking up your own piece during captures. Furthermore player might make mistakes and want to put their piece back down (perhaps not allowed in professional competitions, but very much common in casual matches). Worst of all, the players can perform an illegal move, which cannot be parsed and therefore needs to be retracted. It is paramount that all those situations are fully recoverable, otherwise having to restart the whole game after every mistake would be incredibly annoying. As such the FSM needs to also account for this, increasing complexity further.
Keeping it grounded
There are limits to this of course. There are millions of way a player can make a mistake and at some point it starts to be impossible to keep track of. There is no way to gracefully recover once a cat stepped over the board and knocked off all the pieces. As such, the FSM should support at least one degree of error (i.e. if there is just one mistake on the board), which should handle the majority of situations. In deeper troubles, the FSM goes to an error state that is not directly recoverable. From this point on, there are several possibilities, but those haven’t been implemented yet. The simplest one is to end the game, but this could be seen as lazy. Perhaps a more elegant solution would be to use the accompanying app to display the last valid state of the board and ask the player to restore it. This problem will be handled at a later time.
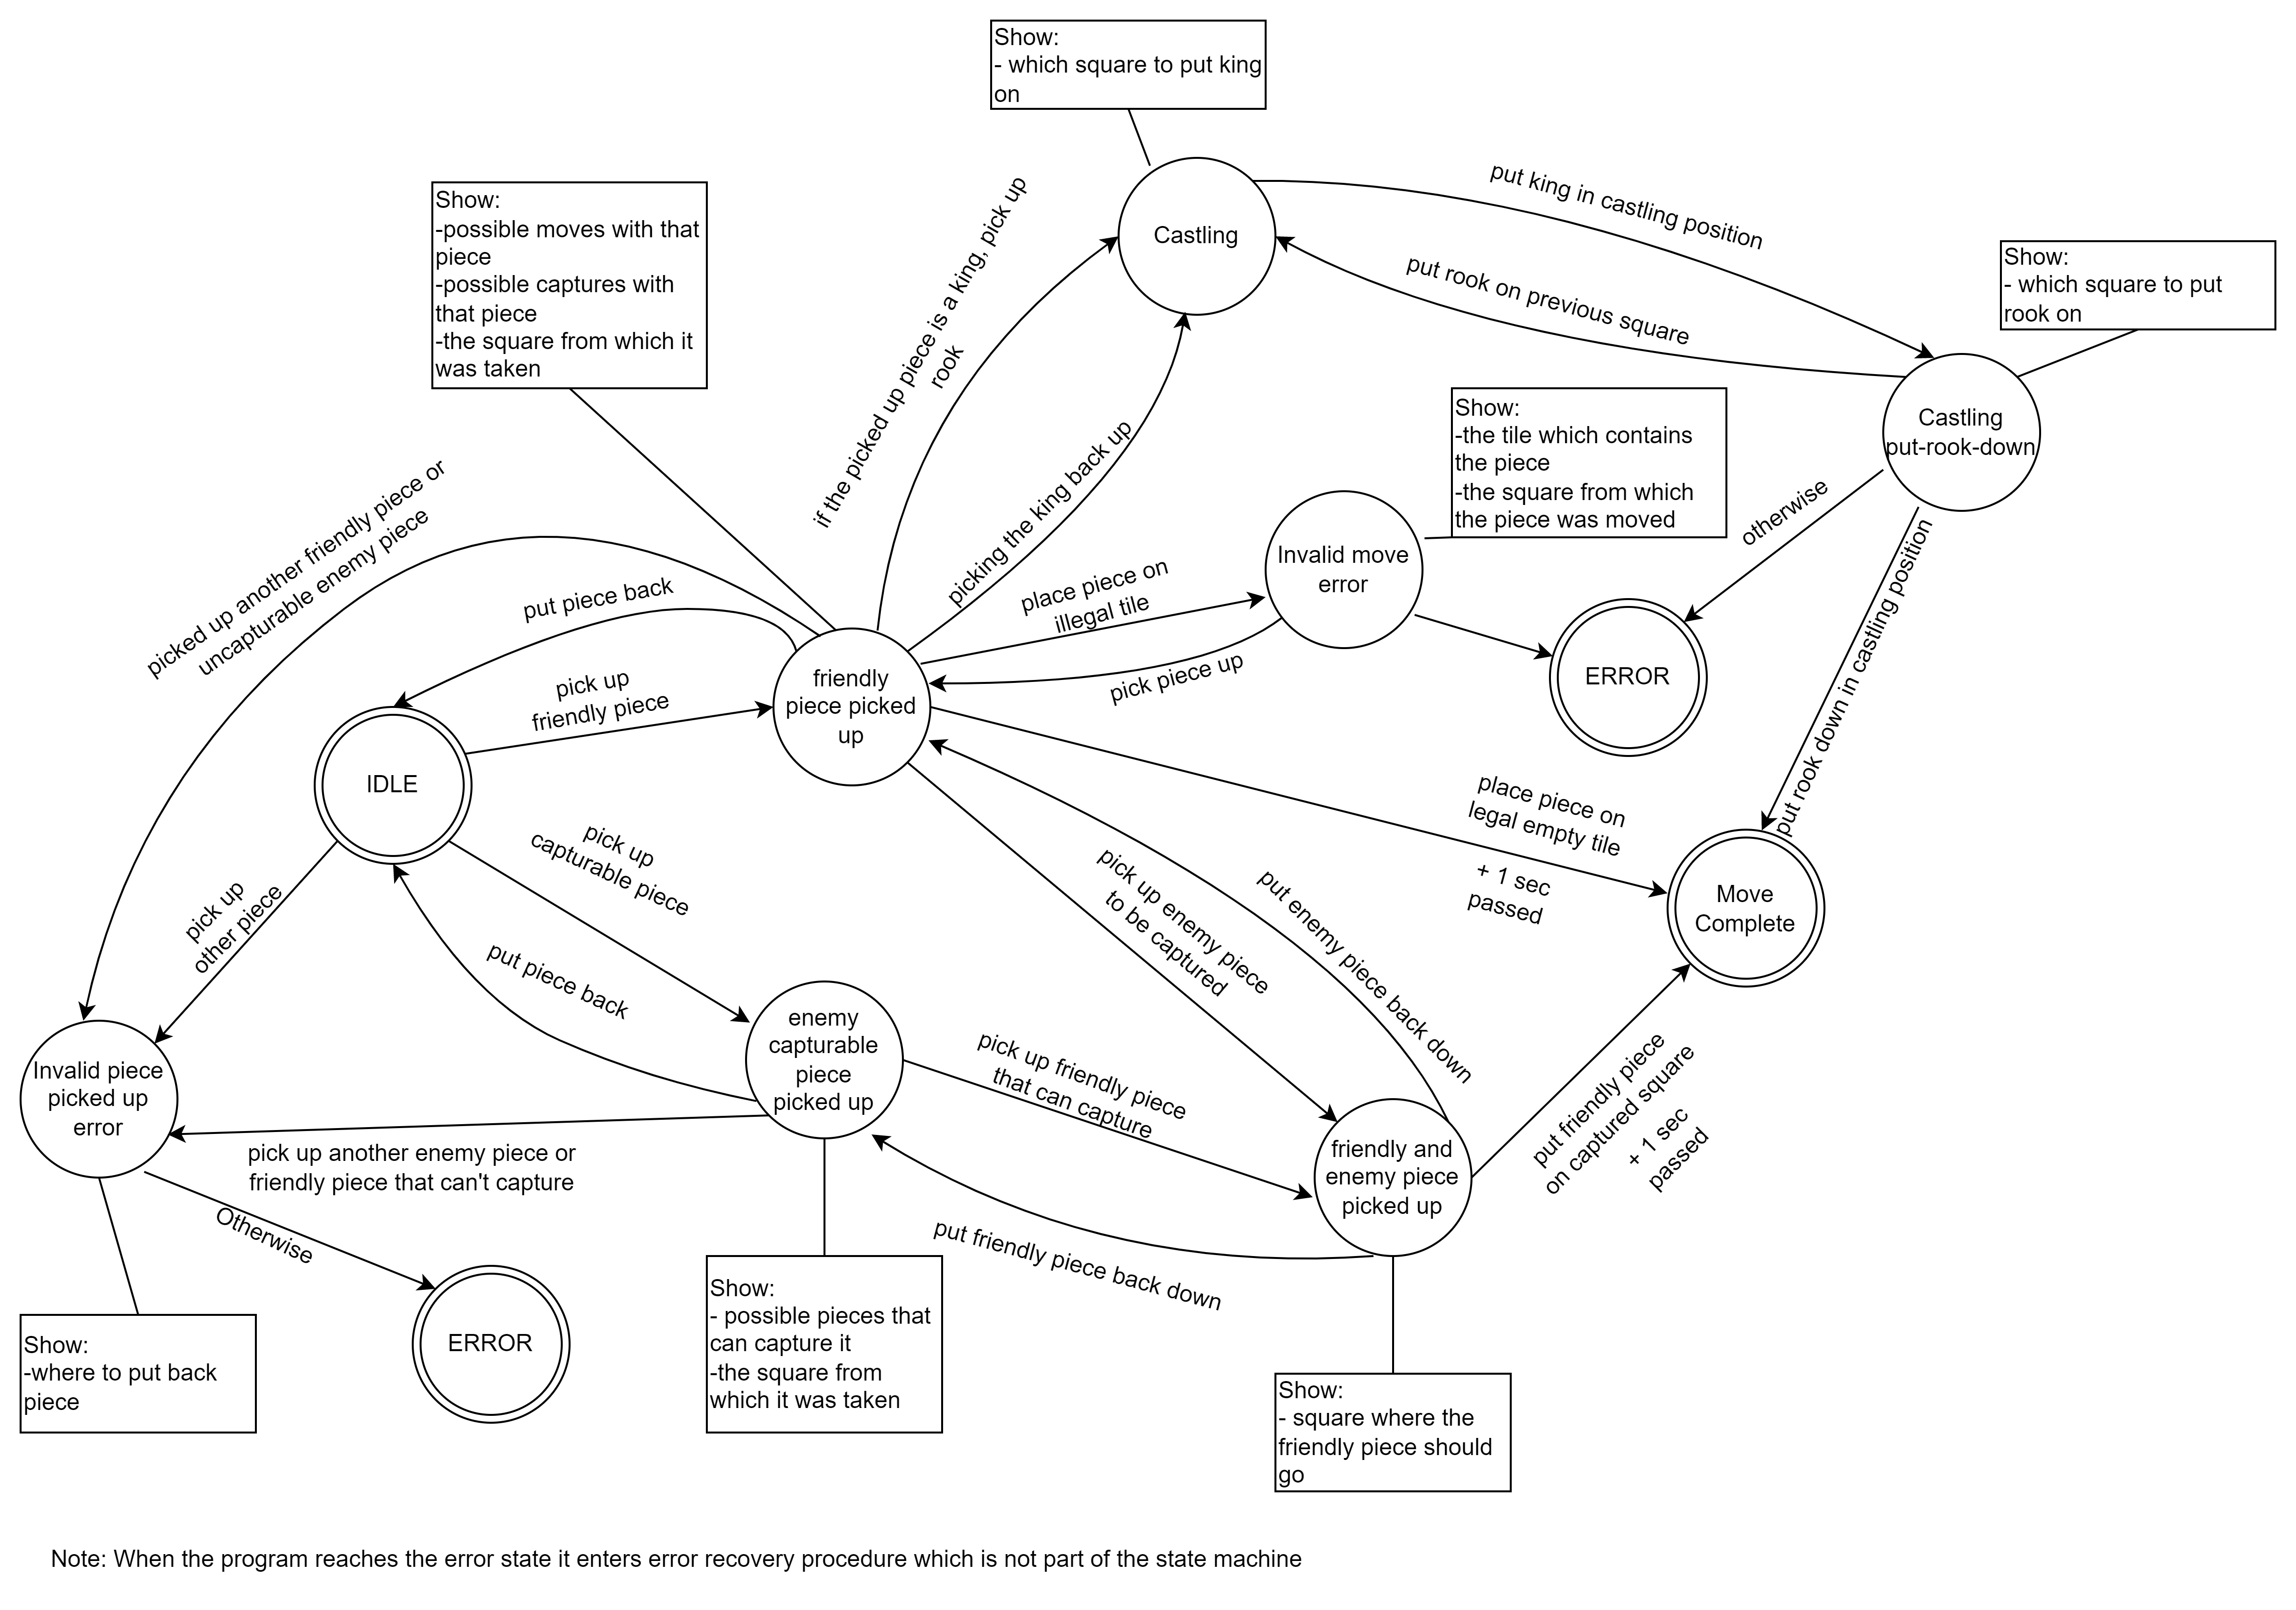
Either way, after much consideration the FSM has been created like so:
![]()
-
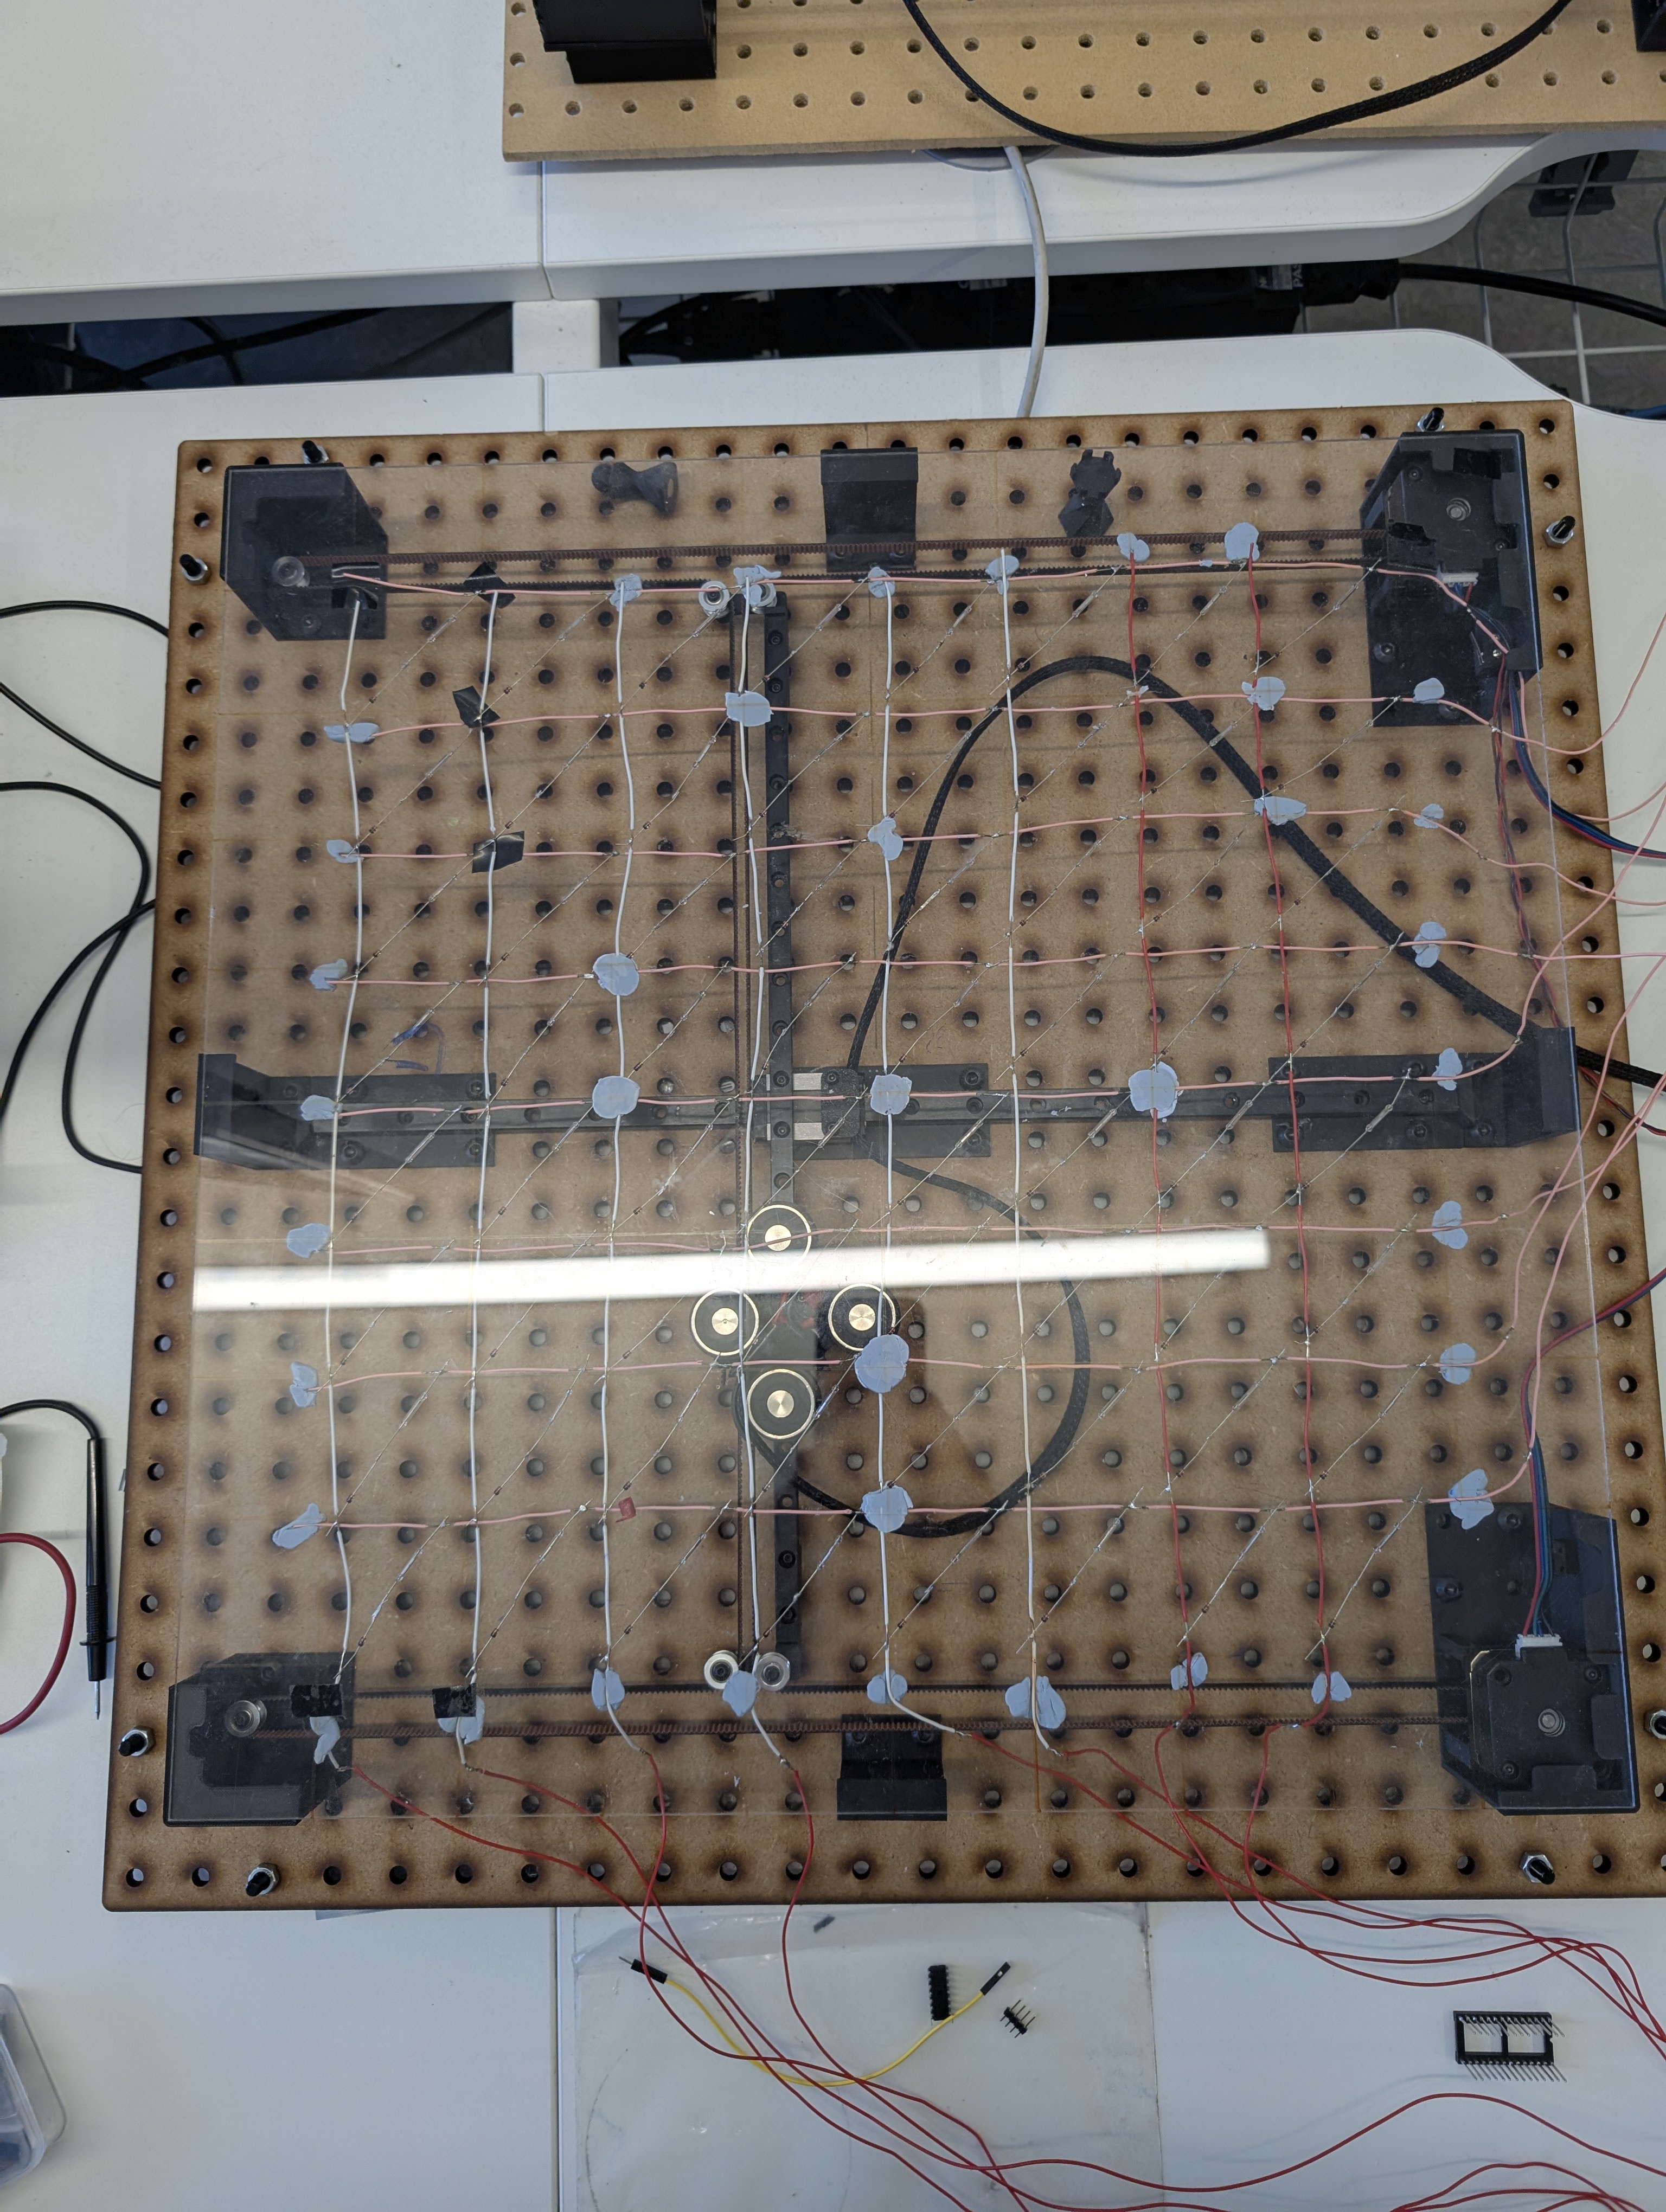
Detection Matrix
02/01/2025 at 15:22 • 0 commentsNow that we have a method for moving our chess pieces—using an electromagnet to attract a magnet embedded in the bottom of each piece—we need a way to detect where the pieces are.
This can be done using reed switches, a type of electronic component that detects when a magnet is nearby. However, since a chessboard has 64 squares, and each reed switch requires both a positive and a negative wire, a direct approach would mean 128 wires just to read the board state.
After some brainstorming, we realized that we could share power lines by splitting them into 8 rows (positive) and 8 columns (negative). This allows us to read the board by pulsing one row high and then checking the columns to see which squares are occupied.
To prevent power from leaking into other columns, we added Zener diodes to one end of each reed switch, ensuring current flows in only one direction.
With this setup, we can now read the entire board using just 16 wires instead of 128.
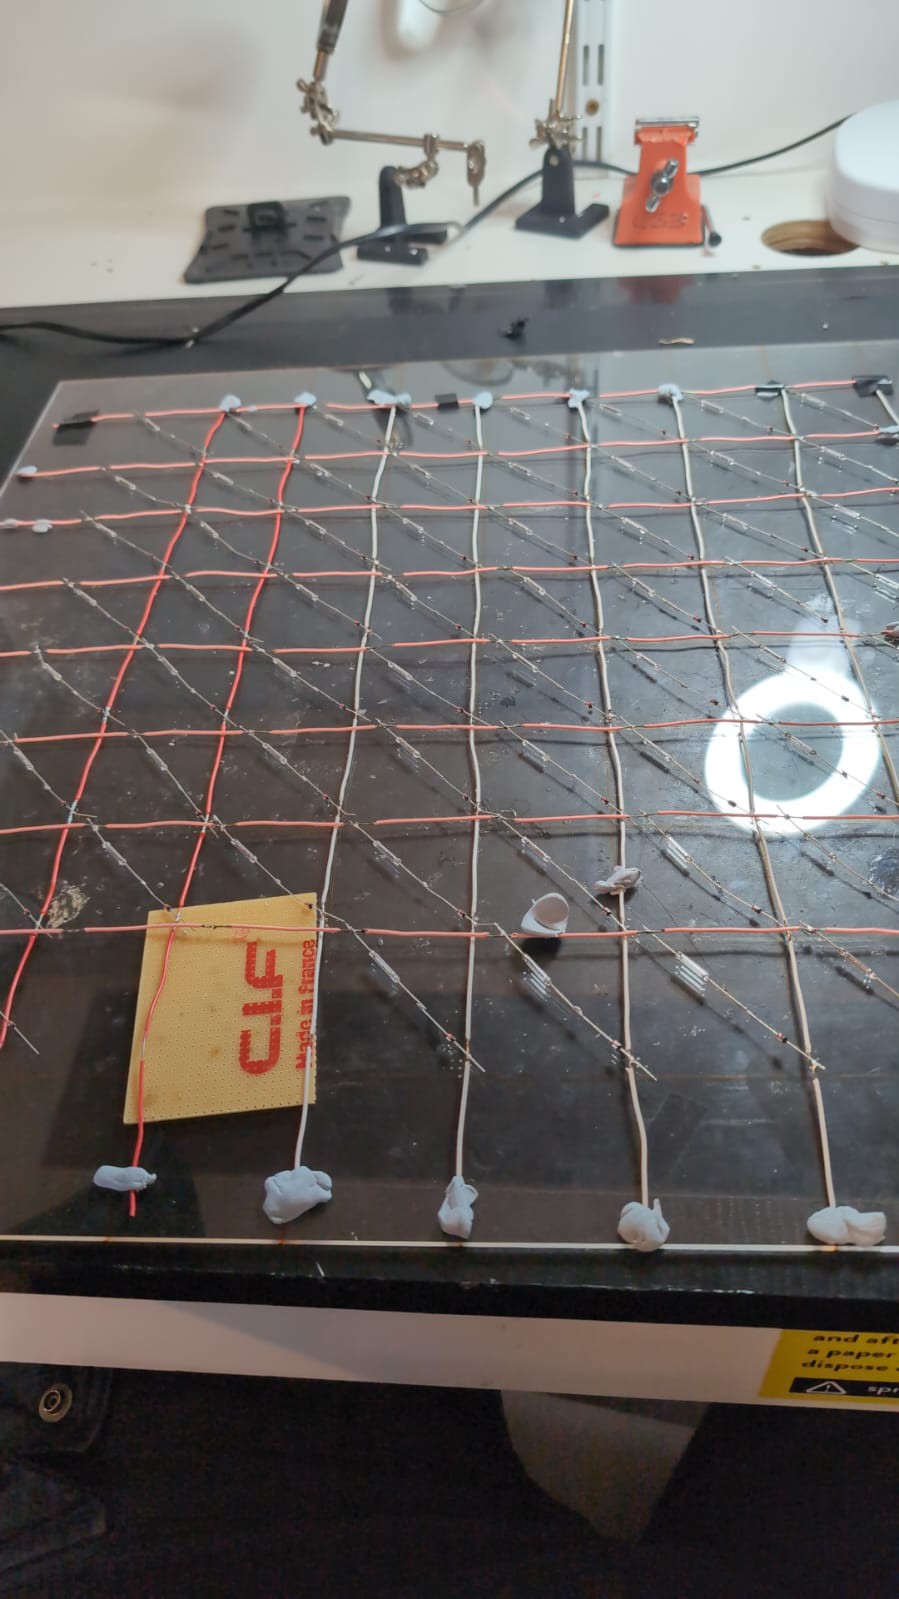
This can be quite a tedious soldering session but it gave us plenty of time to become comfortable with soldering. Hopefully, we can turn this into a PCB as the reed-switch matrix can short quite easily.
![]()
-
Platformio
02/01/2025 at 14:38 • 0 commentsAs our project grew, the Arduino IDE quickly became a bottleneck. Managing multiple files was clunky, testing was nonexistent, and dependency management was manual. Compilation times became slow, debugging was primitive, and switching between different boards and environments was tedious. We needed a scalable, structured development environment that supported unit testing, CI/CD integration, modular code organisation, and better collaboration.
PlatformIO solved these issues by providing:
- Multi-file support – No more massive .ino files; projects can be modular and maintainable.
- Unit testing – Supports software-only tests locally and hardware-in-the-loop (HIL) tests when needed.
- GitHub Actions integration – Enables automated builds and testing on every commit.
- Better dependency management – Automatically handles libraries, ensuring consistency across different setups.
- Unified build system – The platformio.ini file acts as a single source of truth, defining configurations for a repeatable and scalable workflow.
- Faster compilation with caching – Only recompiles changed files, dramatically reducing build times.
- Built-in serial monitor & debugger – Offers real-time logging and GDB-based debugging, making firmware development significantly easier.
With pre-configured toolchains, automated testing, and structured project organization, PlatformIO transformed our workflow, allowing for faster iteration, easier debugging, and more robust firmware development. It’s a game-changer for embedded projects, bringing modern software engineering practices to microcontroller development while eliminating the inefficiencies of traditional Arduino workflows.
-
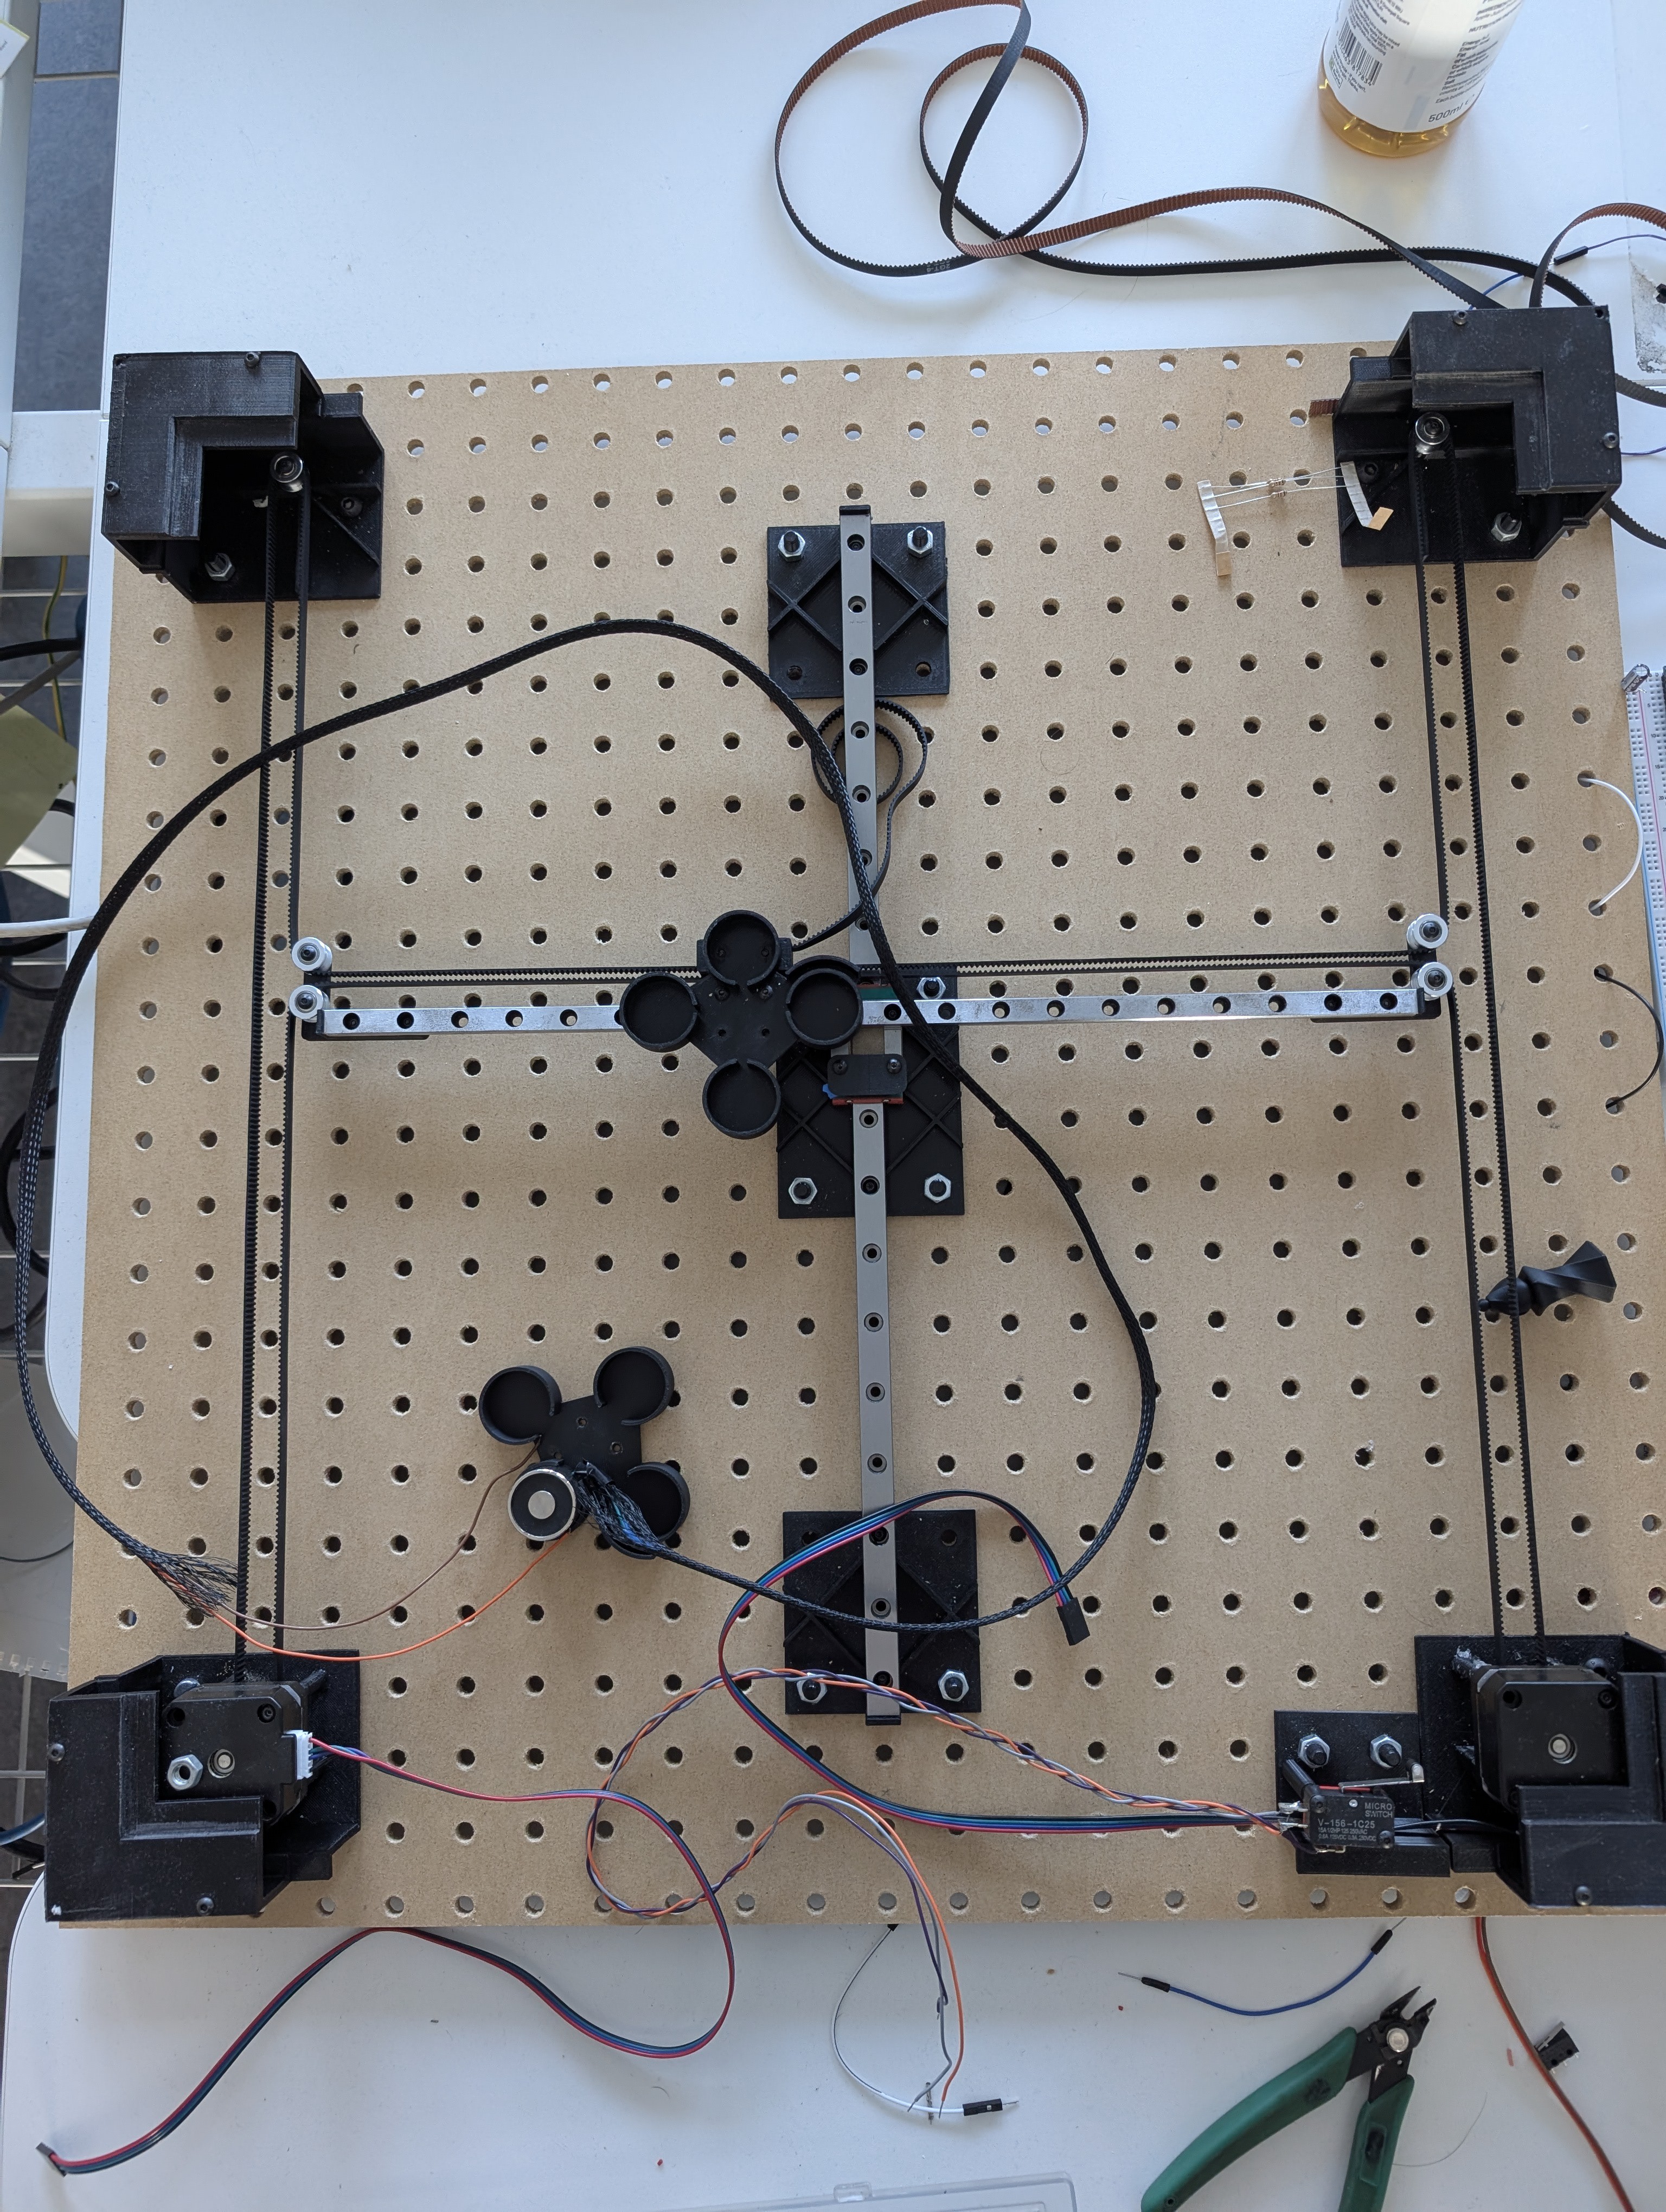
CAD Update - Compacting Design
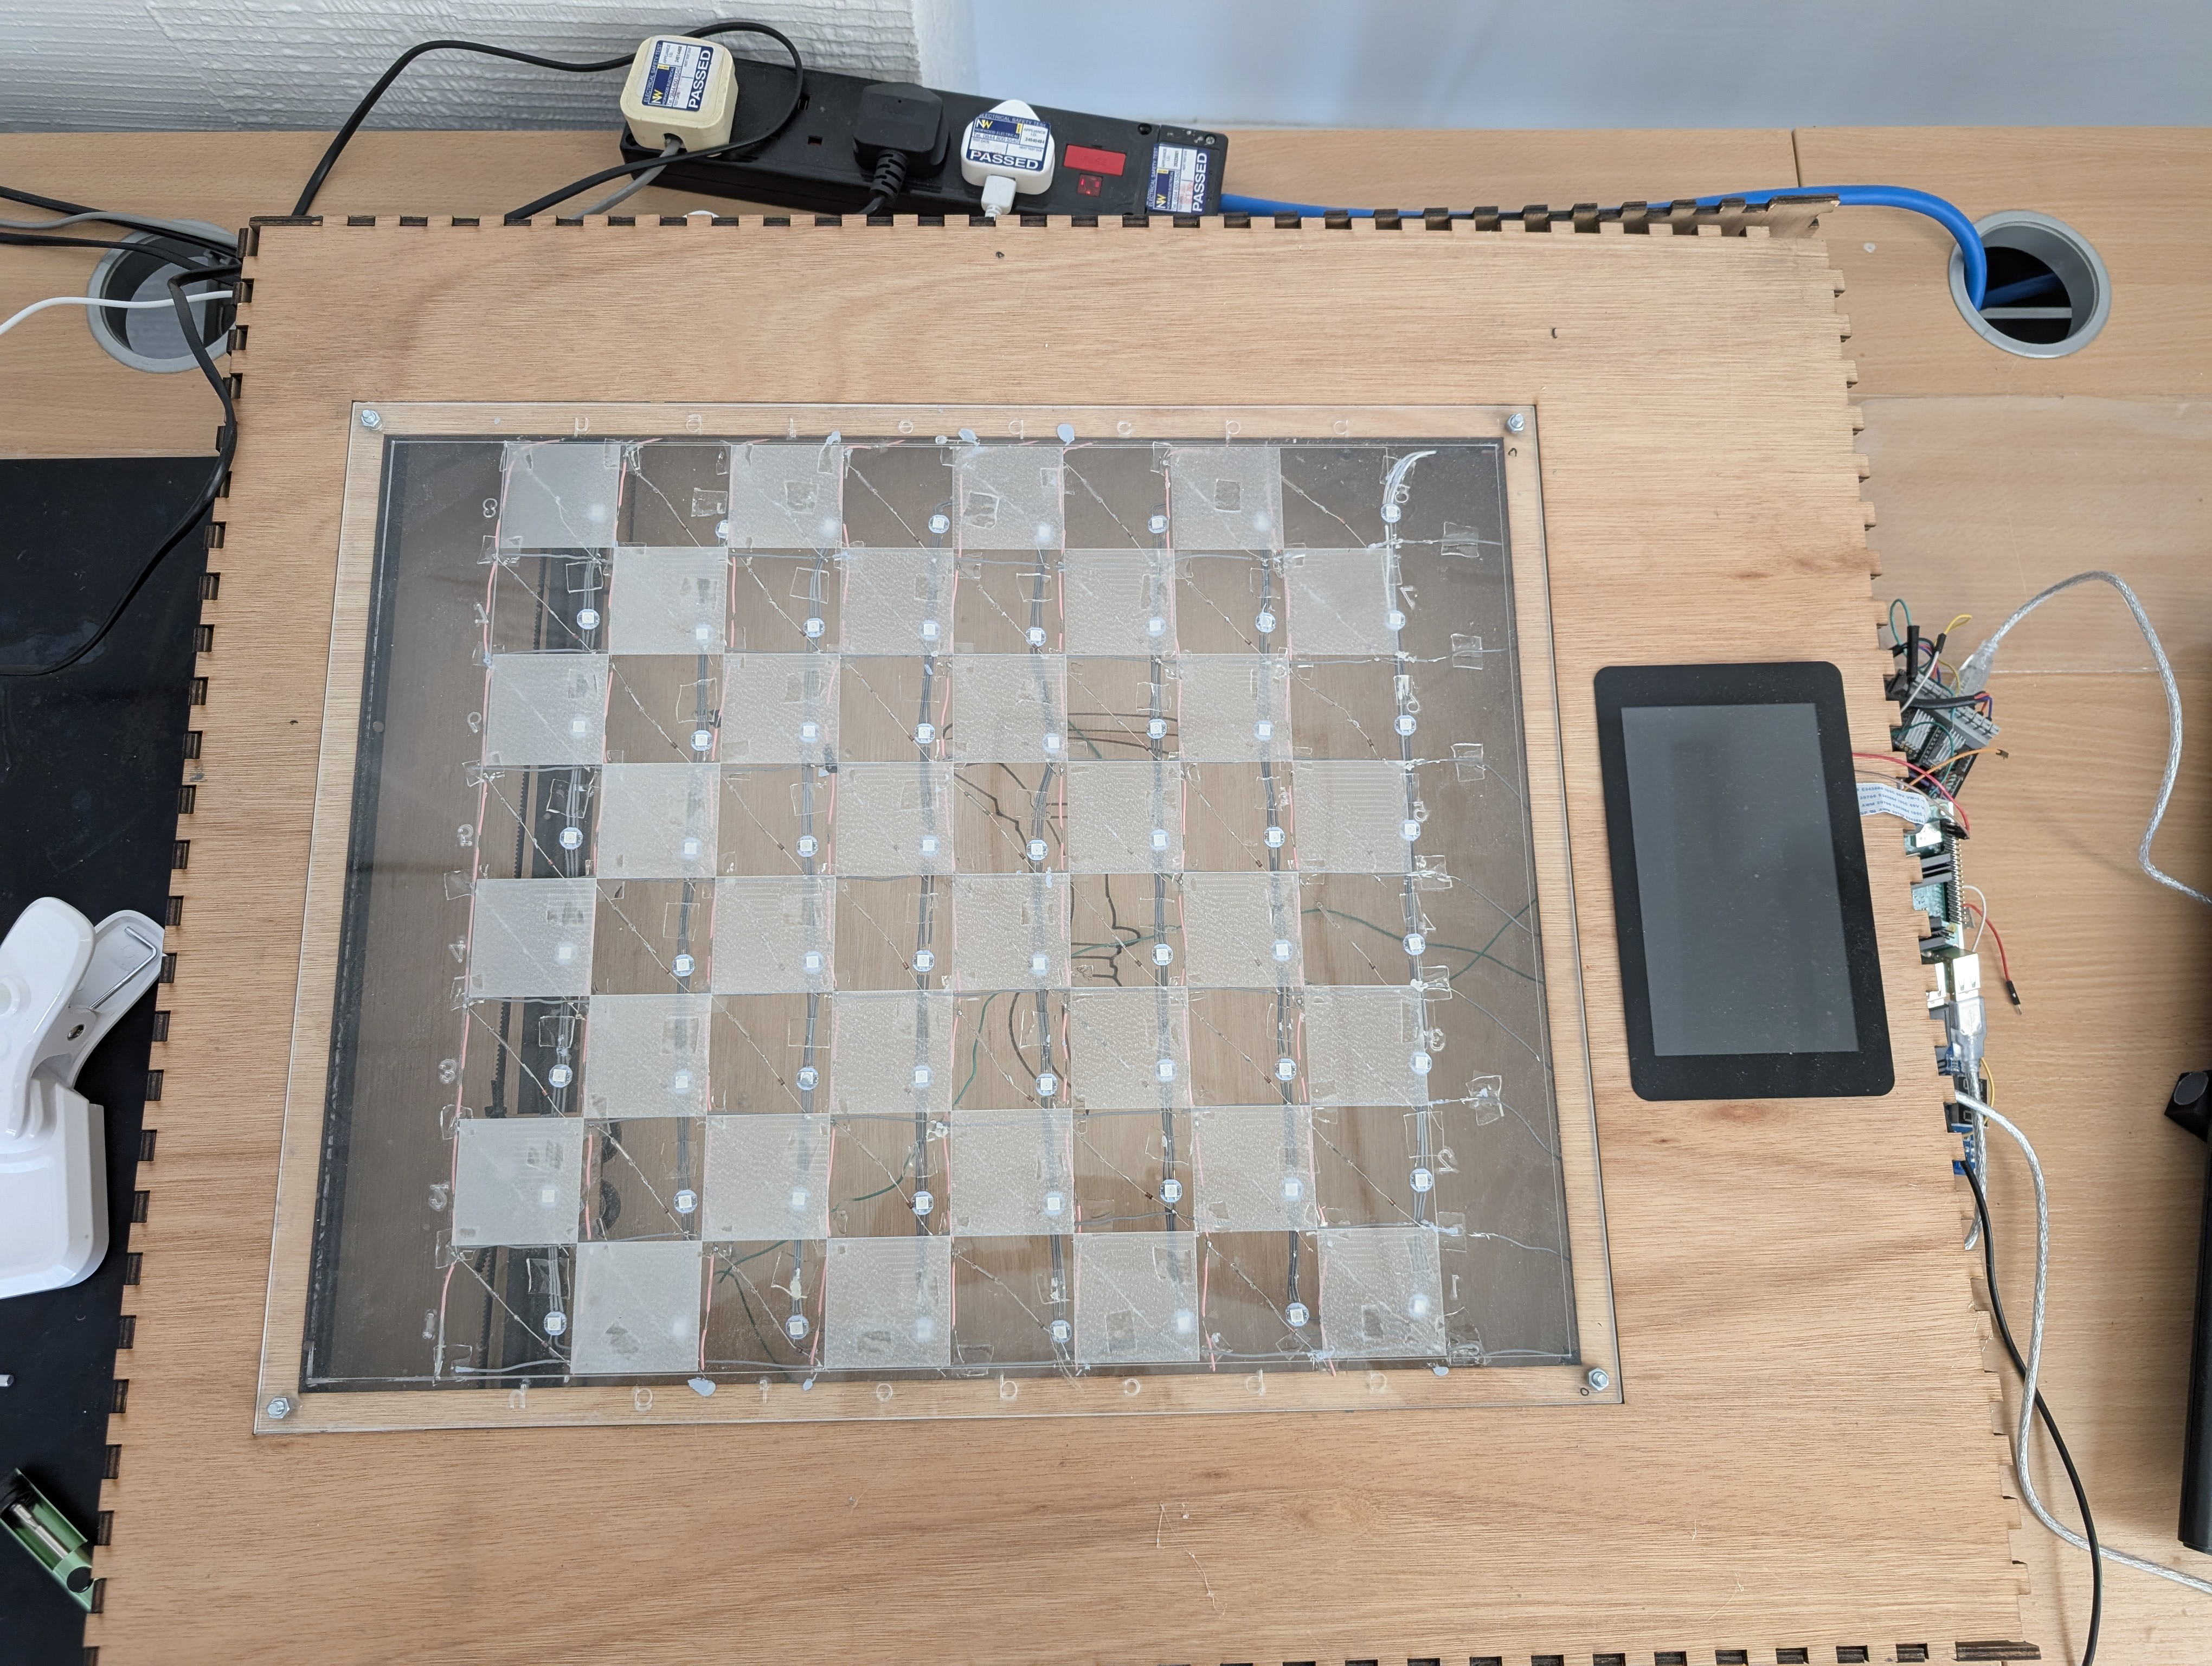
02/01/2025 at 14:13 • 0 commentsOur first attempt at this project was two years ago, when we built the board using a Core-XY mechanism. While we managed to detect and move pieces—and even provide suggestions using a NeoPixel LED matrix—the board was big and clunky due to the Core-XY system. On top of that, our detection matrix electronics were unreliable.
Chess Board V1:
![]()
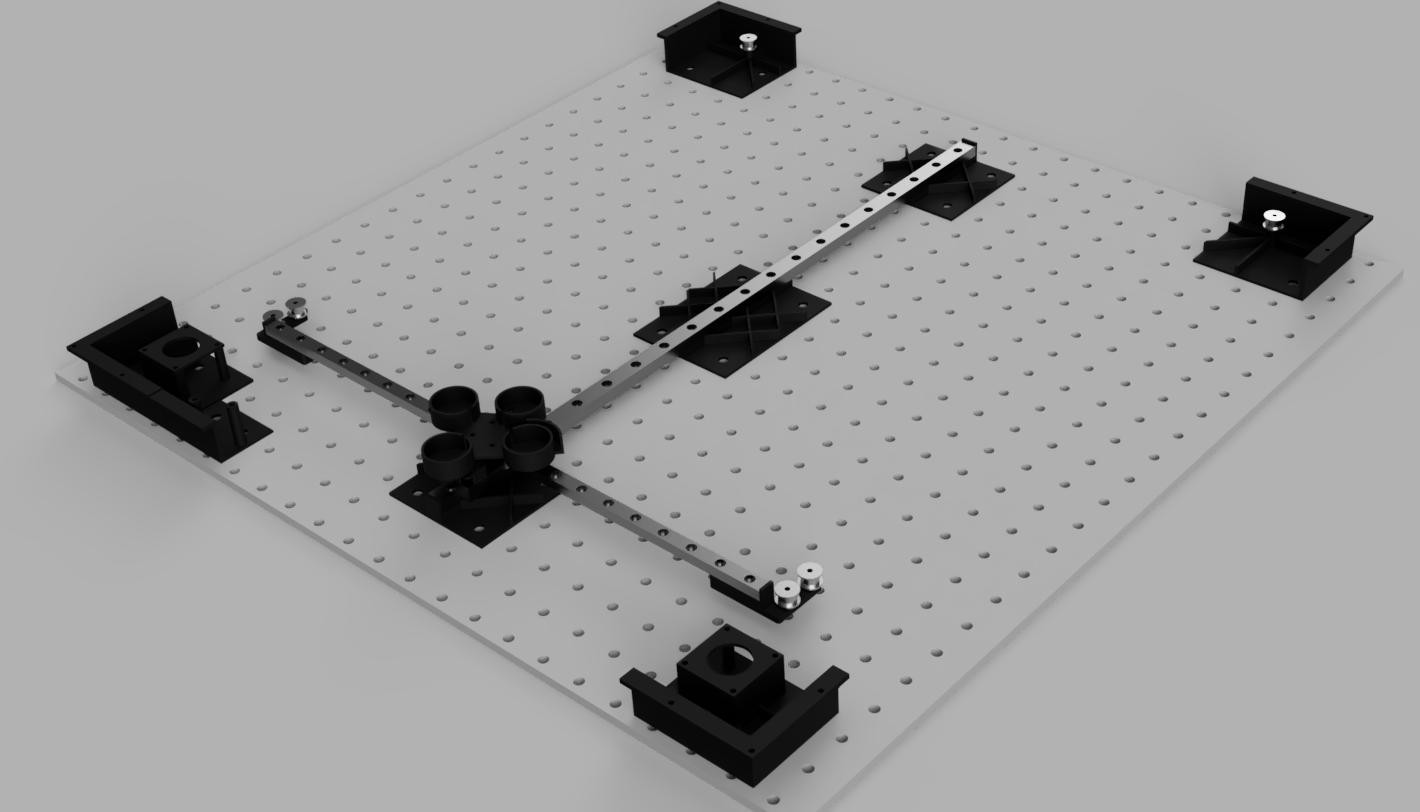
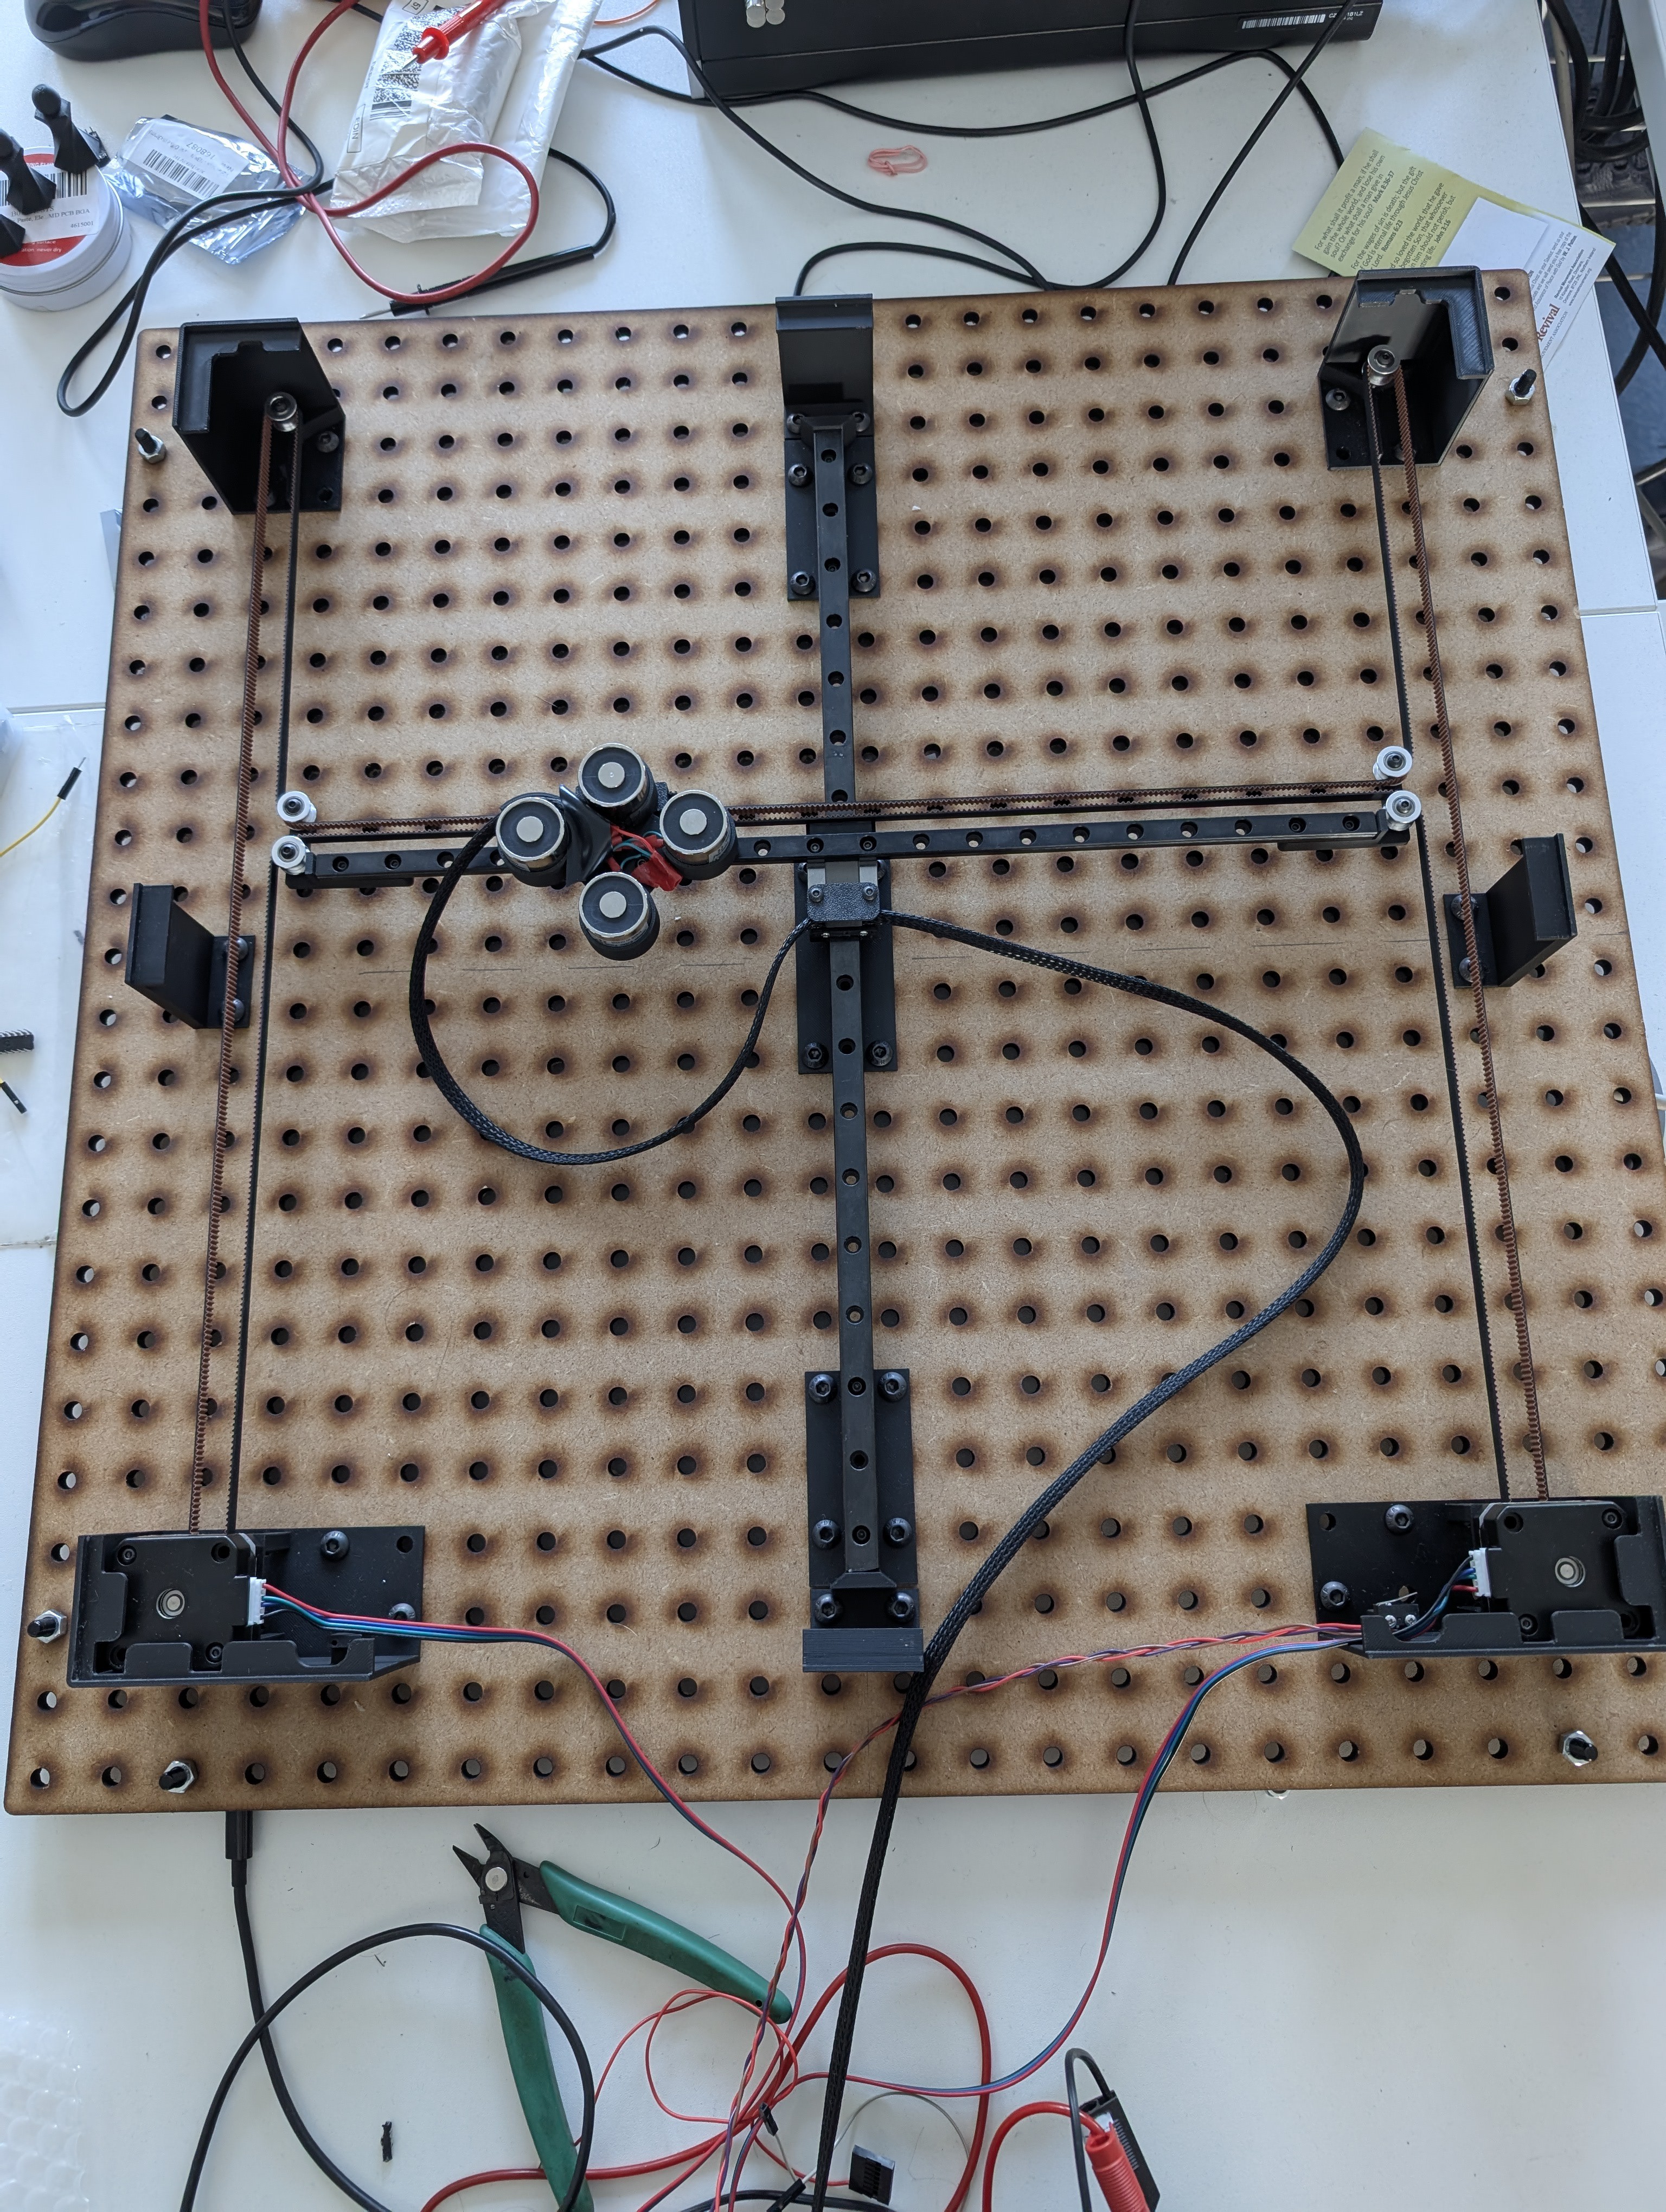
Since then, one of our main goals has been to shrink the board as much as possible. For Version Two, we achieved this by switching to a T-Bot mechanism for the magnets. This significantly reduced the board’s size, as the movement mechanism no longer dictated its overall dimensions.
Chess Board Version 2 (Render):
![]()
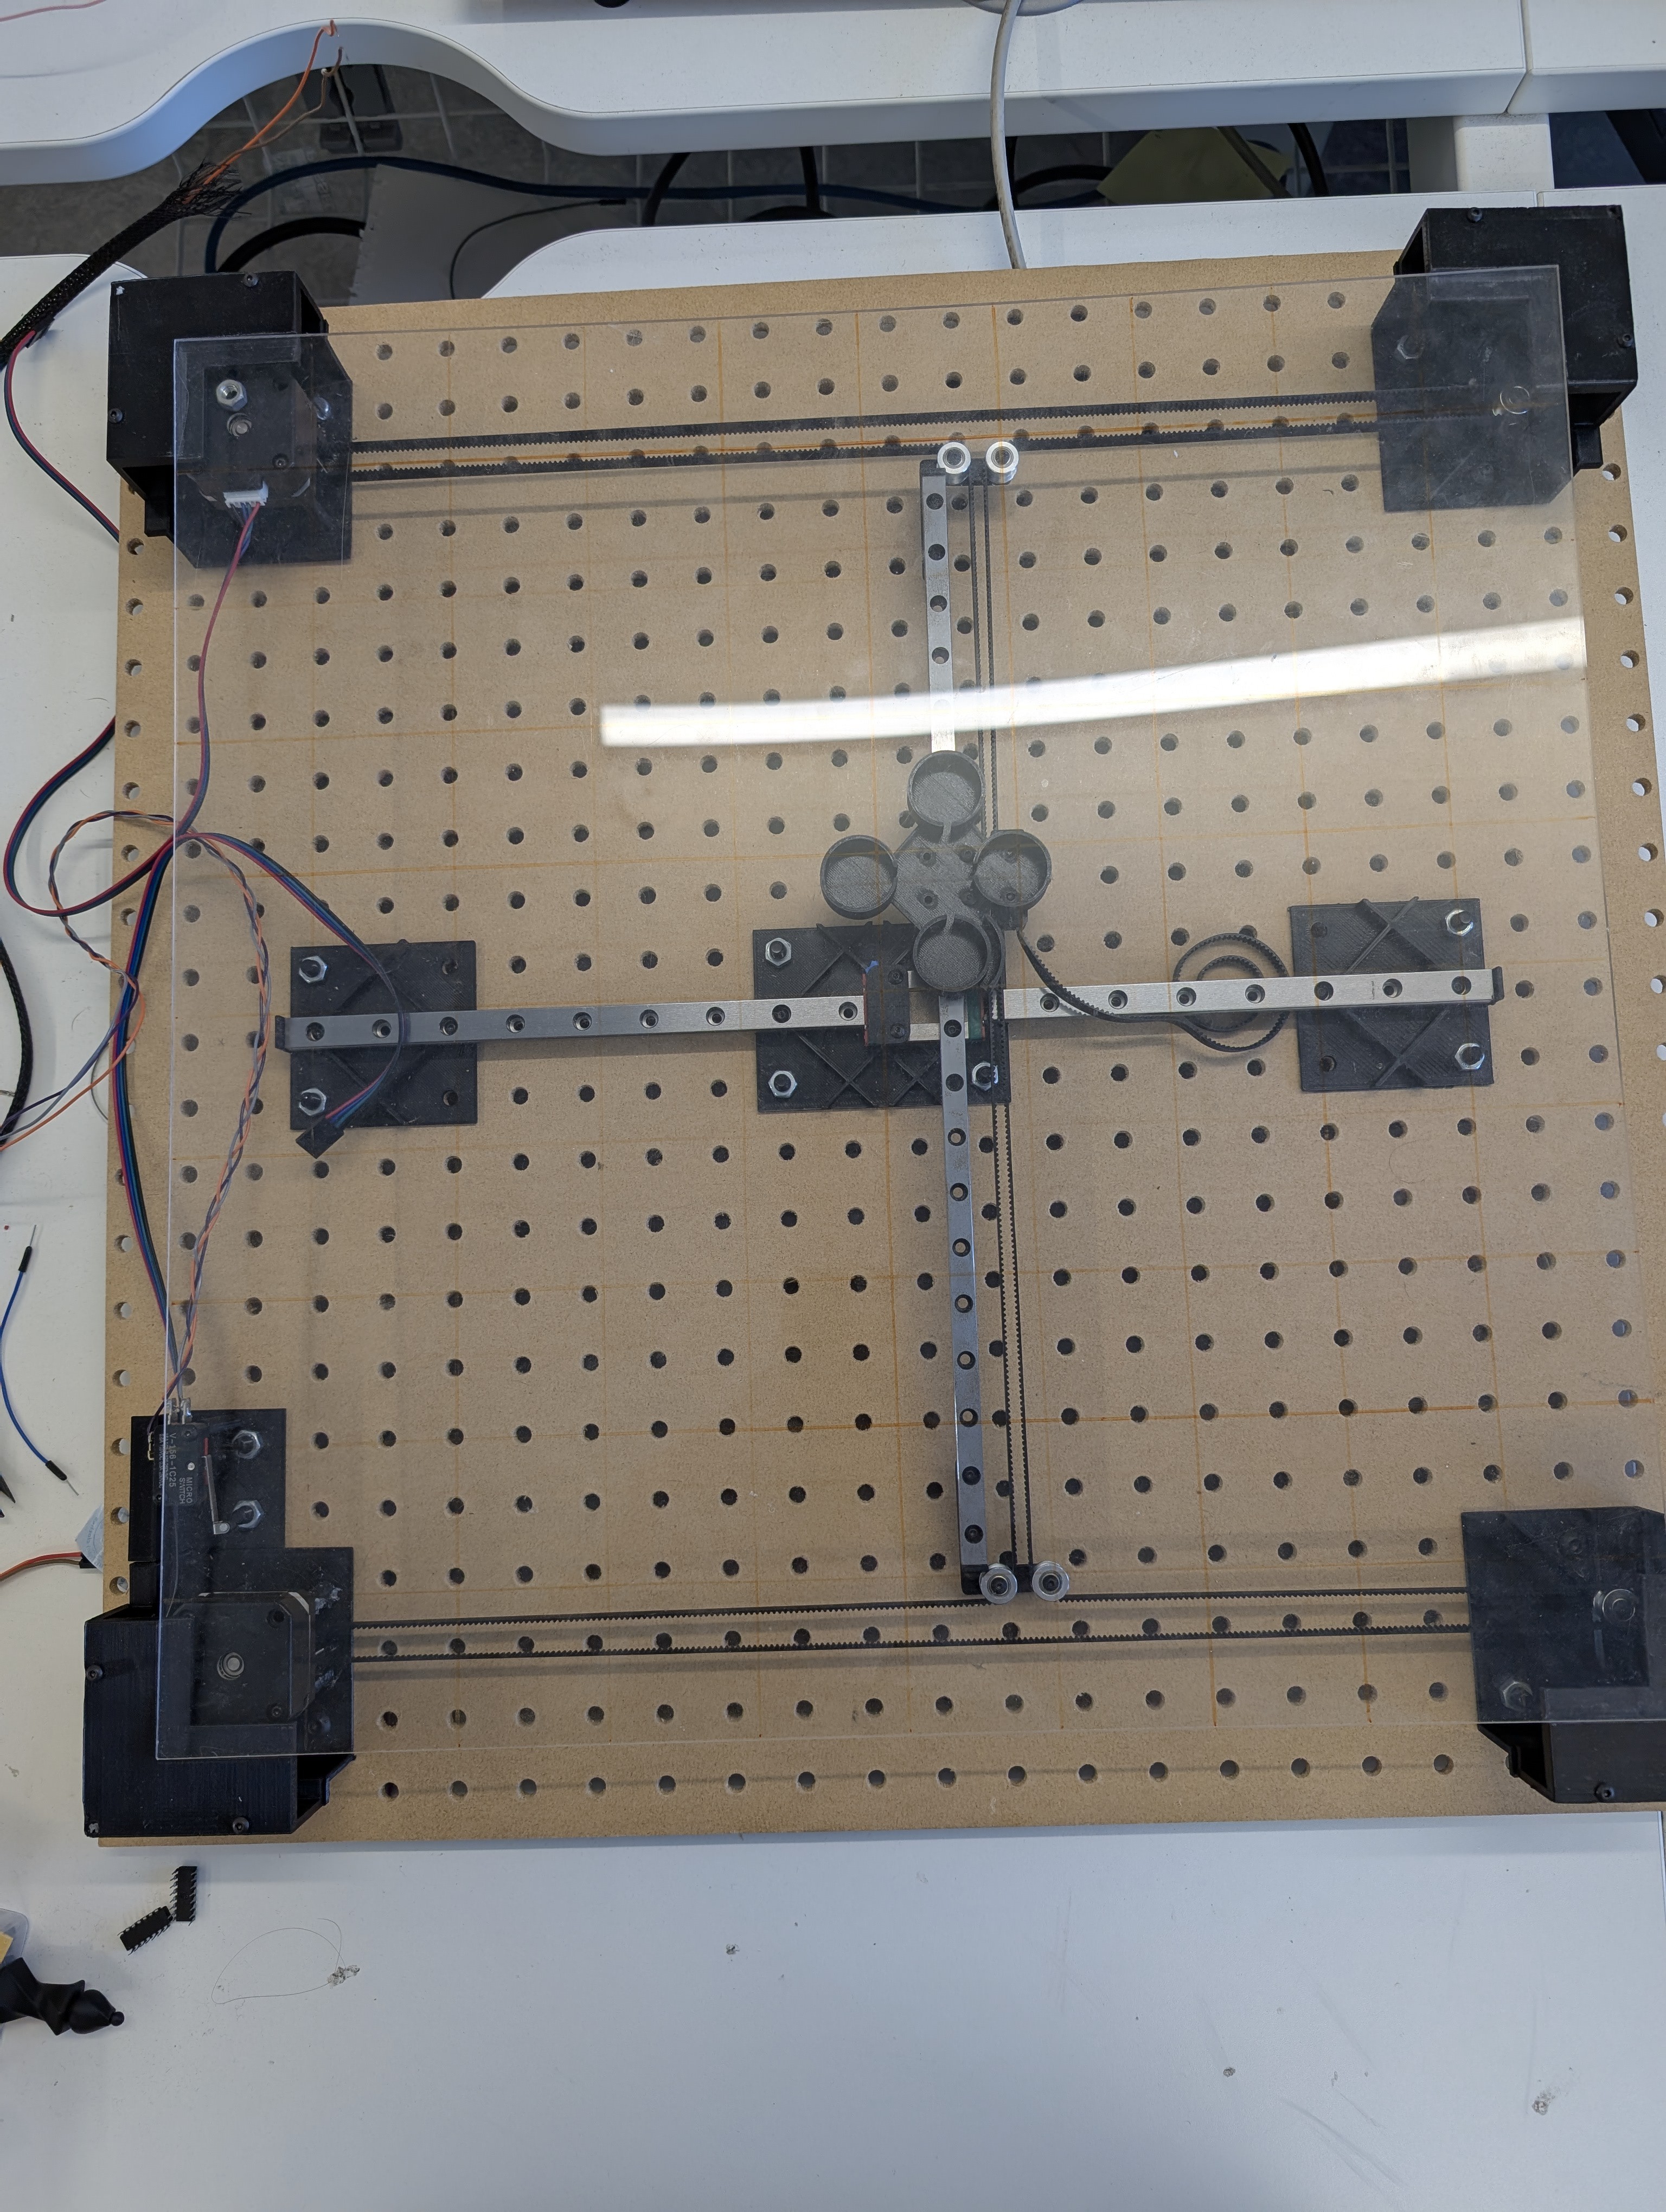
Chess Board Version 2 (Physical):
![]()
However, while this redesign successfully made the board more compact, it introduced new challenges:
- The limit switch mount was too flimsy and could move—definitely a no-go.
- The acrylic board started sagging in the middle, which risked shorting the chess piece detection matrix.
- The motors and GT2 idler PEG board mounts were difficult to access, making motor installation a hassle.Version 3: Fixing Version 2’s Issues
Version 3 addresses many of these problems:
- We added a border holder to prevent sagging, and the border is now more secure thanks to a snap-fit design.
- The outer border is even smaller.
- Mounting components to the PEG board is easier.
- Motor installation is much more accessible.
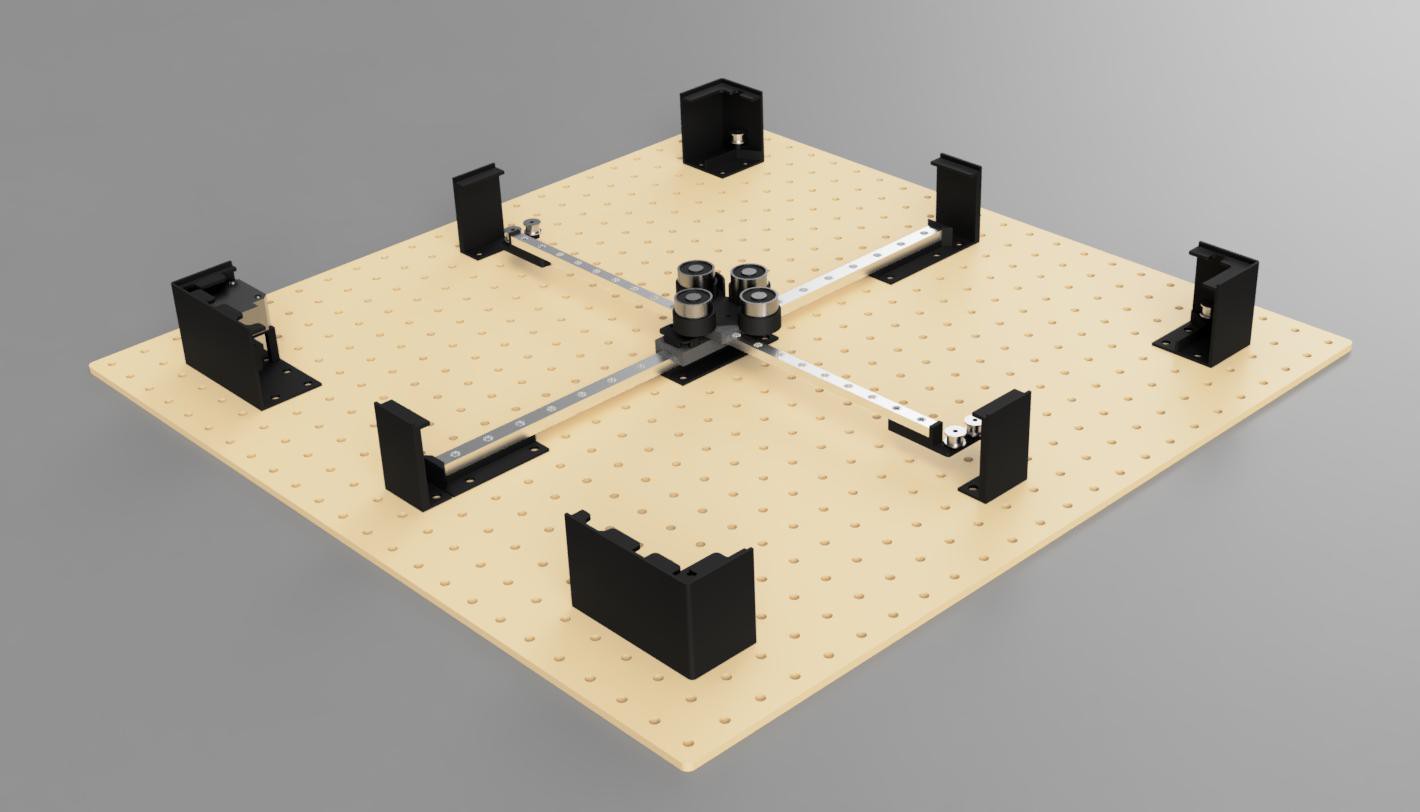
- The limit switch holder is now integrated into the motor mounts, so it can’t move.Chess Board Version 3 (Render):
![]()
Chess Board Version 3 (Physical):
![]()
-
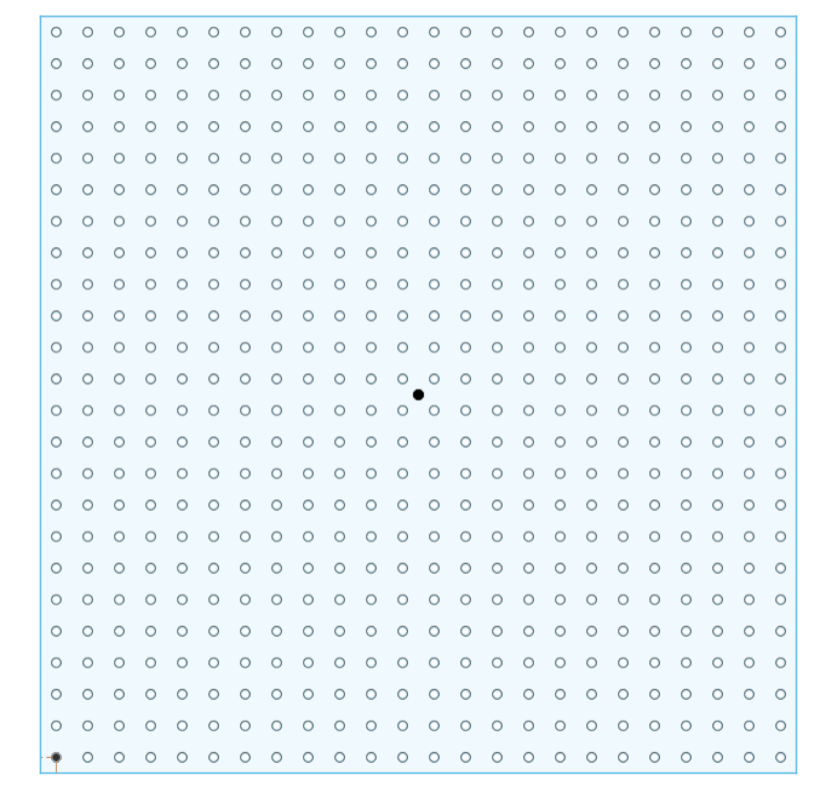
CAD model update - Inconsistency of Amazon PEG Board
02/01/2025 at 12:30 • 0 commentsThe PEG board we used for prototyping was sourced from Amazon, with specifications of 600mm × 600mm and M6 holes spaced 25mm apart.
However, we soon discovered that the hole spacing was not 25mm but varied inconsistently, ranging from 25.75mm to 27.65mm. To be fair, it was advertised for hanging hammers on a garage wall—not for prototyping a chessboard! 🙂
Initially, we tried incorporating the inconsistent PEG board into our model, but it caused accuracy issues when positioning components like the motor mount and GT2 idler mounts.
![]()
So, we laser-cut an MDF board to our exact specifications: 600mm × 600mm with M6 holes and **precise** 25mm spacing. This gave us a great excuse to learn new manufacturing techniques.
DXF:
![]()
Video:
We then re-centered all of our CAD models to align with the consistent spacing, making it much easier to move and adjust components. This was important to us because we want this project to be as reproducible as possible—keeping an inconsistent PEG board just didn’t make sense. That said, it does make for a nice keepsake.
Improved board:
![]()
Updates: Board.dxf has been added to the files section!