Now that I've implemented what I wanted, I can give it a fair evaluation. I'm sending the keyboard back. The angle of the keys both isn't something I can fix in post and it's kind of the biggest problem since I can never quite get my fingers aligned.
Still though, I wanted to give Tetaip a proper go and not dismiss it just because trying to press CTRL + F1 feels like merging a dance mat with a Twister mat.
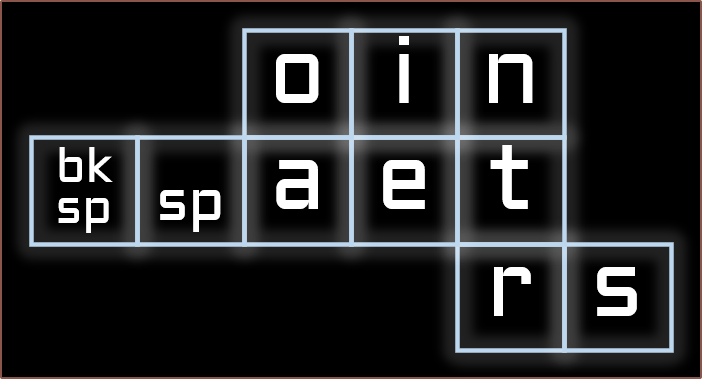
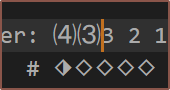
Yesterday, I went through and fixed a few layout bugs and moved the vowels so that they are all on a 2 x 2 grid:
Pressing a + e = u
My hypothesis was that mental overhead during the learning stage will be reduced with the confidence that a vowel I'm looking for will be on 2 fingers. As you might be able to see, the location for a, o and i is inspired from QWERTY.
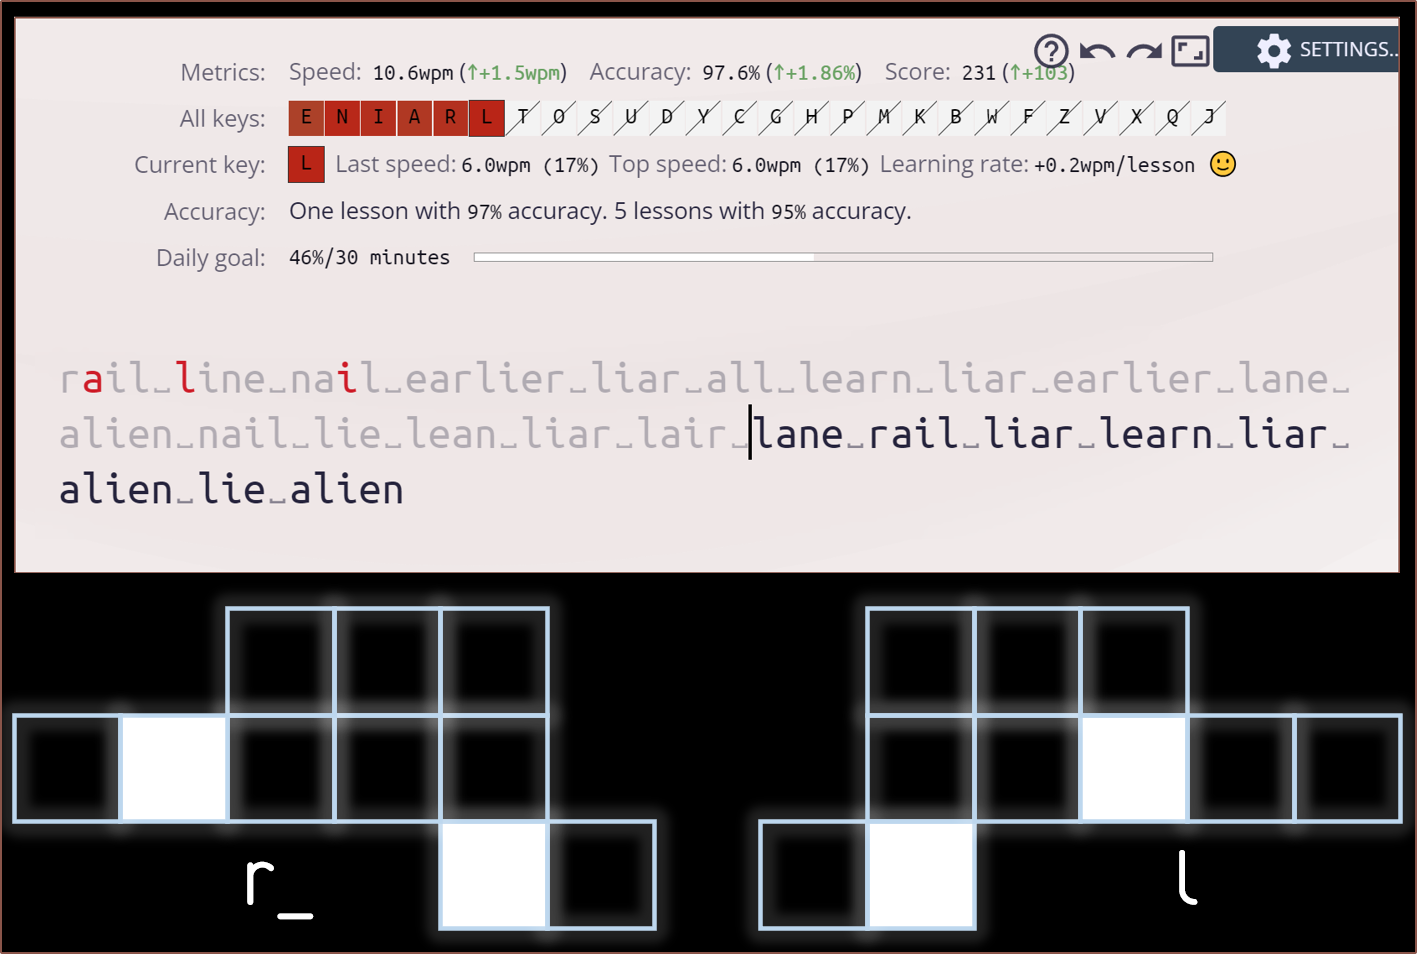
Today, I set keybr.com to a keyboard I haven't used yet, put Lofi Girl on the background and started practicing. The layout feels surprisingly smooth and satisfying, especially when combining a letter with the spacekey. It's like riding a bike on new pavement.
It helps that the starter keys coincidentally means that the chords for r and l are similar. Thus, r l and l r is like mirror magic.
I do believe that placing all vowels on a 2x2 grid made the learning process more productive.
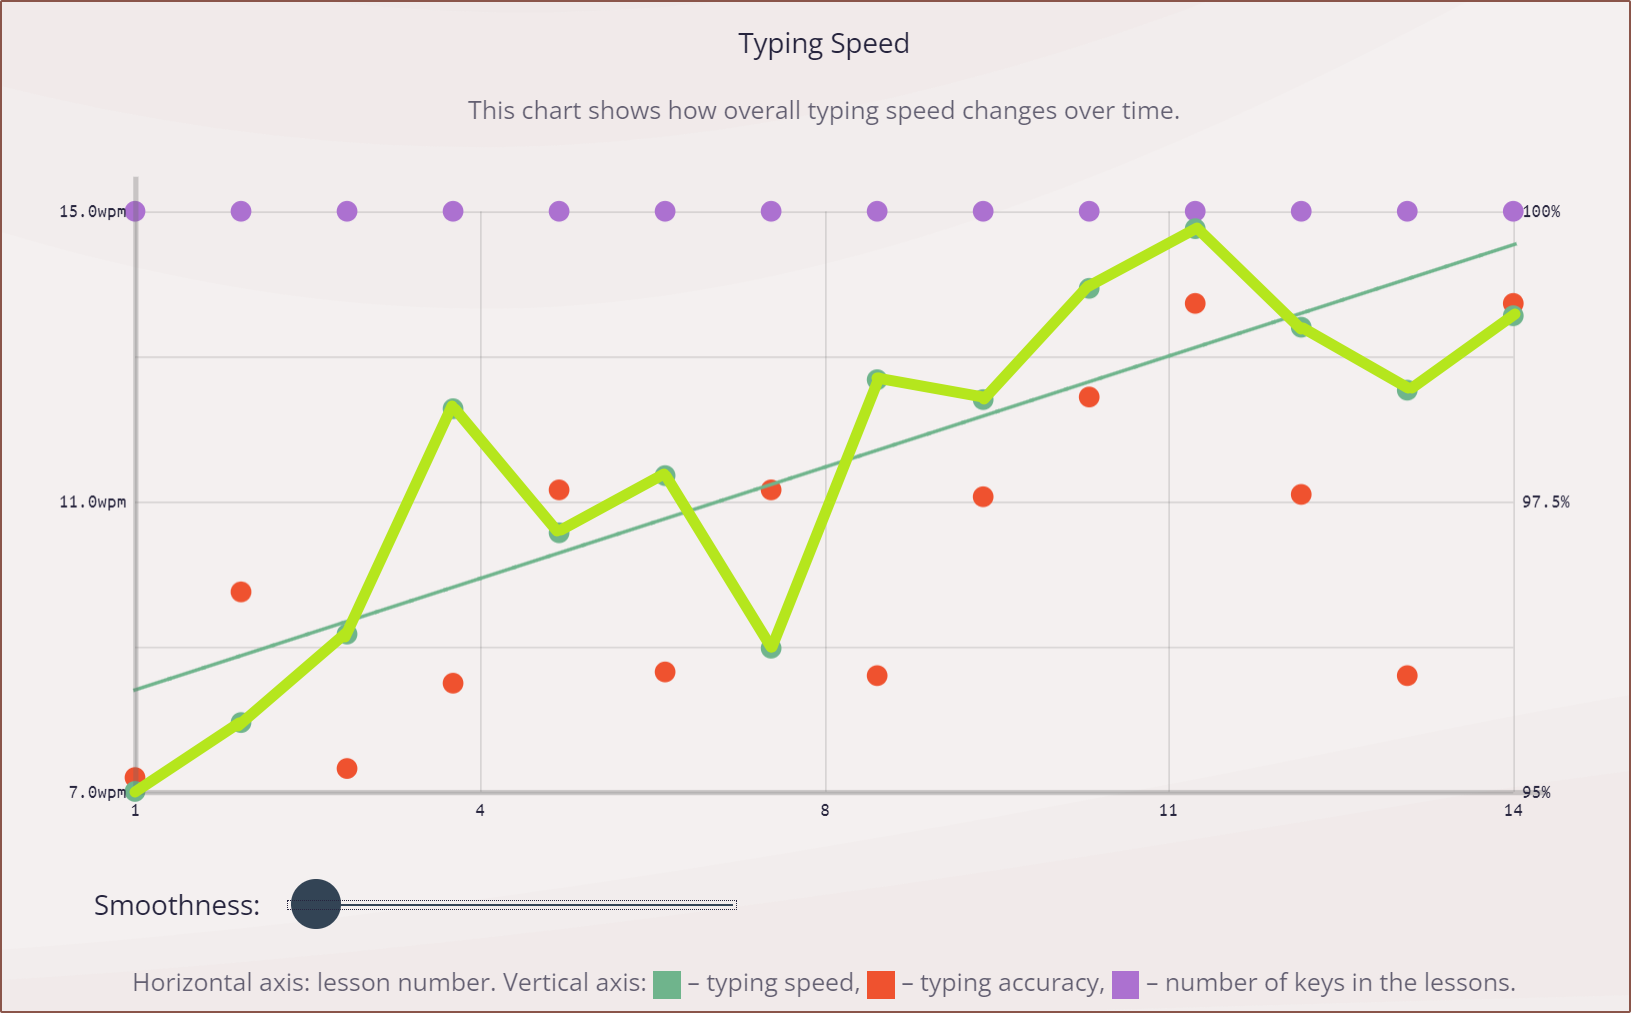
It took 14 tests over the span of 70 minutes to get over 100% on the daily goal meter. I usually took a short break (3 - 6 mins) in-between tests to allow my mind to absorb information.
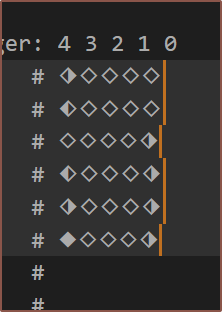
I've turned off smoothing and drawn lines connecting the speed points together to make it easier to see.
I only used a spacekey chord once on the first test. On the second test, I did a few more. By the 4th test, I quite liked the feeling of it as it kept the flow going. Probably the least confident chord was e because of the key depth whilst avoiding pressing a on accident.
I was also tilting my head from side to side to keep me aware which hand needed to press a key. Essentially, I just changed head direction when I pressed a key, and that was enough to keep the alternation going.
I haven't been able to find the meta field in recent versions of KMK, so I've currently used a workaround with argumented keys:
The drawback is that, if the Taipo module is disabled, the keyboard will refuse to start because "Key is not callable". Thus, you also have to go in and remove all the TP() keys in the layout and save. Today, I've had another look in keys.py and figured out how to get a non-augmented key to work, mainly by copy-pasting the boilerplate:
Another thing I've noticed is that the layout breaks if a KC.MACRO() key is held down. I tracked down its signature (sounds like I'm a spy movie hacker writing that) and found an attribute that only KC.MACRO has:
if hasattr(state.keycode, 'blocking'): # Only KC.MACRO has this
    keyboard.tap_key(state.keycode)
else:
    keyboard.add_key(state.keycode)
Still, with these preinstalled milky reds, the 2mm actuation distance is a major issue. Both Taipo and MouseKeys doesn't mesh very well with such a deep actuation distance. I think the Akko Silver v3 Pro is going to be the best solution.
Right now, I'm in the process of creating a UK English layout and sidestepping the WinCompose requirement for unicode.
Circuitpython MemoryError
Yesterday, I was having MemoryErrors unless I turned off RGB and the ADNS-5050 modules. While still trying to solve the pan issue, I read through the changes since Circuitpython 8.2.10 and found out that MemoryError was a cited problem that could happen. Compiling and flashing 8.2.x seems to avoid this problem.
Pog makes it easy to get into the bootloader without having to open the keyboard.
While I was there configuring circuitpython, I found that the RP2.65-F keyboard had this in mpconfigboard.mk:
Thus, I looked it up and found out that it compiles the library .mpy files straight into the fabric of circuitpython:
Normally, all imported Python modules in CircuitPython are loaded into RAM in compiled form, whether they start as .mpy or .py files. Especially on M0 boards, a user program can run out of RAM if too much code needs to be loaded.
To ameliorate this problem, a CircuitPython image can include compiled Python code that is stored in the image, in flash memory, and executed directly from there. These are "internal frozen modules".
With this feature, the neopixel.mpy file doesn't need to be copied into CIRCUITPY/lib/, though it only reduced my MemoryError issue on 9.1.3 from 1280 bytes down to 294. 8.2.x has had no effect on the pan issue.
Invalid USB VID
While on the topic of circuitpython, my PR is currently blocked because WEEKIN might have made up the vendor ID. In an effort to promote open-source software and hardware, pid.codes was founded and I'm requesting the same ProductID as WEEKIN used. I will understand if my PID request is rejected since I don't have any hardware source files.
Conclusions
At the very least, I've finally got an "implementation candidate" 32 days since I discovered the WK-50.
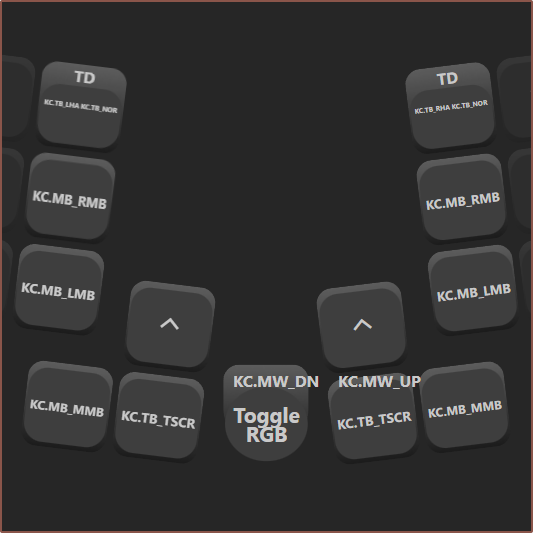
Most of the ^ keys is actually a combo, like CTRL+TAB to advance to the next tab. Only the encoder has CTRL only, allowing to press and turn to zoom pages..
I'm also glad that #Tetent [gd0090] is force-based not displacement-based. If I could get hot-swappable switches that moved and felt like microswitches, that would be ideal for the WK-50. Additionally, I'm glad that the layout is such that I don't have to chord with multiple fingers when starting out.
The good news is that I've got vertical scrolling. The bad news is that, due to an issue resulting in Code 10, I can't enable horizontal scrolling. At least I know that I need to power-cycle for boot.py to even apply in the first place:
What I've decided to do instead is vertical scrolling with a slower mouse X movement so that I can scroll and still move the cursor, such as if the mouse landed in another scrollable area (e.g. a scrollable text field on a website).
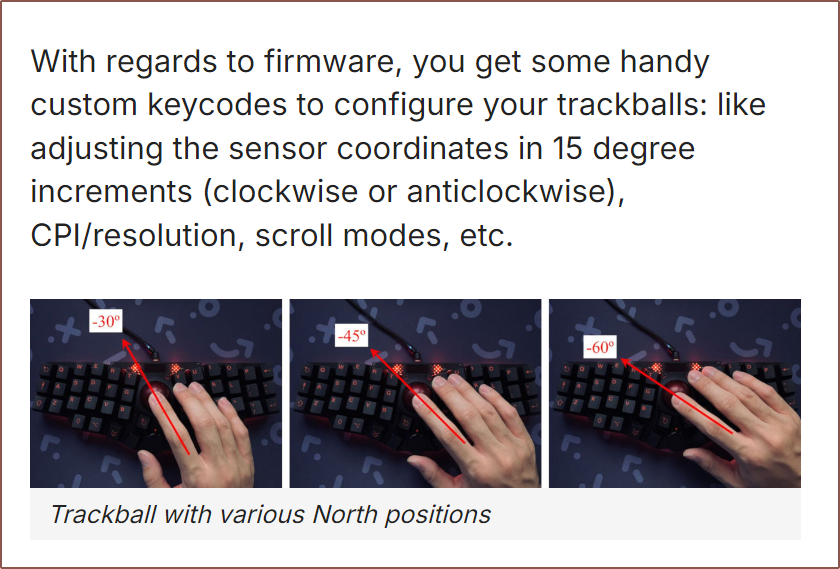
I found out how to make custom keys and made keys for push to scroll and toggle scroll. I've also added keys to have left / right hand north offset correction, and I've put them on tap-dance keys in POG:
Left Hand:  KC.TD(KC.TB_LHA,KC.TB_NOR)

Right Hand: KC.TD(KC.TB_RHA,KC.TB_NOR)
Like with 3DxPoint, I've tweaked the code to store the fractional remainder from integers sent to the host. This way, the north angle corrections should be as accurate as possible. I then used the same logic to implement scrolling. So that the fractional numbers aren't something like 0.2999999, I've used multiple-of-two divisors for the speed reduction:
scroll_speed = [1/2, 1/16]
1/16th is a good 1 : 1 speed to the trackball, making scrolling look as smooth as it feels, but the physical angle change is rather small. 1/64 is the same speed as the scroll wheel on my G300S. 1/32nd speed feels like a middle ground. However, all this is based on the scroll setting being at 4:
When this is set at 1, 1/16th scroll is buttery smooth. Then, precision scrolling can be done on the scroll wheel. Alternatively, code for a toggle could be written where the speed switches between 1/16 and 1/64.
Conclusions
Like with an optical cursor square on UMPCs, I feel like the issue is that there's only a single trackball; the ideal would be dual trackballs or a spacemouse trackball. That exists, BTW, and with this 180g stainless ball, it would've been sweet.
The 3 balls I tried: Black, Cloudy, Stainless Steel
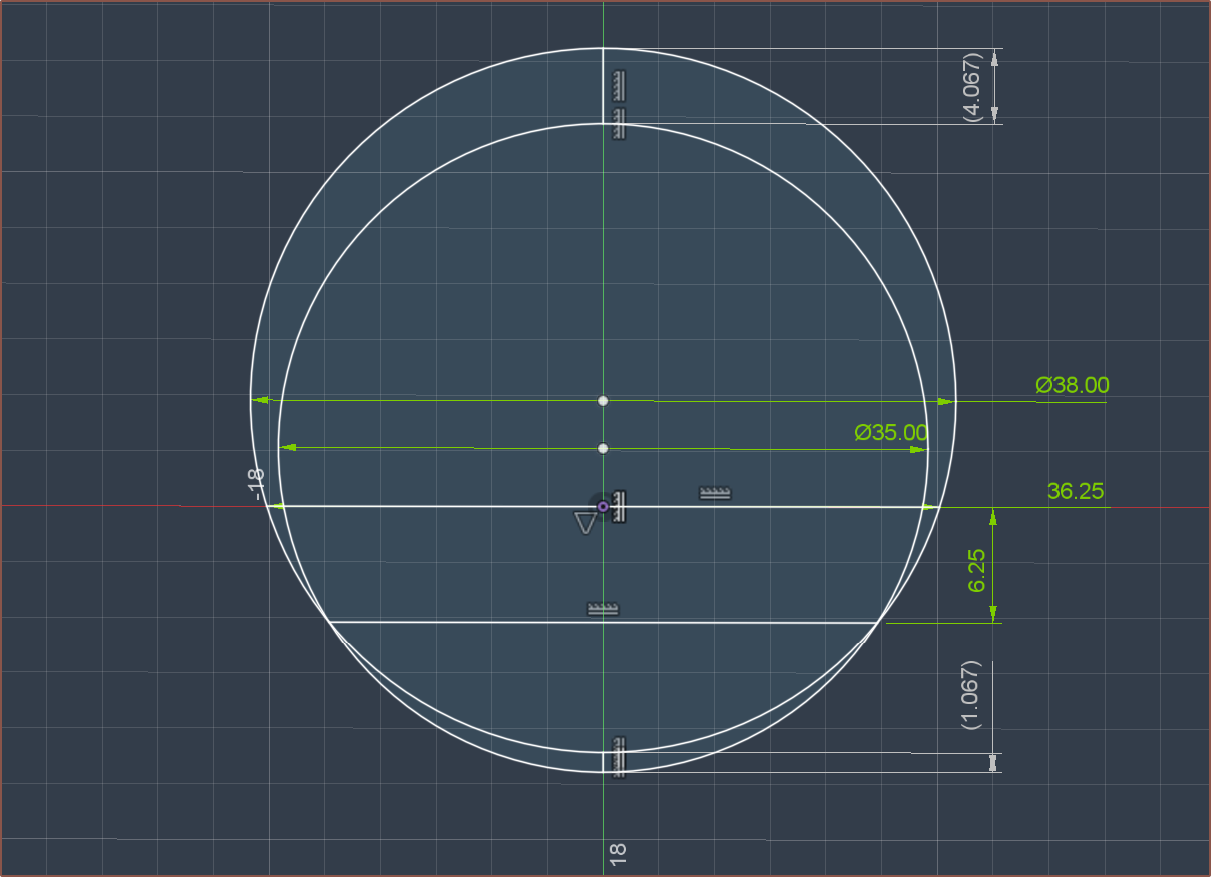
I was quick to feel that the 38mm ball was too tall for this keyboard. I've also mentioned that it tracks surprisingly poorly. Thus, I went looking for an alternative, and got some 35mm balls to try.
The hope was that the lower height will be more ergonomic and the steeper angle to the bearings will reduce the chance of the ball rolling out.
Jade
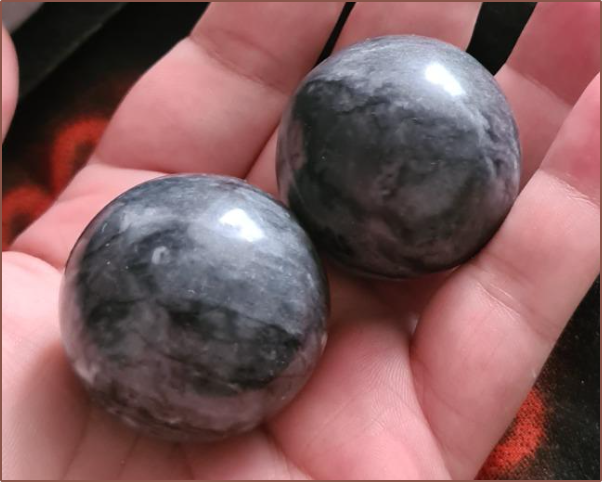
The first balls I found looked black in the product image and cloudier in review images:
Conveniently, both a black and a cloudy grey ball arrived:
The black ball tracked mostly fine (and certainly better than the original grey ball) but the marble-like cloudy ball didn't at all. I correctly suspected this was because the balls were too close to the sensor, and found some m3 nuts to act as 2.3mm spacers. Now both balls would track but the cloudy ball would cause the mouse to jostle when stationary.
The black ball felt scratchy, as if a brown keyswitch was turned into a trackball. The cloudy was smoother. Both were notably louder than the grey ball, as well as less spherical; it's round enough not to feel but enough to see it kinda wobble in place by about 1mm tops.
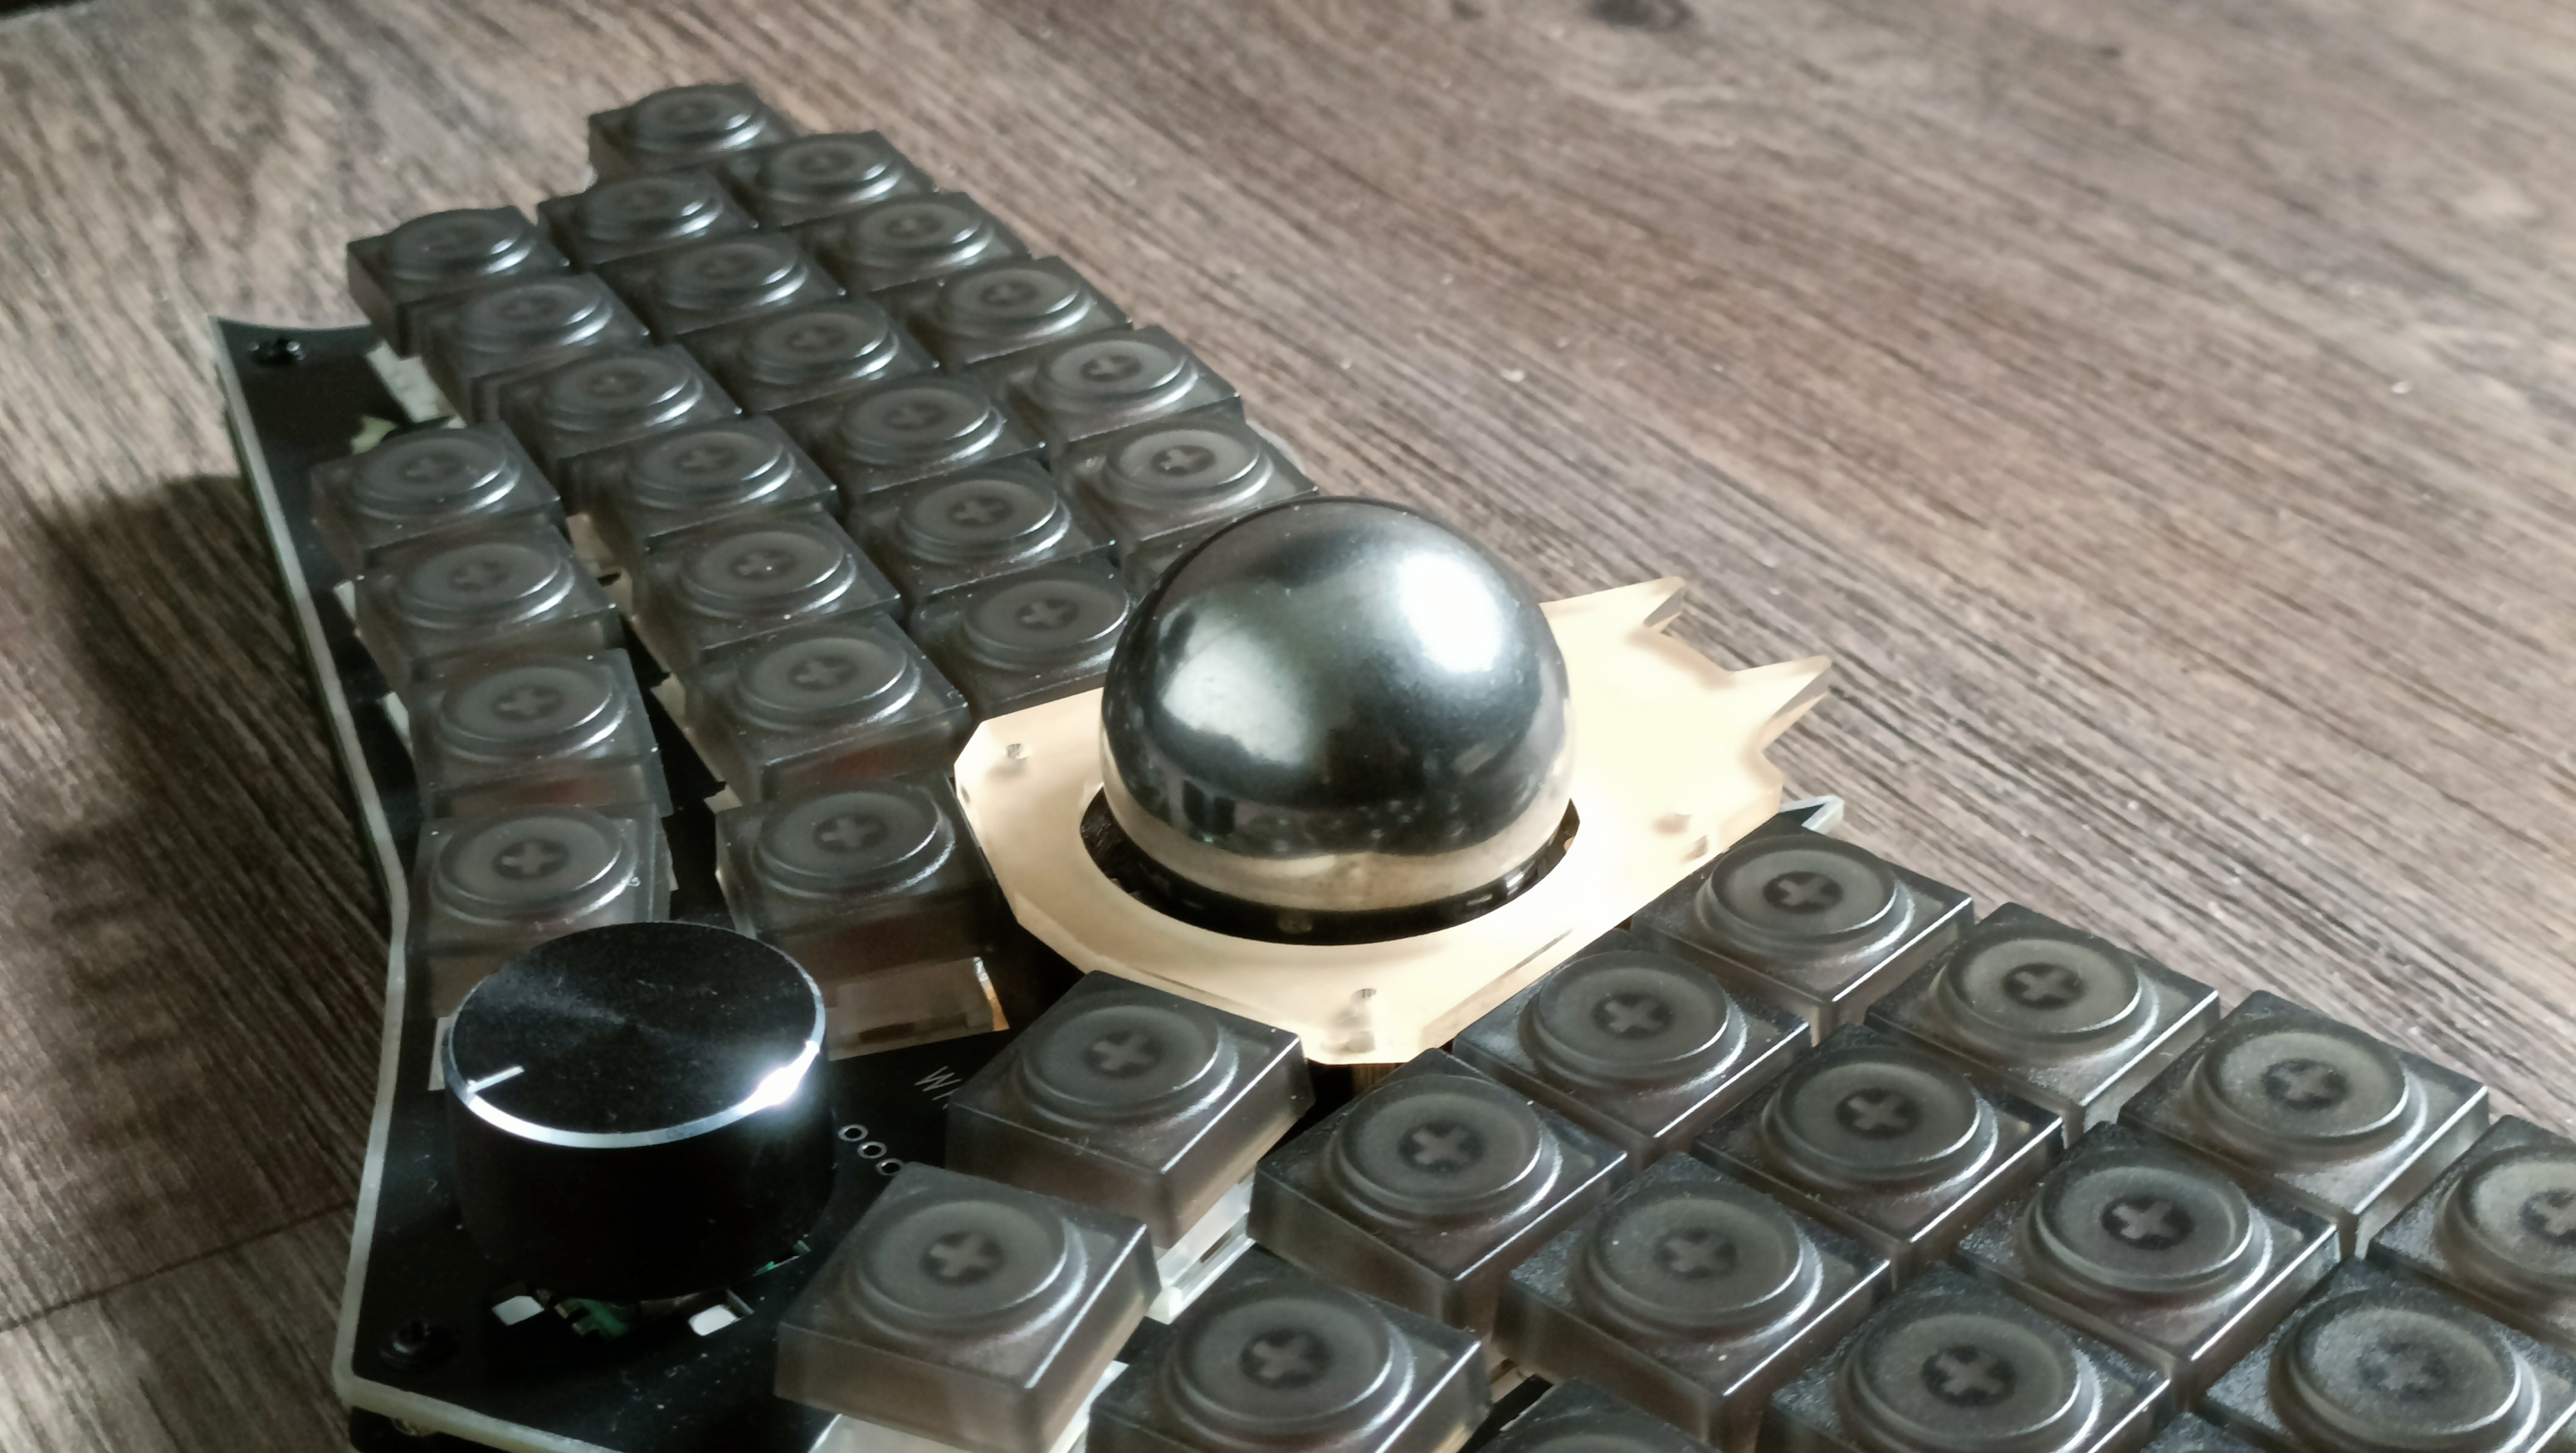
Stainless Steel
Seeing the below video, I decided to try a solid stainless steel ball. I got 2 since it was better value:
I was too concerned about rust to go with the cheaper carbon steel balls.
There's enough specularity on the steel ball for the sensor to detect features. In other words, it tracks fine. Since I got 2 balls, I was able to choose the marginally-smoother / quieter of the two.
Mass effects
The weights for all the balls are as follows:
Original grey - 38g
Jade balls - 62g
Steel balls - 178g
I initially felt like 60g is the minimum and 180g is the maximum mass that I'd tolerate, though through continuous use, it does feel like my fingerprint oil makes the steel ball easier to move that the weight no longer feels like a problem. The jade ball just feels hollow in comparison. The mass of the steel ball means that I can also use it as a hand massager by rolling it around in the palm of my hand. I'd really like to try a 120g ball if it exists.
Using brass inserts as a spacer
Since the brass spacers are 4mm, I also got the idea to use M5 x 5mm brass inserts around them so that I get the 1mm difference that was lost going from 38 -> 35mm diameter.
The balls track better, though I still feel that there's room for improvement so perhaps I need another 0.5mm of spacing.
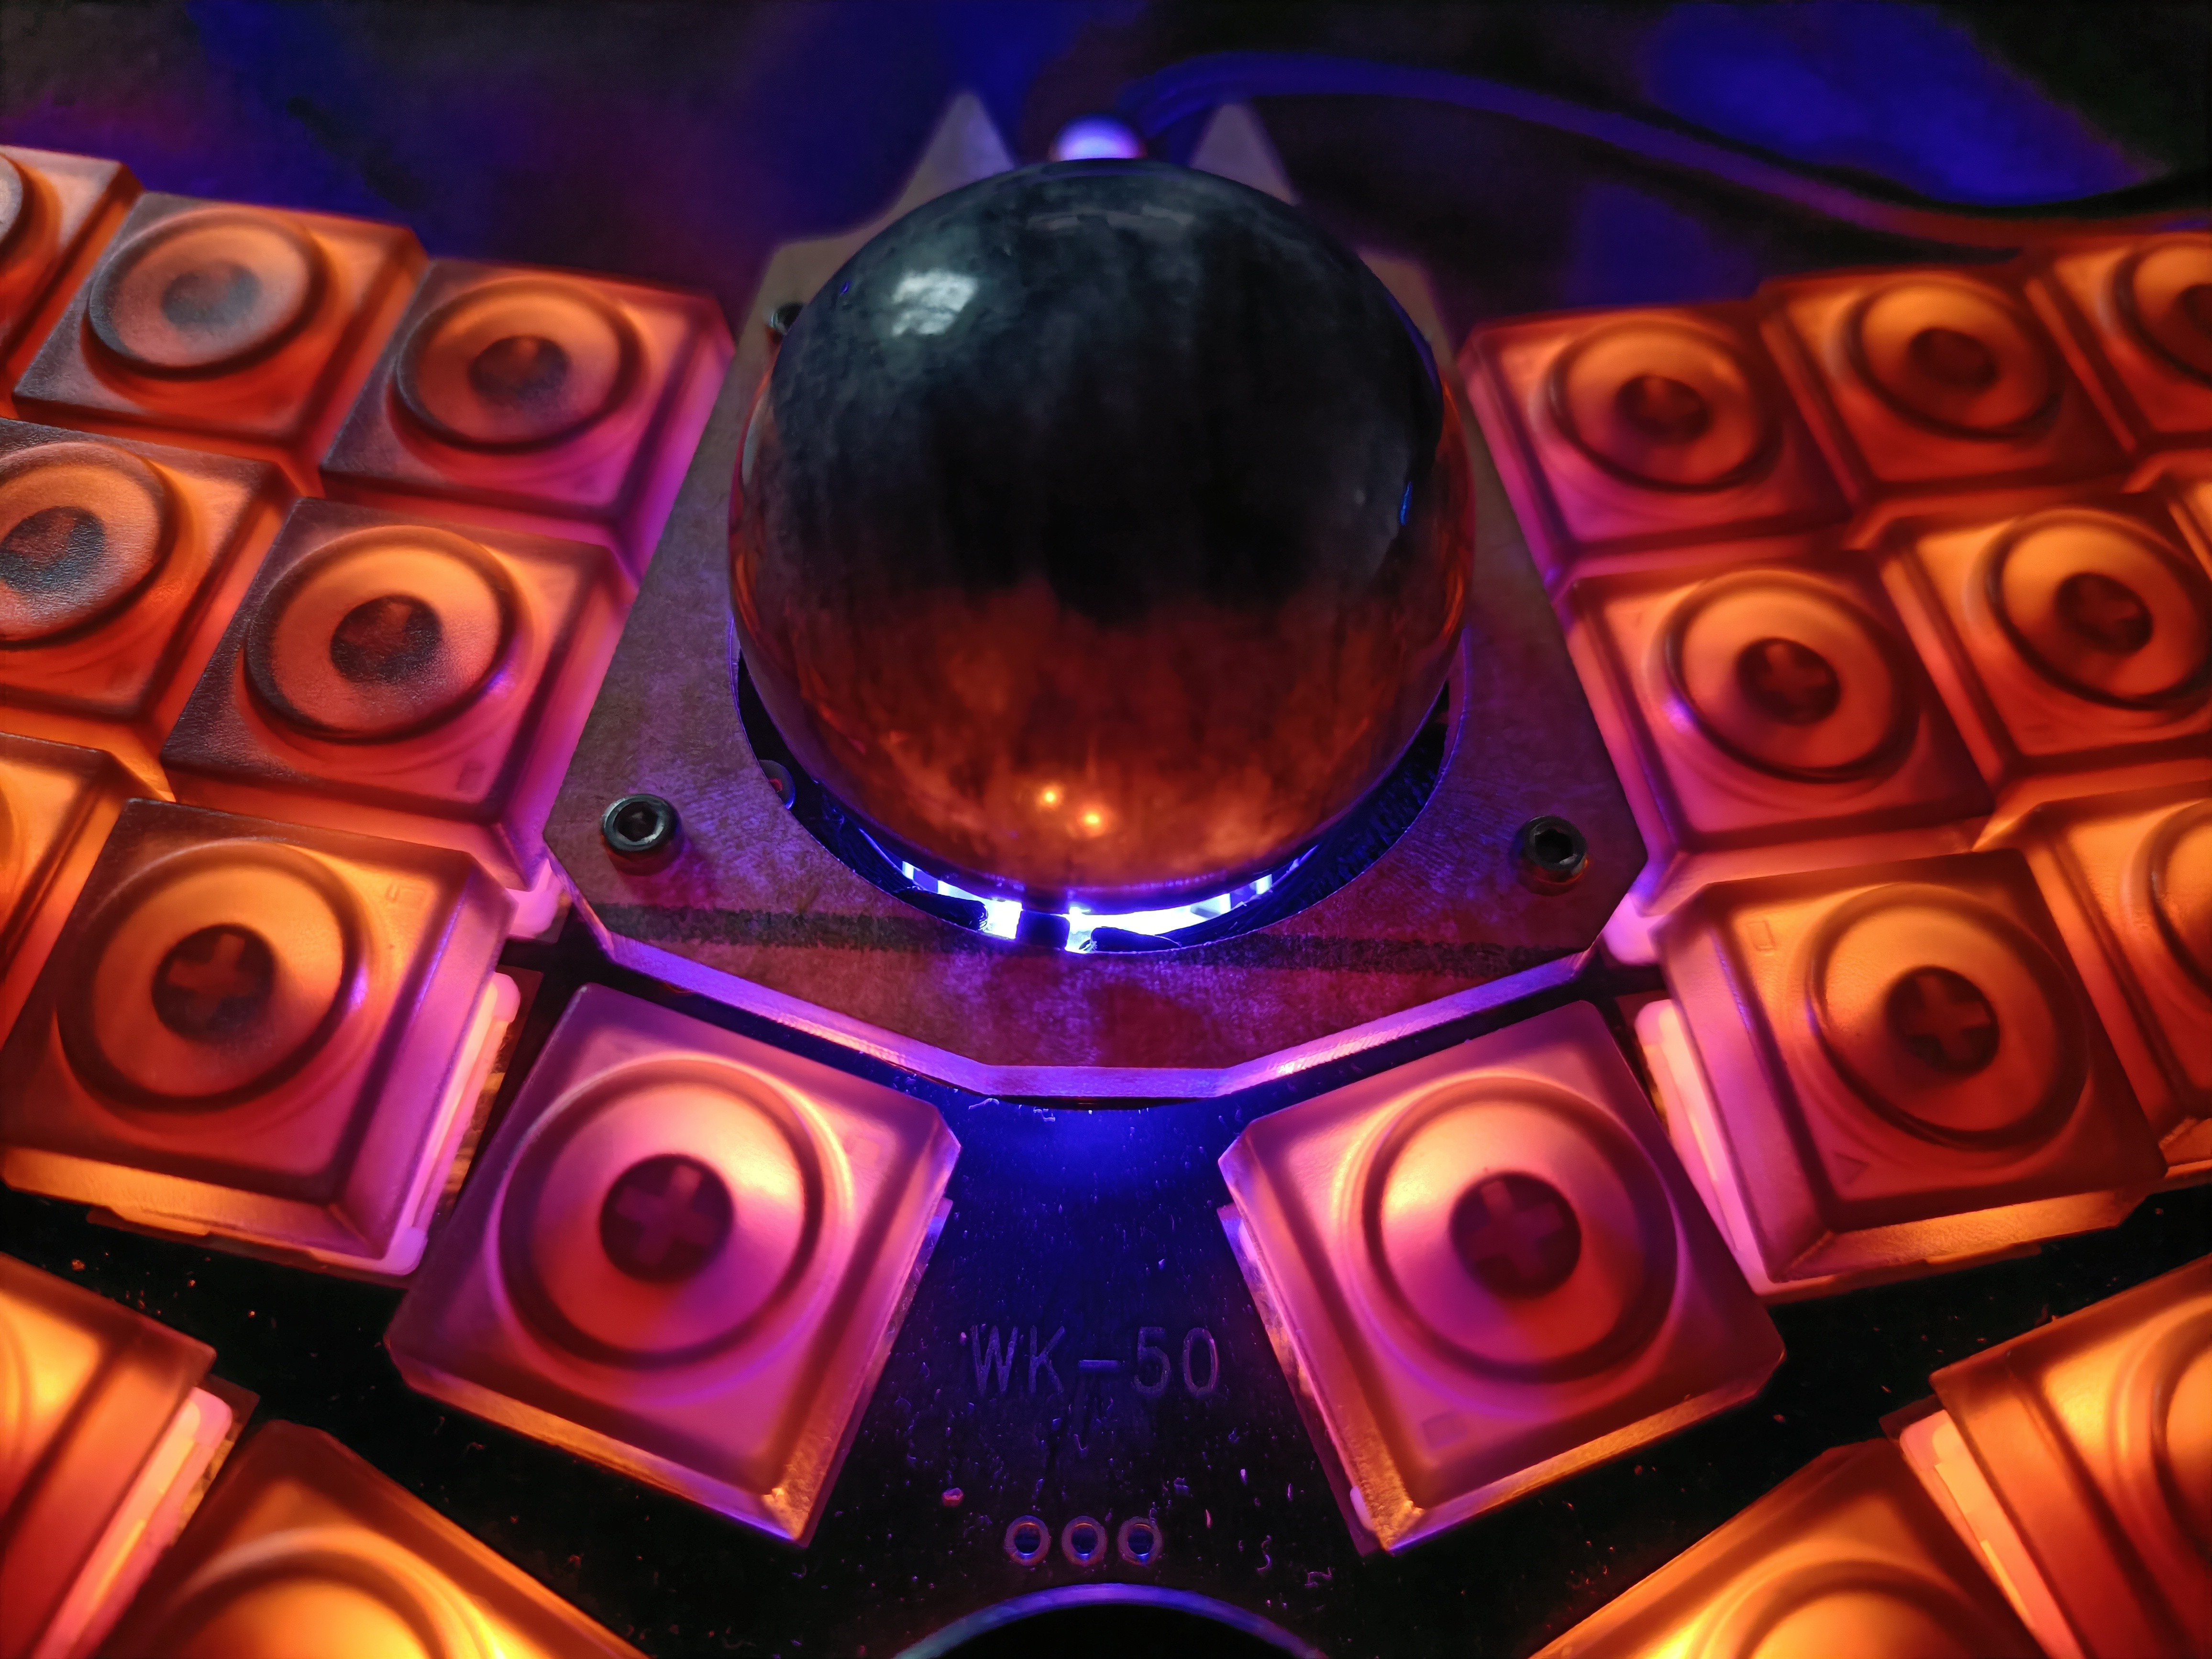
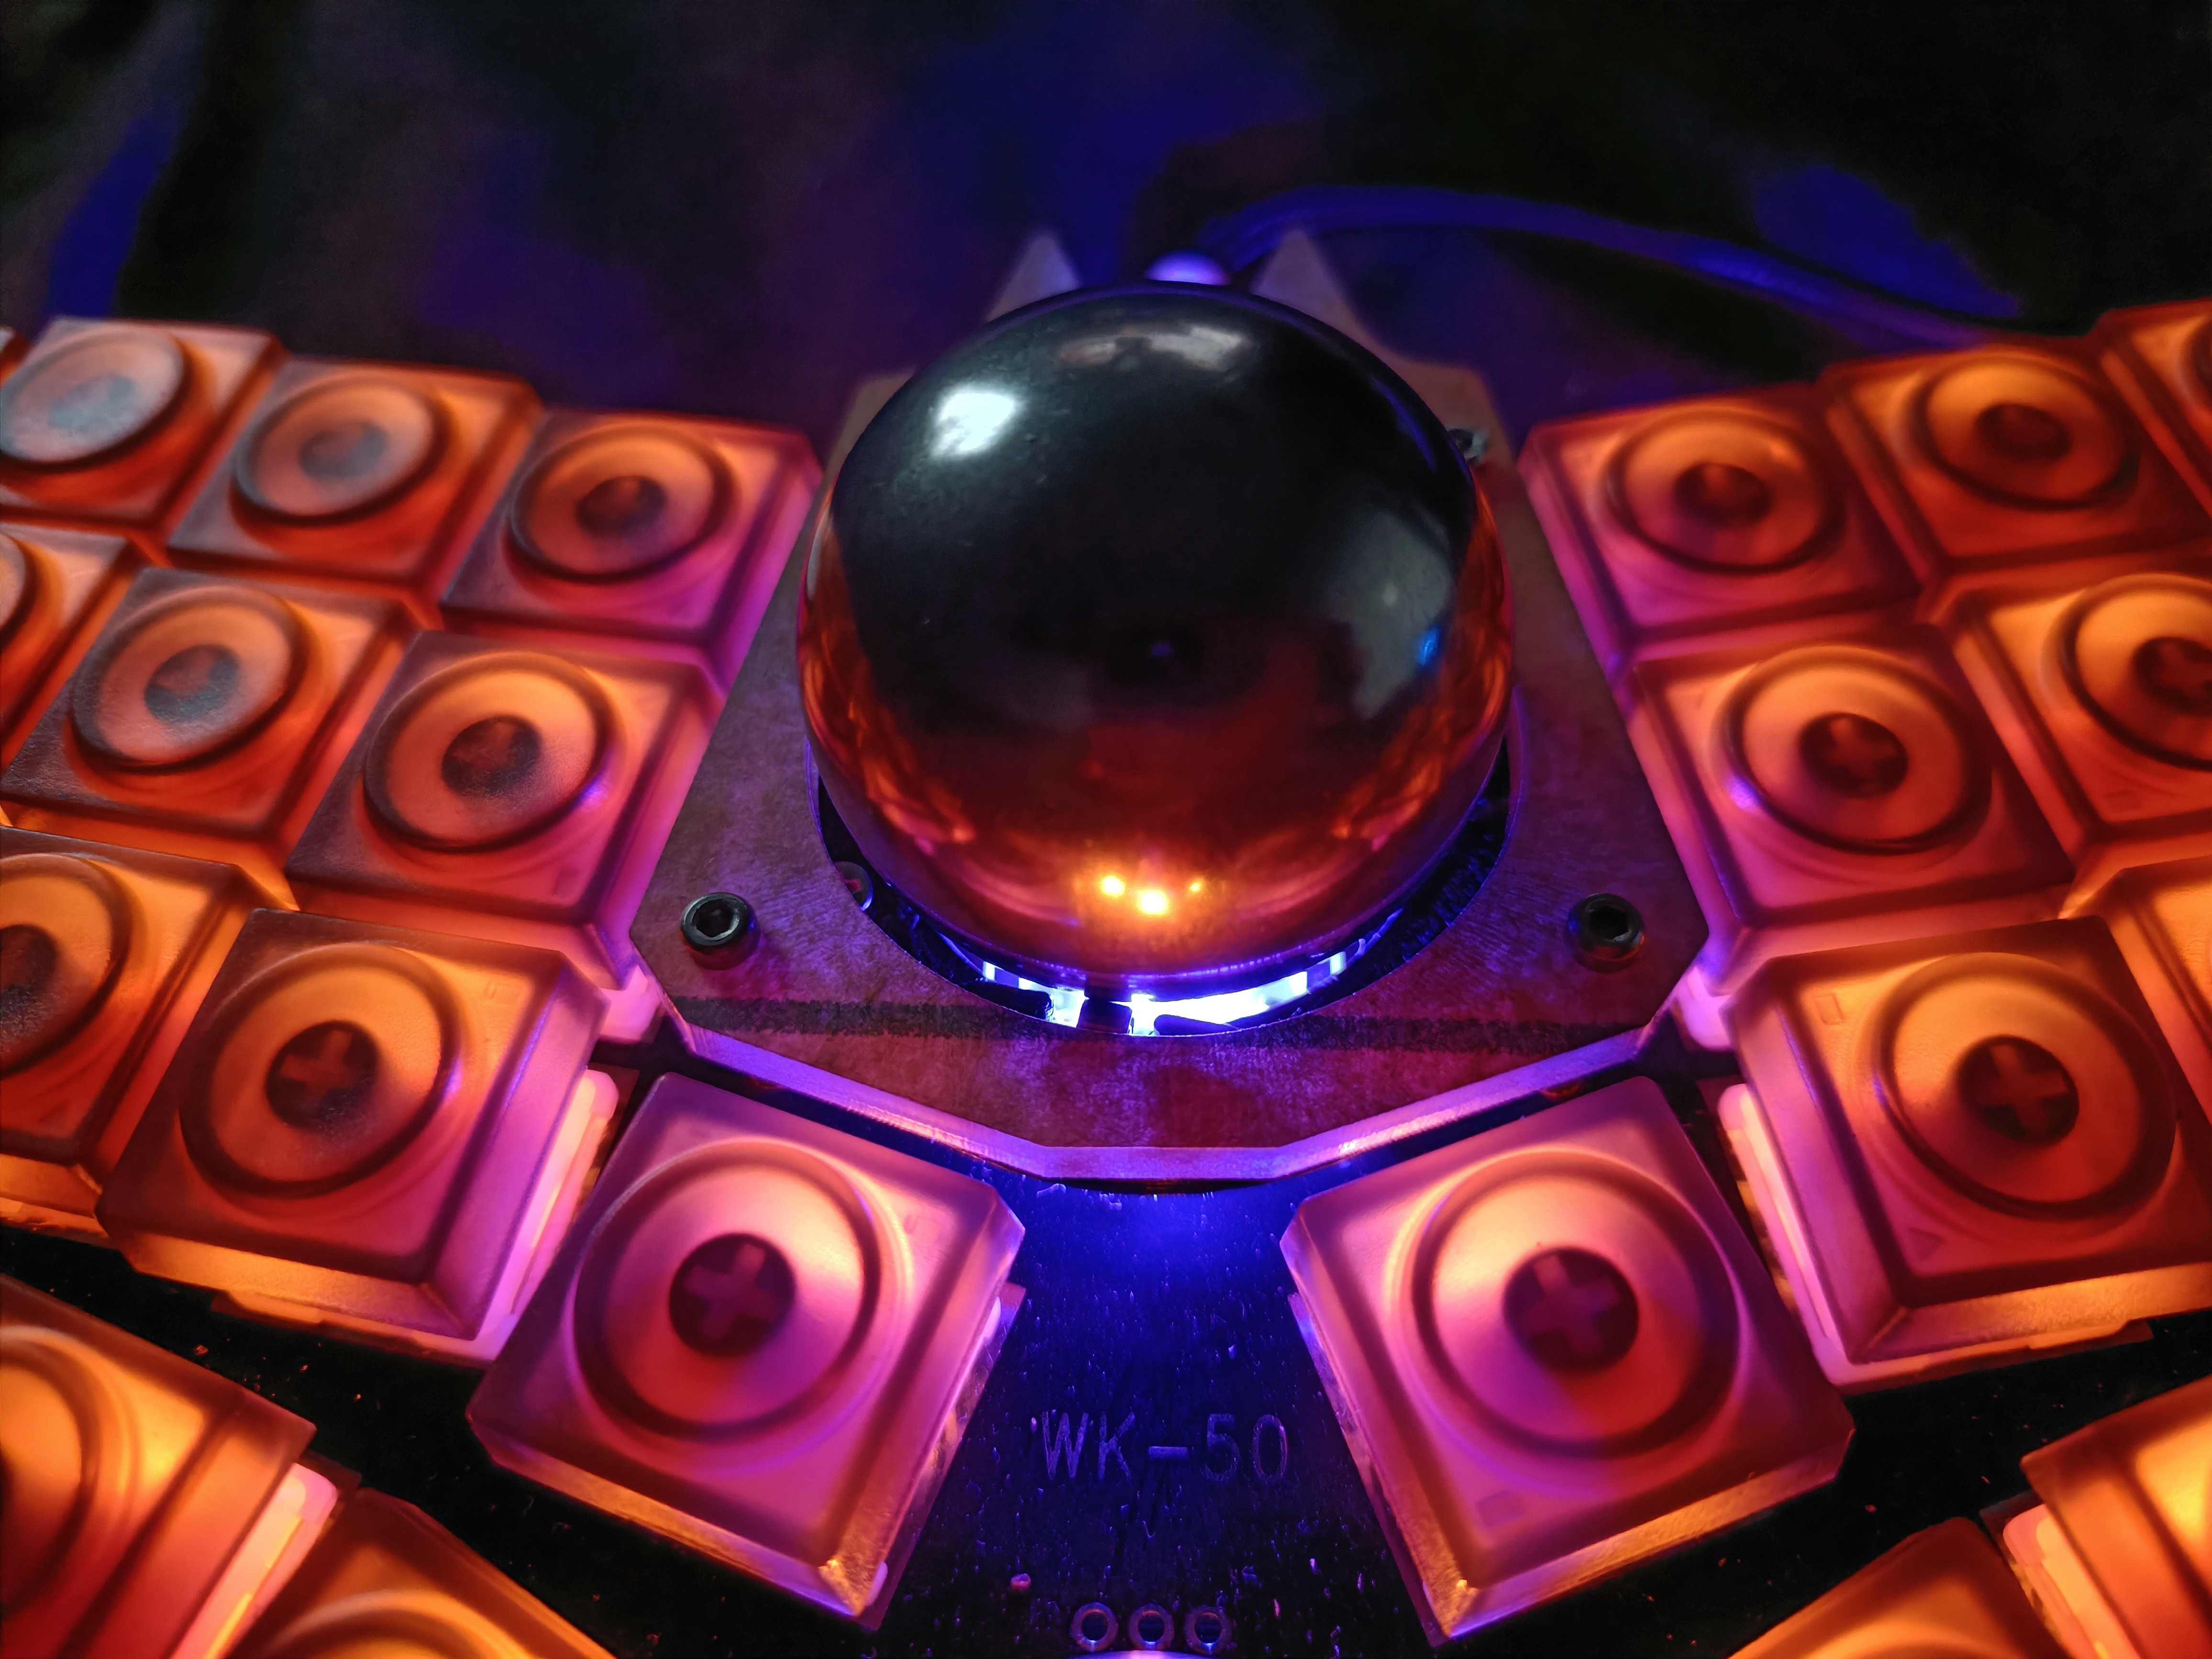
Aesthetics
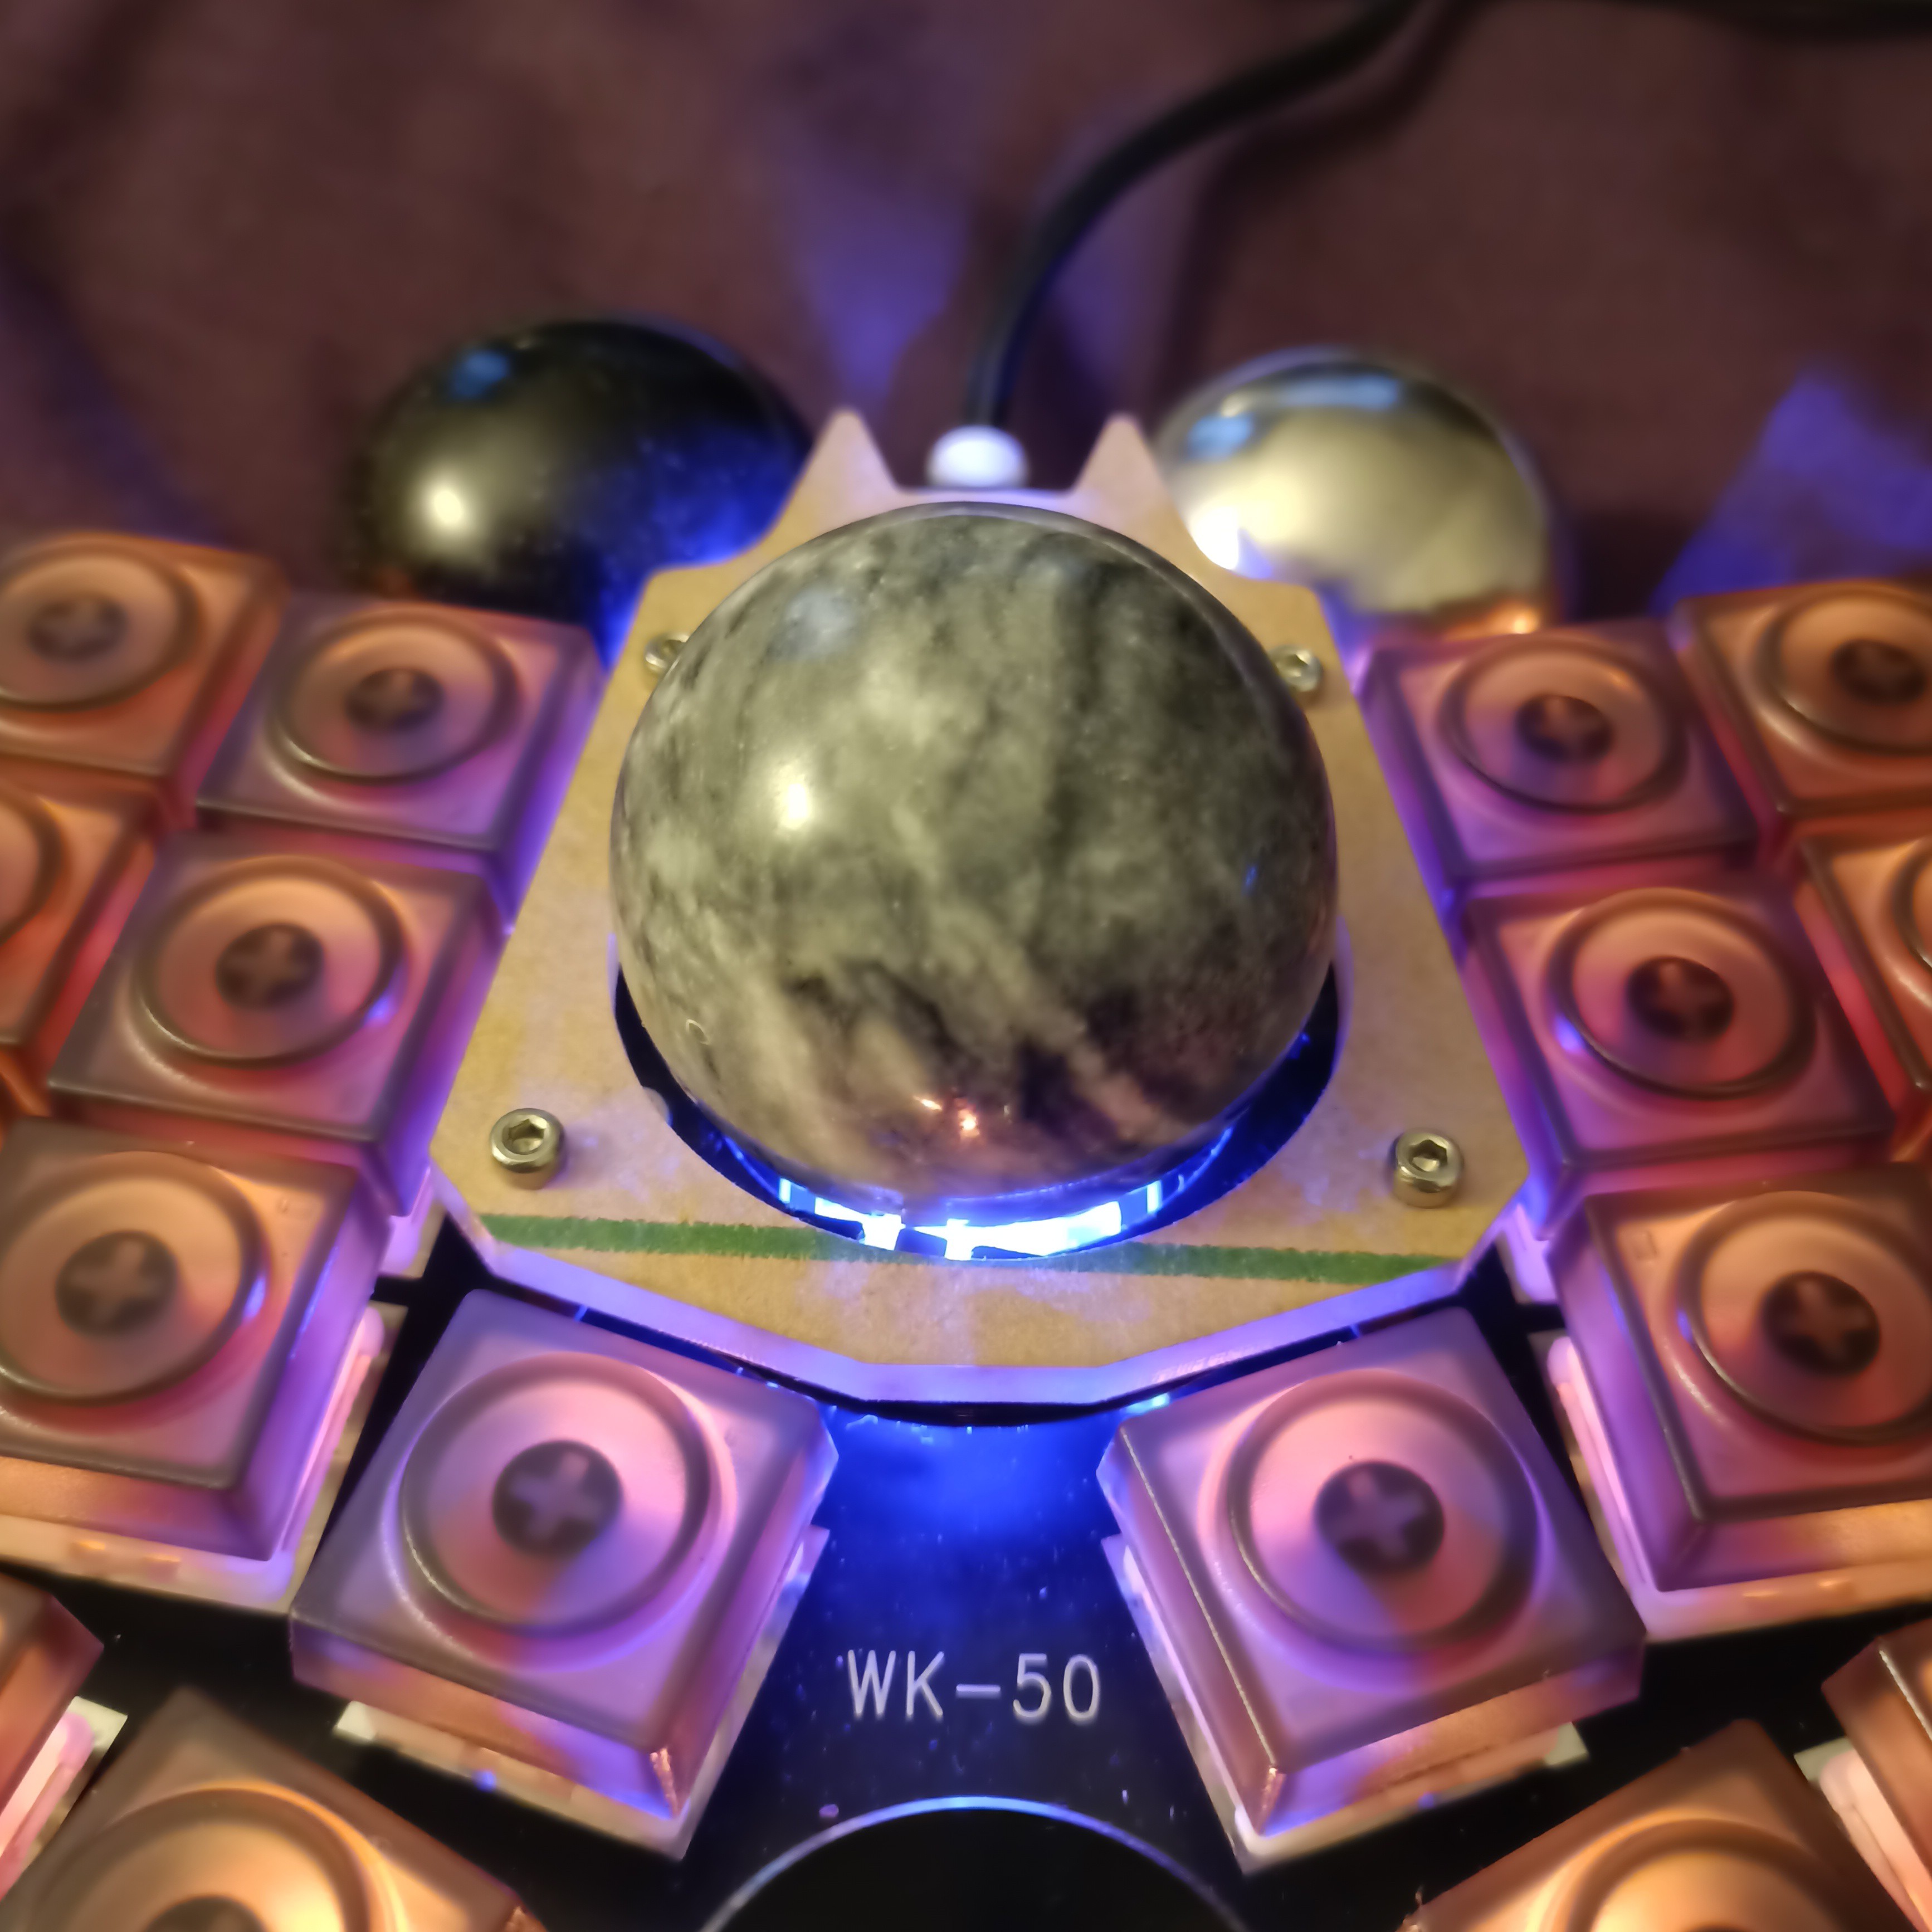
I peeled off one of the protection stickers of the frosted acrylic and now the balls look like they're in a sand zen garden. The cloudy ball has a more zen / meditation vibe and the stainless ball has a more art deco aesthetic. The latter certainly feels more Batman-esque. Here are some day / night images:
The ball is mostly illuminated by the knob LED lights, so I'll keep that in mind when considering for a better knob (as the original one is too short and is opaque).I'm mainly considering the left one since it's 3-dimensional like the trackball and keycaps, but it seems that the right one has a light diffuser on the base. I don't think it'll work though, seeing that the knob without it might block the light at the base.
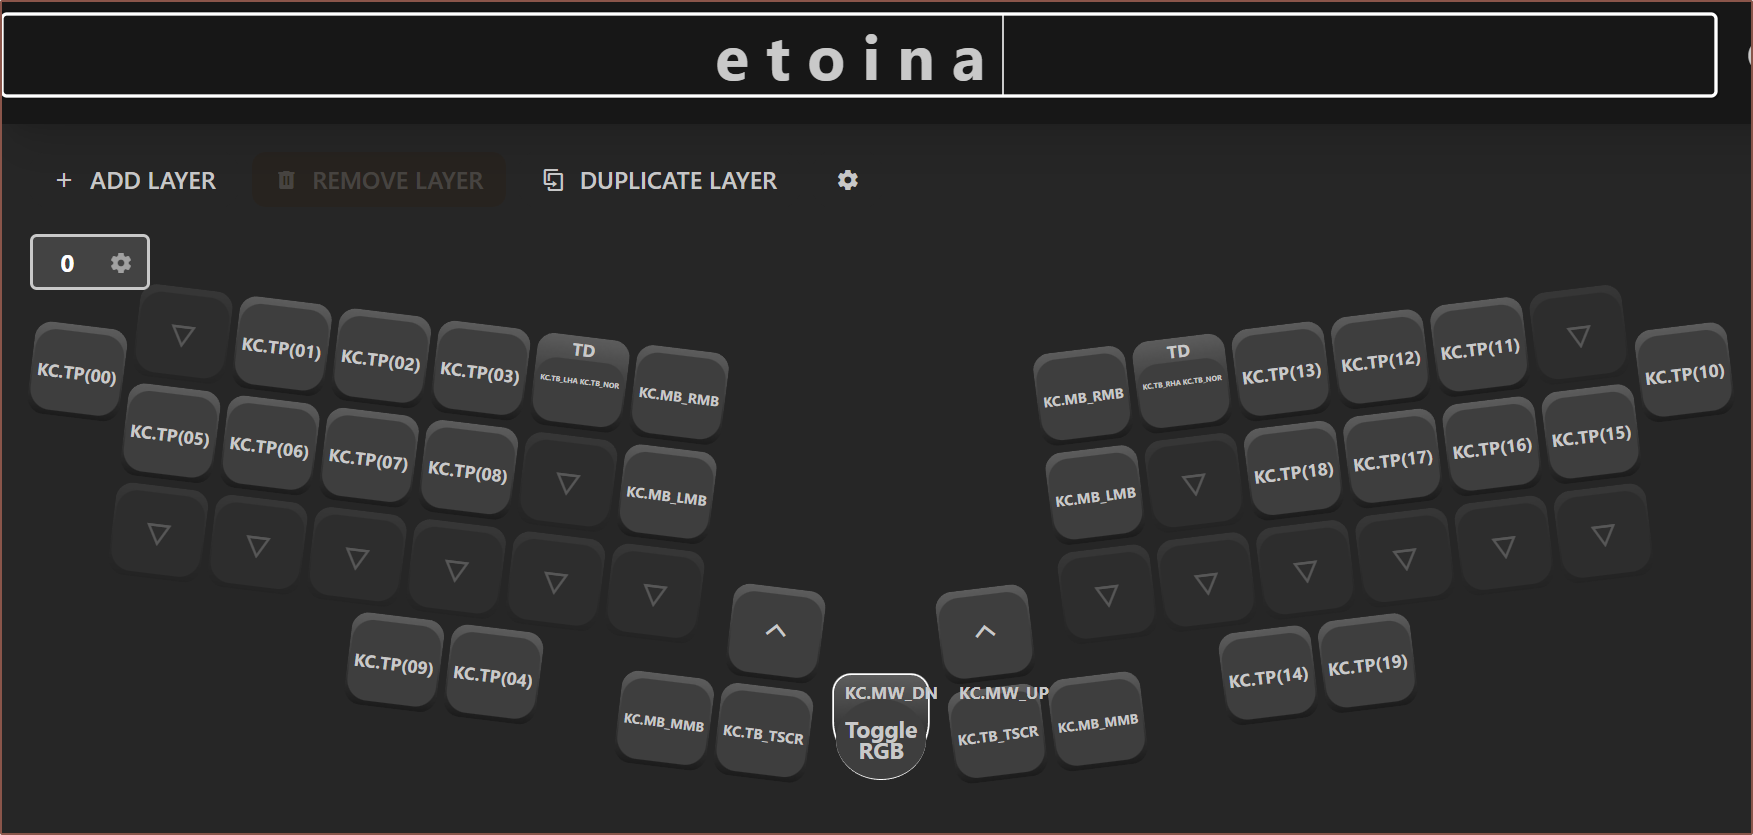
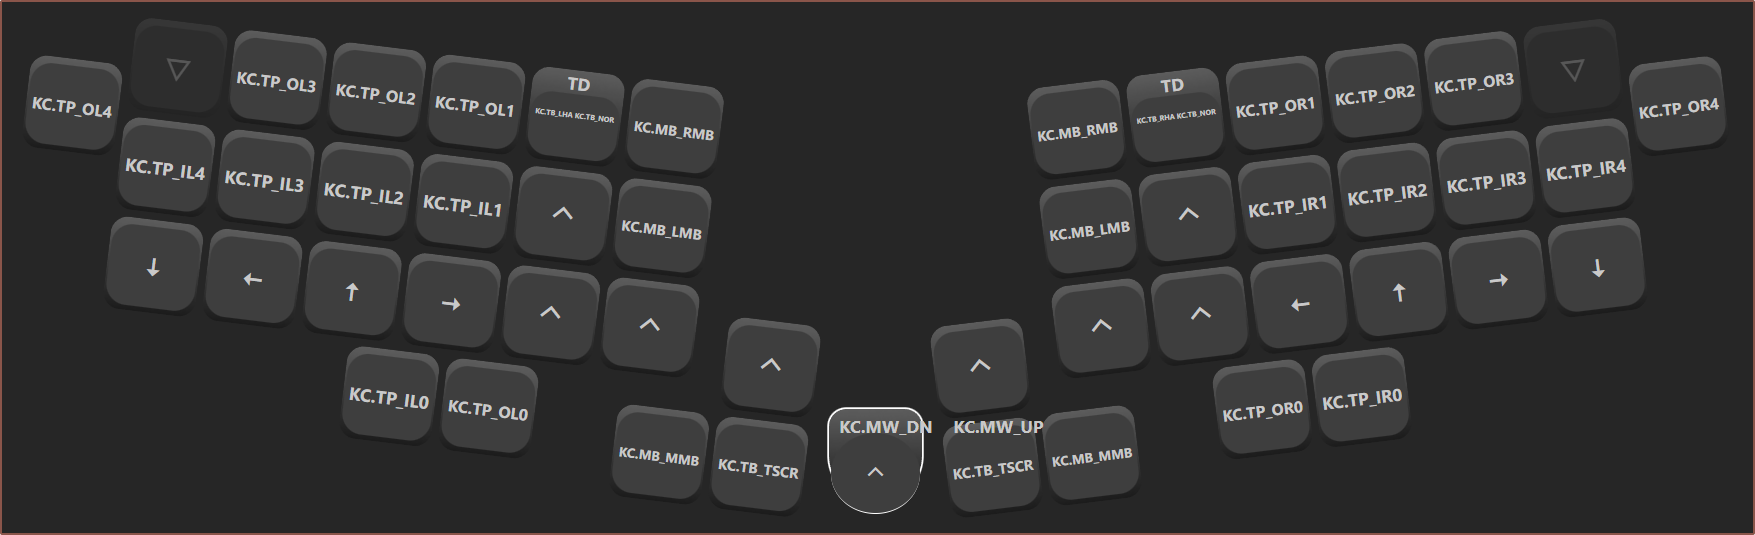
The layout at the time of writing can be seen here, though I haven't been able to get the Taipo-related code working (see issue).
As written in the readme, the main change is that space/bksp/shift are on the smallest finger, Finger4 (aka "pinky", and I also need to make a PSA on the Tetent-related projects that I'm changing the index to start at Finger0, so that Finger1 is literally the 1st appendage called a finger. It also makes more sense for #Tetent [gd0090], which currently only uses F1 - 4) and that a letter + spacekey outputs "[letter] + [space]".
Unicode.
The most amount of time was actually dealing with unicode. Not sending unicode characters, but trying to use unicode to make nice 1-liner comments showing what keys need to be pressed. Reasons include:
#Tetent research that informed me to pay close attention to learnability
the allure for self-documenting code
worried about how much keyspace I'd have after changing chords to fit the spacekey feature.
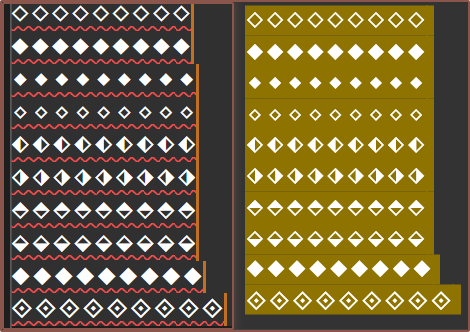
The issue is that there is no consistency between different unicode sets that are supposed to build on the same general idea:
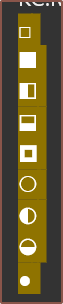
Left: Symbol widths for VS Code and Github. Right: Symbol widths in Sticky Notes
Coincidentally (because my brand image is diamond squares and all), the diamonds are the most consistent that have the symbols I need. In an ideal world, the filled and outline diamond (first 2 lines) would be the same width as the half-filled ones, but lines 3 onwards are from a different unicode set and it seems only the fontmakers for sticky notes made sure to keep them cohesively aligned.
Here's the alignment woes I discovered on my journey. May I suggest playing Monkeys Spinning Monkeys for this montage?:
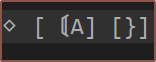
As the fully-filled diamond is rare, I thought it would be a nice compromise to use the small black diamond to denote "nothing pressed on this finger" and I think it actually makes it more obvious compared to my initial strategy:
Changes and improvements
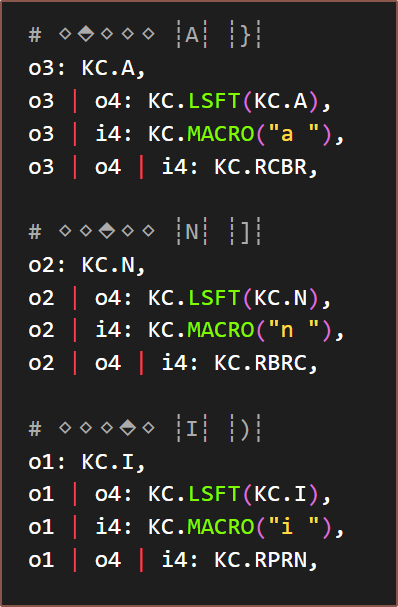
This is also a good time to mention that I renamed the "variables" compared to the original so that it's way easier to read and understand what a chord is made from:
Left: Original. Right: Tetaip
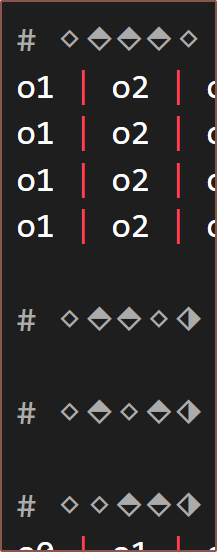
Because of how I ordered the chords, I was able to find all (but one of) the potential chords available. I alternated all-outside, all-inside, all-outside(with one more finger), etc until I got to 4 fingers where I ordered them in binary.
With the ascii art comments, it's now very easy to see chords that are still available and might be nice to press.
I also tried to line up some letters so that their dual F4 functions lined up somewhat nicely:
The general gist of events over the past 2 days was that:
I read through QMK's ADNS5050 implementation and KMKs ADNS9800 and Pimoroni Trackball implementations
Started skimming though the ADNS5050 and ADNS9800's datasheets to see differences
It was only until yesterday that I found the full 9800 datasheet (with timing information) instead of the 9-page one I was reading the day before.
Copied over the 9800 and started making changes, such as importing the 5050's register list and timing requirements.
Learned about SPI phase (CPHA) which determines if data is sampled on the first or second edge.
Find some code to get the 2s complement.
Then, on day 2, just port over the method from QMK because it was more readable.
Find out that busio can only do half_duplex on STM chips, which is the last thing on Day 1
Day 2, changed to bitbangio. Still no readout from sensor.
Did another continuity test to confirm that the sensor pins are correct.
I also don't think GPIO11 is connected to anything and there's just a via nearby to allow GND into the copper pour.
Looked into RP2040 5V pin tolerance, because there's no level shifters between the 3.3V output of the RP2040 and the 5V-supplied ADNS-5050.
Learned that microcontroller.delay_us and time.sleep work in opposite ways to what I thought. The latter is the one that holds up everything, and is why it's only recommended for very short delays.
Decided not to assume how bitbangio worked and instead ported over the QMK implementation
Not exactly sure why one timing was implemented the way it was and so changed it to better reflect the datasheet:
Finished porting and was able to read the Product ID and Revision ID from the sensor!
Squashed bugs related to the fact that every function in here needs to have self as the first argument.
Implement the get/set CPI functions and a debug readout of if the sensor is in Mouse Control 1 or 2 and the CPI if it was in Control2 mode.
Found out that the trackball polling is max 120Hz, usually in the 90Hz range.
Tried messing around with the LED register.
Seems setting bit 6 forces the LED into pulse mode and the sensor won't detect anything.
Setting bit 7, as mentioned in the datasheet, keeps the LED in DC mode. It's less distracting but it also means that it's more susceptible of small mouse vibrations when the ball is stationary.
Remove the pins that were never used and sent a PR to CircuitPython for the keyboard, now that I know it all works.
Lastly, I tried my finger and it seemed to track fine, so it might be an issue with the matte grey ball or it's mounted distance to the sensor.
I am glad that I decided to go the KMK route. Things like probing the LED register would've taken much longer if I had to recompile and flash every single time.
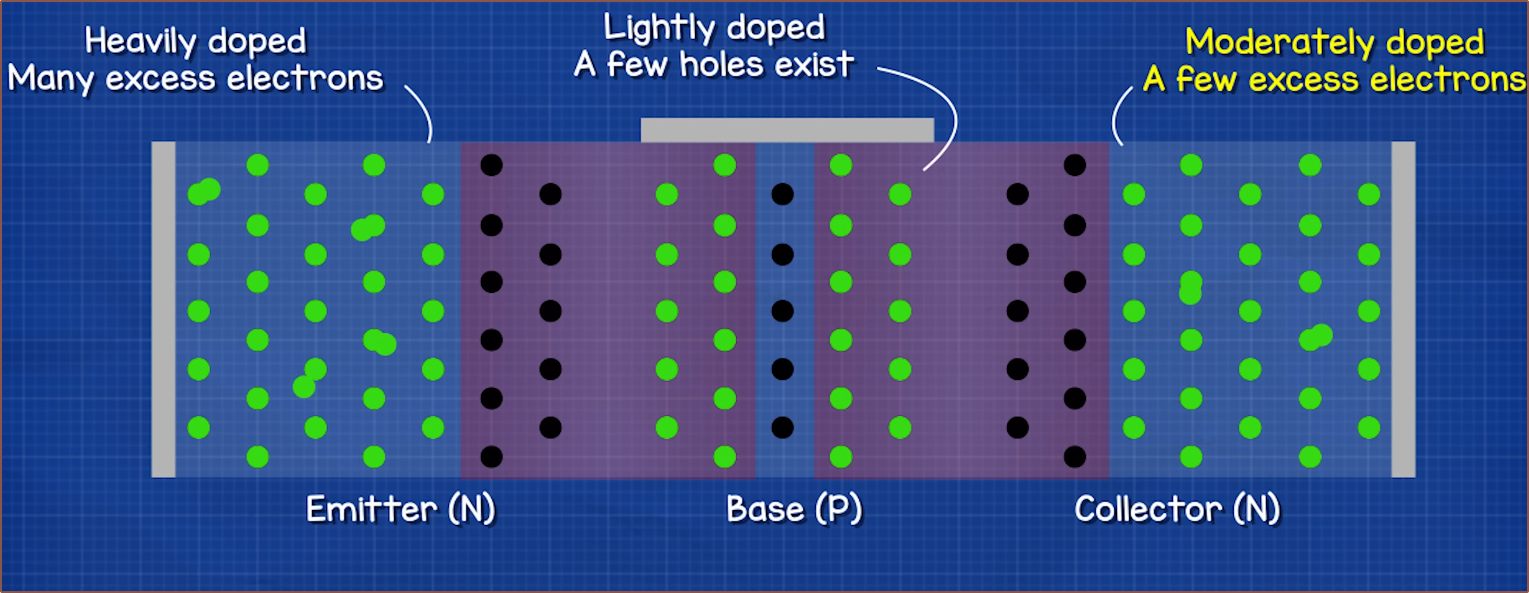
Sometime before the Circuitpython fiasco, I watched the below video about transistors to understand the mystery on this board:
The main frames I want to point out are diagrams of a diode and NPN transistor:
I noticed that the transistor looked like 2 diodes put together. I looked into it and found symbols like the below:
Since matrix scanners only scan one row/column at a time, it's likely safe to assume that the designers of the WK-50 used transistors as alternatives to dual diodes (e.g. BAT54C).
I tried the KMK starter code and the keyboard matrix is configured as Row to Col.
Creating the layout in pog
Turns out pog can install/update KMK, which is nice.
Since I gave the board useful pinnames, it was barely an inconvenience to set up:
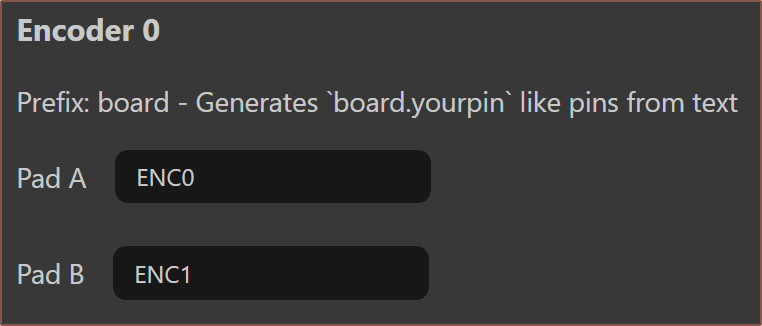
Then I got the ChordMap, moved the keys in the layout area to approximate the keyboard whilst still looking tidy and added the encoder pins:I also needed to download the neopixel library and put it in the lib folder:
So I found the below video which incentivised me to try porting KMK instead of VIAL as I originally intended. It's a configurator that was unveiled to the public on the last day of May called pog.
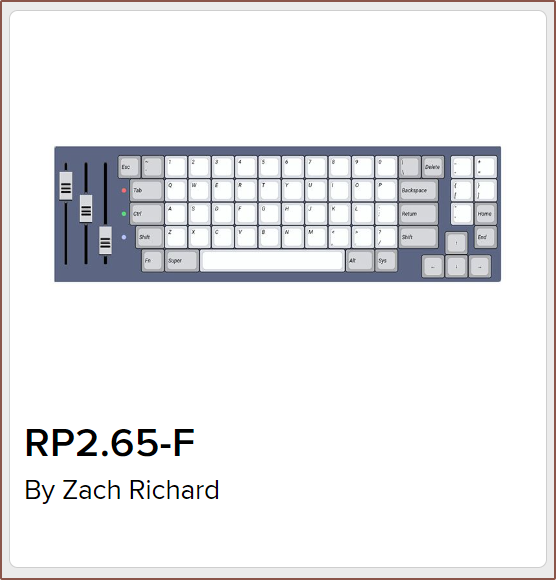
I haven't looked into pog but it sounds like it's VIAL with more of the benefits and less of the drawbacks, so understandably, now that I've got the power of the RP2040 instead of the ProMicro, I wanted to try it first. I also heard that KMK was recommended for handwired boards and tinkering, so I assumed it would be a good fit for a keyboard I'm trying to reverse engineer.
Well, the first step is to install CircuitPython. Okay... just got to download that and-- oh, I need to install it for a specific board? There's even other keyboards here:
I'm going to skip the pitfalls (such as using "git submodule update --tinit --recursive" and then having to backtrack when I saw it was installing things I'd never need) and have a more smooth-sailing-sounding, step-by-step tutorial. Part of the reason is because, on the CircuitPython wiki at the time of writing:
It's possible, but tricky, to build in other environments such as CygWin or MinGW: we may cover how to use these in the future.
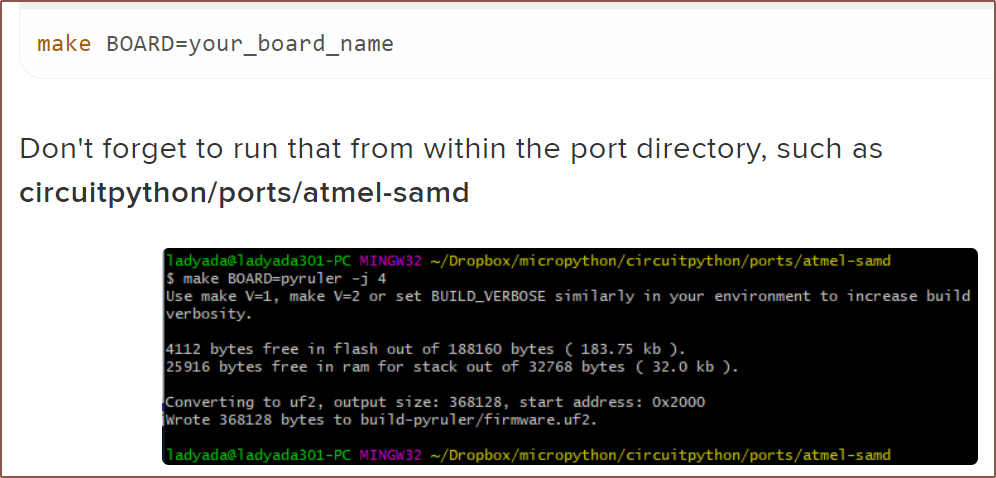
Which made me feel kind of salty because I had just finished setting up the board pins (before I realised I had to build CircuitPython first) and saw this screenshot:
So it's obviously and totally possible!
I also want to avoid using WSL. Sounds like mounting and copying files from the Ubuntu to Windows side and back again. (Steve Jobs' opinion of the stylus comes to mind).
Circuitpython on MSYS2
It turns out that the install is kind of like the days when people said "there's an app for that", but here it's an MSYS package.
Forked and then cloned CircuitPython. I put it in a C:\mcu folder, thus my repo is in C:\mcu\circuitpython.
Before opening MSYS, navigate to C:\msys64, open mingw64.ini and uncomment
MSYS2_PATH_TYPE=inherit
so that MSYS can run Git for Windows (assuming git is present in the system PATH); I was getting a FileNotFoundError when trying to get submodules after the setup. The alternative probably is installing git via pacman, though I hear that it runs slower. I know the QMK MSYS has it's own version of git installed, so it's likely performant enough.
Open MSYS2 MINGw64. I followed the manual setup list.
Installed make, cmake and gettext.
pacman -S make
pacman -S cmake
pacman -S gettext
Installed python3-pip and make a virtual python environment.
Installed rust, as I got an error about it will occur when trying to run requirements-doc.txt later.
pacman -S mingw-w64-x86_64-rust
I tried to run requirements-dev.txt and didn't work fully. I found this when searching in the repo:
# requirements_dev.txt doesn't install on windows. (with msys2 python)
Looking at the error log and seeing as it stalled when trying to install cryptography, I navigated to C:\mcu\circuitpython opened requirements-dev.txt and commented it out.
# for mbedtls certificate store
# version limit due to espressif
# cryptography<36.1,>=2.1.4
Instead, I installed its MSYS package. (I assumed I don't need to worry about the version for an RP2040).
Since I've never used it before, I had to install pre-commit.
pip install pre-commit
Then I could install it into the circuitpython folder
cd ../..
pre-commit install
Yet things were still broken
I was getting a "Cannot determine version" error for either of the following commands:
make -C mpy-cross

cd ports/raspberrypi
make BOARD=raspberry_pi_pico
I asked in the Adafruit discord and it was suggested to run
python -m pdb py/makeversionhdr.py test_file.h
Which now meant that I had to start learning the python debugger in real time. I used this tutorial to learn my way around. With this, I was able to find a clue:
I added "CalledProcessError" into git_tag, which was originally "".
I then changed this to "9.1.2", but then I got a different error:
At least I know where the trickiness lies now.
Admitting defeat and setting up Circuitpython via WSL2
Installing (Ubuntu 22.04) was kind-of straightforward, just following links and inputting commands.
The CircuitPython docs didn't immediately mention how to actually go about installing the ARM toolchain and so I used wget to download the .tar.xz i needed and then install using this tutorial. It was only after successfully doing that when I saw the CircuitPython method, under the Cortex-A information.
Even though I don't think anything would stop me, I still made a python environment and added it into .bashrc via VS Code. I didn't know Microsoft had VS Code integration, which certainly makes WSL easier to work with.
I had a requirements-doc.txt error that was unrelated to having rust or not, and I just ignored it.
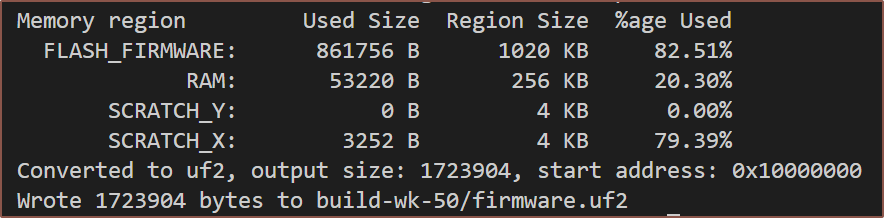
And the raspberry_pi_pico firmware compiled fine.
Configuring the WK-50
I grabbed the USB IDs from Device Manager and then named the pins, remembering that I'm looking at the board from the underside and that the U5 transistor column is actually Col13 (starting from Col0).
I then went back to look at other backlit keyboards and copied their neopixel reset code. I also changed the pin name from ARGB to NEOPIXEL to keep consistency.
So I had spent some time looking at my input device options and determined that trying to reverse-engineer the WK-50 was still the best strategy forward; I skimmed through the trackball section of KBD and community boards really aren't that far off from the WK-50 that exists right here and now, usability-wise. I'm looking again now and the WK-50 looks an awful lot like Cocot46plus:
It even has that angle realignment feature I thought was a bug:
ARGB Order:
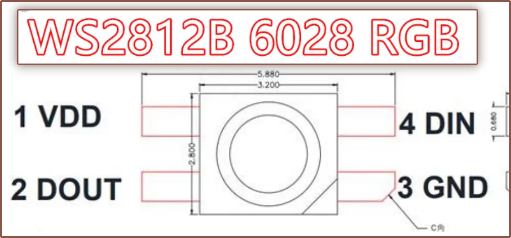
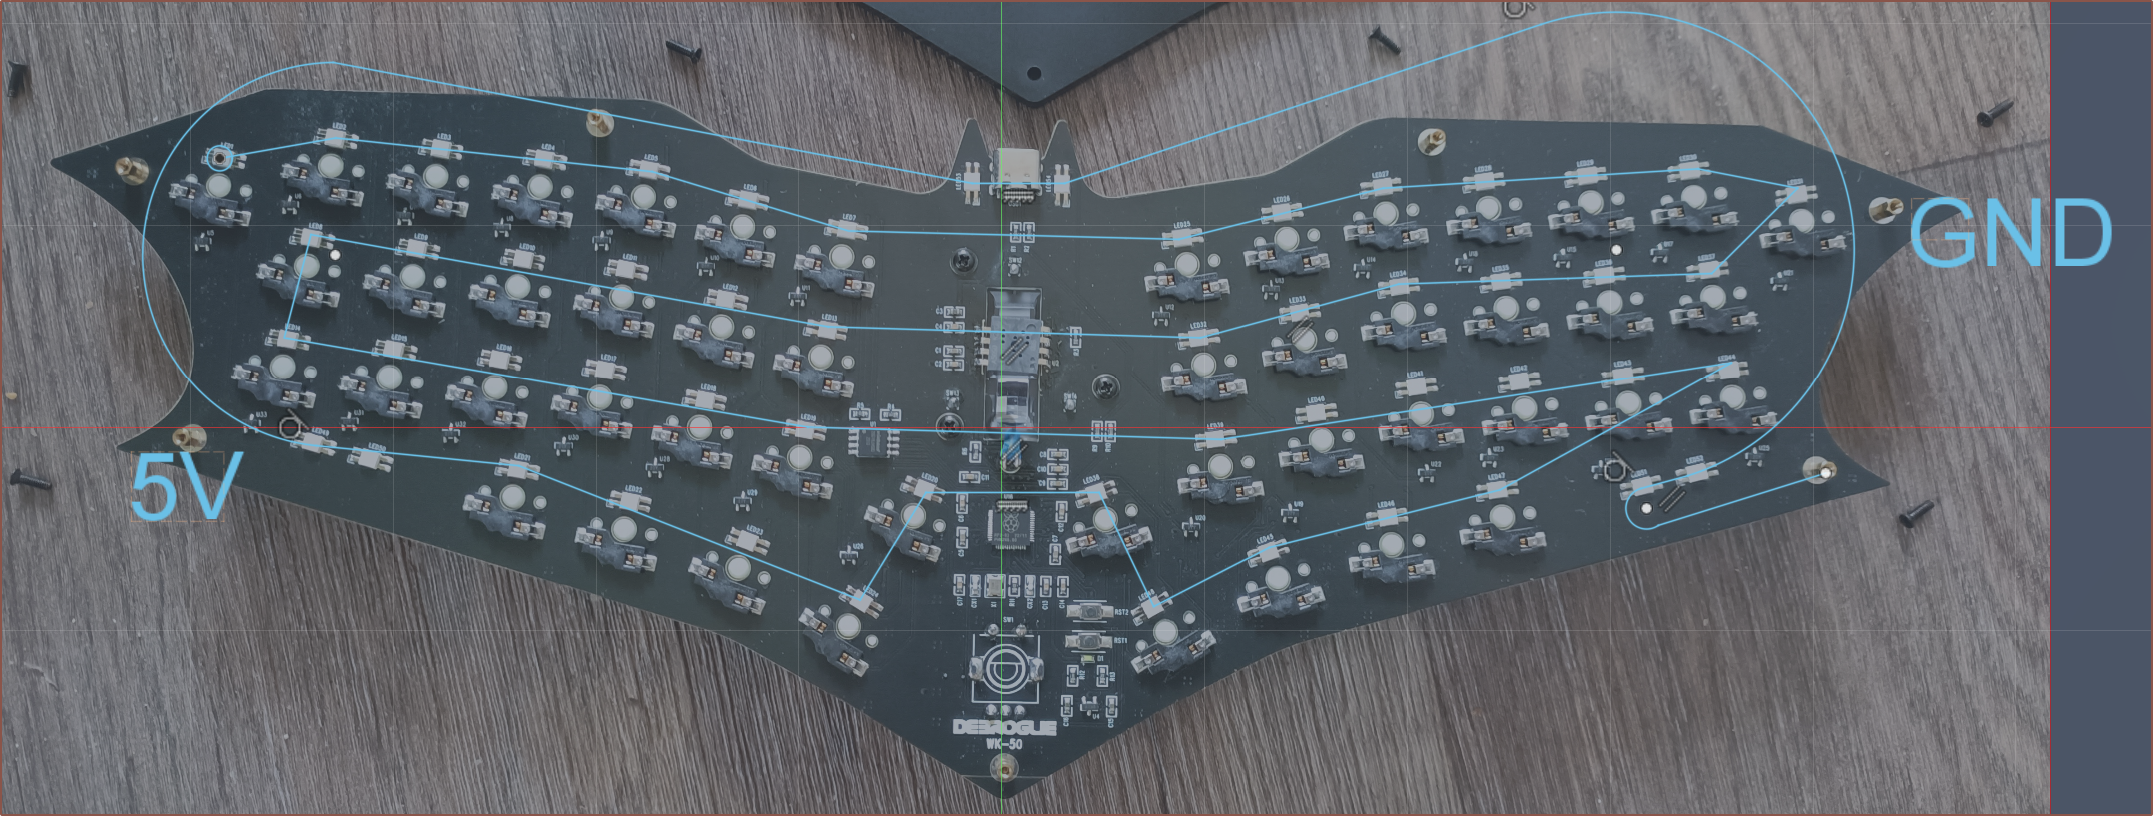
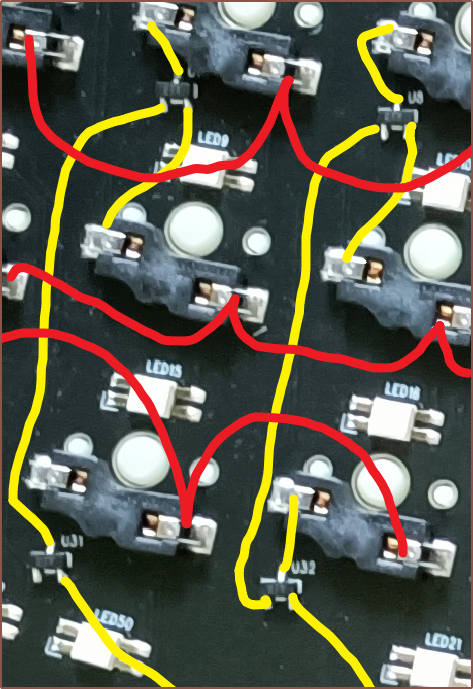
After determining that the LEDs are probably "Reverse Mount 6028 SMD RGB LED WS2812B" and the VCC / GND agreeing with the 5V and GND pins on the USBC receptacle, I traced out the LED order with my multimeter in continuity test mode:
3 standoffs are connections for the 4 RGBs under the encoder.
Matrix of transistors?
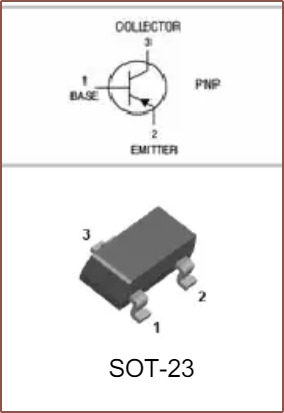
I was able to use macro camera on my phone to actually see the text on U4, which is the 3-pin black square south of the D1 LED. It's an SC662K, a 250mA LDO. All the other lookalikes are 2TY, otherwise known as the S8550 PNP transistor:
I've only heard / seen either direct-pin or diodes ever used for keyboard design. There's 2 transistors per column, and there are 4 rows. Perhaps it's to reduce the amount of passives required to place, thus lower costs and less things that can go wrong during manufacture.
The encoder push button is also on this matrix.
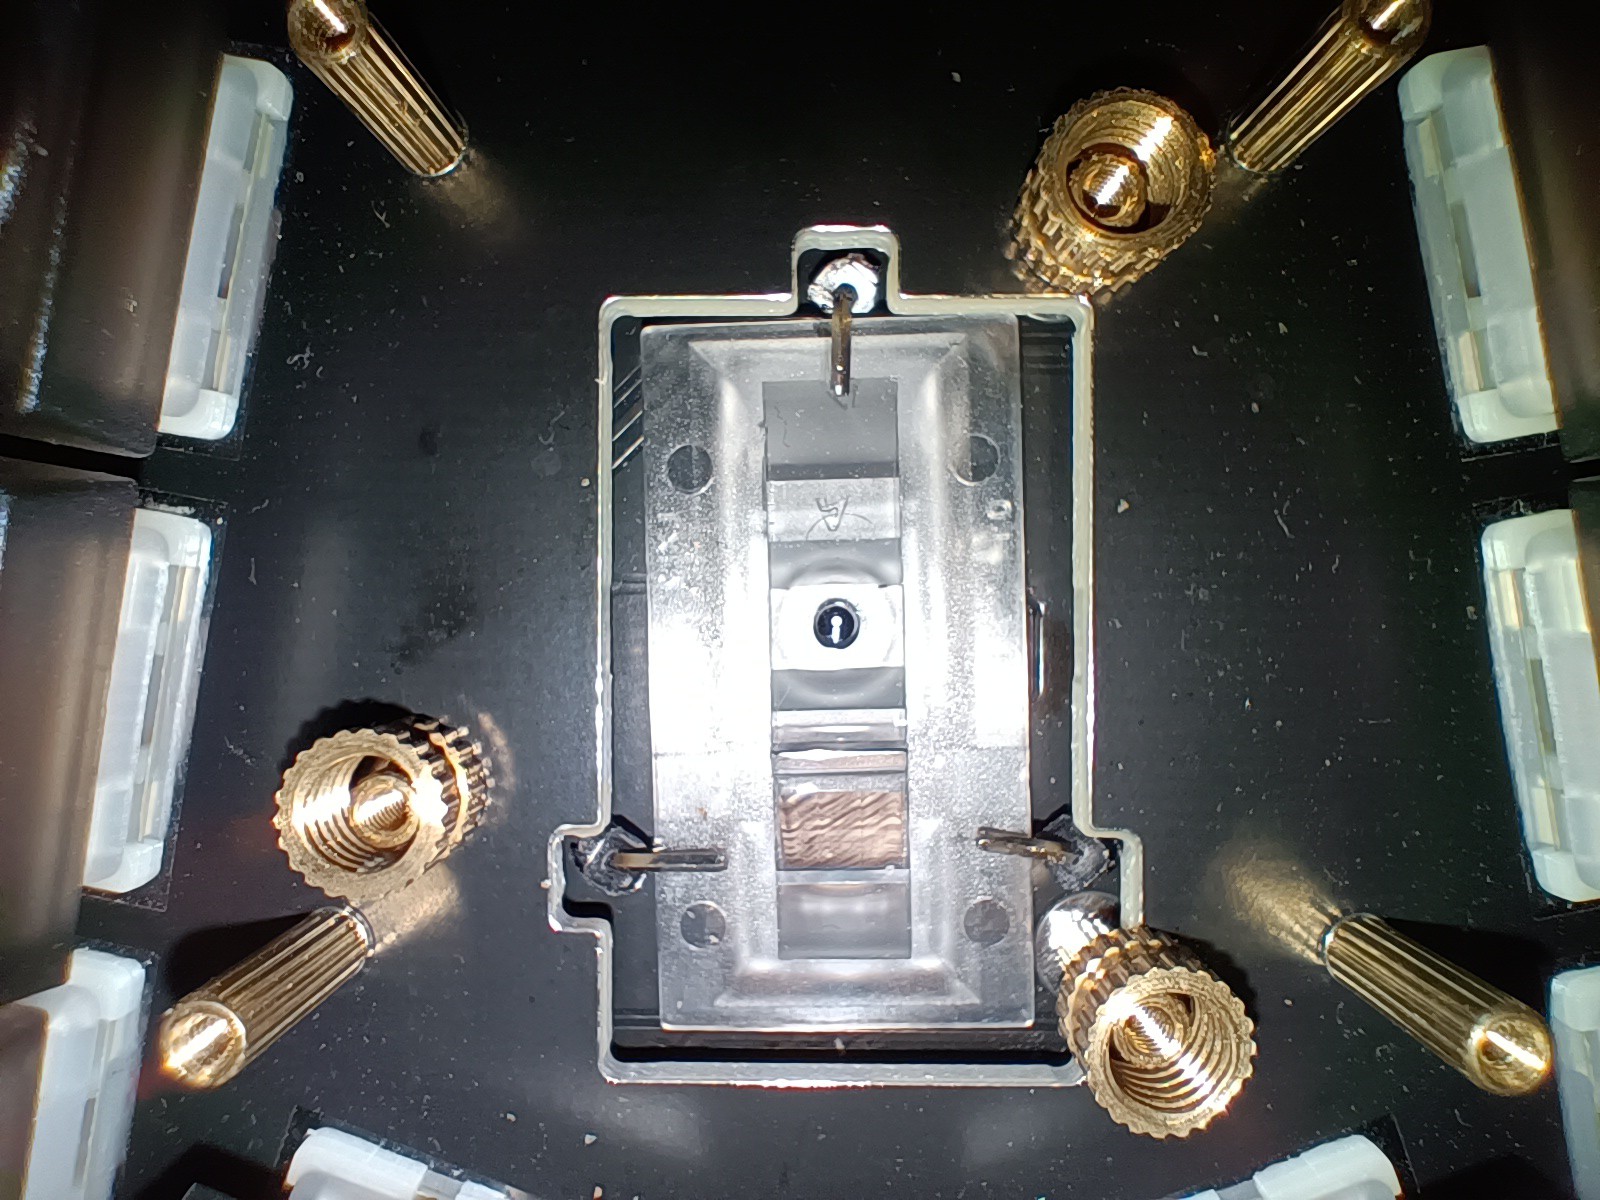
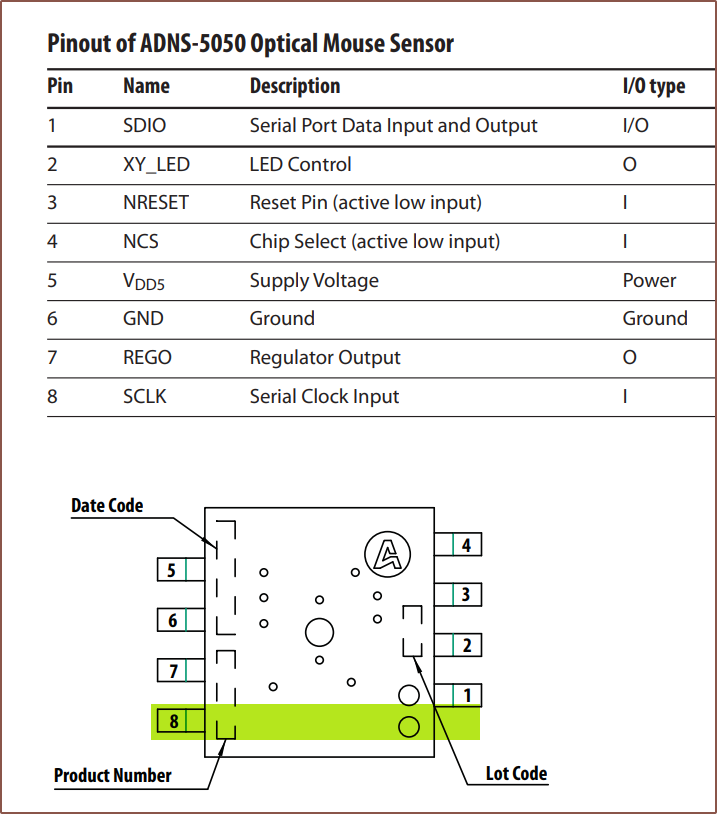
The misalignment of the ADNS-5050
I actually did the colums/rows pins last. First, I did more obvious ones to test to see if I could actually use my probes on the small RP2040 pins in the first place.
As it turns out, the manufacturer of the ADNS-5050 didn't actually align the pins for whatever reason. It seems that the board designer didn't notice this when making its footprint and that's the real reason why the sensor is 4 degrees off:
It's nice to know that the LED is actually controlled by the sensor. Also, I don't think NRESET is connected to the RP2040.
Discovered pinout
I've crossed off pins that don't visibly look connected to anything. I used them as a fiducial marker. The "_uXX" on the columns is the identifier for the topmost transistor on the column.
I haven't determined what GPIO11 nor transistor U26 connects to at the moment. At least it looks like there's a via right next to GPIO11. U26 actually doesn't look like it's connected at all.
Enc_24/48 is the pin closest to LED24/48 respectively.
I reinstalled MSYS2 so that I had the latest version. Only after did I look on how to update it, and for some reason, pacman wasn't found:
The solution was to add
C:\msys64\usr\bin
to the PATH variable in "Environment Variables". Additionally, I made a new variable for the pico-sdk:
PICO_SDK_PATH: C:\mcu\pico-sdk
Pacman is needed, as seen in the installation commands in the readme:
pacman -S $MINGW_PACKAGE_PREFIX-{toolchain,cmake,libusb}
mkdir build
cd build
MSYS2_ARG_CONV_EXCL=- cmake .. -G"MSYS Makefiles" -DCMAKE_INSTALL_PREFIX=$MINGW_PREFIX
make
make install DESTDIR=/  # optional
Well that was all fine until I got to the 4th line when it said that it couldn't find CMakeLists.txt.
I looked around and discovered a picotool package for MSYS2 and decided to try it. I didn't need to clone the picotool repo because I could use the exe from the package instead.
Tried to see if I got a connection to the WK50 in BOOT and got this error about "appears to be a RP2040 device in BOOTSEL mode" and a suggestion for Zadig
So I downloaded that and I indeed didn't have a driver:
I then used
picotool save wk50.uf2 -all
because I tried the default but picotool couldn't determine the size of the binary. I got precisely a 4MB file, which was slightly unexpected. I looked it up and found the reason:
I saved again as a .bin and I got a 2MB file. Hopefully this is what I need if I need to restore from backup.
 kelvinA
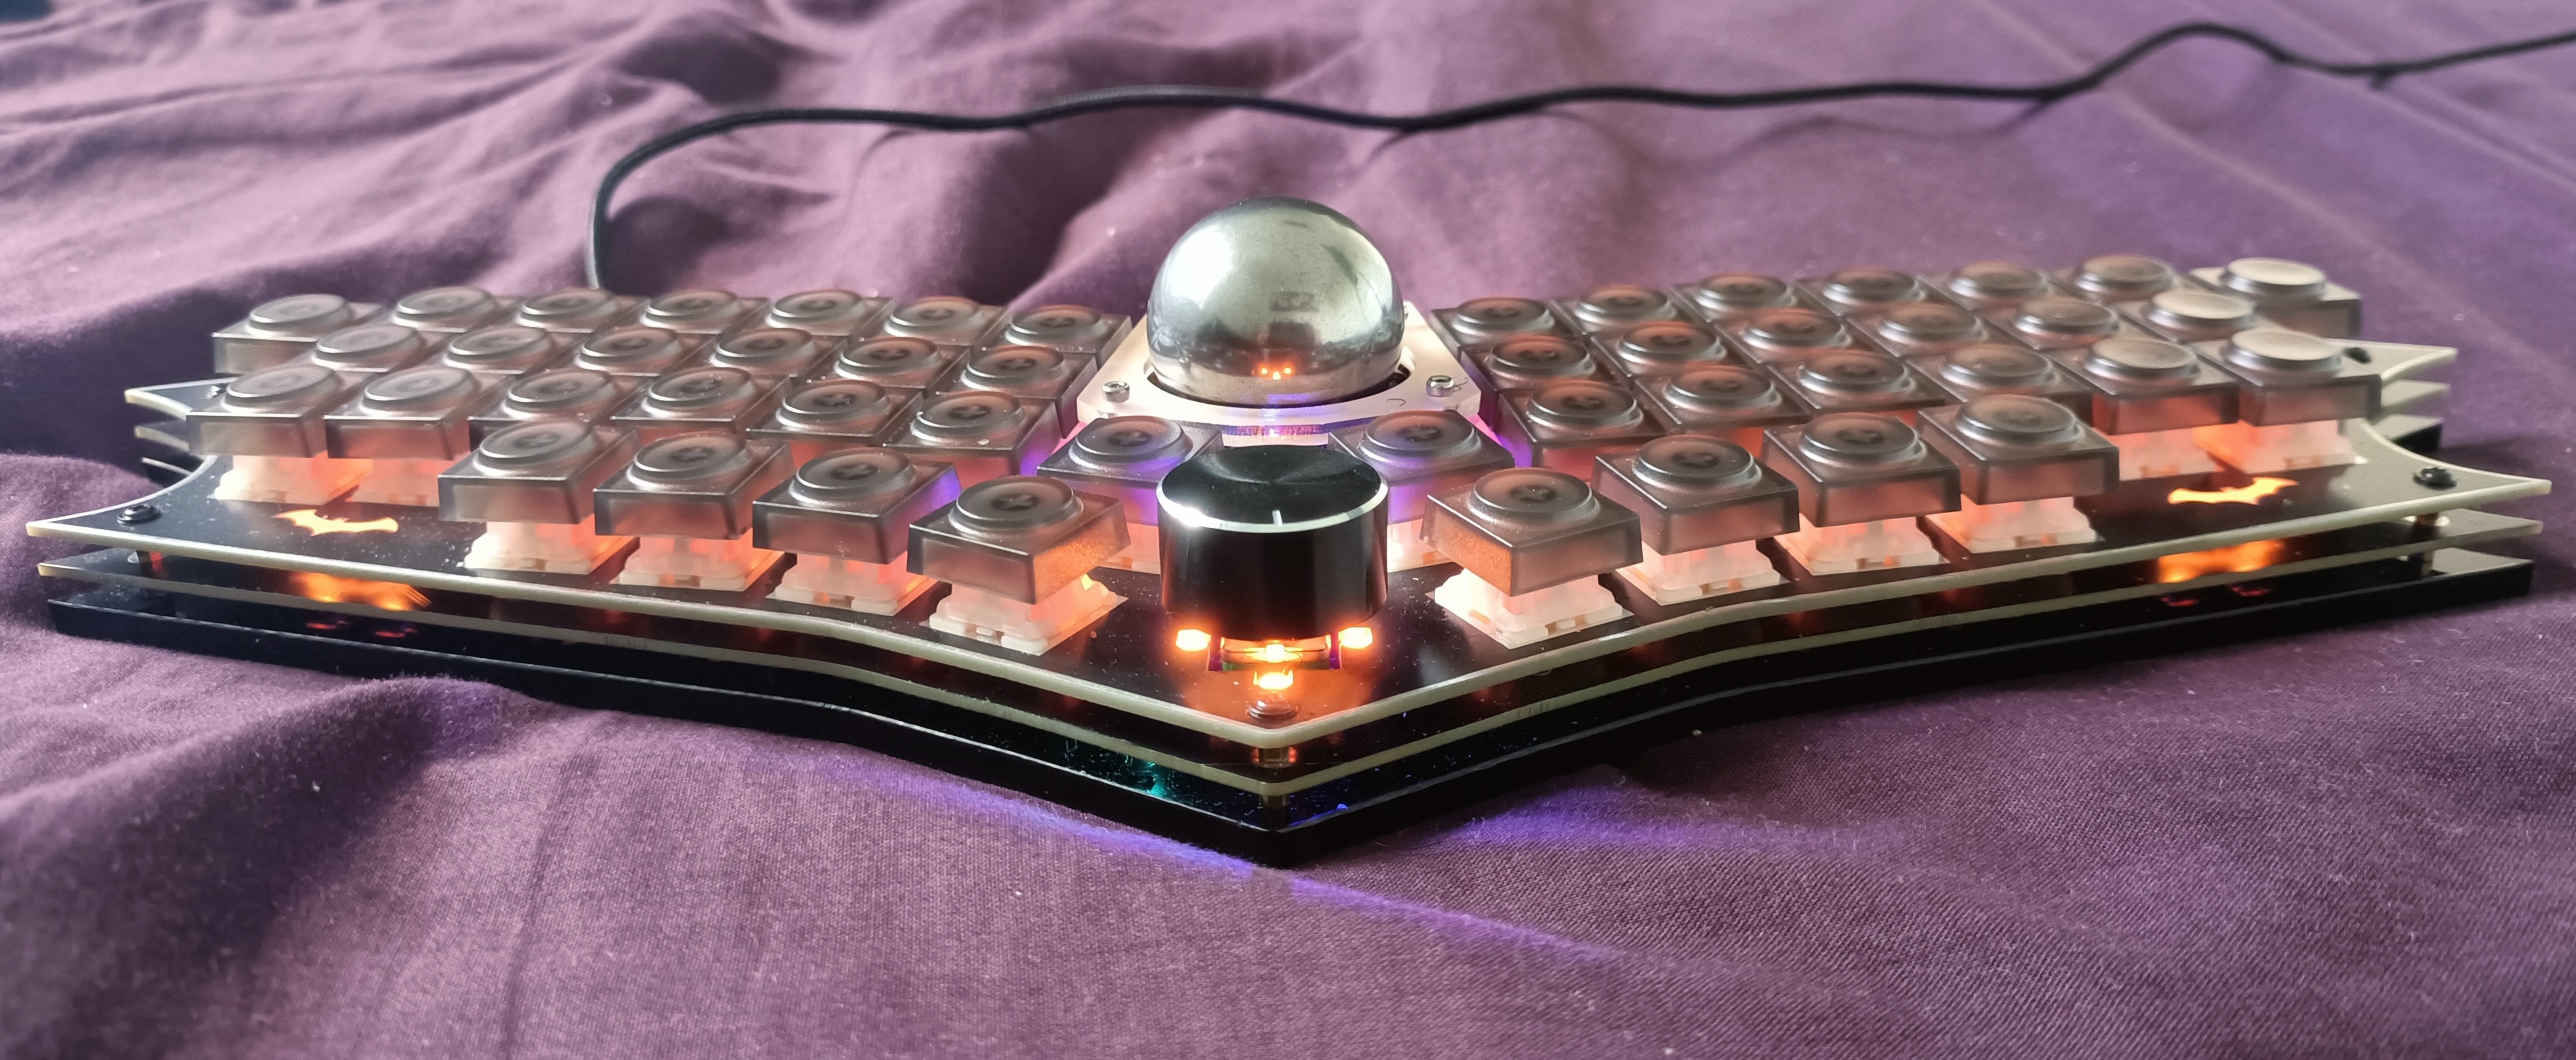


 Conveniently, both a black and a cloudy grey ball arrived:
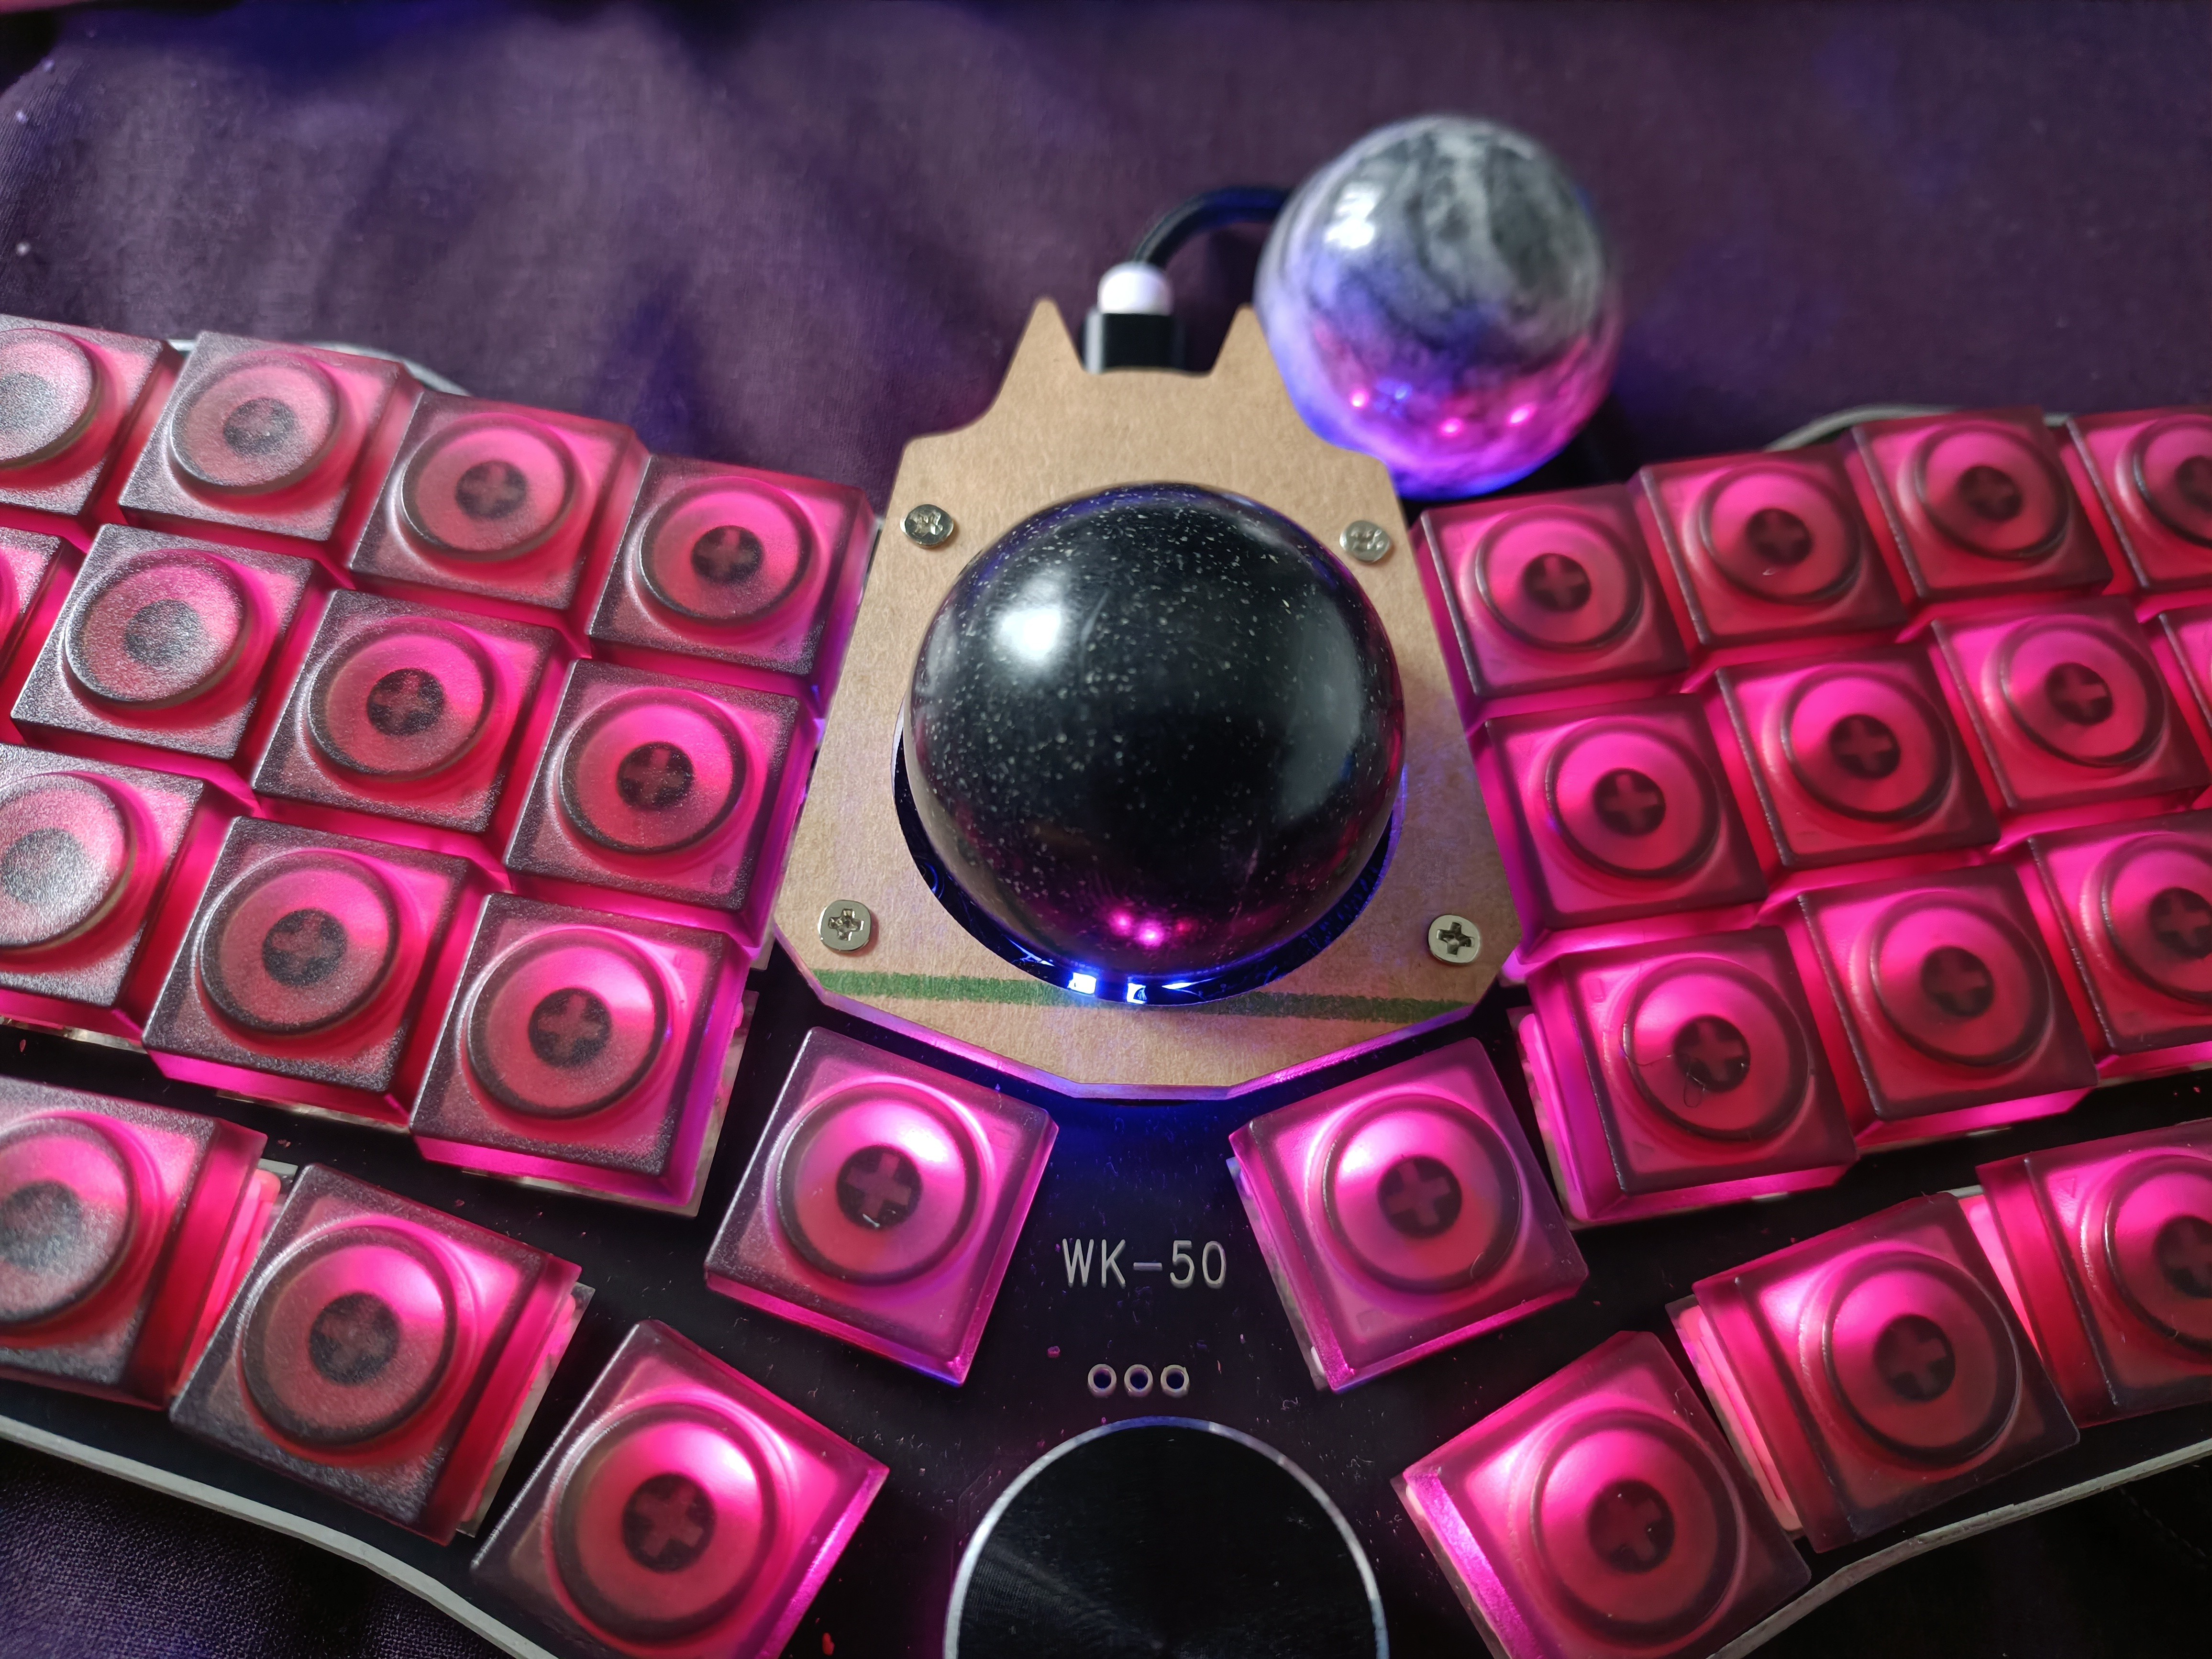 The black ball tracked mostly fine (and certainly better than the original grey ball) but the marble-like cloudy ball didn't at all. I correctly suspected this was because the balls were too close to the sensor, and found some m3 nuts to act as 2.3mm spacers. Now both balls would track but the cloudy ball would cause the mouse to jostle when stationary.
 The balls track better, though I still feel that there's room for improvement so perhaps I need another 0.5mm of spacing.
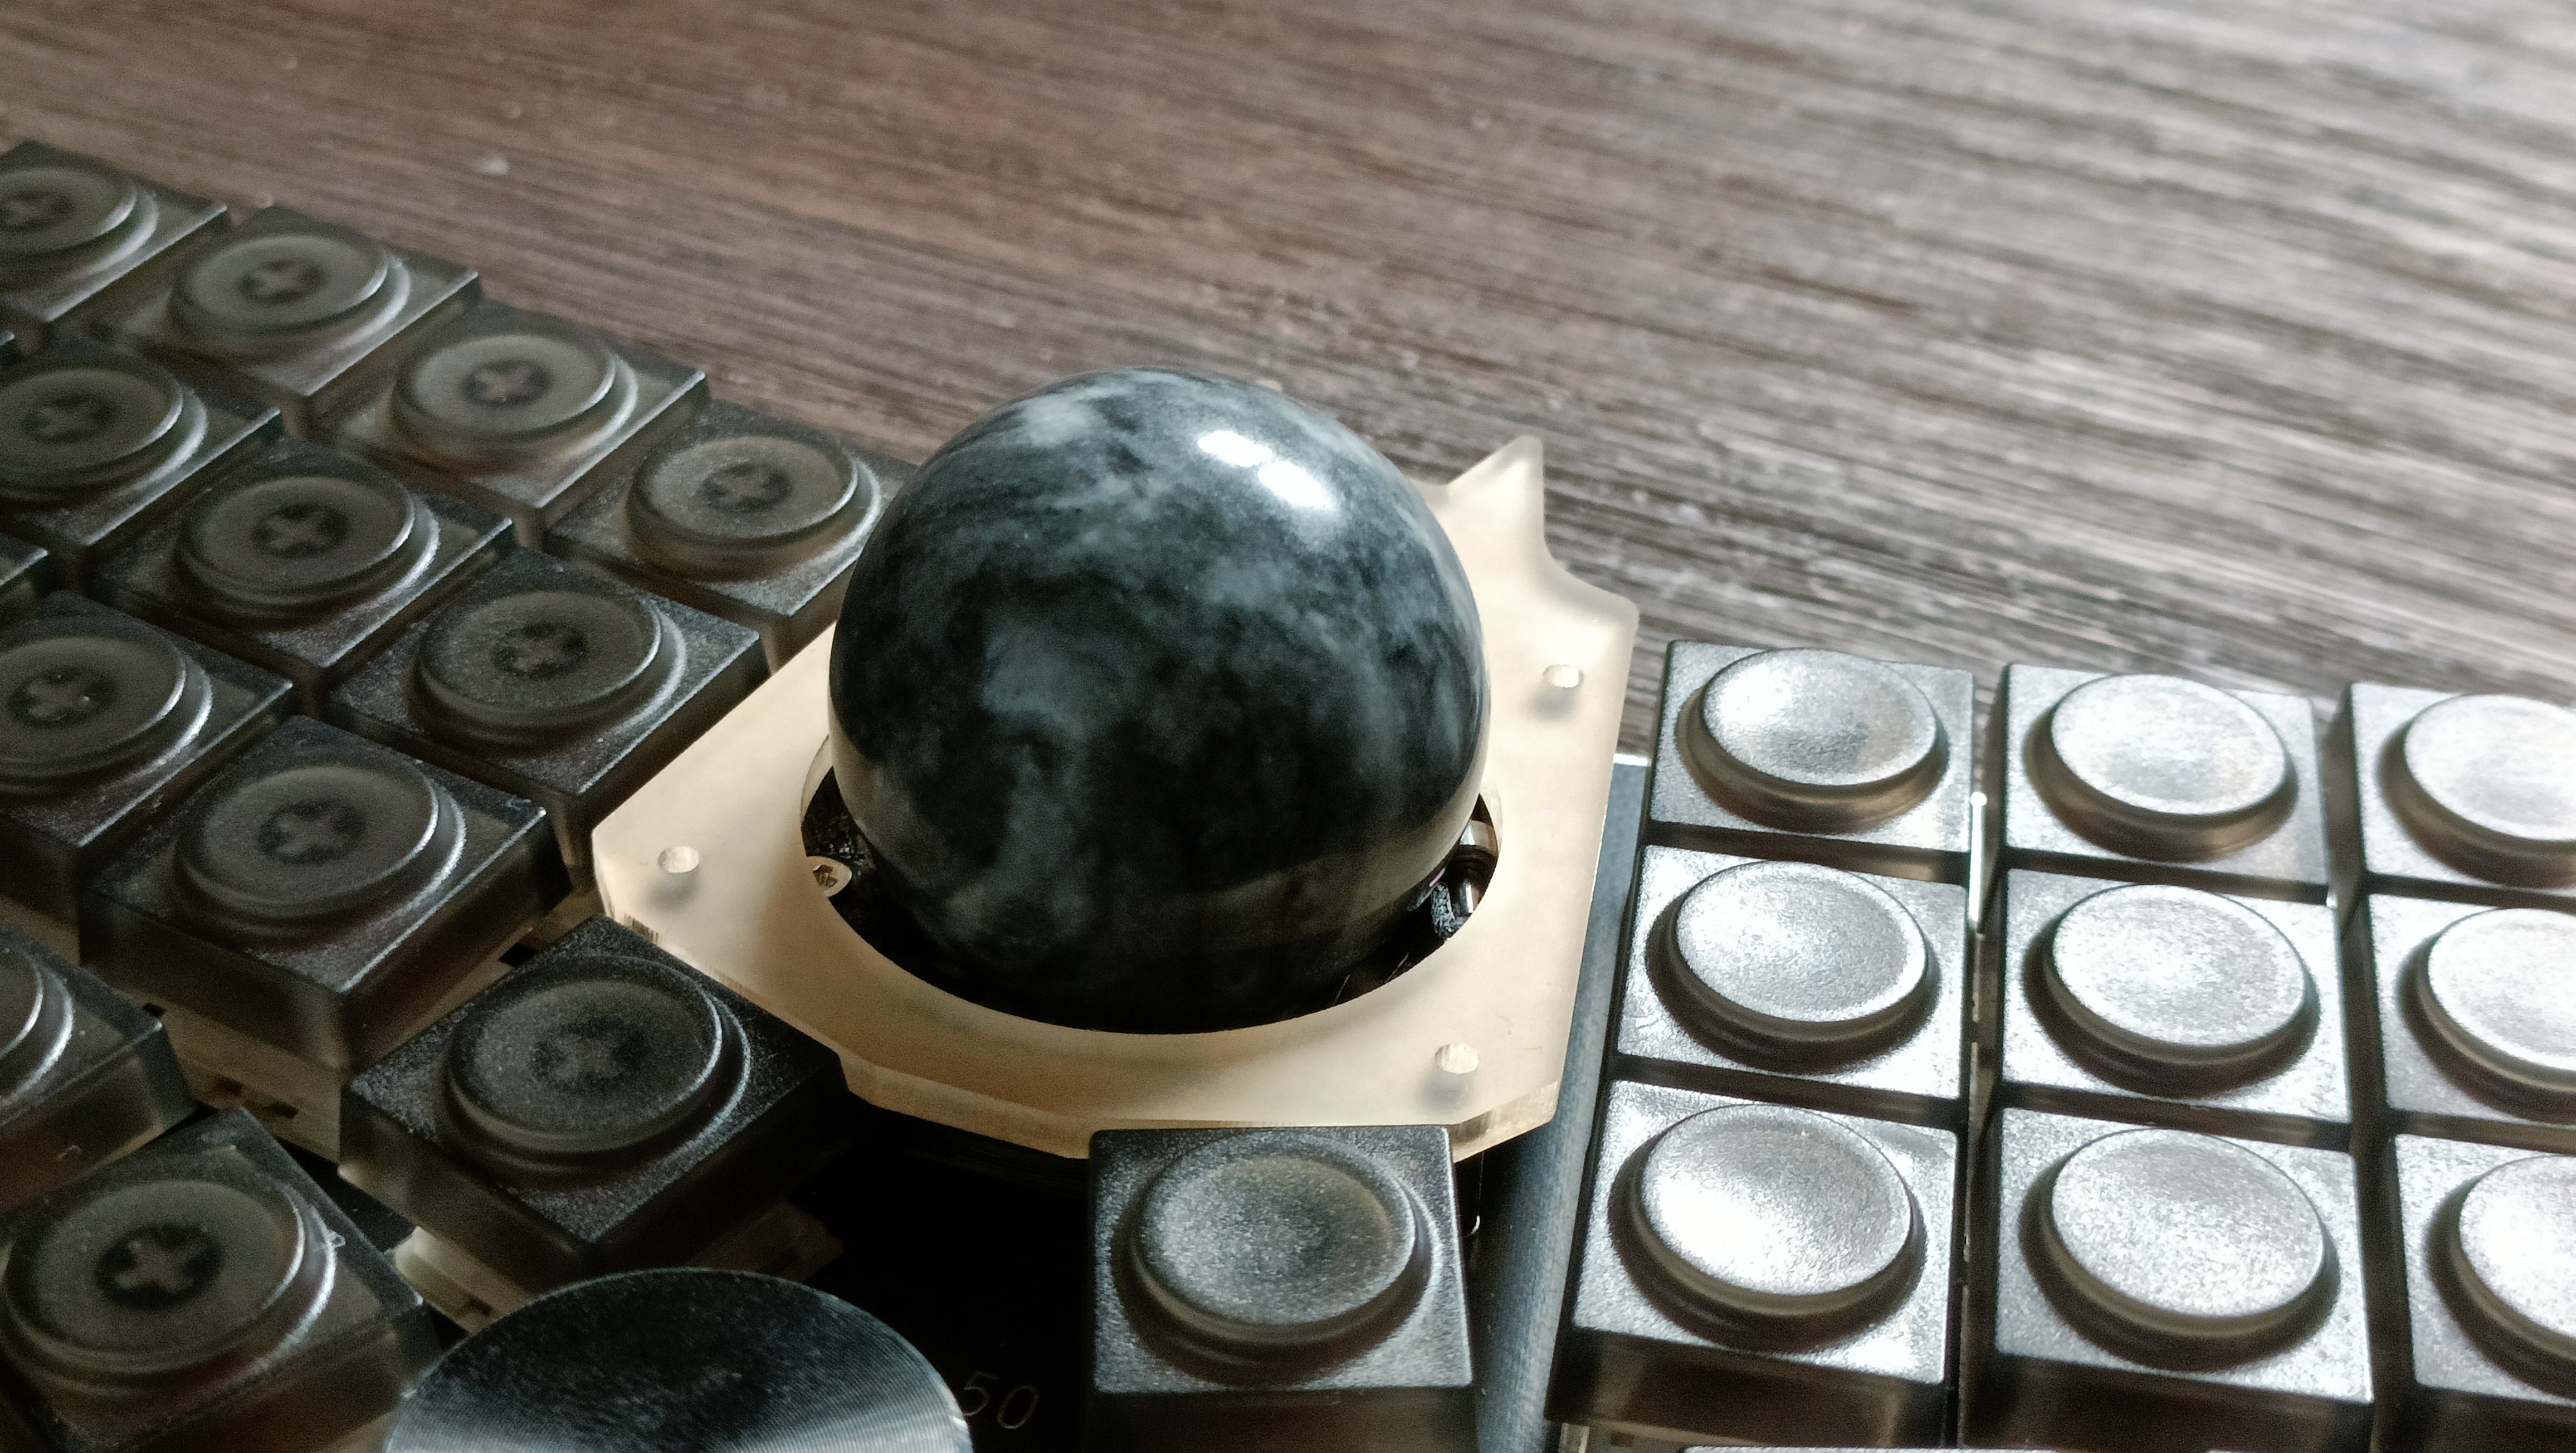
 The ball is mostly illuminated by the knob LED lights, so I'll keep that in mind when considering for a better knob (as the original one is too short and is opaque).
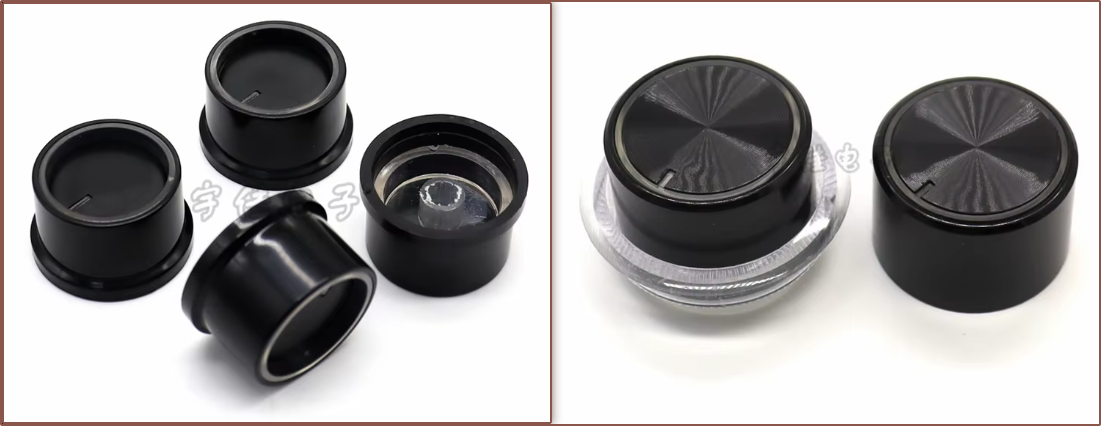


 I noticed that the transistor looked like 2 diodes put together. I looked into it and found symbols like the below:
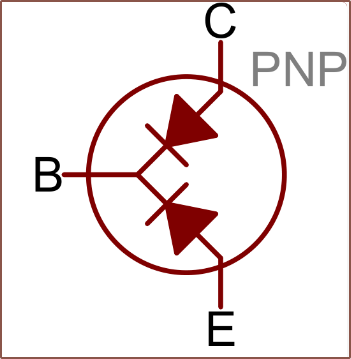 Since matrix scanners only scan one row/column at a time, it's likely safe to assume that the designers of the WK-50 used transistors as alternatives to dual diodes (e.g. BAT54C).
 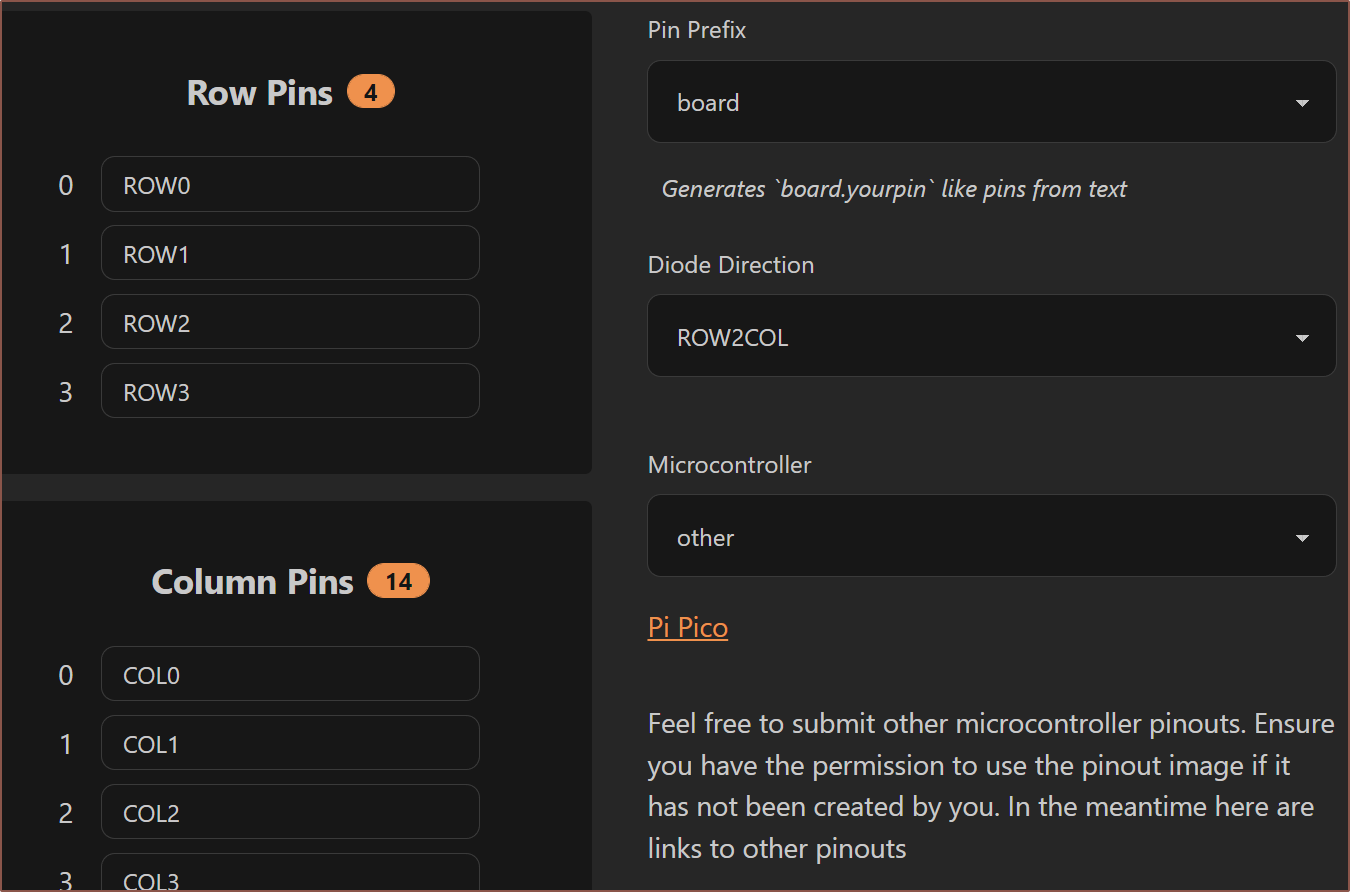 Then I got the ChordMap, moved the keys in the layout area to approximate the keyboard whilst still looking tidy and added the encoder pins:
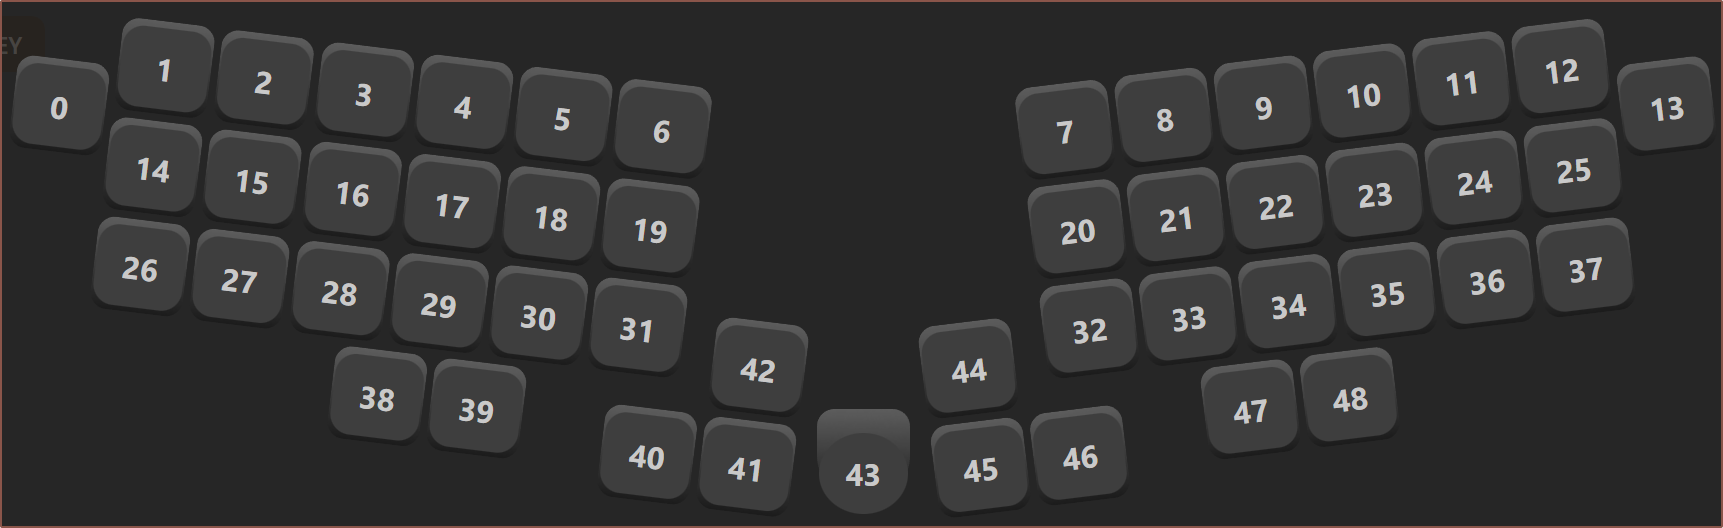
 I also needed to download the neopixel library and put it in the lib folder:
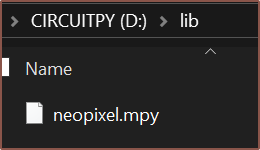
 So it's obviously and totally possible!


 I then went back to look at other backlit keyboards and copied their neopixel reset code. I also changed the pin name from ARGB to NEOPIXEL to keep consistency.
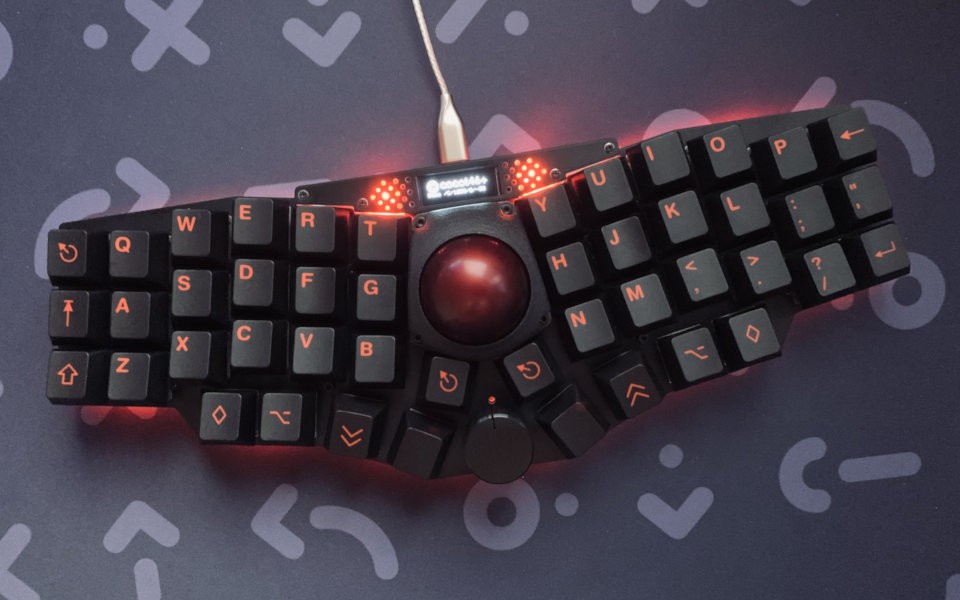
 It's nice to know that the LED is actually controlled by the sensor. Also, I don't think NRESET is connected to the RP2040.
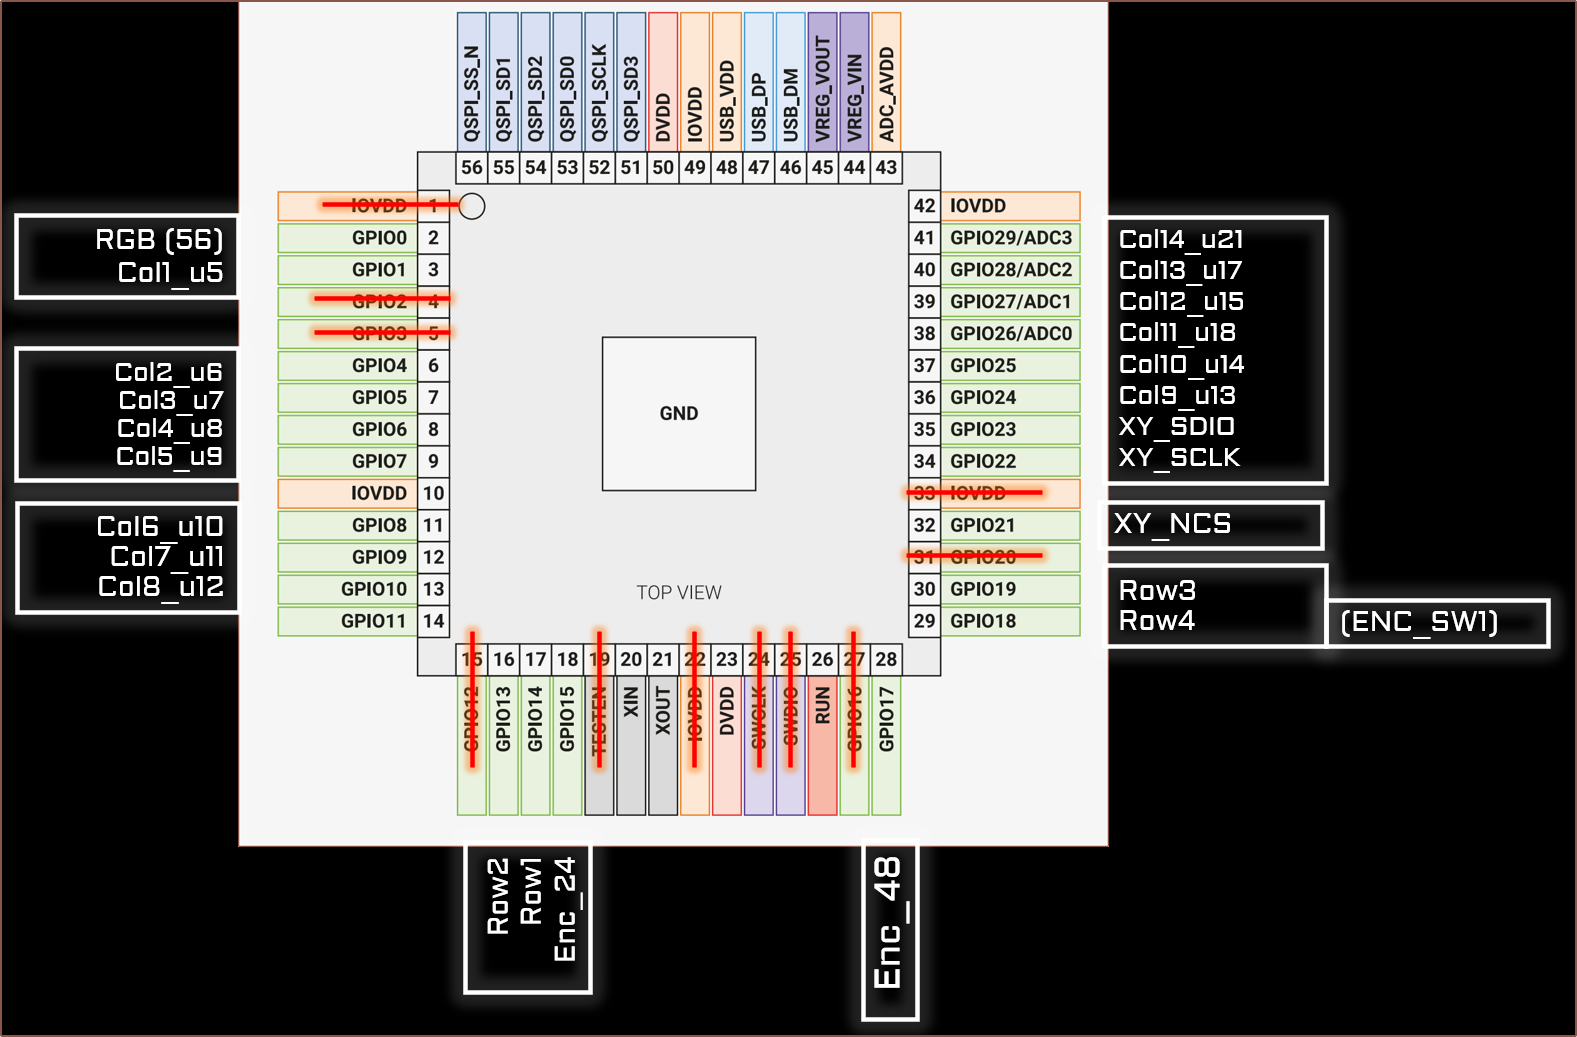 I've crossed off pins that don't visibly look connected to anything. I used them as a fiducial marker. The "_uXX" on the columns is the identifier for the topmost transistor on the column.
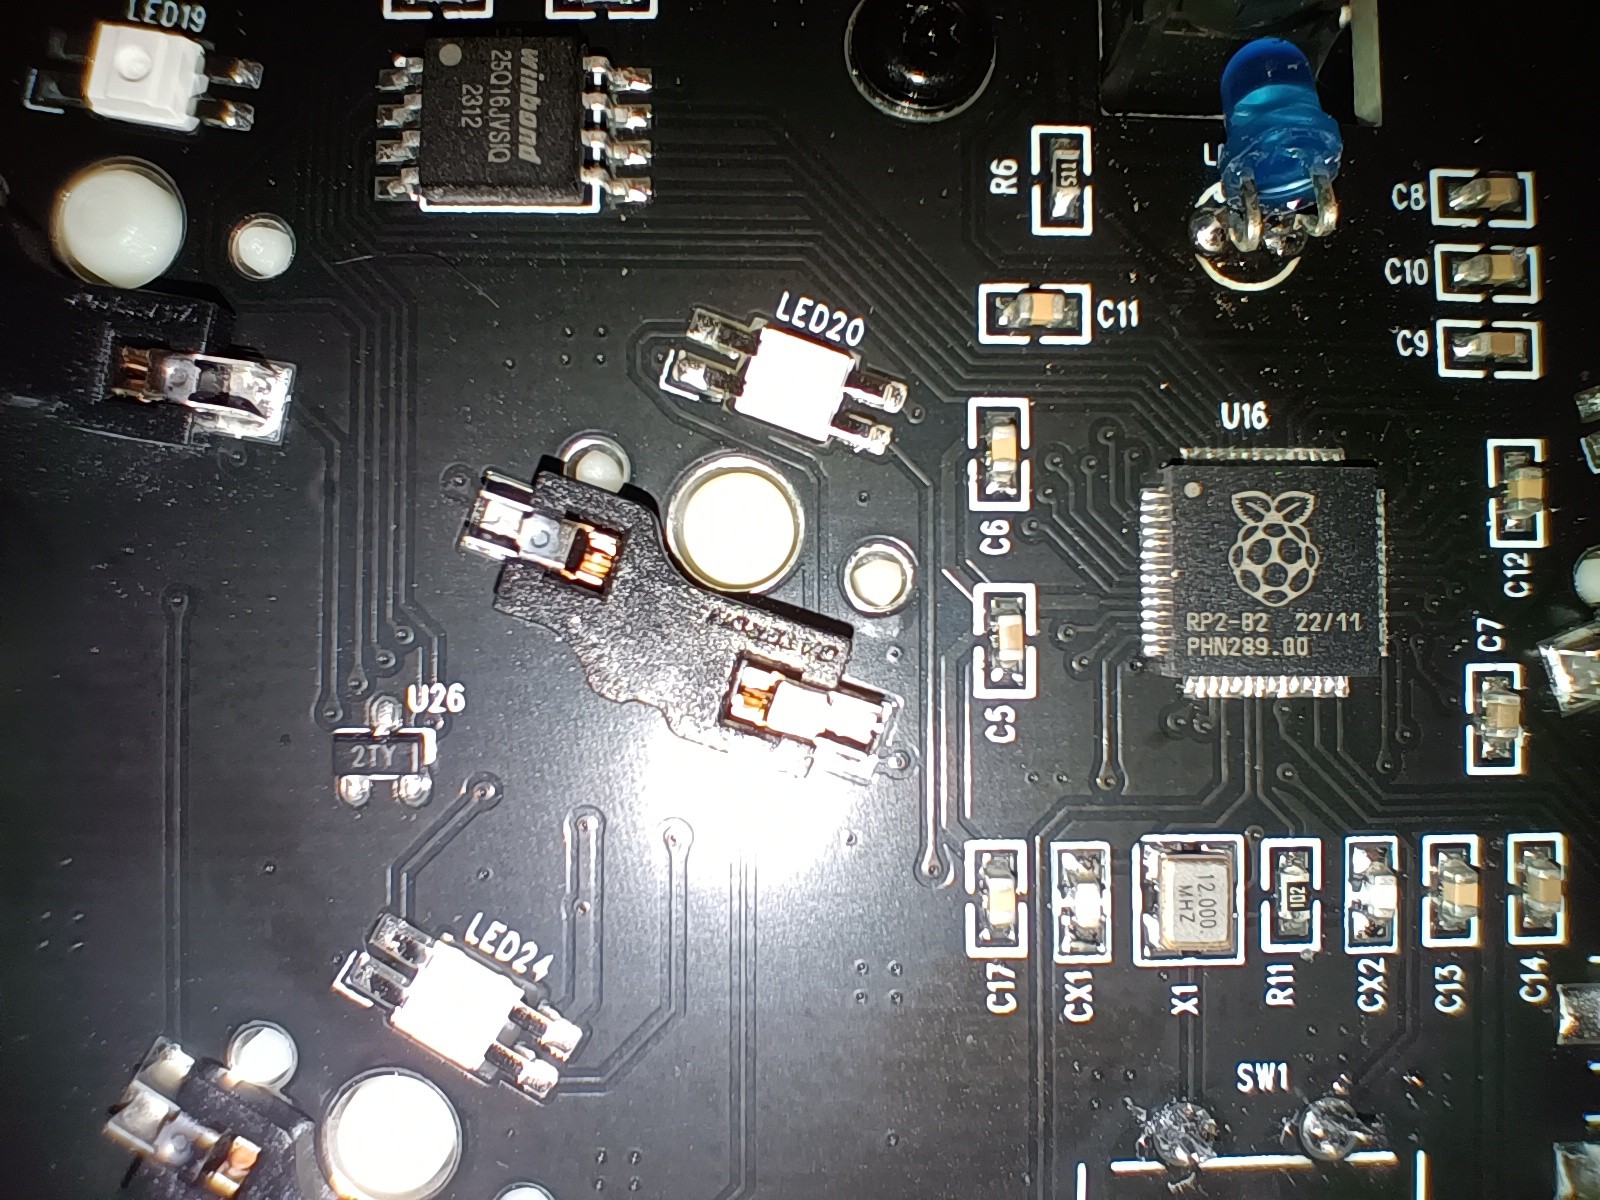 Enc_24/48 is the pin closest to LED24/48 respectively.
 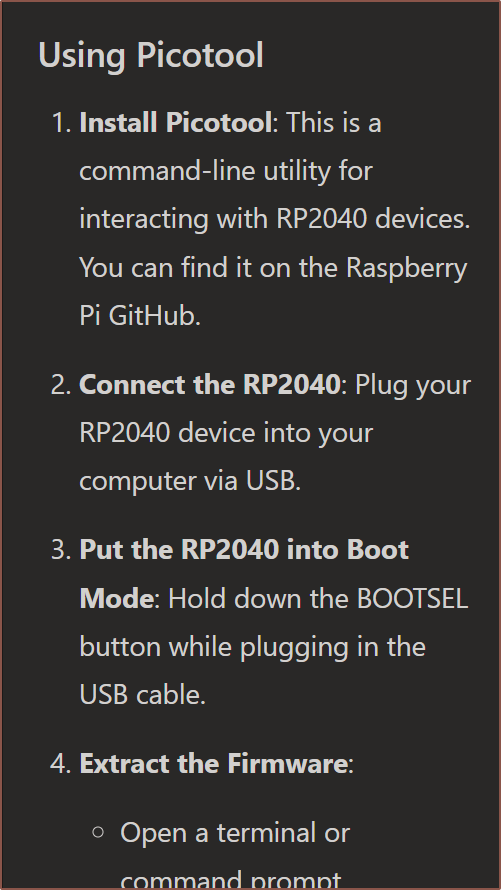 It seemed simple enough.
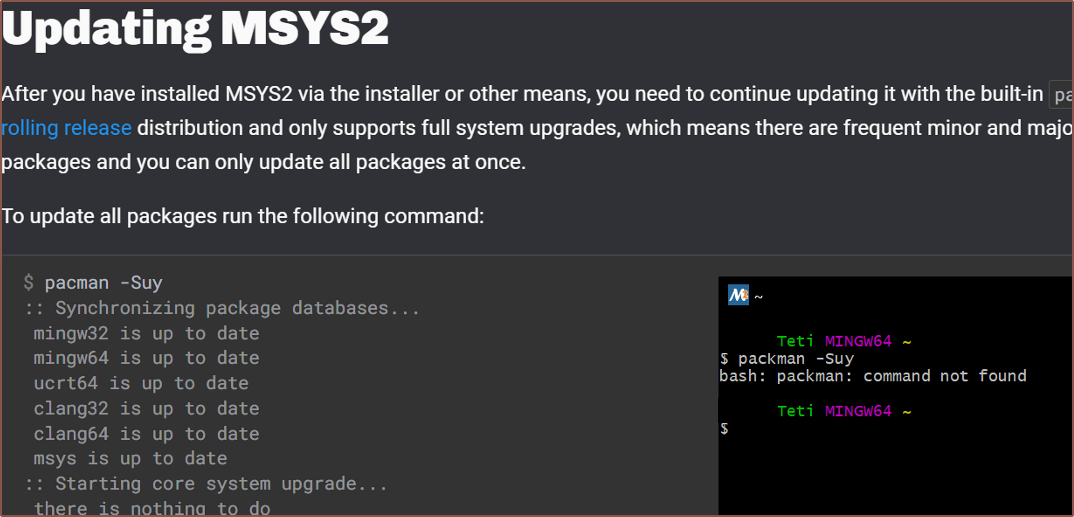 The solution was to add
 So I downloaded that and I indeed didn't have a driver:
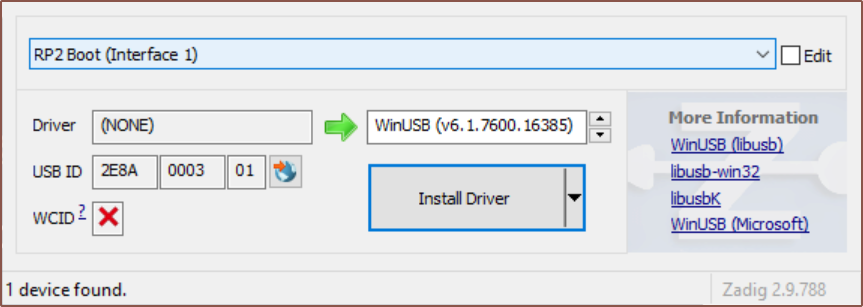
 I saved again as a .bin and I got a 2MB file. Hopefully this is what I need if I need to restore from backup.