Nguyễn Phương Duy
-
Our Kickstarter is live!
11/20/2024 at 01:36 • 0 comments![]()
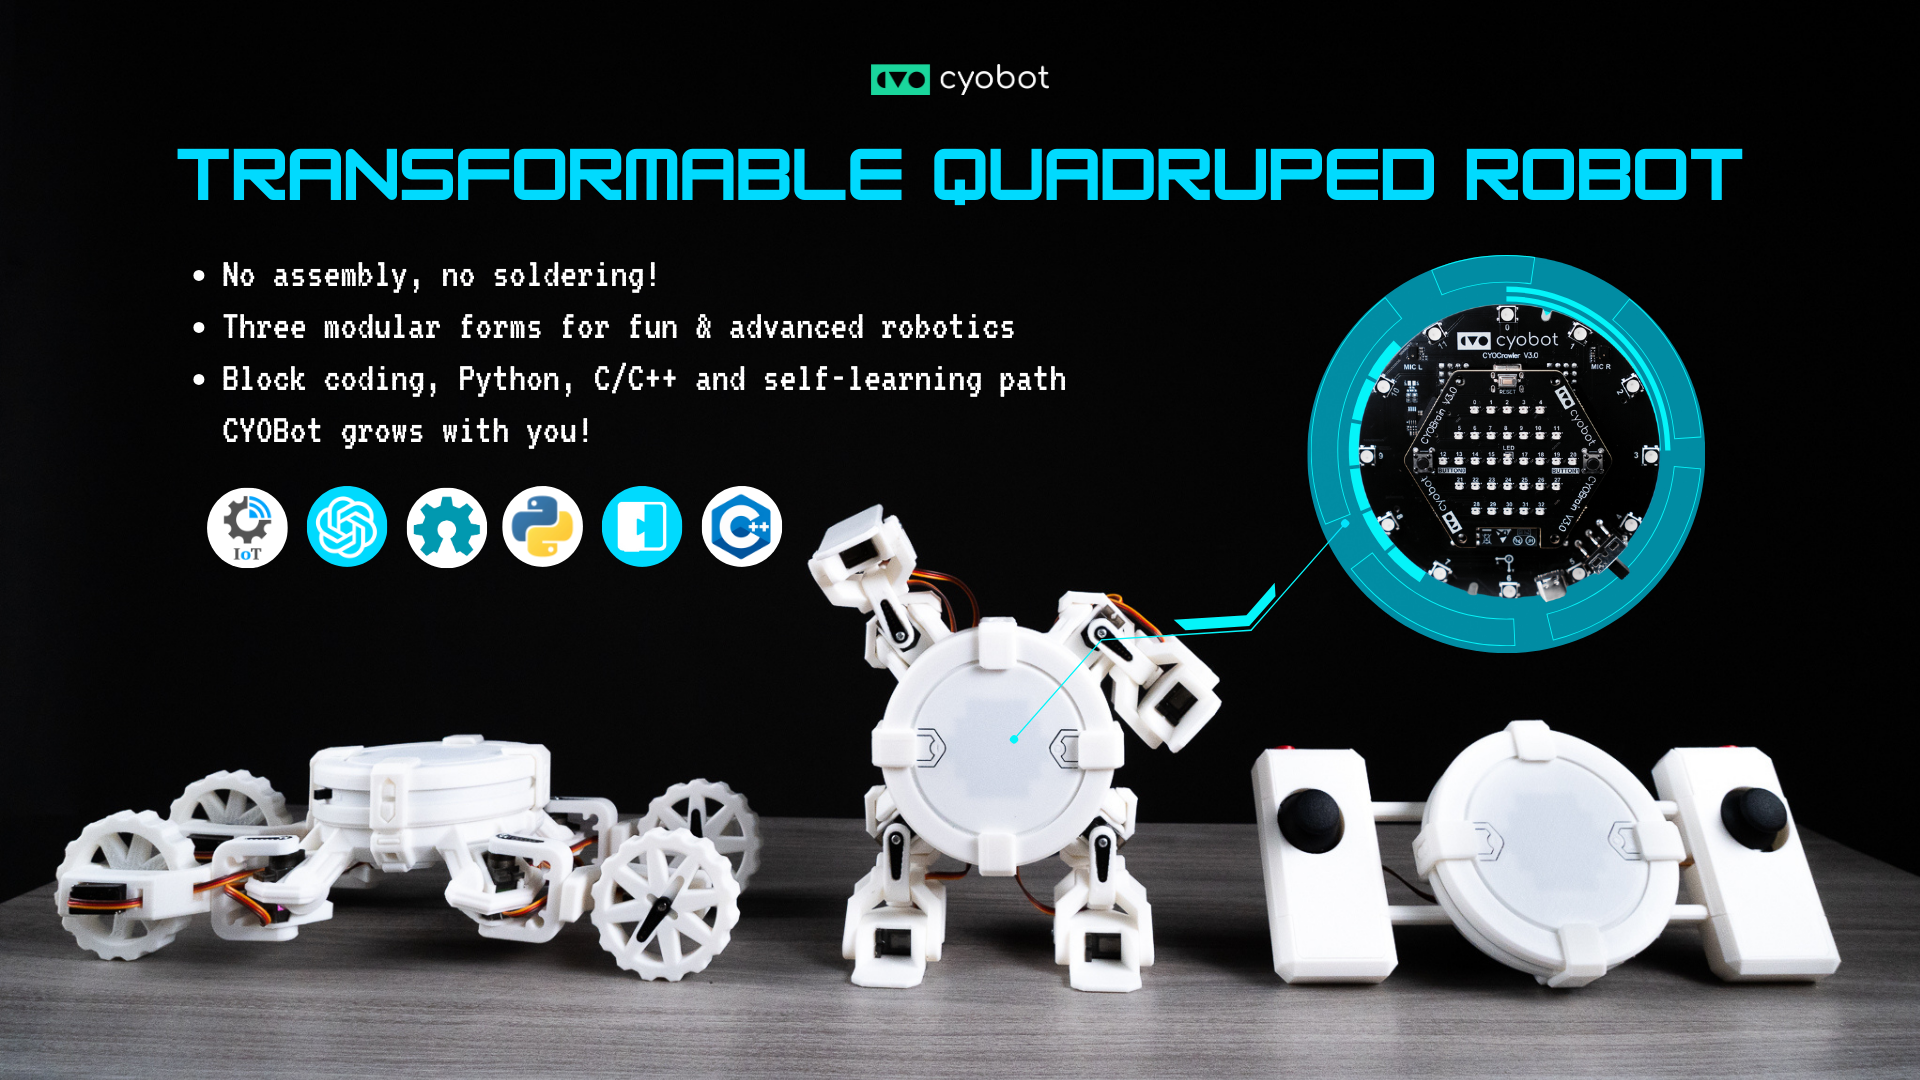
CYOBot: Transformable Open-Source Robot for Innovation & Fun
A hands-on robotics kit that grows with you—explore, learn, and create at your own pace. Help us bring the robot to more students and makers at affordable prices by backing us!
Visit us at: https://www.kickstarter.com/projects/cyobot/cyobot-a-transformable-quadruped-robot-for-innovation-and-fun?ref=6waexz
Our Story
Have you ever wanted to create something that moves, thinks, and solves problems? A project that could lead you to careers at companies like Tesla or Boston Dynamics? Build a smart speaker with ChatGPT?
CYOBot is here to make that dream a reality. Whether you're a beginner just starting in STEM or a seasoned maker ready to innovate, CYOBot transforms learning robotics into an exciting, hands-on experience.
![]()
What Is CYOBot?
CYOBot is a modular, transformable quadruped robot that grows with your skills. Whether you're learning the basics or exploring advanced robotics, CYOBot offers everything you need to build, program, and create something incredible.
![]()
Why CYOBot?
For Students
Start your STEM journey with CYOBot. Assemble and program your robot while learning real-world skills like coding, AI, and robotics. With step-by-step guidance, you build a strong portfolio that can launch your career at top robotics companies.
For Educators
CYOBot transforms the classroom. Its guided projects and affordable kits make it easy to teach robotics and programming in a way that engages students of all ages. It’s the perfect addition to your STEM curriculum.
For Hackers and Makers
Build, customize, and innovate. CYOBot’s powerful microcontroller, modular design and open-source platform give you the freedom to create robots that walk, dance, or solve challenges. 3D print additional components or connect it with your existing Arduino hardware.
For Professionals
Prototyping? Research? CYOBot’s advanced features and compatibility with Arduino, Python, C/C++ and IoT make it a versatile tool for engineers and developers.
Key Features
- Instant Start: No assembly or soldering required! Turn on and connect to wifi in under 1 minute!
![]()
- Transformable Design: Reconfigure CYOBot into multiple forms for endless possibilities, from walkers to crawlers to something entirely new
![]()
![]()
- Interactive Learning Platform: RoboticsQuest guides you step-by-step with over 1,000 hands-on projects, from beginner challenges to advanced experiments.
![]()
- Open-Source Flexibility: All mechanical designs are open-source and 3D printable so that you can build, modify, and innovate however you want.
- Advanced Hardware: Features a 16-channel motor controller, Espressif ESP32-S3 8MB PSRAM with WiFi and Bluetooth, IMU, and expandable interfaces for additional sensors and modules.
- Learn Your Way: Supports block-based coding for beginners and Python or Arduino for advanced users, supports external IDEs and API calls.
![]()
- Instant Start: No assembly or soldering required! Turn on and connect to wifi in under 1 minute!
-
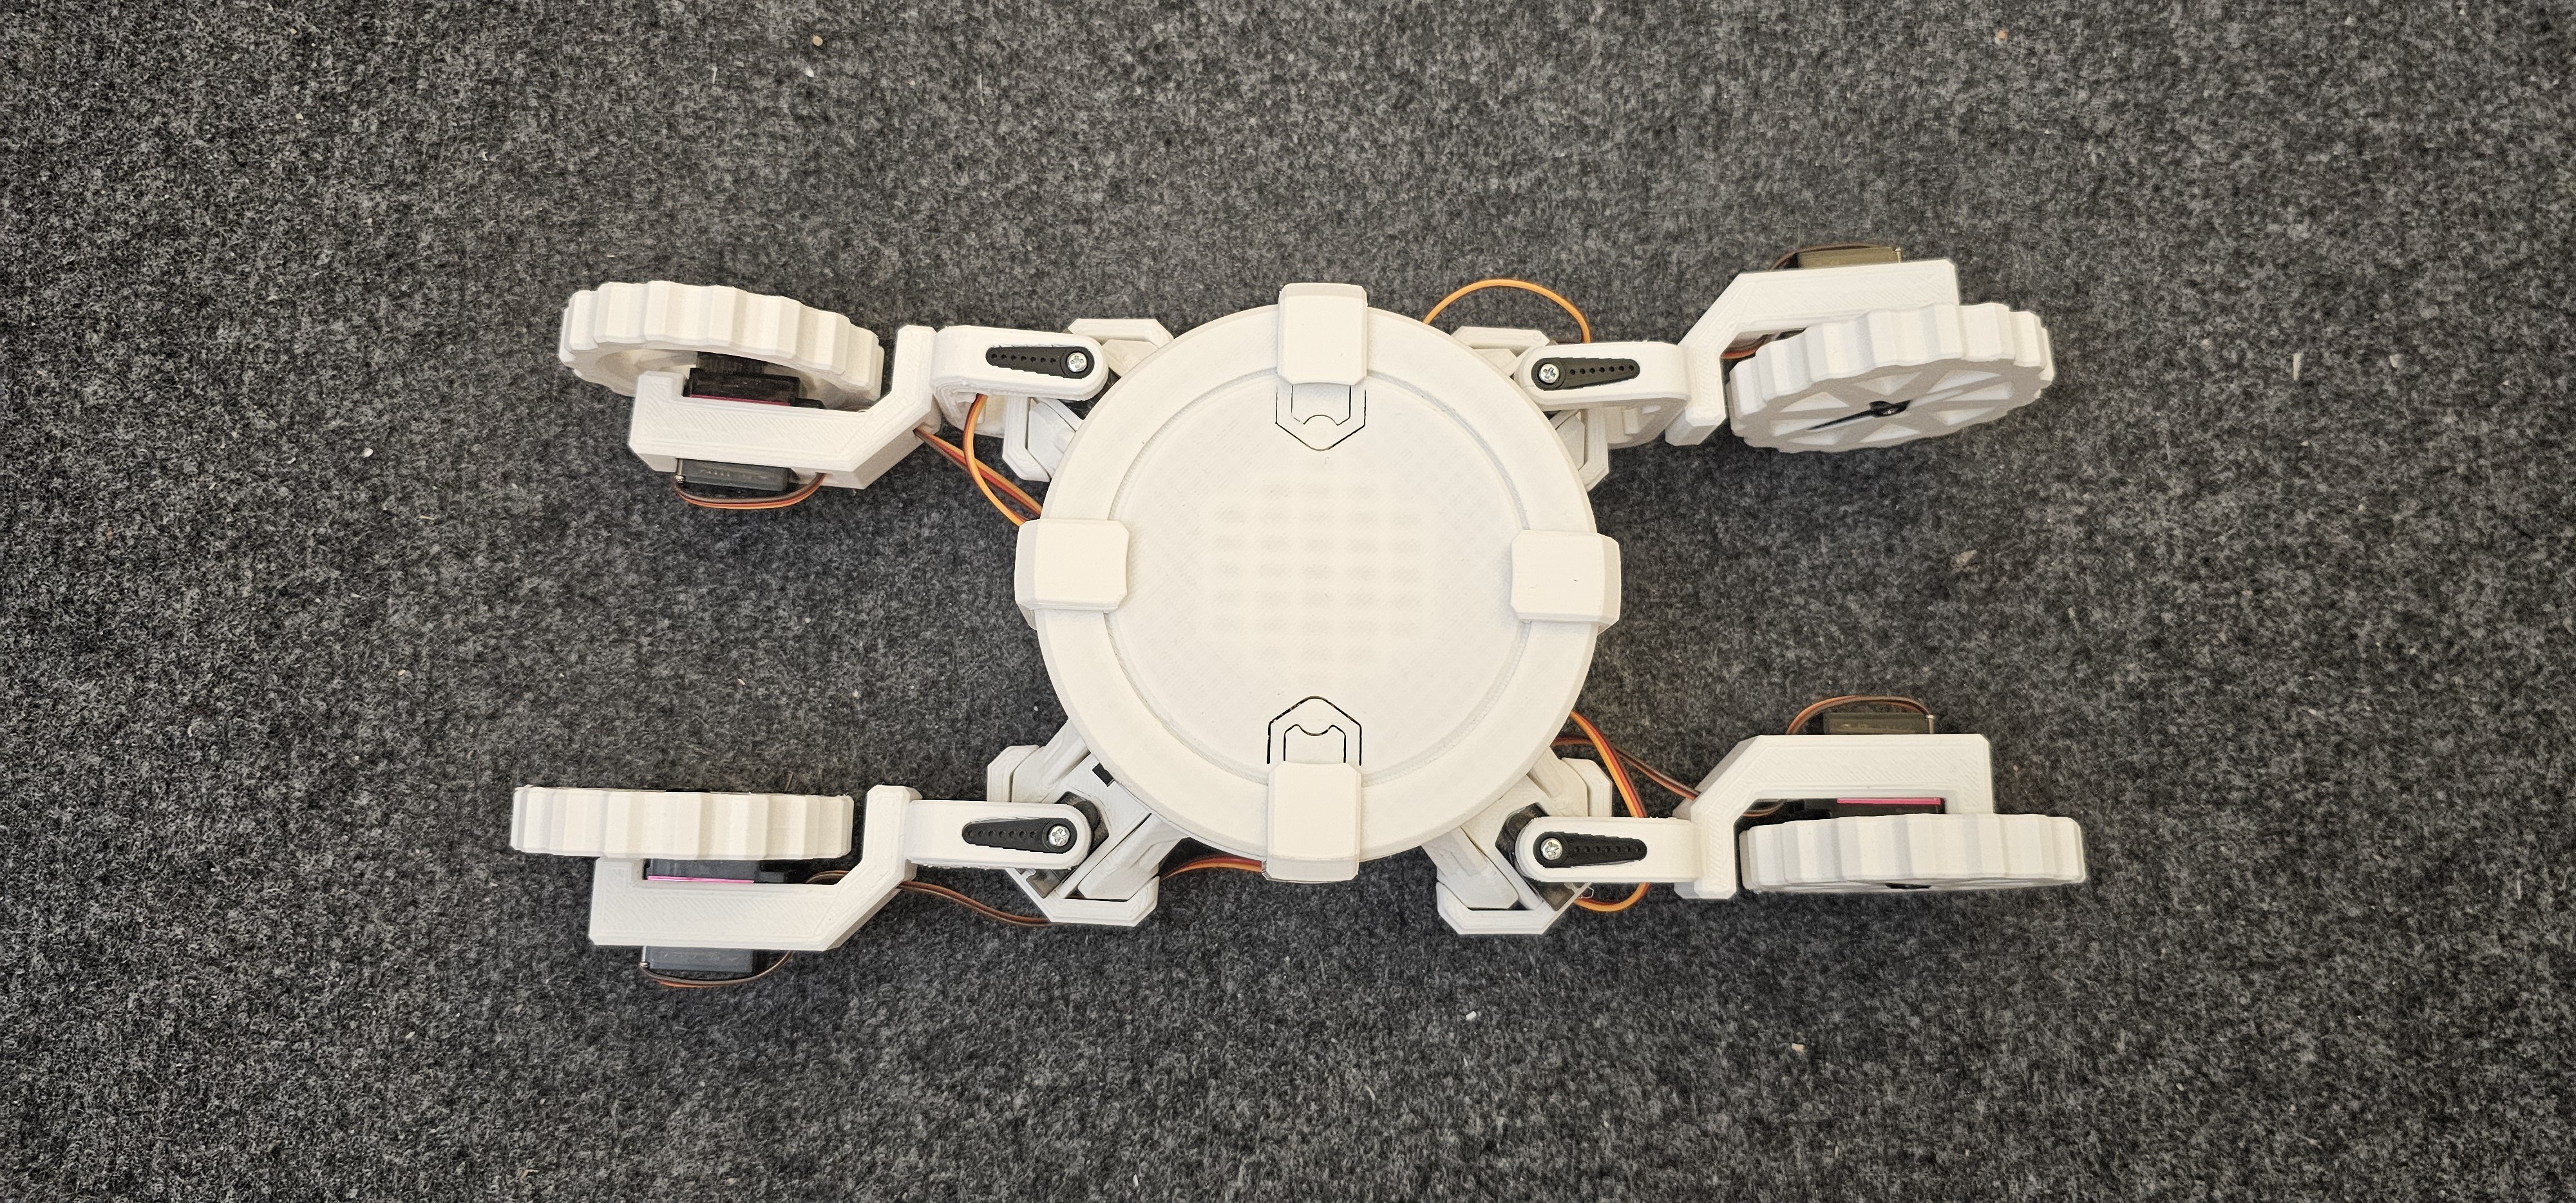
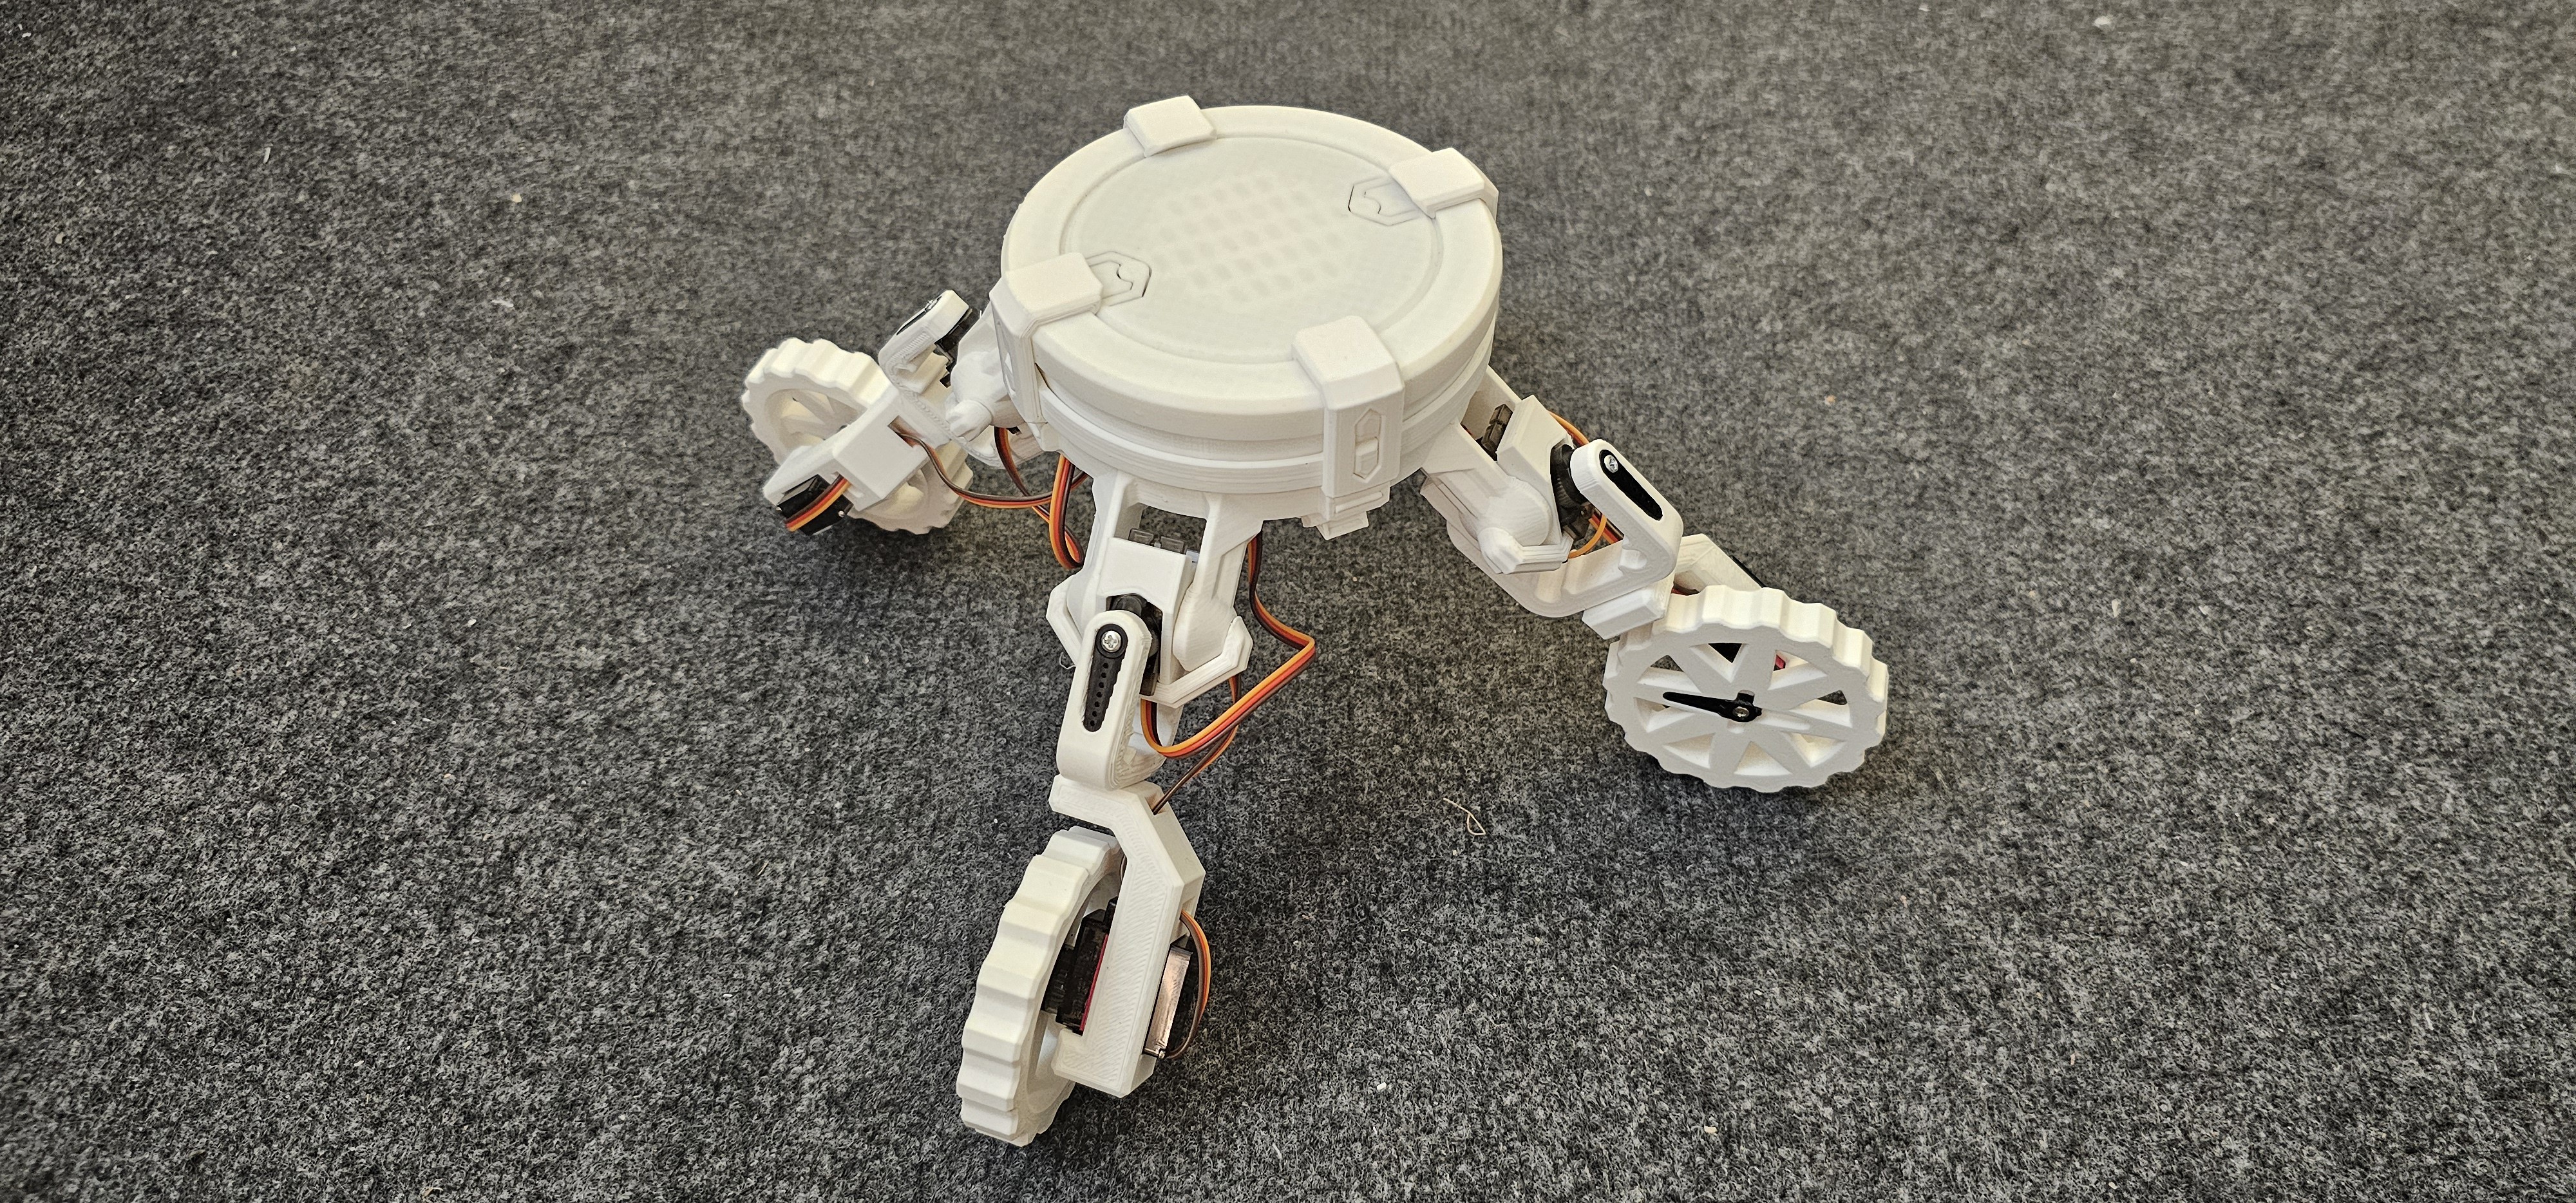
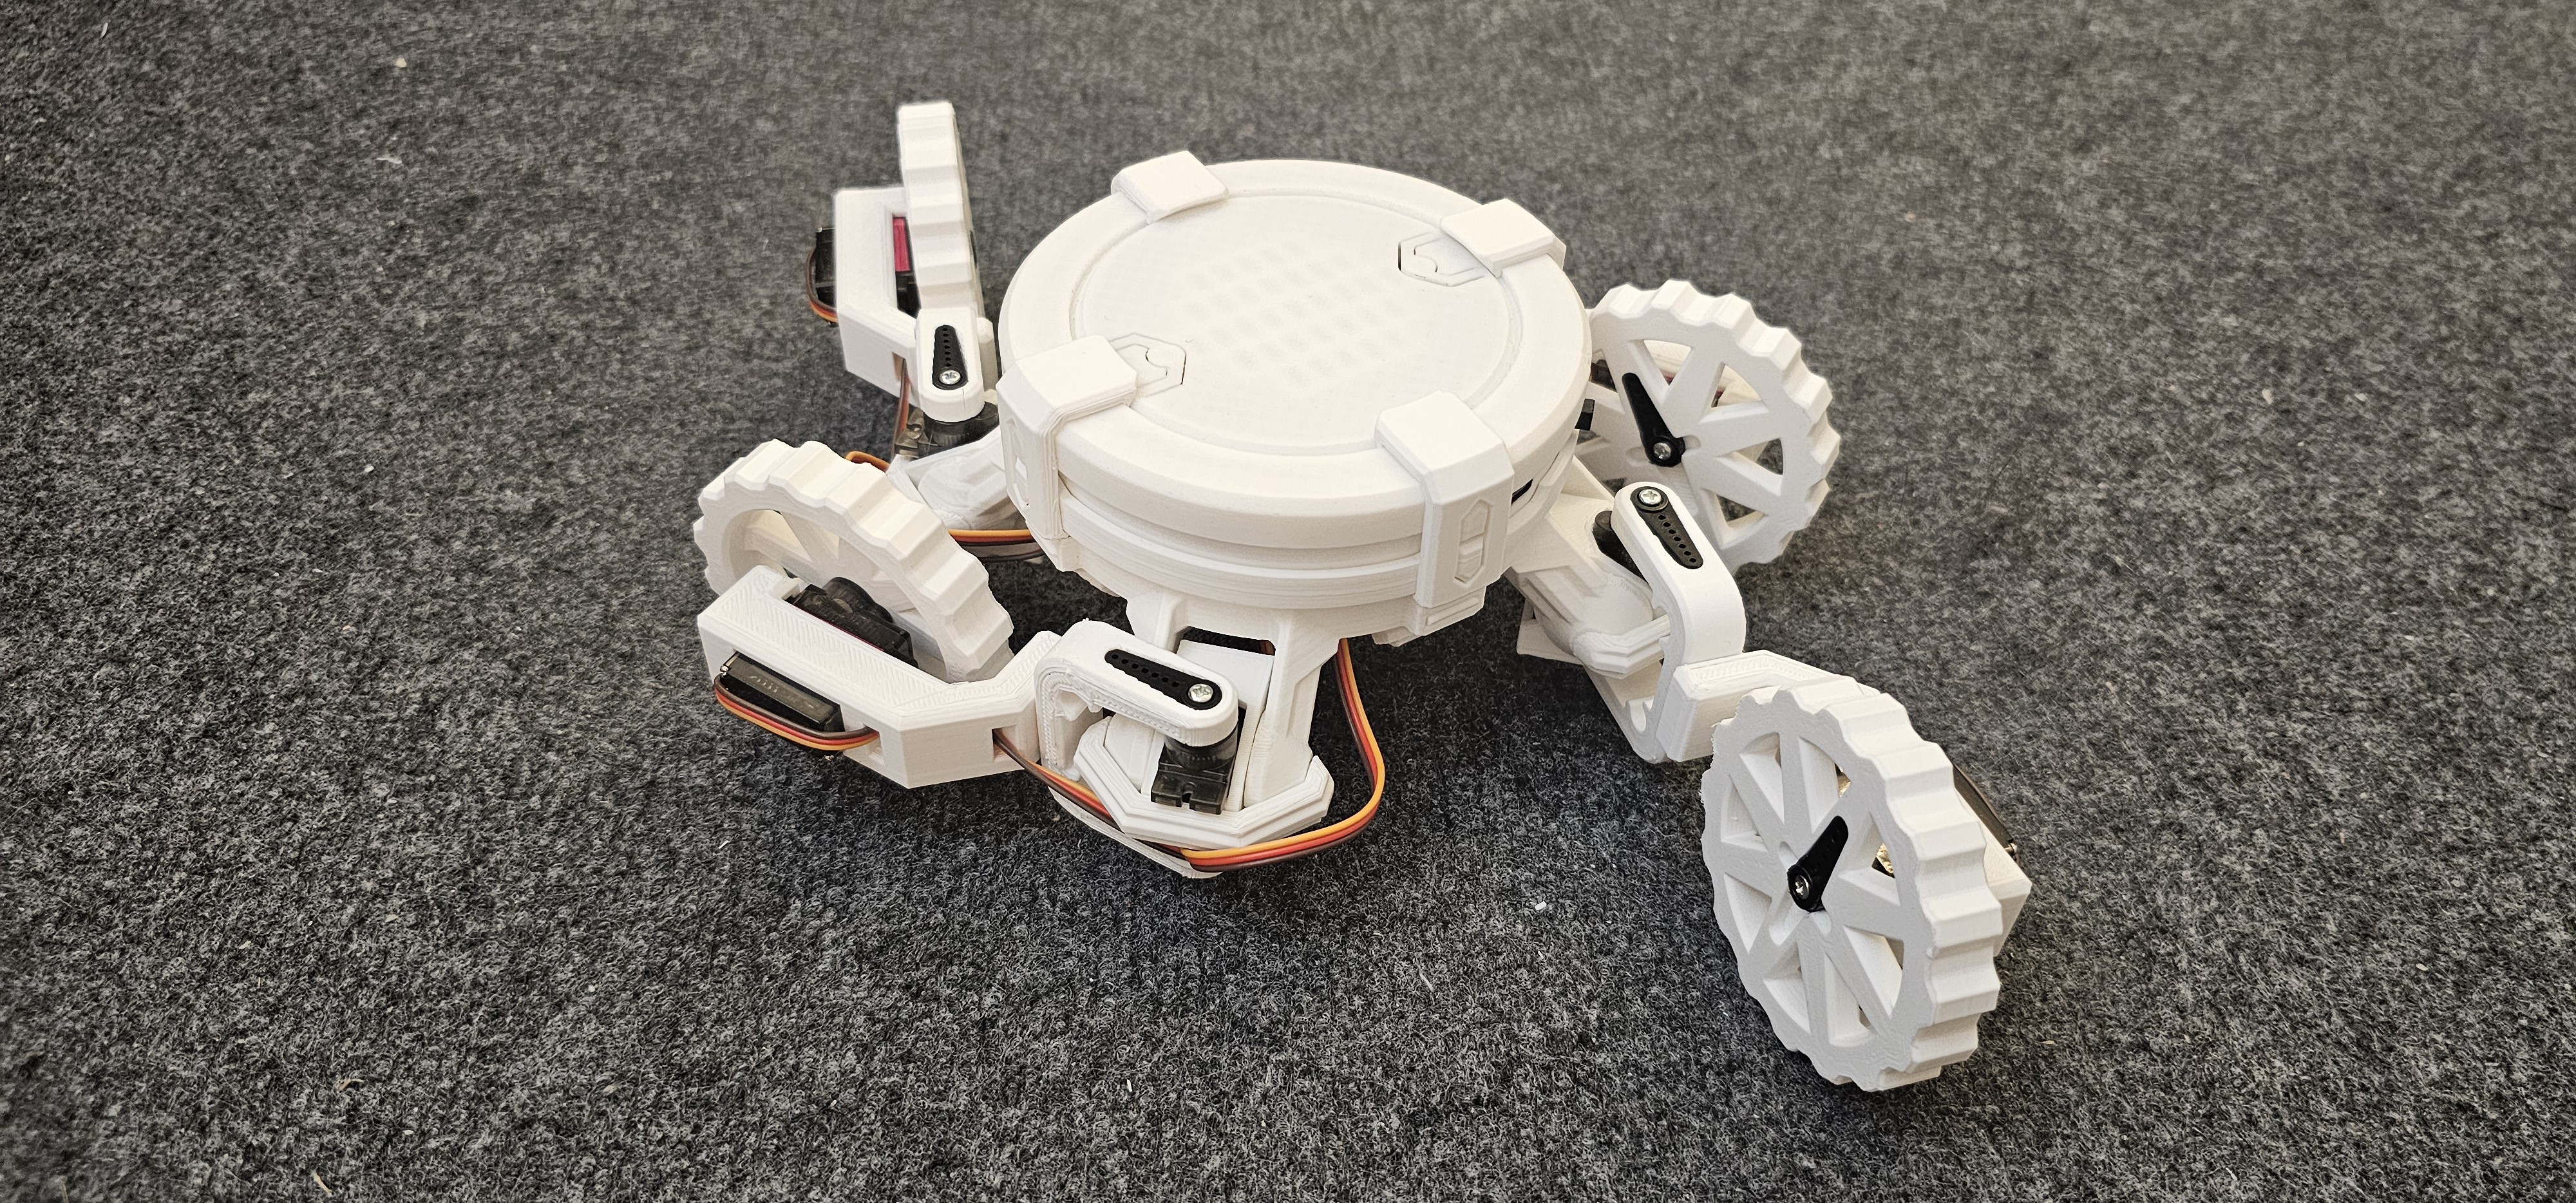
Code test the wheel design
11/15/2024 at 17:59 • 0 commentsWe code-test the wheel design to make sure that the wheels can hold their grips on the floor. We had a little of bit of too much fun exploring different ways to control the robot:
![]()
![]()
-
Designing game console
11/15/2024 at 17:43 • 0 commentsNow that the mechanical board and wheeled base design are done, we move on to designing the game console. Since there's no actuation needed in the game console, we will not need to use any of the 16 servo channels. Instead, we will rely entirely on the extension block, with GPIOs and hardware communication protocols like I2S, SPI and UART.
The brain itself can already be considered as a game console, as you can launch games on it, with 2 buttons on the 2 sides of the brain used as control inputs. Some of the game we have developed to play-test on the brain are Flappy Bird and a simple car chasing game that you found in those monochromic cheap game consoles:
![]()
![]()
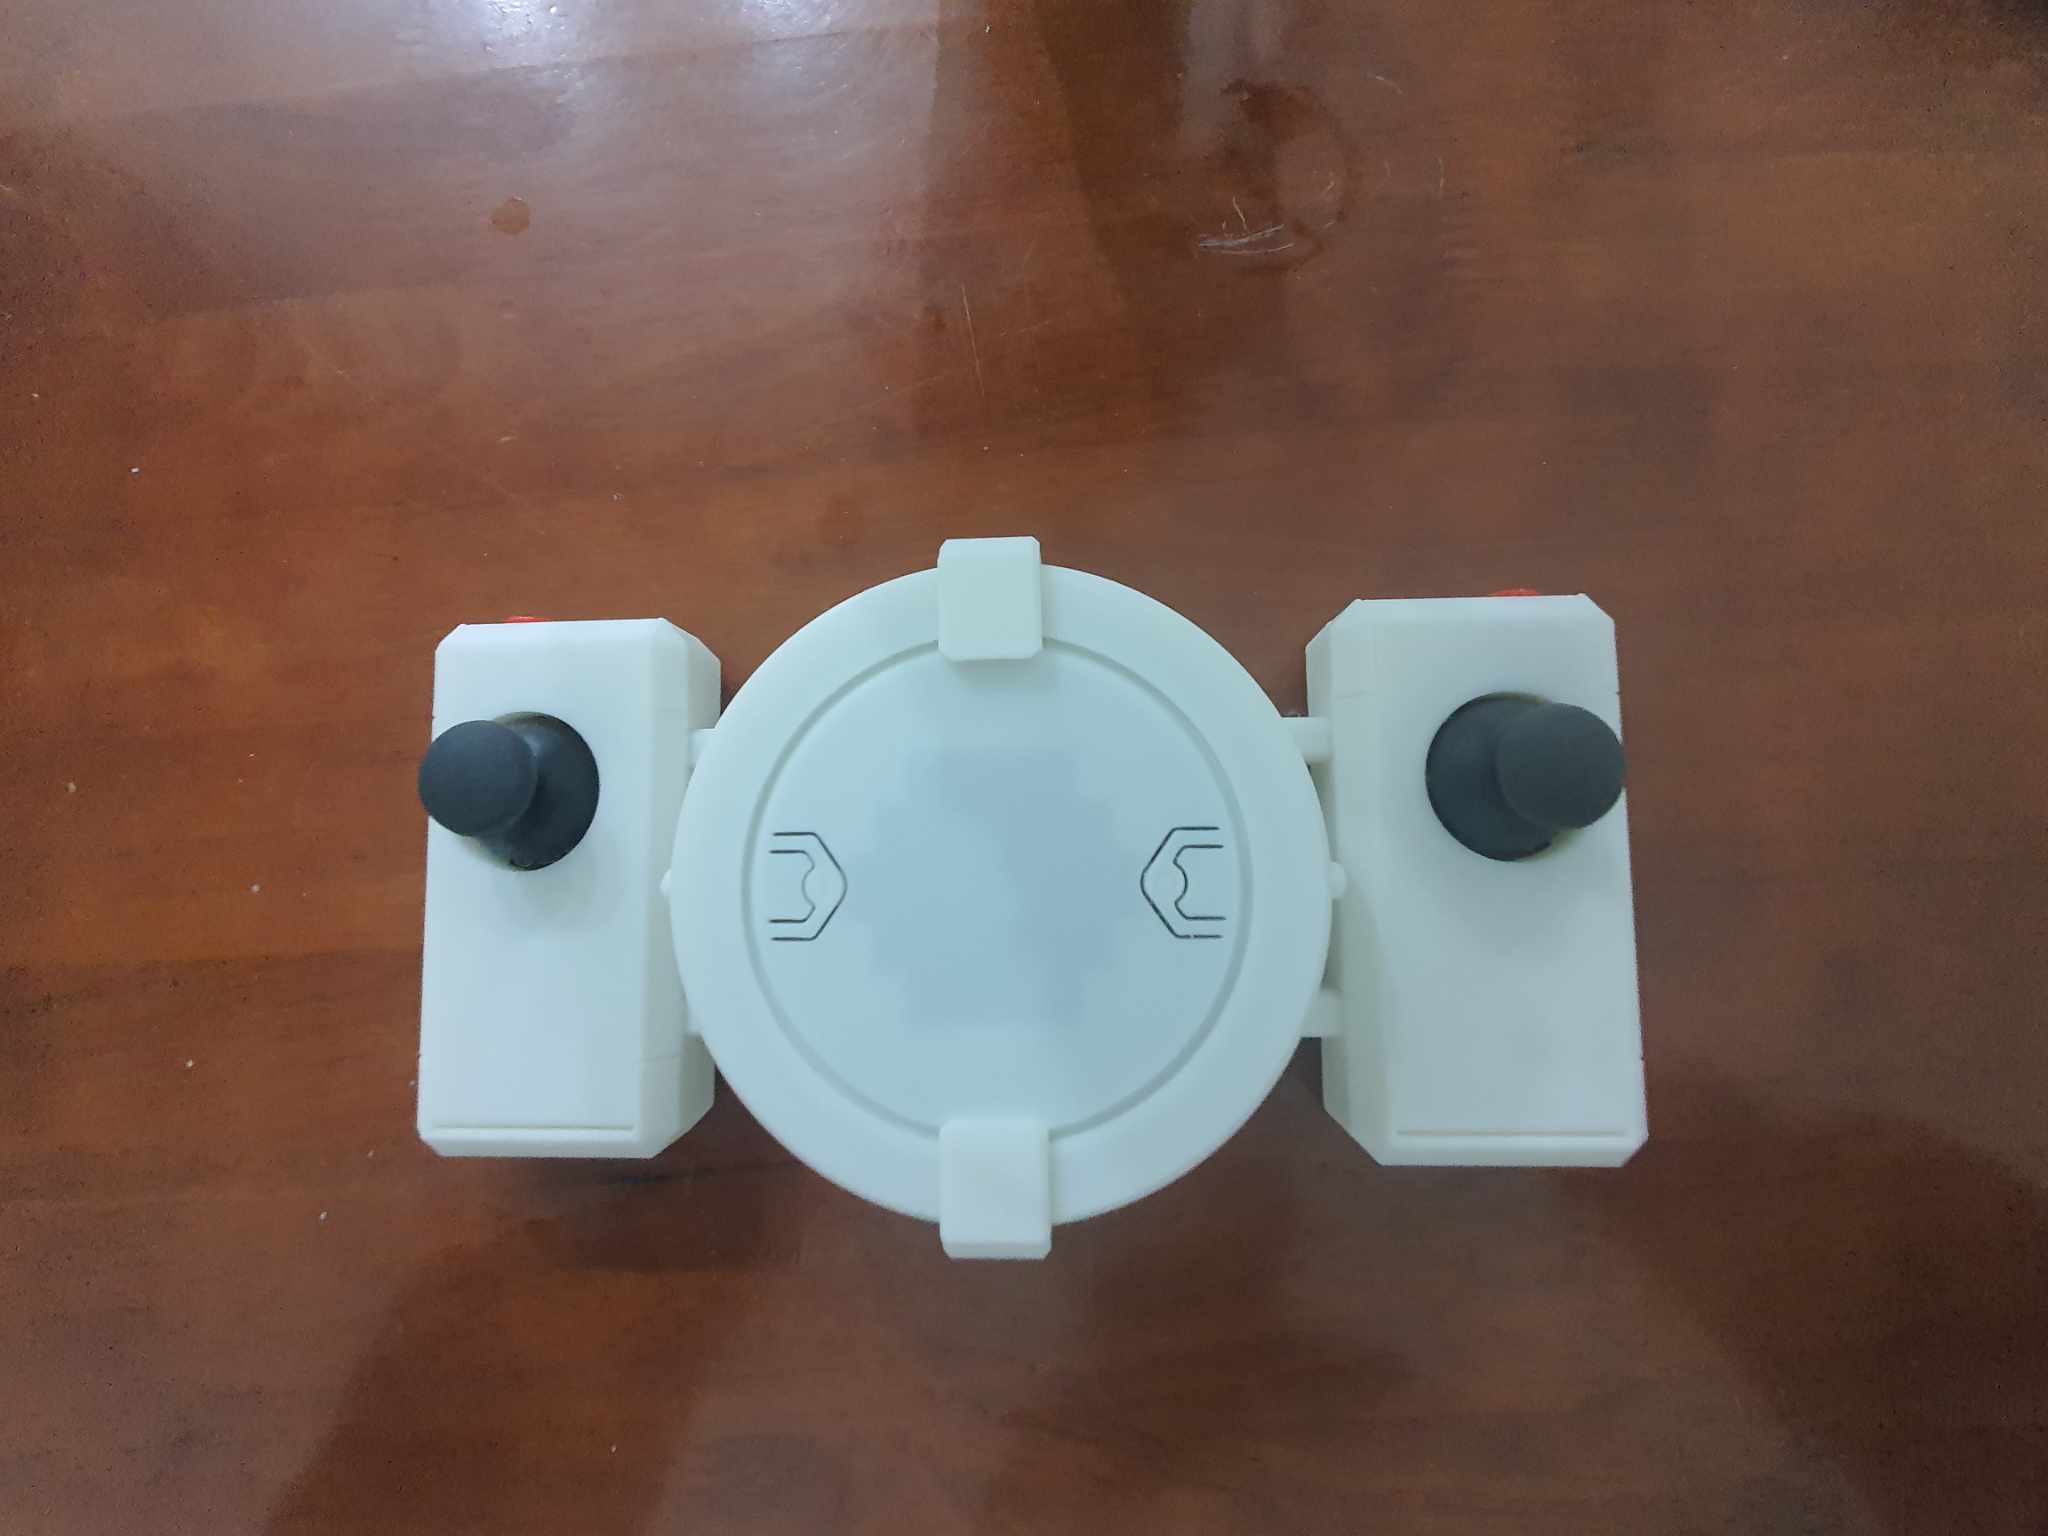
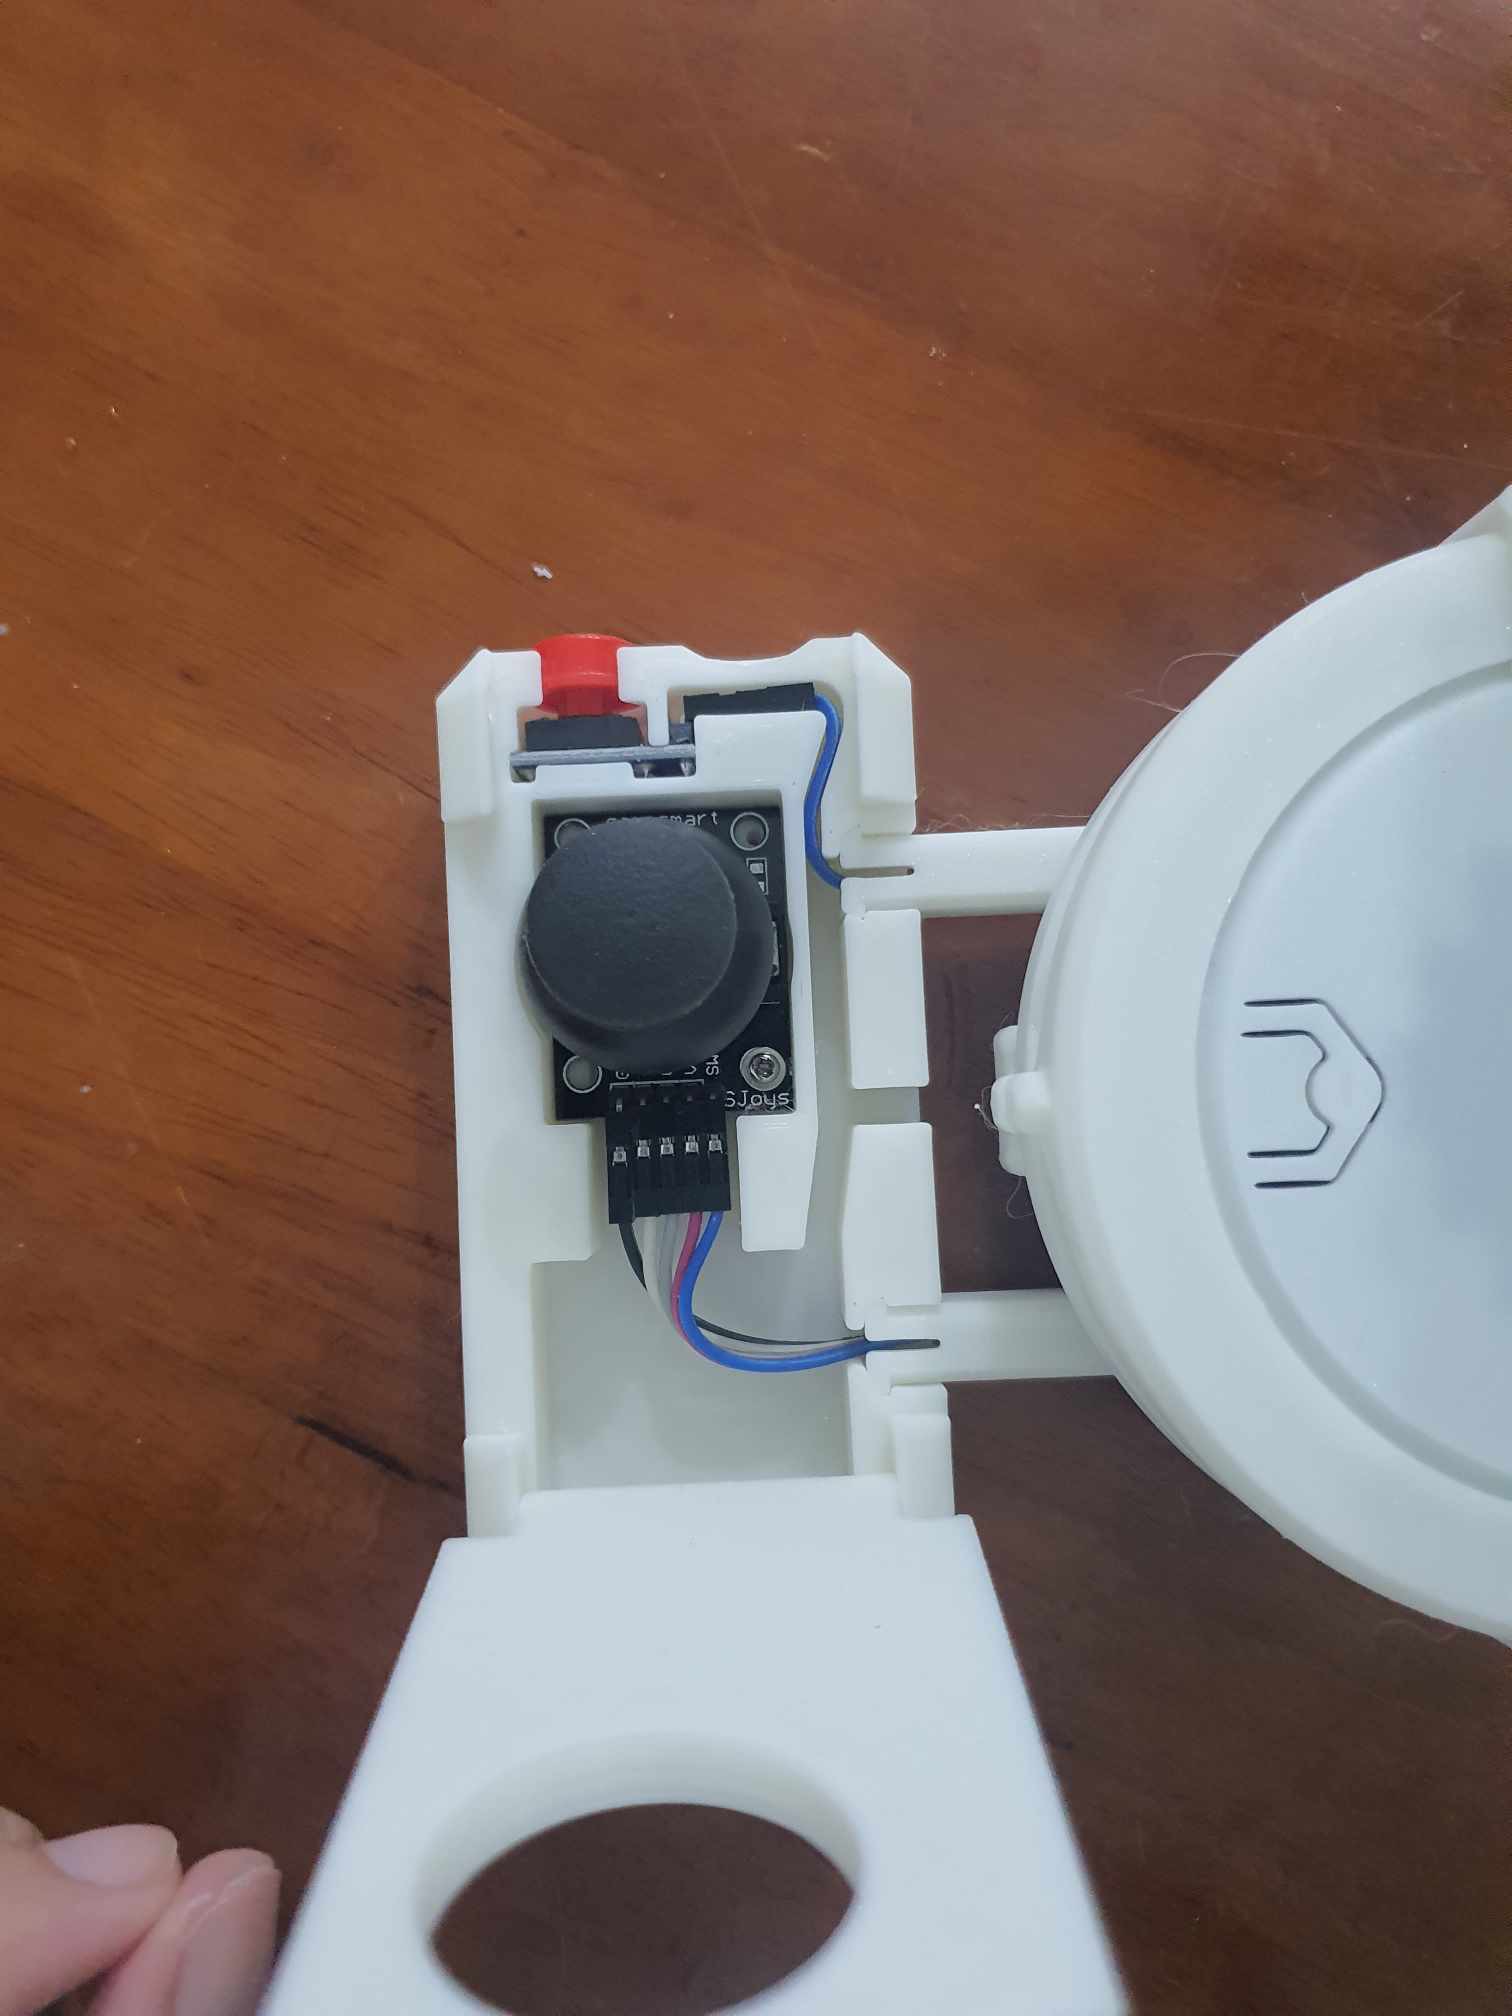
To add in more buttons and joysticks, we need to consider the distance between the added handles and the brain, so that you can still comfortably reach the available buttons. We started out with a rough design of the game console with 1 button and 1 joystick on each side:
![]()
![]()
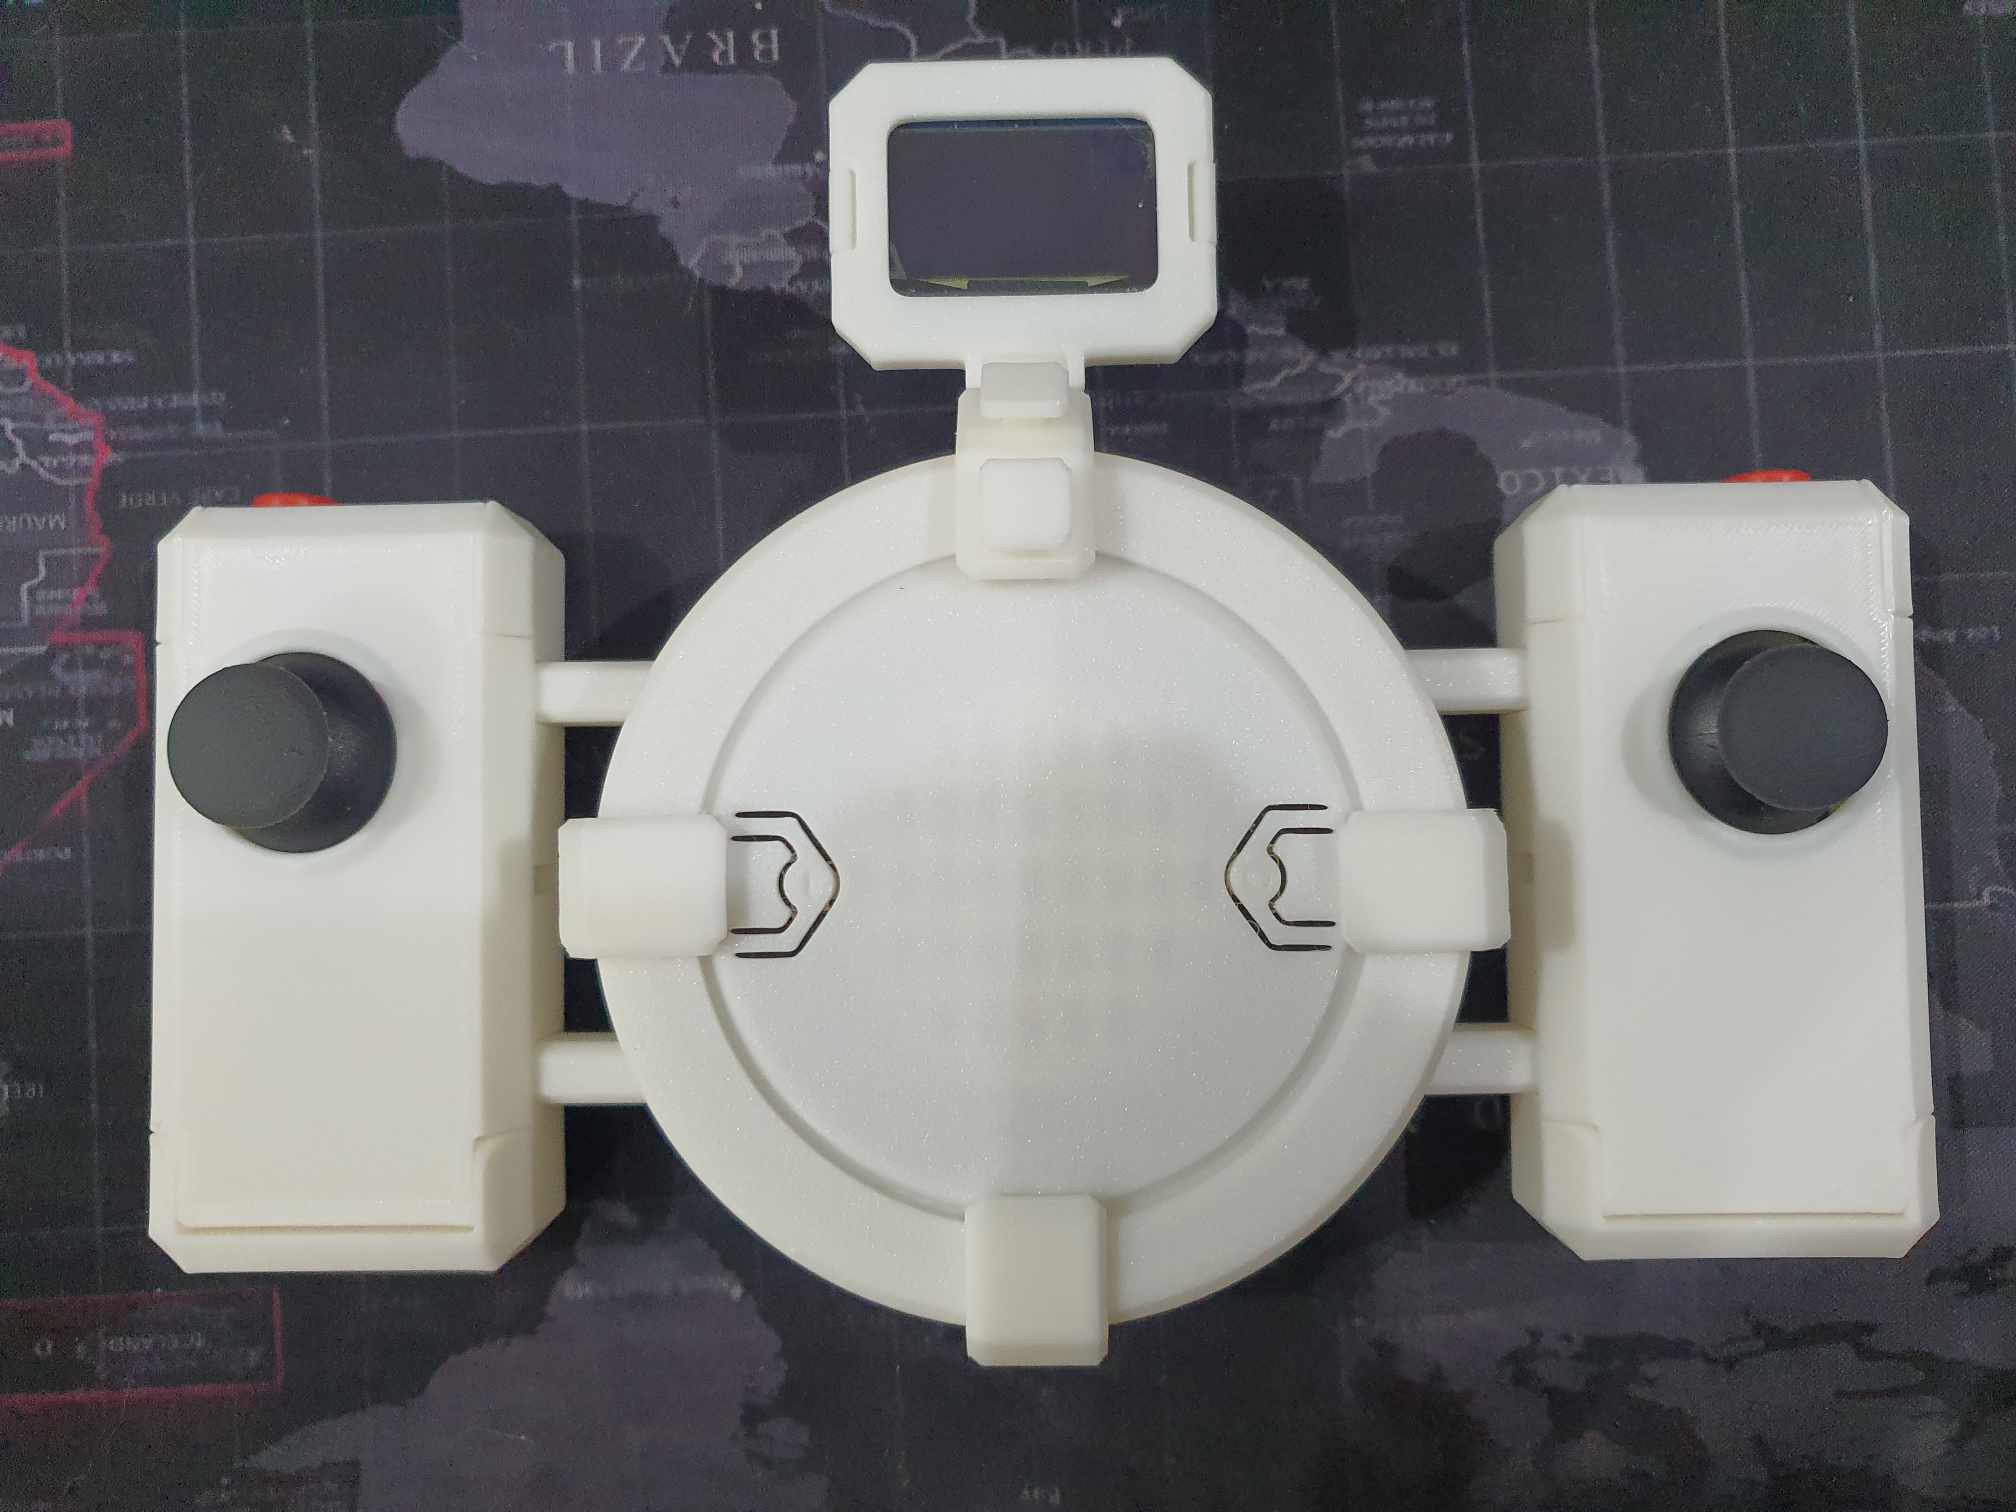
Then, since the design looks so tight, we played around with the distance between the handles and the brain and ended up with a distance that makes holding it feel comfortable. Finally, we added an I2C OLED display so that you can load up any games made for the Arduboy project:
![]()
![]()
![]()
-
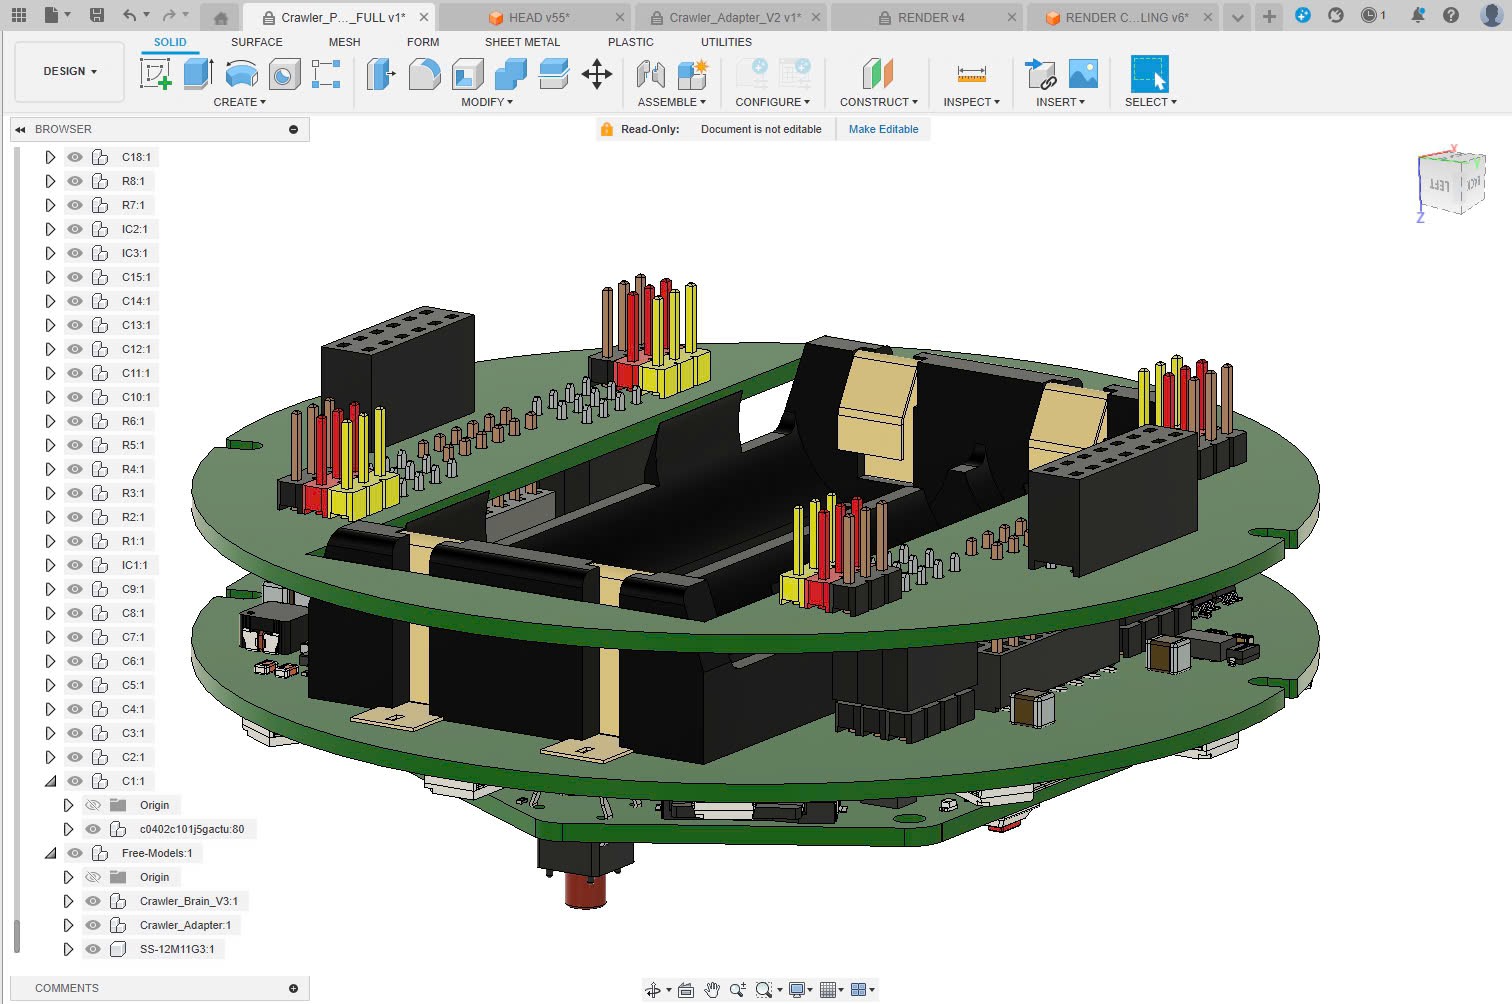
Mechanical board design
11/01/2024 at 14:51 • 0 commentsWe started designing the mechanical board. Since the new wheel-based robot design is also using servo motors, there's no specific hardware and electronics requirement other than the PCA9685, which is already included in the brain. So for both the legged robot and wheel robot, the mechanical board will simply be a pass-through, with headers connecting to the brain when plugged in, and pinouts/headers to attach the servo motors in.
The first design looks like this:
![]()
It is a circular PCB with all the headers connecting to the brain. But this design is too big and that it will make the robot's head much taller than before, meaning that if the robot is used in humanoid form, it's going to fall.
The problem here will be to design a mechanical board that can fit the space of the robot's head, while still able to perform the plug-and-play idea.
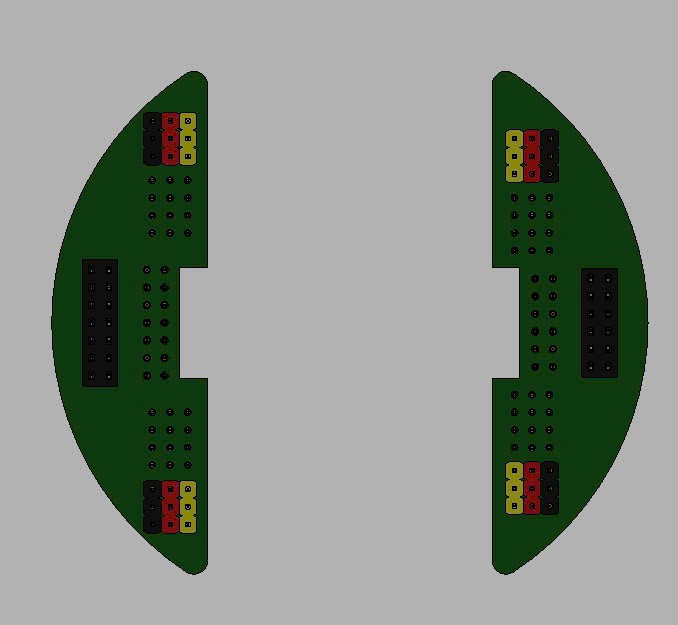
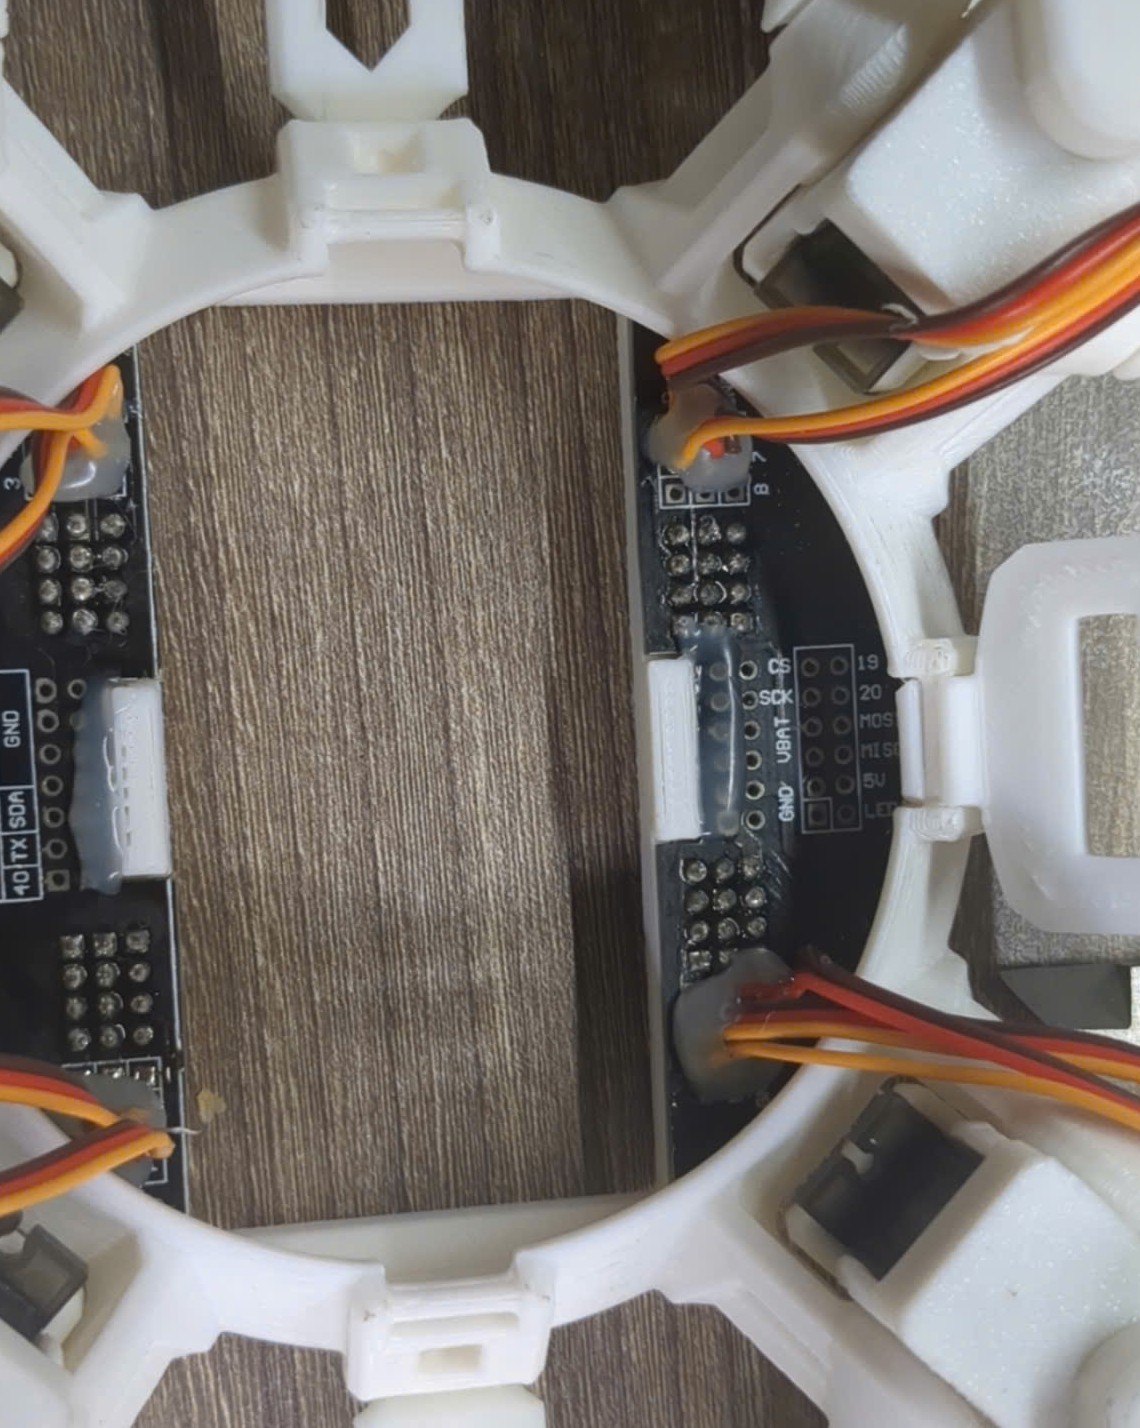
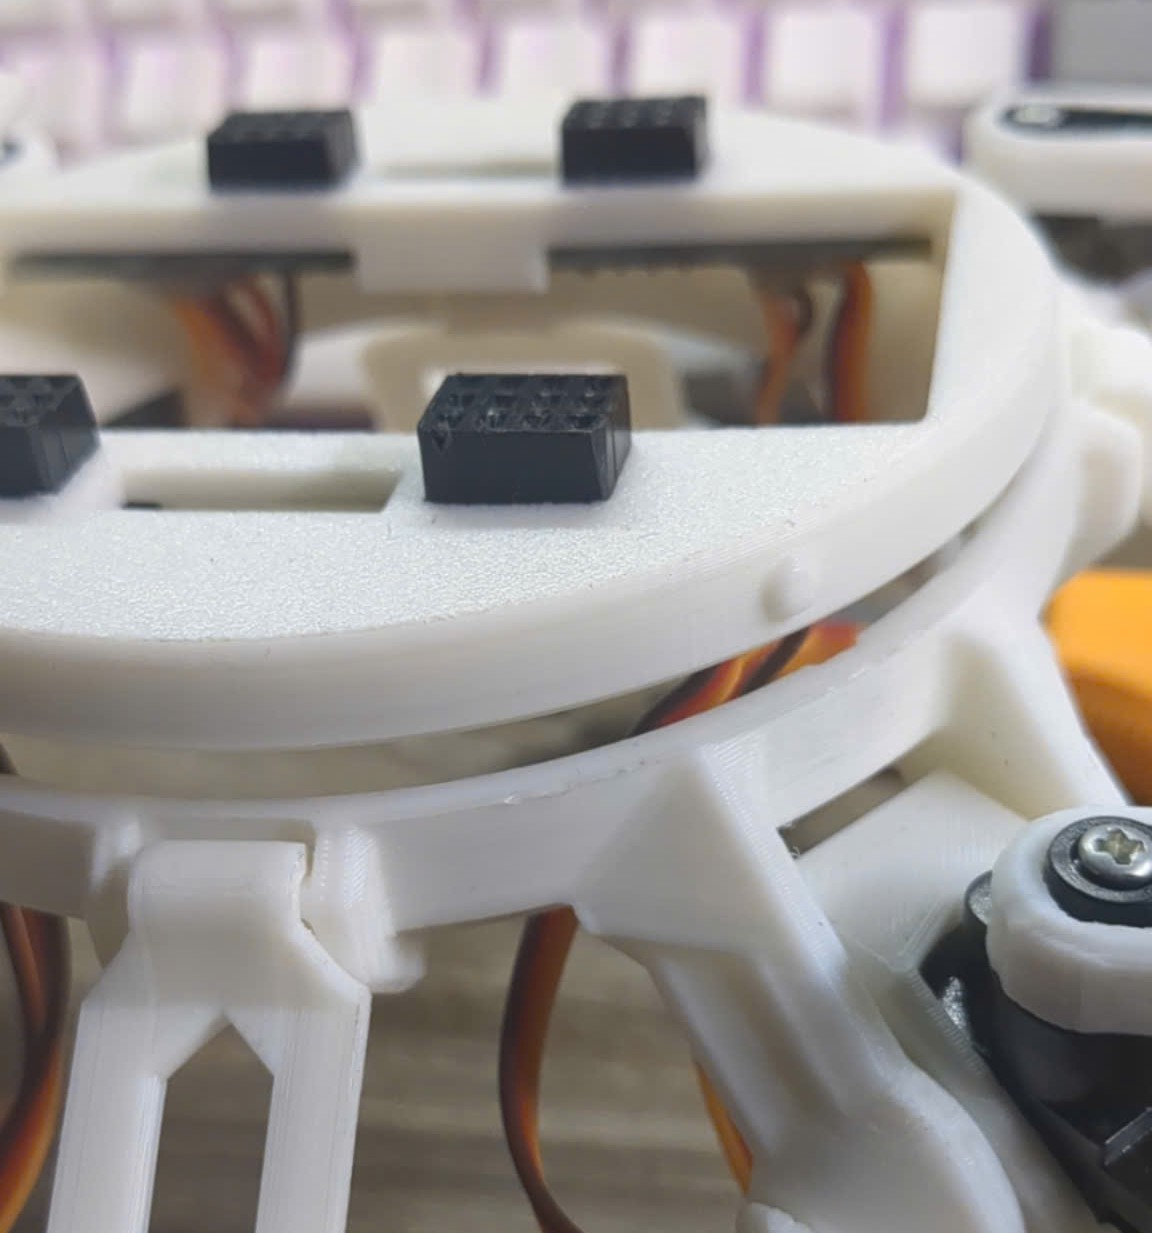
In the second iteration, we cut the circle to 2 smaller PCBs, and redesign the housing structure of the hip/head of the robot, so that everything fits nicely:
![]()
![]()
![]()
-
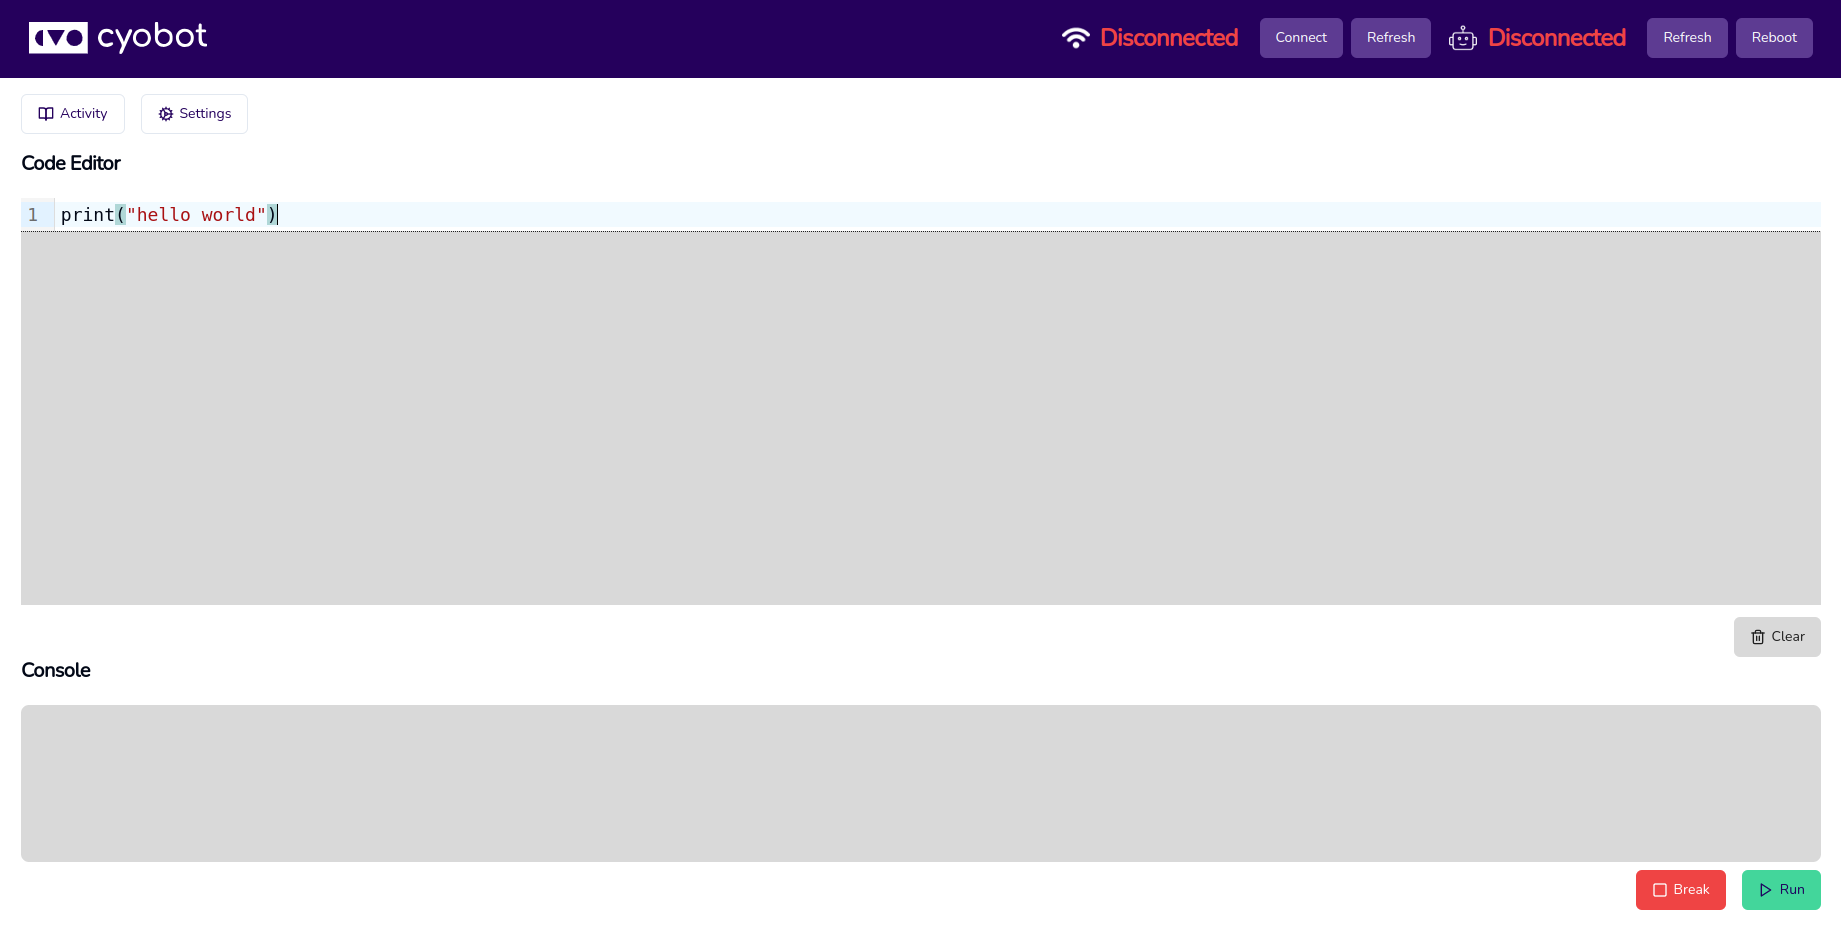
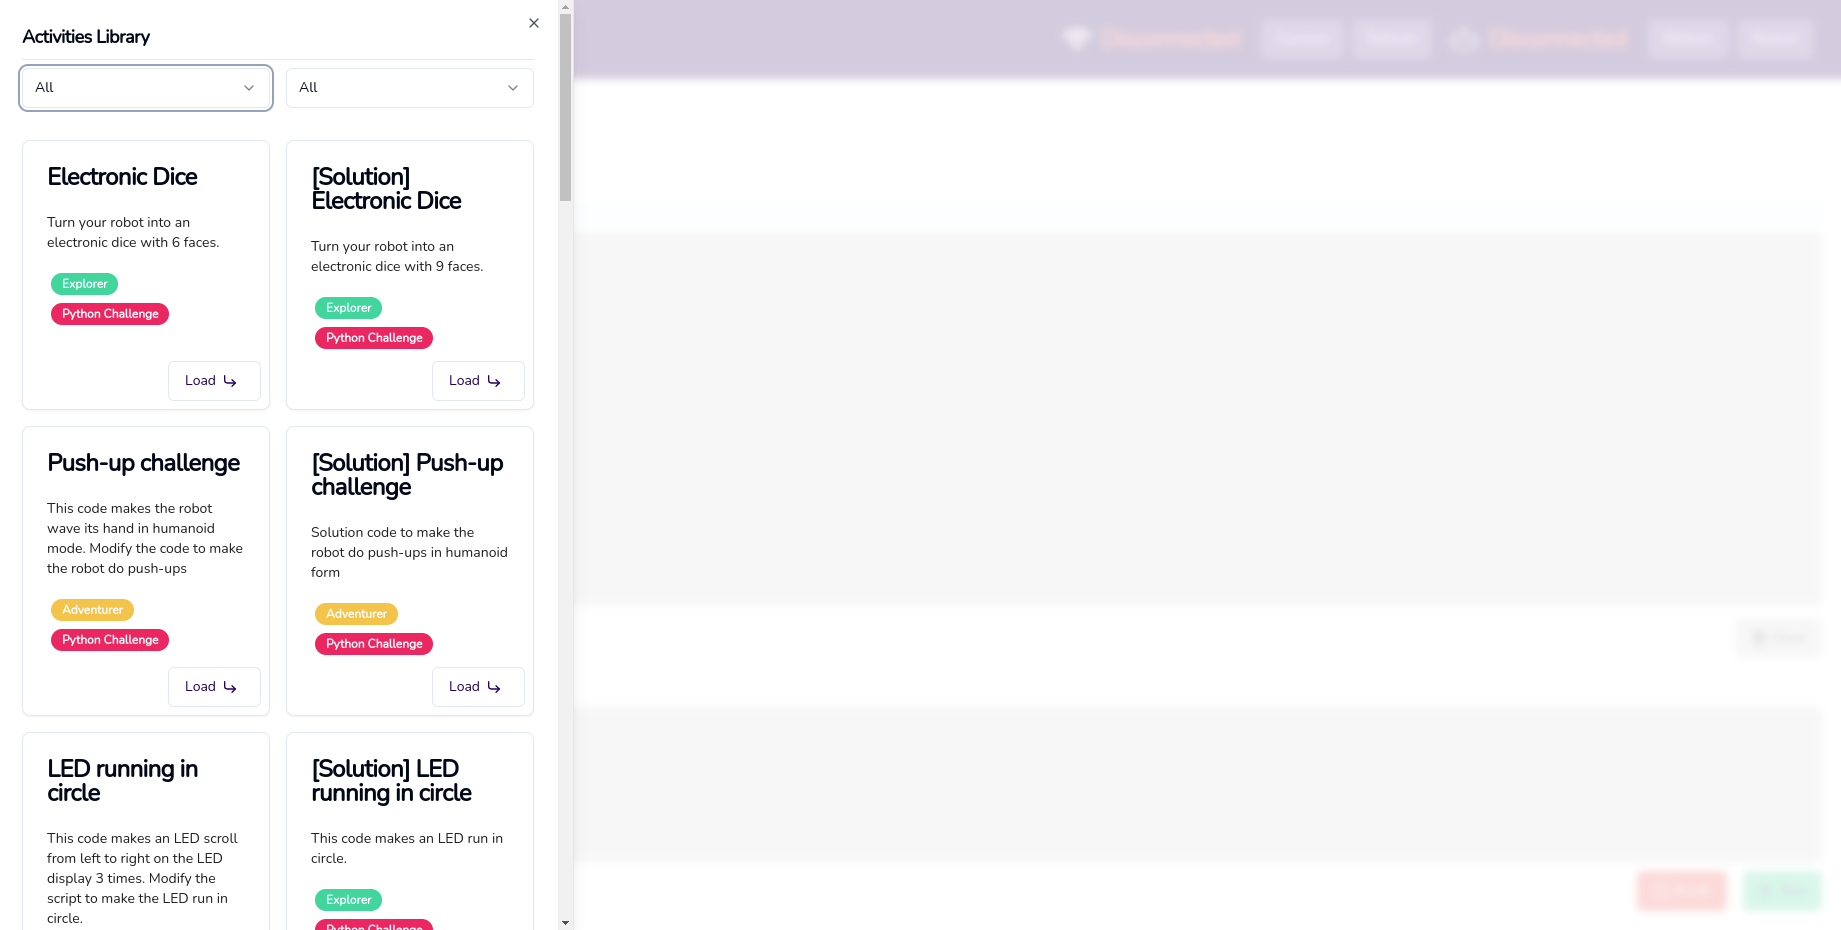
Improving coding portal
11/01/2024 at 14:18 • 0 commentsThe coding portal gets a slight makeover. We make the code editor larger, with a smaller console (so that it renders nicely on small screens), and add in more activities that you can load in to play, and load the solution to check.
![]()
![]()
Source code for the wheel robot is also in the making and coming to the portal shortly.
-
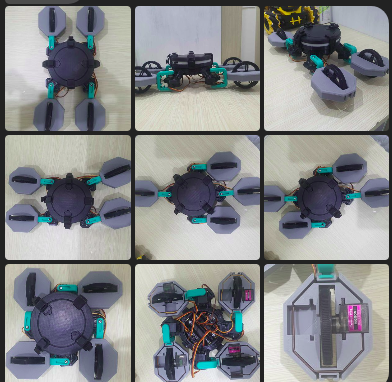
Robot car designs
11/01/2024 at 14:09 • 0 commentsWe set out to find the next suitable robotic design to add to our ecosystem. As CYOCrawler is already a quadruped robot that can also be used as a humanoid robot, we are thinking of adding in wheel-based robot.
We started out by trying to develop a new car design without changing too much the original design of the quadruped robot. We came up with 2 designs:
![]()
![]()
They both share the same design concept: changing only the last joint of CYOCrawler of each leg to include wheels. This design is nice, cause it works and it also allows users to learn and play with wheel-based robots in different configurations. Thanks to this design, the robot can be controlled with steering and throttle separately (by coupling the front legs together and the rear legs together), or all legs be controlled separately to create fancy movements.
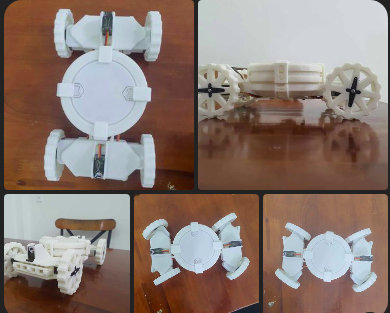
Though this design works, we also want to see if we can design something close to a normal car (using Ackermann kinematic structure). We came up with the third design:
![]()
This design already decouples the steering and throttle, and controlling this car is much easier than the previous ones.
We finally decided to go for the first design, as it works in all cases, and as well we can leverage the hip joint to reconfigure the robot into even more configurations:
![]()
![]()
![]()
-
Speaker and microphone working
11/01/2024 at 07:54 • 0 commentsEven though we followed the design of the Korvo board for the speaker and microphone, getting them to work is another thing. Though the MicroPython build that includes esp-idf and esp-adf works (see https://github.com/espressif/esp-adf/tree/master/micropython_adf if you want to know how to do it), importing the audio library does nothing: cannot record audio from microphone to SD card, and cannot play music from SD card to speaker.
We hit a turning point in solving this problem when we decided to just skip the SD card, and just play music to the speaker via a socket stream. It worked.
Moving to getting the microphones to work is particularly harder than we thought. Everytime we turned on the microphone object and started recording to the SD card, we got core panicked error from ESP32. Digging deeper into the problem shows that it's not the speaker or the microphone that are causing the problem, it's the micro SD card all along!
The micro SD card interface used in Korvo is SDIO, whereas we have been trying to use the SD card with SPI. Switching to SDIO solved the problem.
-
New CYOBrain PCB design
11/01/2024 at 07:32 • 0 commentsThe old problems
The first CYOBrain design has several setbacks:
- The chip might run out of memory while running both the coding portal and other heavily demanded tasks (operating WiFi hotspot, running multiple sensors at the same time, reading music from a micro SD card, and playing through the built-in speaker, etc)
- Users do not know the battery level of the robot
- The extension block is too limited (2 GPIOs, 5V and 3.3V power supply, UART and I2C) → cannot connect SPI devices, especially external camera module
- The microphone is not running I2S → cannot record sound when running Python or Block
Design goal
- Fix all the listed problems
- Prepare for future expansion, including new add-on modules (wheelbase, camera module, more sensors, etc)
- Maintain the final cost increase of new CYOBrain under $15
Several requirements include:
- Users will be able to easily swap CYOBrain from CYOCrawler (legged robot) to other mechanical bases (robotic base with wheels, robotic arm, etc)
- Users can easily connect multiple external peripherals to the robot: sensors, camera, OLED display, LCD, etc
- Users can use the CYOBot coding portal for an extended amount of time without freezing/blocking
- Users can use CYOBrain for more complex projects: Voice-controlled applications, applications with camera, applications with media/audio player, applications with different types of motion and applications with multiple concurrent tasks, real-time applications
Proposed solution
- Use a stronger ESP32 chip: ESP32-S3 with built-in PSRAM (8MB) and 8MB flash. This is an x16 improvement from the previous chip. The previous frozen portal problem comes from an out-of-memory error. With this improvement, the robot can function for a long time without running out of memory. In addition, ESP32-S3 has more GPIOs to use, allowing connection to more external peripherals.
- Add in battery indicator/battery level circuit to be independent of the microcontroller, and will always be able to tell battery level every time the robot is turned on. Combine this battery indicator with the power LED, so that >= 30% is green and < 30% is red.
- Change the position of the power LED and charging LED to the side, allowing users to easily see the LEDs when the robot is turned on/when the robot is plugged in.
- Add SPI to the extension block (for LCD, OLED display, and camera connection).
- Add all unused GPIOs to the extension block.
- Change microphone to I2S interface, use 2 microphones instead of 1 for noise canceling and other audio-related applications.
- Add direct battery output to the extension block to use CYOBrain to power other external peripherals requiring large power consumption.
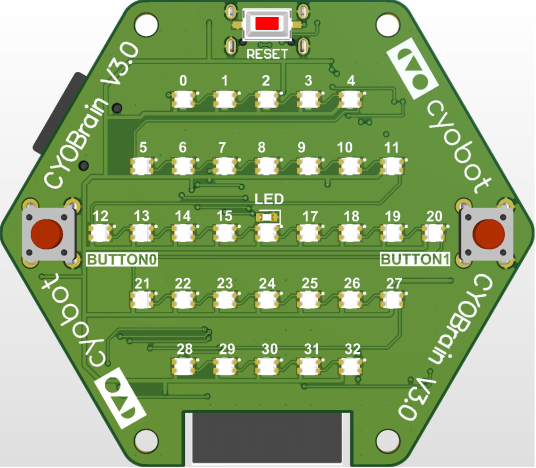
- Add 1 GPIO direct-controlled LED for curriculum support (basic GPIO activities - Blink)
- Wire out all 16 channels of PCA9685 for more connectivity.
- For each robot design, there will be a separate Mechanical Board to handle the required peripherals for controlling the corresponding mechanical movement, and necessary connectivity to connect with CYOBrain. This means that the current CYOCrawler design will be split into 2 parts: the head (CYOBrain) and the body (the hip with 4 legs). The Mechanical Board will be positioned inside the body, so that the head can easily be plugged into the body and start controlling the legs.
The proposed design change will add an estimate of $10 to the final cost of CYOBrain.
The Mechanical Board will hold all the extra peripherals needed so that:
- CYOBrain can easily control the mechanical movement of the robot using either UART, I2C, SPI, or GPIO.
- CYOBrain will power the mechanical board with the same battery.
- CYOBrain can easily attach to and detach from the Mechanical Board.
The additional Mechanical Board will add an estimate of $4 to the final cost of CYOCrawler (legged robot). The Mechanical Board of other future robotic bases will add more cost to the final robot depending on the additional required peripherals, for example:
- Robotic base with wheel will have H-bridge (motor driver) and DC motors.
- Camera module will have a camera and pan-tilt mechanical frame with servo motors
Solution
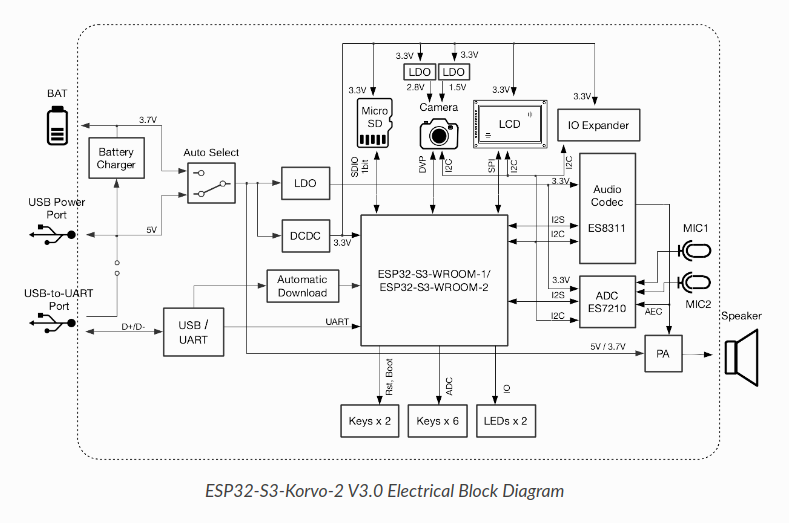
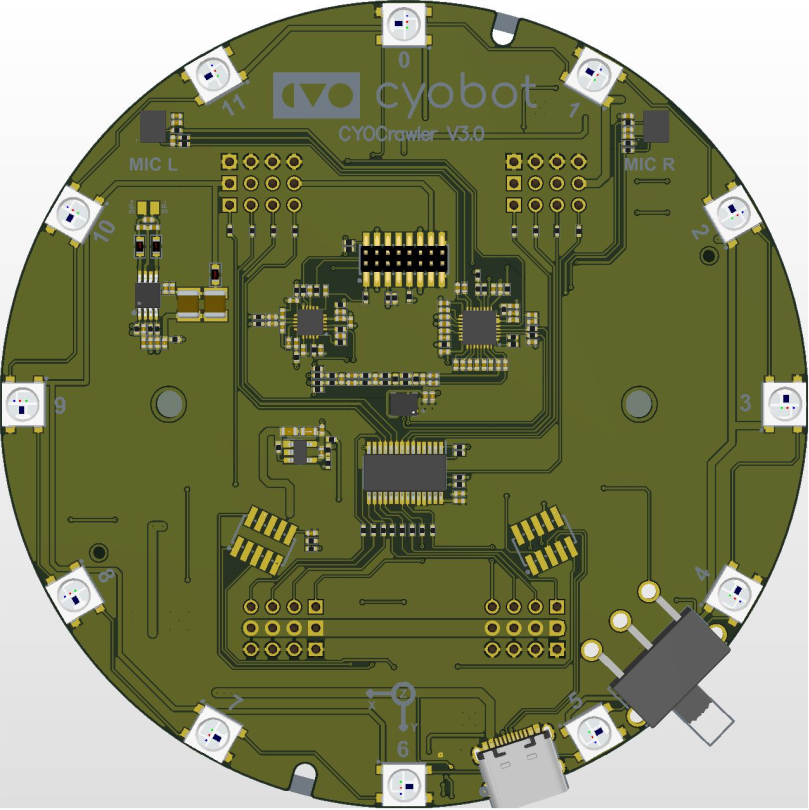
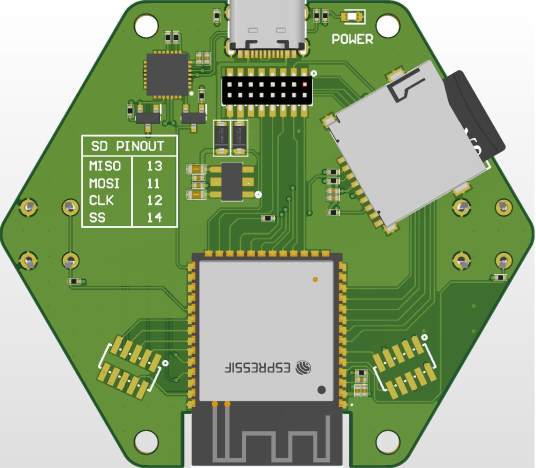
After a month, the new CYOBrain PCB is done, with the following reference:
1. The audio module follows ESP32-S3 Korvo 2 V3.0 (https://espressif-docs.readthedocs-hosted.com/projects/esp-adf/en/latest/design-guide/dev-boards/user-guide-esp32-s3-korvo-2.html) using ES7210 audio ADC chip and ES8311 audio CODEC chip for microphone and speaker respectively.
![]()
Luckily, the design comes with an extensive source code for audio (esp-adf - https://github.com/espressif/esp-adf) with MicroPython support.
2. All 16 channels of PCA9685 are wired out, but in a way that the first 12 channels are kept the same, so that there will be backward and forward compatibility, meaning that when we are done with the Mechanical Board design and decoupling of the brain and body (base) of robot designs, the old boards should be able to work (to some extend) as well.
3. SPI and power source are wired out to extension block, so that we can power the Mech Board later on, and as well connect things like the camera module (the Arducam that uses SPI and I2C):
![Arducam Mini Module Camera Shield with OV2640 2 Megapixels Lens Compatible with Arduino UNO Mega2560 Board and Raspberry Pi Pico]()
4. Battery level indicator and charging indicator are added in.
The most up-to-dated board looks like this:
![]()
![]()
![]()
![]()
CYOBot v2: Transformable Quadruped Robot
Open-source modular plug-and-play robotic platform for makers, students and researchers