Close
0%
0%

Autonomous Agri-robot Control System

Controlling autonomous robots the size of a small tractor for planting, weeding and harvesting

Similar projects worth following
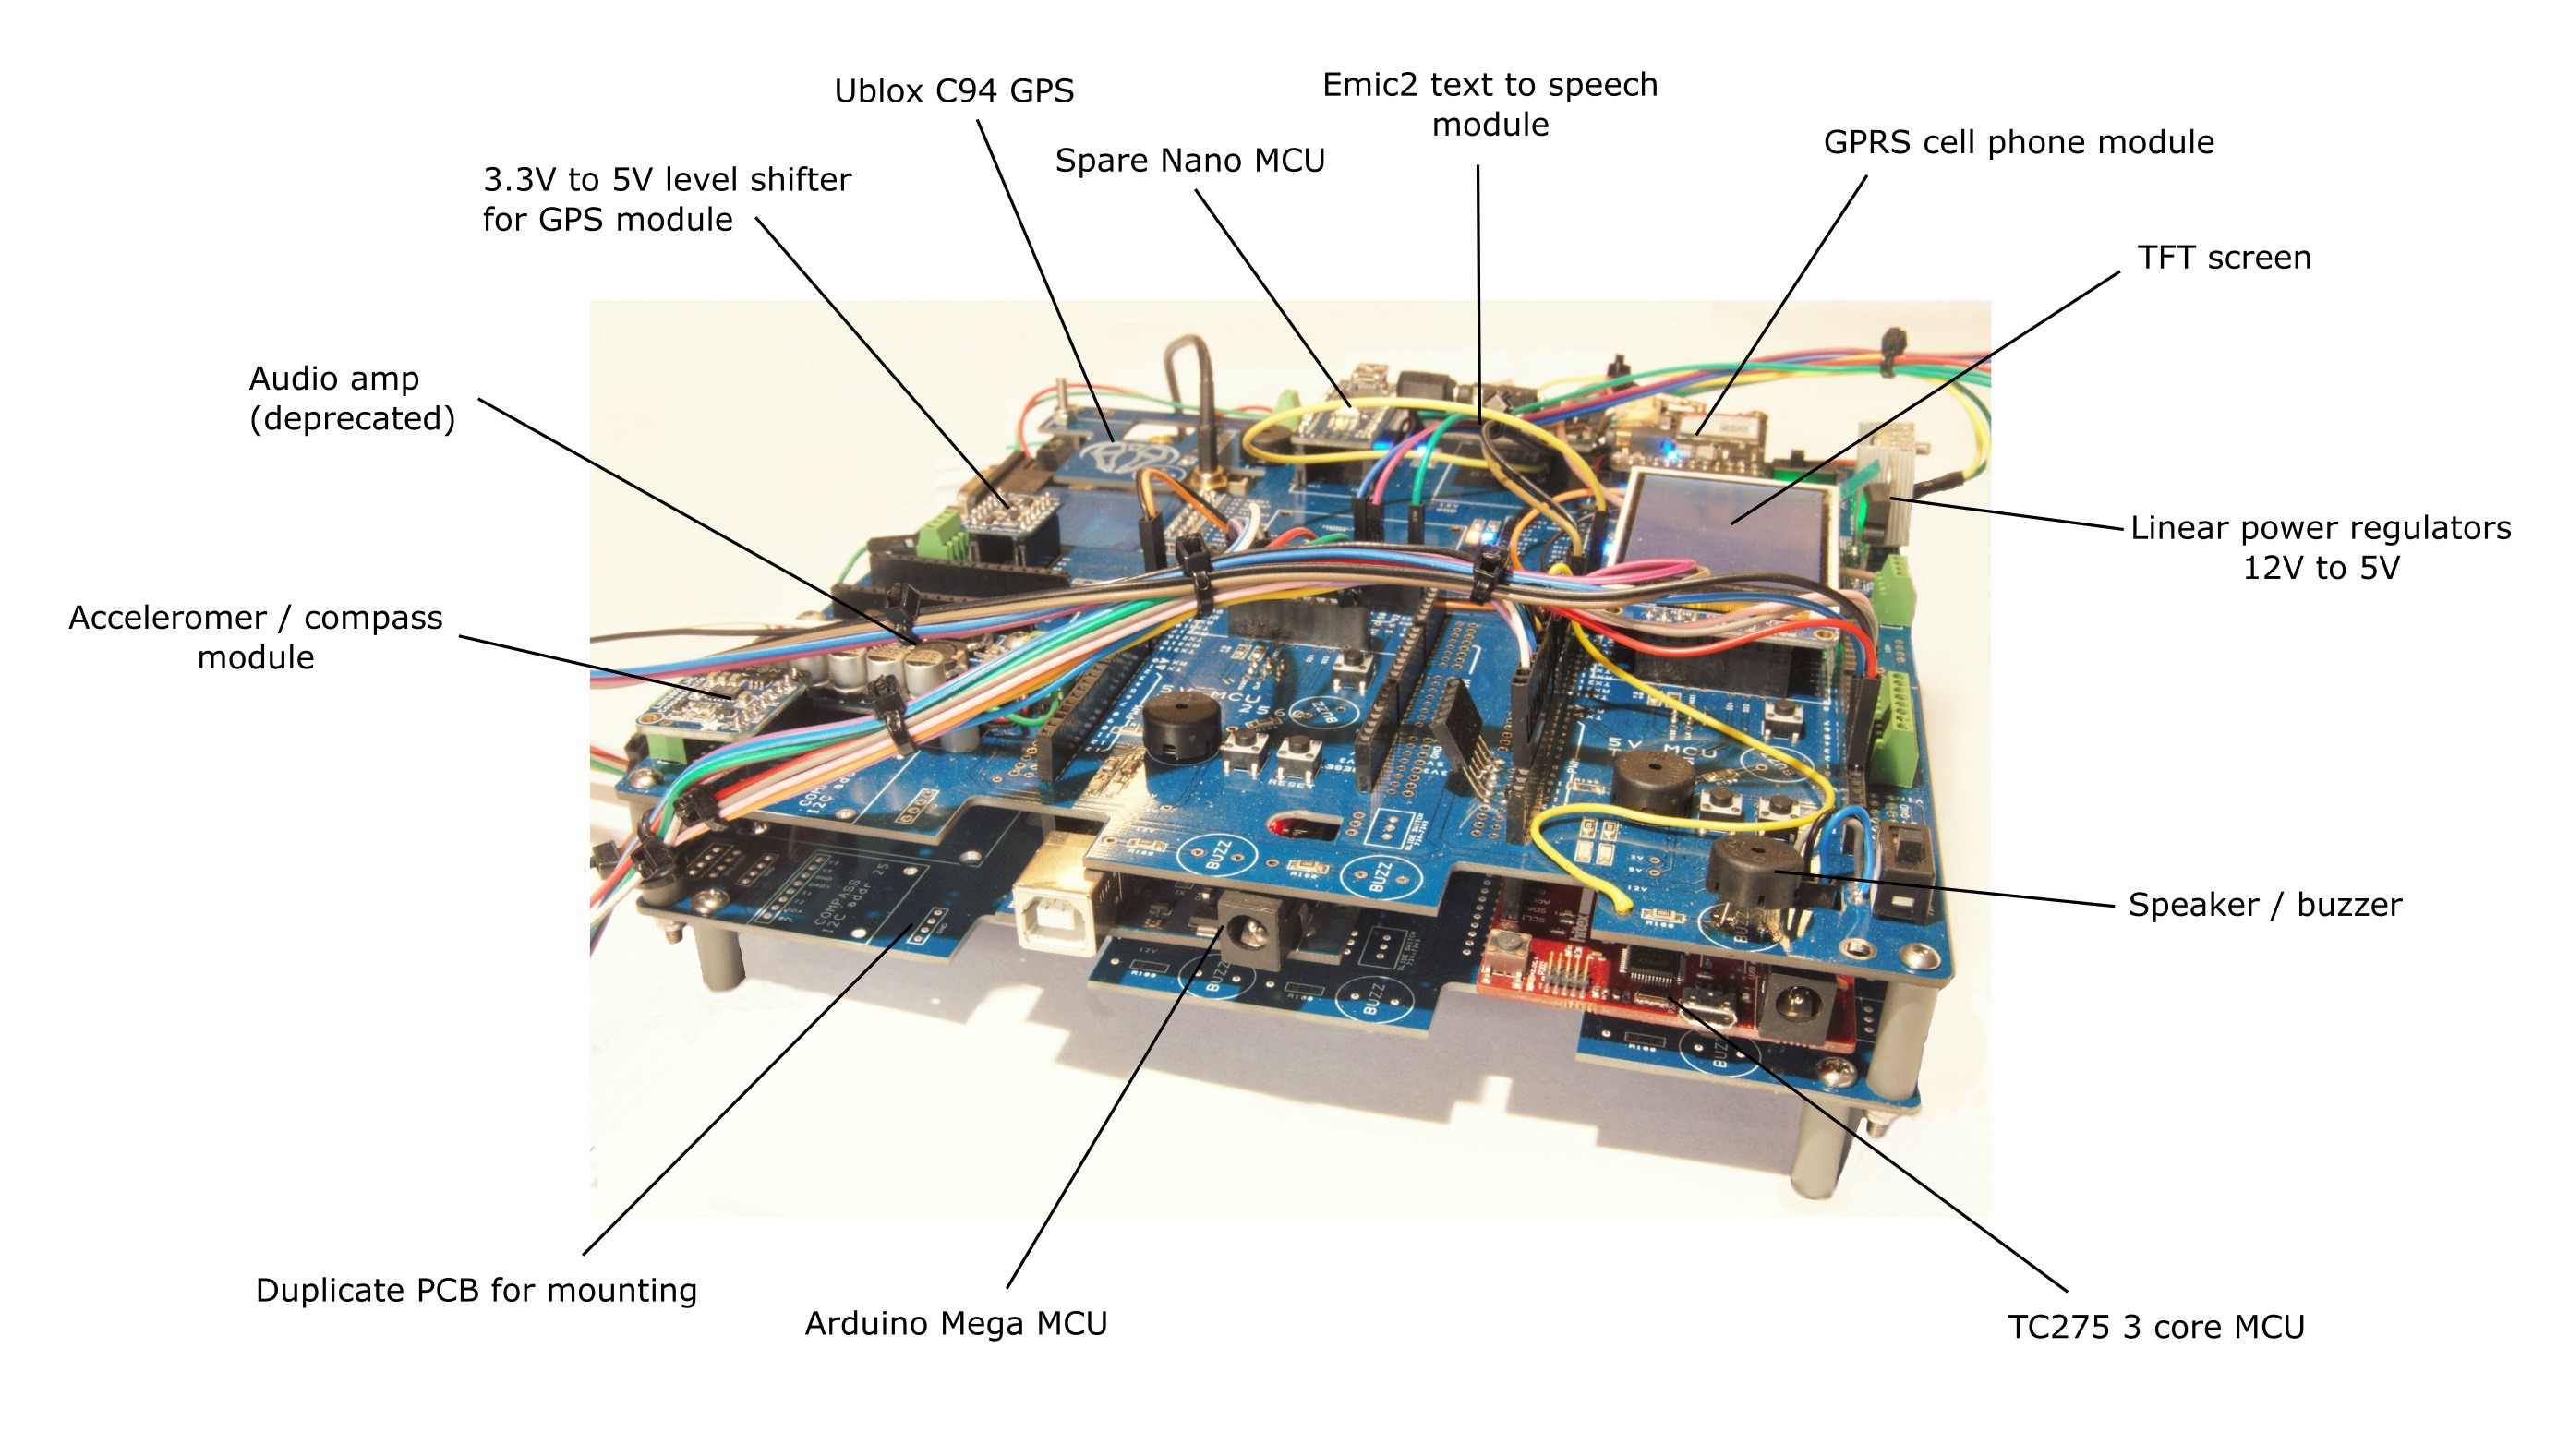
Having robots on farms will help negate the need for pesticides, chemicals and destruction of soil structure, giving us hope for the future of our planet. The machines need to be fully autonomous and features in the control system should include:

1. High accuracy, error correcting GPS/GNSS with RTK
2. Super fast multi-core micro processors for controlling multiple electric motors and enabling parallel processing. Linked via I2C
3. Cellular 2G/3G/4G data comms where WIFI is not practical
4. Object recognition and positioning for distinguishing plants from soil
5. Interweb database and user dashboard for everyday machine control
6. Screens, buzzers and LEDs for status report / debugging
7. Text to Voice and speakers for interaction with humans
8. LIDAR / ultra sonic sensors for detecting unexpected objects in pathway
9. All sub modules securely bolted on one PCB for reliable, hard wired, comms

At present, the system will concentrate on one simple task - weed prevention
..

Licenses: Software: GPLv3; Hardware: Creative commons BY-SA.

There's plenty of 'robot controllers' and such like out there such as Pixhawk for drones and ROS for more complicated robots, but how many have all the modules you need bolted onto one PCB with seamless integration via SPI and I2C? And what if you want to expand the capabilities? Is there any spare 'headroom', for example spare analogue in pins or SPI pins? Or spare space on the PCB? How many are based on just one CPU core with nasty latency issues? How easy is it to understand the code and dependency structure?

A lot of this project revolves around the use of a very fast 3 core processor, the TC275. This is the gadget that holds the world record (16 Mar 2018) for solving the Rubik's cube in something like 0.3 seconds ….. And it can be programmed using Arduino IDE!

Firstly, each core can communicate seamlessly with the others so, for example, core 0 could be controlling motors whilst core 1 sends and receives data to other modules such as the GPRS and TFT screens. The advantage is that core 0 can run at full speed and toggle digital output pins at very high speed (10 nano seconds), which is fast enough for most motors, particularly if servo 'gearing' is used.

If the code on core 0 is not too protracted, the core can run incredibly fast with lots of motors SMOOTHLY accelerating and decelerating. How many motors? I don't know exactly ...... Maybe as many as 20?

An agricultural robot has different requirements from the general run of the mill home vacuum romba. It requires super accurate GPS/GNSS - not just one unit, but two, enabling error correction between the two - one is static and the other roving. Next .... WIFI is a non starter so either cellular GPRS or satellite is required. Then there is debugging ..... We need loads of buzzers and LEDs - yes SERIOUSLY! These things are incredibly useful and obviously some kind of screen which is again incredibly useful for testing / commissioning ..... And what happens when the screen needs to refresh - it pauses the whole CPU core, so we need yet another core. We simply can not have enough cores and eventually the control system will have (about) 5 cores as we gradually upgrade the system within the dark corridors of GitHub.

We're currently making rapid progress with Ai based object recognition and plan to spend the Winter working on perfecting techniques for creating models for detecting the crop itself and using it as the main source for navigation both along the rows and columns of plants. GPS will be used for general driving about the farm tasks. Springtime, we'll be starting to take photos of the crops and test the machine again, taking more and more photos as the season progresses, continually updating the system. At the end, we'll probably have about 10,000 photos to incorporate into the Ai model!

The overall plan is to market the control system using the actual WEEDINATOR as an example of what can be done rather than try and sell the whole machine. Much of the difficult work has been carried out in the background doing programming and the mechanical machine is the 'sexy' bit that attracts all the praise and adoration! Obviously we had to have the machine to test the controller, but the idea is that people are more likely to want to build their own mechanical machine to their own specs, but using our control system (hopefully).

945-82771-0005-000-2T.jpg

Nvidia Jetson TX2

JPEG Image - 75.35 kB - 06/13/2018 at 07:39

Preview

Weedinator_Fona_Nano_13censored.ino

Arduino Nano controls Adafruit SIM800 GPRS module

ino - 8.67 kB - 03/20/2018 at 09:00

Download

Weedinator_TC275_51.ino

The main MCU which is also 'Master' on the I2C bus. Controls motors and one TFT screen.

ino - 30.03 kB - 03/20/2018 at 08:43

Download

Weedinator_NMEA_MEGA_36.ino

This MCU currently hosts a magnetic compass and receives NMEA data from the Ublox network. It's connected to the TC275 MCU as a slave on I2C bus.

ino - 17.59 kB - 03/19/2018 at 13:26

Download

Ublox Rover.txt

text/plain - 5.72 kB - 03/19/2018 at 11:06

Download

View all 9 files

View all 27 components

  • Re-visiting Code from 9 Months Ago

    Capt. Flatus O'Flaherty ☠06/12/2019 at 10:12 0 comments

    Nine months ago, the machine was using a Pixy2 camera to track barcode labels thrown down on the ground. The machine would steer towards the label and then stop dead when the barcode appeared at a pre-defined location on the x axis. Furthermore, the code revolves around calculating a simple 'panError' for the y axis, which is a slightly confusing name as it's not like a de-bugging error or such like. I'm going to change the name to 'deviance' for the future.

    Since only one barcode label was being recognised at the time, the calculation was very simple - just subtract the actual camera y coordinate from the desired coordinate. The same is true for the upgraded camera, where it is detecting the coordinate position of the individual crops, except that there's normally going to be about 6 plants and some of them might not be recognised properly or might just have died or been eaten by a pigeon!

    The principle is exactly the same as for the Pixy2 and the solution is equally simple - just add up the individual 'deviances', divide by the number of plants detected and then subtract from the desired coordinate. The main difference is that the same type of calculation is going to be used for both the x and y axes.

    The calculations themselves are made on the Jetson TX2 during detection itself and then output via I2C to an Arduino Nano intermediate as simple steering or drive commands eg integer '3' means 'stop dead'.

    The following code uses the term 'nonant' which refers to a 3 x 3 matrix but really should really be called 'sextant' as the matrix currently detected is 3 x 2. I'm just too lazy to change the name just yet
    //printf(" Box Area (%i) = %i \n",n,myBoxArea[n]);                          // Print the area (size) of the box.
    //printf(" Box Centre (x,%i) = %i \n",n,myBoxCentreX[n]);                   // Print the box centre (x) coordinate.
    //printf(" Box Centre (y,%i) = %i \n",n,myBoxCentreY[n]);                   // Print the box centre (y) coordinate.
    // Divide up into 'Nonants' (the 9 version of quadrants).                 // 1200/3 = 400, 720/3 = 240.
    // Or divide into sextants eg 1920/3 = 640:
    if (( myBoxCentreX[n] <= 640 ) && ( myBoxCentreY[n] <= 540 ))
    {
        nonant = 0;
        nonantDevianceX[0] =  myBoxCentreX[n] -320;
        nonantDevianceY[0] =  myBoxCentreY[n] -270;
        //printf(" Nonant (%i) = %i \n",n,nonant);
    }
    if (( myBoxCentreX[n] >= 641 ) && ( myBoxCentreX[n] <= 1280 ) && ( myBoxCentreY[n] <= 540 ))
    {
        nonant = 1;
        nonantDevianceX[1] =  myBoxCentreX[n] -960;
        nonantDevianceY[1] =  myBoxCentreY[n] -270;
        //printf(" Nonant (%i) = %i \n",n,nonant);
    }
    if (( myBoxCentreX[n] >= 1281 ) && ( myBoxCentreY[n] <= 540 ))
    {
        nonant = 2;
        nonantDevianceX[2] =  myBoxCentreX[n] -1600;
        nonantDevianceY[2] =  myBoxCentreY[n] -270;
        //printf(" Nonant (%i) = %i \n",n,nonant);
    }
    if (( myBoxCentreX[n] <= 640 ) && ( myBoxCentreY[n] >= 541 ))
    {
        nonant = 3;
        nonantDevianceX[3] =  myBoxCentreX[n] -320;
        nonantDevianceY[3] =  myBoxCentreY[n] -810;
        //printf(" Nonant (%i) = %i \n",n,nonant);
    }
    if (( myBoxCentreX[n] >= 641 ) && ( myBoxCentreX[n] <= 1281 ) && ( myBoxCentreY[n] >= 541 ))
    {
        nonant = 4;
        nonantDevianceX[4] =  myBoxCentreX[n] -960;
        nonantDevianceY[4] =  myBoxCentreY[n] -810;
        //printf(" Nonant (%i) = %i \n",n,nonant);
    }
    if (( myBoxCentreX[n] >= 1281 ) && ( myBoxCentreY[n] >= 541 ))
    {
        nonant = 5;
        nonantDevianceX[5] =  myBoxCentreX[n] -1600;
        nonantDevianceY[5] =  myBoxCentreY[n] -810;
        //printf(" Nonant (%i) = %i \n",n,nonant);
    }
    
    //printf(" Nonant (%i) = %i \n",n,nonant);
    //printf("........................................................
    Read more »

  • Major Control Board Upgrade

    Capt. Flatus O'Flaherty ☠06/05/2019 at 17:07 0 comments

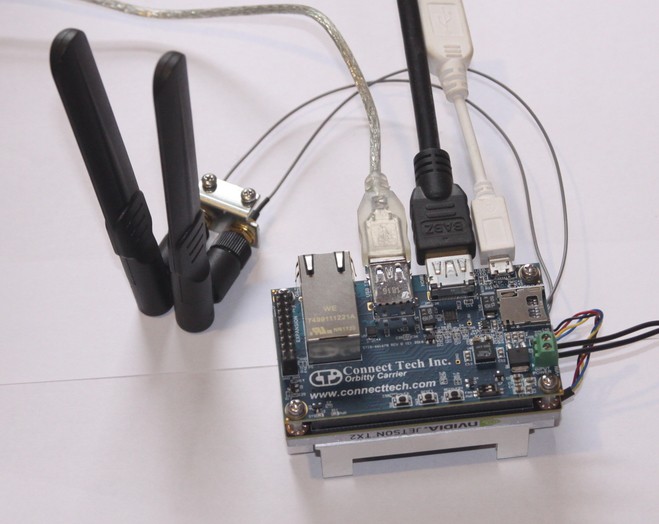
    New board features Jetson Tx2, middle top, for navigation using the actual crops.

    Installed! Only one bug was apparent, a bad earth connection on the LHS steering controller. Worked pretty much out of the box.

    Now to get data into the TC275 via the little Nano intermediator y and try some navigation tests.
  • Time to Shrink the Jetson

    Capt. Flatus O'Flaherty ☠03/06/2019 at 09:35 0 comments

    The Jetson TX2 developer board is fine for getting started, but really, I should have bought the TX2 Jetson module separately and bolted it straight to the Connecttech Orbitty carrier as shown above.

    The system has all the features required for deployment and can even be used for training custom image sets. Most important is: Ethernet connector for flashing CUDA etc, USB3 for camera connect.

  • Getting Detection Data from Jetson TX2 to TC275

    Capt. Flatus O'Flaherty ☠10/25/2018 at 15:23 0 comments

    Some work arounds are better than others and ideally I'd just send the bounding box data from the Jetson TX2 directly to the TC275, which controls the WEEDINATOR motors. However, there's a few critical restraints in that both the Jetson and the TC275 will only work in 'Master' mode and will not communicate with each other through the I2C bus in any shape or form! 

    The first workaround I researched was using an Arduino as an intermediator on the I2C bus, which would work as a slave for both the Jetson and the TC275 …… and this might just have worked if I'd included an auxiliary RTC clock and a digital 'tie line'.  I spent a few days researching this and eventually realised that as work arounds go, this was a very poor one …. lots of work with coding and wiring and still there was the, if somewhat unlikely,  possibility that the whole thing would fail and lock up the I2C bus by having the 2 masters try to access the I2C bus at the same time.

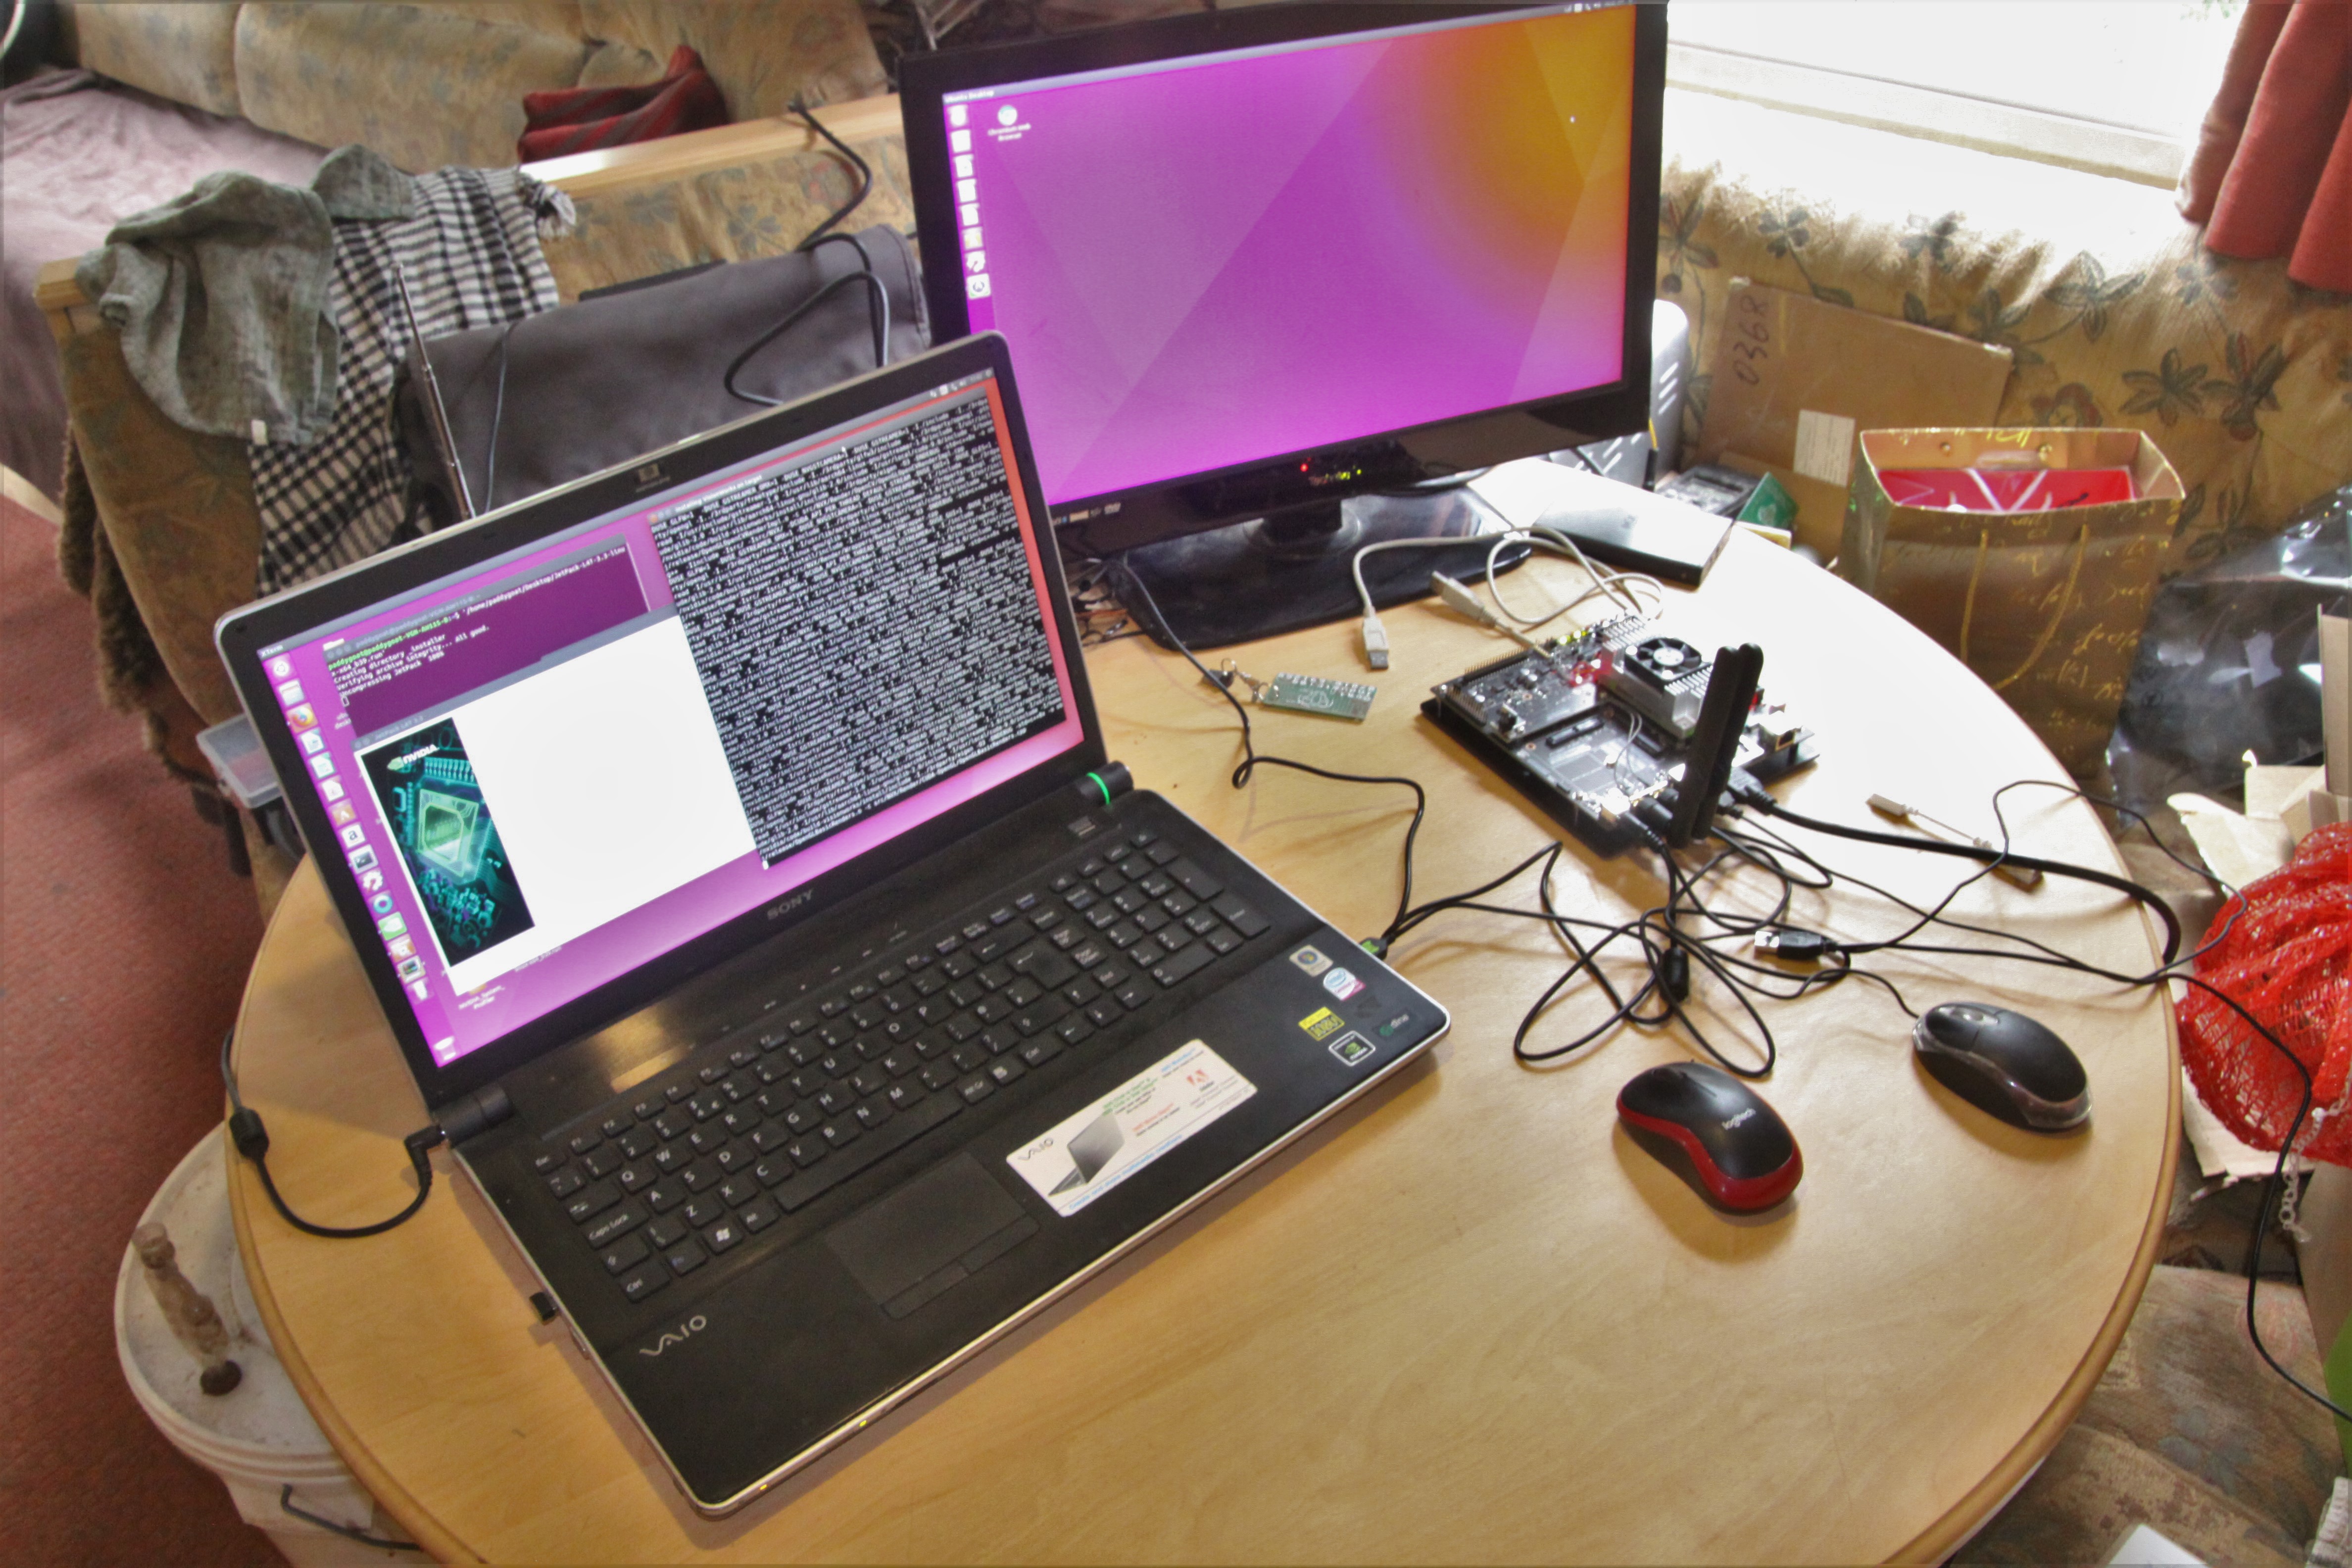
    After a bit more head scratching, the solution became clearer - use I2C to receive data into the intermediator and then hardware serial to send it out again !!! This proved to be by far the simplest solution and I managed to simulate the whole thing on my living room dining table:


    The code, as always, is on GitHub HERE.

    Intermediator: (NB. There's no 'Serial.print' here as this would slow things down excessively.)

    #include <Wire.h>
    void setup() 
    {
      Wire.begin(0x70);                // join i2c bus with address
      Wire.onReceive(receiveEvent);    // register event
      Serial.begin(115200);            // start serial for output
    }
    void loop() 
    {
      delay(100); // Must have delay here.
    }
    void receiveEvent(int howMany) 
    {
      int x = Wire.read();    // receive byte as an integer
      Serial.write(x);        // send a byte
    }

     TC275 (simulated):

    int incomingByte = 0;   // for incoming serial data
    long y[4][4];
    int a;
    int b;
    int c;
    int d;
    long x =0;
    int i;
    int j;
    int numberOfBoxes;
    int xMax;
    
    void setup() 
    {
            Serial.begin(115200);     // opens serial port, sets data rate to 9600 bps
            Serial.println("TEST ");
    }
    
    void loop()
    {
      if (Serial.available() > 0) 
      {
        x = Serial.read();  // read the incoming byte:
    /////////////////////////////////////////////////////////////////////////////////
        if(x>199)
        {
          numberOfBoxes = x-200;
        }
        if((x>139)&&(x<200))
        { 
          j=x-140;Serial.print("Number of boxes: ");Serial.print(numberOfBoxes);Serial.print(", Box number: ");Serial.println(j); 
        }
        if(x==120){ i =-1; }
        if(i==0){ y[0][0] = x*1000; }
        if(i==1){ y[0][1] = x*100; }
        if(i==2){ y[0][2] = x*10; }
        if(i==3){ y[0][3] = x;}
        a= y[0][0]+y[0][1]+y[0][2]+y[0][3];
    
        if(x==121){ i = 4;  Serial.print("  corner a:  ");Serial.println(a);}
        if(i==5){ y[1][0] = x*1000; }
        if(i==6){ y[1][1] = x*100; }
        if(i==7){ y[1][2] = x*10; }
        if(i==8){ y[1][3] = x; }
        b = y[1][0]+y[1][1]+y[1][2]+y[1][3];
    
    
        if(x==122){ i = 9;  Serial.print("  corner b:  ");Serial.println(b);}
        if(i==10){ y[2][0] = x*1000; }
        if(i==11){ y[2][1] = x*100; }
        if(i==12){ y[2][2] = x*10; }
        if(i==13){ y[2][3] = x;   }
        c= y[2][0]+y[2][1]+y[2][2]+y[2][3];
    
    
        if(x==123){ i = 14;  Serial.print("  corner c:  ");Serial.println(c);}
        if(i==15){ y[3][0] = x*1000; }
        if(i==16){ y[3][1] = x*100; }
        if(i==17){ y[3][2] = x*10; }
        if(i==18){ y[3][3] = x;  }
        d= y[3][0]+y[3][1]+y[3][2]+y[3][3];
        if(i==18){  Serial.print("  corner d:  ");Serial.println(d);Serial.println("");}
    
        i++;
      }
    }

  • Dog detector Transmitting All Data to Arduino

    Capt. Flatus O'Flaherty ☠10/23/2018 at 17:01 0 comments

    After a few days of frantic code writing, I managed to cobble together a functional set of programs to send and receive the four coordinates of each box, the number of boxes detected simultaneously and the current box number …. All in a user friendly format that can later be processed into commands to steer the WEEDINATOR machine.

    Here's the code used on the Jetson TX2:

    int i2cwrite(int writeValue) 
    {
      int toReturn = i2c_smbus_write_byte(kI2CFileDescriptor, writeValue);
      if (toReturn < 0) 
      {
        printf(" ************ Write error ************* \n") ;
        toReturn = -1 ;
      }
      return toReturn ;
    }
    
    void OpenI2C()
    {
      int length;
      unsigned char buffer[60] = {0};
      //----- OPEN THE I2C BUS -----
      char *filename = (char*)"/dev/i2c-1";
      if ((kI2CFileDescriptor = open(filename, O_RDWR)) < 0)
      {
        //ERROR HANDLING: you can check errno to see what went wrong
        printf("*************** Failed to open the i2c bus ******************\n");
            //return;
      }
      if( ioctl( kI2CFileDescriptor, I2C_SLAVE, PADDYADDRESS ) < 0 )
      {
        fprintf( stderr, "Failed to set slave address: %m\n" );
                    //return 2;
      }
    }
    
    void I2CDataHandler()
    {
      printf(" My box number  = %i \n",myBoxNumber);
      for( int j=0; j < 4; j++ )
      {
      if(j==0){i2cwrite(200+myNumberOfBoxes);  }                 // Total number of bounding boxes.
      if(j==0){i2cwrite(140+myBoxNumber);  }                     // Designates bounding box number.
      i2cwrite(120+j);                                           // Designates box corner number
      printf(" intBB[j]   = %i \n",intBB[j]);
    
      top = intBB[j];                        
      myArray[j][0] = static_cast<int>(top/1000);
      printf(" myArray[j][0]  = %i \n",myArray[j][0]);
      i2cwrite(myArray[j][0]);
    
      top = (top - myArray[j][0]*1000);
      myArray[j][1] = static_cast<int>(top/100);
      printf(" myArray[j][1]  = %i \n",myArray[j][1]);
      i2cwrite(myArray[j][1]);
    
      top = (top - myArray[j][1]*100);
      myArray[j][2] = static_cast<int>(top/10);
      printf(" myArray[j][2]  = %i \n",myArray[j][2]);
      i2cwrite(myArray[j][2]);
    
      top = (top - myArray[j][2]*10);
      myArray[j][3] = static_cast<int>(top);
      printf(" myArray[j][3]  = %i \n",myArray[j][3]); 
    
      i2cwrite(myArray[j][3]);
      }
    }

    And the code for recieving the data on an Arduino:

    #include <Wire.h>
    long y[4][4];
    int a;
    int b;
    int c;
    int d;
    long x =0;
    int i;
    int j;
    int numberOfBoxes;
    int xMax;
    
    void setup() 
    {
      Wire.begin(0x70);                // join i2c bus with address
      Wire.onReceive(receiveEvent); // register event
      //Wire.begin(0x50);                // join i2c bus with address
      //Wire.onReceive(receiveEvent); // register event
      Serial.begin(9600);           // start serial for output
    }
    
    void loop() 
    {
      delay(100);
    }
    
    // function that executes whenever data is received from master
    // this function is registered as an event, see setup()
    void receiveEvent(int howMany) 
    {
      //delay(50);
      int x = Wire.read();    // receive byte as an integer
      //Serial.print("  Integer:  ");Serial.println(x);         // print the integer
    
    
      if(x>199)
      {
        numberOfBoxes = x-200;
      }
      if((x>139)&&(x<200))
      { 
        j=x-140;Serial.print("Number of boxes: ");Serial.print(numberOfBoxes);Serial.print(", Box number: ");Serial.println(j); 
      }
      if(x==120){ i =-1; }
      if(i==0){ y[0][0] = x*1000; }
      if(i==1){ y[0][1] = x*100; }
      if(i==2){ y[0][2] = x*10; }
      if(i==3){ y[0][3] = x;}
      a= y[0][0]+y[0][1]+y[0][2]+y[0][3];
    
      if(x==121){ i = 4;  Serial.print("  corner a:  ");Serial.println(a);}
      if(i==5){ y[1][0] = x*1000; }
      if(i==6){ y[1][1] = x*100; }
      if(i==7){ y[1][2] = x*10; }
      if(i==8){ y[1][3] = x; }
      b = y[1][0]+y[1][1]+y[1][2]+y[1][3];
    
      if(x==122){ i = 9;  Serial.print("  corner b:  ");Serial.println(b);}
      if(i==10){ y[2][0] = x*1000; }
      if(i==11){ y[2][1] = x*100; }
      if(i==12){ y[2][2] = x*10; }
      if(i==13){ y[2][3] = x;   }
      c= y[2][0]+y[2][1]+y[2][2]+y[2][3];
    
      if(x==123){ i = 14;  Serial.print("  corner c:  ");Serial.println(c);}
      if(i==15){ y[3][0] = x*1000; }
      if(i==16){ y[3][1] = x*100; }
      if(i==17){ y[3][2] = x*10; }
      if(i==18){ y[3][3] = x;  }
      d= y[3][0]+y[3][1]+y[3][2]+y[3][3];
      if(i==18){  Serial.print("  corner d:  ");Serial.println(d);Serial.println("");}
      
      i++;
    }

     All files are on Github HERE.

  • Getting bounding box coordinates transmitted to Arduino over I2C

    Capt. Flatus O'Flaherty ☠10/17/2018 at 16:14 0 comments

    After a few days work, I finally managed to get data out of the Jetson TX2 through the I2C bus. I started off using a tutorial from JetsonHacks that runs a 4 digit LED display and then stripped out most of the code to keep only the few lines that transmit the data. It was a bit tricky to compile the code along with the main 'inference' program which is called detectnet-camera.cpp. This basic code can only transmit one byte at a time so an integer such as 463 cannot be transmitted as the upper limit is 254. We get something like 46 instead of 463. This is not an insolvable problem as there is already I2C code within the WEEDINATOR software repository for doing this between the Arduino Mega and the TC275 so it should be just a case of re-purposing it for this new I2C task. It's also a chance for me to try and understand what Slash Dev wrote !!!!

    Here's some excerpts from my 'basic' I2C code:

    void OpenI2C()
    {
        int length;
        unsigned char buffer[60] = {0};
    
        
        //----- OPEN THE I2C BUS -----
        char *filename = (char*)"/dev/i2c-1";
        if ((kI2CFileDescriptor = open(filename, O_RDWR)) < 0)
        {
            //ERROR HANDLING: you can check errno to see what went wrong
            printf("*************** Failed to open the i2c bus ******************\n");
            //return;
        }
            if( ioctl( kI2CFileDescriptor, I2C_SLAVE, PADDYADDRESS ) < 0 )
            {
                    fprintf( stderr, "Failed to set slave address: %m\n" );
                    //return 2;
            }
    }
    int i2cwrite(int writeValue) 
    {
        int toReturn = i2c_smbus_write_byte(kI2CFileDescriptor, writeValue);
        if (toReturn < 0) 
        {
            printf(" ************ Write error ************* \n") ;
            toReturn = -1 ;
        }
        return toReturn ;
    }
                                    writeValue = static_cast<int>(bb[0]);
                                    printf(" writeValueZero   = %i \n",writeValue);
                                    i2cwrite(writeValue);
    
                                    writeValue = static_cast<int>(bb[1]);
                                    printf(" writeValueOne    = %i \n",writeValue);
                                    i2cwrite(writeValue);
    
                                    writeValue = static_cast<int>(bb[2]);
                                    printf(" writeValueTwo    = %i \n",writeValue);
                                    i2cwrite(writeValue);
    
                                    writeValue = static_cast<int>(bb[3]);
                                    printf(" writeValueThree  = %i \n",writeValue);
                                    i2cwrite(writeValue);
    writeValue = static_cast<int>(bb[0]); 
    printf(" writeValueZero   = %i \n",writeValue); 
    i2cwrite(writeValue);
    writeValue = static_cast<int>(bb[1]);           
    printf(" writeValueOne    = %i \n",writeValue);                               
    i2cwrite(writeValue);
    writeValue = static_cast<int>(bb[2]);   
    printf(" writeValueTwo    = %i \n",writeValue);                                
    i2cwrite(writeValue);
    writeValue = static_cast<int>(bb[3]);     
    printf(" writeValueThree  = %i \n",writeValue);                                
    i2cwrite(writeValue);

     Full code is on Github.

  • Step by Step Instructions for Turning Sets of Images into a Model for Object Detection on the Jetson TX2

    Capt. Flatus O'Flaherty ☠10/14/2018 at 09:58 0 comments

    To detect different crops a large set of photos need to be taken and boundary boxes 'drawn' around the actual plant to help determine where it is in the camera frame. Since we dont actually have any newly planted crops at this time of year, I've used a ready prepared set of dog photos as a practice run. These are accurate step by step instructions and this text assumes all the relevant software is already installed on the Jetson:

    Prerequisites: 

    Jetson TX2 flashed with JetPack 3.3.

    Caffe version: 0.15.14

    DIGITS version: 6.1.1

    Check that all software is installed correctly by using the pre-installed dog detect model that comes with Jetpack by running this in terminal:

    $ sudo ~/jetson_clocks.sh && cd jetson-inference/build/aarch64/bin && ./detectnet-camera coco-dog

    It will take a few minutes to load up before the camera footage appears.

    To start from scratch with a set of photos, first turn on the DIGITS server:

    $ sudo ~/jetson_clocks.sh && cd digits && export CAFFE_ROOT=/home/nvidia/caffe && ./digits-devserver

    Now we're going to build the model using actual images of dogs with their associated text files:

    In browser naviate to http://localhost:5000/      

    Importing the Detection Dataset into DIGITS: 

    > Datasets > Images > Object Detection

    Training image folder:  /media/nvidia/2037-F6FA/coco/train/images/dog 

    Training label folder:  /media/nvidia/2037-F6FA/coco/train/labels/dog 

    Validation image folder: /media/nvidia/2037-F6FA/coco/val/images/dog 

    Validation label folder: /media/nvidia/2037-F6FA/coco/val/labels/dog 

    Pad image (Width x Height): 640 x 640 Custom classes: dontcare, dog 

    Group Name: MS-COCO Dataset Name: coco-dog

    > Create > Home > Models > Images > Object Detection

    > Select Dataset: coco-dog 

    Training epochs = 16
    Snapshot interval (in epochs) = 16
    Validation interval (in epochs) = 16

    Subtract Mean: none 

    Solver Type: Adam 

    Base learning rate: 2.5e-05 

    > Show advanced learning options 

    Policy: Exponential Decay 

    Gamma: 0.99 

    batch size = 2 

    batch accumulation = 5  (for training on Jetson TX2)

    Specifying the DetectNet Prototxt: 

    > Custom Network > Caffe 

    The DetectNet prototxt is located at /home/nvidia/jetson-inference/data/networks/detectnet.prototxt in the repo.

    > Pretrained Model = /home/nvidia/jetson-inference/data/networks/bvlc_googlenet.caffemodel

     >Create 

    Location of epoch snapshots: /home/nvidia/digits/digits/jobs You should see the model being created through a series of epochs. Make a note of the final epoch.

    Navigate to /home/nvidia/digits/digits/jobs and open the latest job folder and check it has the 'snapshot_iter_*****.caffemodel' files in it. Make a note of the highest '*****' number then copy and paste the folder into here for deployment: /home/nvidia/jetson-inference/build/aarch64/bin.

    Rename the folder to reflect the number of epochs that it passed, eg myDogModel_epoch_30.

    For Jetson TX2, at the end of deploy.prototxt, delete the layer named cluster:

    layer {
      name: "cluster"
      type: "Python"
      bottom: "coverage"
      bottom: "bboxes"
      top: "bbox-list"
      python_param {
        module: "caffe.layers.detectnet.clustering"
        layer: "ClusterDetections"
        param_str: "640, 640, 16, 0.6, 2, 0.02, 22, 1"
      }
    }

    Open terminal and run, changing the '*****' number accordingly:

    $ cd jetson-inference/build/aarch64/bin && NET=myDogModel_epoch_30 && ./detectnet-camera \
    --prototxt=$NET/deploy.prototxt \
    --model=$NET/snapshot_iter_*****.caffemodel \
    ... Read more »

  • Dog Detector

    Capt. Flatus O'Flaherty ☠10/13/2018 at 08:49 0 comments

    Obviously, we're not going to be detecting dogs in the field, but there is not a publicly available ready made inference model for detecting vegetable seedlings - yet.

    A lot of Ai models were trained on cats and dogs, so not wanting to break with tradition, I thought it relevant to test the Jetson TX2 object recognition system on my dog. Actually, the correct term is 'inference' and searching the net for 'object recognition' is fairly useless.

    The demo used is found on the Nvidia GitHub page: https://github.com/dusty-nv/jetson-inference and the best thing to do is scroll right down to about 3/4 down and run this:

    $ cd jetson-inference/build/aarch64/bin

    $ ./detectnet-camera coco-dog                           # detect dogs in the camera

    in the terminal  (see video):


    Next thing to do is to try and get the bounding box coordinates exported into the real world via the I2C bus, then, sometime next year, train some models with plant images that represent what is actually grown here in the fields.

    Building the image set for the vegetables is not easy task and requires thousands of photos to be taken in different lighting conditions. Previous experience using the Pixy2 camera shows that bright sunlight causes relatively dark and sharp shadows which were a bit of a problem. With Ai, we can incorporate photos with various shadow permutations to train the model. We need to do some research to make sure that we do it properly.

  • First Steps With Ai on Jetson TX2

    Capt. Flatus O'Flaherty ☠10/13/2018 at 08:40 0 comments

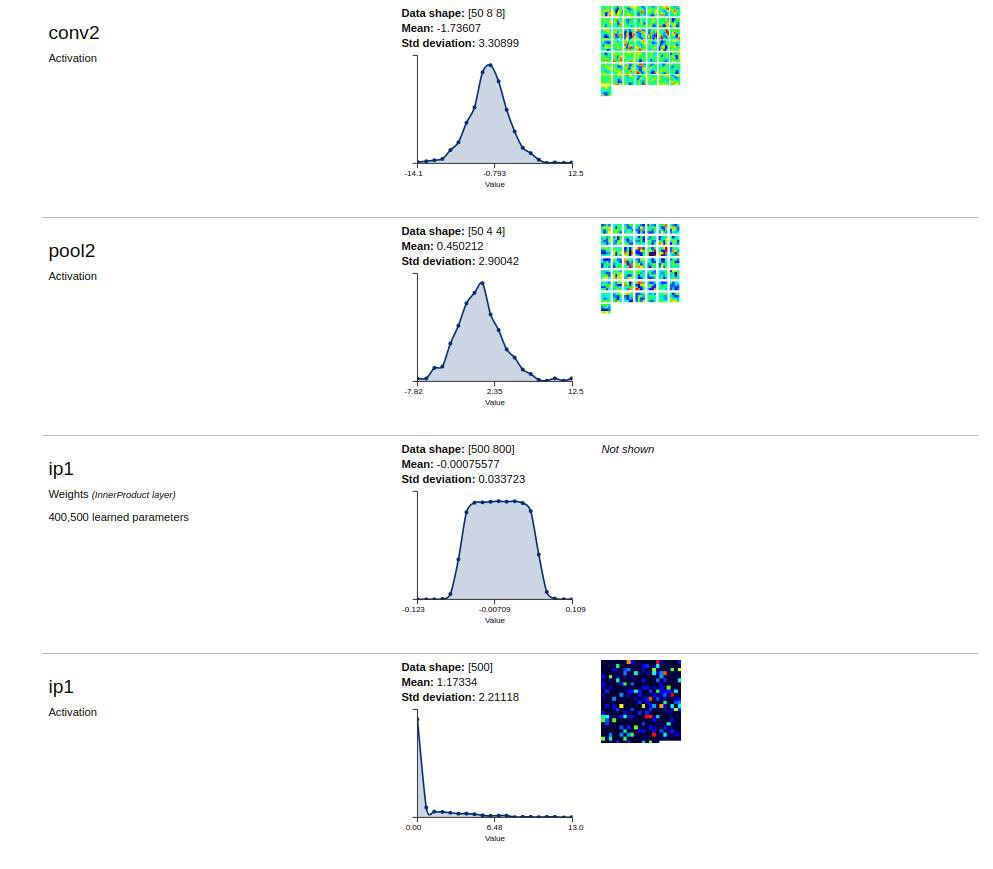
    I really thought that there could not be any more files to upload after the marathon 4 month Jetpack install debacle ..... But, as might be expected, there were still many tens of thousands more to go. The interweb points to using a program called 'DIGITS' to get started 'quickly' , yet this was later defined to be a mere '2 days' work !!!! Anyway, after following the instructions at: https://github.com/NVIDIA/DIGITS/blob/master/docs/BuildDigits.md I eventually had some success. Not surprisingly, DIGITS needed a huge load of dependancies and I had to back track through each one, through 'dependencies of dependencies of dependencies' ....... A dire task for a relative Ubuntu beginner like myself.

    Fortunately, I had just about enough experience to spot the mistakes in each instruction set - usually a missing 'sudo' or failiure to cd into the right directory. A total beginner would have absolutely no chance ! For me, at least, deciphering the various error messages was extremely challenging. I made a note of most of the steps / problems pasted at the end of this log, which will probably make very little sense to anyone as very often I had to back track to get dependancies installed properly eg libprotobuf.so.12 .

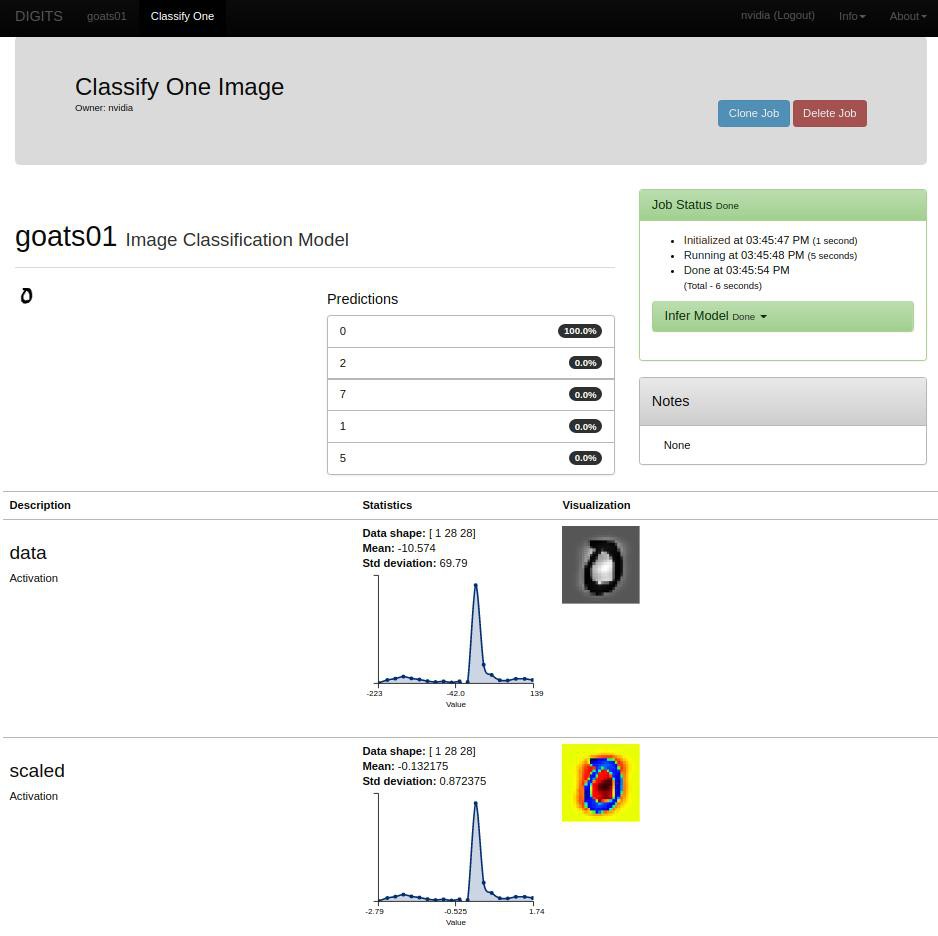
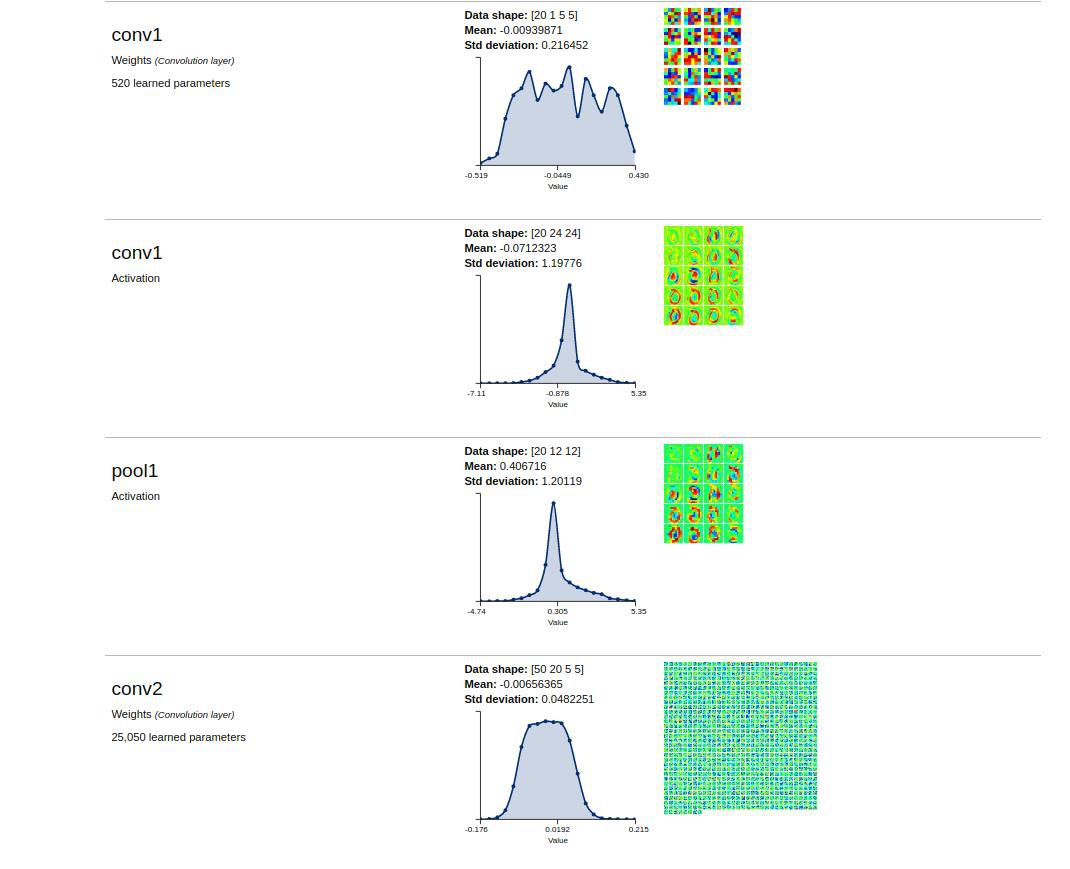
    Anyway, here is my first adventure with Ai - recognising a O:


    Notes:

    File "/usr/local/lib/python2.7/dist-packages/protobuf-3.2.0-py2.7-linux-aarch64.egg/google/protobuf/descriptor.py", line 46, in <module>
        from google.protobuf.pyext import _message
    ImportError: libprotobuf.so.12: cannot open shared object file: No such file or directory

    Procedure:

    # For Ubuntu 16.04
    CUDA_REPO_PKG=http://developer.download.nvidia.com/compute/cuda/repos/ubuntu1604/x86_64/cuda-repo-ubuntu1604_8.0.61-1_amd64.deb

    ML_REPO_PKG=http://developer.download.nvidia.com/compute/machine-learning/repos/ubuntu1604/x86_64/nvidia-machine-learning-repo-ubuntu1604_1.0.0-1_amd64.deb

    # Install repo packages
    wget "$CUDA_REPO_PKG" -O /tmp/cuda-repo.deb && sudo dpkg -i /tmp/cuda-repo.deb && rm -f /tmp/cuda-repo.deb

    wget "$ML_REPO_PKG" -O /tmp/ml-repo.deb && sudo dpkg -i /tmp/ml-repo.deb && rm -f /tmp/ml-repo.deb

    # Download new list of packages
    sudo apt-get update

    sudo apt-get install --no-install-recommends git graphviz python-dev python-flask python-flaskext.wtf python-gevent python-h5py python-numpy python-pil python-pip python-scipy python-tk

                   ------------------DONE------------------------------

    sudo apt-get install autoconf automake libtool curl make g++ git python-dev python-setuptools unzip

                   ------------------DONE------------------------------

    $ git clone https://github.com/protocolbuffers/protobuf.git
    $ cd protobuf
    $ git submodule update --init --recursive
    $ ./autogen.sh
    To build and install the C++ Protocol Buffer runtime and the Protocol Buffer compiler (protoc) execute the following:

    $ ./configure
    $ make
    $ make check
    $ sudo make install
    $ sudo ldconfig # refresh shared library cache.
    cd python
    sudo python setup.py install --cpp_implementation

    Download Source
    DIGITS is currently compatiable with Protobuf 3.2.x

    # example location - can be customized
    export PROTOBUF_ROOT=~/protobuf
    cd $PROTOBUF_ROOT
    git clone https://github.com/google/protobuf.git $PROTOBUF_ROOT -b '3.2.x'
    Building Protobuf
    cd $PROTOBUF_ROOT
    ./autogen.sh
    ./configure
    make "-j$(nproc)"
    make install
    ldconfig
    cd python
    sudo python setup.py install --cpp_implementation
    This will ensure that Protobuf 3 is installed.

                  ------------------ DONE -------------------------

    sudo apt-get install --no-install-recommends build-essential cmake git gfortran libatlas-base-dev libboost-filesystem-dev libboost-python-dev
                   ----------- DONE -----------------------------------

    sudo apt-get install...

    Read more »

  • Ai Object Based Navigation Takes One Step Forwards

    Capt. Flatus O'Flaherty ☠10/13/2018 at 08:37 0 comments

    About 4 months ago I bought the Jetson TX2 development board and tried to install the JetPack software to it …….. but after many hours of struggle, I got pretty much nowhere. Fortunately, the next release, JetPack 3.3, worked a lot better and I finally managed to get a working system up and running:

    The installation uses two computers running Ubuntu and the tricks that I used are:
    • Make a fresh install of Ubuntu 16.04 (2018) on the host computer
    • Use the network settings panel to set up the USB interface, particularly the IPv4 settings. The documentation gives an address of 192.168.55.2, so enter this then 255.255.255.0 then 255.255.255.0 again. When the install itself asks for the address. use: 192.168.55.1.
    • There must be an internet connection !
    • Make sure the install knows which internet device to use eg Wi-Fi / Bluetooth / whatever. A router switch is NOT required as the install will automatically switch between the internet and USB connection whenever it needs to, as long as it was told before hand which connection to use.

    The plan is to spend the colder Winter months developing an object based navigation system for the machine so, for example, it can use the plants themselves to enhance the overall navigation accuracy. We'll still be using GNSS, electrical cables, barcodes etc but will eventually give mathematical weighting to the techniques that prove to be more useful.


View all 23 project logs

  • 1
    Annotated Diagram

  • 2
    Surface Mount Soldering

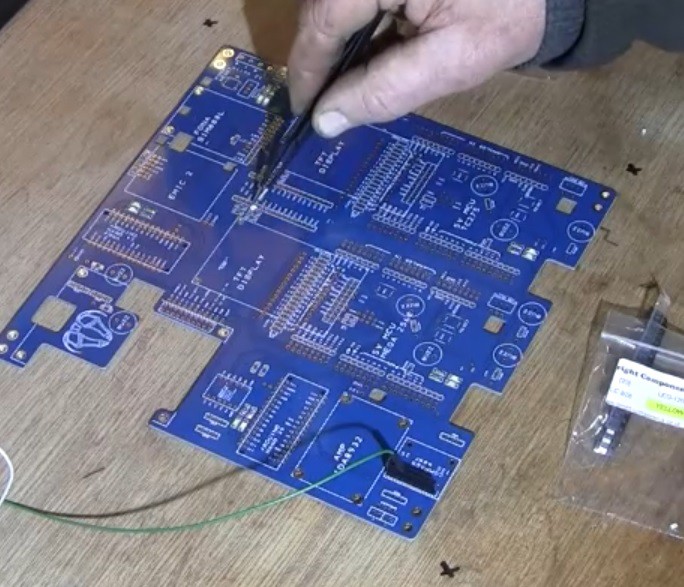
    First thing is to solder all the 1206 components - resistors, LEDs and capacitors. No stencil is required - just a small amount of solder paste and a reflow heat gun. Fear not - soldering this size SMT is easy!

    Sometimes it's difficult to spot the polarity of the LEDs so it's a good idea to have a flying 5v power supply to check that the LEDs work before applying the final heat. Lay the LED in the solder on the pads and test they work. 

    The green LEDs require a higher resistor than the others so 2k is used with these and 1k with the others. 

    The 0 ohm resistors can be left off  - they give options to connect the SIM800 to the MEGA 2560 instead of a NANO. The 2560 tends to be more stable in operation.

  • 3
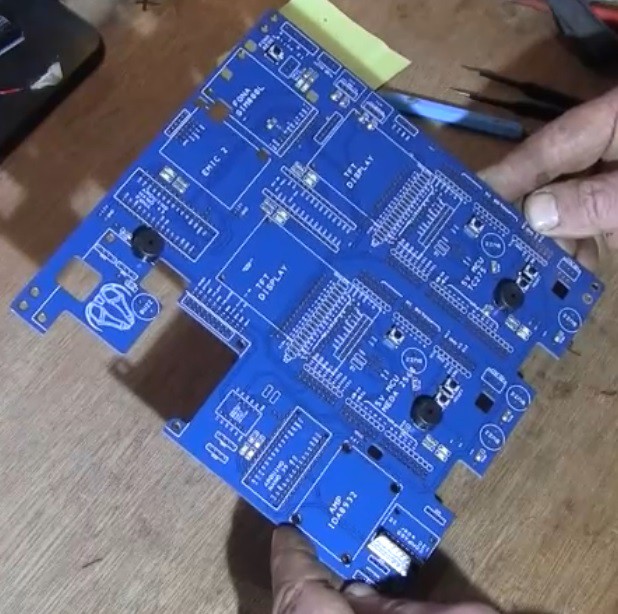
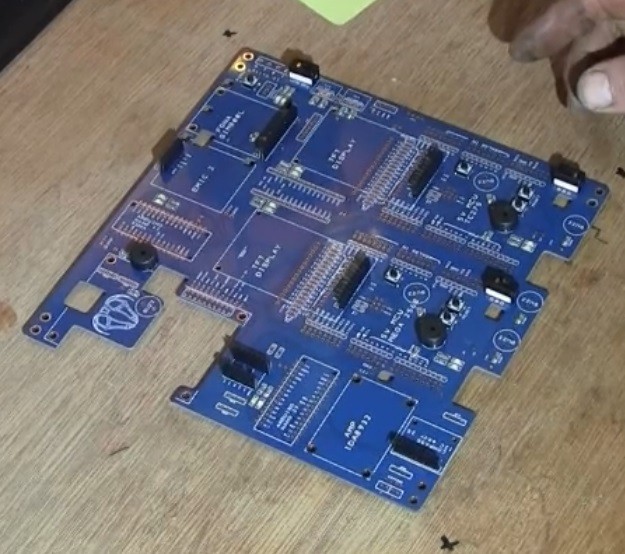
    Mount the Buzzers, switches, regulators, screw terminals

    These items are very robust, so need to be soldered next. Screw connectors are very useful where there is any vibration in the machine as they are pretty solid. Otherwise there are female connectors for flying leads on the stackable pins on the MCUs. The buzzers require 100 ohm resistors to protect the MCU from supplying too much current and burning out the pin circuit.

    There are some random locations for ground and 5v screw terminals which are very useful. The 12V screw terminals are all 5.08 mm pitch.

    NB. The Ublox Rover module can be connected to the PCB 12v supply or to a 10 to 30 VDC battery which is useful for keeping it 'live'.

View all 13 instructions

Enjoy this project?

Share

Discussions

ngochieu642 wrote 03/14/2019 at 02:08 point

Awesome project ! I'm currently stuck with my own project because GPS errors are way too big then find this, great inspiration ! 


So in order to setup RTK GPS we only need :
Hardware

1/  2 GPS modules at base and rover( in your project it was NEO M8P at rover and base)

2/ A way to communicate between base and rover (in your project it was SIM 800 GPRS)

Software

1/ A configuration file for U-center that you pointed out in step 8

2/ A GPS RTK library that handles numbers from base and rover to calculate the exact position (in your project it was NeoGPS from SlashDevin)

Is that enough ?

And could you please tell me what is the purpose of the configuration file for U-center ? Is it related to C94-MP8 module ? 

  Are you sure? yes | no

Capt. Flatus O'Flaherty ☠ wrote 03/14/2019 at 09:01 point

Yes, that's pretty much it. The config file is indeed related to C94-MP8. IF you use the 2 config files, one for base, one for rover, you should be fine. It may take a number of hours for the base to get a fix. Cant remember the exact time, last time i used it i set it to 24 hours, but you can change this to 2 hours as long as you don't turn the base off again. You can also save the last setting to avoid the need to re-orientate.

Ucentre is a bit tricky to navigate, but it does work quite well after you get used to it.

  Are you sure? yes | no

Domen wrote 05/19/2018 at 08:14 point

Hi, great project!

Which motors are you using for movement and which for the steering? Could you please provide pricing and where to buy from?

Best regards

  Are you sure? yes | no

Capt. Flatus O'Flaherty ☠ wrote 05/19/2018 at 08:24 point

Drive: NEMA32 0.75KW 220V High Speed CNC Servo Control 2.4NM 2500line AC Servo Motor and Driver https://www.fasttobuy.com/nema32-075kw-220v-high-speed-cnc-servo-control-24nm-2500line-ac-servo-motor-and-driver_p35191.html

  Are you sure? yes | no

Capt. Flatus O'Flaherty ☠ wrote 05/19/2018 at 08:26 point

Steering: 2 Phase Closed Loop Stepper System NEMA34 12NM High Torque CNC Stepper Motor Control kits https://www.fasttobuy.com/2-phase-closed-loop-stepper-system-nema34-12nm-high-torque-cnc-stepper-motor-control-kits_p36311.html

  Are you sure? yes | no

merck.ding wrote 03/20/2018 at 06:57 point

This is a very good idea and I am very much looking forward to you completing it.

  Are you sure? yes | no

Capt. Flatus O'Flaherty ☠ wrote 03/20/2018 at 08:35 point

Thanks for the encouragement!

  Are you sure? yes | no

Similar Projects

Does this project spark your interest?

Become a member to follow this project and never miss any updates