Lark
Lark-
Project Reflection: Future Improvements
03/18/2025 at 10:13 • 0 commentsAs we have completed this project, I just wanted to note some of the changes I would make if I were to do this project again. While this was a super fun project, and I'm very proud of how it turned out, as a software engineer, this was my first time making a physical object as part of a very small team, so there are definitely areas for improvement.
---------- more ----------First and foremost, our bot wasn't actually able to operate on our window blinds--the ones at Caltech take a lot of force to operate, and even with the motor controller set to maximize torque, the motor was just slipping. This could be resolved either by buying a higher torque motor, or by designing a gearbox to improve the gear ratio.
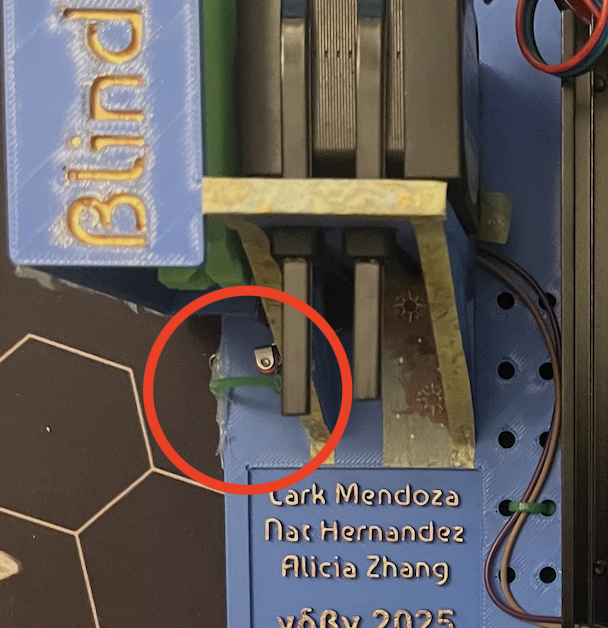
Second, this is difficult to see in many of the pictures, but we had to add a ziptie "guide" to make sure the blinds actually hit the limit switch. This wasn't perfect, and in demos, the extended knob would sometimes catch on this, causing the motor to slip. This could and should be a 3d printed part that more smoothly guides the blinds towards the switch; this likely would need to be a part that attaches after the blinds have been fed in.
![]()
Also, the limit switch is apparently installed incorrectly! The way it is now, it is liable to being crushed. The switch should actually be vertical, so the blind stopper would basically slide up on the rolling part. Who knew.
Penultimately, in order to operate, this currently would need two cables plugged into wall power: the 24V motor controller power, and the USB C 5V (?) Arduino power. I think it should be possible to draw some power from the 24V through a relay (?) in order to power the Arduino through just one plug, for convenience. Having already fried one cheap component during this project, I didn't want to risk it, but I think this would be a nice feature.
Finally, I don't think I'd personally use this, but we initially intended to have a light sensor to make it optional to have the blinds rise and set with the sun. This definitely could be a neat feature to add. You could also probably add a scheduler on the Arduino Cloud to query for sunrise/sunset times each day at midnight, and then instead of using schedulers for opening + closing, just check the time every so often and run the functions at the times matching sunrise/sunset. This would be more robust against light level changes, such as gloomy days potentially not activating the light sensor, and wouldn't require any extra hardware.
Just as one more note, a major pain point/failure of this project was getting it on WiFi. Caltech has a really weird setup, and we never actually succeeded in connecting it, despite trying to register its MAC address. Apparently the WiFi module on the UNO R4 can have multiple MAC addresses, including one for Bluetooth, so I'm not sure we got the right one. But we also weren't able to get it to connect to a private WiFi, which should have worked fine, so who knows. We only got it working using my phone hotspot. I think investigating the way the WiFi module works would be a worthwhile use of time if I ever were to return to this project.
-
Instructions and Files uploaded
03/18/2025 at 09:53 • 0 commentsAs we've reached the end of our project, complete instructions and files have been uploaded! The files contain the 3D models, in both 3D printable and editable formats, along with the updated wiring diagram and code for use with Arduino Cloud. Instructions are included in the files, and copied onto the Hackaday page with photos for convenience.
BOM has also been updated (but it's contained everything of note for a while now). We also added a pic of the complete robot in a few places. Project Logs are mostly complete too (although there will be at least one more)!
-
Late Update: Scheduling via Arduino Cloud
03/18/2025 at 09:48 • 0 commentsOn Mar 8, we were able to successfully connect the bot to the Arduino Cloud service to run the motor on a schedule!
We initially were going to use Adafruit, but in debugging issues with that, I stumbled upon Arduino Cloud, which is much more user friendly--it's made especially for Arduino, handles all WiFi connecting and time tracking, and generally has more features than Adafruit for the dashboard. They also have an app, so it's super convenient.
The full details are in the instructions page, but we were able to use the CloudSchedule feature to set times for the bot to open and close the blinds. For testing, we had this running about once a minute, but it is very easy to change the times and can be set to run once a day.
Here's what our dashboard looks like:
![]()
-
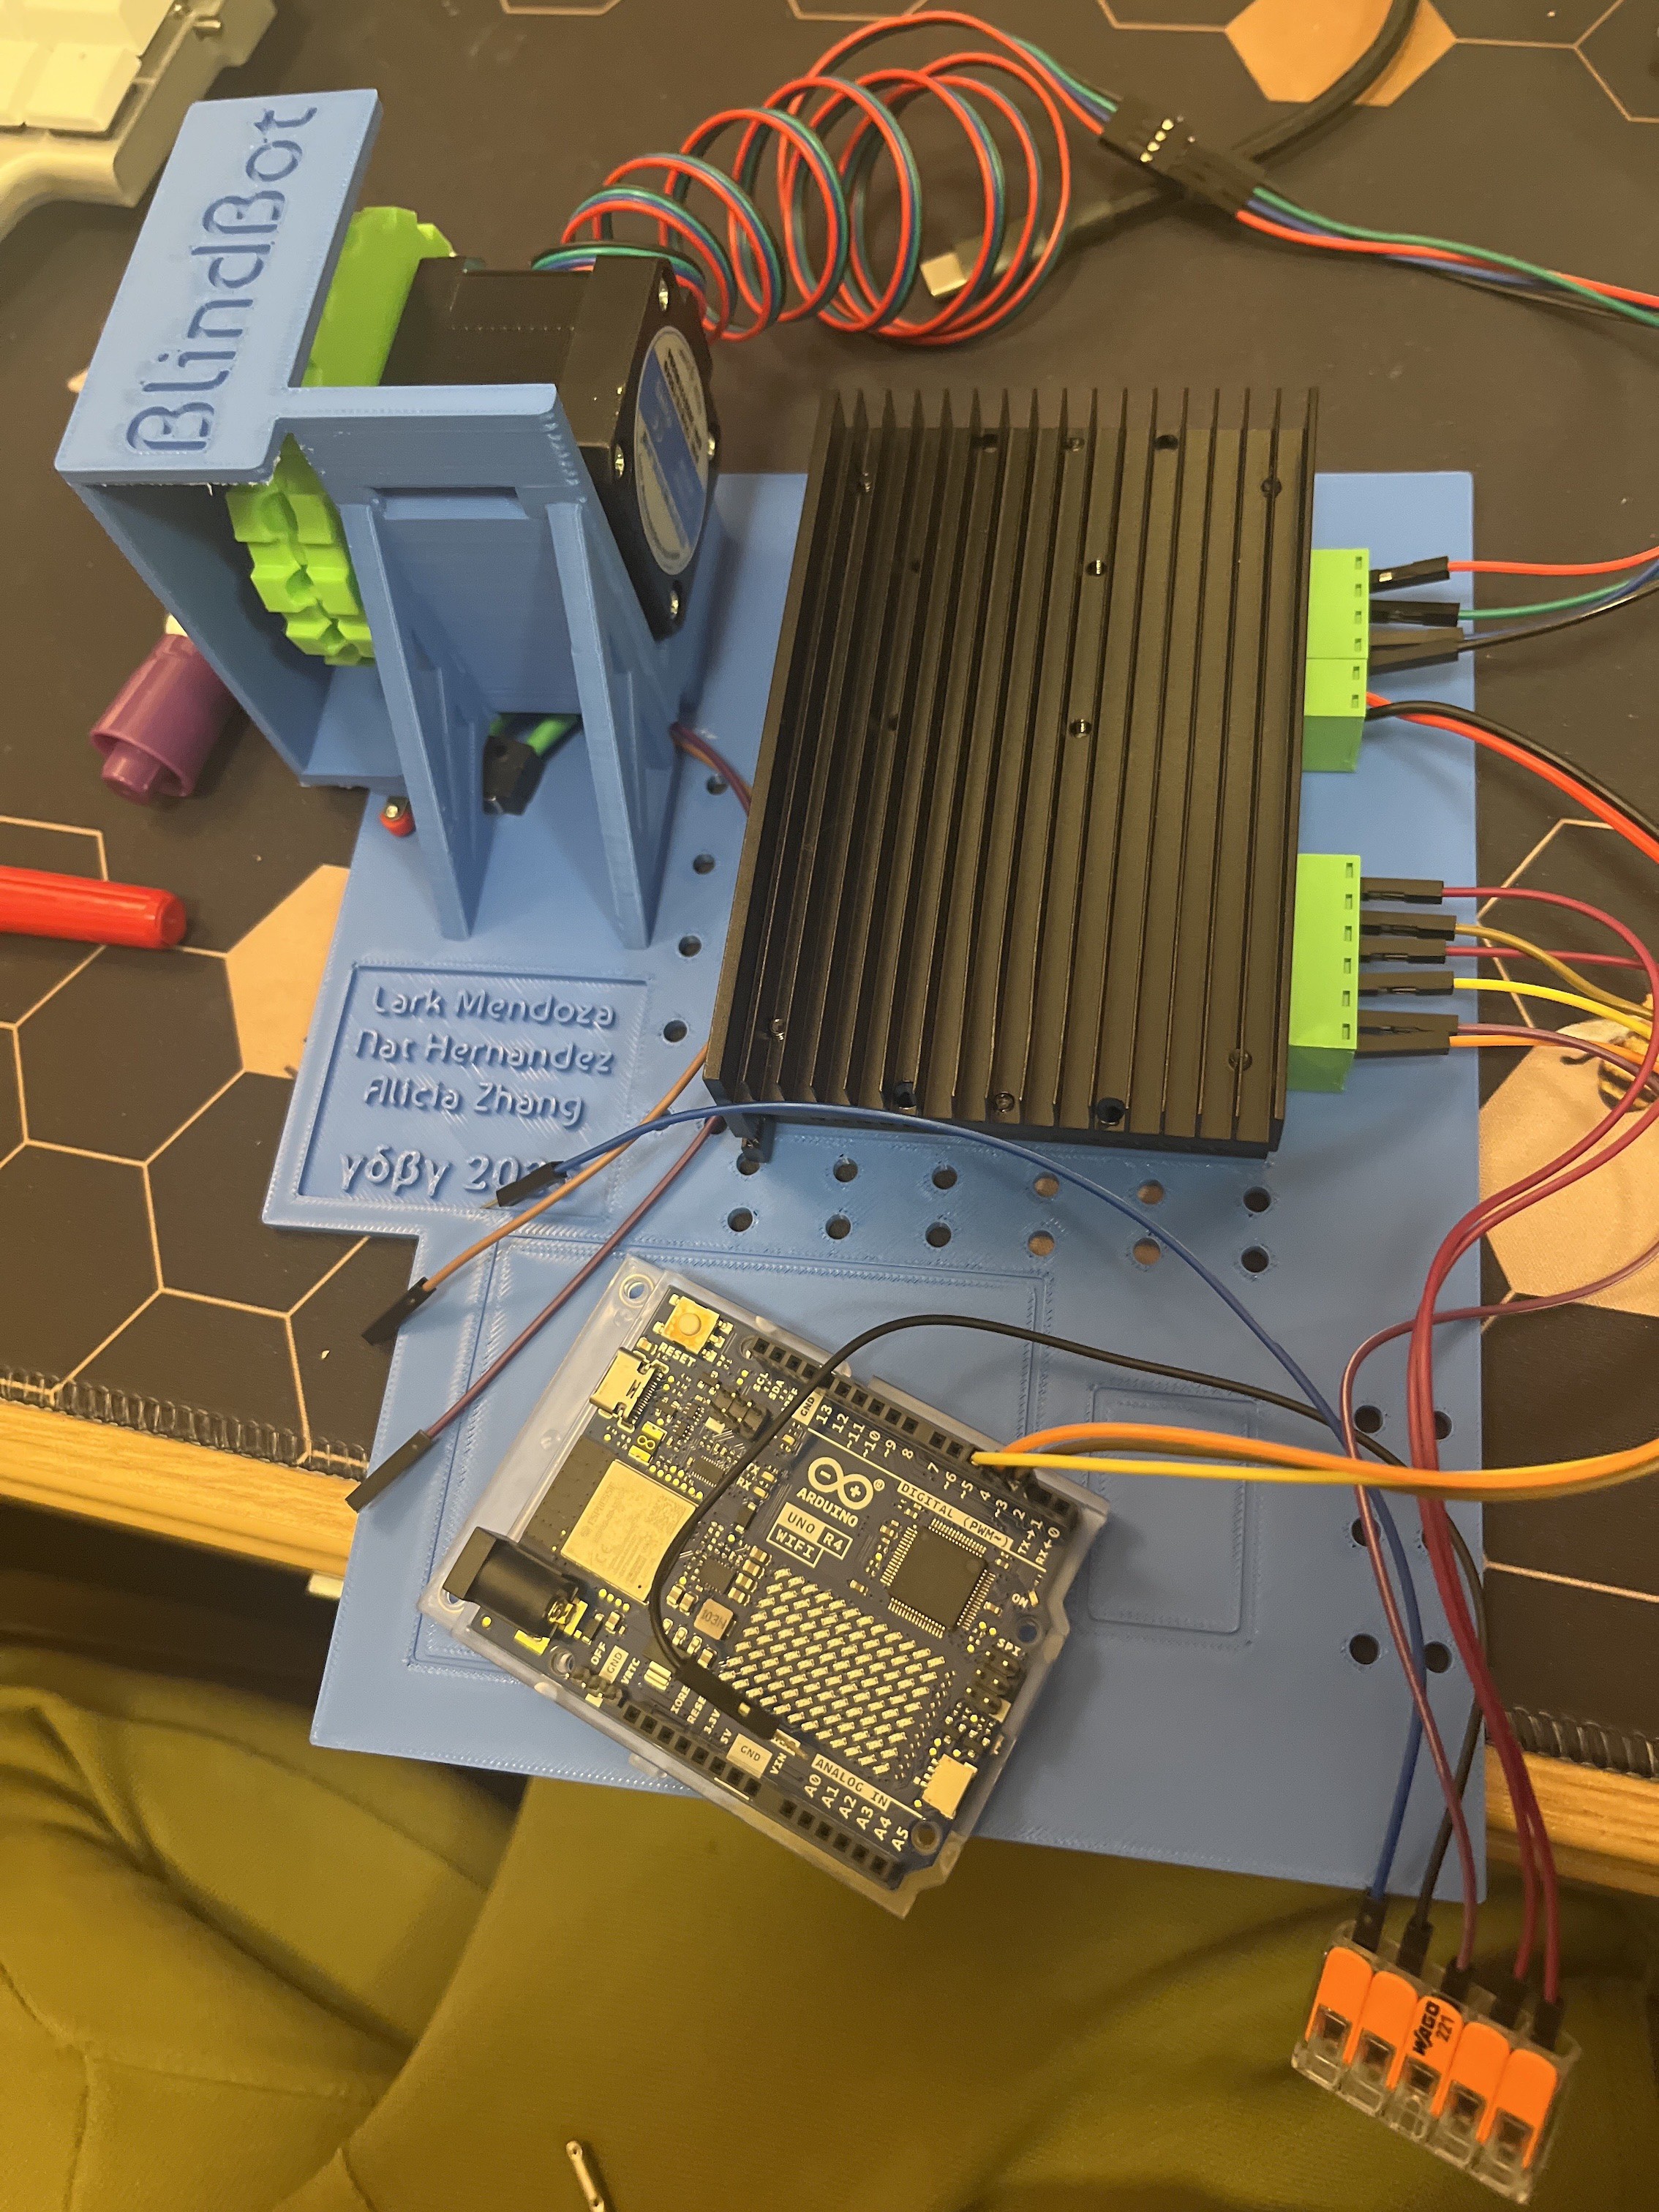
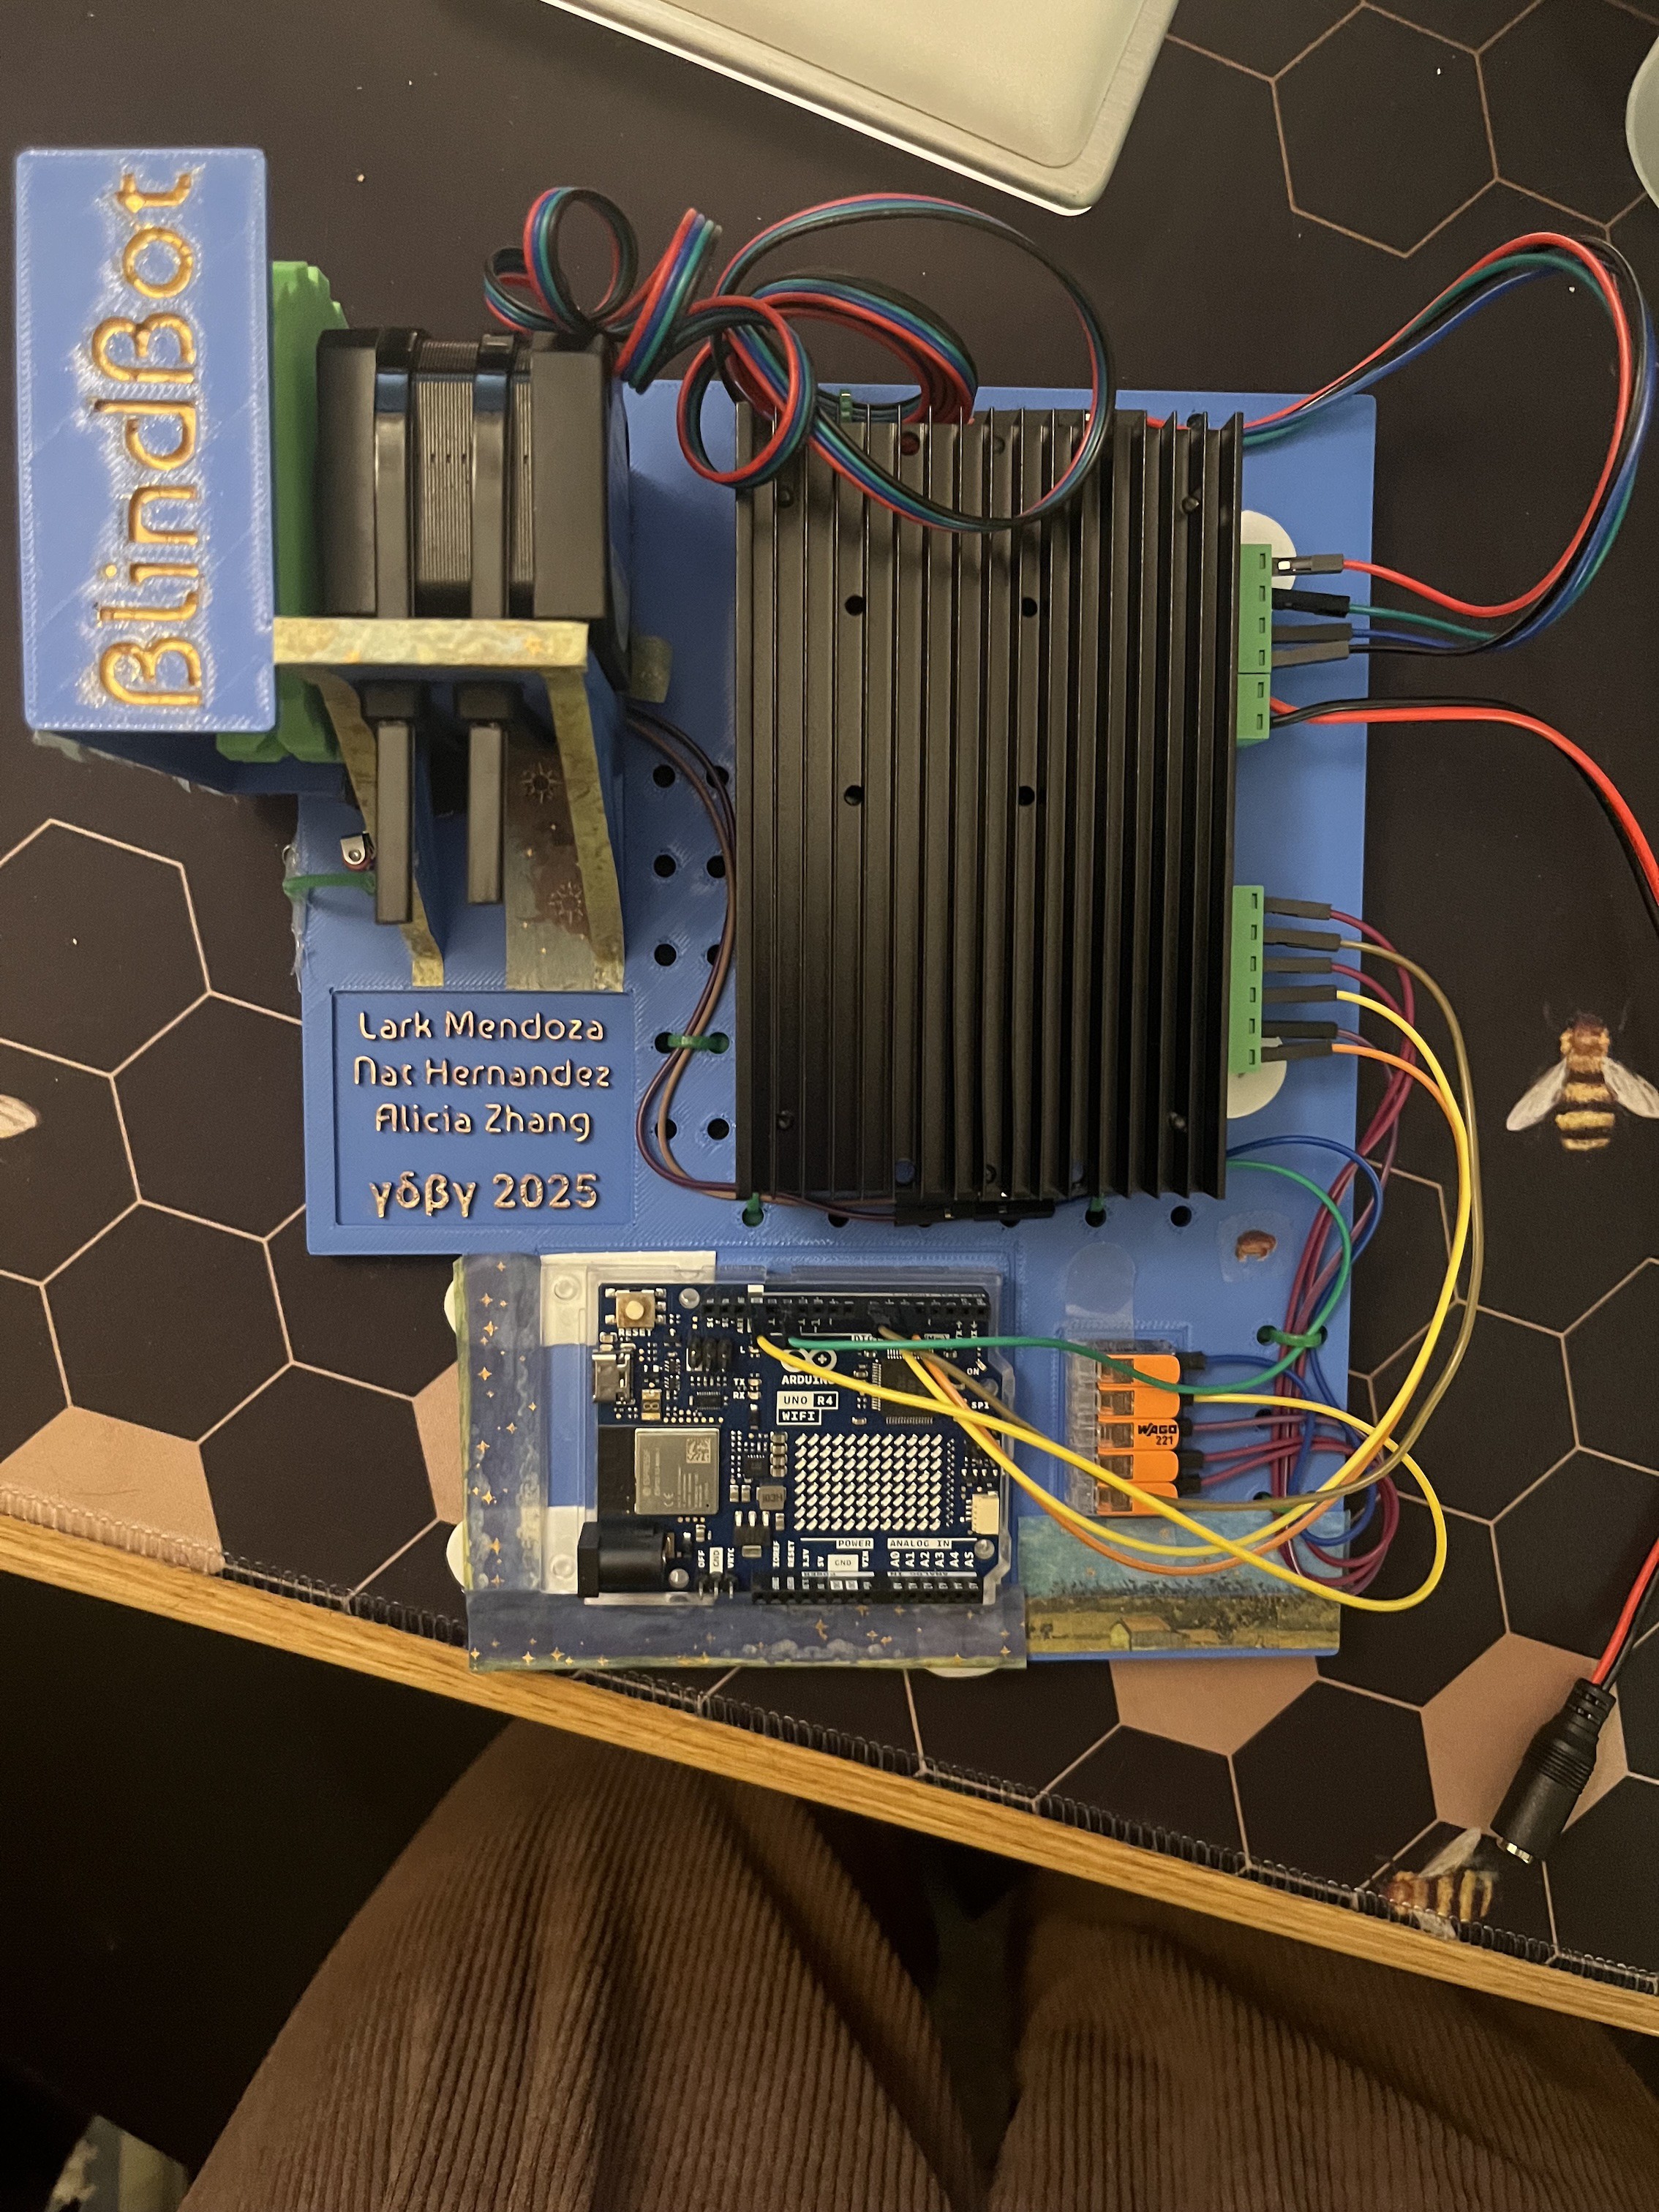
Late Update: Fully Assembled
03/17/2025 at 11:08 • 0 comments![]()
![]()
![]()
Most components were affixed with command strips. The limit switch was hot-glued in place, and the motor is zip-tied. Wires were also zip-tied to the board for convenience. We also took some time decorating with washi tape and paint pens, for fun :)
-
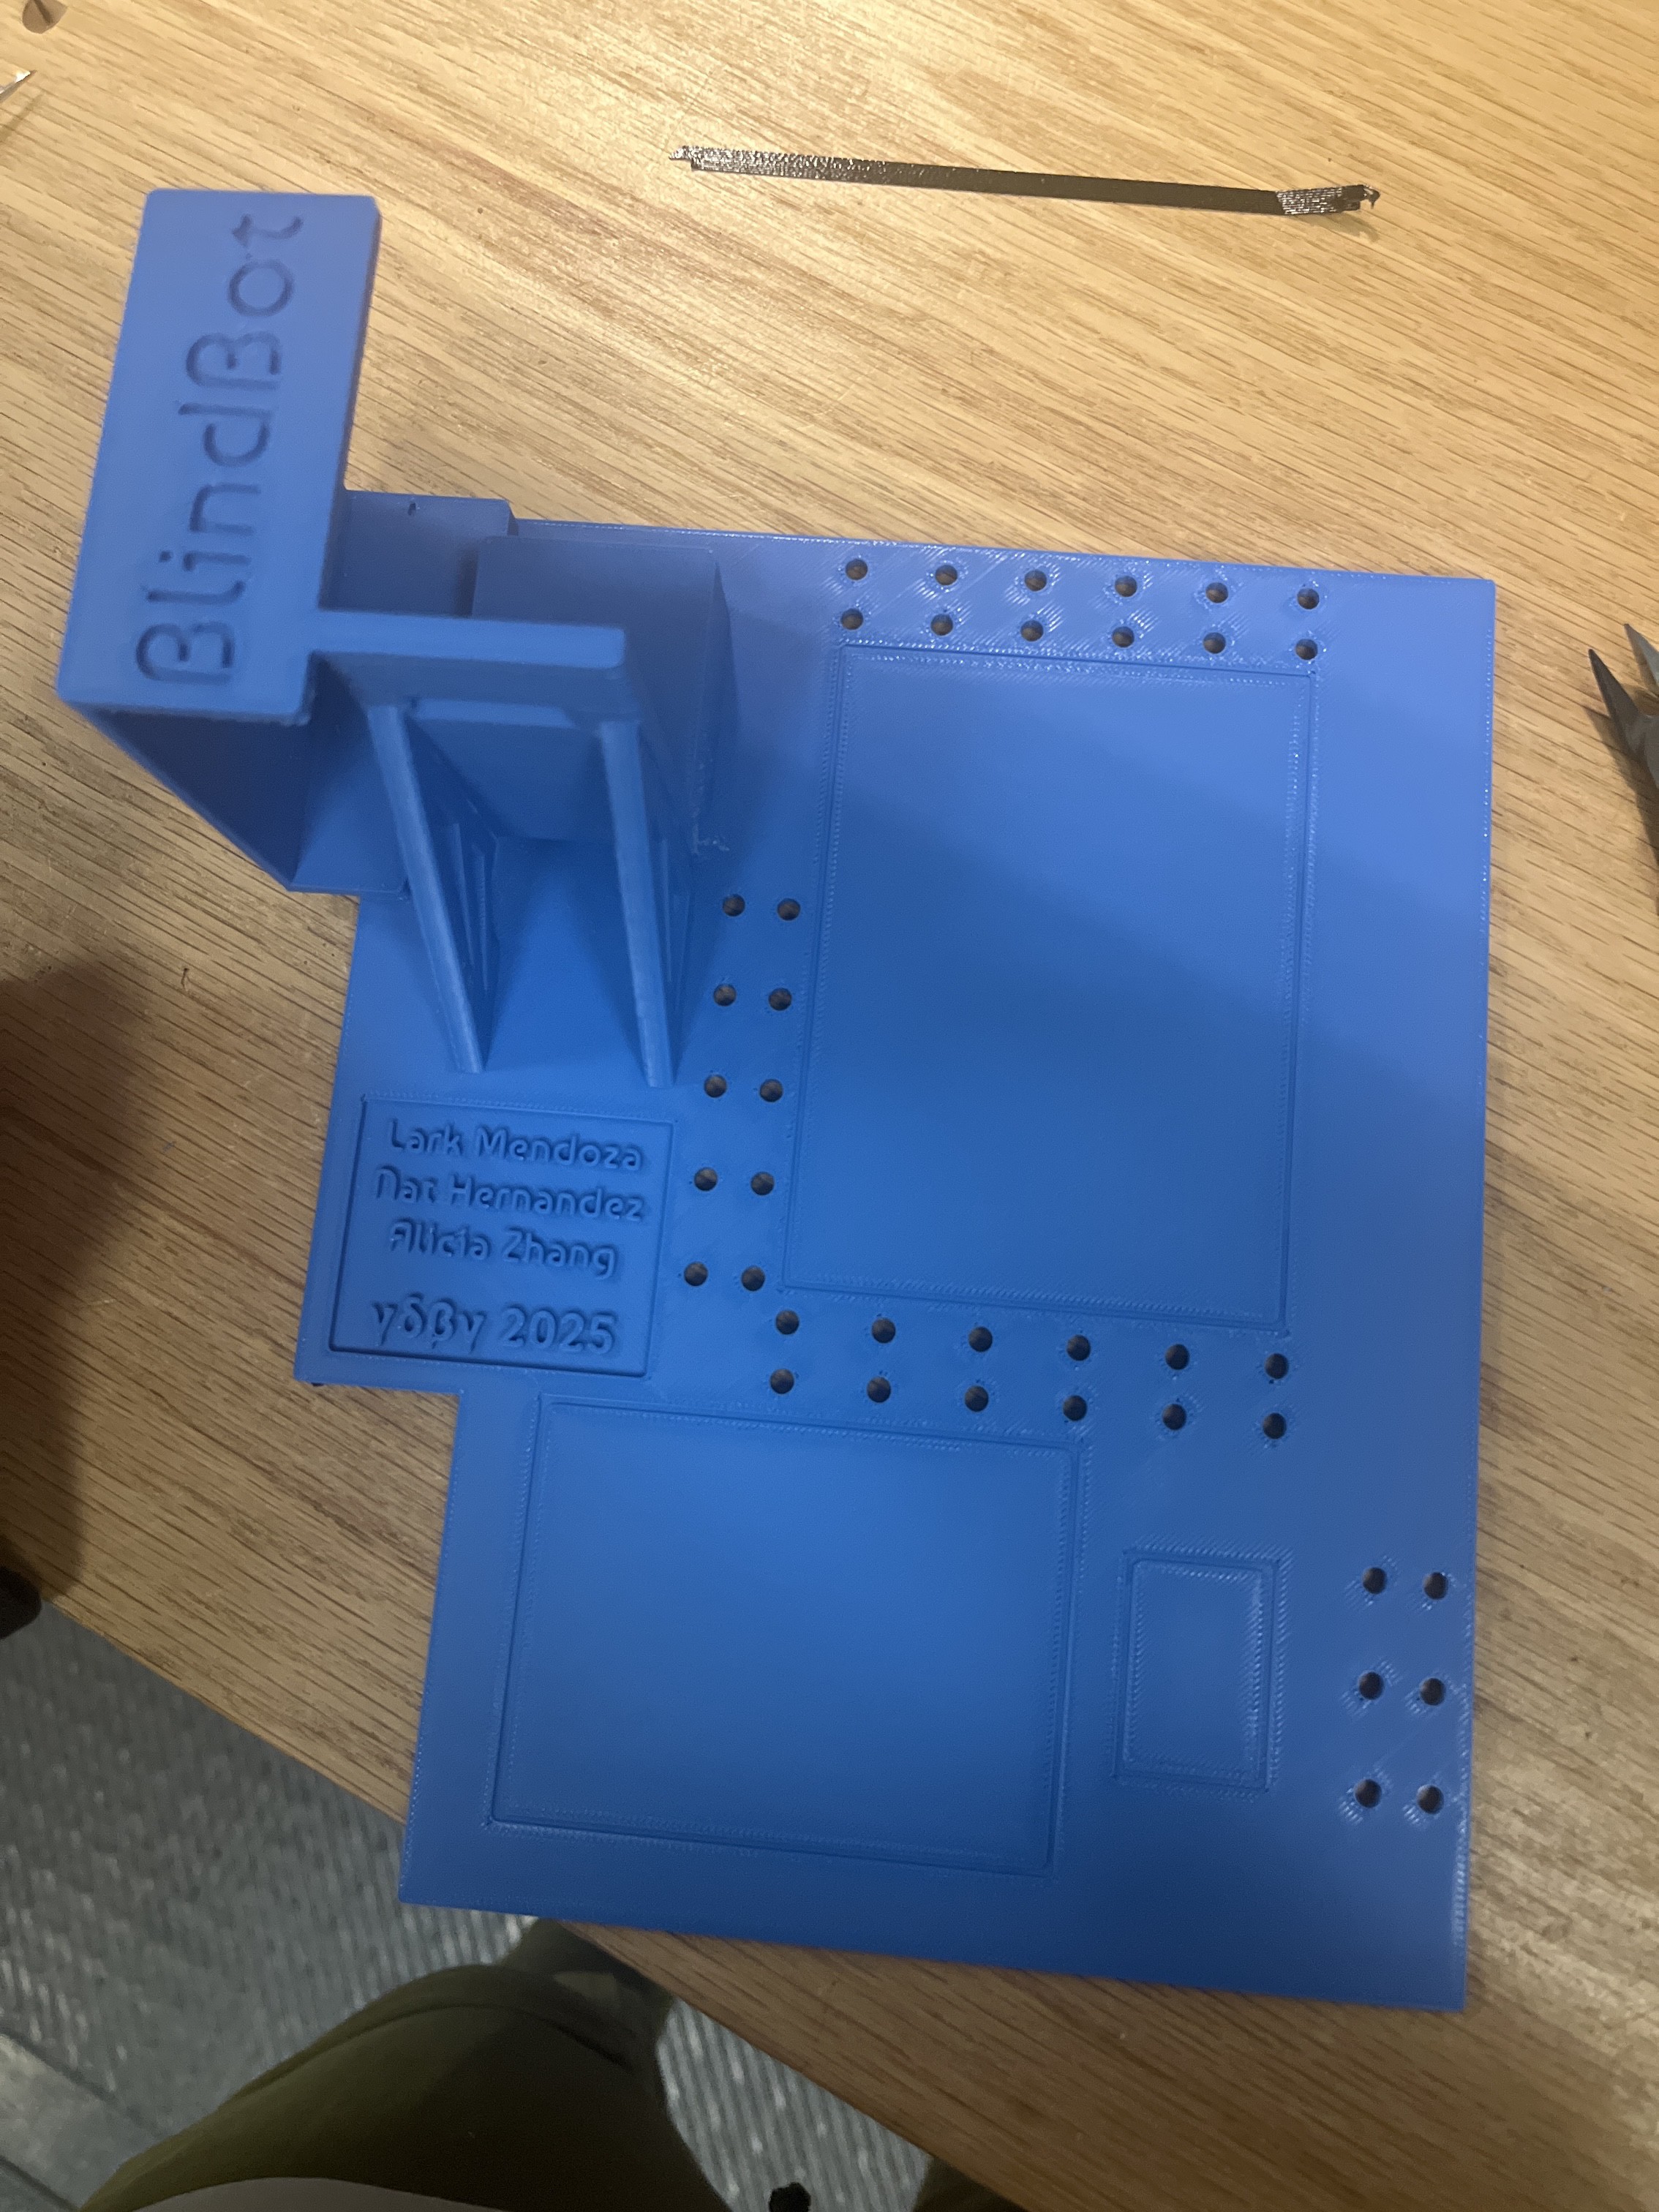
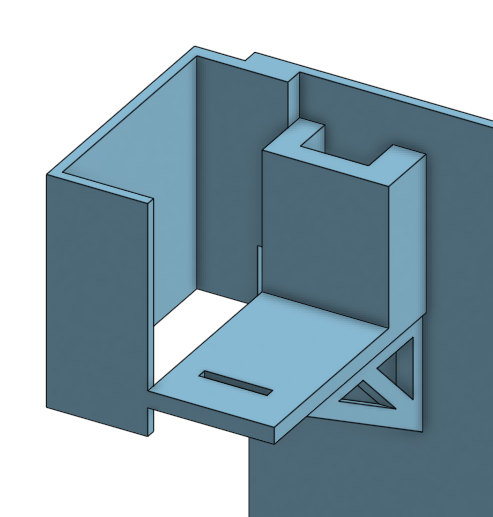
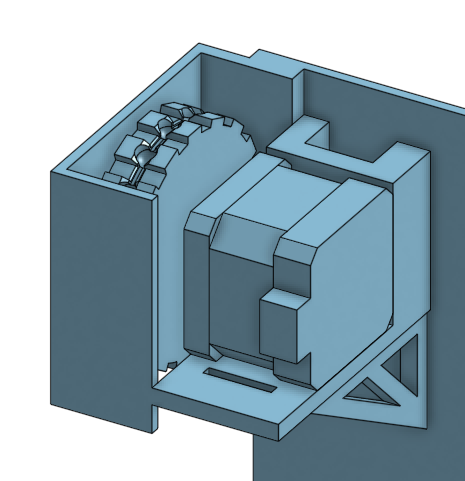
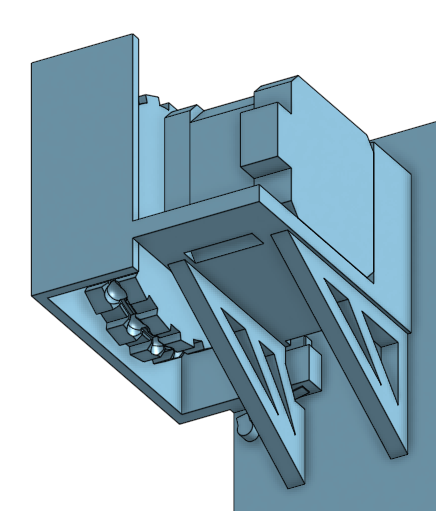
Housing Design Underway
03/04/2025 at 02:12 • 0 commentsThe mounting system for the main components (gear, stepper motor, limit switch) has been designed for 3d printing. The current plan is to use zipties to fix the motor, and hot glue to fix the limit switch. The plate will be attached to the wall with command velcro strips.
The motor driver, Arduino, and possibly the breadboard all still need to be mounted.
![]()
![]()
![]()
-
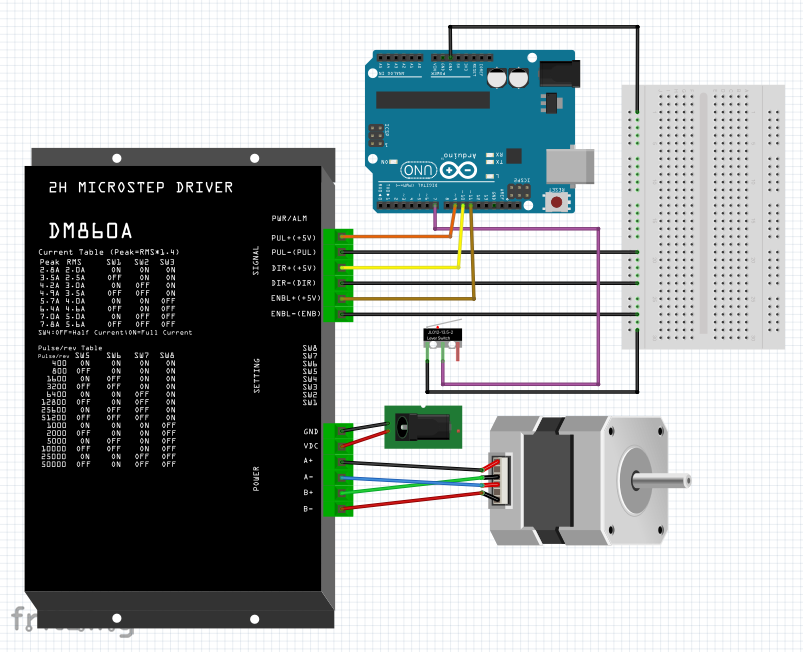
Wiring Diagram
03/04/2025 at 01:58 • 0 commentsWiring Diagram so far! It looks like the enable pin allows us to cut power to the driver, so we won't need a relay. Note that the driver we're using is actually the DM542--this is just what was available in Fritzing. Additionally, since the only reason we have a breadboard is to ground everything, we may look at alternative ways to connect those wires.
![]()
-
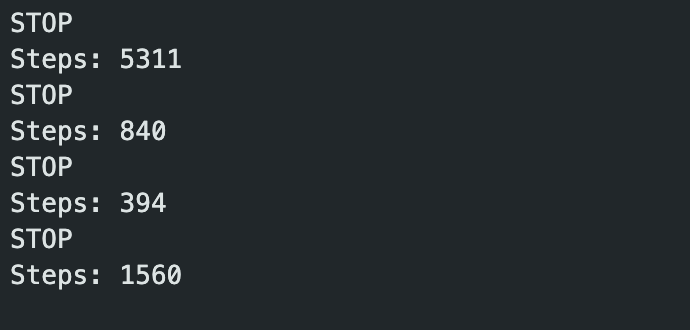
Motor and Limit Switch Working
02/19/2025 at 06:13 • 0 commentsThe basics of the motor and limit switch have been achieved! Currently, the motor spins until the limit switch is pressed once, and then stops forever:
in the gif below, the motor makes 1 full rotation, waits for 1 second, and repeats until the limit switch is pressed.
![]()
It can even tell us how many steps it took, which in the future can help us calibrate to the length of the blinds string.
![]()
This uses a NEMA 17 motor and a DM542 motor controller, which unfortunately is massive. We initially had a smaller one, but it shorted during testing :(
-
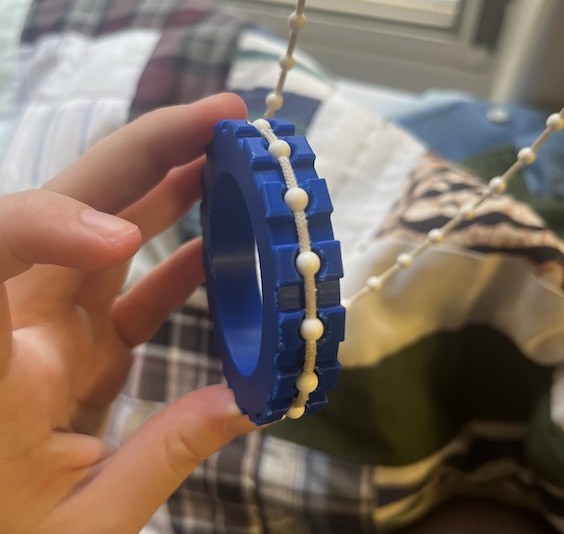
Weeks late: Basic Housing for Gear
02/19/2025 at 06:05 • 0 commentsThis is a couple of weeks late, but the basic housing around the gear intended to keep the blinds cord from escaping the gear has been prototyped!
![]()
Shown: pulling the blinds in either direction without the cord jamming or otherwise coming free.
This will need to be mounted for a full-scale test, but so far it is promising :)
-
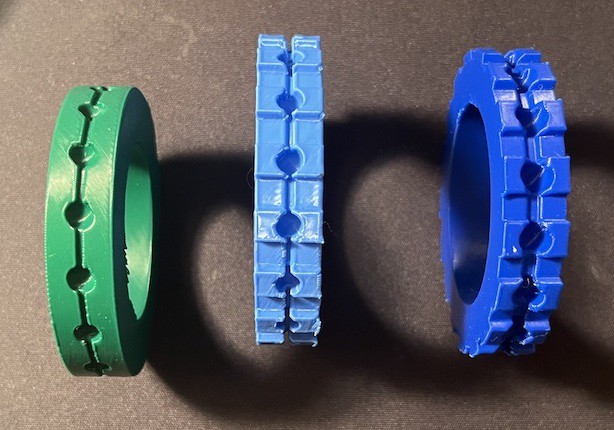
Gear Prototyping Begins
01/25/2025 at 03:48 • 0 comments![]()
This week we began modeling and 3D printing the gear that will pull the cord to open/close the blinds.
The first iteration, in green, was based on a thingiverse project; however, the beads on the Caltech blinds are much smaller and the holes were too shallow to have any chance of applying actual force to the cable.
The second iteration, in light blue, made the holes deeper to account for this, but not enough tolerance was added, so the beads wouldn't go very far in and would get stuck if they did. The chamfers added to the slots to ensure the string didn't get caught on corners also were too small to 3D print correctly, rendering them useless.
The third (and current) iteration, in dark blue, added more tolerance to the holes and widened the slot for the string. It also has larger chamfers on the corners. This works great so far!
![]()