Close
0%
0%

Dynamometer for Post Stroke Rehabilitation

An open-source, 4-channel differential dynamometer for post-stroke rehabilitation. Includes 4 force sensors, device with display and PC soft

Similar projects worth following
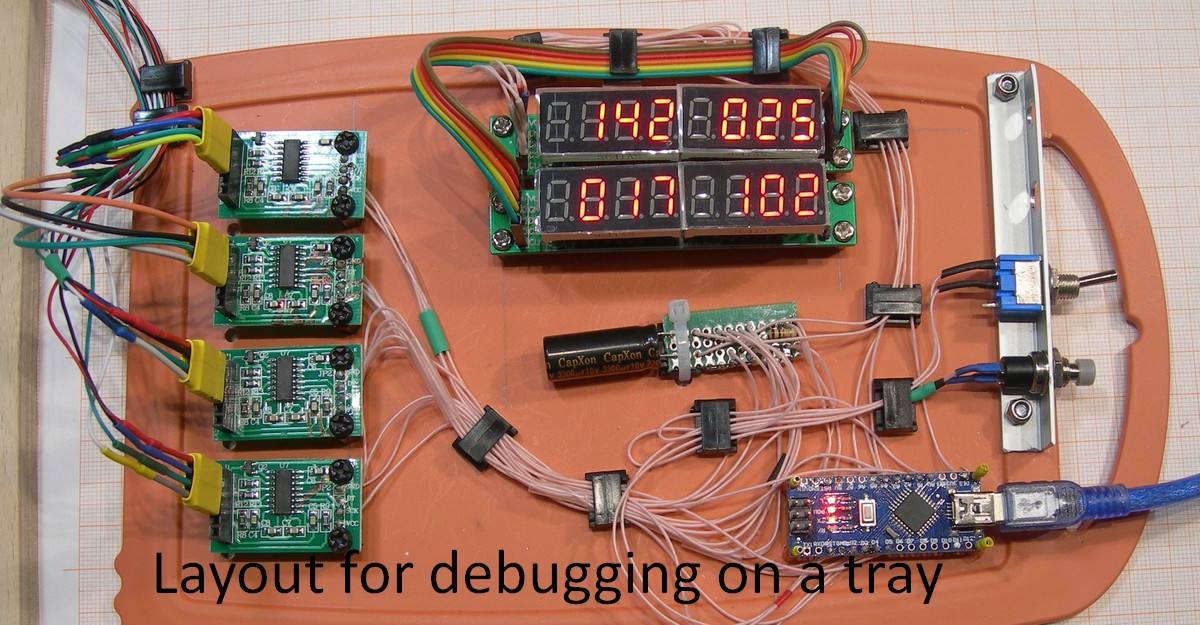
The set consists of 4 Strain Gauges, 24 bit ADCs, device with LCD or LED display and a programm for windows. The force sensors have +- 50 N force range and 0.01 N resolution. We use 24 bit ADCs HX-711. The summe price of it all is no more than $100. The force of finger press can be seen on device display and on PC (Windows) screen. An open-source code for the Arduino environment is covered by the GPL.

  • Introduction. More than 50% of stroke survivors have the secondary Post stroke in the next 5 years. We made the Differential Dynamometer (DifDyn) for post stroke rehabilitation.
  • The objective of the project. Post stroke rehabilitation can be done with very expensive Exoskeletons or some kind of joystick devices (kind of a computer games).   The use of  joystick is impossible for heavy patients with weak muscle control. We have to make simple chip open source device to measure fingers forces.
  •  DifDyn can measure the forces in the range  ± 5000 Gramm (1 Gramm resolution). We try to construct the devise using very chip Arduino Nano controller and Arduino Shields.
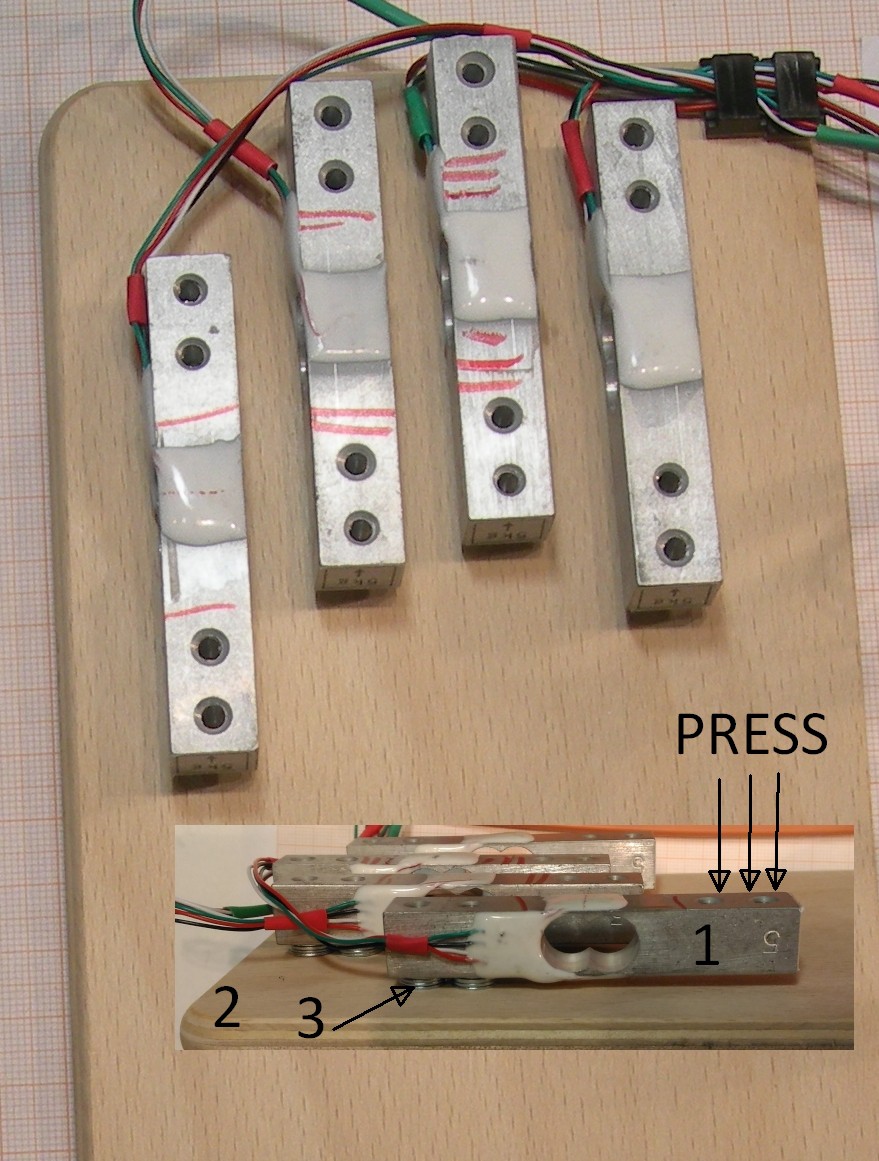
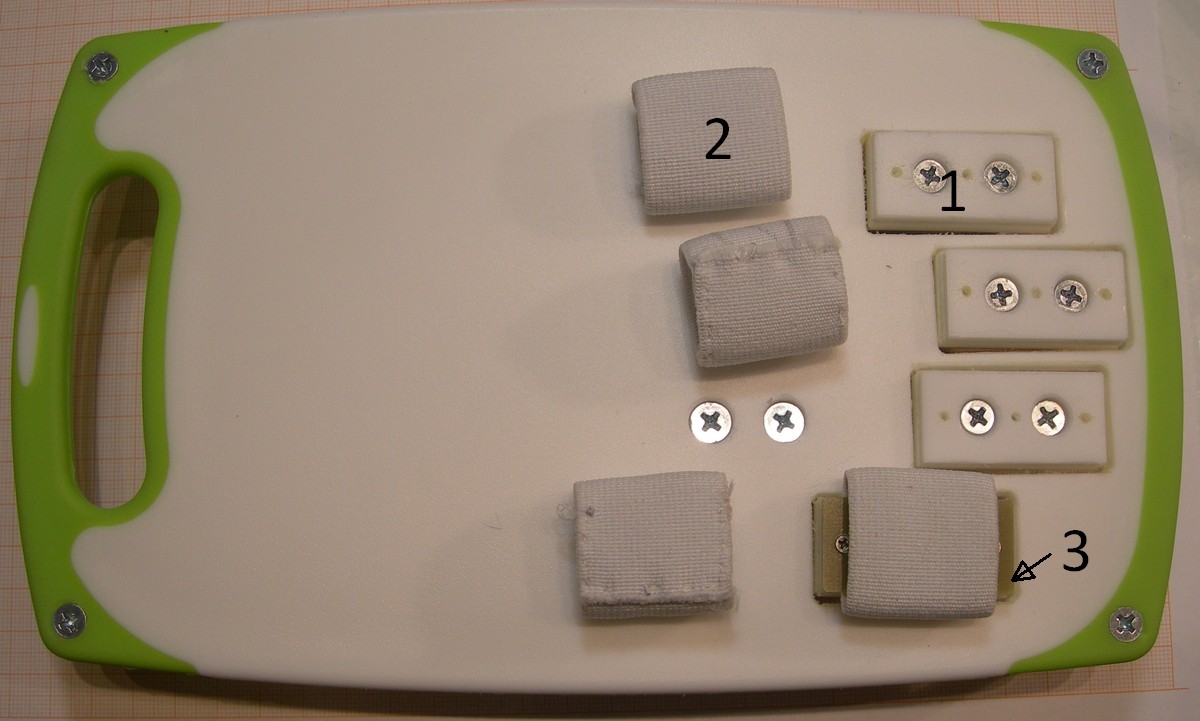
  • 3 types of Sensor Board are constructed, using plywood and plastic cutting boards (breadboards).
  • The DifDyn has a 0.36 inch  LED, 4x4 digits. The data can be shown in 4- digit format or as a bar in log scale. It is also LCD Display version. The program code is free and it is  open source Arduino IDE code.
  • The data can be seen in PC monitor. The program is free. The program shows 4 values of  pressing forces (in Gramms), the 4 bars in log scale. The data can be stored in file as a text or in electronic table format. The data can be shown, stored and  loaded as a graph diagram.
  • 3 types of sensor board are tested and described- simple plywood board, plastic breadboard, and sandwich - type 3 -layer sensor board using plastic breadboards.

BuildInstruction4.pdf

The last Build Instruction. Include description of a 3- layer sandwich sensor board.

Adobe Portable Document Format - 1.74 MB - 08/29/2017 at 09:49

Preview

BuildInstruction3.pdf

Build Instruction - description of a simple plywood board and model board are added.

Adobe Portable Document Format - 1.74 MB - 08/23/2017 at 22:25

Preview

InstructionEng.pdf

Instruction how to launch and work DiffDyn4 PC monitor program.

Adobe Portable Document Format - 367.48 kB - 08/06/2017 at 21:18

Preview

DifDyn4Engl.zip

Zip file of PC Monitor program in English for Windows PC. Unzip and run, no installation is needed. The description is on InstructionEng.pdf file in English (see the file here and on a Git Hub).

x-zip-compressed - 2.41 MB - 08/06/2017 at 21:12

Download

t2.hex

hex binary file for download to atmega mega328pu without boot.

hex - 42.44 kB - 08/04/2017 at 01:12

Download

View all 13 files

  • 1 × Controller Arduino nano R3 CH340 992-ARD-NANO30NP
  • 4 × 24 bit ADC shild HX-711 shild 474-SEN-13879
  • 2 × 8 digits LED shild max7219 0,36"LED shild
  • 4 × Strain Gauge Kitchen Scale Sensor 5 kG
  • 2 × Push button Any push button- one momentary and one toggle

View all 12 components

View all 10 project logs

  • 1
    You can download Instrucitons "BuildInstruction4.pdf" (1.7 MBytes) from the Files here

    You can download also  Instrucitons "BuildInstruction4.pdf" from the repositary Build Instruction v.4

  • 2
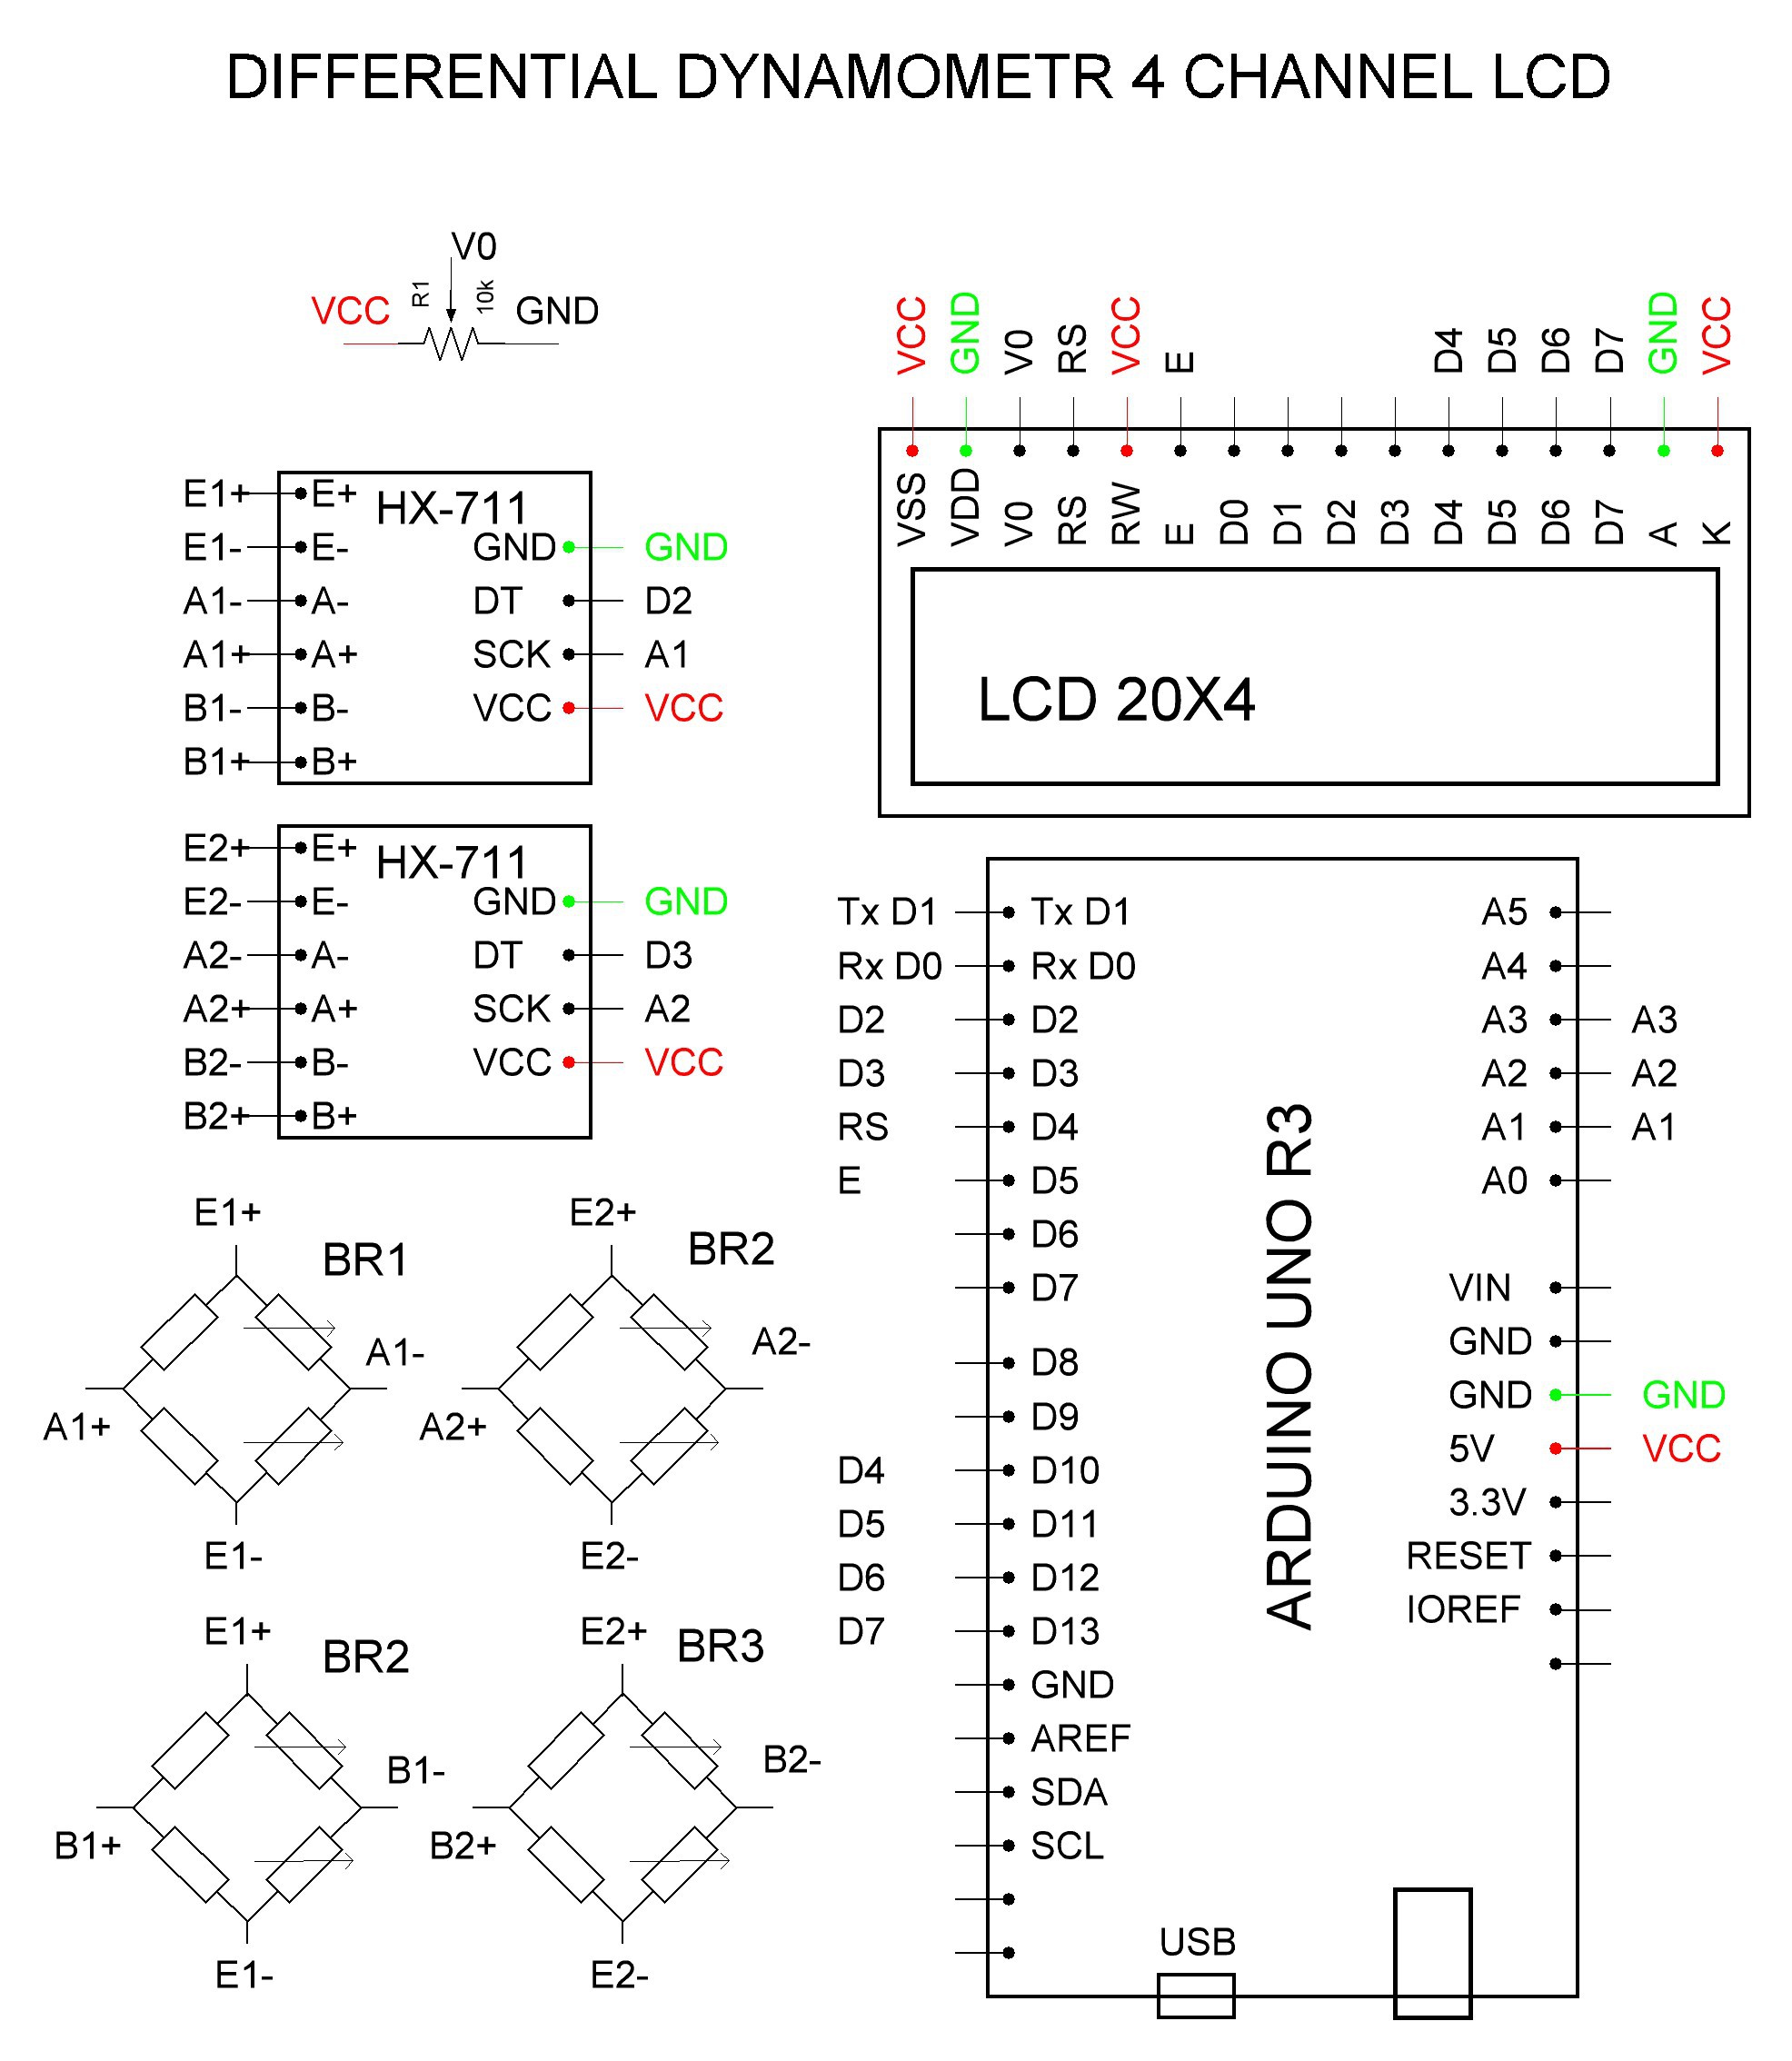
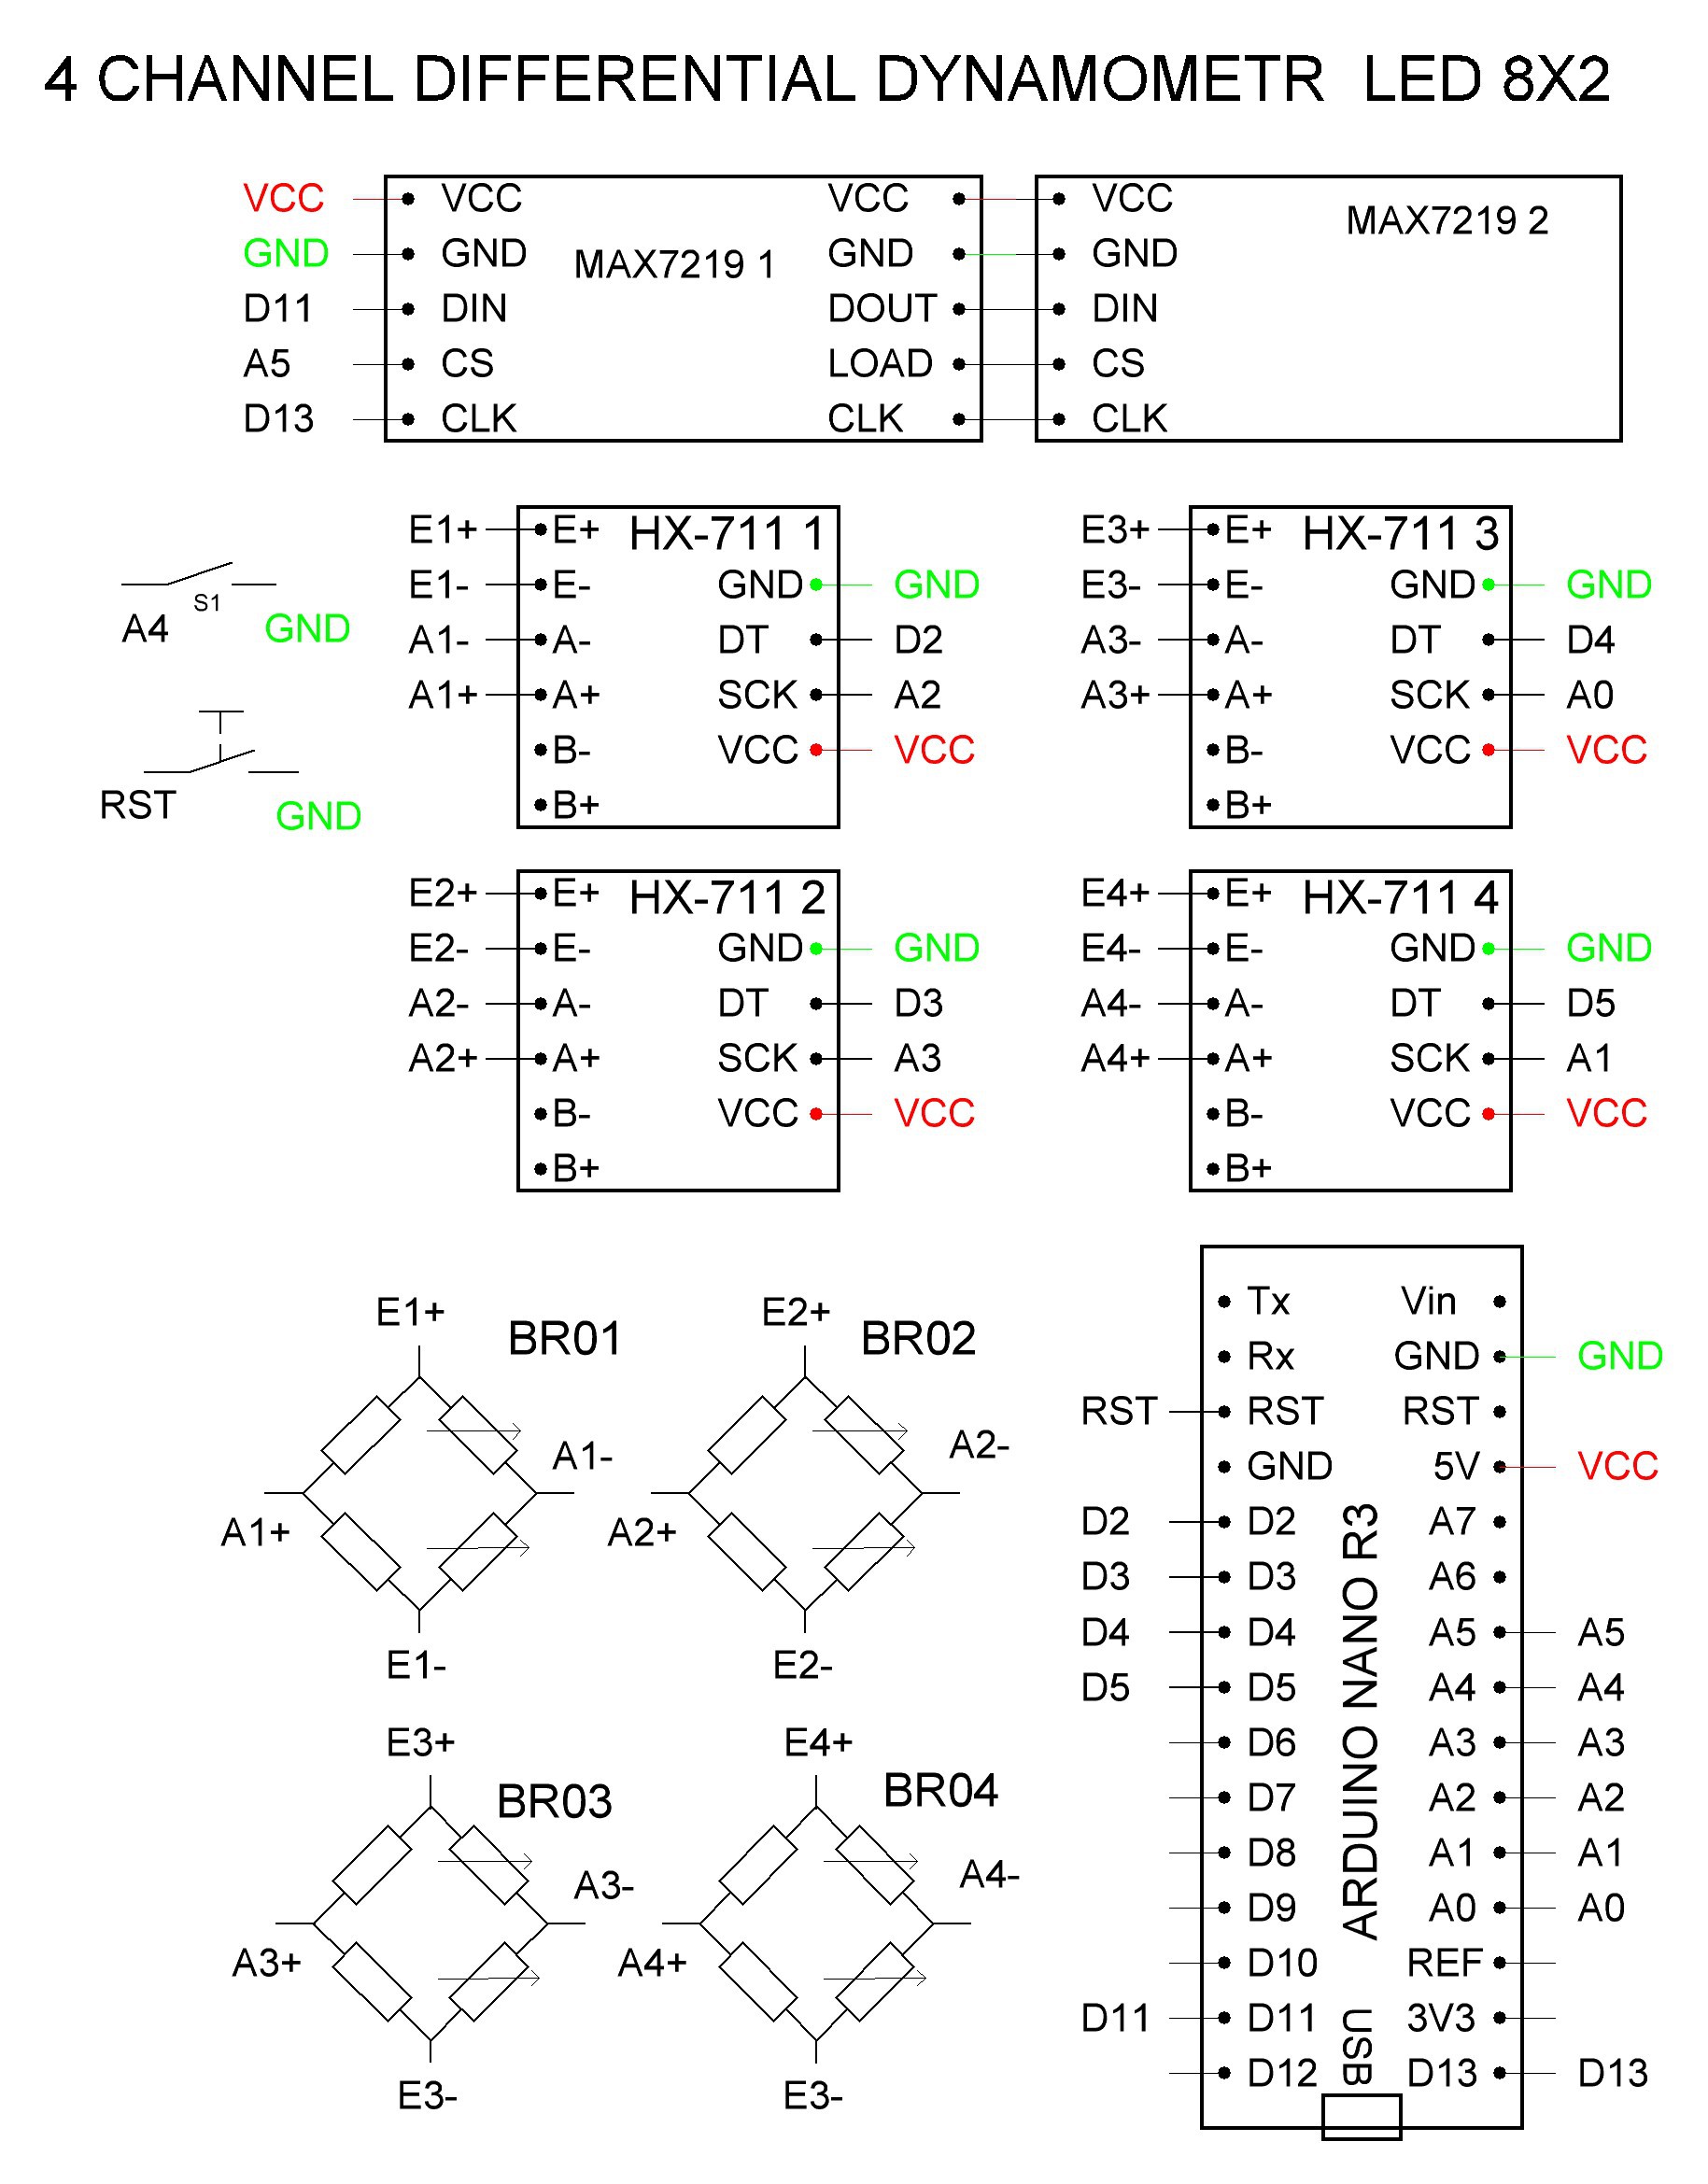
    You can see the main stages of construcion here. Schematics.

    We construct two versions of the devise. The firsto version include LCD and here is schematics

    Here is schematics of the device with LED Display. We pay attention to this version becouse LED Display is more usable.  You can consruct the device with LCD Display the same way. The only difference is size and situation of Display.

  • 3
    Housing

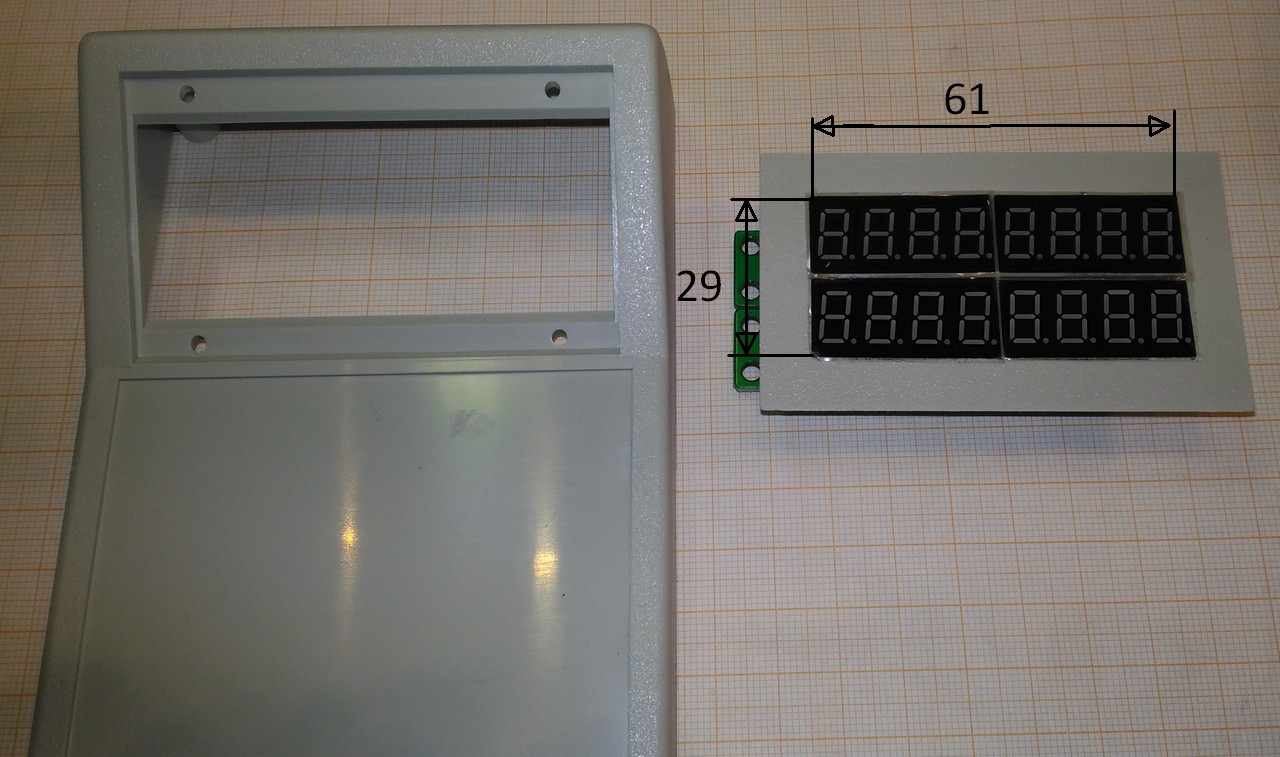
    We use ready box (housing) G1168G Gainta. You only need to make a slot for the LED or LCD display.

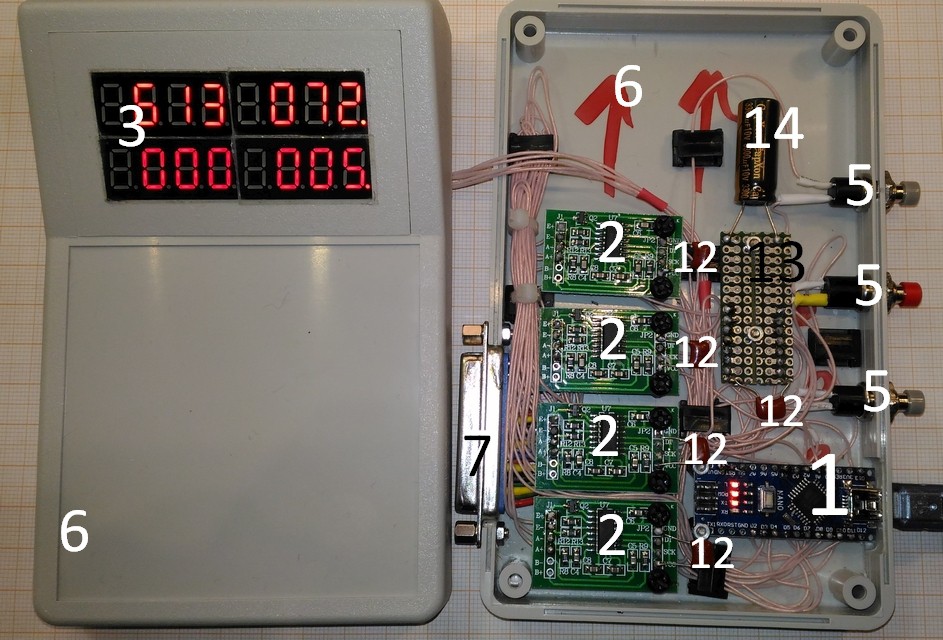
    Assembled devise is shown here, with
    • 1       Controller
    • 2       24 bit ADC shields
    • 3       8 digits LED shields
    • 5       Push button
    • 6       Box for device
    • 7       DB25F connector
    • 12     0.1 uF 16 V capacitors
    • 13     PCB for GND and VCC connections
    • 14     3300 uF 16 V low ESR capacitor

View all 5 instructions

Enjoy this project?

Share

Discussions

rraetz wrote 11/13/2020 at 20:31 point

Nice project! Do you plan to use it mainly as an assesment device or are you developing any interactive games that could potentially be used for rehabilitation training?

  Are you sure? yes | no

dreschel wrote 08/01/2017 at 18:36 point

Thank you very much!

Bill

  Are you sure? yes | no

Sergei V. Bogdanov wrote 08/01/2017 at 18:55 point

OK. New version of firmware for Arduno/ Genuino will be published in two days. If it is interesting I can publish *.hex code for Atmega328p.

  Are you sure? yes | no

dreschel wrote 08/01/2017 at 18:26 point

Hi, The build instruction pdf doesn't seem to be on GitHub yet. Or am I missing something.

The ZIP file only contains the license info.

Looking forward to seeing this project, as I have known a few stroke victims.

Bill

  Are you sure? yes | no

Sergei V. Bogdanov wrote 07/27/2017 at 00:06 point

The code is made in Arduino IDE. The source code for the Arduino environment is covered by the GPL.

  Are you sure? yes | no

Similar Projects

Does this project spark your interest?

Become a member to follow this project and never miss any updates